TMB ProPlex IQ Two 416 User manual

- 1 -
ProPlex IQ Two 416
USER MANUAL
TMB 24/7 Technical Support
US/Canada: +1 818.794.1286
Toll Free: 1 877.862.3833 (877.TMB.DUDE)
UK: +44 (0)20.8574.9739
Toll Free: 0800.652.5418
e-mail: tec[email protected]
- 2 -
Overview
The ProPlex IQ Two 416 is a 16-way Ethernet-DMX node/opto-splitter with the following features:
•Assign 4 ArtNet/sACN universes to 16 DMX outputs.
•Full RDM functionality.
•RDM Manager software available for system setup and feedback.
•Web interface – manage large networks locally or remotely.
•Large touchscreen for quick, easy setup and operation.
•Rugged, tour-ready ProPlex “Blue Box” RackMount chassis.
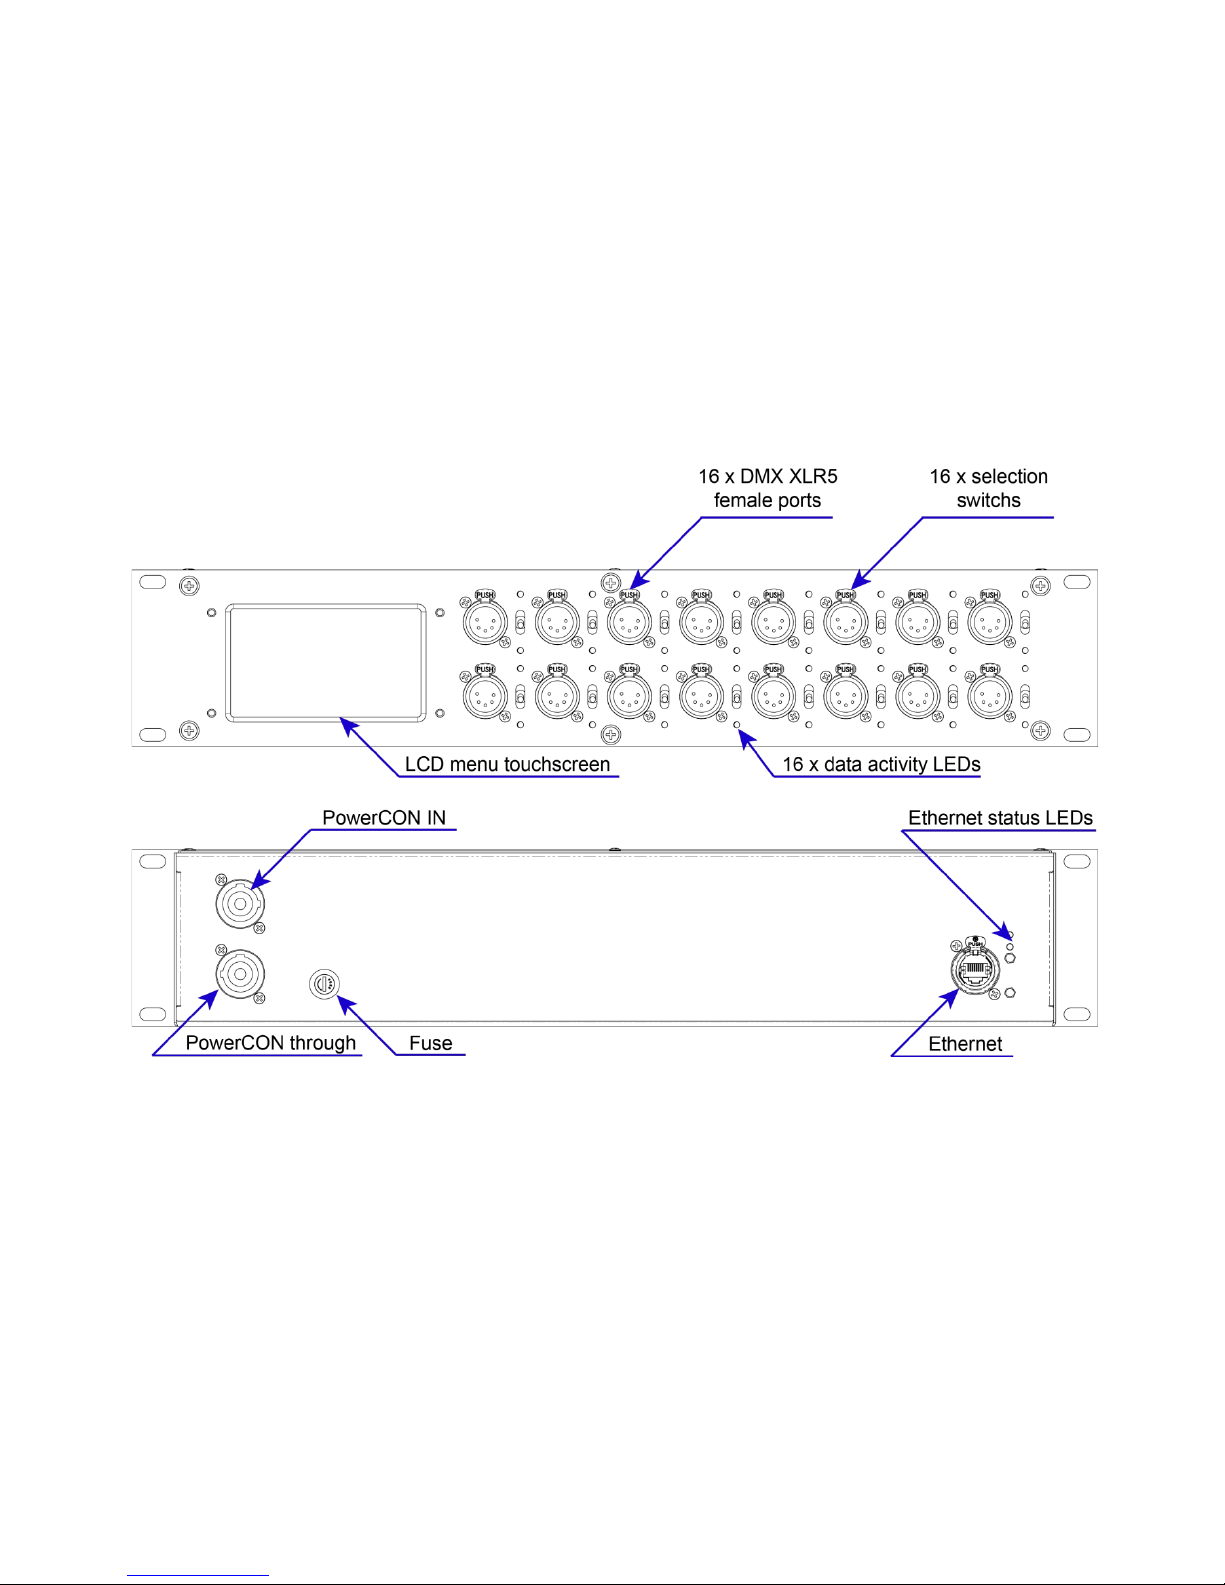
Front and Rear Panels
- 3 -
Menu Map

- 4 -
- 5 -
Configuration using LCD Touchscreen
ProPlex IQ Two can be configured locally on the unit by using the touchscreen or remotely through the
Ethernet port by accessing the built-in web page with a web browser or with the ProPlex IQ RDM Manager
software.
Navigation through menus is done using the LCD touch screen.
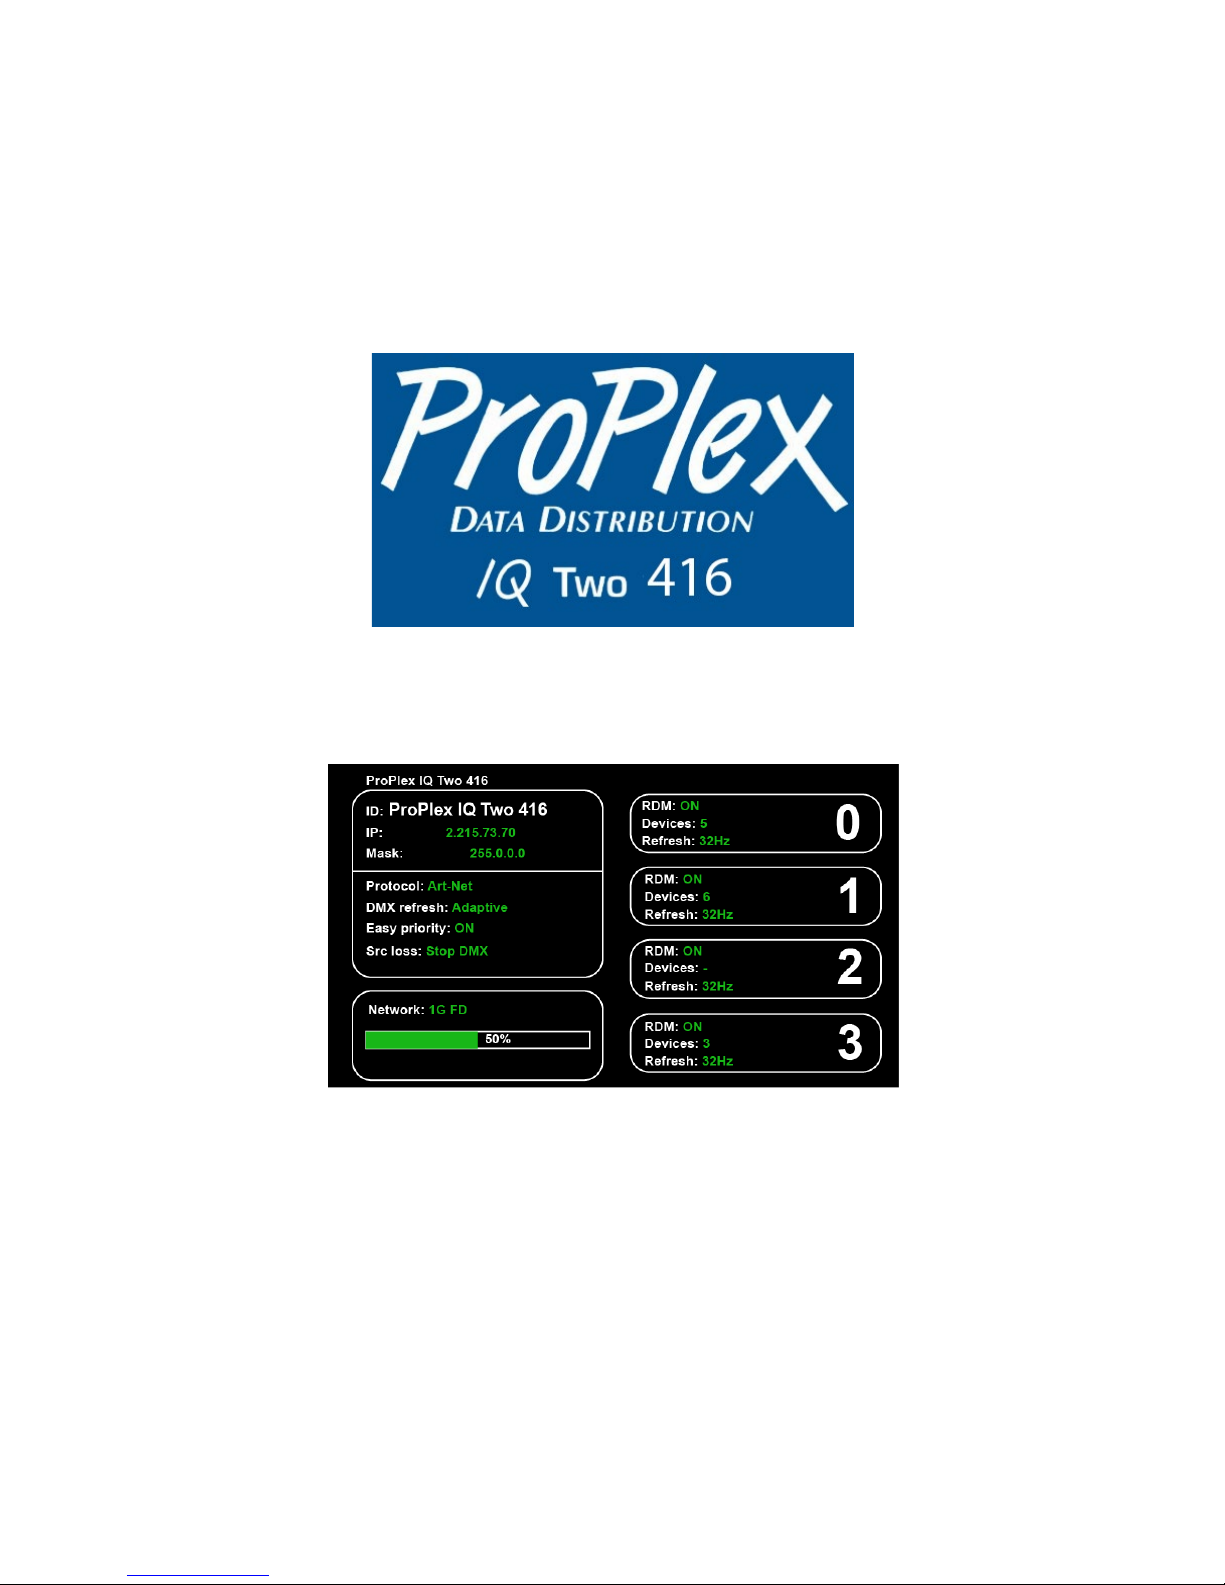
When the device is turned on, it shows the following welcome screen:
To begin, press anywhere on the screen and a touch screen calibration screen will appear.
The main status screen is displayed, showing the important information about the IQ Two 416 node.
Configuration:
Assigned ID (name) for ProPlex IQ Two fixture
Mask
Protocol
DMX refresh (rate)
Easy priority
Src loss (source loss)
Status:
Network (state + information about network speed)
Network usage (%)
Outputs:
Information about 4 DMX output groups

- 6 -
Configuration:
Fixture ID: (ProPlex IQ Two 1616 example)
DMX refresh: (40Hz example)
IP: (2.145.232.108. example;
Mask: (255.0.0.0 example)
Protocol: ArtNet example)
Status:
Network: (Link down example, when there is network, it shows the network type, 1G FD (1 Gigabit Full
Duplex) for example, and it shows the network usage in percent).
Device and version description: (ProPlex IQ Two 1616 v:0.28 example)
Port information:
Information of all 16 DMX ports, labeled as A, B, C, etc.
If using the ArtNet protocol, the universes start from universe 0.
When using sACN, numbering begins with universe 1.
General Information
The ProPlex IQ Two 416 has 2 status LEDs for each DMX port.
Each port has an assigned switch defining which universe the port depends on.
Switch ports 1-8 as A port group or B port group outputs
Switch ports 9-16 as C port group or D port group outputs.
Because there a maximum of four universes are assignable (one universe for each of four port groups), the
device can easily be used as a DMX splitter.
For example, you can use the ProPlex IQ 416 as 2x8 port splitters or 4x4 port splitter.
There are four different port groups: A, B, C and D.

- 7 -
In this example, the ProPlex IQ 416 is set up as four independent splitters.
Ports 1, 2, 3, 4: Assigned to port group B
Ports 5, 6, 7, 8: Assigned to port group A
Ports 9, 10, 11, 12: Assigned to port group D
Ports 13, 14, 15, 16: Assigned to port group C

- 8 -
When using the IQ Two 416 as 2x8-port DMX splitter, the configuration will look like this:
Ports 1, 2, 3, 4, 5, 6, 7, 8: Assigned to port group A
Ports 9, 10, 11, 12, 13, 14, 15, 16: Assigned to port group C

- 9 -
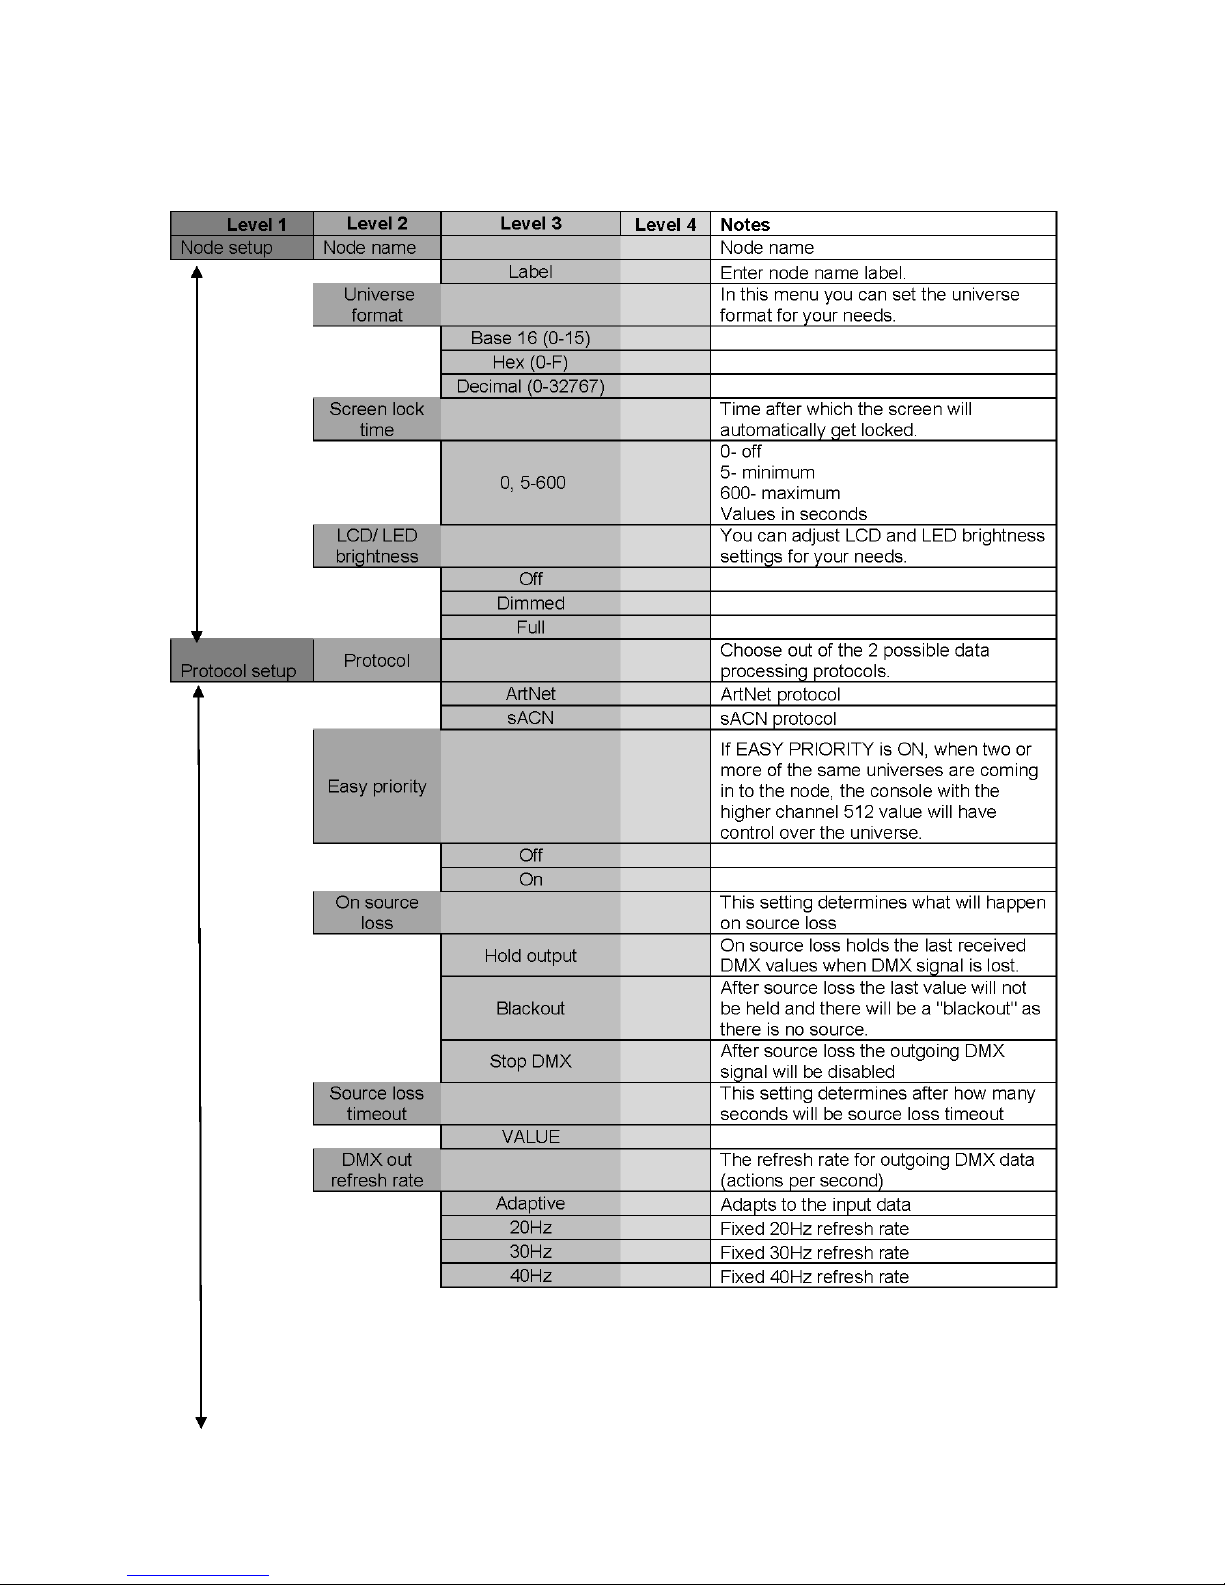
Configuration Menu:
By pressing the "Configuration" button, a new configuration submenu will appear.
There are six pages:
1. Node setup
2. Protocol setup
3. Protocol setup
4. IP setup
5. Configuration profiles
6. Defaults
- 10 -
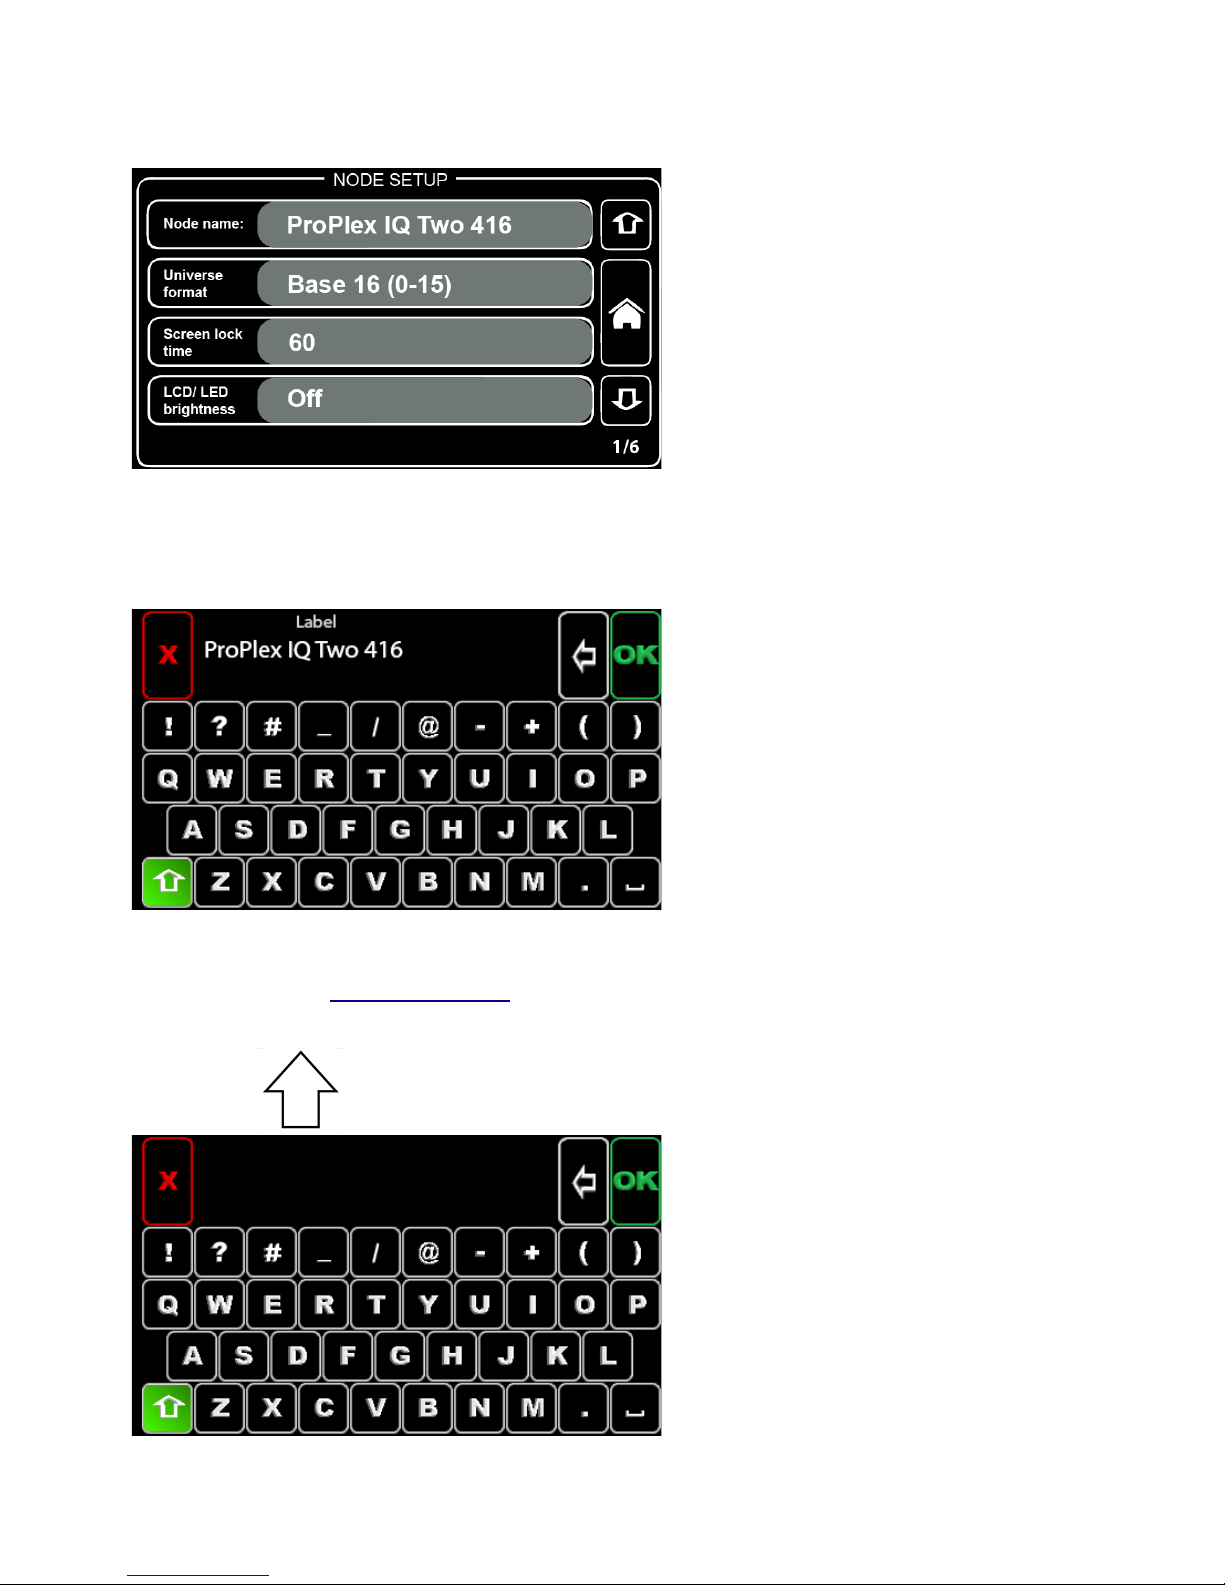
Node Setup
Node name:
Here the node and default names may be changed (ProPlex IQ Two 416 is default).
By pressing this button, a new window will appear:
Using the virtual keyboard, the name can be changed.
By pressing the shift ( Level 2 Select key) button on the virtual keyboard, all letters will change to capital
letters and symbols will exchange.
- 11 -
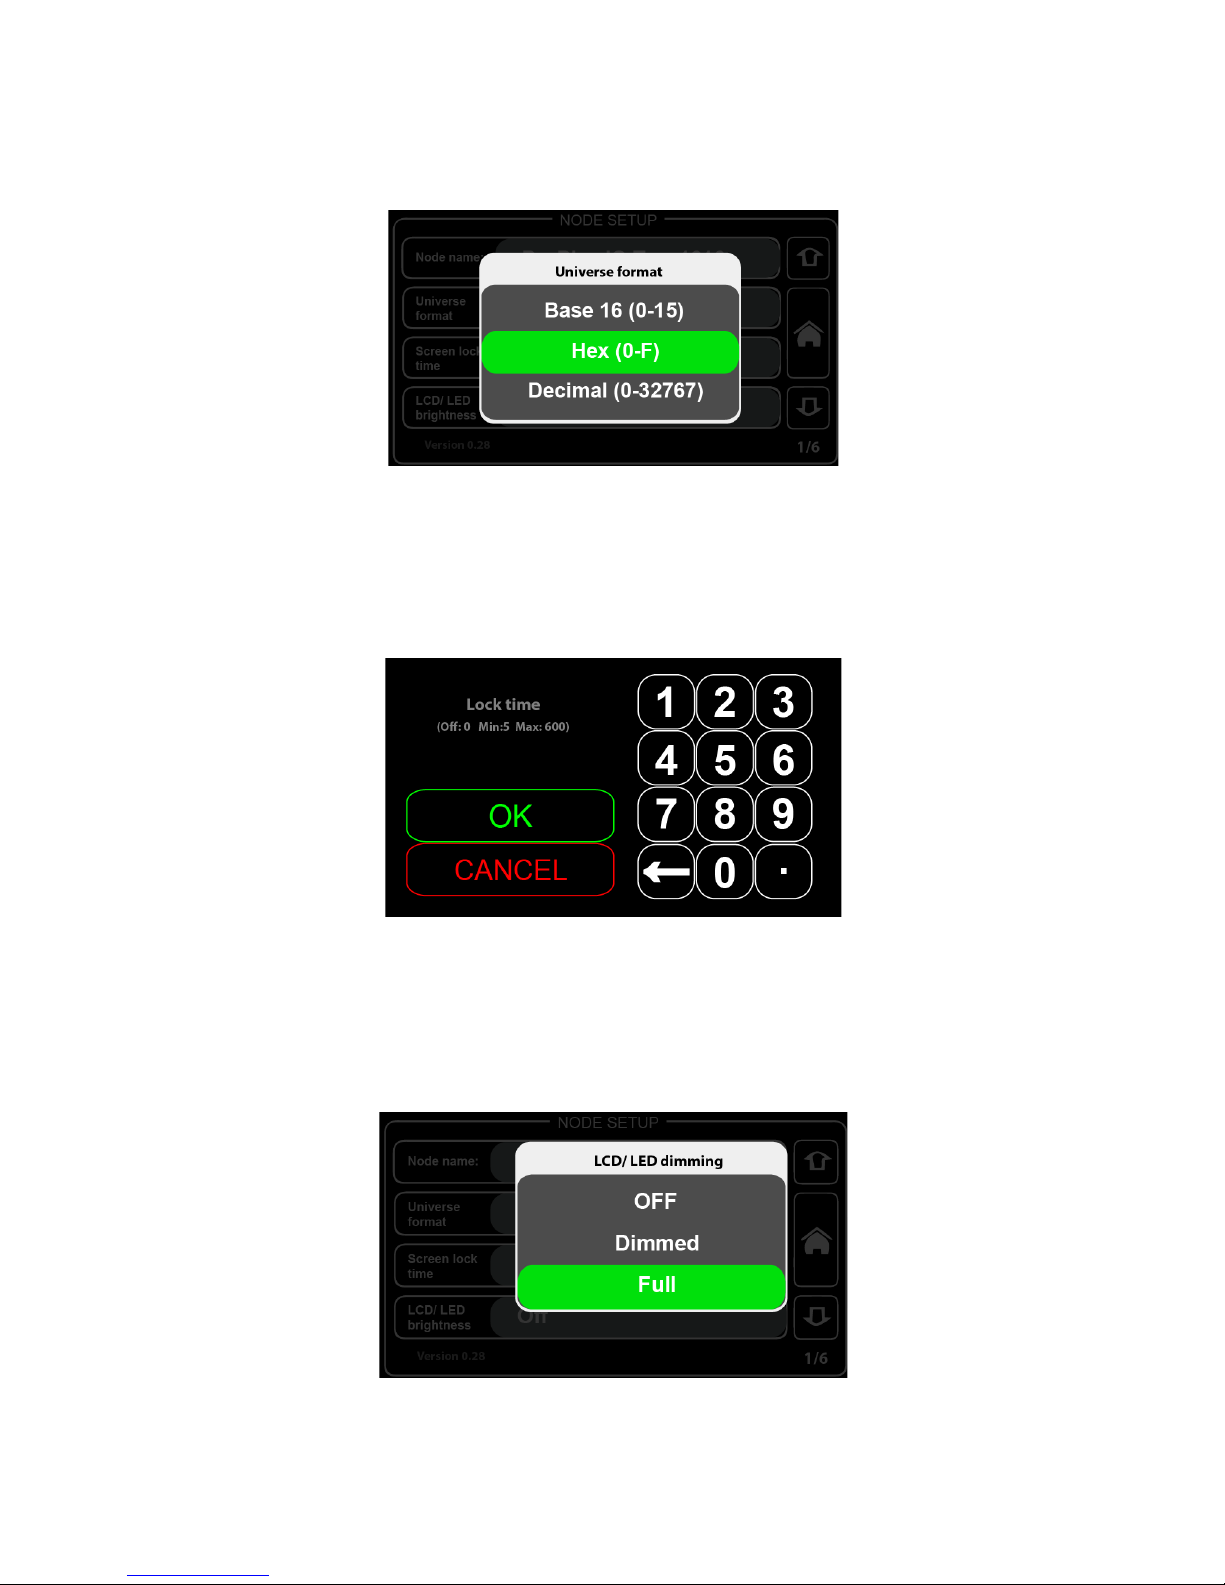
Universe format:
By pressing the "Universe format" section, a new window will appear
In this window, choose the universe format. By default, the universe format is set at Hex (hexadecimal) but
may be changed to Base 16 or decimal counting system.
Screen lock time:
By pressing the "Screen lock time" section, a new window will appear.
Screen lock time: This setting will change the time after which the ProPlex IQ Two will lock the screen.
Enter a value from 5 to 600 (5 to 600 seconds).
LCD/ LED brightness:
By pressing the "LCD/ LED brightness" section, a new window will appear.
Select from three settings: OFF, Dimmed, Full.

- 12 -
Protocol Setup
Protocol:
By pressing the "Protocol" section, a new window will appear.
Select from two "DMX over Ethernet" protocols: ArtNet and sACN (e1.31).
What is ArtNet and what is sACN?
ArtNet is an Ethernet protocol based on the TCP/IP protocol suite. Its purpose is to allow transfer of large
amounts of DMX512 data over a wide area using standard networking technology.
.
Streaming ACN (sACN) is a protocol to efficiently transport DMX universes over the network. It is
comparable to ArtNet in many aspects. The multicast option allows very easy configuration. sACN is a
popular protocol to control large number of RGB LEDs.
Both are Ethernet protocols for sending DMX universes over the network, with a few minor differences.
ArtNet allows the user to use the RDM protocol.
When using the sACN protocol, the universe 0 cannot be used. The system will show a warning sign if the
universe 0 + sACN protocol has been chosen. Also, it is not possible to use RDM functionality when sACN
protocol is used.

- 13 -
ArtNet easy priority:
By pressing the "ArtNet easy priority" section, a new window will appear.
ArtNet easy priority: ON or OFF.
Note: The ArtNet easy priority setting works only when the ArtNet is selected as the data transfer protocol
(not sACN).
What does easy do? When easy priority is ON, with two or more of the same ArtNet/ sACN universes
coming into the ProPlex IQ fixture, the console with the higher channel 512 value will have control over the
universe.
On source loss:
By pressing the "On source loss" section, a new window will appear.
Hold output setting: After source loss there is no action at all, old data remains in output.
Blackout setting: After DMX source loss, the last value will not be held and there will be a "blackout" (after
delay, drop all DMX channels to 0).
Stop DMX setting: After source loss, the DMX signal will be disabled (after delay, stop DMX generation at
all – fixtures doesn't see DMX anymore and can react accordingly by themselves).

- 14 -
Source loss timeout:
By pressing the "Source loss timeout" section, a new window will appear.
Source loss timeout value: This setting changes the time after which the ProPlex IQ Two will start the
blackout or stop DMX output on source loss.
Enter a value from 5 to 120 (5 to 120 seconds).
Protocol Setup
- 15 -
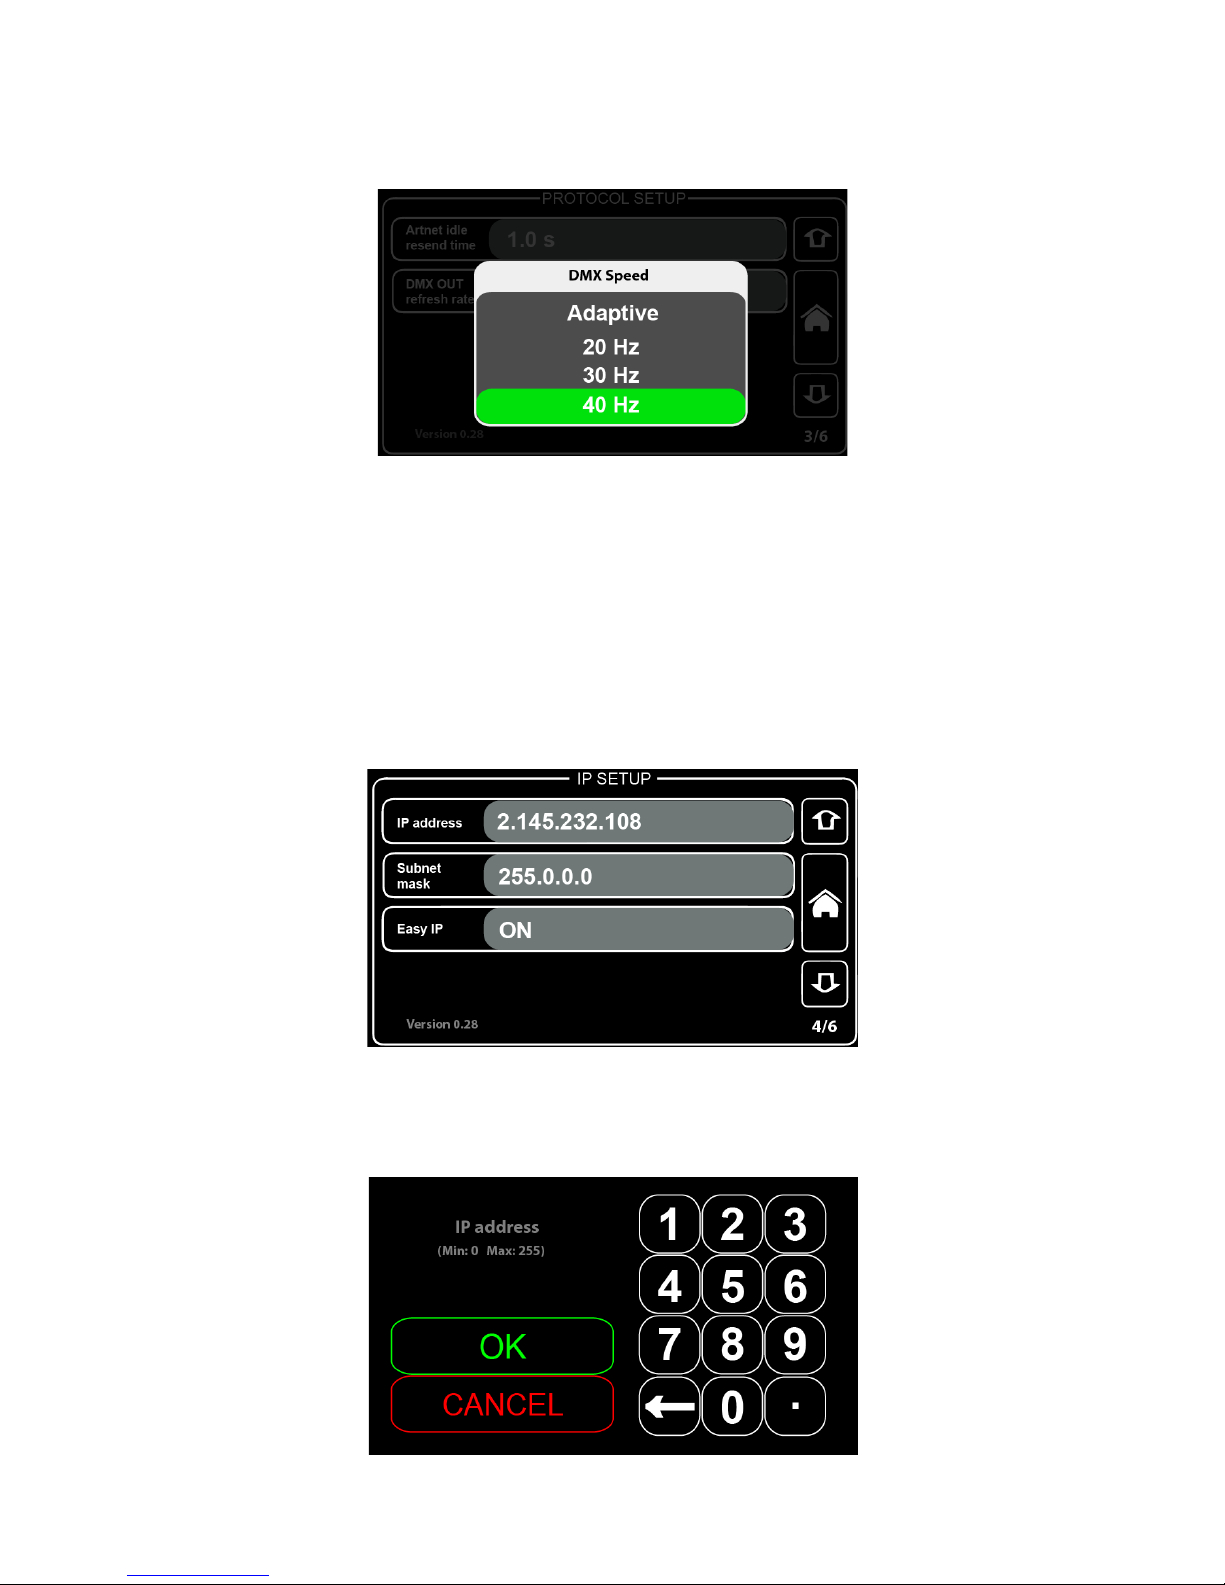
DMX OUT refresh rate:
By pressing the "DMX OUT refresh rate" section, a new window will appear.
Select one of four states for "DMX out refresh rate": Adaptive, 20Hz, 30Hz, 40Hz).
DMX out refresh rate defines how many times per second the information (DMX data) is sent. For example,
when setting is at 40Hz, the color fades will appear more fluid, but it will take more resources from the
system than 20Hz setting.
Sometimes this setting is called also FPS (frames per second).
What is "Adaptive" DMX speed setting? DMX speed mode that adapts to ArtNet data speed. This is the
best way to reduce latency and improve response for very fast effects.
IP Setup
IP address:
By pressing the "IP setup" section, a new window will appear.

- 16 -
IP address for the ProPlex IQ may be set.
Subnet mask:
By pressing the "Subnet mask" section, a new window will appear.
Subnet mask of the ProPlex IQ Two 416 may be set.
To exchange assigned subnetwork mask, replace the current network subnet mask to the desired
mask.
NOTE:When Easy IP setting is ON, mask settings may not be changed to custom ones.
Easy IP:
By pressing the "Easy IP" section, a new window will appear.
This setting ensures that software will search for all masks, not only for a specified one.
When Easy IP setting is turned ON, the subnet mask may not be changed.
- 17 -
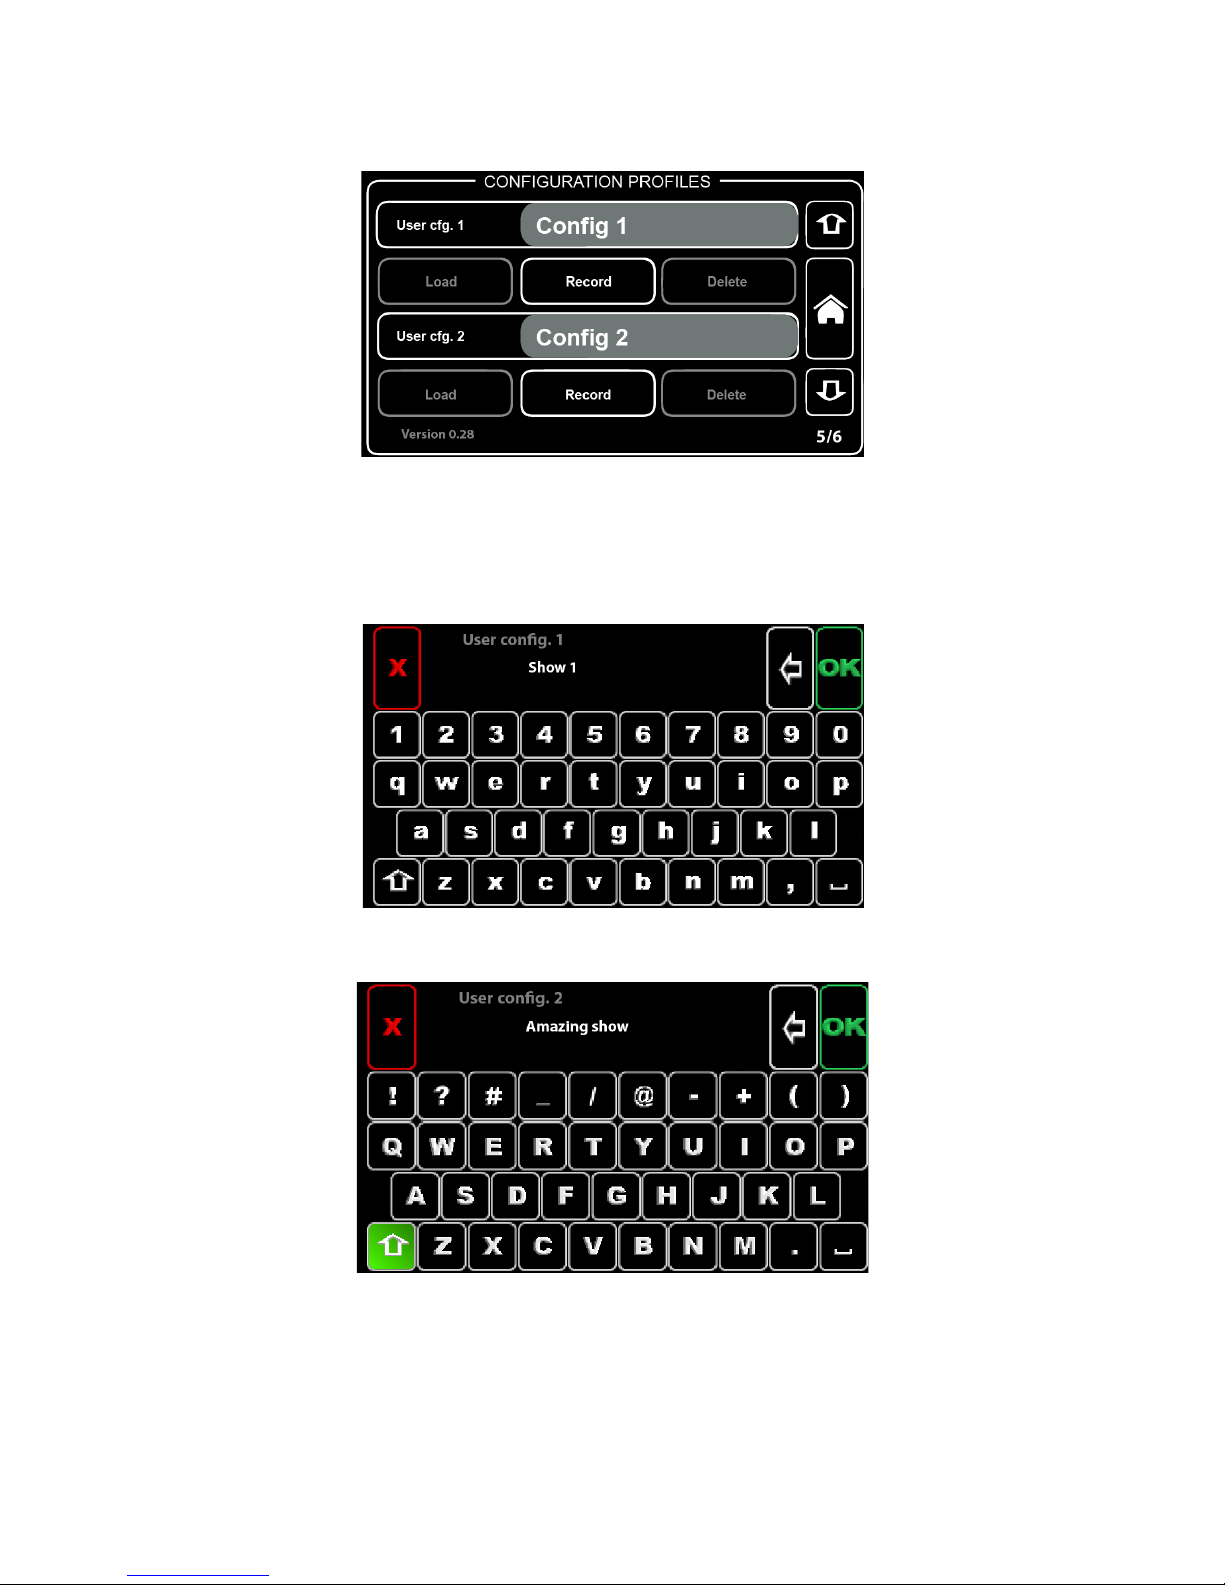
Configuration Profiles
Configuration must be named in order to save.
Choose configuration to be saved: User cfg. 1 or User cfg. 2.
For example, naming User config. 1 as "Show 1":
And User config. 2 as "Amazing show":
Press the "Record" button in order to save the chosen configuration
- 18 -
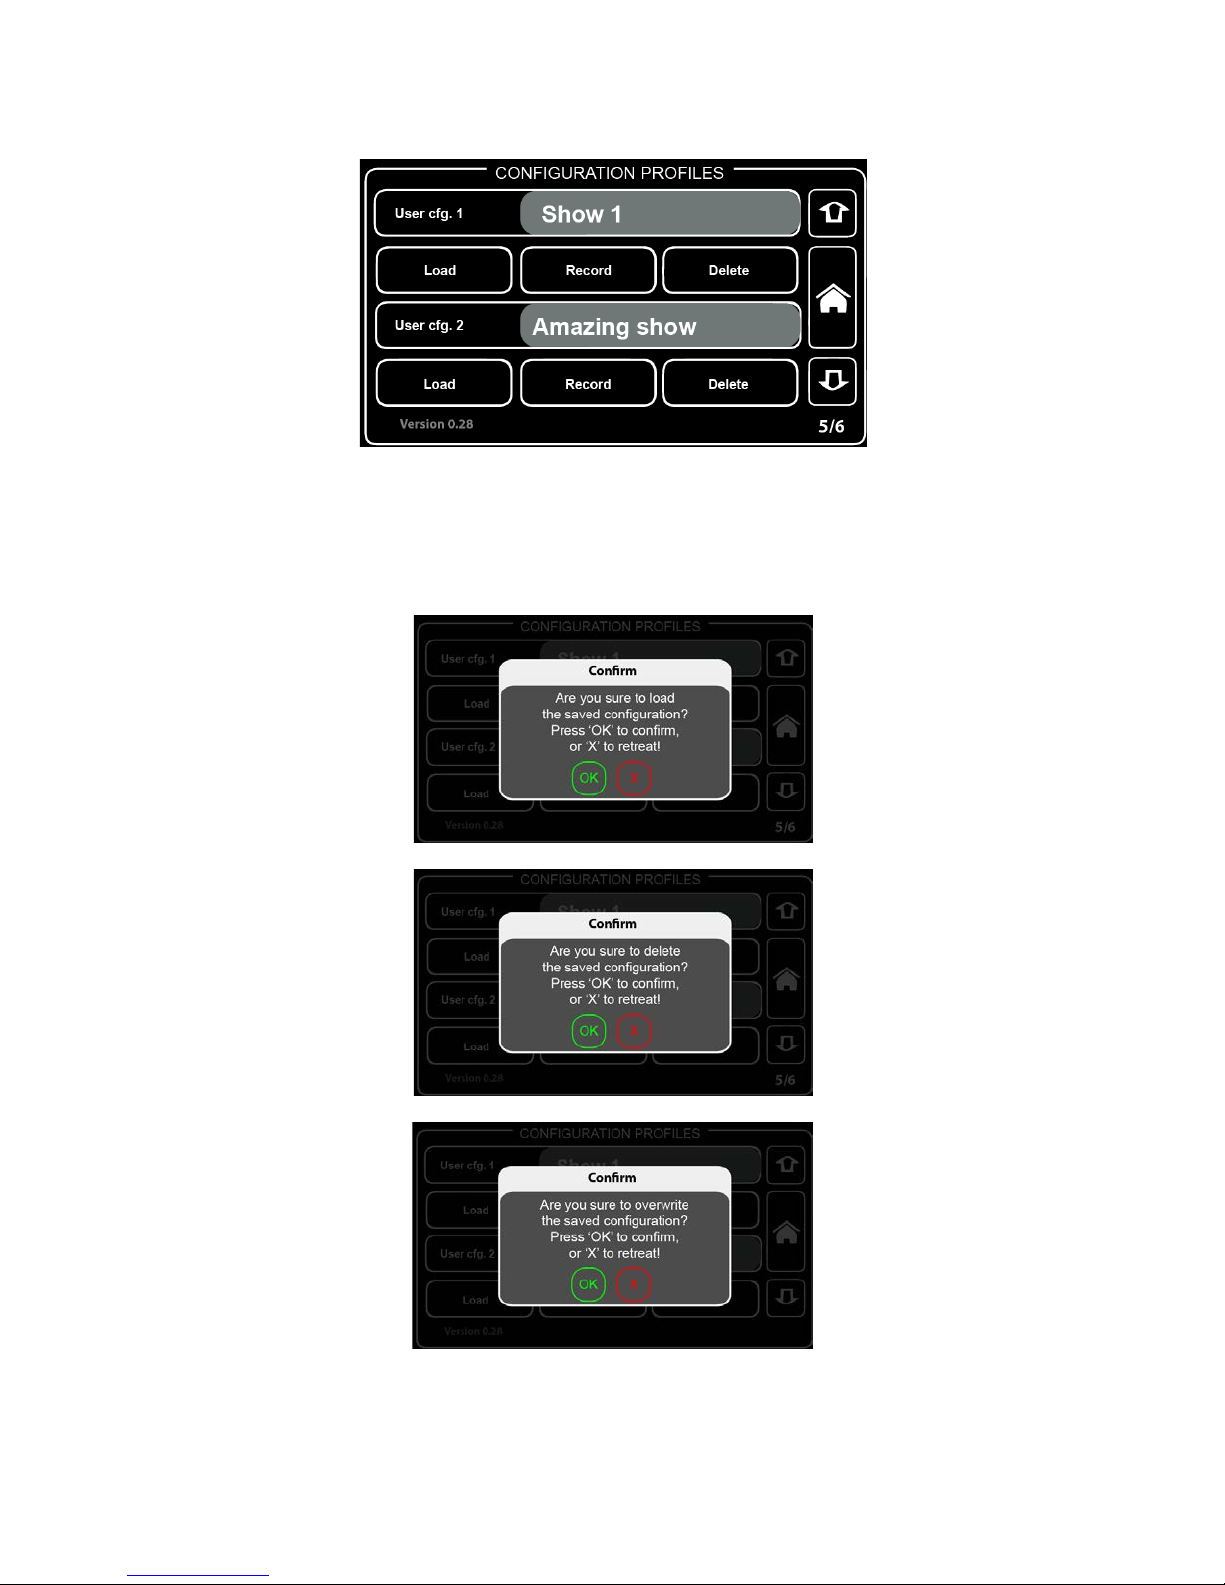
The previous menu will appear.
Either load or delete the saved configuration.
By pressing "Load", "Record" or "Delete" buttons, a confirmation window will appear. Press "OK" to confirm
or "X" to retreat.

- 19 -
Defaults
In this menu the user can load defaults:
Port defaults: Resets all DMX port related settings (configuration as IN/OUT/ RDM settings, etc.)
Protocol defaults: Resets all protocol related settings (sACN/ ArtNet settings).
Touch screen calibration: Opens touch screen calibration menu.
Factory defaults: Resets all settings and restarts the system.
After pressing Load/ Reset buttons, a new confirmation window will appear:
Press "OK" to confirm or "X" to retreat.

- 20 -
Status menu
View DMX status for four outputs (A, B, C, D).
Select from four outputs (A, B, C, D) by pressing on the icons.
The green background of the icon identifies selected output.
Following is an example of port A DMX value status.
The four green bars display the DMX value depending on the DMX value (if DMX value is 255, then the
green bar will be full; if DMX value is 0, there will be no green bar).
In this example, from channel 1 and 3-5, there is 100% value (255), but from channel 6-512 there are no
DMX values.
By pressing touch screen once again, a new menu will appear.
Here the user can see basic information about the output chosen to view.
\
Press the screen once more to return to the main menu.
Table of contents
Other TMB Cables And Connectors manuals


