Tocwon D20 User manual
For any questions and malfunctions
of the appliance during use, please
contact our customer service email:
INSTRUCTION MANUAL
VACUUM CLEANER
Model: D20


IMPORTANT SAFETY INSTRUCTIONS
WHAT'S IN THE BOX
OVERVIEW
OPERATING INSTRUCTIONS
ASSEMBLY
SPECIFICATION
CLEANING AND MAINTAINENCE
TROUBLESHOOTING
CLEAR A CLOG
WARRANTY
01
02
03
04
04
05
07
10
11
12
CATALOGUE

-01-
IMPORTANT SAFETY INSTRUCTIONS
1. To protect against electrical shock,
do not immerse power cord or plug
in water or any other liquid. To
avoid the risk of electrical shock or
serious personal injury, always
operate with dry hands.
2. Close supervision is necessary
when any appliance is being used
by or near children. This vacuum is
not intended for use by persons
(including children) with reduced
physical, sensory or mental
capabilities, or lack of experience
and knowledge, unless they have
been given supervision or
instruction concerning the use of
the vacuum by a person responsible
for their safety.
3. Do not use the vacuum outdoors.
It is for household use only.
4. Do not use the vacuum if it has
been dropped, damaged, left
outdoors, or dropped in water.
Please contact customer service
for help when the appliance or the
adapter is damaged.
5. Use the vacuum only as described
in this manual. The use of accessory
attachments not recommended may
cause damage to the vacuum or
personal injuries.
6. Do not use abrasive materials to
clean the vacuum. Do not use
spirits or other solvents to clean
the appliance.
7. Do not use the appliance to
vacuum all the below things:
Ɣ:DWHUIODPPDEOHRUFRPEXVWLEOH
liquids such as gasoline;
Ɣ/LJKWHGVWXEPDWFKHVKRWDVKHV
and other combustible things;
Ɣ1HHGOHVSLQVDQGRWKHUVKDUS
things;
Ɣ:RRGSLHFHVJHVVRFHPHQW
calcimine and other tiny granules;
Ɣ3LHFHVRIVWULQJRUIDEULFV
8. Do not pick up liquids with the
vacuum or use on wet floors. Do
not immerse the vacuum in water.
9. Do not use the vacuum on
concrete, tar, or similar rough
surfaces.
10. Do not vacuum frayed carpets or
tassels on carpets.
11. Do not use the vacuum without
the dust cup lid in place.
12. Do not put any object into
openings of the vacuum. Do not
use when any opening is blocked.
Keep free of dust, lint, hair and
anything that may reduce air flow.
13. Keep hair, loose clothing, fingers,
and all parts of body away from
openings and moving parts.
14. Store the vacuum indoors. Store
after use to prevent accidents.
15. Keep the vacuum cleaner away
from stoves and heat-emitting
appliance. Heat can deform and
discolor the plastic parts of unit.
Please use the vacuum in 0 to 40
degrees temperature environ-
ment.
16. Do not abuse the power cord.
Never carry the vacuum by the
power cord or pull the power cord
to disconnect the outlet plug from
an outlet; instead grasp the plug
and pull to disconnect.
17. Unplug from the outlet when not
in use and before cleaning.
18. Do not let cord hang over edge of
counter or touch hot surfaces.
19. To disconnect, always turn OFF
first, then unplug power cord from
wall outlet.
20. The thermal cutout will switch off
the vacuum automatically when it
overheats. If this should happen,
turn off the power switch, wait for
45 minutes to restart the vacuum.
Please keep the adapter
away from liquids.
Do not vacuum large
piece of paper.
Do not vacuum fire or
flammable substances.
Do not vacuum water
or liquids.
Do not remove plug
by grasping the cord.
IMPORTANT SAFETY INSTRUCTIONS
When using an electric appliances, basic precautions should always be followed,
including the following:
READ ALL INSTRUCTIONS
BEFORE USING (THIS APPLIANCE)
WARNING: TO REDUCE THE RISK OF FIRE, ELECTRIC SHOCK, DAMAGE OR INJURY:
POLARIZED PLUG
NOTE: This vacuum has a polarized plug (one blade is wider than the other).
1. As a safety feature to reduce the risk of electrical shock, this plug is intended to fit in a polarized outlet only one way.
2. If the plug does not fit fully in the outlet, reverse the plug.
3. If the plug still does not fit, contact a qualified electrician. Do not attempt to defeat this safety feature.

-02-
CAUTION: Assemble the vacuum according to chapter "Assembly".
WHAT'S IN THE BOX
Vacuum main body
Telescopic tube Crevice tool
Wall hanger
Hose
HEPA filter
Screws and wall anchors
Floor brush
Brush tool

OVERVIEW
-03-
Power switch
Crevice tool
Air outlet
Vacuum main body
Telescopic tube
Power cord
Dust cup lid release button
Brush tool
Wall hanger
Dust cup
Filter case
Extension button
Brush conversion switch
Floor brush
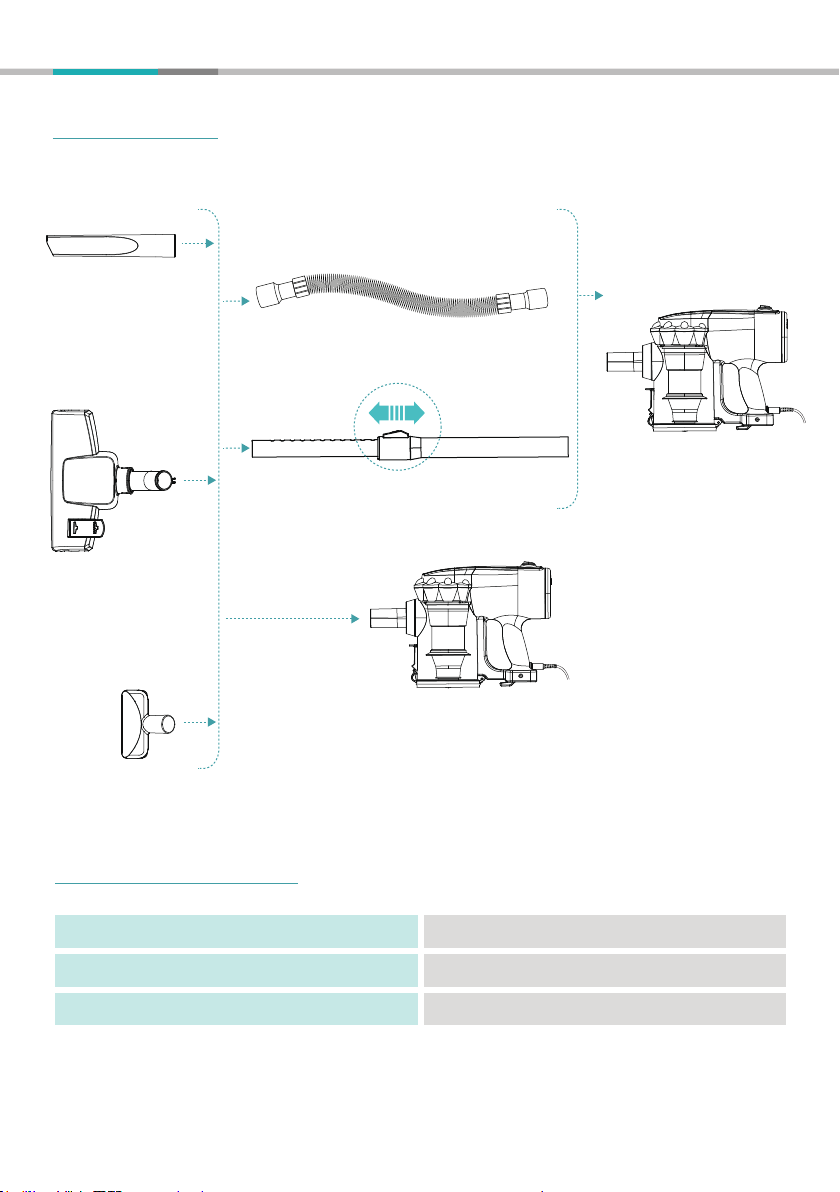
ASSEMBLY
-04-
SPECIFICATION
Name
Model
Voltage
VACUUM CLEANER
D20
120V

OPERATING INSTRUCTIONS
-05-
1
1
2
2
Power Instruction
Plug the power cord into a well-earthed wall socket. Turn on the power switch to vacuum.
Floor Brush Instruction
As the above figure shown, press the highlighted
part of the conversion switch to use the floor
brush without bristle.This mode of floor brush can
meet most of cleaning requirements.
As the above figure shown, press the highlighted
part of the conversion switch to use floor brush
with bristle for deep clean.

-06-
1
Wall Hanger Use Instruction
Use the screws and wall anchors to fix the wall hanger at the certain height to mount the vacuum with tube
attached.
2After fixing the wall hanger, store accessories on the hanger as well as the vacuum when not used.

-07-
MAX
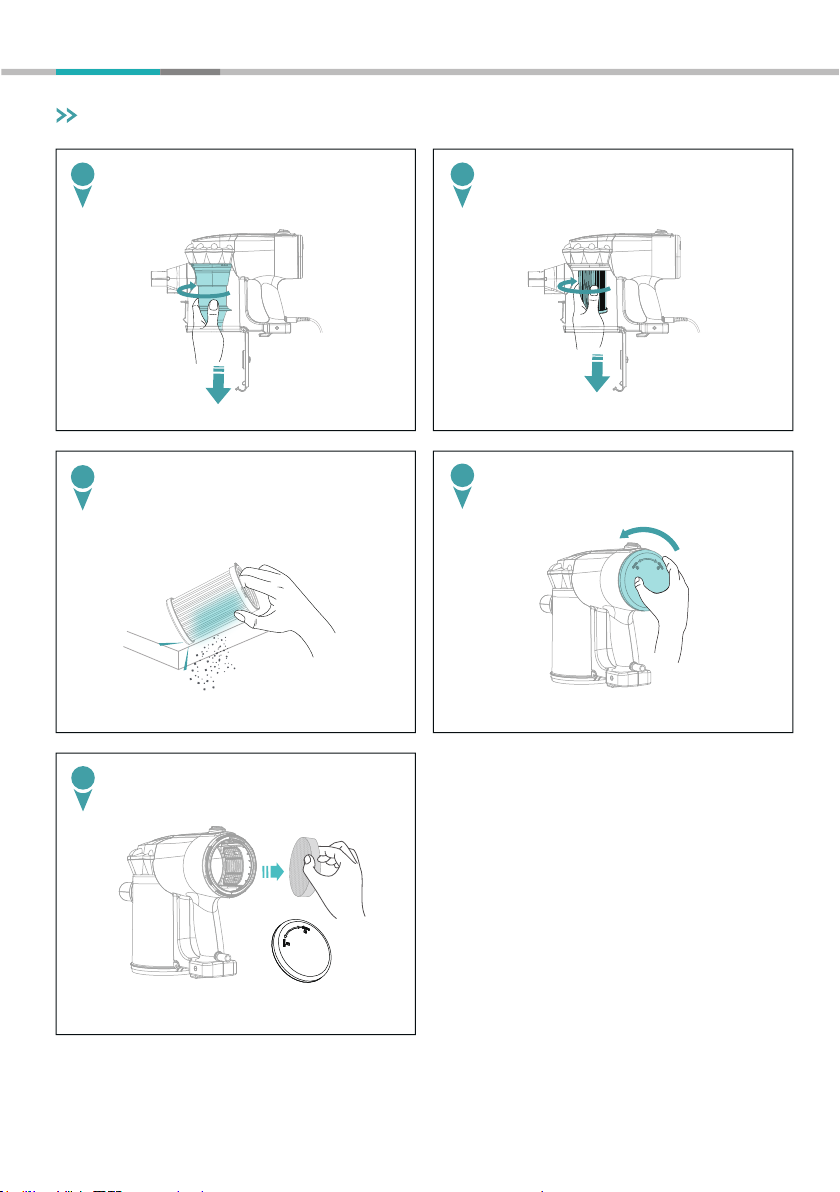
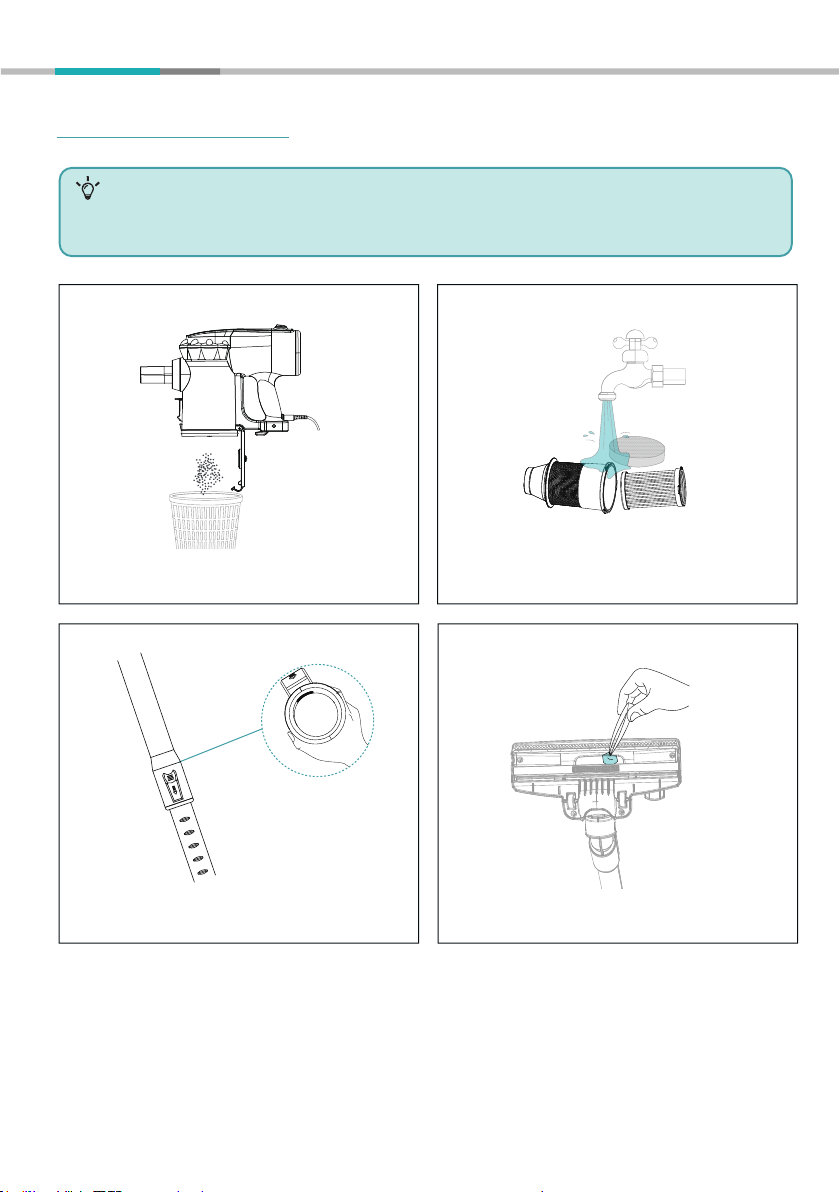
1Remove the telescopic tube from the main body before maintaining and cleaning dust cup and HEPA filter.
2Press the dust cup lid release button to dump dust.
Clean the Dust Cup
CLEANING AND MAINTENANCE
CAUTION:
1. Empty the dust cup when dust inside has exceeded the MAX sign, otherwise, the suction may be weakened.
2. Always be sure that the vacuum is switched to OFF before attempting to empty the dust tank.
-08-
Hold and turn the mesh shell clockwise to detach it. Turn the HEPA filter clockwise to remove it out of
the dust cup.
Before rinsing the HEPA filter, knock the HEPA
filter slightly to dump dust on it.
Clean the HEPA Filter & Exhaust Sponge
1 2
3Turn the back cover according to the figure
shown to remove it from the vacuum.
Detach the exhaust sponge.
4
5
-09-
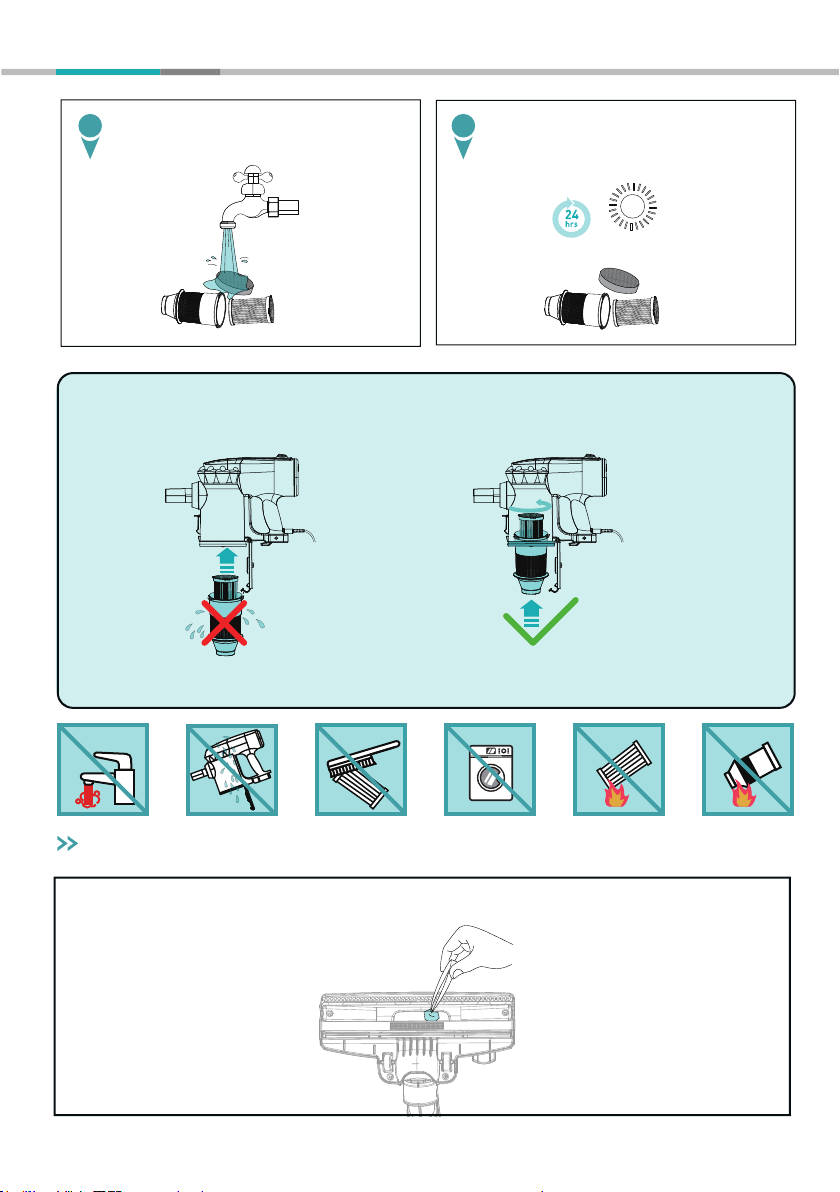
CAUTION:
1. Do not assemble HEPA filter back until they are completely dry.
2. Turn anticlockwise to assemble them back.
)
drywet
Filter is suggested to be washed (air dry before installing back) every 2 weeks, to be replaced every 2 months,
otherwise, it will result in insufficient filter system and loss of suction.
Clean the Floor brush
Check the floor brush and clear the clog with tweezers.
Rinse the HEPA filter, mesh shell and the
exhaust sponge under tap water.
Air dry them for at least 24 hours. Do not
assemble it back until completely dry.
6 7
-10-
CLEAR A CLOG
Low suction or vacuum stopped caused by overheat may be due to a clog in the vacuum. Please
check and clear clogs in the dust cup, HEPA filter, sponge, telescopic tube and floor brush.
CAUTION:
Check and rinse the HEPA filter and sponge.Do
not assemble them until completely dry.
Check the floor brush and clear the clog with
tweezers.
Check and empty the dust cup.
Check if there are any clogs inside the telescopic
tube.
-11-
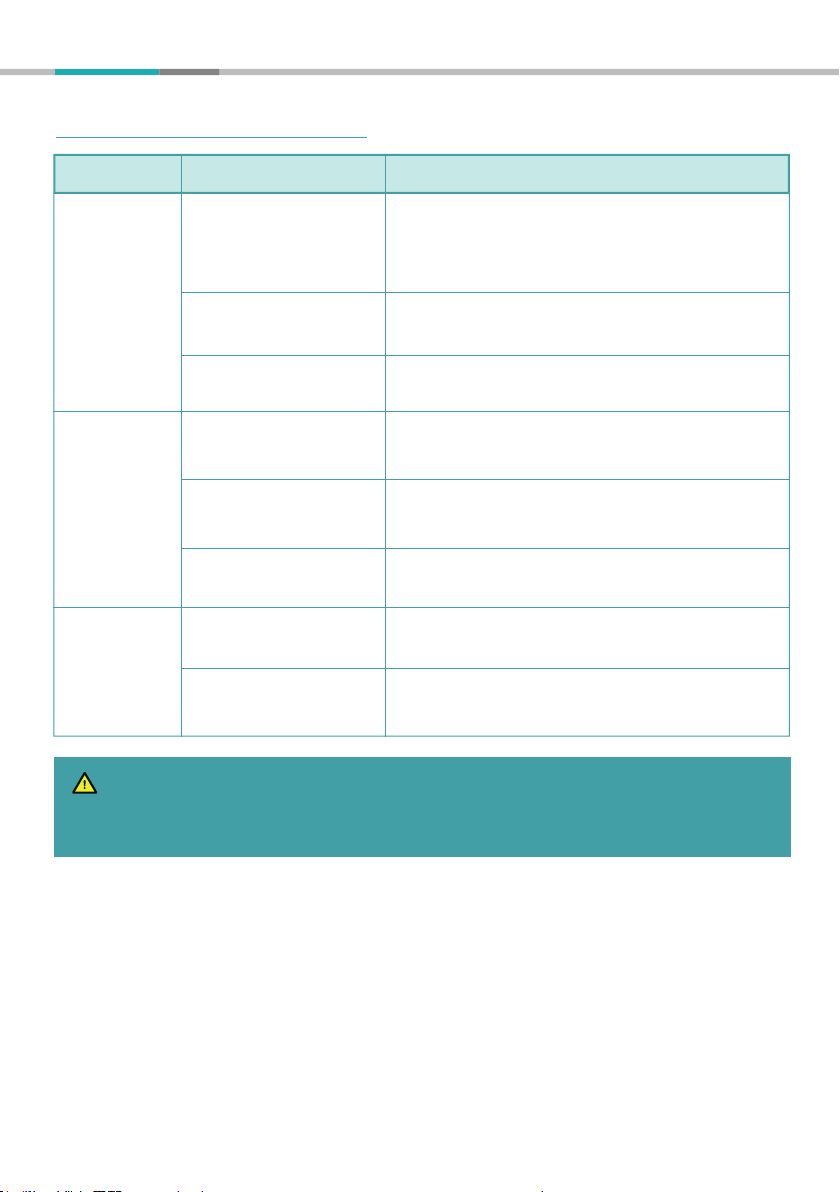
The vacuum
over-
heats/stops
working
The cleaning
results are not
good
There is static
during vacuum
working
A thermal cutout switches off the cleaner to prevent
overheating. Please restart the vacuum after cooling for
45 minutes and clean the floor brush, tube, dust cup
and the HEPA filter
Do not use the vacuum for more than 60 minutes
continuously. Please take a break during long time use
1.The air duct is blocked
2. The dust cup is full
It is recommended to use the crevice tool for better
pickup for vacuuming heavy objects such as beans
1. The air duct is blocked
2. The dust cup is full
Use for too long time
Other malfunctions
Incorrect use of the
vacuum
The HEPA filter is not
dried completely
There is too much dust
inside the dust cup
The vacuum runs at an
environment full of static
Clean the floor brush, telescopic tube, dust cup
and the HEPA filter regularly
Detach and air dry the HEPA filter. It is recommend-
ed to clean and replace it regularly
Please empty the dust cup
It's normal that there may be much static in the air in
winter and dry regions
Please contact customer service for help
PROBLEM POSSIBLE REASONS SOLUTIONS
TROUBLESHOOTING
WARNING
The thermal cutout will switch off the vacuum automatically when it overheats. If this should happen, turn off the
power switch, wait for 45 minutes to restart the vacuum.

-12-
WARRANTY
1. According to the requirements outlined in this instruction manual, the warranty is subject to the following
conditions and exclusions.
2. This warranty provides, at no extra cost to you all labor and parts necessary to ensure your machine
is in proper operating condition during the warranty period.
3. We provide the repair or replacement of your Tocwon appliance if your Tocwon app liance is found
to be defective due to faulty materials, workmanship function within 1 year of purchase or delivery. ( If
any part is no longer available or out of manufacture, we will replace it with a functional replacement
part).
1. Under your Tocwon guarantee, Tocwon shall not be liable for costs of repair or replacement of a
product incurred as a result of: Accidental damage, faults caused by negligent use or care, misuse,
neglect, careless operation or handling of the Tocwon appliance which is not in accordance with
this Tocwon Instruction Manual.
2. Machines purchased from an unauthorized dealer.
3. Use of parts and accessories other than those produced or recommended by Tocwon.
4. Repairs or alterations carried out by unauthorized parties or agents.
5. Use of the machine other than for normal domestic purpose, e.g. for commercial or rental purposes.
6. Reduction in battery run time due to battery age or use.
The 1-year Limited Warranty is valid for products purchased from our Tocwon only, starting from the
date of the original retail purchased. We will provide customer service for any defects in quality or
materials under normal, non-commercial use.
CUSTOMER CARE
WHAT IS NOT COVERED
1. If you have a query about your Tocwon appliance, please contact the Tocwon customer service
email:
2. Please inform us your model name/number, purchase date, order number, machine problem and your
requirement.
3. Your model number can be found on rating plate.
4. Please keep your purchase receipt in a safe place to ensure you have this information.
Service under this warranty will not extend the available time of warranty.
WARRANTY SERVICE

Table of contents


