SPIT AC 1630P User manual
Bedienungs- und Wartungsanleitungen
(Original) 24
Instrukcja obslugi 112
Operating Instructions 7
Käyttöohje 94
Notice d’utilisation 15
KezelésiUtasítás 103
Istruzioni d’uso 33
Návod k obsluze 120
Gebruiksaanwijzing 40
Návod na obsluhu 129
Instrucciones para el manejo 49
Instrucciones para el manejo 138
Instruções de utilização 58
Uputstvo za upotrebu 147
Bruksanvisning 67
Uputa za uporabu 156
Betjeningsveiledning 76
Navadila za uporabo 165
Bruksanvisning 85
Pуководствопозксплуатации 174
δηγίες ειρισµύ 183
FIN
H
PL
CZ
SK
MK
SRB
HR
SL
RUS
EL
192
2
Ⓖ
Ⓗ
Ⓒ
Ⓒ
Ⓒ
Ⓓ
Ⓓ
Z
①②
③
④
⑤⑥
⑦ ⑧
⑨
⑩
⑩
⑪
⑫
⑬
⑭ ⑮
⑯
⑰
⑱
⑲

33
EL
F
D
E
GB
I
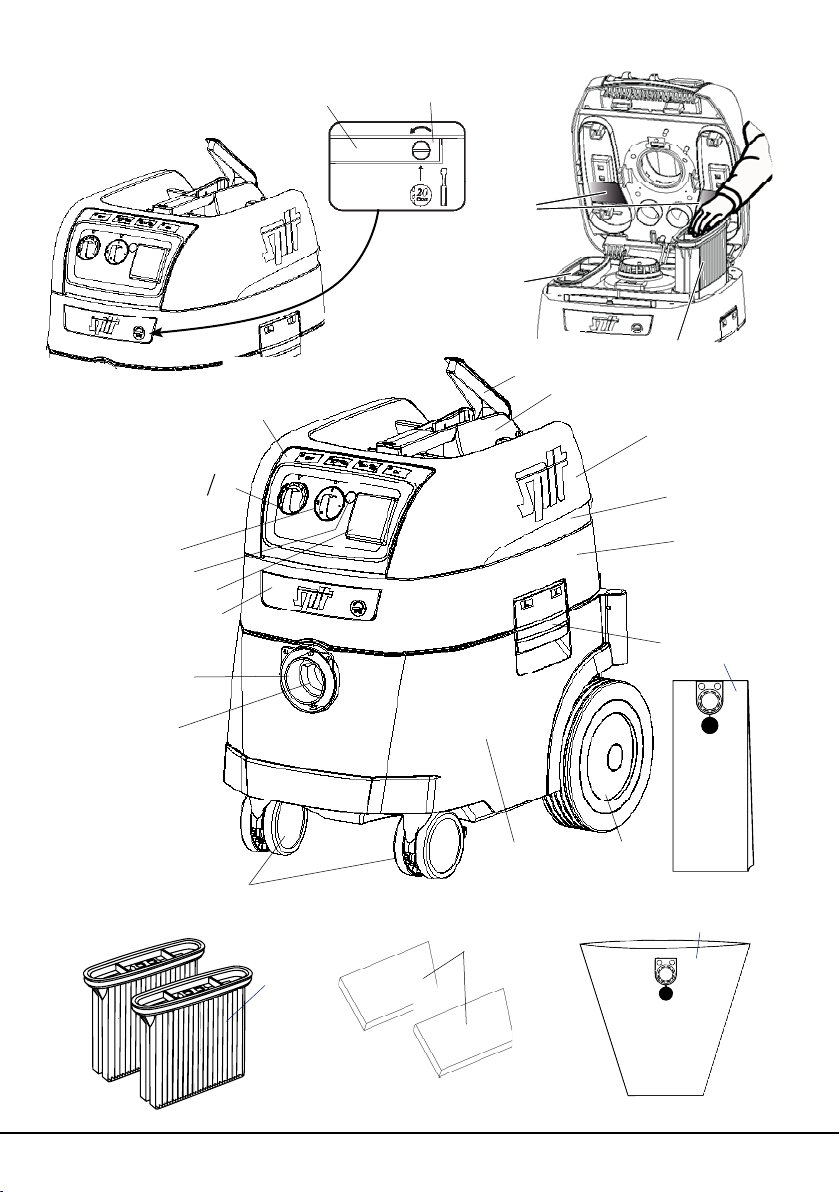
①Griff Deckel
②Griff
③Schalterplatte
④Drehschalter
⑤Füllanzeige
⑥Steckdose
⑦/⑧ Drehzahlregulierung/
Einstellung Saugschlauch-Ø
⑩Riegel
⑪Ansaugstutzen
⑫Drehschieber
⑬Lenkrolle
⑭Behälter
⑮Rad
⑯Verschluss
⑰Motorgehäuse
⑱Trägerplatte
⑲Deckel
CFaltenlterkassetten G Papierlterbeutel
DMotorschutzlter H PE-Entleer- und
Entsorgungsbeutel
①
Handgreep deksel
②
Handgreep
③
Bedieningspaneel
④
Draaischakelaar
⑤
Niveau-indicatie
⑥
Stopcontact
⑦/⑧ Toerentalregeling/
Instelling zuigslangdiameter
⑩
Vergrendeling
⑪
Aanzuigopening
⑫
Draaischuif
⑬
Zwenkwieltje
⑭
Container
⑮
Wiel
⑯
Slot
⑰
Motorbehuizing
⑱
Dragerplaat
⑲
Deksel
C
Vouwltercassette
G
Papieren lterzak
D
Motorlter
H
PE-zak voor legen
en afvoer
①
Asa de la tapa
②
Asa
③
Placa de conmutadores
④
Conmutador giratorio
⑤
Indicador de recipiente lleno
⑥
Caja de enchufe
⑦/⑧ Regulación de velocidad / Ajuste del diámetro
de la manguera de aspiración
⑩
Enclavamiento
⑪
Toma de aspiración
⑫
Corredera giratoria
⑬
Ruedas giratorias
⑭
Recipiente
⑮
Rueda
⑯
Cierre
⑰
Carcasa del motor
⑱
Placa de soporte
⑲
Tapa
C
Cartuchos de ltro en fuelle
G
Bolsa ltro de papel
D
Filtro protector del motor
H
Bolsa de vaciado y
eliminación de PE
①
Impugnatura coperchio
②
Impugnatura
③
Interruttore ON/OFF
④
Manopola
⑤
Indicatore serbatoio
⑥
Presa di corrente
⑦/⑧ Regolazione numero giri /Impostazione
diametro tubo essibile di aspirazione
⑩
Blocco
⑪
Bocchettone di aspirazione
⑫
Valvola a maschio
⑬
Ruota di guida
⑭
Serbatoio
⑮
Ruota
⑯
Chiusura
⑰
Carter motore
⑱
Piastra di supporto
⑲
Coperchio
C
Cartucce ltro pieghettato
G
Sacchetto ltro di carta
D
Filtro di protezione motore
H
Sacchetto PE per svuo-
tamento e smaltimento
①
Cover handle
②
Handle
③
Switch plate
④
Rotary switch
⑤
Fill level indicator
⑥
Plug socket
⑦/⑧ Speed control/
Adjustment of the vacuum hose diameter
⑩
Latch
⑪
Vacuum spigot
⑫
Rotary slider
⑬
Steering roller
⑭
Container
⑮
Wheel
⑯
Lock
⑰
Motor housing
⑱
Support plate
⑲
Cover
C
Folding lter cartridges
G
Paper lter bag
D
Motor protection lter
H
PE emptying and
disposal bag
①
Poignée couvercle
②
Poignée
③
Panneau des interrupteurs
④
Interrupteur rotatif
⑤
Indicateur de niveau de remplissage
⑥
Prise
⑦/⑧ Régulation du nombre de tours/
Réglage du diamètre du exible d'aspiration
⑩
Verrou
⑪
Tubulure d’aspiration
⑫
Régulateur rotatif
⑬
Roue directrice
⑭
Cuve
⑮
Roue
⑯
Fermeture
⑰
Carter de moteur
⑱
Plaque support
⑲
Couvercle
C
Cassettes à ltre plissé
G
Sac ltrant en papier
D
Filtre de protection-
moteur
H
Sac PE de vidange
et d’élimination
GB
F
D
I
NL
E
P
S
DK
N
FIN
H
PL
CZ
SK
SRB
HR
SL
RUS
MK
EL

4
①
Greb, dæksel
②
Greb
③
Kontaktplade
④
Drejekontakt
⑤
Fyldningsindikator
⑥
Stikdåse
⑦/⑧ Regulering af omdrejningstal /
Indstilling af sugeslanges diameter
⑩
Spærre
⑪
Indsugningsstuds
⑫
Drejeventil
⑬
Styrehjul
⑭
Beholder
⑮
Hjul
⑯
Lukkemekanisme
⑰
Motorhus
⑱
Bæreplade
⑲
Dæksel
C
Filterkassetter til
foldelter
G
Papirlterpose
D
Motorlter
H
PE-tømnings- og
bortskaffelsespose
①
Håndtak deksel
②
Håndtak
③
Bryterplate
④
Dreiebryter
⑤
Fyllingsindikator
⑥
Stikkontakt
⑦/⑧ Turtallsregulator /
Innstilling sugeslangediameter
⑩
Sperre
⑪
Sugestuss
⑫
Dreieskiver
⑬
Styretrinse
⑭
Beholder
⑮
Hjul
⑯
Lås
⑰
Motorhus
⑱
Bærerplate
⑲
Deksel
C
Foldelterkassetter
G
Papirlterpose
D
Motorbeskyttelseslter
H
PE-tømme- og
avfallspose
①
Pega da tampa
②
Pega
③
Placa de interruptores
④
Interruptor rotativo
⑤
Indicador do enchimento
⑥
Tomada
⑦/⑧ Regulação da rotação /Ajuste do diâmetro da
mangueira de aspiração
⑩
Trinco
⑪
Bocal de aspiração
⑫
Interruptor rotativo
⑬
Roda direccional
⑭
Recipiente
⑮
Roda
⑯
Fecho
⑰
Caixa do motor
⑱
Placa de suporte
⑲
Tampa
C
Cassete de ltros
plissados
G
Saco de papel para
ltragem
D
Filtro de protecção do
motor
H
Saco em PE para esva-
ziamento e eliminação
①
Handtag till lock
②
Grepp
③
Kopplingsplatta
④
Vridbrytare
⑤
Fyllnadsindikering
⑥
Stickkontakt
⑦/⑧ Varvtalsreglering/
Inställning sugslangens diameter
⑩
Regel
⑪
Uppsugningstappar
⑫
Vridslid
⑬
Styrhjul
⑭
Behållare
⑮
Hjul
⑯
Lås
⑰
Motorhölje
⑱
Bärplatta
⑲
Lock
C
Vecklterkassetter
G
Filterpåse av
papper
D
Motorskyddslter
H
PE-tömnings- och
bortskaffningspåse
N
S
P
①
Kahvan suojus
②
Kahva
③
Kytkinlevy *
④
Kiertokytkin *
⑤
Täyttötason osoitin *
⑥
Pistorasia*
⑦/⑧
Kierrosluvunsäädin* / Letkun läpimitan säädin *
⑩
Lukitsin
⑪
Imuistukka
⑫
Suljin*
⑬
Ohjauspyörä
⑭
Säiliö
⑮
Pyörä
⑯
Kiinnitin
⑰
Moottorin kotelo
⑱
Tukilevy
⑲
Kansi
C
Suodatinkasetteja
G
Paperinen suoda-
tinpussi
D
Moottorin suojasuo-
datin
H
PE-tyhjennys- ja
hävityspussi
①
Fogantyú fedél
②
Fogantyú
③
Kapcsoló lap *
④
Forgókapcsoló *
⑤
Töltés kijelző *
⑥
Dugaszoló aljzat *
⑦/⑧
Fordulatszám szabályozó * / Szívócső átmérő
beállítás *
⑩
Retesz
⑪
Szívócsonkok
⑫
Forgó tolattyú *
⑬
Vezető görgő
⑭
Tartály
⑮
Kerék
⑯
Zár
⑰
Motorház
⑱
Tartólap
⑲
Fedél
C
Redőzött szűrő kazetta
G
Papír szűrőtasak
D
Motorvédő szűrő
H
PE ürítő és
hulladékkezelő tasak
H
FIN
5
GB
F
D
I
NL
E
P
S
DK
N
FIN
H
PL
CZ
SK
SRB
HR
SL
RUS
MK
EL
①
Poklopac rukohvata
②
Rukohvat
③
Komandna tabla *
④
Obrtni prekidač *
⑤
Indikator punjenja *
⑥
Utičnica *
⑦/⑧
Regulacija broja obrtaja * / Podešavanje prečnika
usisnog crijeva *
⑩
Zasovnica
⑪
Usisni priključak
⑫
Obrtni klizač *
⑬
Upravljački točkić
⑭
Posuda
⑮
Točak
⑯
Zatvarač
⑰
Kućište motora
⑱
Noseća ploča
⑲
Poklopac
C
Naborani lter (umeci)
G
Papirna vreća ltera
D
Zaštitni lter motora
H
PE-vreća za pražnjenje
i uklanjanje
①
Ručka poklopca
②
Ručka
③
Ploča sklopke *
④
Okretna sklopka *
⑤
Prikaz punjenja *
⑥
Utičnica *
⑦/⑧
Regulacija broja okretaja * / Postavke usisnog
crijeva-promjer *
⑩
Zapor
⑪
Usisni oslonci
⑫
Okretni kliznik *
⑬
Upravljački valjak
⑭
Posuda
⑮
Kotač
⑯
Brava
⑰
Kućište motora
⑱
Nosiva ploča
⑲
Poklopac
C
Kasete za nabrani lter
G
Papirnate lter vrečice
D
Filter za zaštitu motora
H
PE vrečica za
pražnjenje i uklanjanje
HR
SRB
①
Držadlo krytu
②
Držadlo
③
Spínací panel *
④
Otočný spínač *
⑤
Indikátor stavu naplnenia *
⑥
Zásuvka *
⑦/⑧
Regulácia otáčok * / Nastavenie priemeru sacej
trubice *
⑩
Západka
⑪
Sacie hrdlo
⑫
Otočný posúvač *
⑬
Otočné koliesko
⑭
Nádoba
⑮
Koleso
⑯
Uzáver
⑰
Puzdro motora
⑱
Nosná doska
⑲
Kryt
C
Kazety so skladaným ltrom
G
Papierové ltračné
vrecko
D
Ochranný lter motora
H
PS vyprázdňovacie a
likvidačné vrecko
①
Рачка на капак
②
Рачка
③
Плочка со прекинувачи
④
Прекинувач на вртење
⑤
Индикатор за полнење
⑥
Утичница
⑦/⑧ Регулација на бројот на вртежи /
Нагодување Ø на всмукувачкото црево
⑩
Блок-елемент
⑪
Навој за всмукување
⑫
Ротирачки вентил
⑬
Управувачко тркалце
⑭
Сад
⑮
Тркало
⑯
Затворач
⑰
Куќиште на мотор
⑱
Носечка плочка
⑲
Капак
C
Касети за набран филтер
G
Хартиена филтер ќеса
D
Филтер за заштита на
мотор
H
Ќеса од ПЕ за празнење
и отстранување
①
Uchwyt pokrywa
②
Uchwyt
③
Płyta łącznika *
④
Przełącznik obrotowy *
⑤
Wskaźnik wypełnienia *
⑥
Gniazdo wtykowe *
⑦/⑧
Regulacja prędkości obrotowej * / Ustawienie
średnicy węża ssącego *
⑩
Zasuwa
⑪
Końcówka ssąca
⑫
Zasuwka obrotowa *
⑬
Rolka kierownicy
⑭
Pojemnik
⑮
Koło
⑯
Zamek
⑰
Obudowa silnika
⑱
Płyta nośna
⑲
Pokrywa
C
Kasety ltra
składanego
G
Papierowy worek
ltra
D
Filtr ochronny silnika
H
Worki
①
Rukojeť víka
②
Rukojeť
③
Ovládací panel *
④
Otočný spínač *
⑤
Indikace stavu naplnění *
⑥
Zásuvka *
⑦/⑧
Regulace otáček * / Nastavení průměru sací
hadice *
⑩
Západka
⑪
Sací hrdlo
⑫
Otočné šoupátko *
⑬
Řídicí kolečko
⑭
Zásobník
⑮
Kolo
⑯
Uzávěr
⑰
Kryt motoru
⑱
Nosná deska
⑲
Víko
C
Kazety se skládaným ltrem
G
Papírový sáček
D
Mot Ochranný ltr motoru
orskyddslter
H
Polyetylenový sáček
pro vyprazdňování a
likvidaci prachu
MK
CZ
SK
PL
Other manuals for AC 1630P
1
Table of contents
Other SPIT Vacuum Cleaner manuals


