Tommy Bahama Relax User manual


Tommy Bahama, the purveyors of “Island
Lifestyles”, brings you a new collection of
spirited casual sport watches that appeal
to those who believe the philosophy that
LIFE IS A GAME, PLAY IT WELL.
Intentionally Blank

100% STAINLESS STEEL
Tommy Bahama Relax Watches are made from 100% Solid
Stainless Steel. Stainless Steel is:
•The most durable materials with which to construct a watch
case & bracelet
•100% hypoallergenic
TImE ANd dATE SETTINg
Do not set / adjust date nor turn hour / minute hands counter
clockwise between the hours of 8 PM and 3 AM.
Between these times the gears are too close together, therefore,
doing so could cause damage to your watch.
TEmpErATurE
Your watch works with stable accuracy between a temperature
range of 41F and 95F (5C and 35C).
LImITEd LIFETImE WArrANTY
Thank you for choosing a Tommy Bahama Relax precision
timepiece. This Tommy Bahama Relax Watch is warranted to
you, the owner for your lifetime against all defects in material or
workmanship.
The warranty does not apply to normal wear and tear or abuse and
excludes battery, case, crystal, strap, malfunction and deteriora-
tion resulting from accident, negligence and tampering. Tommy
Bahama Relax Watches are water-resistant. Special gasket and
crown protectors have been used in the creation of these time
pieces to ensure their resistance to water. In the event of a defect
or malfunction, it will be repaired or replaced at our option. PLEASE
DO NOT SEND CASH. No additional charge will be made unless
additional servicing is necessary for reasons beyond our control
such as accident, misuse, neglect or replacement of parts not
warranted such as battery, case, crystal, strap. In this event, please
see Watch Repair section in the back of this booklet.
3-HANd dATE modELS
Includes all models with an hour, minute and second hand and
date at 3:00, 4:00 or 6:00
To Set the TIME:
1. Pull out crown to second click position “C”.
2. Turn crown counter clockwise to correct time.
3. Push in crown to “A” position to set.
To Set the DATE:
1. Pull out crown to second click position “C”.
2. Turn crown counter-clockwise to correct date.
3. Push in crown to “A” position to set.
BATTErY LIFE
The battery in your Tommy Bahama Relax Watch should last
approximately 2 years. When the battery expires, replace it as
soon as possible to prevent any malfunction. For battery replace-
ment, we recommend that you contact an AUTHORIZED TOMMY
BAHAMA RELAX DEALER, Battery type is found on the caseback.
WATEr rESISTANcE
• Before using watch in or near water, be sure that crown is
pushed in completely.
• If watch is underwater or wet, do not use pushers, rotating
bezels or crowns.
• If watch becomes wet, wipe it dry as soon as possible.
• If watch comes in contact with salt water, rise case and
bracelet immediately and thoroughly.
• Do not take your watch into a Hot Tub or Sauna. Extreme heat
and pressure may cause your watch to lose its water
resistance.
• Water resistance is not permanent. In the course of time, as
your case becomes worn, the water resistance of the watch
may decrease.
WATER
30 M / Or Watch Simply
Marked Water Resistance
50 Meters
100 Meters
SUITABLE
Washing Hands, Showering
Light Swimming
Most Water Sports - But Not Deep Water Diving
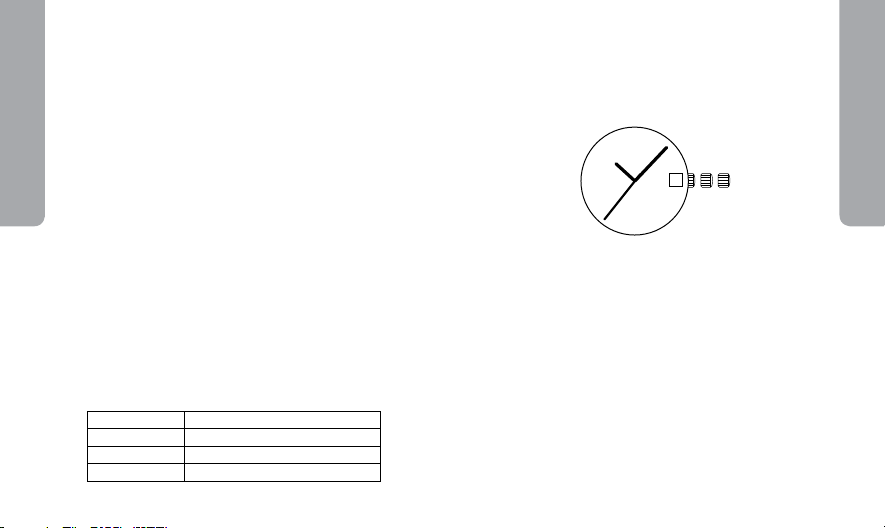
GeNeral INformatIoN
tIme/date
1. Calendar
A B C
1

To Set the TIME:
1. Pull the crown out to the second click position “C” when the
second hand reaches the 12 o’clock position so that the second
hand stops there.
2. Set the hour and minute hands.
*When setting the minute hand, adjust it to 4-5 minutes earlier
than the time to be set, and then turn it back to the correct time.
Note: The day is changed during the period from about 12:00 AM
to about 5:30 AM.
3. After the time is set, push the crown back to the “A” position.
The second hand will start running at the same time.
To Set the DATE (Quick change function):
1. Pull the crown out to the first click position “B”.
2. Set the date by rotating the crown backward (counter clock-
wise).
*The date must be set only at certain times. If the date is set be-
tween 9:00 PM and 12:00 AM, the date will not change correctly.
3. Push in crown to “A” position to set.
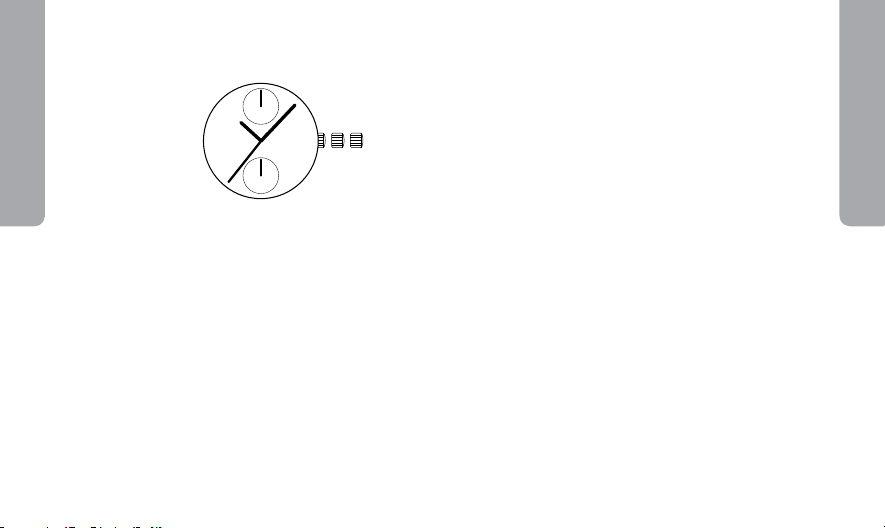
TWo EYES muLTI-FuNcTIoN modELS
To Set the DAY:
Set the day before setting the time.
1. Pull out the crown to second click position “C”.
2. Set the date by rotating the crown forward (to rotate the
hour and minute hands clockwise).
*If the day is set by rotating the crown backward (rotating
the hour and minute hands counter-clockwise), the date will
not be changed.
Note: The day is changed during the period from about
12:00 AM to about 5:30 AM.
3. Push in crown to “A” position to set.
multI-fuNctIoN
multI-fuNctIoN
A B C
1
2 3
1. Sweep Hand
2. Day Hand
3. Date Hand
To Set the DATE (Quick change function):
1. Pull the crown out to the first click position “B”.
2. Set the date by rotating the crown backward (counter
clockwise).
*The date must be set only at certain times. If the date is set
between 9:00 PM and 12:00 AM, the date will not change
correctly.
3. Push the crown back to normal position “A”.
TWo EYES muLTI-FuNcTIoN modELS
To Set the TIME:
1. Pull the crown out to the second click position “C” when the
second hand reaches the 12 o’clock position so that the second
hand stops there.
2. Then set the hour and minute hands.
*When setting the minute hand, adjust it to 4-5 minutes
earlier than the time to be set, and then turn it back to the
correct time.
Note: The day is changed during the period from about 12:00
AM to about 5:30 AM.
3. After the time is set, push the crown back to the “A” position.
The second hand will start running at the same time.
multI-fuNctIoN
multI-fuNctIoN
A B C
1. Second Hand
2. Date Hand
3. 24 Hour Hand
1
2
3

To Set the DATE: (Select models)
1. Pull out crown to first click position “B”.
2. Turn crown clockwise to correct date.
3. Push in crown to “A” position to set.
CHRONOGRAPH
The chronograph can measure up to 12 hours, 59 minutes and
59 seconds. Before using, ensure that both 12:00 and 9:00 eyes
are at zero/12 o’clock position or “60” and “12” respectively. If
not, press Pusher B to Reset.
To Use the CHRONOGRAPH:
1. Press Pusher A to Start.
2. Press Pusher A to Stop.
3. Press Pusher A to Restart.
4. Press Pusher B to Reset to zero.
When the chronograph measurement is within one minute.
1. The sweeping second hand indicates the seconds up to 59
chrono seconds.
When the chronograph measurement exceeds 1 minute.
1. The 12 o’clock eye hand indicates minutes up to 59 chrono
minutes.
2. The 9 o’clock eye hand indicates minutes up to 12 chrono
hours.
IMPORTANT
To conserve the battery life: Make sure that chronograph is
reset to zero when not in use.
cHroNogrApH modELS WITH 6/9/12 EYES
• This chronograph watch has TIME, DATE and CHRONOGRAPH
functions.
• The top eye (minutes) measures chronograph minutes, up to
maximum of 60 minutes.
• The left eye (hours) measures chronograph hours, up to 12
hours. It also shows measurement of Lap Time.
• The bottom eye (seconds) displays time seconds.
• Sweep second hand measures chronograph seconds, up to
60 seconds.
To Set the TIME:
1. Pull out crown to second click position “C”.
2. Sweeping second will turn and stop at “60” or 12
o’clock position.
3. Turn crown counter clockwise to correct time.
4. Push in crown to “A” position to set.
chroNoGraph
chroNoGraph
1. Chronograph Minute
2. Chronograph Hour
3. Time Second Hand
4. Chronograph Hand 1/5 Second
5. Calendar (Select models)
A B C
Pusher A
Pusher B
5
1
3
228
4

7. Press Pusher “B” again until the months start flashing. Now
press Pusher “C” to advance the months.
8. Press Pusher “B” until the days start flashing. Now press
Pusher “C” to advance the days.
9. At this point you can select the 12 or 24 hour format by
pressing Pusher “B” again and then pressing Pusher “C” to
toggle between formats.
To Set The ALARM:
1. Press Pusher “A” to select the current calendar mode.
2. Press Pusher “B” and hold for about 2 seconds until the
hours start flashing on the alarm time. Now press Pusher “C”
to advance the hours.
3. Press Pusher “B” again until the minutes start flashing. Now
Press Pusher “C” to advance the minutes.
4. Press Pusher “B” again to lock in the alarm time.
5. Pressing Pusher “C” after the alarm time is locked in will
activate the alarm or turn it off as indicated by the letter “A”
on the left of the display.
To Use The STOPWATCH:
To use the stopwatch, press Pusher “A” to enter the stopwatch
mode. Press Pusher “C” to start the timing. Press Pusher “C”
again to stop the timing. To clear the stopwatch, press
Pusher “B”.
ANALog-dIgITAL
3 HANdS W/ dIgITAL WINdoW
To Set The ANALOG TIME:
Pull the crown out to position B. Rotate the crown clockwise or
counterclockwise to set the hands to the desired time.
Push in crown to “A” position to set.
To Set The DIGITAL TIME AND CALENDAR:
1. Press Pusher “A” to select the current time mode.
2. Press Pusher “B” for about 2 seconds until the seconds start
flashing.
3. Pressing Pusher “C” will now reset the seconds to 00.
4. Press Pusher “B” again until the minutes start flashing. Now
press Pusher “C” to advance the minutes.
5. Press Pusher “B” again to set the hours. Hold until the hours
start flashing. Now press Pusher “C” to advance the hours.
6. Press Pusher “B” to select the current calendar mode.
aNaloG-dIGItal
aNaloG-dIGItal
A B
PUSHER A
(MODE)
PUSHER B
(SET)
PUSHER C
(START /
STOP)

ANALog-dIgITAL
3 HANdS W/ dIgITAL WINdoW
WorLd TImE
aNaloG-dIGItal
aNaloG-dIGItal

aNaloG-dIGItal
aNaloG-dIGItal

WATcH rEpAIr ANd SErVIcE
Please visit www.genevawatchgroup.com
for instructions and cost of repair service.
Geveva Watch Group
47-50 33rd Street
Long Island City, NY 11101
Tel: (800) 874-0907

LIFE IS A GAME, PLAY IT WELL.
RLXWR1
Table of contents


