ToneWorks Toneworks Pandora PX3 User manual
E G F 1

2
To ensure long, trouble-free operation, please
read this manual carefully.
Precautions
Location
Using the unit in the following locations can re-
sult in a malfunction.
• In direct sunlight
• Locations of extreme temperature or humidity
• Excessively dusty or dirty locations
• Locations of excessive vibration
Power supply
Please connect the designated AC adaptor to an
AC outlet of the correct voltage. Do not connect
it to an AC outlet of voltage other than that for
which your unit is intended.
Interference with other electrical devices
This product contains a microcomputer. Radios
and televisions placed nearby may experience
reception interference.Operate this unit at a suit-
able distance from radios and televisions.
Handling
To avoid breakage, do not apply excessive force
to the switches or controls.
Care
If the exterior becomes dirty, wipe it with a clean,
dry cloth.Do not use liquid cleaners such as ben-
zene or thinner, or cleaning compounds or flam-
mable polishes.
Keep this manual
After reading this manual, please keep it for later
reference.
Keeping foreign matter out of your equipment
• Never set any container with liquid in it near
this equipment. If liquid gets into the equip-
ment,itcould causea breakdown,fire,or elec-
trical shock.
• Be careful not to let metal objects get into the
equipment. If something does slip into the
equipment, unplug the AC adaptor from the
wall outlet.Then contact your nearest Korg
dealer or the store where the equipment was
purchased.

3
THE FCC REGULATION WARNING (for U.S.A)
This equipment has been tested and found to comply with the limits for a Class B digital device, pursuant to
Part 15 of the FCC Rules.These limits are designed to provide reasonable protection against harmful interfer-
ence in a residential installation.This equipment generates, uses, and can radiate radio frequency energy
and, if not installed and used in accordance with the instructions, may cause harmful interference to radio
communications.However, there is no guarantee that interference will not occur in a particular installation. If
this equipment does cause harmful interference to radio or television reception, which can be determined by
turning the equipment off and on, the user is encouraged to try to correct the interference by one or more of
the following measures:
• Reorient or relocate the receiving antenna.
• Increase the separation between the equipment and receiver.
• Connect the equipment into an outlet on a circuit different from that to which the receiver is
connected.
• Consult the dealer or an experienced radio/TV technician for help.
Unauthorized changes or modification to this system can void the user’s authority to operate this equipment.
CE mark for European Harmonized Standards
CE mark which is attached to our company’s products of AC mains operated apparatus until December 31, 1996
means it conforms to EMC Directive (89/336/EEC) and CE mark Directive (93/68/EEC).And, CE mark which is
attached after January 1, 1997 means it conforms to EMC Directive (89/336/EEC), CE mark Directive (93/68/
EEC) and LowVoltage Directive (73/23/EEC).
Also, CE mark which is attached to our company’s products of Battery operated apparatus means it conforms to
EMC Directive (89/336/EEC) and CE mark Directive (93/68/EEC).

4
Um einen langfristigen, einwandfreien
Betriebzu gewährleisten,lesen Siebitte
diese Bedienungsanleitung sorgfältig
durch.
Vorsichtsmaßnahmen
Aufstellung
Betreiben Sie das Gerät nicht in folgenden
Umgebungen, da dies zu Fehlfunktionen füh-
ren könnte:
• in direktem Sonnenlicht
• bei extremer Temperatur oder Luftfeuch-
tigkeit
• in extrem staubigen oder schmutzigen
Umgebungen
• unter dem Einfluß starker Vibrationen
Stromversorgung
Schließen Sie den mitgelieferten Wechsel-
stromadapter bitte nur an eine Steckdose mit
korrekter Netzspannung an. Schließen Sie den
Adapter nicht an eine Netzsteckdose an, die
eine Spannung liefert, für die Ihr Gerät nicht
vorgesehen ist.
Interferenzen bei anderen Elektroge-
räten
Dieses Produkt ist mit einem Mikrocompu-
ter ausgerüstet. Bei der Aufstellung in direk-
ter Nähe von Rundfunk-und Fernsehgeräten
kann deren Empfang durch Interferenzen ge-
stört werden. Betreiben Sie dieses Gerät des-
halb in ausreichender Entfernung von Rund-
funk- und Fernsehempfängern.
Handhabung
Bedienen Sie die Schalter und Regler nicht
mit übermäßiger Kraft, um Beschädigungen
zu vermeiden.
Reinigung
Wenn das Gehäuse verschmutzt ist, reinigen
Sie es mit einem trockenen, weichen Tuch.
Verwenden Sie keine flüssigen Reinigungs-
mittel, zum Beispiel Leichtbenzin, Verdün-
ner, Lösungsmittel oder brennbare Polituren.

5
* CE-Marke der EG-Norm
Die CE-Marke auf unseren netzgespeisten Geräten deutet auf deren Übereinstimmung mit den
EMC- und CE-Richtilinien der EG (respektive 89/336/EWG und 93/68/EWG) hin. DieseAb-
zeichen ist bis zum 3. Dezember 1996 gültig.
Die CE-Marke ab 1. Januar 1997 deutet auf Übereinstimmung mit den EMC-, CE- und Nieder-
spannungsstrom-Richtilinien der EG (respektive 89/336/EWG, 93/68/EWG und 93/68/EWG)
hin.
Die CE-Marke auf unseren batteriegespeisten Geräten deutet auf deren Übereinstimmung mit
den EMC- und CE-Richtilinien der EG (respektive 89/336/EWG und 93/68/EWG) hin.
Bedienungsanleitung
Nachdem Sie die Bedienungsanleitung gele-
sen haben, sollten Sie sie für den späteren
Gebrauch gut aufbewahren.
Fremdgegenstände
• Stellen Sie keine Behälter mit Flüssigkeit
in die Nähe dieses Geräts. Wenn Flüssig-
keiten in das Gerät gelangen, könnte dies
einen Systemausfall, Brand oder Strom-
schlag zur Folge haben.
• Achten Sie darauf, daß keine Metallgegen-
stände in das Gerät gelangen. Sollte dies
dennoch geschehen, ziehen Sie den Wech-
selstromadapter aus der Netzsteckdose.
Setzen Sie sich anschließend mit dem
nächstgelegenen Korg-Fachhändler oder
dem Geschäft in Verbindung, in dem Sie
das Gerät gekauft haben.

6
Précautions à prendre
Emplacement
L’utilisation de l’appareil dans les endroits
suivants risquerait d’être la cause d’un mau-
vais fonctionnement:
• Sous les rayons directs du soleil
• Dans des endroits de températures extrêmes
ou d’une humidité excessive.
• Dans des endroits excessivement sales ou
poussiéreux.
• Dans des lieux sujets à des vibrations ex-
cessives.
Alimentation DC9V
Veuillez raccorder l’adaptateur secteur four-
ni à une prise de courant fournissant la ten-
sion adéquate. Ne jamais le raccorder à une
prise d’un autre voltage que celui prévu pour
l’appareil.
Interférences avec d’autres appareils
électriques
Cet instrument contient un micro-ordinateur.
Les postes de radio et de télévision situés à
proximité peuvent par conséquent souffrir
d’interférences à la réception. Veuillez dès
lors faire fonctionner cet appareil à une dis-
tance raisonnable de postes de radio et de té-
lévision.
Manipulations
Pour éviter tout dommage, ne jamais exercer
une force excessive sur les interrupteurs ou
les commandes.
Entretien
Essuyer l’extérieur avec un chiffon propre et
sec. Ne jamais utiliser de détergents liquides
comme du benzène ou du thinner ni des com-
posants de nettoyage ou des cires inflamma-
bles.

7
* Marque CE de conformité aux normes de sécurité européennes
La marque CE attachée à nos produits alimentés par secteur indique que ces produits sont conformes à la
directive EMC (89/336/CEE) ainsi qu'à la directive relative à la marque CE (93/68/CEE).Cette marque est
valable jusqu'au 31 décembre 1996.
La marque CE attachée après le 1 janvier 1997 indique que ces produits sont conformes à la directive EMC
(89/336/CEE), à la directive relative à la marque CE (93/68/CEE) ainsi qu'à la directive relative au courant
de guitare tension (73/23/CEE).
Enfin, la marque CE attachée à nos produits alimentés par batterie indique que ces produits sont conformes
à la directive EMC (89/336/CEE) ainsi qu'à la directive relative à la marque CE (93/68/EEC).
Conserver le manuel
Après avoir lu attentivement le présent ma-
nuel, veuillez le conserver pour pouvoir le
consulter ultérieurement.
Tenir tout corps étranger à l’écart de
l’instrument:
• Ne jamais poser de récipient contenant du
liquide à proximité de l’instrument. La pé-
nétration de liquide dans l’instrument ris-
querait de provoquer une panne, un incen-
die ou un court-circuit.
• Veiller à ce qu’aucun objet métallique ne
tombe dans l’instrument. Si un corps étran-
ger a pénétré dans l’équipement, débrancher
l’adaptateur de la prise secteur puis contac-
ter le représentant Korg le plus proche ou le
magasin où l’équipement a été acheté.

8
Contents
Introduction ................................ 14
Main features.............................. 14
Turning on the power .................. 15
Battery Low display........................ 15
Controls and connectors .............. 16
LCD screen .................................. 17
Making connections..................... 18
Try it out ..................................... 19
Play mode .................................. 20
1.Selecting a program.................... 20
2.Master level ................................ 20
3.Bypass/Mute .............................. 20
4.Tuner .......................................... 21
Calibration (frequency of the standard A
pitch) ................................................ 22
5.HBB (Hyper Bass Boost) ............... 22
6. Specifying the function of the Value Dial
.................................................. 22
Rhythm & Bass mode .................. 24
1.Rhythm Pattern ........................... 24
2.Tempo ........................................ 24
3.Bass On/Off & Bass Key ............. 25
4.Rhythm & Bass Level ................... 25
AUX Effect mode ......................... 26
Phrase Trainer mode ................... 27

9
1.Select the recording mode ........... 27
2.Recording ................................... 28
3.Playback .................................... 28
4.Pause ......................................... 29
If you wish to re-record ..................... 29
Edit mode ................................... 30
1.Select the effect that you wish to edit
.................................................. 30
2.Editing each effect....................... 30
1) DRIVE ........................................... 30
2) TONE ............................................ 31
3) MOD (modulation) ......................... 31
4) AMB (ambience) ............................ 31
5) CR (cabinet resonator) ................... 32
6) NR (noise reduction) ...................... 32
7) LEVEL ............................................ 32
8) RENAME ....................................... 33
9) WRITE ........................................... 33
3.Reloading the factory programs .. 34
Troubleshooting........................... 35
Effect parameter list..................... 36
About the Intelligent Pitch Shifter........ 38
Preset-program list ...................... 40
Rhythm pattern list ...................... 41
Specifications .............................. 42

10
Inhalt
Einleitung ......................................44
Hauptmerkmale ............................44
Einschalten ....................................45
Batterieanzeige .................................45
Bedienelemente und Anschlüsse ..46
LCD-Display .................................47
Herstellen derAnschlüsse ............48
Ausprobieren .................................49
Play-Modus ...................................50
1. Auswahl eines Programms ..........50
2. MASTER LEVEL (Gesamtlautstär-
ke) ..................................................50
3.Bypass/Mute .................................50
4.Tuner (Stimmfunktion)................51
Kalibrierung (Frequenz des Referenz-
tons A).............................................. 51
5.HBB (Hyper Bass Boost) .............52
6.Festlegen der Funktion des Endlos-
reglers ............................................52
Der Rhythm & Bass-Modus.........54
1. Rhythm Pattern ............................54
2.Tempo ............................................54
3.Bass On/Off & Bass-Tonart.........55
4.Rhythm & Bass Level ..................55
AUX Effect-Modus .......................56

11
Phrase Trainer-Modus..................57
1. Auswahl des Aufzeichnungsmodus .
........................................................57
2. Aufzeichnung ................................58
3. Wiedergabe ...................................58
4. Pausenfunktion.............................59
Neuaufzeichnen einer Phrase ............59
Edit-Modus....................................60
1. Auswählen des zu bearbeitenden Ef-
fekts ...............................................60
2. Effektbearbeitung ........................60
1) DRIVE (Drive)................................60
2) TONE (Tone)...................................61
3) MOD (Modulation) ........................61
4) AMB (Ambience)............................61
5) CR (Cabinet Resonator) ................62
6)NR (Noise Reduction/Rauschunter-
drückung)........................................62
7) LEVEL (Pegel) ...............................63
8) RENAME (Umbenennung) ...........63
9) WRITE (Speichern) .......................63
3.Wiederherstellen der Werkspro-
gramme .........................................64
Fehlersuche....................................65
Effektparameterliste.....................67
Der „Intelligente Pitchshifter“ ..........69
Parameterliste der Preset-Program-
me ...................................................71
Auflistung der Rhythmus-Patterns .
........................................................72
Technische Daten ..........................73

12
Table des matière
Introduction ..................................74
Caractéristiques principales ........74
Mise sous tension ..........................75
Affichage de pile épuisée .................75
Commandes et connecteurs .........76
Ecran LCD ....................................77
Raccordements..............................78
Premier essai .................................79
Mode de jeu Play ..........................80
1. Sélection d’un programme ..........80
2. Niveau de volume général............80
3.Contournement/Assourdissement
(Bypass/Mute)...............................80
4.Accordeur .....................................81
Calibrage (fréquence de la hauteur du
La standard) ...................................82
5.HBB (Accentuation des extrêmes
graves) ...........................................82
6.Définition de la fonction du disque
de valeurs ......................................82
Mode de rythmes et de basses......84
1.Motif rythmique ...........................84
2.Tempo ............................................84
3. Activation/Désactivation des basses
et tonalité des basses ....................85
4. Niveau rythmique et de basse .....85

13
Mode d’effet AUXILIAIRE “AUX
Effect” ............................................86
Mode de pratique des phrases .....87
1. Sélection du mode d’enregistrement
........................................................87
2. Enregistrement .............................88
3. Reproduction ................................89
4. Pause..............................................89
Pour réenregistrer ..............................90
Mode d’édition “Edit”..................90
1. Sélectionner l’effet à éditer..........90
2. Edition de chacun des effets ........91
1) DRIVE (Drive)................................91
2) TONE (Tonalité) .............................91
3) MOD (Modulation) ........................91
4) AMB (Ambience)............................92
5) CR (Résonateur de coffret) ...........92
6) NR (Réduction des bruits) .............93
7) LEVEL (Niveau).............................93
8) RENAME (Réassignation de nom)93
9) WRITE (Sauvegarde) ....................94
3.Réinitialisation aux programmes
d’usine ...........................................94
Guide de dépannage .....................95
Liste des paramètres des effets....97
A propos du Pitch Shifter intelligent 99
Liste des programmes présélection-
nés.................................................101
Liste des motifs rythmiques .......102
Spécifications techniques ...........103

14
Introduction
Thank you for purchasing the Korg Tone
Works PANDORA PX3 Personal Multi Effect
Processor. In order to enjoy long and trouble-
free use, please read this owner’s manual and
use the product correctly. Keep this manual in a
safe place for future reference.
Main features
PANDORA is a multi-function yet compact-sized
effect unit.
56 types of effect variations
A maximum of seven effects can be used simul-
taneously.
50 user programs and 50 preset programs
IPE (Integrated Parameter Edit) system
Easy to adjust effect settings.
AutoTuner function
This feature makes tuning fast and easy.You can
also tune without being heard (i.e., while muted).
Backlit LCD
The LCD screen can be easily viewed even in
dark locations.
Rhythm and Bass function
You can play forty different rhythm and bass pat-
terns.
AUX Effect function
The sound of a CD player or other audio source
connected to the AUX jack can be transposed,
or center-cancelled.
PhraseTrainer function
A segment of audio (maximum 16 seconds) re-
corded from a CD player or other audio source
can be looped for repeated playback.You can
even slow down the playback speed without af-
fecting the pitch.
Cabinet Resonator
Select the desired type of speaker cabinet reso-
nance from six types of guitar amp cabinets.
15
HBB (Hyper Bass Boost)
Boosts low frequency response.
Value dial
This lets you rapidly select programs or edit the
effects.
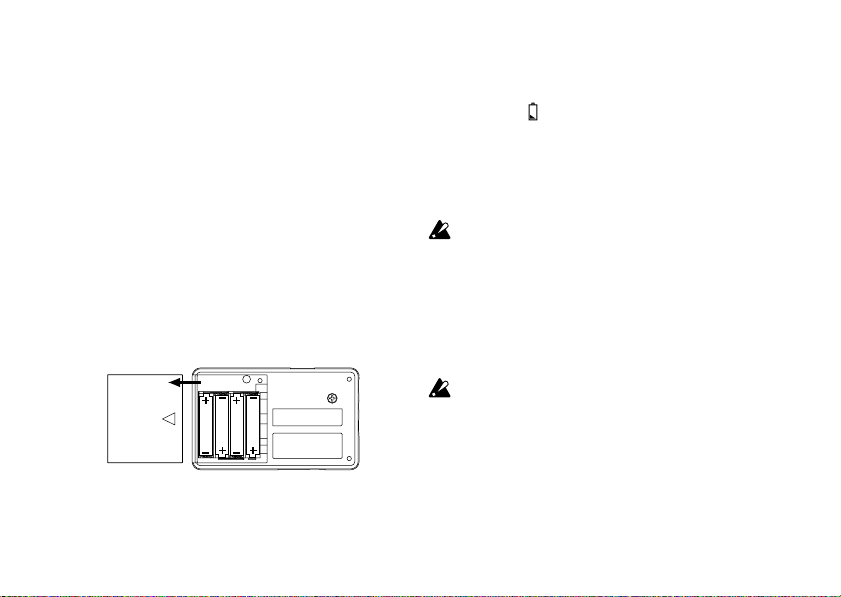
Turning on the power
Remove the battery cover located on the bottom
of the base by sliding it in the direction of the
arrow. Insert four AAA alkaline batteries (sold
separately) as shown in the illustration.Be care-
ful to insert the batteries in the correct orienta-
tion.
Battery Low display
When the battery begins to run down, the Low
Battery icon will light. When this icon lights,
replace the battery as soon as possible.
Programs and other data (except for the data
being edited) will not be lost even if the battery is
removed.
Batteries that have run down must be re-
moved from the PANDORA. If you leave dead
batteries in the unit, malfunctions (battery
leakage, etc.) may occur.You should also
remove the batteries when you do not ex-
pect to use the PANDORA for an extended
period.
Batteries and an AC adapter are not includ-
ed with this product.They must be purchased
separately.

16
3Value dial
Use this to adjust master level,
editeffects, andselect programs.
4OUTPUT jack
Connect this jack to your guitar
amp or headphones etc.
5AUX jack (stereo)
Connect this jack to a CD play-
er etc.
6INPUT jack
Connect this jack to your guitar.
7+/- buttons
Use these buttons to select pro-
grams, edit effects, and adjust
the master level.
8Input level switch
Set this as appropriate for the
output level of your guitar.
9EDIT √ [ ]/®[HOLD]
buttons
Use these buttons to select the
parameter that you wish to edit,
and to operate the PhraseTrain-
er function.
0HBB (Hyper Bass Boost)
button
This button turns the HBB func-
tion on/off.
APHRASE TRAINER [ ]
button
This button enters PhraseTrain-
er mode.This is also used to be-
gin recording on the Phrase
Trainer.
BBYPASS·TUNE [ ] but-
ton
Use this button when you wish
to tune in Play mode. (The
PANDORA will be bypassed or
Controls and connectors
1Power switch/Backlight
switch
This switch turns the power on/
off, and also turns the backlight
on/off.
When batteries are used,
leaving the backlight ON for
an extended period will
shorten battery life.
2DC9V
The separately sold AC adapt-
er (DC9V ) can be con-
nected here.
17
muted.)This is also used to turn
the effects on/off and to play-
back/pause the PhraseTrainer.
CRHYTHM/AUX EFFECT
button
This button enters Rhythm &
BassmodeorAUXEffectmode.
DEXIT button
This button returns you from
any mode back to Play mode.
This button is also used to as-
sign a function to theValue dial.
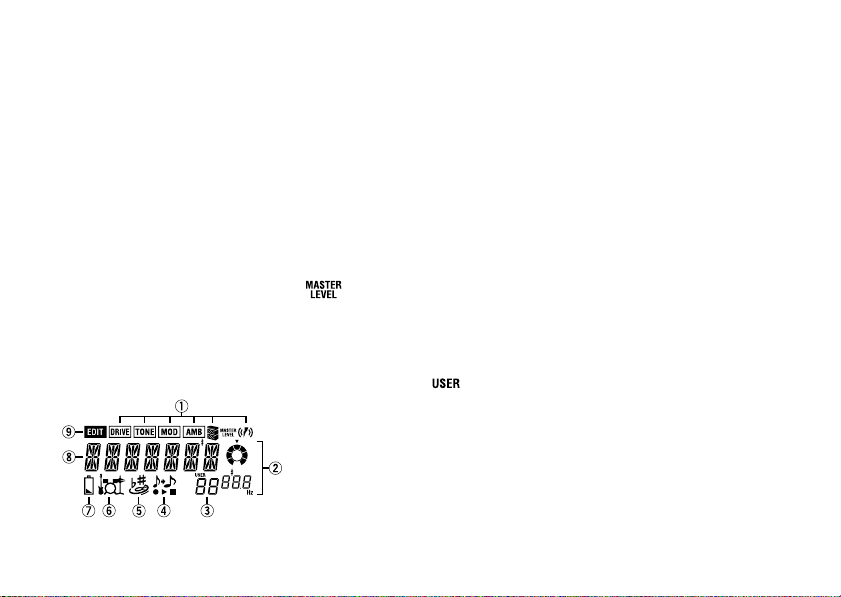
LCD screen
1Effect chain
This indicates the on/off status
of Drive, Modulation, Ambience,
Cabinet Resonator, and HBB.
2Value display
This area indicates the master
level or parameter values both
numerically and graphically.
(Whenthemaster levelis shown,
the MASTER LEVEL indicator
will light.)
3Program number display
This indicates the program
number.(When a user program
is selected, the indicator
will light.)
4PhraseTrainer mode icon
This icon will blink when you en-
ter Phrase Trainer mode.
5AUX Effect mode icon
This icon will blink when you en-
ter AUX Effect mode.
6Rhythm & Bass mode icon
This icon will blink when you en-
ter Rhythm & Bass mode.
7Low Battery icon
This icon will light when the bat-
teries run down.
8Program name/Effect type
display
This area shows the program
name or effect type.When the
PANDORA is bypassed or mut-
ed, this area will function as the
tuning meter.
9Edit mode icon
This icon will light when you
enter Edit mode.

18
Making connections
For all equipment being connected, turn the pow-
er OFF and lower the volume.
*1Connecting cables are sold separately.
*2PANDORA’s output jack is stereo. If you use
a standard mono cable to connect it to a gui-
tar amp etc., only the L (left) output will be
heard.
*3If a CD player or other audio source is con-
nected to AUX jack, you can play along on
your guitar with a tape, etc. However the vol-
ume must be adjusted on the connected de-
vice.
*4Be sure to use only the specified AC adapter
(DC9V ).
*5PANDORA’s output level and sound quality
will vary depending on which headphones are
used.We recommend using good quality low
impedance headphones, 32 Ohms or less with
a sensitivity rating near 100dB/mW or above.
Many headphones sold for use with portable
CD or cassette players will work just fine.

19
Try it out
1When you finish making connections,set
the power switch in the“ON”position. (This
setting is referred to as Play mode.)
Use the +/- buttons to select a program.
Select a clean-type program that will be suit-
able for setting the volume. (As an example
here, we will select Program 5 “WES”.)
Program name Program number
2Set the input level switch to a position ap-
propriate for the output level of your gui-
tar.
Input level switch
H:Guitars with a high output level (humbuck-
ing pickups) or basses
L: Guitars with a low output level (single coil
pickups)
3Set the volume control of the guitar to its
usual position.
Use the Value dial to adjust the master level.
Master level
Value dial

20
2. Master level
When MASTER LEVEL is lit, the master level is
shown in the value display.
Value display
Value dial
Immediately after the power is turned on, you
will be able to adjust the master level using the
Value dial.You can also use the +/- buttons to
adjust the master level. (☞p.22)
The master level is remembered even when the
power is turned off.
3. Bypass/Mute
When you press the BYPASS·TUNE button, the
PANDORA will be bypassed, and the original
sound will not be processed by any effect.
The effect chain will blink, and the display will in-
dicate “BYPASS”for approximately one second.
Play mode
Play mode is the mode in which you will normal-
ly use PANDORA.
1. Selecting a program
You can select programs (types of sound) from
50 user programs and 50 preset programs.Use
the +/- buttons to select a program.
If a user program is selected, the display will in-
dicate “”above the program number.
Programs can also be selected when you are in
Rhythm & Bass mode, AUX Effect mode, or
Phrase Trainer mode.
Table of contents
Languages:
Other ToneWorks Music Pedal manuals

ToneWorks
ToneWorks Ampworks Product information sheet

ToneWorks
ToneWorks Pandora PX2 User manual

ToneWorks
ToneWorks AX5G User manual

ToneWorks
ToneWorks 104ds User manual

ToneWorks
ToneWorks Toneworks Pandora PX4 User manual

ToneWorks
ToneWorks Toneworks AX3G User manual

ToneWorks
ToneWorks Toneworks Pandora PX4 Product information sheet


