TOOL WAREHOUSE TDS150EBL3 User manual

BENCH GRINDER
TDS150EBL3
2
1
2
3
4
6
7
7
4
3
2
1
6
5
5
4
4 ba
2.1
2
1

3
f
e1
f
1
5
e
2
5
cc
6
c
5
3 4
4.1 4.2
5 5.1

4
Explanation of the symbols on the equipment
Warning! In case of non-compliance, risk of injury to life, risk of injury or damage to
the tool!
Warning - Read the operating instructions to reduce the risk of inquiry
Wear ear-mus. The impact of noise can cause damage to hearing.
Wear a breathing mask. Dust which is injurious to health can be generated when
working on wood and other materials. Never use the device to work on any materials
containing asbestos!
Wear safety goggles. Sparks generated during working or splinters, chips and dust
emitted by the device can cause loss of sight.
Warning! Before installation, cleaning, alterations, maintenance, storage and trans-
port switch o the device and disconnect it from the power supply.
A grindstone must never be used on the brush side of the machine.

5
Table of contents: Page:
1. Introduction................................................................................ 6
2. Layout........................................................................................ 6
3. Scope of delivery....................................................................... 6
4. Proper use................................................................................. 6
5. Safety instructions..................................................................... 7
6. Technical Data........................................................................... 9
7. Assembly................................................................................... 10
8. Operation................................................................................... 11
9. Cleaning and maintenance ....................................................... 11
10. Electrical connection ................................................................. 11
11. Storage...................................................................................... 12
12. Disposal and recycling .............................................................. 12

6
1. Introduction
Manufacturer:
scheppach
Fabrikation von Holzbearbeitungsmaschinen GmbH
Günzburger Straße 69
D-89335 Ichenhausen
Dear Customer,
we hope your new tool brings you much enjoyment
and success.
Note:
According to the applicable product liability laws, the
manufacturer of the device does not assume liability
for damages to the product or damages caused by
the product that occurs due to:
• Improper handling,
• Non-compliance of the operating instructions,
• Repairs by third parties, not by authorized service
technicians,
• Installation and replacement of non-original spare
parts,
• Application other than specied,
• A breakdown of the electrical system that occurs
due to the non-compliance of the electric regu-
lations and VDE regulations 0100, DIN 57113 /
VDE0113.
We recommend:
Read through the complete text in the operating in-
structions before installing and commissioning the
device.
The operating instructions are intended to help the
user to become familiar with the machine and take
advantage of its application possibilities in accord-
ance with the recommendations.
The operating instructions contain important infor-
mation on how to operate the machine safely, pro-
fessionally and economically, how to avoid danger,
costly repairs, reduce downtimes and how to in-
crease reliability and service life of the machine.
In addition to the safety regulations in the operating
instructions, you have to meet the applicable regula-
tions that apply for the operation of the machine in
your country.
Keep the operating instructions package with the
machine at all times and store it in a plastic cover to
protect it from dirt and moisture. Read the instruction
manual each time before operating the machine and
carefully follow its information. The machine can only
be operated by persons who were instructed con-
cerning the operation of the machine and who are in-
formed about the associated dangers. The minimum
age requirement must be complied with.
In addition to the safety notices contained in this
operating manual and the particular instructions for
your country, the generally recognised technical reg-
ulations for the operation of identical devices must
be complied with.
We accept no liability for damage or accidents which
arise due to non-observance of these instructions
and the safety information.
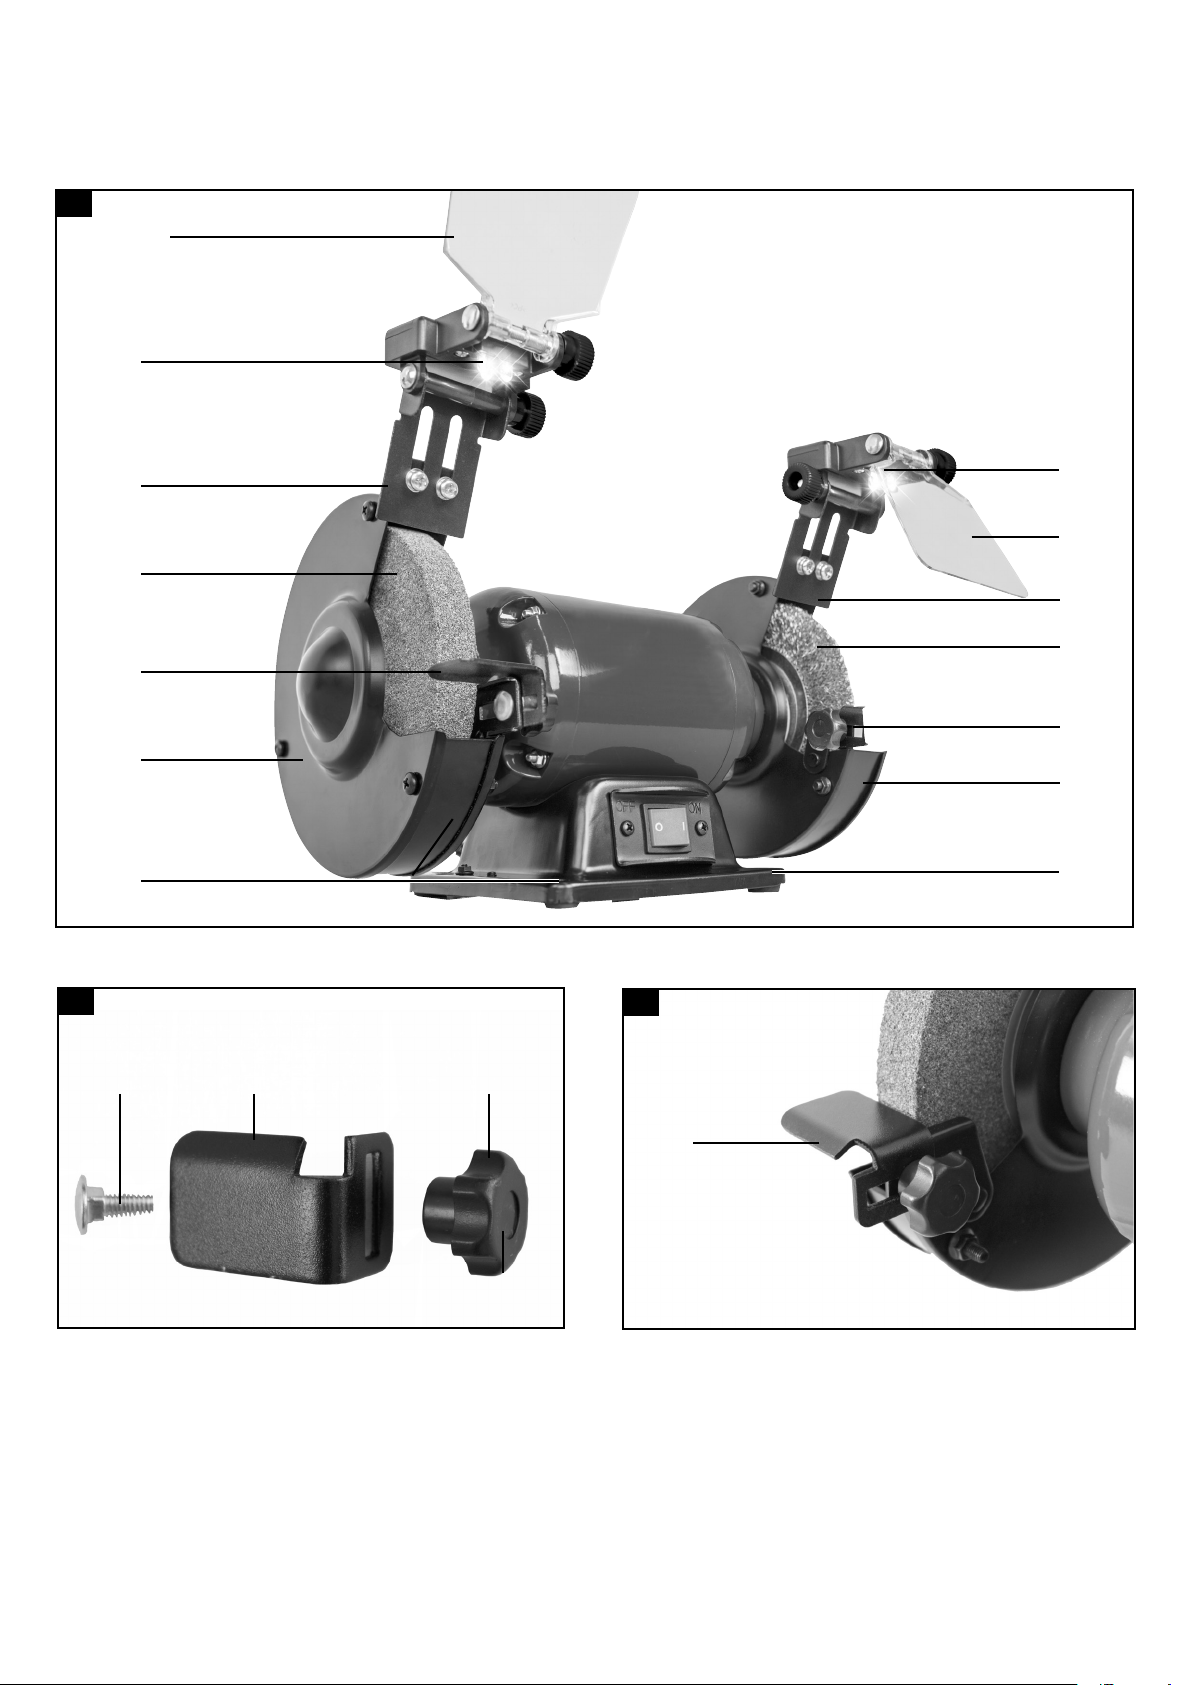
2. Layout (Fig. 1)
Know your bench grinder
1. Eye shield
2. Spark guard
3. Grinding wheel (36 grit) / Brush
4. Work rest
5. LED work lamp
6. Wheel Guard
7. Bolt Hole for Bench Mounting
8. Main Switch (On/O)
3. Scope of delivery
• Open the packaging and remove the device care-
fully.
• Remove the packaging material as well as the
pack aging and transport bracing (if available).
• Check that the delivery is complete.
• Check the device and accessory parts for trans-
port damage.
• If possible, store the packaging until the warranty
period has expired.
Attention
The device and packaging materials are not toys!
Children must not be allowed to play with plastic
bags, lm and small parts! There is a risk of swal-
lowing and suocation!
4. Proper use
The double-wheel grinder is a combination tool for
the grinding and polishing of metals, plastics and oth-
er materials using the appropriate grinding wheels.
The machine meets the currently valid EU machine
directive.
• The manufacturer’s safety, operation and main-
tenance instructions as well as the technical data
given in the calibrations and dimensions must be
adhered to.
• Relevant accident prevention regulations and oth-
er generally recognized safety and technical rules
must also be adhered to.

7
• The machine may only be used, maintained or re-
paired by trained persons who are familiar with the
machine and have been informed about the dan-
gers. Unauthorized modications of the machine
exclude a liability of the manufacturer for damages
resulting from the modications.
• The machine is intended for use only with original
spare parts and original tools from the producer.
• The equipment is allowed to be used only for its
prescribed purpose. Any other use is deemed to
be a case of misuse. The user/operator and not
the manufacturer will be liable for any damage or
injuries of any kind resulting from such misuse.
• Please note that our equipment has not been de-
signed for use in commercial, trade or industri-
al applications. Our warranty will be voided if the
equipment is used in commercial, trade or indus-
trial businesses or for equivalent purposes.
Residual risks
The machine is allowed to be used only for its in-
tended purpose! Even when the equipment is used
as prescribed it is still impossible to eliminate cer-
tain residual risk factors. The following hazards may
arise in connection with the machine‘s construction
and layout:
• Contact with the grinding wheel where it is not-
covered.
• Catapulting of parts from out of damaged grind-
ing wheels.
• Catapulting of workpieces and parts of workpiec-
es.
• Damage to hearing if essential ear-mus are not
used.
• Lung damage if no suitable protective dust mask
is used.
• Health damage caused by hand-arm vibrations if
the equipment is used over a prolonged period or
is not properly guided and maintained.
• The use of incorrect or damaged mains cables can
lead to electrical injuries.
• Although having regarded all considerable rules
there may still remain not obvious remaining haz-
ards.
• Minimize remaining hazards by following the in-
structions in ”Safety Rules”, ”Use only as author-
ized” and in the entire operating manual.
5. Safety instructions
Caution! In order to protect yourself from the danger
of electric shock, injury or re when using electri-
cal power tools, please observe the following basic
safety precautions. Read all these requirements be-
fore you use the electrical power tool, and keep the
safety advice in a safe place.
Working safely
1. Keep your working area clean and tidy.
• A disorderly working area can lead to acci-
dents.
2. Be aware of the eects of the environment.
• Do not leave electrical power tools out in the
rain.
• Do not use electrical power tools in moist or
wet surroundings.
• Ensure that your working area is well lit.
• Do not use electrical power tools in areas
where there is risk of re or explosion.
3. Protect yourself from electric shock.
• Avoid touching earthed objects such as pipes,
heating radiators, ovens or refrigerators with
parts of your body.
4. Keep other people at a safe distance.
• Do not allow other people, in particular chil-
dren, to touch the electrical power tool or the
mains lead. Keep them away from your work-
ing area.
5. Store currently unused electrical power tools in
a safe place.
• When not being used electrical power tools
should be stored in dry conditions in a high or
enclosed place, out of reach of children.
6. Do not overload your electrical power tool.
• By keeping within the specied working range
of the tool you will work more safely and
achieve a better result.
7. Use the right electrical power tool for the task.
• Do not use low-output devices for heavy tasks.
• Do not use an electrical power tool for purpos-
es for which it was not intended. For example,
do not use a hand operated circular saw for
trimming tree branches or cutting logs.
8. Wear suitable clothing.
• Do not wear loose-tting clothing or jewellery.
They could become caught on moving parts.
• We recommend that you wear anti-slip foot-
wear when working outdoors.
• If you have long hair, wear a hair net.
9. Use personal protective equipment.
• Wear protective glasses.
• Wear a dust mask if your work generates dust.
10. Attaching the vacuum dust extraction device.
• Where there are connection points provided for
vacuum dust extraction please ensure that the
connections are made and used properly.

8
• Damaged safety equipment and components
must be properly repaired or replaced at a
competent electrical equipment repair centre
unless otherwise indicated in the operating in-
structions.
• Damaged switches must be replaced at a Cus-
tomer Service Centre.
• Never use an electrical power tool that cannot
be switched on and o properly.
21. Caution!
• The use of inserted tools and accessories other
than those recommended by the manufacturer
could lead to you being injured.
22. Have your electrical power tool repaired at an
electrical equipment repair specialist.
• This electrical power tool complies with the rel-
evant safety regulations. Repairs may only be
carried out by a specialist electrical repair cen-
tre using original spare parts, otherwise injury
could occur to the user.
Warning! This electric tool generates an electro-
magnetic eld during operation. This eld can im-
pair active or passive medical implants under certain
conditions. In order to prevent the risk of serious
or deadly injuries, we recommend that persons with
medical implants consult with their physician and the
manufacturer of the medical implant prior to operat-
ing the electric tool.
Safety advice relating specically to bench
grinders
• Do not touch the mains lead if it becomes dam-
aged or cut through while you are using the device.
Pull the plug out of the mains socket immediately
and have the device repaired by a suitably quali-
ed person or at your service centre.
• Do not operate the device if it is damp and do not
use it in a damp environment.
• If you use the device outdoors, always connect
it through a residual current device (RCD) with a
maximum trip current of 30 mA. If using an ex-
tension lead, always use one that is approved for
outdoor use.
• If a dangerous situation arises, pull the mains plug
immediately out of the mains socket.
• Always work with the mains lead leading away
from the rear of the device.
• Danger of re from ying sparks ! Grinding metal
creates ying sparks. For this reason, always make
sure that nobody is placed in any danger and that
there are no inammable materials near the work-
ing area.
• Warning! Noxious fumes! Working with harmful /
noxious dusts represents a risk to the health of the
person operating the device and to anyone near
the work area.
11. Do not use the mains lead for purposes for which
it was not intended.
• Do not use the mains lead to pull the plug out of
the mains socket. Protect the mains lead from
heat, oil and sharp edges.
12. Securely support the workpiece.
• Use clamps or a vice to grip the workpiece
rmly. This is much safer than holding it with
your hand.
13. Avoid placing your body in an unnatural position.
• Keep proper footing and balance at all times.
14. Look after your tools carefully.
• Keep cutting tools sharp and clean. This way
you will work more safely and achieve better
results.
• Follow the advice on tool lubrication and con-
sumables replacement.
• Check the condition of the mains lead on your
electrical power tool regularly and have any
damage repaired by a competent specialist.
• Check the condition of extension leads regu-
larly and replace them if they are damaged.
• Keep handles and hand grips clean, dry and
free of oil and grease.
15. Pull the mains plug out of the mains socket.
• Do this if the electrical power tool is not being
used, before carrying out maintenance tasks
on the electrical power tool and whenever you
are changing inserted tools, e.g. saw blades,
drills or router bits.
16. Make sure that no spanners, keys etc. are left
attached.
• Check before switching on that all spanners,
keys and setting tools have been removed.
17. Avoid unintentionally starting up the device.
• Check that the switch is set to OFF on the de-
vice when the mains plug is inserted into the
mains socket.
18. Using an extension lead for working outdoors.
• When working outside, always use an approved
and appropriately labelled extension lead.
19. Remain alert.
• Watch what you are doing. Proceed with cau-
tion. Do not use electrical power tools if you
cannot concentrate.
20. Check the electrical power tool for damage.
• Before the electrical power tool is used, care-
fully check the safety equipment and any slight-
ly damaged parts to see that they are still work-
ing properly.
• Check that all moving parts on the tool are
working properly, can move freely and are not
damaged. All parts must be correctly attached
and full all the requirements necessary to al-
low the electrical power tool to operate prop-
erly.

9
• The adjustment of the work rest shall be made
frequently, so as to compensate the wear of the
wheel, keeping the distance between the work rest
and the wheel as small as possible, and no greater
than 2 mm.
• Use wheels that have a bore exactly equal to the
arbor of the grinder. Do not attempt to machine an
• Do not overtighten wheel nut.
• Do not grind on a cold wheel. The grinding wheel
should be started and run at idle speed for one
minute before applying the work.
• Do not grind on the side of the wheel. Grind on the
face of the wheel only.
• Do not apply coolant directly to a grinding wheel.
Coolant can weaken the bonding strentgh of the
wheel and cause it to fail.
• Sparks are a hazard. Do not grind near gas or
• Stand to one side of the wheel when turning on the
power. Dress the wheel on the face only. Dressing
the side of the wheel can cause it to become too
thin for safe use.
• Grinding creates heat. Do not touch the work piece
• Use grinding wheels that are rated for safe use on
the grinder. Do not use a wheel that is rated lower
than the grinder speed.
• Do not use any damaged or deformed grinding
wheels or brushes.
• Only use grinding wheels and brushes marked with
a rotational speed which is at least as high as the
speed indicated on the rating plate of the electrical
tool.
• Always leave the brush fastened to the spindle in
order to limit the risk of contact with the rotating
spindle.
6. Technical Data
Delivery
Bench Grinder
TDS150EBL3
User’s Manual
Technical Data
Dimensions L x W x H 380 x 210 x 280 mm
Grinding disc max. ø 150 mm
Grinding disc min. (after
wear and tear) ø 110 mm
Brush max. ø 150 mm
Brush min. (after wear) ø 120 mm
Grinding disc bore max ø 12,7 mm
Brush bore max. 20 mm
Brush width 13,5
Lamp LED with battery (2x)
Weight 7 kg
• Wear protective glasses, hearing protection, dust
protection mask and protective gloves.
• Danger of burns! The workpiece gets hot during
grinding. Never touch the part you are grinding.
grinding for longer periods, stop grinding from time
to time and allow the workpiece to cool before con-
tinuing. Do not operate the device for continuous
periods exceeding 10 minutes.
• The double grinding machine is intended for dry
grinding of the surfaces of metal objects. The de-
vice may only be used for dry grinding.
• Do not grind materials containing asbestos. As-
bestos is a known carcinogen.
• Do not use damaged grinding wheels.
• Only use grinding wheels with details that corre-
spond with those given on the device ratin plate. The
circumferential speed should be equal to or greater
than the value given on the device rating plate.
•
the eye guards periodically so that wear on the
grinding wheels can be evened out. Keep the gap
as small as possible.
• Avoid contact with the moving grinding wheel.
• Never leave the device working unattended.
• Never use the device for a purpose for which it
was not intended.
• Before you insert the mains plug into the socket,
• Always switch the device on before bringing the
workpiece into contact with the grinding wheel. Af-
•
times when working.
• Always keep proper footing and balance.
•
grinding wheel(s) to come to a standstill.
• When taking a break from your work, before car-
rying out any tasks on the device itself and when
you are not using the device, always pull the mains
plug out of the mains socket.
• Handle the device carefully and treat it with re-
spect. Always keep the device clean, dry and free
of oil or grease.
• Remain alert at all times! Always watch what you
are doing and proceed with caution. Do not use
the device if you cannot concentrate or you are
feeling unwell.
• Store grinding wheels in such a way that they are
not subject to mechanical loads or damaging en-
• Do not use damaged or unshaped wheels.
• The adjustment of the spark guard shall be made
frequently, so as to compensate the wear of the
wheel, keeping the distance between the guard
and the wheel as small as possible, and no greater
than 2 mm.

10
7. Assembly
Before you connect the equipment to the mains sup-
ply make sure that the data on the rating plate are
identical to the mains data.
Always pull the power plug before making adjust-
ments to the equipment.
Pull the power plug before doing any maintenance
or assembly work on the equipment.
• The machine must be set up so that it stands rm-
ly, i.e. it must be securely screwed to a work bench
or similar.
• All covers and safety devices have to be properly
tted before the equipment is switched on.
• The grinding wheels must rotate freely.
• Check that the voltage on the rating plate is the
same as your supply voltage before you connect
the equipment to the power supply.
Warning! Never connect the plug to power source
outlet until all installations and adjustments are com-
pleted and you have read and understood the safety
and operation instructions.
Tool support (left and right) (Fig. 1, 2, 2.1)
Fasten the tool support (4) to the grinding wheel
guard (6) with the mushroom head screw (M6x10) (a)
and the star grip nut (b).
The distance between wheel and work rest should
not exceed 2 mm.
Spark guard with LED work lamp (left and right)
(Fig. 1, 3)
Fasten the spark guard (2) with LED work lamps (5)
to the grinding wheel guard (6) with two M5x8 pan
head screws (c).
The distance to the grinding wheel (3) should be not
more than 2 mm. The distance between the spark
guard (2) and the grinding wheel (3) can be adjusted
by slackening the two pan head screws (c). Tighten
the screws securely.
LED work lamp (Fig. 1, 4, 4.1, 4.2)
The lighting (5) can be switched on by pressing the
switch (d) on the lamp. The lighting is switched o
by pressing the switch again.
Open the battery compartment (Fig. 4.1) to insert/
change the batteries (2xAAA R03 1.5 V) . Insert the
batteries (2x on each side) (Fig. 4.2). If you change
the batteries dispose of the used batteries properly.
Replace the cover of the battery compartment in re-
verse order (Fig 4.1).
Safety screens (Fig. 1, 5, 5.1)
Install the safety screen (1) on the LED work lamp (5)
with the M5x55 mushroom head screw (e) and the
knurled head screw (f).
Motor
Motor 230~/50 V/Hz
Input power S2 10 min 400 W
Motor speed 2850 /min
Subject to technical changes!
Load factor:
A load factor of S2 10 min (intermittent periodic duty)
means that you may operate the motor continuously
at its nominal power level (400 W) for no longer than
10 minutes ON period. If you fail to observe this time
limit the motor will overheat. During the OFF period
the motor will cool again to its starting temperature.
Sound and vibration
Sound and vibration values were measured in ac-
cordance with EN 61029.
LpA sound pressure level 78,8 dB(A)
KpA uncertainty 3 dB
LWA sound power level 91,8 dB(A)
KWA uncertainty 3 dB
Wear ear-mus.
The impact of noise can cause damage to hearing.
Total vibration values (vector sum of three directions)
determined in accordance with EN 61029.
Vibration emission value ah ≤ 2.5 m/s2
K uncertainty = 1.5 m/s2
Warning!
The specied vibration value was established in ac-
cordance with a standardized testing method. It may
change according to how the electric equipment is
used and may exceed the specied value in excep-
tional circumstances.
The specied vibration value can be used to com-
pare the equipment with other electric powertools.
The specied vibration value can be used for initial
assessment of a harmful eect.
Keep the noise emissions and vibrations to a
minimum.
• Only use appliances which are in perfect working-
order.
• Service and clean the appliance regularly.
• Adapt your working style to suit the appliance.
• Do not overload the appliance.
• Have the appliance serviced whenever necessary.
• Switch the appliance o when it is not in use.
• Wear protective gloves.

11
• Examine the new grinding wheels on cracks or
other visible damages and dispose if necessary.
• Mount ange and nut again.
• Do not tighten the screw by force. This can cause
the grinding wheel to break.
• Re-install the grinding wheel guard (6) in the re-
verse order.
• Mount work rest, spark guard and eye shield ac-
cording to installation instructions.
9. Cleaning and maintenance
Always pull out the mains power plug before starting
any cleaning work.
Cleaning
• Keep all safety devices, air vents and the motor
housing free of dirt and dust as far as possible.
Wipe the equipment with a clean cloth or blow it
with compressed air at low pressure.
• We recommend that you clean the device immedi-
ately each time you have nished using it.
• Clean the equipment regularly with a moist cloth
and some soft soap. Do not use cleaning agents or
solvents; these could attack the plastic parts of the
equipment. Ensure that no water can seep into the
device. The ingress of water into an electric tool
increases the risk of an electric shock.
Maintenance
There are no parts inside the equipment which re-
quire additional maintenance.
Service information
Please note that the following parts of this product
are subject to normal or natural wear and that the fol-
lowing parts are therefore also required for use as
consumables.
Wear parts*: grinding medium, Carbon brushes,
sharpening wheel, angle gauge, v-belt
* Not necessarily included in the scope of delivery!
10.Electrical connection
The electrical motor installed is connected and
ready for operation. The connection complies
with the applicable VDE and DIN provisions.
The customer‘s mains connection as well as
the extension cable used must also comply with
these regulations.
Damaged electrical connection cable
The insulation on electrical connection cables is of-
ten damaged.
This may have the following causes:
• Passage points, where connection cables are
passed through windows or doors.
The guard is individually adjustable, as to protect the
users eyes during grinding process.
8. Operation
On/O switch (8)
• To switch on the equipment set the On/O switch
(8) to position On.
• Move the On/O switch (8) to position O to switch
o the equipment.
After switching on, wait for the equipment to reach
its maximum speed of rotation. Only then should you
begin with the grinding.
Work practice
• Exert only moderate pressure on the workpiece so
that it can be machined at constant speed.
• Instead of accelerating your work, high pressure
will cause the drive unit to slow down and even
stop, thus overloading the motor.
• For your own safety, it is essential to secure small
workpieces with a screw clamp or vise.
Grinding
• Place the workpiece onto the workpiece support
(4) and slowly guide the workpiece towards the
grinding wheel (3) at the desired angle to the point
where workpiece and grinding wheel make con-
tact.
• Move the workpiece slightly back and forth to pro-
duce an optimal grinding result. This way the grind-
ing wheel (3) will be evenly worn. Allow the work-
piece to cool down occasionally.
Important!
If the grinding wheel becomes jammed during op-
eration, remove the workpiece and wait until the tool
reaches its top speed again.
Changing the grinding wheels
Important note: In order to prevent injuries from ac-
cidentally starting the machine the machine’s main
switch must be turned o before changing a grinding
wheel. Pull power plug!
• Loosen the spark gard and the eye shield and pull
out as far as possible. Do not remove these parts!
• Loosen work rest and pull out as far as possible.
• Undo the screws of the grinding wheel guard (6)
and remove the guard.
• Take o outside ange and the old grinding wheel,
then assemble the new one.
Important note:
• Do not remove the pieces of card board on the
sides of the wheel, as they are intended for
strengthening the grip of the Flange against the
grinding wheels.

12
Old devices must not be disposed of with house-
hold waste!
This symbol indicates that this product must
not be disposed of together with domestic
waste in compliance with the Directive
(2012/19/EU) pertaining to waste electrical
and electronic equipment (WEEE). This product must
be disposed of at a designated collection point. This
can occur, for example, by handing it in at an author-
ised collecting point for the recycling of waste elec-
trical and electronic equipment. Improper handling
of waste equipment may have negative consequenc-
es for the environment and human health due to po-
tentially hazardous substances that are often con-
tained in electrical and electronic equipment. By
properly disposing of this product, you are also con-
tributing to the eective use of natural resources.
You can obtain information on collection points for
waste equipment from your municipal administration,
public waste disposal authority, an authorised body
for the disposal of waste electrical and electronic
equipment or your waste disposal company.
• Kinks where the connection cable has been im-
properly fastened or routed.
• Places where the connection cables have been cut
due to being driven over.
• Insulation damage due to being ripped out of the
wall outlet.
• Cracks due to the insulation ageing.
Such damaged electrical connection cables must not
be used and are life-threatening due to the insula-
tion damage.
Check the electrical connection cables for damage
regularly. Make sure that the connection cable does
not hang on the power network during the inspection.
Electrical connection cables must comply with the
applicable VDE and DIN provisions. Only use con-
nection cables with the marking „H05VV-F“.
The printing of the type designation on the connec-
tion cable is mandatory.
AC motor
• The mains voltage must be 230 V~
• Extension cables up to 25 m long must have a
cross-section of 1.5 mm2.
Connections and repairs of electrical equipment may
only be carried out by an electrician.
Please provide the following information in the event
of any enquiries:
• Type of current for the motor
• Machine data - type plate
• Motor data - type plate
11. Storage
Store the equipment and accessories out of chil-
dren’s reach in a dark and dry place at above freez-
ing temperature. The ideal storage temperature is
between 5 and 30 °C. Store the electric tool in its
original packaging.
12.Disposal and recycling
The equipment is supplied in packaging to prevent it
from being damaged in transit. The raw materials in
this packaging can be reused or recycled. The equip-
ment and its accessories are made of various types
of material, such as metal and plastic. Defective
components must be disposed of as special waste.
Ask your dealer or your local council.
Table of contents


