Toolots DZW-1200 User manual

1
Direct Cooling Type
Deli / Bakery Cases Installation and
Operation Manual
Please read this manual completely before attempting to install or operate this equipment
DZW-1200 DZW-1500 DZW-1800 DZW-2000

2
TABLE OF CONTENTS
Section Page
Warning ---------------------------------------------------------------- 3-4
Technical Specification--------------------------------------------------4
Installation----------------------------------------------------------------4-5
Operation-----------------------------------------------------------------5-8
Maintenance-------------------------------------------------------------8-9
Parts Breakdown--------------------------------------------------------8-12
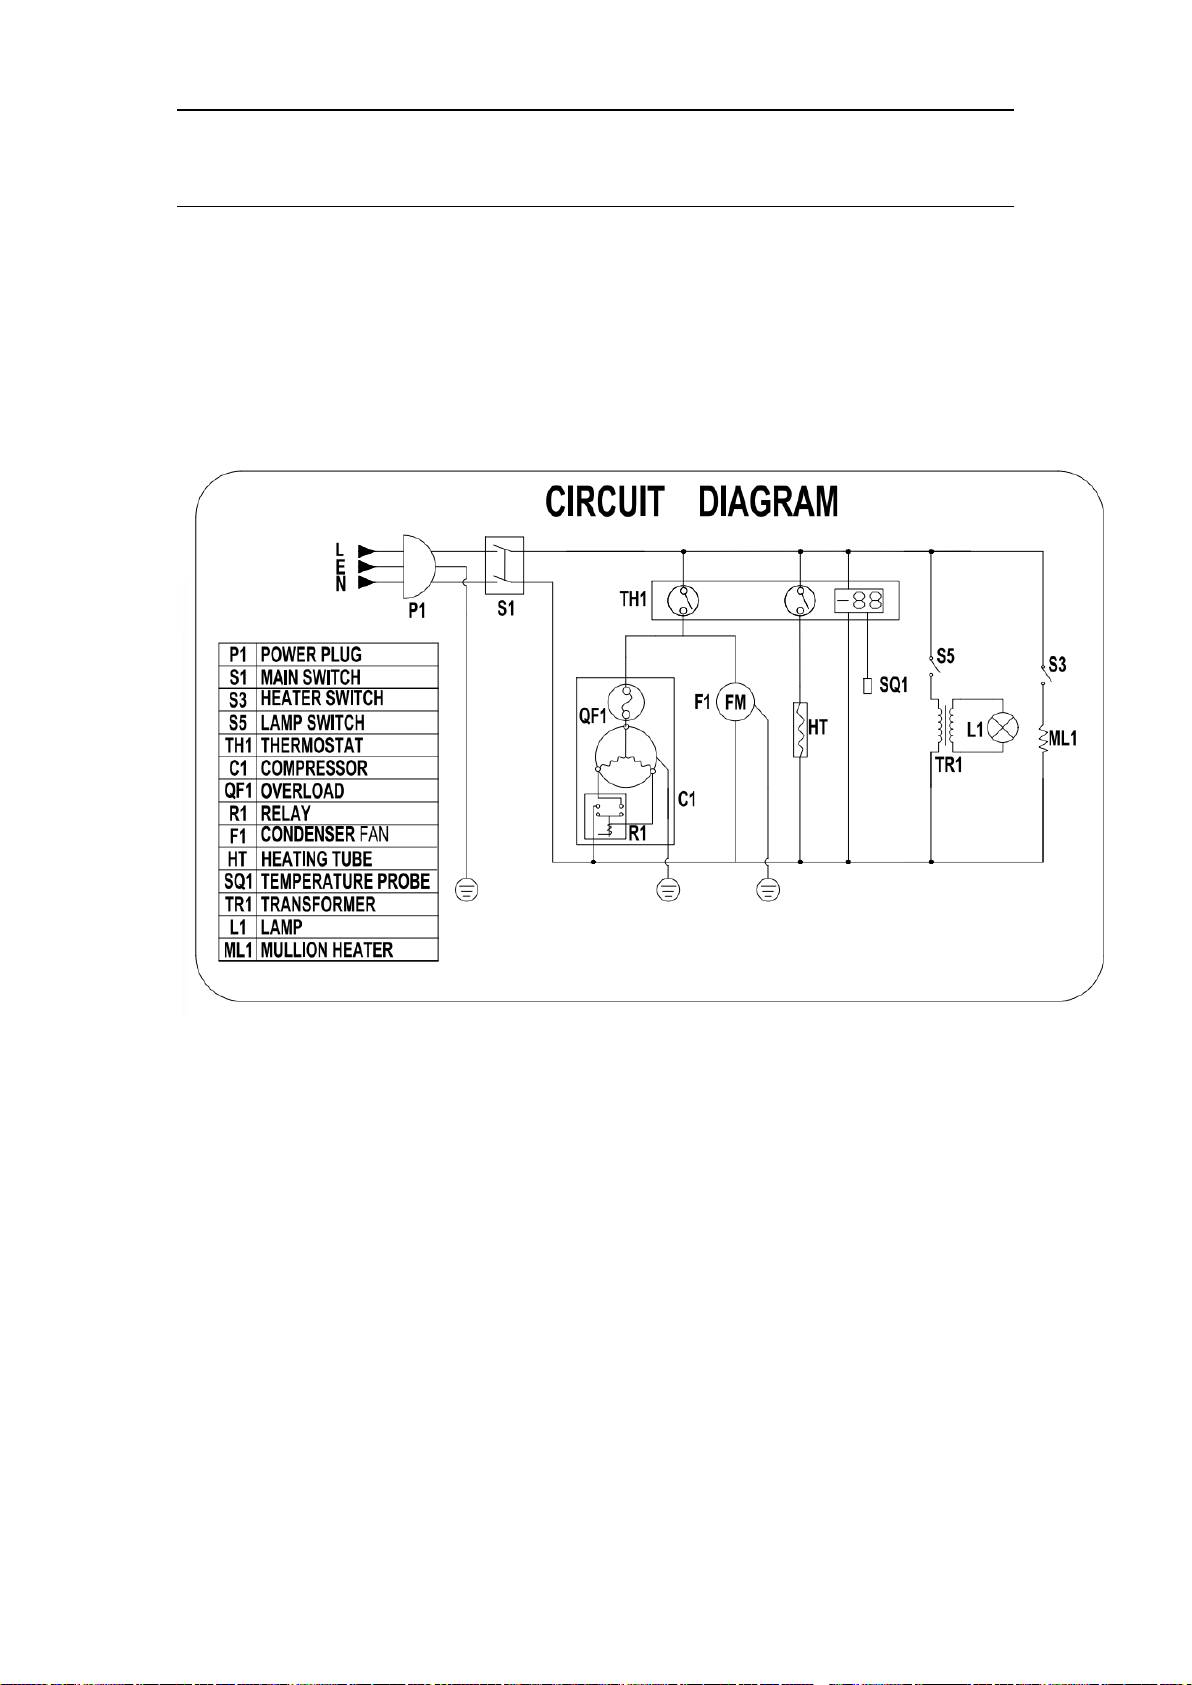
Electrical Diagram-------------------------------------------------------12

3
Warning
DANGER –RISK OF FIRE OR EXPLOSION. FLAMMABLE REFRIGERANT USED. TO BE REPAIRED
ONLY BY TRAINED SERVICE PERSONNEL. DO NOT PUNCTURE REFRIGERANT TUBING.
PELIGRO - RIESGO DE INCENDIO O EXPLOSION. REFRIGERANTE INFLAMABLE UTILIZADO.
PARA SER REPARADO SOLAMENTE POR PERSONAL DE SERVICIO CALIFICADO. NO PINCHAR
LA TUBERÍA REFRIGERANTE.
DANGER –RISQUE DE FEU OU D’EXPLOSION. LE FRIGORIGÈNE EST INFLAMMABLE.
CONFIER LES RÉPARATIONS À UN TECHNICIEN SPÉCIALISÉ. NE PAS PERFORER LA TUBULURE
CONTENANT LE FRIGORIGENE.
CAUTION –RISK OF FIRE OR EXPLOSION. FLAMMABLE REFRIGERANT USED. CONSULT
REPAIR MANUAL/OWNER’S GUIDE BEFORE ATTEMPTING TO SERVICE THIS PRODUCT. ALL
SAFETY PRECAUTIONS MUST BE FOLLOWED.
ATENCION - RIESGO DE INCENDIO O EXPLOSIÓ N. REFRIGERANTE INFLAMABLE UTILIZADO.
CONSULTE EL MANUAL DE REPARACIÓ N / GUÍA DEL PROPIETARIO ANTES DE INTENTAR DAR
SERVICIO A ESTE PRODUCTO. DEBEN CUMPLIR CON TODAS LAS PRECAUCIONES DE
SEGURIDAD.
ATTENTION –RISQUE DE FEU OU D’EXPLOSION. LE FRIGORIGÈNE EST INFLAMMABLE.
CONSULTER LE MANUEL DU PROPRIÉTAIRE/GUIDE DE RÉPARATION AVANT DE TENTER UNE
RÉPARATION. TOUTES LE MESURES DE SÉCURITÉ DOIVENT ÊTRE RESPECTÉES.
CAUTION –RISK OF FIRE OR EXPLOSION DUE TO PUNCTURE OF REFRIGERANT TUBING;
FOLLOW HANDLING INSTRUCTIONS CAREFULLY. FLAMMABLE REFRIGERANT USED. A
TENCION - RIESGO DE INCENDIO O EXPLOSIÓ N DEBIDO A LA PERFORACION DE LA TUBERÍA
REFRIGERANTE; SIGA LAS INSTRUCCIONES DE MANIPULACIÓ N CON CUIDADO.
REFRIGERANTE INFLAMABLE UTILIZADO.
ATTENTION –RISQUE DE FEU OU D’EXPLOSION SI LA TUBULURE CONTENTANT LE
FRIGORIGÈNE EST PERFORÉE; SUIVRE LES INSTRUCTIONS DE MANUTENTION AVEC SOIN. LE
FRIGORIGÈNE EST INFLAMMABLE.
CAUTION –RISK OF FIRE OR EXPLOSION DUE TO FLAMMABLE REFRIGERANT USED.
FOLLOW HANDLING INSTRUCTIONS CAREFULLY IN COMPLIANCE WITH LOCAL
GOVERNMENT REGULATIONS.
4
ATENCIÓ N –RIESGO DE INCENDIO O EXPLOSIÓ N DEBIDO A REFRIGERANTE INFLAMABLE
UTILIZADO. SIGA LAS INSTRUCCIONES DE MANIPULACIÓ N CON CUIDADO CONFORME A
LAS REGLAS DE LA MUNICIPALIDAD.
ATTENTION –RISQUE DE FEU OU D’EXPLOSION SI LE FRIGORIGÈNE EST INFLAMMABLE.
SUIVRE LES INSTRUCTIONS DE MANUTENTION AVEC SOIN CONFORMÉMENT AUX
RÈGLEMENTATION GOUVERNEMENTALE LOCAUX.
TECHNICAL SPECIFICATIONS
MODEL
DZW-1200
DZW-1500
DZW-1800
DZW-2000
Number of doors
2
Capacity (cu.ft)
15.3
18.2
21.4
30
Number of
Shelves
2
HP
1/3
1/3
1/2
1/2
Electrical
110V/60HZ/1P
Amps
5.0
5.8
6.2
6.8
Temperature
Range
33-41 °F
Refrigerant
R290a
Dimensions
47.2”x32.5”x45.2”
59”x32.5”x45.2”
70.8”x32.5”x45.2”
79”x32.5”x45.2”
Shipping Weight
551
639
720
785
INSTALLATION
TRANSPORTATION
1. To prevent the oil contained in the compressor from flowing into the cooling circuit,
it is necessary to always carry, store and handle the unit in a vertical position and
follow the instructions found on the packaging.
2. If the unit was placed in a non-vertical position during the transportation, keep the
unit in a vertical position for approximately 24 hours before using the unit and
turning it on, to allow the oil to flow back into the compressor.

5
UNPACKING
1. Remove the wooden baseboard and plastic covering.
2. Make sure that the unit has not been damaged.
3. Remove plastic film from all the stainless-steel panels, if applicable.
IMPORTANT: The packaging should be kept away from children as it is potentially
dangerous. Dispose of the packaging according to the regulation from the local authorities.
POSITION
1. Never clean the unit with pressurized water jets.
2. Place the unit on a flat and stable surface.
3. Install the unit in a location where it can be overseen by trained personnel.
4. For good ventilation, keep 20 cm (7 inches) between the unit and walls or other
objects. Increase the distance if the objects surrounding are heating sources. When
the unit is in place, press the brake on the wheels to keep it from moving.
5. Fix the shelves on the unit.
ELECTRICAL CONNECTION
Before inserting the plug into the electrical socket, carefully read the following
precautions:
1. Make sure that the unit is correctly connected to a properly grounded outlet, in
compliance with current safety standards.
2. Make sure that the voltage is in accordance with what is indicated on the rating
label.
3. The current voltage available should be enough for the maximum energy required by
the unit.
4. If necessary, use multiple outlets, which are all properly grounded, in compliance
with current safety standards.
5. If in doubt, please consult qualified technicians.
THE REFRIGERATED SHOWCASE MUST BE CONNECTED TO AN ELECTRICAL SOCKET WITH A
GROUND.
OPERATION
Before using, the unit should be completely cleaned as it comes into contact with food.
1. Make sure that the main switch is in the (I) position, then plug in the unit.

6
2. Before starting the unit, ensure the sliding doors are properly closed.
3. Turn the main switch to the (I) position, the condensing unit will automatically start.
4. For lighting, press the lighting button. The lighting button is located on the
thermostat.
5. If there is some condensation in front of the curved glass, please turn the switch to (I)
position for defogging.
6. Allow the unit to reach proper temperature before loading with product.
WORKING TEMPERATURE ADJUSTMENT
To reset the temperature inside the showcase, please follow as below:
CAUTION: You are suggested not to reset the temperature controller frequently.
Temperature Controller Operation
Front Panel Commands
7
Main Functions
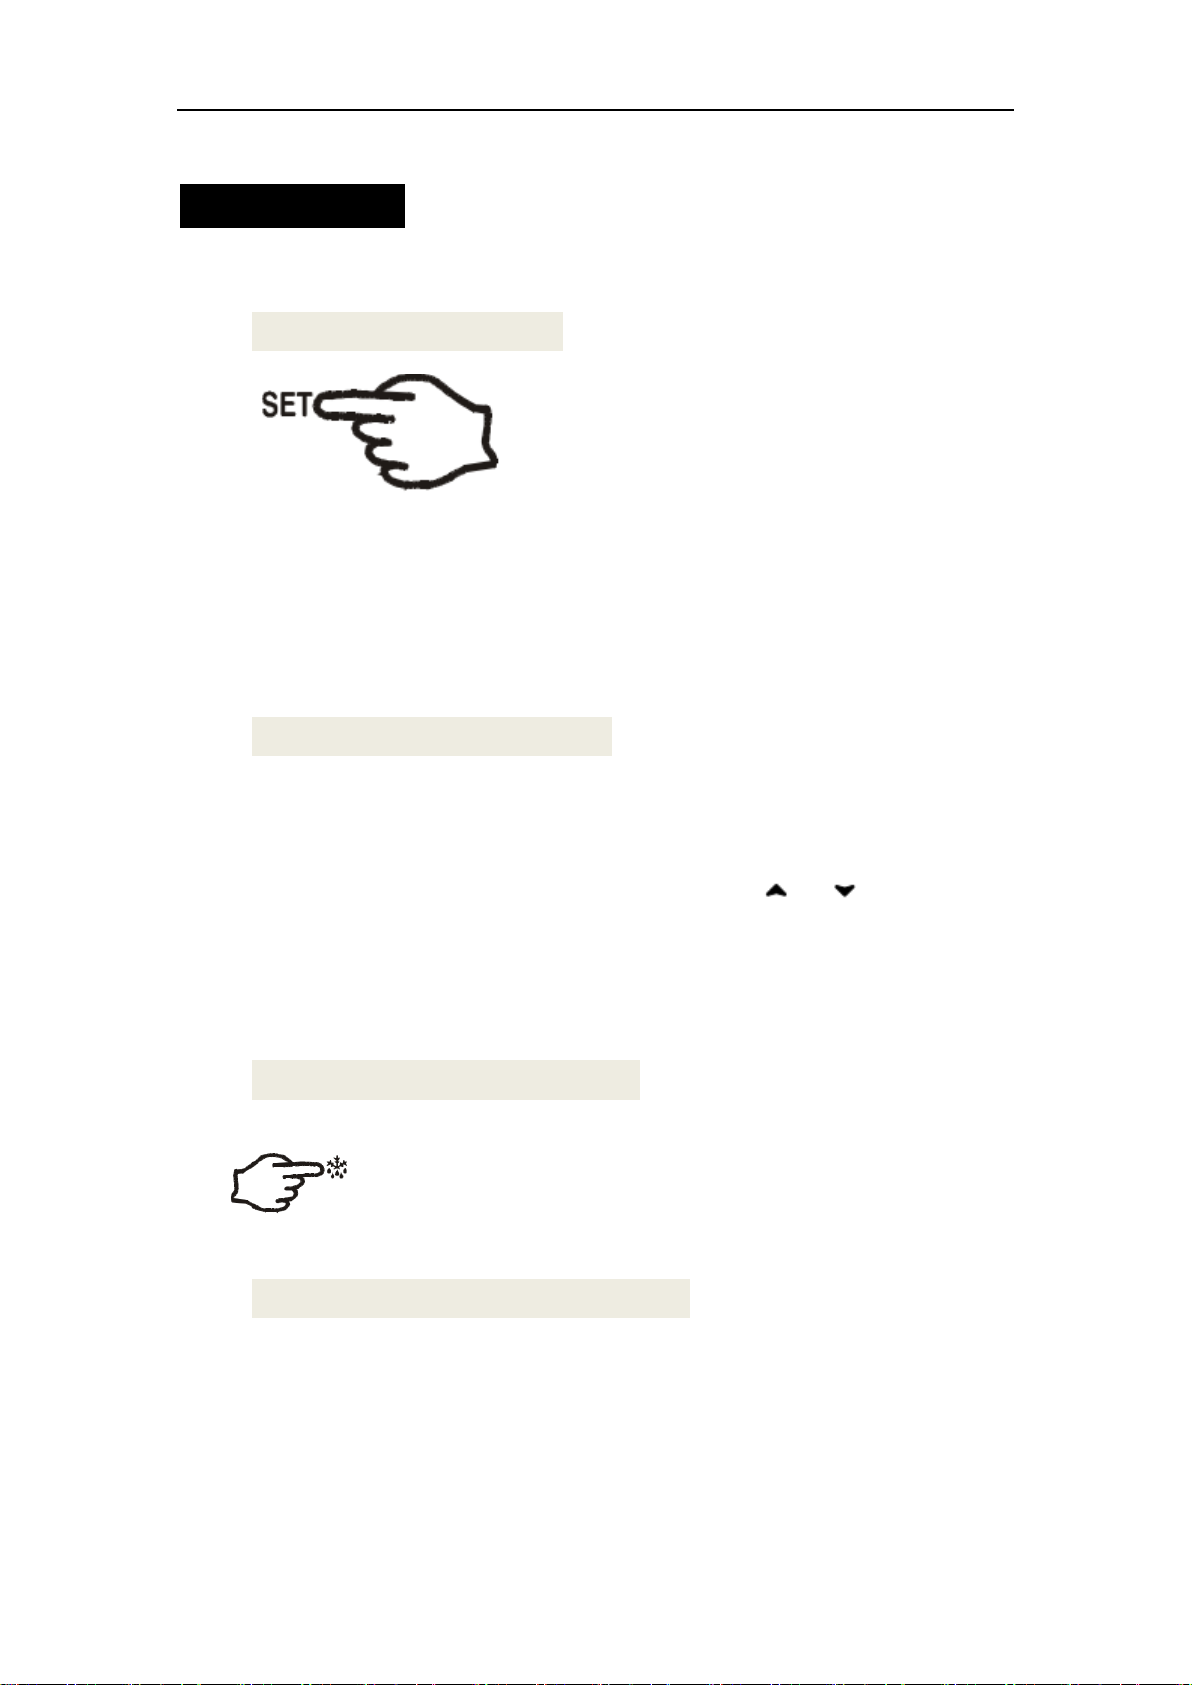
1. How to see the setpoint
1. Push and immediately release the SET key: the
display will show the Set point value;
2. Push and immediately release the SET key or wait for 5 seconds to display
the probe value again.
2. How to change the setpoint
1. Push the SET key for more than 2 seconds to change the Set point value;
2. The value of the set point will be displayed and the “°C” or “°F” LED starts
blinking; 、3. To change the Set value push the or arrows within
10s.
4. To memorise the new set point value push the SET key again or wait 10s.
3. How to start a manual defrost
Push the DEF key for more than 2 seconds and a manual defrost will start.
4. How to change a parameter value
To change the parameter’s value operate as follows:
1. Enter the Programming mode by pressing the Set + n keys for 3s (the “°C” or “°F”
LED starts blinking).
2. Select the required parameter. Press the “SET” key to display its value
3. Use “UP” or “DOWN” to change its value.

8
4. Press “SET” to store the new value and move to the following parameter. To exit:
Press SET + UP or wait 15s without pressing a key. NOTE: the set value is stored even
when the procedure is exited by waiting the time-out to expire.
For more info, please refer to the controller manual
MAINTENANCE
CLEANING
For health standards and good quality of beverages or foods, clean interiors of the unit as
often as possible.
CAUTION: Do not clean the unit by means of a water jet or pressurized washer.
1. Before carrying out cleaning, turn the unit off and remove the power plug.
2. Do not use abrasive powders that might damage the interior parts of the showcase.
3. Use neutral soap and warm water to wash the interiors. Rinse carefully with water to
remove any soap residues.
4. To maintain a high standard of working performance, leave the unit turned on during
the night and day to avoid deposits.
CAUTION: Do not use any damaging solvents (petrol, alcohol, etc.) for cleaning the unit.
The unit may get damaged. Do not use and sharp objects for cleaning. The unit may be
cleaned with a damp towel but should never directly come in contact with water. After
cleaning the unit, make sure all parts are dried completely.
INSTRUCTIONS FOR DISPOSAL
When replacing your old unit with a new one, comply with the following information:
Old units are not to be disposed of as regular waste. Valuable raw materials can be
obtained by recycling old units.
Render your old unit unusable:
Cut off and remove the main power plug from the unit, then discard separately.
CAUTION: Substances and gases in the thermal insulation must be disposed of
professionally. Ensure that refrigeration tubing is not damaged prior to disposal. Please
discard the unit according to the regulations of local law.
9
Troubleshooting
System
Possible Reasons
Solution
Remark
No power input
/power direction
Broken fuse
Replace
As for authorized
service department
Poor connection of plug and
Repair or replace the socket
10
WARNING: If the machine has any problems or has been damaged, do not try to repair or
replace it by yourself. Please contact local service department.
Parts breakdown
lamp does not light
socket
to check and repair
Failure in input control circuit
Compressor does not
work
Thermostat does not work
Replace
Thermostat is not on the
working position
Turning to the working
position
Poor contract of
thermostat
Insert the plug tightly
Loose plug pins in the starter
Insert the plug tightly
Broken compressor
Replace
Broken starter or
capacitor
Repair or replace
Compressor runs,
but the
temperature in the
showcase is
high
Circulating temperature is
too high
Adjust the thermostat
properly
Ask for authorized
service department
to check and too
much dust and dirt
on repair it
Too much dust and dirt on the
condenser
Clean it on time
Fr thick
Stop the machine
to defrost. Set the
temperature higher
Thermostat is out of work
Replace
Condenser fan does
not
run
The capacitor of the fan is out
of work
Replace
The ball-bearing of the fan
motor lacks oil
Fill oil
The winding of the fan motor
is damaged
Replace
Compressor
starts/stops
frequently
The winding of the
compressor is short
circuit
Check with a multi meter,
replace the compressor.
Poor contact of the
socket
Repair or replace

11

12
Part
Description
MFG Code
MFG Description
1
Bottom deck
138-0001
#DZX.0.1 BOTTOM DECK
2
Sliding door
138-0002
#DZX.0.2 SLIDING DOOR
3
Structure body
138-0003
#DZX.0.3 STRUCTURE BODY
4
Evaporator
138-0004
#DZX.0.4 EVAPORATOR
5
Top panel
138-0005
#DZX.0.5 TOP PANEL
6
Top water tray
138-0006
#DZX.0.6 TOP WATER TRAY
7
Evaporator cover
138-0007
#DZX.0.7 EVAPORATOR COVER
8
Ladder for shelves
138-0008
#DZX.0.8 LADDER FOR SHELVES
9
Shelves
138-0009
#DZX.0.9 SHELVES
10
Left panel
138-0010
#DZX.0.10 LEFT PANEL
11
Air guide board
138-0011
#DZX.0.11 AIR GUIDE BOARD
12
Front glass
138-0012
#DZX.0.12 FRONT GLASS
13
Front panel
138-0013
#DZX.0.13 FRONT PANEL
14
Condenser
138-0014
#DZX.0.14 CONDENSER
15
Compressor board
138-0015
#DZX.0.15 COMPRESSOR BOARD
16
Condenser fan
138-0016
#DZX.0.16 CONDENSER FAN
17
Water tray
138-0017
#DZX.0.17 WATER TRAY
18
Compressor
138-0018
#DZX.0.18 COMPRESSOR
19
Bottom frame
138-0019
#DZX.0.19 BOTTOM FRAME
20
Caster
138-0020
#DZX.0.20 CASTER
21
Back vent
138-0021
#DZX.0.21 BACK VENT
22
Control Panel
138-0022
#DZX.0.22 CONTROL PANEL
23
Switch
138-0023
#DZX.0.23 SWITCH
24
Thermostat
138-0024
#DZX.0.24 THERMOSTAT
25
Right Panel
138-0025
#DZX.0.25 RIGHT PANEL
26
Side glass
138-0026
#DZX.0.26 SIDE GLASS
27
Heating tube
138-0027
#DZX.0.27 HEATING TUBE
13
CIRCUIT DIAGRAM
This manual suits for next models
3
Table of contents
Popular Display Case manuals by other brands


Bartscher
Bartscher Panorama 550L Translation of the original instruction manual

Hatco
Hatco FLAV-R-SAVOR PFST-1X Installation & operating manual

Alto-Shaam
Alto-Shaam HALO-HEAT TY-48 Operation and care manual

Avantco
Avantco 177HDC13 user manual

Ubert
Ubert HT Series user manual

Federal
Federal SN48 Installation & operation instructions


