Tornado VS4 User manual

VS4
59656860 06/15
English 4
Français 15
Español 27

A
9
3
1
6
4
107
23 21 20
30
28
31
5
812
14
18
27
29
25
28
26
16
29
19
17
11
22
2
18
18
1824
13 15
2

B
1
5
3
2
6
7
9
4
8
10
C
D
3

Inform your dealer immediately if there
is any shipping damage.
Completely remove the accessories
from the box.
Only operate the steam cleaner from a
grounded outlet. Refer to the Technical
data for the necessary main fuse.
Connect to a properly grounded outlet
only. See Grounding Instructions.
When using an electrical machine, basic
precautions should always be followed, in-
cluding the following: This steam cleaner is
intended for commercial use.
1 DISCONNECT STEAM CLEANER
FROM POWER CIRCUIT before re-
moving the cover, performing mainte-
nance work, and when not in use.
2 DO NOT LEAVE the machine unattend-
ed when plugged in.
3 ALWAYS CHECK THE POWER SUP-
PLY CORD for damage or signs of any
aging before each use.
4 DO NOT PULL OR CARRY STEAM
CLEANER BY CORD. Do not close
door on cord or pull cord around sharp
edges.
5 KEEP CORD AWAY FROM HEAT AND
OIL. Do not leave cord lying around af-
ter job is complete. It can become a trip-
ping hazard.
6 DO NOT RUN STEAM CLEANER
OVER CORD.
7 TURN SWITCH TO OFF before unplug-
ging power supply cord.
8 DO NOT UNPLUG BY PULLING
CORD. To unplug, grasp plug, not cord.
9 DO NOT GRASP PLUG WITH WET
HANDS.
10 A DAMAGED CORD OR PLUG should
only be replaced by an authorized ser-
vice center representative. DO NOT AT-
TEMPT TO REPAIR POWER CORD.
11 TO AVOID SHOCK, do not expose to
rain. Store indoors.
12 USE ONLY AS RECOMMENDED BY
THIS MANUAL. Use only with recom-
mended attachments.
13 KEEP HAIR, CLOTHING, LOOSE
JEWELRY, FINGERS and all parts of
the body away from openings and mov-
ing parts.
14 DO NOT BLOCK OR OBSTRUCT
OPENINGS. Keep openings free of lint,
hair, dust, and anything that restricts air
flow.
15 CONNECT STEAM CLEANER WITH
PROPERLY GROUNDED OUTLET
ONLY. See grounding instructions.
16 DO NOT ALLOW STEAM CLEANER
TO BE USED AS A TOY. Keep children
away from Steam Cleaner.
17 DO NOT LEAVE UNATTENDED while
Steam Cleaner is running.
18 DO NOT USE IF CORD, PLUG, FIL-
TER, OR STEAM CLEANER IS IN
POOR CONDITION. If the Steam
Cleaner has been dropped, damaged,
exposed to weather, or dropped into
water; have it checked by an authorized
service.
19 ALWAYS USE EYE PROTECTION
when operating Steam Cleaner.
20 USE EXTRA CAUTION when operating
on stairs.
21 STAY ALERT! Do not use Steam
Cleaner when you are tired or under the
influence of drugs, alcohol or medica-
tion.
IMPORTANT SAFETY
INSTRUCTIONS
READ ALL INSTRUCTIONS BEFORE
USING THIS MACHINE
SAVE THESE INSTRUCTIONS
4 EN

–This appliance must be grounded. If it
should malfunction or break down,
grounding provides a path of least re-
sistance for electric current to reduce
the risk of electric shock.
–This appliance is equipped with a cord
having an equipment grounding con-
ductor and ground plug.
–The plug must be inserted into an ap-
propriate outlet that is properly installed
and grounded in accordance with all lo-
cal codes and ordinances.
–Improper connection of the equipment-
grounding conductor can result in a risk
of electric shock.
–Check with a qualified electrician or ser-
vice person if you are in doubt as to
whether the outlet is properly grounded.
–Do not modify the plug provided with
the appliance.
–If it will not fit the outlet, have a proper
outlet installed by a qualified electrician.
–This appliance is for use on a nominal
120-volt circuit, and has a grounded
plug that looks like the plug illustrated in
Fig.A.
–A temporary adapter that looks like the
adapter illustrated in Fig.B, may be
used to connect this plug to a two-pole
receptacle as shown in Fig.B, if a prop-
erly grounded outlet is not available.
–The temporary adapter should be used
only until a properly grounded outlet
(Fig.A) is installed by a qualified electri-
cian.
–The green colored rigid ear, lug, or the
like extending from the adapter must be
connected to a permanent ground such
as a properly grounded outlet box cov-
er.
–Whenever the adapter is used, it must
be held in place by a metal screw.
This steam cleaner is intended for
commercial use.
SAFETY INSTRUCTIONS
GROUNDING INSTRUCTIONS
WARNING:
IN ALL CASES, MAKE SURE THE
RECEPTACLE IN QUESTION IS
PROPERLY GROUNDED.
5EN

Use only three-wire extension cords that
have three-prong grounding-type plugs and
three-pole receptacle that accepts the ap-
pliance’s plug. Replace damaged or worn
cord immediately.
Figure A
1 Grounded outlet box
2 Current carrying prongs
Grounding prong is longest of the 3 prongs
Figure B
1 Grounded outlet box
2 Grounding means
3 Adapter
Note: In Canada, the use of a temporary
adapter is not permitted by the Canadian
Electrical Code.
In a double-insulated machine, two sys-
tems of insulation are provided instead of
grounding. No grounding means is provid-
ed on a double-insulated machine, nor
should a means for grounding be added to
the machine. Servicing a double-insulated
machine requires extreme care and knowl-
edge of the system, and should be done
only by qualified service personnel. Re-
placement parts for a double-insulated ma-
chine must be identical to the parts they
replace.
NEVER REMOVE GROUNDING PRONG
FROM POWER PLUG.
EXTENSION CORDS
DO NOT ATTEMPT TO REPAIR POWER
CORD.
Servicing of double-insulated machines
6 EN

– 1
Please read and comply with
these original instructions prior
to the initial operation of your appliance and
store them for later use or subsequent own-
ers.
– The non-compliance of the operating
and safety instructions may lead to
damages of the appliance and to dan-
gers for the operator and other persons.
– In case of transport damage inform ven-
dor immediately.
DANGER
Immediate danger that can cause severe
injury or even death.
몇WARNING
Possible hazardous situation that could
lead to severe injury or even death.
몇CAUTION
Pointer to a possibly dangerous situation,
which can lead to minor injuries.
ATTENTION
Pointer to a possibly dangerous situation,
which can lead to property damage.
– The machine is designed for generating
steam and vacuum cleaning liquids and
solid substances according to the de-
scription in this Operating Instructions
Manual.
– This appliance is suitable for commer-
cial use.
– This appliance is not suitable for indus-
trial use.
Contents
Environmental protection . . . . EN 1
Danger or hazard levels . . . . . EN 1
Proper use . . . . . . . . . . . . . . . EN 1
Symbols on the machine. . . . . EN 2
Overview . . . . . . . . . . . . . . . . . EN 2
Safety Devices . . . . . . . . . . . . EN 2
Cleaning methods . . . . . . . . . . EN 3
Start up . . . . . . . . . . . . . . . . . . EN 3
Operation . . . . . . . . . . . . . . . . EN 3
How to use the accessories . . EN 5
Transport. . . . . . . . . . . . . . . . . EN 6
Storage . . . . . . . . . . . . . . . . . . EN 6
Care and maintenance . . . . . . EN 6
Troubleshooting . . . . . . . . . . . EN 7
Warranty . . . . . . . . . . . . . . . . . EN 7
Accessories and Spare Parts . EN 7
Technical specifications . . . . . EN 8
Environmental protection
The packaging material can be
recycled. Please do not throw
the packaging material into
household waste; please send it
for recycling.
Old appliances contain valuable
materials that can be recycled;
these should be sent for recy-
cling. Batteries, oil, and similar
substances must not enter the
environment. Please dispose of
your old appliances using appro-
priate collection systems.
Danger or hazard levels
Proper use
7EN

– 2
Steam
CAUTION - Danger of scalding
Illustration
1 Safety lock (steam boiler)
2 Operating field
3 Steam hose
4 Reset key - Descaling
5 Steam switch
6 Accessory compartment
7 Cover of the appliance connector
8 Steam plug
9 Carrying handle
10 Cable hook
11 Hood
12 Container closure (fresh water tank)
13 Terry cloth cover
14 Funnel inlet
15 Hand nozzle
16 Window nozzle (option)
17 Power cord
18 Retaining clip
19 Floor nozzle with bristles
20 Floor cleaning cloth (floor nozzle with
bristles)
21 Round brush
22 Power nozzle (red)
23 Extension piece
24 Floor nozzle with lamellae
25 Detail nozzle (4.7 in/120 mm)
26 Detail nozzle (7.1 in/180 mm)
27 Floor cleaning cloth (floor nozzle with
lamellae)
28 Locking knob
29 Extension tube
30 Lock (child-proof lock)
31 Steam gun
Illustration
1 Switch - pump fresh water tank
2 Indicator lamp - heating (yellow)
3 Indicator lamp - water shortage steam
boiler (red)
4 Temperature display
5 Rotary knob for VAPOHYDRO regula-
tion
6 Rotary knob for steam quantity control-
ler
7 Working temperature range
8 Indicator lamp - Descaling (white)
9 Indicator light - water shortage fresh
water tank (red)
10 Switch - heating (ON/OFF)
– The operating elements for the cleaning
process are yellow.
– The controls for the maintenance and
service are light gray.
Safety devices serve for the protection of
the user and must not be put out of opera-
tion or bypassed with respect to their func-
tion.
The pressure controller keeps the boiler
pressure during the operation as constant
as possible. The heating is turned off if the
maximum operating pressure of 4 bar is
reached in the boiler and is reactivated in
case of a pressure drop in the boiler due to
steam tapping.
When the water in the boiler becomes ex-
hausted, the temperature of the heating in-
creases. The low-water thermostat turns off
the heating, and the red low-water indicator
lamp "water shortage" lights up. The heat-
ing is prevented from being turned on again
until the boiler has cooled down or been re-
filled with water.
Symbols on the machine
Risk of burns on account of hot
surfaces!
Overview
Device elements
Operating field
Colour coding
Safety Devices
Pressure controller
Water shortage thermostat
8 EN

– 3
– If the low-water thermostat fails and the
appliance overheats, the safety thermo-
stat turns off the steam cleaner.
– Please contact your local Tornado cus-
tomer service to arrange for the reset of
the safety thermostat.
– The safety lock seals the boiler against
the steam pressure that builds up in the
boiler. If the pressure controller is de-
fective and the steam pressure in the
boiler rises above 5.7 bar, a pressure
control valve in the safety lock opens,
and steam is emitted through the lock to
the outside.
– Please contact your local Tornado cus-
tomer service before you put the appli-
ance into operation again.
Always test the compatibility of the fabrics
on a hidden spot prior to treating them with
the appliance: Steam first, then allow to dry
before checking for colour changes or de-
formation.
When cleaning painted or plastic-coated
surfaces, as found on kitchen and living
room furniture, doors, parquet, linoleum;
wax, furniture polish, plastic surfaces or
paint can come loose or stains can be cre-
ated. When cleaning these surfaces, briefly
steam a cloth and wipe the surfaces with it.
Preheat window panes during seasons with
especially low temperatures. In order to do
so, lightly steam the entire glass surface
from a distance of approx. 19.7 in (50 cm).
This will prevent tensions on the surface
which might lead to glass breakage.
Lift up the cover of the socket in the de-
vice and tightly plug the steam connec-
tor into the device. The pins of the plug
must lock into the cover of the appli-
ance connector.
Connect the required accessories (floor
nozzle, hand nozzle or detail nozzle) to
the steam gun. Slide the parts together
until the locking button locks into the
steam gun.
Use the extension pipes if necessary.
Slide the parts together until the respec-
tive locking button locks into place.
Press down on the locking knob to sep-
arate the accessories.
Note: The use of distilled water (no lime-
scale build-up) is possible, however, leads
to faster wear of the boiler; thus, it is not
recommended.
Check safety lock for tight seating.
Unscrew the container closure from the
fresh water tank.
Attach the funnel inlet to the fresh water
tank and snap into place by a rotating
motion.
Fill max. 0.5 gal (2 litres) of fresh water
into the fresh water tank.
몇WARNING
Do not use detergent.
Unlock and remove the funnel inlet.
Screw the container closure onto the
fresh water tank.
The temperature indicator shows whether
the operation is taking place in the correct
temperature range (working temperature
range).
Safety thermostat
Safety lock
Cleaning methods
Refreshing textiles
Cleaning of Coated or Lacquered
Surfaces
Cleaning of Glass
Start up
Attaching the Accessories
Fill up with water
Operation
Temperature display
9EN

– 4
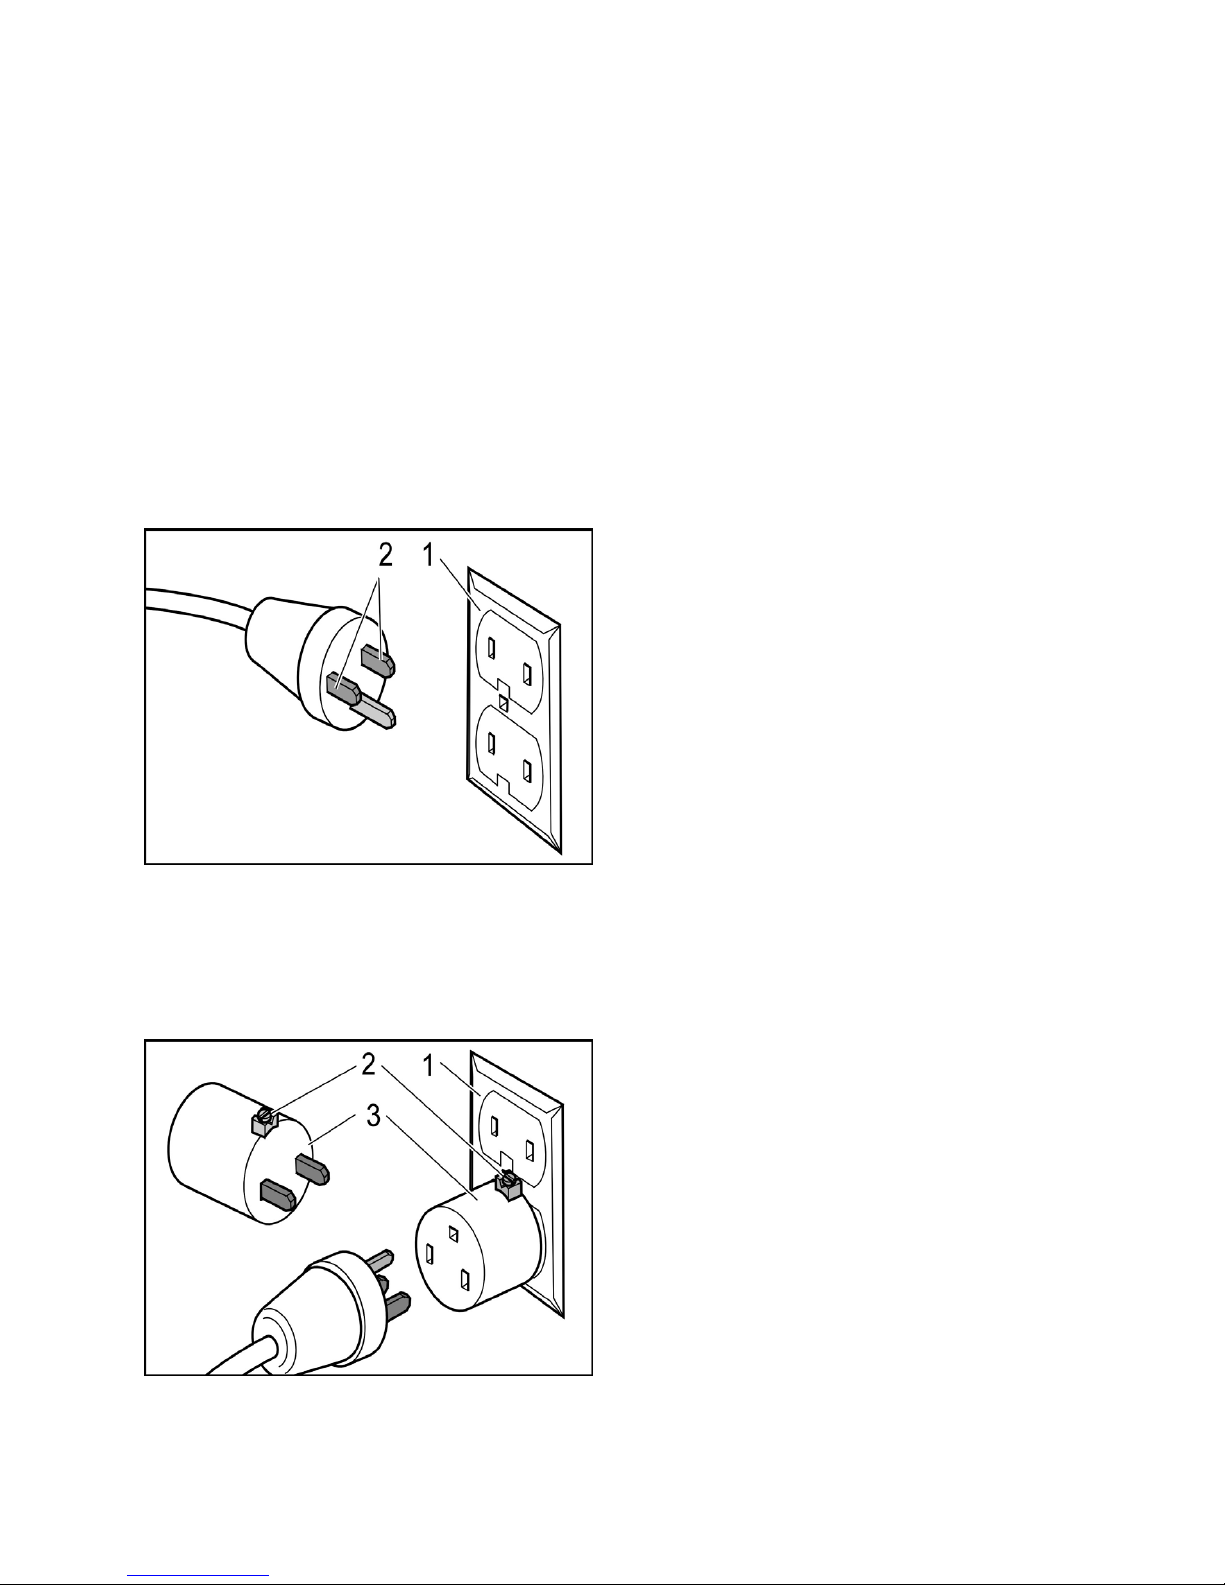
Insert the mains plug into the socket.
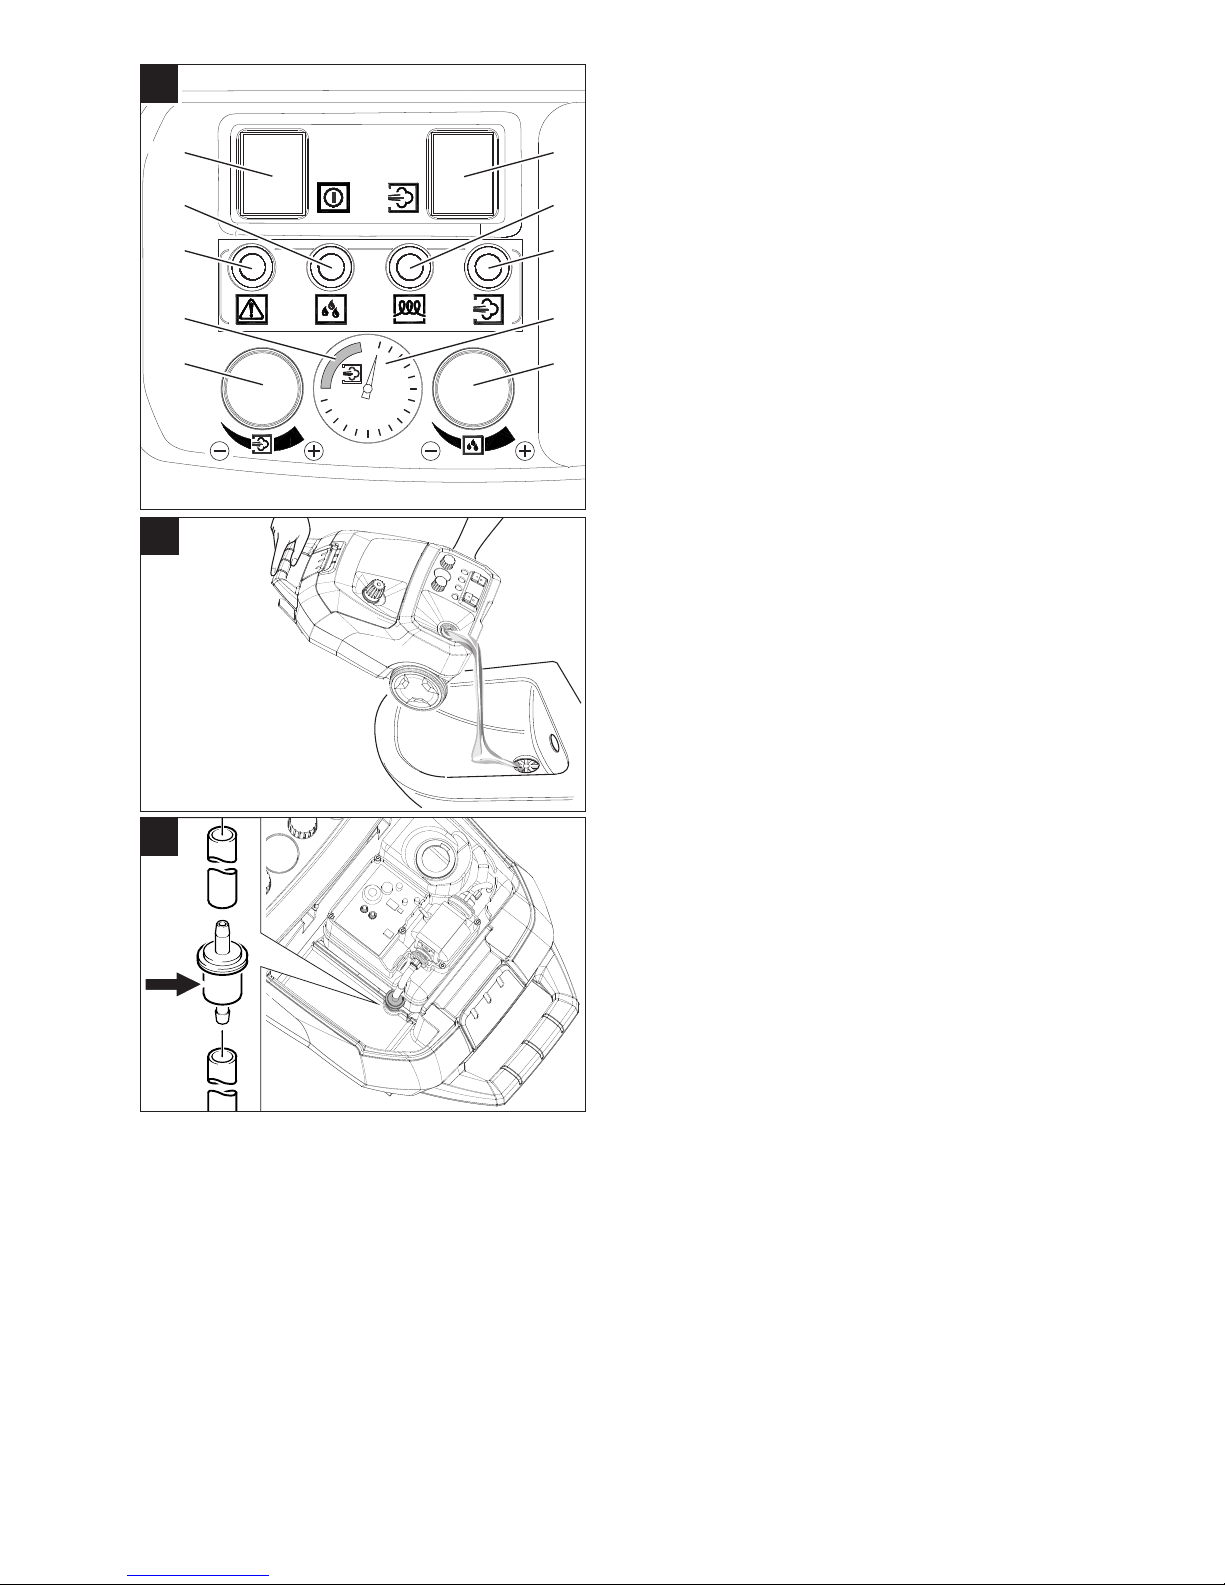
Switch on the device with the switch -
pump fresh water tank and with the
switch - switch on heating. The indicator
lamps illuminate.
Note: The full heating performance is only
available if the steam plug is connected to
the appliance during the heating-up period.
Once the indicator lamp "heating" has gone
out, the system is ready for use.
Note: Do not place the appliance into an
upright position while it is running. Other-
wise, the heating will turn off automatically
after a brief period and the indicator lamp
"water shortage" will illuminate in red.
Switch the heating off by means of the
switch while the appliance is being
transported.
Actuate the steam switch, steam will es-
cape. Always direct the steam gun at a
separate piece of cloth until the steam
is emitted evenly.
– The heating of the steam cleaner is
turned on during operation of the appli-
ance (indicator lamp glows yellow) in
order to maintain the pressure in the
boiler at a constant level.
– If the device is switched on without wa-
ter, initially, the indicator lamp "heating"
will glow yellow until the water shortage
thermostat switches the heating off. Af-
ter that, the indicator lamp "water short-
age" glows red.
When working with standard accesso-
ries, regulate the steam volume via the
rotary knob on the device.
Note: If the steam quantity regulation is set
to a small quantity, steam may continue to
be emitted after the steam switch has been
released until the pressure in the steam
hose is reduced. This pressure can be re-
lieved even faster by briefly setting the
steam quantity regulation to a large vol-
ume.
– In wet areas, you can also wash away
the dirt instead of absorbing it with the
cloth. For this, set the moisture of the
steam to regulate via VAPOHYDRO
regulation by means of the rotary knob.
The higher the humidity of the steam,
i.e. the more water is contained in the
steam jet, the higher the rinsing effect.
If you turn the rotary knob in the coun-
ter-clockwise direction to the highest
quantity (+), a hot water jet is issued,
and the highest rinsing effect is
achieved.
– We recommend using the VAPOHY-
DRO in connection with the detail noz-
zle for cleaning the bathroom.
– Turn the rotary knob of the VAPOHY-
DRO regulation in the clockwise direc-
tion to the smallest quantity (-) when
working with cloths (floor nozzles, man-
ual nozzle) in order to have as little
moisture in the steam jet as possible.
The dirt loosening power of the steam is
improved this way.
Note: If the rotary knob of the VAPOHY-
DRO regulation is turned in the counter-
clockwise direction to the highest quantity
(+), the boiler is depleted faster.
Note: Once the water in the fresh water
tank is used up, a signal is issued and the
indicator light for "water shortage fresh wa-
ter tank" lights up red.
Fill the fresh water tank with a maxi-
mum of 0.5 gal (2 litres) of fresh tap wa-
ter using the filling funnel.
Once the indicator lamp "heating" has gone
out, the system is ready for use.
Note: If the pump does not deliver any wa-
ter in spite of the fresh water tank being full,
the boiler must be descaled.
Turning on the Appliance
Steam quantity regulation
VAPOHYDRO regulation with rotary
knob
Refilling Water
10 EN

– 5
DANGER
Scalding danger! Hot water may drip out of
the accessory parts while you are detach-
ing them! Never disconnect accessory
parts while steam is escaping.
Switch the appliance off at the switches.
Fold down the cover of the socket in the
device and pull the steam connector out
of the device.
Disconnect the mains plug from the
socket.
Note: You can leave the residual water in
the appliance.
Place the manual nozzle, detail nozzles
and small parts into the accessories
storage box.
Coil the power cord around the cable
hooks while the device is standing.
Insert the extension pipes individually
into the recesses on the appliance floor.
Note: Always allow the brushes to cool
down so that any deformation of the bristles
is avoided.
Note: Detergent residue or care emulsions
that are still present on the surface to be
cleaned can lead to streaks during steam
cleaning. However, these will disappear
with repeated cleaning procedures.
Application examples for use of the steam
gun without accessories:
– Elimination of odours and wrinkles from
hanging pieces of clothing, by steaming
them from a distance of 3.9-7.9 in (10-
20 cm).
– Removing dust from plants. Here, keep
a distance of 7.9-15.7 in (20-40 cm).
– Moist dusting, by briefly steaming the
cloth and wiping the furniture with it.
– The closer you hold the nozzle to the
dirty spot, the higher the cleaning effect
as temperature and pressure of the
steam reach their maximum values im-
mediately when they are emitted from
the nozzle.
– The detail nozzle with the different at-
tachment is suited for cleaning difficult
to access points, such as corners,
grooves, etc. as well as blinds, central
heaters, toilets, stainless steel, mirrors,
mirrors, fixtures, coated and enameled
surfaces, loosening of stains.
– The power nozzle increases the emis-
sion speed of the steam. Therefore, it is
well-suited for cleaning very tough dirt,
blowing out corners, grooves, etc.
Note: The round brush is not suitable for
cleaning sensitive surfaces.
– For abrasive cleaning of stubborn soil-
ing.
– Suited for all washable wall and floor
coverings, e.g. stone floors, tiles and
PVC floors. Work slowly on very dirty
surfaces to allow the steam to act on the
dirt for a longer period of time.
– For hygienic cleaning of smooth surfac-
es, because of higher surface tempera-
ture.
– For a hygienical cleaning result steam
directly on the hard surface with a work-
ing speed of max. 11.8 in per second
(30 cm per second). Additionally set
VAPOHYDRO to minimum position and
steam pressure to maximum position.
Removing the Accessories
Turning Off the Appliance
Storing the Appliance
How to use the accessories
Steam gun
Detail nozzle
Floor nozzle
Floor nozzle with bristles
Floor nozzle with lamellae
11EN

– 6
Flip and replace floor cloth regularly to im-
prove the dirt pickup.
Attach the floor cloth to the floor nozzle.
1 Fold the floor cloth the long way and
place the floor nozzle on top of it.
2 Open holding clamps.
3 Place the cloth ends into the openings.
4 Close the holding clamps.
몇CAUTION
Do not insert fingers between the clamps.
Suited for small washable areas, shower
stalls, mirrors or furniture cloth material.
Pull the terry cloth cover over the man-
ual nozzle.
Order no. 4.130-115.0
Apply steam to the glass surface from a
distance of approximately 7.9 in
(20 cm) until the surface is moistened
evenly.
Switch off the steam supply.
Strip the glass surface in straight lines
from the top to the bottom using the rub-
ber lip.
Wipe the rubber lip and the bottom
edge of the window dry after each strip.
Order no. 2.863-076.0
You can use the wallpaper remover with
the steam cleaner to remove wallpapers.
Apply wallpaper remover to the edge of
a wallpaper length and let the steam
settle in until the wallpaper is fully mois-
tened (approx. 10 seconds).
Reset wallpaper remover without
switching off. Lift the soaked piece of
wallpaper using a flat trowel, and pull it
off the wall.
In case of woodchip wallpaper that has
been painted several times, the steam may
not be able to soak the wallpaper. If this
happens, you need to prepare accordingly
with a nail roller.
몇CAUTION
Risk of injury and damage! Observe the
weight of the appliance when you transport
it.
For transport over short distances:
Switch off the heating, bring the device
into an upright position, grab the device
on the carrying handle and extension
tube to carry it.
When transporting in vehicles, secure
the appliance according to the guide-
lines from slipping and tipping over.
몇CAUTION
Risk of injury and damage! Note the weight
of the appliance in case of storage.
This appliance must only be stored in inte-
rior rooms.
DANGER
Always disconnect the mains plug and al-
low the steam cleaner to cool down before
performing any maintenance work.
Illustration
Rinse the boiler of the steam cleaner boiler
at the latest after 5 boiler fillings.
Fill the boiler with water and shake it
strongly. This dissolves lime scaling re-
siding on the boiler bottom.
Empty water out.
Note: If you always use usual commercial
distilled water it is not necessary to descale
the boiler.
ATTENTION
Only use products approved by Tornado to
exclude any damages of the appliance.
Disconnect the mains plug from the
socket.
Completely empty the steam boiler.
Using the floor cleaning cloth
Hand nozzle
Window nozzle (option)
Wallpaper remover (optional)
Transport
Storage
Care and maintenance
Rinsing the boiler
Descaling the boiler
12 EN

– 7
Completely dissolve two bags of
descaler by stirring it in 0.5 gal (2 liters)
of warm water.
Fill the descaling solution into the boiler
and allow to react for approximately 8
hours.
DANGER
Do not screw the steam boiler safety cap on
the appliance during the descaling. Do not
use the appliance as long as there is des-
caling agent in the boiler.
Pour out the descaling solution. Rinse
the boiler at least two more times with
cold water to ensure that there is no res-
idue left behind in the boiler.
Turn on the appliance.
Press the reset key until the indicator
lamp "Descaling" goes off.
The appliance is ready for use again. After
approx. 50 operating hours, the indicator
lamp "Descaling" shows the next neces-
sary descaling process.
Note: Never fill descaler into the fresh wa-
ter tank as this damages the pump.
Illustration
Using soiled water can occlude the filter.
This is shown by extraordinaly long run
times of the pump or a complete malfunc-
tion.
Replac the filter.
DANGER
Always disconnect the mains plug and al-
low the steam cleaner to cool down before
performing any maintenance work.
DANGER
Repair works may only be performed by the
authorized customer service.
Refill water.
Decalcify appliance.
If malfunction can not be fixed, the de-
vice must be checked by customer ser-
vice.
The warranty terms published by our com-
petent sales company are applicable in
each country. We will repair potential fail-
ures of your accessory within the warranty
period free of charge, provided that such
failure is caused by faulty material or de-
fects in fabrication. In the event of a warran-
ty claim please contact your dealer or the
nearest authorized Customer Service cent-
er. Please submit the proof of purchase.
– Only use accessories and spare parts
which have been approved by the man-
ufacturer. The exclusive use of original
accessories and original spare parts
ensures that the appliance can be oper-
ated safely and trouble free.
– At the end of the operating instructions
you will find a selected list of spare parts
that are often required.
– For additional information about spare
parts, please go to the Service section
at www.tornadovac.com.
Only use special accessories approved by
the manufacturer.
Filter replacement
Troubleshooting
Indicator lamp "water shortage"
glows red
Indicator lamp "Descaling" glows
white
Customer Service
Warranty
Accessories and Spare Parts
Special accessories
Name Part no.:
Caddy cart 6.962-239.0
Round brush kit with brass
bristles
2.863-075.0
Round brush kit 2.863-077.0
Micro fibre cloth 6.905-921.0
13EN

– 8
Technical specifications
Electrical connection
Mains voltage V 120
Frequency Hz 1~ 60
Voltage in the steam gun V 24
Type of protection -- IPX4
Protective class -- I
Performance data
Rated power W 1500
Rated current, Pump A 0.3
Max. operating pressure psi (MPa) 58 (0.4)
Permitted operating pressure psi (MPa) 87 (0.6)
Max. work temperature °F (°C) 293 (145)
Heating time per litre of water min ca. 5.5
Steam quantity (max.) oz/min (g/min) 2.6 (75)
Dimensions and weights
Typical operating weight lbs (kg) 17.6 (8.0)
Max. water capacity gal (l) 1.1 (4.0)
Tank content gal (l) 0.5 (2.0)
Boiler capacity gal (l) 0.6 (2.4)
Length x width x height in (mm) 18.5 x 12.5 x 11.0
(475 x 320 x 275)
Power cord SJTW 3/14 AWG
Part no.: Cable length
Tornado 6.647-791.0 13 ft (4 m)
14 EN

En cas de dommages dus au transport,
veuillez en informer immédiatement
votre revendeur.
Sortir tous les accessoires du carton.
Ne brancher le nettoyeur à vapeur qu’à
une prise de courant de sécurité
conforme. Fusible nécessaire, voir les
caractéristiques techniques.
Brancher uniquement sur une prise cor-
rectement reliée à la terre. Voir les ins-
tructions de mise à terre.
Lorsque vous utilisez un appareil élec-
trique, vous devez prendre certains pré-
cautions de base, dont la suivante: Cet
nettoyeur à vapeur est conçu pour l’usage
professionnel.
1 DÉBRANCHER LE NETTOYEUR À
VAPEUR avant d’enlever le couvercle,
d’effectuer tout entretien et lorsqu’il
n’est pas utilisé.
2 Ne laissez pas l’appareil sans surveil-
lance tant qu’il est branché.
3 TOUJOURS VÉRIFIER QUE LE COR-
DON D’ALlMENTATlON n’est ni vieilli,
ni abîmé, avant chaque usage.
4 NE PAS TRANSPORTER LE NET-
TOYEUR À VAPEUR OU LE TIRER
PAR LE CORDON. Ne pas fermer de
portes sur le cordon ou faire passer ce-
lui-ci sur des bords tranchants.
5 NE PAS METTRE LE CORDON À LA
CHALEUR OU DANS DE L’HUILE. Ne
pas laisser le cordon traîner par terre
après la fin du travail. Il pourrait provo-
quer une chute.
6 NE PAS PASSER LE NETTOYEUR À
VAPEUR SUR LE CORDON.
7 METTRE L’INTERRUPTEUR SUR
avant de débrancher l’appareil.
8 NE PASTIRER SUR LE CORDON
POUR DÈBRANCHER l’appareil. Tirer
sur la prise.
9 NE PAS SAISIR LA PRISE AVEC DES
MAINS MOUILLÉES.
10 SI LE CORDON OU LA PRISE EST
ABÎMÉ, le faire remplacer par un agent
d’un centre de service agréé unique-
ment. NE PAS ESSAYER DE RÉPA-
RER SOI-MÊME.
11 POUR ÉVITER TOUT CHOC ÉLEC-
TRIQUE, ne pas laisser l’appareil sous
la pluie. Le stocker à l’intérieur.
12 N'UTILISER L'APPAREIL QUE
COMME IL EST CONSEILLÉ DANS
CE MODE D’EMPLOI. Utiliser exclusi-
vement les accessoires recommandés.
13 ÉLOIGNER LES CHEVEUX, LES VÊ-
TEMENTS, LES BIJOUX FLOTTANTS,
LES DOIGTS et toutes les parties du
corps des ouvertures et des pièces mo-
biles.
14 NE PAS FERMER OU OBSTRUER
LES OUVERTURES. Enlever les pe-
luches, cheveux, poussières et tout ce
qui pourrait gêner le passage de l’air.
15 NE BRANCHER LE NETTOYEUR À
VAPEUR QUE SUR UNE PRISE PRO-
PREMENT RELIÉE À LA TERRE. Voir
les consignes de raccordement à la
terre.
16 INTERDIRE DE JOUER AVEC LE
NETTOYEUR À VAPEUR. En tenir les
enfants éloignés.
17 NE PAS LAISSER LE NETTOYEUR À
VAPEUR SANS SURVEILLANCE pen-
dant le fonctionnement.
18 NE PAS L’UTILISER SI LE CORDON,
LA PRISE, LE FILTRE OU LE NET-
TOYEUR À VAPEUR EST EN MAU-
VAIS ÉTAT. Si le nettoyeur à vapeur
est tombé, a été abîmé, a été exposé,
aux intempéries ou est tombé dans de
l’eau, le faire vérifier par un agent de
service.
19 TOUJOURS PORTER UNE PROTEC-
TION OCULAIRE lors de l’utilisation de
le nettoyeur à vapeur.
CONSIGNES DE SÉCURITÉ
IMPORTANTES
OBSERVEZ LES POINTS SUIVANTS
AVANT LA MISE EN SERVICE DE
L’APPAREIL
15FR

20 REDOUBLER DE PRUDENCE pour
l’utilisation dans un escalier.
21 RESTER VIGILANT! Ne pas utiliser le
nettoyeur à vapeur quand on est fatigué
ou après avoir pris de la drogue, de l’al-
cool ou des médicaments.
–Cet appareil doit être connecté à la
terre. En cas de dysfonctionnement ou
de panne, la mise à la terre fournit un
chemin de moindre résistance pour le
courant électrique pour réduire le risque
de choc électrique.
–Cet appareil est équipé d'un câble doté
d'un équipement conducteur de terre et
d'une prise de terre.
–La fiche doit être branchée dans une
prise électrique qui est correctement
installée et raccordée à la terre en
conformité avec les réglementations et
directives locales.
–Une connexion incorrecte du conduc-
teur de terre de l'équipement peut avoir
pour résultat un risque de choc élec-
trique.
–Contrôler avec un électricien qualifié ou
un technicien de service si vous avez
des doutes relatifs à la mise à la terre
correcte de la prise.
–Ne pas modifier la fiche fournie avec
l'appareil.
–Si la fiche ne rentre pas dans la prise,
faites installer une prise appropriée par
un électricien qualifié.
–Cet appareil est destiné à une utilisation
sur un circuit 120 V nominaux, et est
équipé d'une prise de terre qui res-
semble à la prise illustrée dans la fig. A.
–Un adaptateur temporaire qui res-
semble à l'adaptateur illustré dans la
fig. B peut être utilisé pour connecter
cette fiche au réceptacle deux pôles
comme indiqué dans la fig. B si une
prise correctement reliée à la terre n'est
pas disponible.
–L'adaptateur temporaire doit être utilisé
uniquement jusqu'à ce qu'une prise cor-
rectement reliée à la terre (fig. A) soit
installée par un électricien qualifié.
–L'oreille rigide de couleur verte, la lame
ou l'équivalent étendu depuis l'adapta-
teur doit être connecté à une terre per-
manente comme un couvercle de prise
relié correctement à la terre.
–Quel que soit l'endroit où l'adaptateur
est utilisé, il doit être maintenu en place
par une vis métallique.
CONSERVER CES CONSIGNES
Cet nettoyeur à vapeur est conçu pour
l’usage professionnel.
CONSIGNES DE SÉCURITÉ
INSTRUCTIONS DE MISE À LA TERRE
AVERTISSEMENT :
DANS TOUS LES CAS, S'ASSURER QUE
LE RECEPTACLE EN QUESTION EST
CORRECTEMENT RELIE A LA TERRE.
16 FR

Utiliser uniquement des câbles de rallonge
à trois fils équipés de fiches à mise à la
terre à trois languettes et des réceptacles à
trois pôles qui acceptent la fiche de l'appa-
reil. Remplacer le câble endommagé ou
usé immédiatement.
Figure A
1 Socle de prise de courant
2 Languettes conduisant le courant
La languette de terre est la plus longue.
Figure B
1 Socle de prise de courant
2 Moyens de mise à la terre
3 Adapteur
Note : au Canada, l'utilisation d'un adapta-
teur temporaire n'est pas autorisée par le
Code Electrique Canadien.
Dans un appareil à double isolation, deux
isolations distinctes remplacement la mise
à la terre. L’appareil à double isolation n’est
pourvu d’aucun dispositif de mise à la terre
et un tel dispositif ne doit pas être ajouté.
L’entretien d’un appareil à double isolation
demande beaucoup de soins ainsi qu’une
bonne connaissance du système et net de-
vrait être effectué que par un technicien
d’entretien qualifié. Les pièces de rechange
d’un appareil à double isolation doivent être
identiques aux pièces originales.
NE JAMAIS RETIRER LA LANGUETTE
DE CONTACT DE TERRE DE LA FICHE
ELECTRIQUE.
RALLONGES
NE PAS TENTER DE REPARER UN
CABLE D'ALIMENTATION.
Entretien des appareils à double-
isolation
17FR

– 1
Lire ce manuel d'utilisation origi-
nal avant la première utilisation
de votre appareil, le respecter et le conser-
ver pour une utilisation ultérieure ou pour le
futur propriétaire.
– En cas de non-respect des instructions
de service et des consignes de sécuri-
té, l'appareil risque de subir des dom-
mages matériels et l'utilisateur ainsi
que toute tierce personne sont exposés
à des dangers potentiels.
– Contactez immédiatement le revendeur
en cas d'avarie de transport.
DANGER
Pour un danger immédiat qui peut avoir
pour conséquence la mort ou des bles-
sures corporelles graves.
몇AVERTISSEMENT
Pour une situation potentiellement dange-
reuse qui peut avoir pour conséquence des
blessures corporelles graves ou la mort.
몇PRÉCAUTION
Remarque relative à une situation poten-
tiellement dangereuse pouvant entraîner
des blessures légères.
ATTENTION
Remarque relative à une situation éven-
tuellement dangereuse pouvant entraîner
des dommages matériels.
– L'appareil est destiné au nettoyage
avec de la vapeur et peut être utilisé
avec les accessoires appropriés de la
manière décrite dans ces instructions
de service.
– Cet appareil est approprié pour une uti-
lisation industrielle.
– Cet appareil n'est pas approprié pour
l'utilisation industrielle.
Table des matières
Protection de l’environnement FR 1
Niveaux de danger . . . . . . . . . FR 1
Utilisation conforme . . . . . . . . FR 1
Symboles sur l'appareil. . . . . . FR 2
Aperçu général . . . . . . . . . . . . FR 2
Dispositifs de sécurité . . . . . . . FR 2
Méthodes de nettoyage . . . . . FR 3
Mise en service . . . . . . . . . . . . FR 3
Utilisation . . . . . . . . . . . . . . . . FR 4
Utilisation des accessoires . . . FR 5
Transport. . . . . . . . . . . . . . . . . FR 7
Entreposage . . . . . . . . . . . . . . FR 7
Entretien et maintenance . . . . FR 7
Assistance en cas de panne . . FR 8
Garantie . . . . . . . . . . . . . . . . . FR 8
Accessoires et pièces de re-
change . . . . . . . . . . . . . . . . . . FR 8
Caractéristiques techniques . . FR 9
Protection de
l’environnement
Les matériaux constitutifs de
l’emballage sont recyclables. Ne
pas jeter les emballages dans
les ordures ménagères, mais les
remettre à un système de recy-
clage.
Les appareils usés contiennent
des matériaux précieux recy-
clables lesquels doivent être ap-
portés à un système de recy-
clage. Il est interdit de jeter les
batteries, l'huile et les subs-
tances similaires dans l'environ-
nement. Pour cette raison, utili-
ser des systèmes de collecte
adéquats afin d'éliminer les ap-
pareils hors d'usage.
Niveaux de danger
Utilisation conforme
18 FR

– 2
Vapeur
ATTENTION - Risque de brûlures
Illustration
1 Fermeture de sécurité (chaudière à va-
peur)
2 Pupitre de commande
3 Flexible vapeur
4 Bouton à rappel - détartrage
5 Interrupteur de vapeur
6 Espace de rangement pour les acces-
soires
7 Couvercle de la fiche de l'appareil
8 Connecteur vapeur
9 Poignée de transport
10 Crochet de câble
11 Carter
12 Fermeture du réservoir (réservoir d'eau
propre)
13 Housse en tissu éponge
14 Entonnoir de remplissage
15 Buse manuelle
16 Buse à fenêtre (accessoires spéciaux)
17 Câble d’alimentation
18 Agrafes de retenue
19 Brosse pour sol avec poils
20 Serpillière (brosse pour sol avec poils)
21 Brosse ronde
22 Brosse de puissance (rouge)
23 Rallonge
24 Buse pour sol avec lamelles
25 Buse à jet crayon (4.7 in/120 mm)
26 Buse à jet crayon (7.1 in/180 mm)
27 Serpillière (buse pour sol avec la-
melles)
28 Bouton de verrouillage
29 Rallonge
30 Verrouillage (sécurité-enfants)
31 Pistolet à vapeur
Illustration
1 Interrupteur - Pompe du réservoir d'eau
propre
2 Lampe témoin – chauffage (jaune)
3 Lampe témoin - Manque d'eau ballon
de vapeur (rouge)
4 Affichage de la température
5 Bouton rotatif pour la régulation VAPO-
HYDRO
6 Bouton rotatif pour la régulation de
quantité de vapeur
7 Plage de température de travail
8 Lampe témoin - détartrage (blanc)
9 Témoin lumineux - Manque d'eau du ré-
servoir d'eau propre (rouge)
10 Interrupteur - chauffage (Marche/Arrêt)
– Les éléments de commande pour le
processus de nettoyage sont jaunes.
– Les éléments de commande pour la
maintenance et l'entretien sont en gris
clair.
Les dispositifs de sécurité ont pour but de
protéger l'utilisateur. Par conséquent, ils ne
doivent en aucun cas être désactivés ou
transformés.
Le manostat est chargé de conserver la
pression de la chaudière à un niveau aussi
constant que possible durant le fonctionne-
ment. Lorsque la pression de service maxi-
male admissible est atteinte dans la chau-
dière, le chauffage est désactivé. Il se re-
met en marche en cas de chute de pression
provoquée par une prise de vapeur.
Symboles sur l'appareil
Risque de brûlure provoqué par
les pièces chaudes de l'installa-
tion!
Aperçu général
Éléments de l'appareil
Zone de commande
Repérage de couleur
Dispositifs de sécurité
Régulateur de pression
19FR

– 3
La température augmente lorsque la quan-
tité d’eau dans la chaudière diminue. Le
thermostat de manque d’eau désactive le
chauffage et le témoin de contrôle rouge
"Manque d’eau" s’allume. La réactivation
du chauffage est bloquée jusqu’à ce que la
chaudière soit refroidie ou de nouveau
remplie.
– Si l’appareil surchauffe suite à une
panne du thermostat d’absence d’eau,
le thermostat de sécurité met l’appareil
hors marche.
– S'adresser au service après-vente Tor-
nado responsable pour réinitialiser le
thermostat de sécurité.
– La fermeture de sécurité empêche la
vapeur de s’échapper de la chaudière.
Si le manostat est défectueux et si la
pression de la vapeur dans la chaudière
est excessive, une soupape de sûreté
située dans la fermeture de sécurité
s’ouvre permettant ainsi à la vapeur de
s’échapper.
– Avant de remettre l’appareil en service,
s'adresser au service après-vente Tor-
nado responsable.
Avant d'utiliser l'appareil, toujours vérifier la
compatibilité des textiles à un endroit
caché : commencer par vaporiser, puis
laisser sécher et enfin vérifier la modifica-
tion de la couleur ou de la forme.
Lors du nettoyage des surfaces peintes ou
à revêtement plastique, comme par
exemple les meubles de cuisine et de salle
de séjour, les portes, les parquets, la cire,
le poli des meubles, les revêtements plas-
tiques ou la couleur peuvent se détacher ou
des tâches peuvent se former. Pour net-
toyer ces surfaces, mettre un peu de va-
peur sur un chiffon puis nettoyer les sur-
faces.
Préchauffer la fenêtre en cas de saisons
aux températures basses. Mettre un peu
de vapeur à une distance de 19.7 in
(50 cm) env. sur toute la surface vitrée. Les
tensions sur la surface qui pourraient en-
traîner un bris de vitre sont ainsi évitées.
Ouvrir le couvercle de la fiche de l'appa-
reil et insérer le connecteur vapeur fer-
mement dans l'appareil. Au cours de
cette opération, les crans du connec-
teur doivent s’enclencher dans le cou-
vercle de la prise d'appareil.
Connecter l'élément accessoire (buse
de sol, buse manuel ou buse de jet à
point) avec le pistolet de vapeur. Enfon-
cer les pièces les unes dans les autres
jusqu'à ce que le bouton de verrouillage
sur le pistolet de vapeur s'enclenche.
Utiliser les tubes de rallonge en cas de
besoin. Enfoncer les pièces les unes
dans les autres jusqu'à ce que la tête de
verrouillage respective d'enclenche.
Appuyer sur la tête de verrouillage pour
séparer les pièces accessoires.
Thermostat de manque d'eau
Thermostat de sécurité
Fermeture de sécurité
Méthodes de nettoyage
Rafraîchissement des textiles
Nettoyage de surfaces enduites ou
vernies
Nettoyage de surfaces vitrées
Mise en service
Montage des accessoires
20 FR
Table of contents
Languages: