Oster POWER STEAM GCSTBS-100 User manual

Manual de Instrucciones
VAPORIZADOR PORTÁTIL
LEA TODAS LAS INSTRUCCIONES ANTES DE USAR ESTE APARATO
Instruction Manual
POWER STEAM HANDHELD STEAMER
READ ALL INSTRUCTIONS BEFORE USING THIS APPLIANCE
Manual de Instruções
VAPORIZADOR PORTÁTIL
LEIA E GUARDE ESTAS INSTRUÇÕES
MODELO
MODEL
GCSTBS-100
GCSTBS-200

Español - 1
PRECAUCIONES IMPORTANTES
Cuando use algún aparato eléctrico siempre deben seguirse precauciones básicas de
seguridad incluyendo las siguientes:
Lea todas las instrucciones antes de usar.
1. Utiliceelaparatosolamenteconelnparaelquehasidodiseñado.
2. Paraprotegersecontraelriesgodeunchoqueeléctrico,nosumerjaelaparatoen
aguanienningúnotrolíquido.
3. Siempreapagueelaparato(Off)antesdeenchufarodesenchufardeltomacorriente.
Nuncatiredelcableparadesenchufarelaparatodeltomacorriente,envezdetirar,
sujeteelenchufeyjáleloparadesconectarelaparato.
4. Nopermitaqueelcabletoquelassuperciescalientes.Dejeenfriarelaparatopor
completoantesdeguardarlo.Envuelvaelcablealrededordelaparatodeforma
holgadacuandoloalmacene.
5. Desconectesiempreelapartodeltomacorrienteeléctricocuandoestéllenándolocon
agua,limpiándoloovaciándoloycuandonoloestéusando.
6. Nohagafuncionarelaparatosielcableestádañadoosielaparatosehacaídoo
dañadoopresentefuga.Paraevitarelriesgodechoqueeléctrico,nodesarmeel
aparato.Lléveloauncentrodeservicioautorizadoparaqueloexamineny/oreparen.
Elrearmadoincorrectopuedeprovocarelriesgodeunchoqueeléctricoalusarel
aparato.
7. Este artefacto eléctrico no está destinado para ser usado por personas (incluyendo
niños)cuyascapacidadesfísicas,sensorialesomentalesesténdisminuidas,o
carezcandeexperienciayconocimiento,amenosqueunapersonaresponsablepor
suseguridadleshayasupervisadooinstruidoenelusodeesteelectrodoméstico.
LosniñosdeberánestarbajosupervisiónparacerciorarsedequeNOjueguenconel
artefacto eléctrico.
8. Sepuedenproducirquemadurasporcontactoconlaspartesdemetalcalientes,el
aguacalienteoelvapor.Tengacuidadoalinvertirelaparatodevaporyaquepuede
quedaraguacalienteenelreservorio.
9. Parareducirelriesgodecontactoconelaguacalientequesaleporlassalidas
devapor,reviseelaparatoantesdecadauso,sosteniéndololejosdelcuerpoy
operandoelinterruptordevapor.
10.Paraevitarunasobrecargadelcircuito,nohagafuncionarotroaparatodealta
potencia en el mismo circuito.
11.Nuncaapliquevaporenlasprendasmientrasalguienlasllevepuestas.
12.Siresultaabsolutamentenecesariousaruncabledeextensión,Sedebeutilizarun
cable con una capacidad eléctrica mayor o igual a la capacidad eléctrica nominal de
laplancha.Loscablesdemenoramperajesepuedensobrecalentar.Sedebetener
cuidadodeacomodarelcabledeextensióndemodotalquenopuedaserhaladoo
provocartropiezos.
13.Cuandolleneeltanquedeagua,vigileelaguaquepuedagotearycaerenelsuelo
yaqueestopuedeprovocarunresbaloyunacaida.
14.Asegúresedeenchufarelcabledemaneraquenopuedaserjaladooprovocar
tropiezos.Asegúresesiempredequepuedamoverselibrementesinenredarseconel
cable,causandounacaidaylesiónpersonal.

Español - 2
15.Elaparatopuedecausardañospersonalesodañarsesisecae.
16.Elusodeaccesoriosnorecomendadosovendidosporelfabricantepuedeanularsu
garantía.
17.Paraevitardañospersonalesyalaunidad,soloañadaaguaeneltanquedeagua.
NUNCAañadasolucionesdelimpieza,perfumes,aceitesniotrosaditivosquímicos.
GraciasporlacompradelVaporizadordePrendasdeVaporPotentedeOster®. Con una
tecnologíadevaporqueproveevaporpotentecontinuoyaccesoriosfácilesdeutilizar,
estevaporizadorledarávidaalasprendas,laropadecama,lascortinasymucho
más—¡rápidamenteyecientemente!
• Desempaquesuvaporizador,retireydespeguecualquieretiquetadelaunidad.
• Retireyconserveelmanualdeinstucciones.
• Limpieelexteriordelaunidadconunpañohúmedoounaesponjapararemoverel
polvo.Sequebien.
• Mantengalaunidadsobreunasupercieplana,nivelada.
• Cuandoutilicesuvaporizadorporprimeravez,podríanotarunpocodehumoyun
lígeroolor.Estoesnormalcuandoelaparatosecalientaporprimeravezynodebe
sermotivodepreocupación.
• NO utilice este artefacto al aire libre.
• NOutiliceelvaporizadordeprendasparaotrosnesquenoseanlosprevistos.
• ESTEVAPORIZADORHASIDODISEÑADOPARAUSODOMESTICO
SOLAMENTE.
CONSERVE ESTAS INSTRUCCIONES
ANTES DEL PRIMER USO

Español - 3
VAPORIZADOR PORTÁTIL + ALMOHADILLA
1. Barradeplanchado,contemperatura
2. Salidadevapor
3. Interruptordedisparodevapor
4. Tanquedeaguaremoviblecontubodeentradadeagua
5. Luzroja/verdeindicadorasdefuncionamiento
6. Interruptordeslizableconajustesdeapagado,temperaturabaja/temperaturaalta
(Off,Low/High)
7. Cable de 198 mm
8. Mangoparavapor
9. Cepilloparatejidos
10.Accesorioacolchonadoparapelusas/difusordevapor
11.Almohadilladeplanchadosobrelapuerta
11a.Barra de soportes*
*Paraobtenermásinformaciónsobreesteproductoysusaccesorios,porfavorvisite
Oster.com
3
2
5
1
4
6
7

Español - 4
Accesorios Adjuntos
8 9 10
11 11a
Acerca De Sus Características Y Accesorios
Características
Barradeplanchado,contemperatura–Simulalasueladeunaplanchaparaeliminarlas
arrugas.
Salidadevaporamplia–Proveeampliacoberturadevaporparasusprendasytejidos.
Interruptordedisparodevapor–Elinterruptorincorporadolebrindalaopcióndeutilizar
elvaporsegúnlonecesiteojarelinterruptorenposiciónparaobtenerhasta24minutos
devaporcontinuo.
Tanquedeaguaremoviblecontubodeentradadeagua–Fácilderemoverconsoloun
giro,permitellenareltanqueconrápidez.Untubodeentradadeaguatransmiteelagua
desdeeltanquehastalaboquilladelvaporizador.Unruidoaltovibratorioesindicativode
queelniveldeaguaestábajoyesmomentoderellenareltanquedeagua.
Luzrojaindicadoradefuncionamiento–Seiluminacuandolaunidadseenchufaaun
tomacorrienteyseseleccionaelajustedevaporbaja/alta(High/Low).
Luzverdeindicadoradelisto–Seiluminacuandolaunidadestálistaparaserutilizada.
Interruptordeslizableparaajustesdeapagadoyvapor–altoybajo–Apagalaunidady
proveedosajustesdevaporparausarenunavariedaddetejidos.
3metros(3,7metrosenelmodeloGCSBHS-200)–Lebrindalalibertaddemoversesin
enredarse.

Español - 5
Accesorios
Mangoparavapor–Dejaqueelvaporcalientehagatodoeltrabajo
paraobtenerlosmejoresresultadosmientrasqueustedsostieneel
vaporizadorcómodamente.
Cepilloparatejidos–Utiliceengeneralpararelajarlasbrasdesus
tejidosgruesosypesadosylograrunamejorpenetracióndevapor.
Cepilloparapelusasydifusordevapor–Usepararemoverlaspelusas,
elpelodeanimales,elpolvoymás.Sudiseñoacolchonadotambién
ayudaasuavizarelvaporparaprotegersustejidosdelicados.
Almohadilladeplanchadosobrelapuerta–Fácildeensamblar,
funcionacomounatabladeplancharverticalparaeliminarlasarrugas
difíciles,permitiendoleplancharalvaporjustoenlapercha¡eliminando
latabladeplanchar!
Instrucciones De Operación
LLENADO DEL TANQUE DE AGUA
Advertencia: paraevitardañospersonalesoalaunidad,soloañadaaguaaltanquede
agua.NUNCAañadasolucionesdelimpieza,perfumes,aceitesniotrosaditivosquímicos
Nota:Suvaporizadorestádiseñadoparaserutilizadoconaguadelallave.Sinembargo,
siustedtieneaguadura,esrecomendadoutilizaraguadestiladaparaobtenermejores
resultados.
1. Coloqueelvaporizadorsobreunasupercieplana.
2. Sujeteeltanquedeaguaconunamanomientrasgiraelmangodelvaporizdor
hacialaizquierdaconlaotramano,hastaquelaechaenelmangosealineecon
el símbolo de candado abierto ( )eneltanquedeagua(Figura1).Alceelmango
fueradeltanquedeagua.Coloqueelvaporizadorhaciaunlado.
3. Lleveeltanqueaunfregadero.Tiredelatapadegomadeloriciodellenadopara
abrirlayviertaaguadelallaveeneloriciohastaqueelaguaalcanceelnivelMax
eneltanque(Figura2).Sielaguasederramaporfueradeltanqueodentrodel
centrodelacavidaddeltanque,sequeconpapeldetoallaounpaño.
Door
Puerta
Figura 1

Español - 6
Advertencia:Cuandolleneeltanquedeagua,vigileelaguaquepuedagotearycaeren
elsueloyaqueestopuedeprovocarunresbaloyunacaida.
Consejo:Noesnecesarioqueeltanqueestéllenoparaqueelvaporizadorgenere
vapor.Paramejoresresultados,soloasegúresedequeeltanqueestéllenoporlomenos
hastalamitad.
4. Cierrelatapadeloricio,inserteelmangodentrodeltanqueygírelohacialaderecha
hastaquelaechaenelmangosealineeconelsímbolodecandadocerrado( )
eneltanquedeagua.Tiredelmangoparaasegurarsedequeestéaseguradoen
posición.Unruidoaltovibratorioesindicativodequeelniveldeaguaestábajoyes
momentoderellenareltanquedeagua.
Nota:Sinecesitaagregaraguamientrasaplicaelvapor,desenchufeelvaporizador,
espereaqueseenfríeysigalospasosmásarriba.
CÓMO INSTALAR Y RETIRAR LOS ACCESORIOS
• Parainstalar:Sujeteambosladosdelaccesorioeinsertelaaberturaenlaparte
superiordelaccesoriodetrásdelalengüetapequeña,localizadaarribadelabarrade
planchado,luegopresioneelaccesorioligeramentesobrelaboquilladelvaporizador
hastaqueencajeensulugar.
• Pararetirar:Sujeteelmangodelaccesorioyjaleligeramentehaciaustedpara
separarlodelaboquilla(Figura3).
USO DE SU VAPORIZADOR EN POSICIÓN VERTICAL
Ustedpuedeutilizarsuvaporizadorenposiciónverticalparaplancharprendasycortinas
colgadas.
Nota:Sisumodeloincluyelaalmohadilladeplanchadosobrelapuerta,sigalas
instruccionesbajolasecciónENSAMBLAJEYUSODESUALMOHADLLADE
PLANCHADOSOBRELAPUERTA.
Precaución:Labarradeplanchadosecalienta.Nolatoque.
1. Coneltanquedeagualleno,instaleelaccesoriodeseado(consulteCÓMO
INSTALARYRETIRARLOSACCESORIOS).
2. Cuelguesuprendaenunaperchalimpiaquenoestéoxidada.
3. Enchufelaunidadauntomacorrienteestándar.
Advertencia: Asegúresedeenchufarelcabledemaneraquenopuedaserjalado
oprovocartropiezos.Asegúresesiempredequepuedamoverselibrementesin
enredarseconelcable,causandounacaidaylesiónpersonal.
Door
Puerta
Figura 2
Door
Puerta
Figura 3

Español - 7
4. Laluzrojadefuncionamientoseiluminayalternaentreprendidoyapagadopara
mantenerlatemperatura;entansolo45segundos,laluzverdeindicadoradelisto
tambiénseiluminará.Laluzverdeseapagaráylabombadejarádefuncionarsila
temperaturaesmuybajaparagenerarvapor.
Precaución:Puedenocurrirquemadurasaltocarlaspartesmetálicascalientes,el
aguacalienteoelvapor.Procedaconprecaucióncuandoinviertaelaparatoyaque
podríahaberaguacalienteeneltanque.
5. Ahorayaestálistoparacomenzaraaplicarvaporasusprendas!
6. Sostengasuvaporizadorporelmangoenposiciónverticalconlaboquilladirigida
hacialatelaylejosdeustedysucuerpo.
Advertencia:Elvaporestácaliente.Siempredirigalaboquillaendireccióncontraria
asupersona,otraspersonas,mascotas,plantasylasparedes.Nuncaapliquevapor
alasprendasquesellevenpuestas.
7. Conlamanolibre,tiredeltejidoypresioneelinterruptordedisparodevapor
mientrasquemuevelaboquillasobreeltejido.
8. Ustedpuedeutilizarelinterruptordedisparodevapordedosmaneras:
a.Presioneelinterruporparagenerarvaporysuélteloparapausarelvapor.
b.Paraobtenervaporcontinuoporhasta24minutos,puedepresionarelinterruptory
moverlohaciaabajoparajarloenposición.
9. Toqueeltejidoligeramenteconlabarradeplanchado,moviéndolahaciaarribay
haciaabajo,comenzandoenlapartesuperiordelaprendaymoviendosehacia
abajo.
Precaución:Labarradeplanchadosecalienta,nolatoque.
10.Repitaestepasohastaqueeltejidonotengaarrugas.
Consejo:Paralasarrugasmásdifíciles,tratedeaplicarelvaporenlapartede
adentrodeltejido.
11.Cuandotermine,muevaelinterruptorhaciaarribaparaliberarlodelaposiciónjay
desliceelinterruptordetemperaturaalaposicióndeapagado(Off).
12.Coloqueelvaporizadorsobreunasupercieplanaydesenchufedeltomacorriente.
13.Espereaquelaunidadsehayaenfriadoyvacieeltanquedeagua.
Nota:Siempredesenchufeelvaporizadorcuandonoestéenuso.
ENSAMBLAJE Y USO DE ALMOHADILLA DE PLANCHADO SOBRE LA PUERTA
Ensamblaje
1. Veriquequetienetodaslaspiezasnecesariasparaensamblarelproducto(verla
ilustraciónqueaparecedebajodeFAMILIARICESECONSUVAPORIZADORDE
PRENDASDEVAPORPOTENTEOster®).
2. Conecte las dos barras de soporte en el centro
paraformarunasolabarra,luegoinsertela
barra completa dentro de la abertura en la
partesuperiordelaalmohadilladeplanchado,
vericandoqueestébieninsertada(Figura4).
3. Conlapuertacompletamenteabierta,coloquelas
correasdesoportesobrecadaesquinasuperior
decualquierpuerta,asegurándosedequela
tela de toalla blanca con el logo de Oster esté
mirandohaciausted.
Door
Puerta
Figura 4

Español - 8
4. Enganchecadacorreaalrededordecadaesquinadelapuerta
(Figura5).
Tip:Ustedpuedetirardelascorreasatravésdelossujetadores
paraajustaraunlargoadecuadoqueacomodelapuerta.
Nota:Elvaporpuedeatravesarlaalmohadilladeplachandoylos
alrededores.Noutilicevaporenpuertasqueseansensiblesal
calorolahumedad.
5. Unavezquelascorreasencajenbienylaalmohadillade
planchadoestéaunaalturacómoda,tireligeramentedela
almohadillahaciaabajoparaasegurarqueestébiencolocada.
Cierre la puerta completamente para ayudar a mantener la
almohadilladeplancharaseguradaenposición.
Uso de su almohadilla de planchado
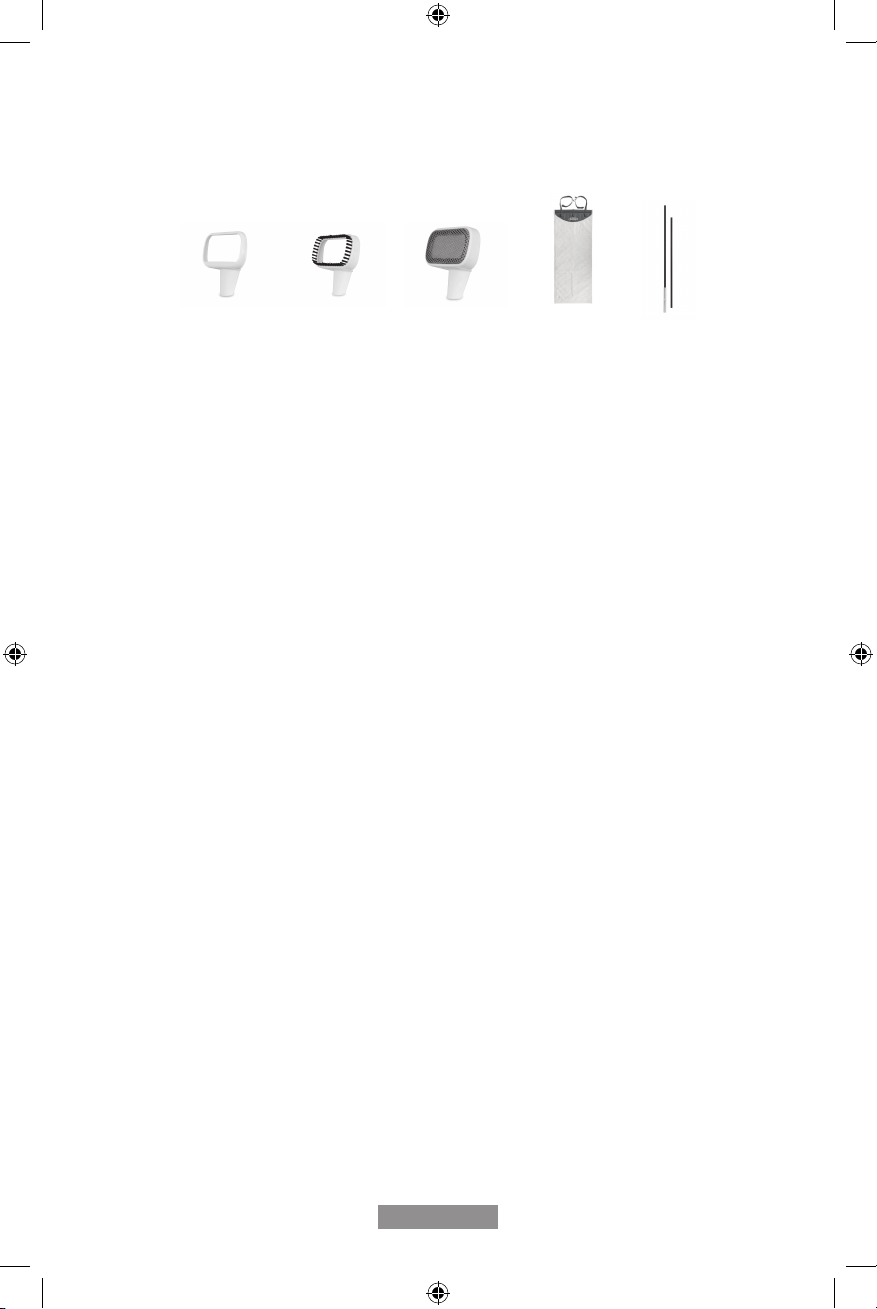
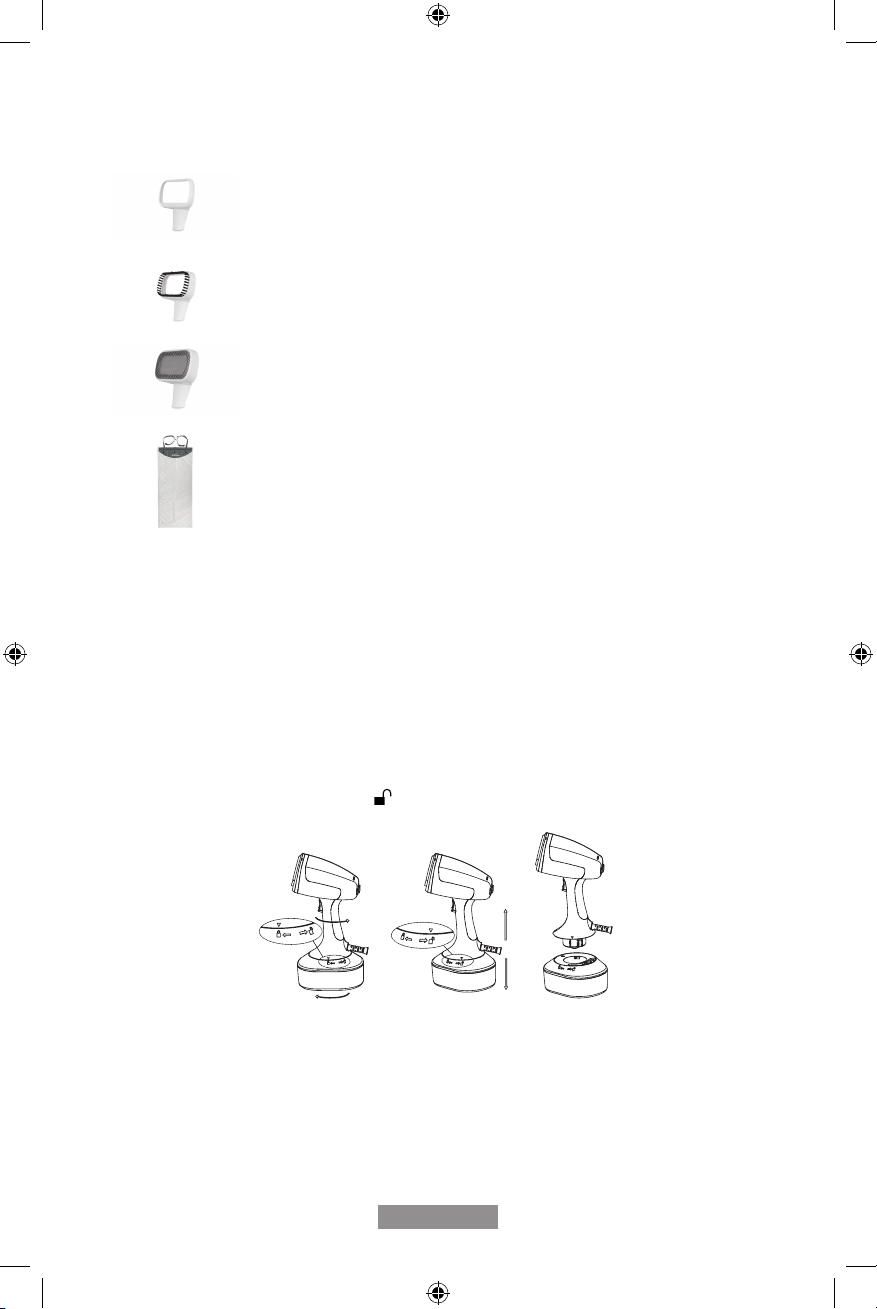
1. Silaalmohadilladeplanchadoestáensamblada,cuelguesuprendaenunapercha
limpiaquenoestéoxidadaeinsertelaperchaenelenganchedelcentroenla
partesuperiordelaalmohadilladeplanchado.Sinoestáensamblada,sigalas
instruccionesbajolaseccióndeEnsamblaje,másarriba.Usecualquieradelos
enganchesalosladosparacolgarsusprendasyaplicarvaporalasmangas.
2. Sigalospasos1al13bajolaseccióndeUSODESUVAPORIZADOREN
POSICIÓNVERTICAL.
USO DE SU VAPORIZADOR EN POSICIÓN HORIZONAL
Tambiénpuedeusarsuvaporizadorcomounaplanchatradicionalpararefrescarlas
sábanas,almohadas,colchones,sofásymás.
1. Despuésqueeltanqueestélleno,asegúresedequenohayaquedadoaguadentro
delcentrodelacavidaddeltanque.Conecteeltanquedeaguaalmangodel
vaporizador.Instaleelaccesoriodeseadoysigalospasos3y4bajolasecciónde
USODESUVAPORIZADORENPOSICIÓNVERTICAL.
2. Unavezqueelvaporizadorhayaalcanzadolatemperaturaseleccionada,presione
elinterruptordedisparodevaporyenposiciónhorizontal,muevaelvaporizador
continuamentesobrelapiezaaplanchar.
Precaución: Labarradeplanchadosecalienta,nolatoque.
3. Unavezquetermine,desliceelinterruptordetemperaturavaporalaposiciónde
apagado(Off)ydesenchufelaunidad.Espereaquelaunidadseenfríeporcompleto
antesdevaciareltanquedeaguayretirarelaccesorio.
Consejos Para Aplicar Vapor
• Elusoincorrectodelvaporizadorpuedecausardañosasupropiedaddebidoal
vapor.Siemprelealasinstruccionesenestemanualantesdeutilizarsuvaporizador.
• Noopereelvaporizadorconuntanquedeaguavacio.Paraagregaraguadurante
elfuncionamiento,apagueelvaporizador,espereaqueseenfríe,luegoremuevael
tanquedeaguayllénelodenuevo.
• Siemprelealasetiquetassobreelcuidadodeltejidoparaayudarleadeterminarel
tipodetejidoparaaplicarlevapor.Sinoestásegurodelabradeltejido,pruebe
primerosobreunapequeñaáreayapliquevaporenunacosturaoruedointerior.
• Paralasarrugasmásdifíciles,tratedeaplicarvapordesdelapartedeadentrodela
tela.
• Useprecaucióncuandocuelgueprendasenlaalmohadilladeplanchadosobrela
puerta.Sisecargademasiadoosehalalaprenda,estopuedeocasionarquela
almohadillasesalgadelapuertaysecaiga.
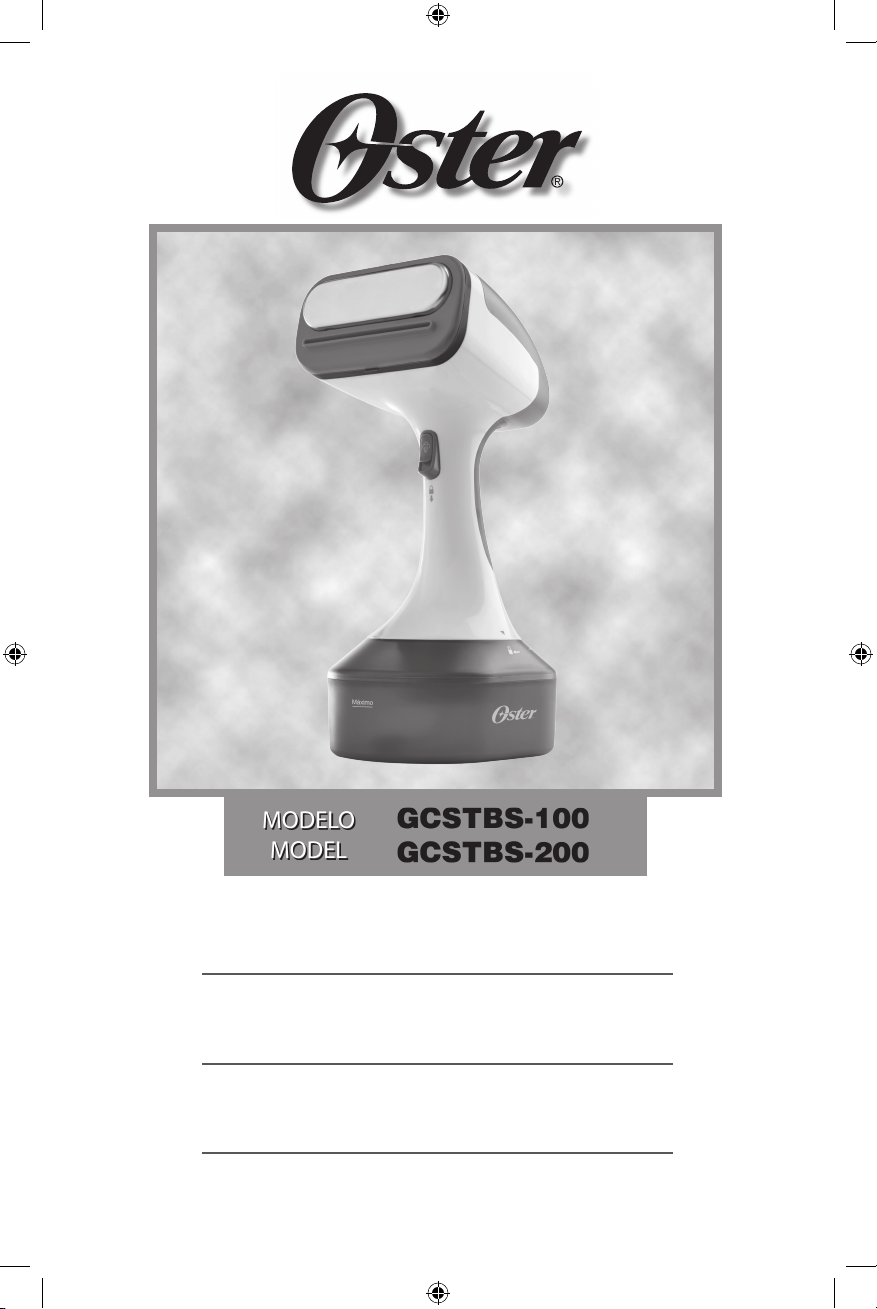
Door
Puerta
Figura 5

Español - 9
• Cuandoestéaplicandovapor,eltocareltejidoligeramenteconlaboquilladevapor
puedeayudaraeliminarlasarrugas.Esimportantehacercontactoconlaprenday/o
eltejido.
• Lostejidosmásgruesosrequierenmásvapor.
• Solouseaguaenlaunidad.Noañadasolucionesdelimpieza,perfumes,aceitesni
ningunaotrasustanciaquímicaquepuedadañarelaparato.
• Nousevaporenlasparedesnilaspuertas.
• Cuandocuelgueunaprendaenlapuertamientrasaplicavapor,tengacuidadode
nodañarlapuerta.Uselaalmohadilladeplanchadosobrelapuertaparaprotegerla.
Despuésdecadauso,vacíeeltanquedeaguainvirtiéndoloparaasegurarquetoda
elaguasevacieyevitargoteos.
• Cuandoapliquevapor,muevaelvaporizadorconstantementesobrelapiezaqueestá
vaporizando.Nomantengaelvaporizadorsobrelamismaáreaporningúnperíodode
tiempoparaevitardañosaltejido.
Cuidado Y Limpieza
LIMPIEZA
1. Asegúresedequelaunidadestéapagada,desenchufadaydejequeseenfríe
completamente antes de limpiar.
2. Siquedaaguaeneltanquedeagua,remuevaeltanqueeinviértaloparaasegurar
quetodaelaguasevacie.
3. Limpielassuperciesexterioresconunpañosuave,humedecido.Sequebien.
Advertencia:Nuncasumerjaelvaporizador,elcablenielenchufeenaguanien
ningúnotrolíquido.
•Noutilicelimpiadoresabrasivosnialmohadillasdefregarquepuedanrayarla
supercie.
•Nocoloqueelvaporizadorenlamáquinalavaplatos.
4. Retirelaalmohadilladeplanchadodelapuertaparadesensamblar:
a.Sujeteunodelosextremosdelabarradesoporteydeslicehaciaafuera.
b.Coloquelaalmohadilladeplanchadoenlalavadoraderopaylaveenaguafría
condetegentedelavar,luegosequealaire.
c.Unavezquesehayasecadocompletamente,vuelvaaensamblarlaalmohadilla
deplanchadosegúnlasinstruccionesenlaseccióndeENSAMBLAJEYUSODE
SUALMOHADILLADEPLANCHADOSOBRELAPUERTA.
LIMPIEZA CON VINAGRE Y AGUA
Esrecomendadolimpiarsuvaporizadorcadadosmesesparareducirlosdepósitos
mineralesquepuedenafectareldesempeñodesuunidad.
1. Apaguelaunidadydejequeseenfríecompletamente.
2. Remuevaeltanquedeaguayasegúresedequeestévacio.
3. Lleneeltanquedeaguaconunasoluciónde50%devinagreblancoy50%deagua
hastaelnivelquemarcaMax.
4. Enchufelaunidadauntomacorrienteypresioneelinterruptordedisparodevapor
paraprocesarunciclocompletodevapor.
5. Unavezqueelciclodevaportermine,lleneeltanqueconagualimpiayrepitael
procesohastaqueeloloravinagredesaparezca.
ALMACENAMIENTO
Dobleelcableenformadelazosyalmacenelaunidadenposiciónvertical,enunlugar
limpioysecoconunasupercieestable.Asegúresedequeeltanquedeaguaesté
vacio.Sinoloestá,remuévaloeinviértaloparaasegurarquetodaelaguasevaciey
evitargoteos.

Español - 10
Problema Causa Posible Solución
Elvaporizadorno
producevapor.
Elvaporizadorno
sehacalentadolo
sucientemente.
Ustedpresionóel
interruptor de disparo
devaporylosoltó.
Elniveldeaguaenel
tanquedeaguaestá
muybajo.
Elvaporizadorno
estáenchufadoaun
tomacorriente.
El tomacorriente no
está funcionando.
Elvaporizadornoestá
encendido.
Dejequeelvaporizadorsecaliente
poruntiempoaproximadode45
segundosantesdeutilizar.
Presione el interruptor de disparo
devaporymanténgalopresionado
omuévaloalaposiciónjapara
obtenervaporcontinuo.
Desenchufeelvaporizador,dejeque
seenfríecompletamenteyvuelvaa
llenareltanquedeagua.
Asegúresedequeelvaporizador
estéenchufadoauntomacorriente.
Enchufeaotrotomacorrientey
veriquequefunciona.
Muevaelinterruptordeslizableal
ajustedetemperaturaaltaobaja
(LowoHigh).
Elvaporizadorhace
unruidovibrante.
La bomba de agua
dentro de la unidad
detectaqueelnivelde
aguaestábajo.
Desenchufeelvaporizador,dejeque
se enfrie completamente y llene el
tanquedeagua.
Elvaporizadordeja
gotas de agua en la
prenda.
Puedeserqueel
accesorioutilizado
tengacondensación.
Dejequeelaparatoseenfríe
completamente,retireelaccesorioy
séquelo.
Elvaporizadorhace
unruidodezumbido
mientrasexpulsael
vapor.
La bomba de agua
está funcionando.
Este ruido es normal.
Resolución De Problemas

English - 1
IMPORTANT SAFEGUARDS
Whenusingelectricalappliances,basicsafetyprecautionsshouldalwaysbefollowed
includingthefollowing:
Read All Instructions Before Use.
1. Use appliance only for its intended use.
2. Toreducetheriskofelectricshock,donotimmersetheapplianceinwaterorother
liquids.
3. Alwaysturntheapplianceto“Off”beforepluggingorunpluggingtheappliancefrom
theelectricaloutlet.Neveryankcordtodisconnectfromoutlet;instead,graspplug
and pull to disconnect.
4. Donotallowcordtotouchhotsurfaces.Letappliancecoolcompletelybeforeputting
away.Loopcordlooselyaroundappliancewhenstoring.
5. Alwaysdisconnectappliancefromelectricaloutletwhenllingwithwateroremptying,
andwhennotinuse.
6. Donotoperateappliancewithadamagedcord,oriftheappliancehasbeendropped
ordamaged.Toreducetheriskofelectricshock,donotdisassembleorattemptto
repairtheappliance,takeittoaqualiedservicecenterforexaminationandrepair.
Incorrectreassemblyorrepaircouldcauseariskofre,electricshock,orinjuryto
personswhentheapplianceisused.
7. Thiselectricalapplianceisnotintendedforusebypersons(includingchildren)
withreducedphysical,sensoryormentalcapabilities,orlackofexperienceand
knowledge,unlesstheyhavebeengivensupervisionorinstructionconcerningthe
useoftheappliancebyapersonresponsiblefortheirsafety.
8. Burnscouldoccurfromtouchinghotmetalparts,hotwater,orsteam.Usecarewhen
youturnasteamapplianceupsidedown–theremaybehotwaterinthereservoir.
9. Toreducetheriskofcontactwithhotwateremittingfromsteamvents,check
appliancebeforeeachusebyholdingitawayfrombodyandoperatingsteambutton.
10.Toreducethelikelihoodofcircuitoverload,donotoperateanotherhighwattage
applianceonthesamecircuit.
11.Neversteamclotheswhilesomeoneiswearing.
12.Ifanextensioncordisabsolutelynecessary,themarkedelectricalratingofthe
extensioncordshouldbeatleastasgreatastheelectricalratingoftheappliance.
Cordsratedforlessamperagemayoverheat.Careshouldbetakentoarrangethe
cordsothatthecordcannotbepulledortrippedover.
13.Whenllingthewatertank,watchforwaterthatcandripontotheoorandcauseyou
to slip and fall.
14.Careshouldbetakentoarrangethecordsothatitcannotbepulledortrippedover.
Alwaysmakesureyoucanmovefreelywithoutgettingtangledwiththecord.
15.Appliancemaycausepersonalinjuryorbedamagedifdropped.
16.Theuseofattachmentsnotrecommendedorsoldbytheappliancemanufacturer
maycauseinjuriesorvoidyourwarranty.
17.Toavoidpersonalinjuryanddamagetotheappliance,onlyaddwatertothewater
tank.NEVERaddcleaningsolutions,perfumes,oilsoranyotherchemicaladditives.
SAVE THESE INSTRUCTIONS
ThankyouforpurchasingtheOster®PowerSteamFabricSteamer.Withpowerful
continuoussteamtechnologyandeasy-to-useaccessories,thisSteamerwillbringout
thebestingarments,linens,drapesandmore--quicklyandefciently!.

English - 2
• UnpackyourSteamer;removeandpeeloffanylabelsadheredtotheunit.
• Removeandsaveinstructionmanual.
• Wipeoutsideoftheunitwithadampclothorspongetoremoveanydust.Dry
thoroughly.
• Keepunitonaat,leveledsurface.
• WhenusingyourSteamerforthersttime,youmaynoticeasmallamountofsmoke
andaslightodor.Thisisnormalwhenheatingtheapplianceforthersttimeand
thereisnoreasonforconcern.
BEFORE FIRST USE
LEARNING ABOUT YOUR OSTER®
POWER STEAM FABRIC STEAMER
1. Heatedpressbar
2. Steamexit
3. SteamTrigger,withlockingmechanism
4. Removablewatertankwithwaterinlettube
5. Red/greenpowerindicatorlight
6. Off,Low/Highslideswitch
7. 198 mm. cord
8. SteamHandle
9. Fabricbrush
10.Lintpad/steamdiffuser
11.Overthedoorpresspad
11a. Support rods*
*Formoreinformationaboutthisproductanditsaccessories,pleasevisitOster.com
3
2
5
1
4
6
7

English - 3
Accessories Attachments
About Your Features And Accesories
Features
Heatedpressbar–Workslikeanironsoleplatetopresswrinklesout.
Widesteamexit–Provideswidecoverageofsteamforyourgarmentsandfabrics.
Steamtrigger,withlockingmechanism–Integratedswitch,givesyoutheoptiontosteam
ondemandorsettheswitchinthelock-downpositionforupto24minutesofcontinuous
steam.
Removablewatertankwithwaterinlettube–Easilytwistsoffforquickrells.Awaterinlet
tubeinsidethewatertransmitsthewaterfromthetanktosteamerhead.Aloudvibrating
noiseindicatesthatthewaterislowinthewatertankandtimetorell.
Redpowerindicatorlight–Lightsupwhenunitispluggedintoanelectricaloutletand
settoHighorLowsetting.
Greenreadyindicatorlight–Lightsuptoindicatetheunitisreadyforuse.
Off&Low/Highslideswitch–Turnsunitoffandprovidestwosteamsettingsforuseona
varietyoffabrics.
3meters(3.7metersonModelGCSBHS-200)–Givesyouthefreedomtomovearound
withoutgettingintheway.
8 9 10
11 11a

English - 4
Accessories
Operating Instructions
SteamHandle–Letsallthehotsteamgetthebestresultsforyouwhile
youcomfortablyholdthesteamer.
FabricBrush–Useforgeneralsteamingtoloosenthebersofyour
thickandheavyfabricsforbettersteampenetration.
LintBrush&SteamDiffuser–Usetopickuplint,pethair,dustand
more.Thecushionalsohelpsdiffusesteamforasmoothsteamingto
protect your delicate garments.
OvertheDoorPressPad–Quicktosetup,servesasaverticalironing
boardtopressouttoughwrinkles,allowingyoutosteamrightonthe
hangerandskiptheironingboard!
FILLING WATER TANK
Warning:Toavoidpersonalinjuryanddamagetotheunit,onlyaddwatertothewater
tank.NEVERaddcleaningsolutions,perfumes,oilsoranyotherchemicaladditives.
Note:YourSteamerisdesignedtobeusedwithtapwater.However,ifyouhavehard
water,werecommendusingdistilledwaterforbetterresults.
1. PlaceSteameronaatsurface.
2. Holdthewatertankwithonehandwhileturningthesteamerhandlecounterclockwise
withotherhand,untilthearrowonthehandlereachestheunlocksymbol( )onthe
watertank.Liftthehandleoffthewatertank.SettheSteameraside(Figure1).
Door
Puerta
Figure 1

English - 5
3. Takethewatertanktoasink.Pulltherubberizedwater-llcovertoopenandpourtap
waterfromthefaucetintothewater-llopeninguntilitreachestheMaxwaterlevelin
watertank(Figure2).Ifwaterspillsoutsideofthetank,orwithinthecenterwatertank
cavity,wipeitdrywithapapertowelorcloth.
Warning:Whenllingthewatertank,watchforwaterthatcandripontotheoorand
cause you to slip and fall.
Tip: ItisnotnecessarytohaveafulltankofwaterfortheSteamertogeneratesteam.
Forbestresults,justmakesurethewatertankisatleasthalffull.
4. Closethewater-llcover,insertthehandleintothewatertankandturnclockwise
untilthearrowonthehandlealignswiththelocksymbol( )onthetank.Pullonthe
handletoensureitisfullylockedinposition.
Note:Ifyouneedtoaddwaterwhilesteaming,unplugthesteamer,waituntilitcools
andfollowabovesteps.Ifaloudvibratingnoiseisheard,thenthewaterlevelislow
andneedstoberelled.
ATTACHING AND REMOVING ACCESSORIES
• To attach: Graspbothsidesoftheaccessoryandinserttheheatedpressbar
openingatthetopoftheaccessory,behindthesmalltababovetheheatedpressbar
thengentlypressaccessoryontosteamerheaduntilitsnapsintoplace.
• To remove:Gripaccessoryhandleandgentlypulltowardyoutoseparatefromthe
steamhead(Figure3).
Door
Puerta
Figure 2
Door
Puerta
Figure 3

English - 6
USING YOUR STEAMER VERTICALLY
YoucanuseyourSteamerintheverticalpositiontopresswithsteamhanginggarments
and drapes.
Note: IfyourmodelincudestheOvertheDoorPressPad,followtheinstructionsunder
SETTINGUPANDUSINGYOUROVERTHEDOORPRESSPAD.
Caution: Heatedpressbargetshot.Donottouch!
1. Withthewatertanklled,attachdesiredaccessorytouseonyourgarment(referto
ATTACHINGANDREMOVINGACCESSORIES).
2. Hangyourgarmenttobesteamedonaclean,rust-freehanger.
3. Plug unit into a standard electrical outlet.
Warning: Careshouldbetakentoarrangethecordsothatitcannotbepulledor
trippedover.Alwaysmakesureyoucanmovefreelywithoutgettingtangledwiththe
cord.
4. SlidetheswitchtoLoworHigh.Theredpowerindicatorlightilluminatesandwill
cycleonandoffasthetemperatureismaintained,andinjustapproximately45
seconds,thegreenreadylightwillalsoilluminate.Thegreenlightmaycycleoff,and
thepumpwillstopifthetemperatureistoolowtogeneratesteam.
Caution:Burnscouldoccurfromtouchinghotmetalparts,hotwater,orsteam.Use
carewhenyouturnasteamapplianceupsidedown–theremaybehotwaterinthe
reservoir.
5. Youarenowreadytostartsteaming!
6. HoldyourSteamerbythehandleinverticalpositionwiththeheadpointingtowardthe
fabricandawayfromyouandyourbody.
Warning:Steamishot.Alwayspointsteamerexitawayfromyourself,otherpersons,
pets,plantsandwalls.Neversteamclotheswhiletheyarebeingworn.
7. Withyourfreehand,pullthefabrictightandpressthetriggerswitchasyoumovethe
Steameroverthefabric.
8. Youcanusethetriggertwoways:
a.Presstheswitchtogeneratesteamandreleaseittopausethesteam.
b.Togetcontinuoussteamforupto24minutes,youcanpressthetriggerswitchand
moveitdowntothelockdownposition.
9. Touchthefabriclightlywiththeheatedpressbar,movingitinadownwardmotion,
beginningatthetopofthegarmentandmovingdownward.
Caution:Theheatedpressbargetshot,donottouch.
10.Repeatthisstepuntilfabriciswrinklefree.
Tip: Formoredifcultwrinkles,trysteamingfromtheundersideofthefabric.
11.Whennished,movetriggerswitchuptoreleaseitfromthelockdownpositionand
slideswitchtoOff.
12.PlaceSteameronaatsurfaceandunplugfromelectricaloutlet.
13.WaituntilSteamerhascooledandemptywatertank.
Note: AlwaysunplugtheSteamerwhennotinuse.

English - 7
SETTING UP AND USING THE DOOR PRESS PAD
Setting Up
1. Verifythatyouhaveallthepartsnecessaryforthe
setup(seeillustrationunderLEARNINGABOUT
YOURSTEAMER).
2. Attachthe2supportrodstogethertheninsertthe
combinedrodintothetopopeningofthepress
pad(Figure4).
3. Withthedoorcompletelyopen,positiononestrap
loopovereachcornerofanydoor,makingsure
thewhiteterryclothsidewiththeOsterlogois
facingtowardyou.
4. Loopeachstraparoundeachcorneronthedoor(Figure5).
Tip:Youcanpullonthestrapsthroughthefastenerstoadjusttheir
lengthstotthedoor.
Notice:Steamcangetthroughandaroundthepresspad.Donot
useondoorsthataresensitivetoheatormoisture.
5. Oncethestraploopstandthepresspadisatacomfortable
height,gentlypulldownonittoensureitissecure.Closethe
doorcompletelytohelpkeepthepresspadsecuredinplacefor
pressing.
Using Your Press Pad
1. Ifthepresspadissetup,hangyourgarmenttobesteamedonaclean,rust-free
hangerandinsertthehangerinthecenterloopatthetopofthepresspad.Ifitisnot
setup,refertotheinstructionsinSettingUpsection,above.Useanyofthetwoside
loopsonthepresspadtohangyourclotheswhensteamingsleeves.
2. Followsteps1-13underSTEAMINGVERTICALLY.
STEAMING HORIZONTALLY
YoucanalsouseyourSteamerasanirontorefreshsheets,pillows,mattress,sofasand
more.
1. Afterthewatertankislled,makesurethereisnoresidualwaterinsidethe
centerwatertankcavity.Attachthewatertanktothesteamer.Attachthedesired
accessorytothesteamerandfollowsteps3and4underUSINGYOURSTEAMER
VERTICALLY.
2. OncetheSteamerhasreachedsettemperature,presstriggerswitchandina
horizontalposition,movethesteamercontinuouslyoverthefabricbeingsteamed.
Caution: Theheatedpressbargetshot,donottouch.
3. Onceyounish,slideswitchtoOffandunplugunit.Waitforunittocoolcompletely
beforeemptyingthewatertankorremovingaccessory.
•ImproperuseoftheSteamercancausepropertydamageduetothesteam.Always
readtheinstructionsinthismanualbeforeusingyourSteamer.
•DonotoperatetheSteamerwithanemptywatertank.Toaddwaterduring
operation,turnsteameroff,waitforittocooldownthenremovewatertankandrell.
•Alwaysreadthefabriccarelabelstohelpdeterminefabrictypetobesteamed.If
unsureoffabric’sber,testasmallhiddenarea,suchasaninsideseamorhem,
before steaming.
Door
Puerta
Figura 5
Door
Puerta
Figura 4

English - 8
•Formoredifcultwrinkles,trysteamingfromtheundersideofthefabric.
•UsecautionwhenhangingclothingontheOvertheDoorPressPad.Toomuch
weightorpullingonthegarmentmaycausethepresspadtoslipfromthedoorand
falldown.
•Whensteaming,touchingfabriclightlywiththesteamnozzlecanhelpinwrinkle
removal.Itisimportanttomakecontactwiththegarmentand/orfabric.
•Heavierfabricsrequiremoresteam.
•Onlyusewaterintheunit.Donotaddcleaningsolutions,scentedperfumes,oilsor
anyotherchemicalstothewaterthatcancausedamagetotheappliance.
•Donotusesteamagainstwallordoors.
•Whenhanginggarmentonadoorwhilesteaming,becarefulnottodamagethe
doorwithsteam.UsetheOvertheDoorPressPadtoprotectyourdoor.
•Afteruse,emptywatertankbyturningitupsidedowntoensureallwaterempties
outandavoidleaks.
•Whensteaming,movethesteamercontinuouslyovertheitembeingpressed.Do
notkeepsteameroveranareaforanyperiodoftimetoavoiddamagetothefabric.
CLEANING
1. Makesureunitisoff,unpluggedandallowittocoolcompletelybeforecleaning.
2. Ifthereiswaterinthewatertank,removethetankandturnitupsidedowntoensure
allthewateremptiesout.
3. Wipeexteriorsurfaceswithasoft,dampcloth.Drythoroughly.
Warning:Neverimmersesteamer,cordorpluginwateroranyotherliquid.
•Donotuseabrasivecleanersorscouringpadsthatcanscratchthesurface.
•Donotplaceinthedishwasher.
4. Removepresspadfromthedoortodisassemble:
a.Griponeendofthesupportrodsandslideout.
b.Placepresspadinthewasherandwashincoldwaterandlaundrydetergentthen
air dry.
c.Oncedry,reassemblethepresspadasinstructedunderSETTINGUPANDUSING
YOUROVERTHEDOORPRESSPAD.
CLEANING WITH VINEGAR AND WATER
ItisrecommendedtocleanyourSteamereverytwomonthstoreducemineralbuildup
thatcanaffecttheperformanceofyourunit.
1. Turnofftheunitandletitcoolcompletely.
2. Removewatertankandmakesureitisempty.
3. Fillwatertankwithasolutionof50%whitevinegarand50%wateruptothemax
level.
4. Plug unit into electrical outlet and press trigger to run a full steaming cycle.
5. Oncesteamingisnished,llwithcleanwaterandrepeatprocessuntilthevinegar
odor is eliminated.
Care And Cleaning

English - 9
STORAGE
Foldthecordinloopsandstoretheunitinuprightposition,inacleandryplacewitha
at,sturdysurface.Makesurethewatertankisempty.Ifnot,removeitandturnitupside
downtoensureallthewateremptiesoutandavoidleaks.
Troubleshooting
Problem Possible Cause Solution
Thesteamerdoesnot
produce any steam.
Thesteamerhasnot
heatedupsufciently.
Youpressedthe
triggerandthen
released it.
Thewaterlevelinthe
watertankistoolow.
Thesteamerisnot
plugged in.
Electrical outlet is not
working.
Thesteamerisnot
turned on.
Letthesteamerheatupforabout45
seconds before using it.
Pressthesteamtriggerfullyand
keepitpressedormoveittothelock
downpositionforcontinuoussteam.
Unplugthesteamer,letitcool
completelyandrellthewatertank.
Makesurethesteamerisplugged
into an electrical outlet.
Plugintoanotherelectricaloutlet.
MovetheslideswitchtoLoworHigh
setting.
Thesteamermakes
a rattling noise and
vibrates.
Thewaterpump
insidetheunitdetects
thewaterlevelislow.
Unplugtheunit,letitcoolcompletely
andrellwatertank.
Thesteamerleaves
waterdropsonthe
garment.
Theaccessory
attachmentbeing
usedmayhave
condensation.
Lettheappliancecoolcompletely,
removeattachmentandwipedry.
Thesteameris
makingabuzzing
noisewhilesteaming.
Thewaterpumpis
running.
Thisnoiseisnormal.
This manual suits for next models
1
Table of contents
Languages:
Other Oster Steam Cleaner manuals