Toro 23522 User manual

FormNo.3412-299RevA
BrushCutter
ModelNo.23522—SerialNo.400000000andUp
ModelNo.33522—SerialNo.400000000andUp
Registeratwww.Toro.com.
OriginalInstructions(EN)*3412-299*A
ThisproductcomplieswithallrelevantEuropeandirectives;
fordetails,pleaseseetheseparateproductspecicDeclaration
ofConformity(DOC)sheet.
WARNING
CALIFORNIA
Proposition65Warning
Thisproductcontainsachemicalorchemicals
knowntotheStateofCaliforniatocausecancer,
birthdefects,orreproductiveharm.
ThissparkignitionsystemcomplieswithCanadianICES-002
Becauseinsomeareastherearelocal,state,orfederal
regulationsrequiringthatasparkarresterbeusedonthe
engineofthismachine,asparkarresterisavailableas
anoption.Ifyourequireasparkarrester,contactyour
AuthorizedToroServiceDealer.
GenuineTorosparkarrestersareapprovedbytheUSDA
ForestryService.
ItisaviolationofCaliforniaPublicResourceCode
Section4442or4443touseoroperatetheengineonany
forest-covered,brush-covered,orgrass-coveredlandunless
theengineisequippedwithasparkarrester,asdenedin
Section4442,maintainedineffectiveworkingorderorthe
engineisconstructed,equipped,andmaintainedforthe
preventionofre.
Introduction
Thismachineisdesignedtolevelbrush,tallweeds,saplings,
smalltreesandheavyvegetationupto1.8m(6feet)talland
5.1cm(2inches)indiameter.
Readthisinformationcarefullytolearnhowtooperateand
maintainyourproductproperlyandtoavoidinjuryand
productdamage.Youareresponsibleforoperatingthe
productproperlyandsafely.
YoumaycontactTorodirectlyatwww.Toro.comforproduct
andaccessoryinformation,helpndingadealer,ortoregister
yourproduct.
Wheneveryouneedservice,genuineToroparts,oradditional
information,contactanAuthorizedServiceDealerorToro
CustomerServiceandhavethemodelandserialnumbersof
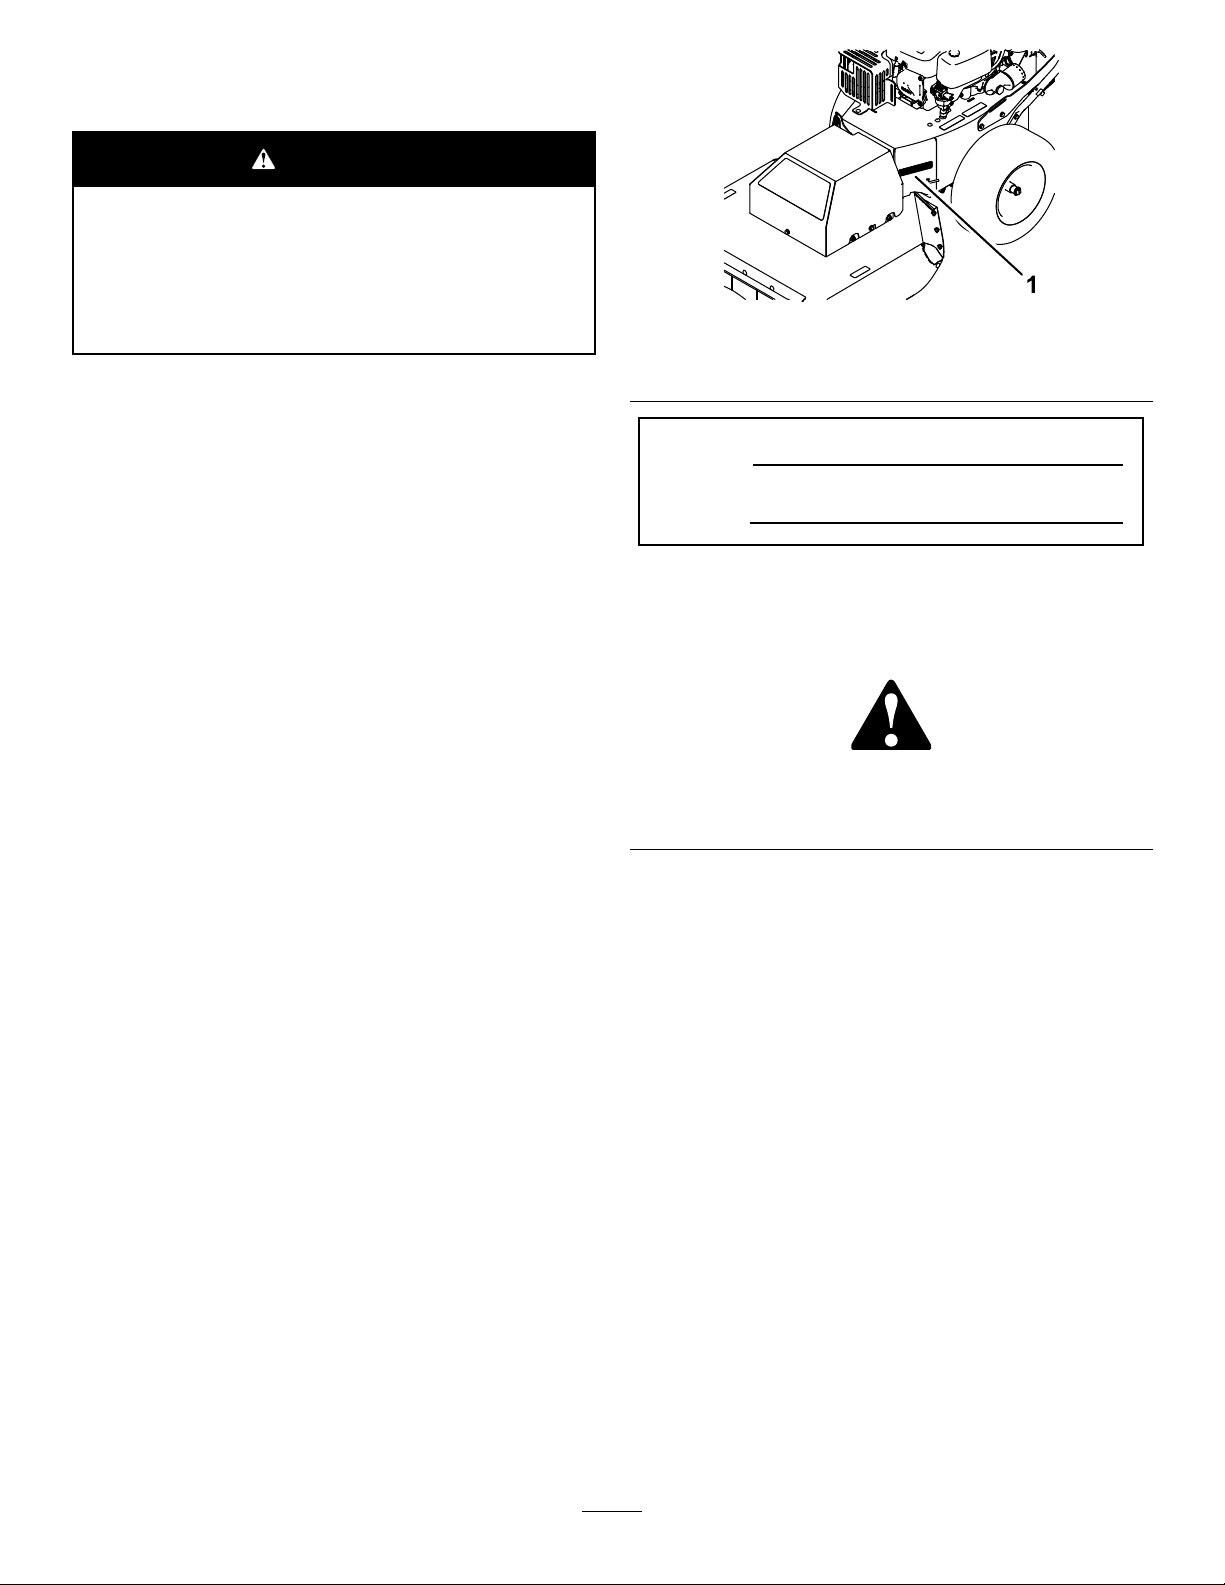
yourproductready.Figure1illustratesthelocationofthe
modelandserialnumbersontheproduct.Writethenumbers
inthespaceprovided.
g186622
Figure1
1.Modelandserialnumberplate
ModelNo.
SerialNo.
Thismanualidentiespotentialhazardsandhassafety
messagesidentiedbythesafety-alertsymbol(Figure2),
whichsignalsahazardthatmaycauseseriousinjuryordeath
ifyoudonotfollowtherecommendedprecautions.
g000502
Figure2
1.Safety-alertsymbol
Thismanualuses2wordstohighlightinformation.
Importantcallsattentiontospecialmechanicalinformation
andNoteemphasizesgeneralinformationworthyofspecial
attention.
©2016—TheToro®Company
8111LyndaleAvenueSouth
Bloomington,MN554202
Contactusatwww.Toro.com.
PrintedintheUSA
AllRightsReserved

Contents
Safety...........................................................................4
GeneralSafety.........................................................4
SlopeIndicator.......................................................5
SafetyandInstructionalDecals.................................6
Setup............................................................................8
1InstallingtheHandle.............................................8
2ConnectingtheNegativeBatteryCable....................8
ProductOverview.........................................................10
Controls...............................................................10
Specications........................................................11
BeforeOperation......................................................12
BeforeOperationSafety..........................................12
RecommendedFuel................................................12
UsingStabilizer/Conditioner...................................12
FillingtheFuelTank...............................................13
CheckingtheEngine-OilLevel.................................13
ThinkSafetyFirst...................................................13
DuringOperation.....................................................13
DuringOperatingSafety..........................................13
OperatingtheIgnitionSwitch..................................14
StartingandShuttingOfftheEngine.........................14
OperatingtheTractionControl................................14
OperatingtheBlade-ControlClutch..........................15
AfterOperation........................................................15
AfterOperationSafety............................................15
MovingaNonfunctioningMachine...........................16
TransportingtheMachine........................................16
Maintenance.................................................................17
RecommendedMaintenanceSchedule(s)......................17
MaintenanceSafety.................................................17
EngineMaintenance..................................................18
EngineSafety.........................................................18
ServicingtheAirCleaner.........................................18
ServicingtheEngineOil..........................................19
ServicingtheSparkPlug..........................................21
FuelSystemMaintenance...........................................22
ReplacingtheIn-LineFuelFilter...............................22
ElectricalSystemMaintenance....................................23
ElectricalSystemSafety...........................................23
RemovingtheBattery.............................................23
ChargingtheBattery...............................................24
InstallingtheBattery...............................................24
ServicingaReplacementBattery...............................24
DriveSystemMaintenance.........................................25
CheckingtheTirePressure......................................25
CoolingSystemMaintenance......................................25
CleaningtheEngineScreen......................................25
CleaningtheEngine-CoolingFinsand
Shrouds.............................................................25
BeltMaintenance......................................................26
InspectingtheBelts................................................26
ReplacingtheTransmissionBelt...............................26
ReplacingtheMowerBelt........................................26
MowerMaintenance...................................................27
BladeSafety...........................................................27
BeforeInspectingorServicingtheBlade....................27
InspectingtheBlade...............................................27
CheckingforaBentBlade........................................28
RemovingtheBlade................................................28
SharpeningtheBlade..............................................29
InstallingtheBlade.................................................29
Cleaning...................................................................30
RemovingDebrisfromtheMachine..........................30
Storage........................................................................30
StoringtheMachine................................................30
Troubleshooting...........................................................31
3

Safety
ThismachinehasbeendesignedinaccordancewithEN
12733.
GeneralSafety
Thisproductiscapableofamputatinghandsandfeetand
ofthrowingobjects.Alwaysfollowallsafetyinstructionsto
avoidseriouspersonalinjury.
Usingthisproductforpurposesotherthanitsintendeduse
couldprovedangeroustoyouandbystanders.
•ReadandunderstandthecontentsofthisOperator’sManual
beforestartingtheengine.
•Donotputyourhandsorfeetnearmovingcomponents
ofthemachine.
•Donotoperatethemachinewithoutallguardsandother
safetyprotectivedevicesinplaceandworkingonthe
machine.
•Keepclearofanydischargeopening.Keepbystandersa
safedistanceawayfromthemachine.
•Keepchildrenoutoftheoperatingarea.Neverallow
childrentooperatethemachine.
•Stopthemachineandshutofftheenginebeforeservicing,
fueling,oruncloggingthemachine.
Improperlyusingormaintainingthismachinecanresult
ininjury.Toreducethepotentialforinjury,complywith
thesesafetyinstructionsandalwayspayattentiontothe
safety-alertsymbol,whichmeansCaution,Warning,or
Danger—personalsafetyinstruction.Failuretocomplywith
theseinstructionsmayresultinpersonalinjuryordeath.
Youcanndadditionalitemsofsafetyinformationintheir
respectivesectionsthroughoutthismanual.
4
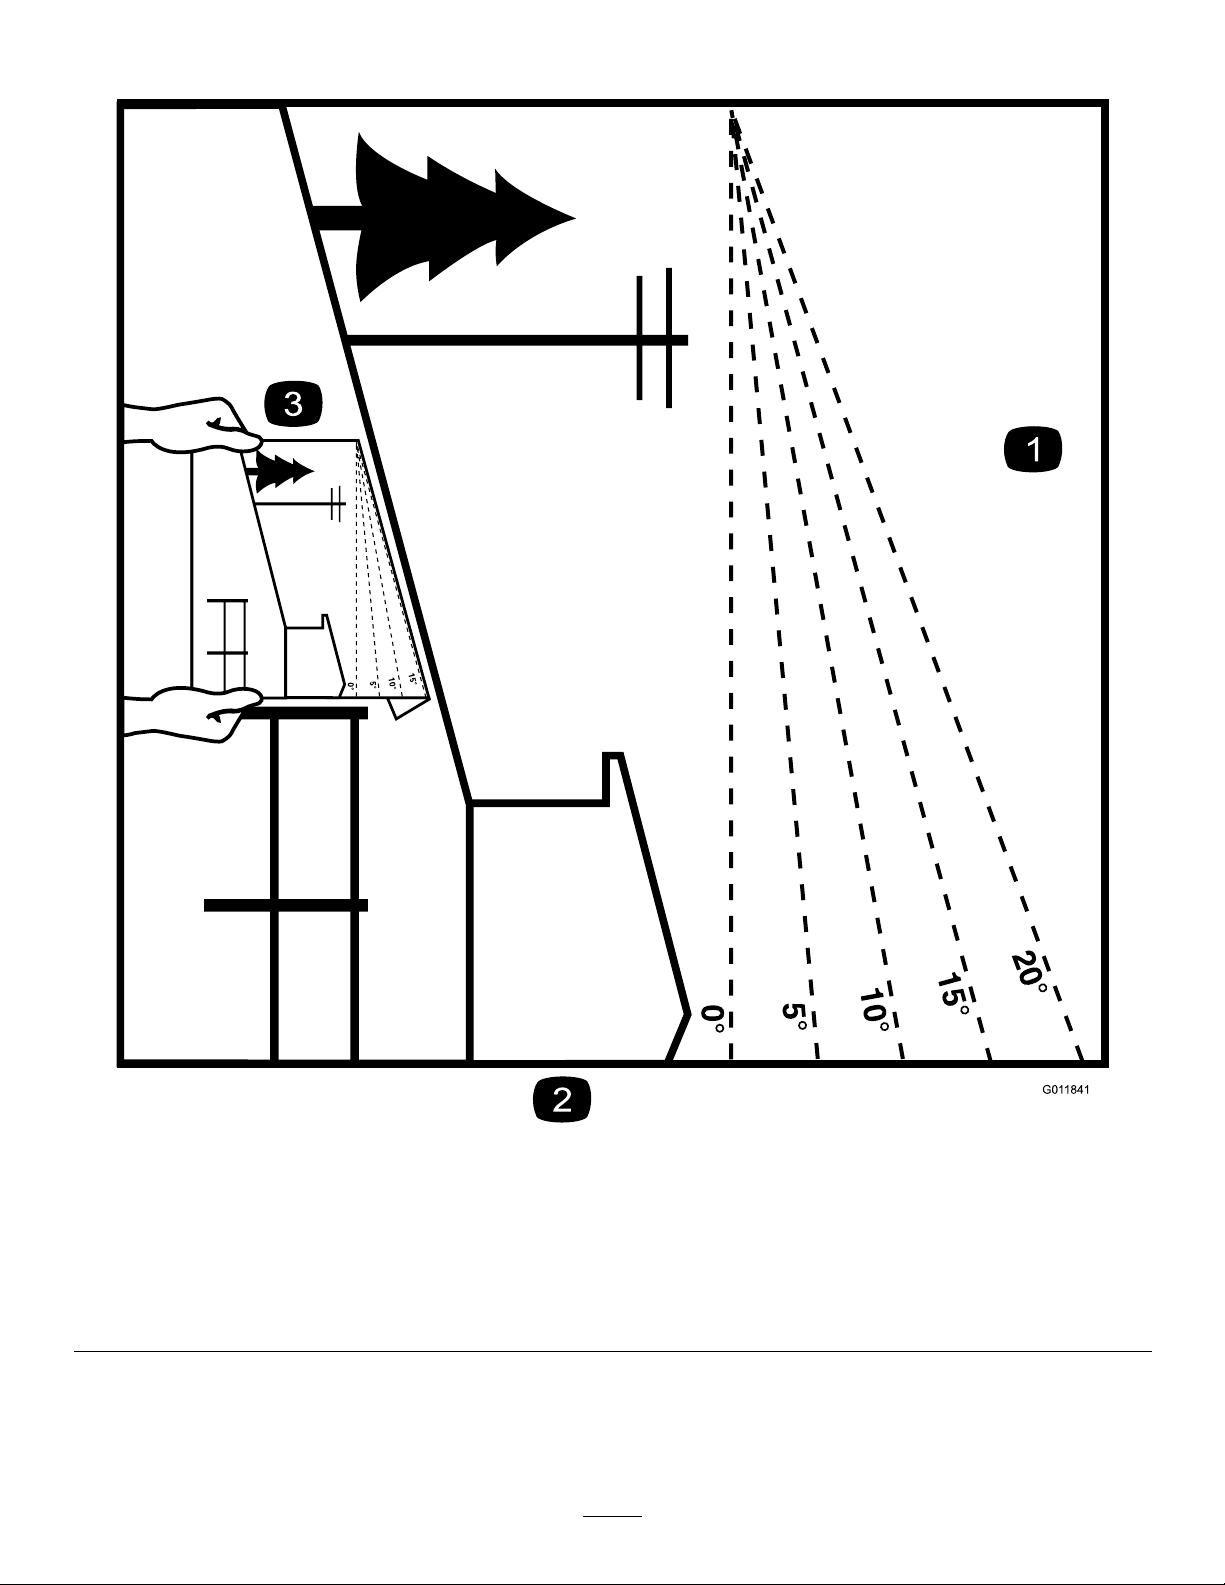
SlopeIndicator
G01 1841
g011841
Figure3
Thispagemaybecopiedforpersonaluse.
1.Themaximumslopeyoucansafelyoperatethemachineonis15degrees.Usetheslopecharttodeterminethedegreeofslope
ofhillsbeforeoperating.Donotoperatethismachineonaslopegreaterthan15degrees.Foldalongtheappropriateline
tomatchtherecommendedslope.
2.Alignthisedgewithaverticalsurface,atree,building,fencepole,etc.
3.Exampleofhowtocompareslopewithfoldededge
5

SafetyandInstructionalDecals
Safetydecalsandinstructionsareeasilyvisibletotheoperatorandarelocatednearanyareaofpotential
danger.Replaceanydecalthatisdamagedormissing.
decal93-7814
93-7814
1.Entanglementhazard,belt—stayawayfrommovingparts;
keepallguardsandshieldsinplace.
decal115-9625
115-9625
1.Parking
brake—disengaged
2.Parkingbrake—engaged
decal117-2718
117-2718
decal130-9670
130-9670
1.Severinghazardofhandorfoot;mowerblade—keepaway
frommovingparts;keepallguardsandshieldsinplace.
decal136-4635
136-4635
decal136-4646
136-4646
1.Whenthemachinehas
power,disengagethe
bypassandtransportthe
machinenormally.
3.Whenthemachinehasno
power,engagethebypass
andpushthemachineto
transportit.
2.ReadtheOperator's
Manual.
6

decal132-4005
132-4005
1.Cuttingbladecontrol6.Warning—alloperator'sshouldbe
trainedbeforeoperatingthemachine.
11.Warning—shutofftheengine,
disconnectthesparkplug,andreadthe
Operator'sManualbeforeperforming
maintenance.
2.Choke7.Thrownobjecthazard—shutoffthe
engineandpickupdebrisbefore
operating.
12.Warning—hearingprotectionmustbe
worn.
3.Fastenginespeed8.Warning—keepawayfrommoving
parts;keepallguardsandcoversin
place.
13.Tractiondrivecontrol
4.Slowenginespeed9.Thrownobjecthazard—keep
bystandersasafedistancefromthe
machine.
5.Warning—readtheOperator’sManual.10.Warning—shutofftheenginebefore
leavingtheoperatorposition.
7

Setup
LooseParts
Usethechartbelowtoverifythatallpartshavebeenshipped.
ProcedureDescriptionQty.Use
Cabletie1
Handlebolt4
Nut(5/16inch)4
Slotted-headbolt(#10)2
1
Locknut(#10)2
Installthehandle.
2Nopartsrequired–Connectthenegativebatterycable.
1
InstallingtheHandle
Partsneededforthisprocedure:
1Cabletie
4Handlebolt
4Nut(5/16inch)
2Slotted-headbolt(#10)
2Locknut(#10)
Procedure
1.Installtheupperhandletubestothelowerhandleand
bracesusing2handleboltsand2nuts(5/16inch)on
bothsidesofthemachine(Figure4).
g194930
Figure4
Leftsideshown
1.Upperhandletube4.Nut(5/16inch)
2.Handlebolt5.Brace
3.Lowerhandle
2.Securethethrottlecableoverthelowerhandleusinga
cabletie(Figure5).
g195541
Figure5
1.Operator’sManualtube4.Slotted-headbolt(2)
2.Clamp(2)5.Cabletie
3.Throttlecable6.Locknut(2)
3.SlidetheclampsontotheOperator’sManualtubeand
installitontopofthelowerhandleusing2slotted-head
boltsand2locknuts(Figure5).
8
2
ConnectingtheNegative
BatteryCable
NoPartsRequired
Procedure
WARNING
CALIFORNIA
Proposition65Warning
Batteryposts,terminals,andrelated
accessoriescontainleadandleadcompounds,
chemicalsknowntotheStateofCalifornia
tocausecancerandreproductiveharm.
Washhandsafterhandling.
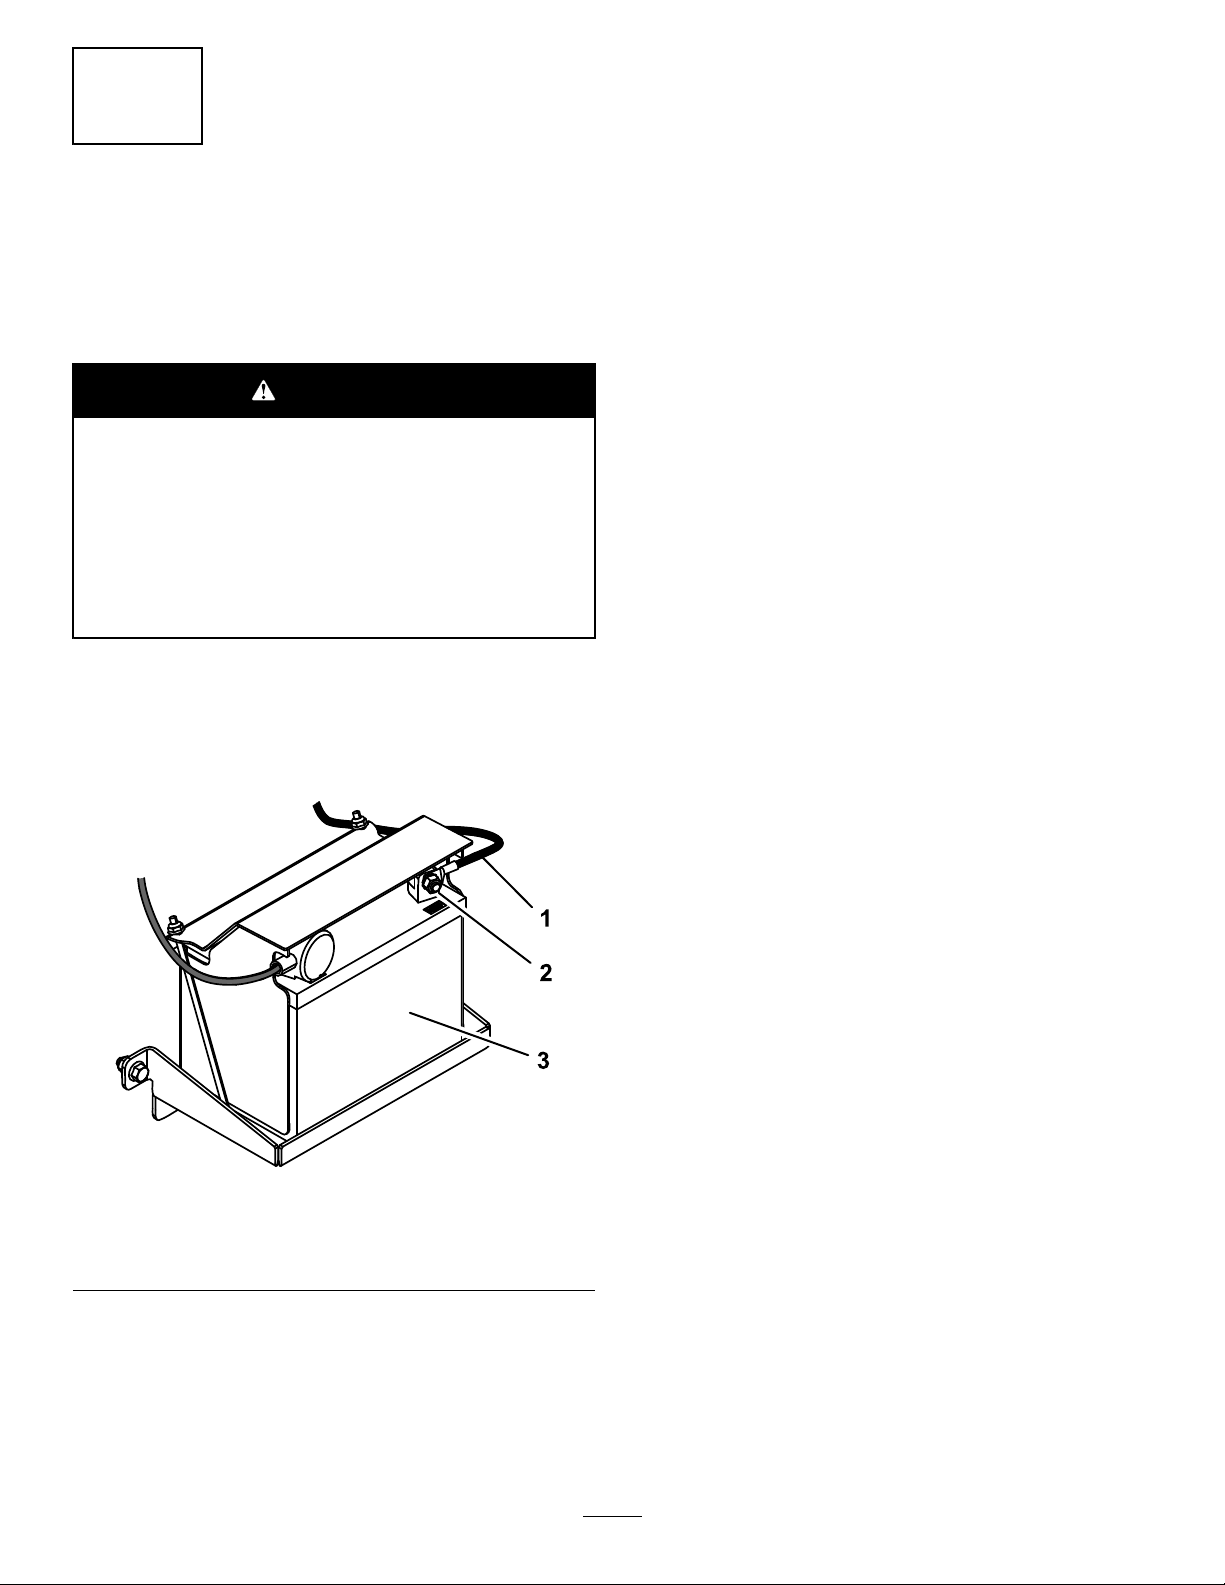
1.Removetheplasticcapfromthenegativebattery
terminal.
2.Connectthenegativebatterycabletothenegative(-)
batterypostusingtheboltandnutattachedtothe
cable(Figure6).
g195546
Figure6
1.Negativebatterycable3.Battery
2.Boltandnut
9
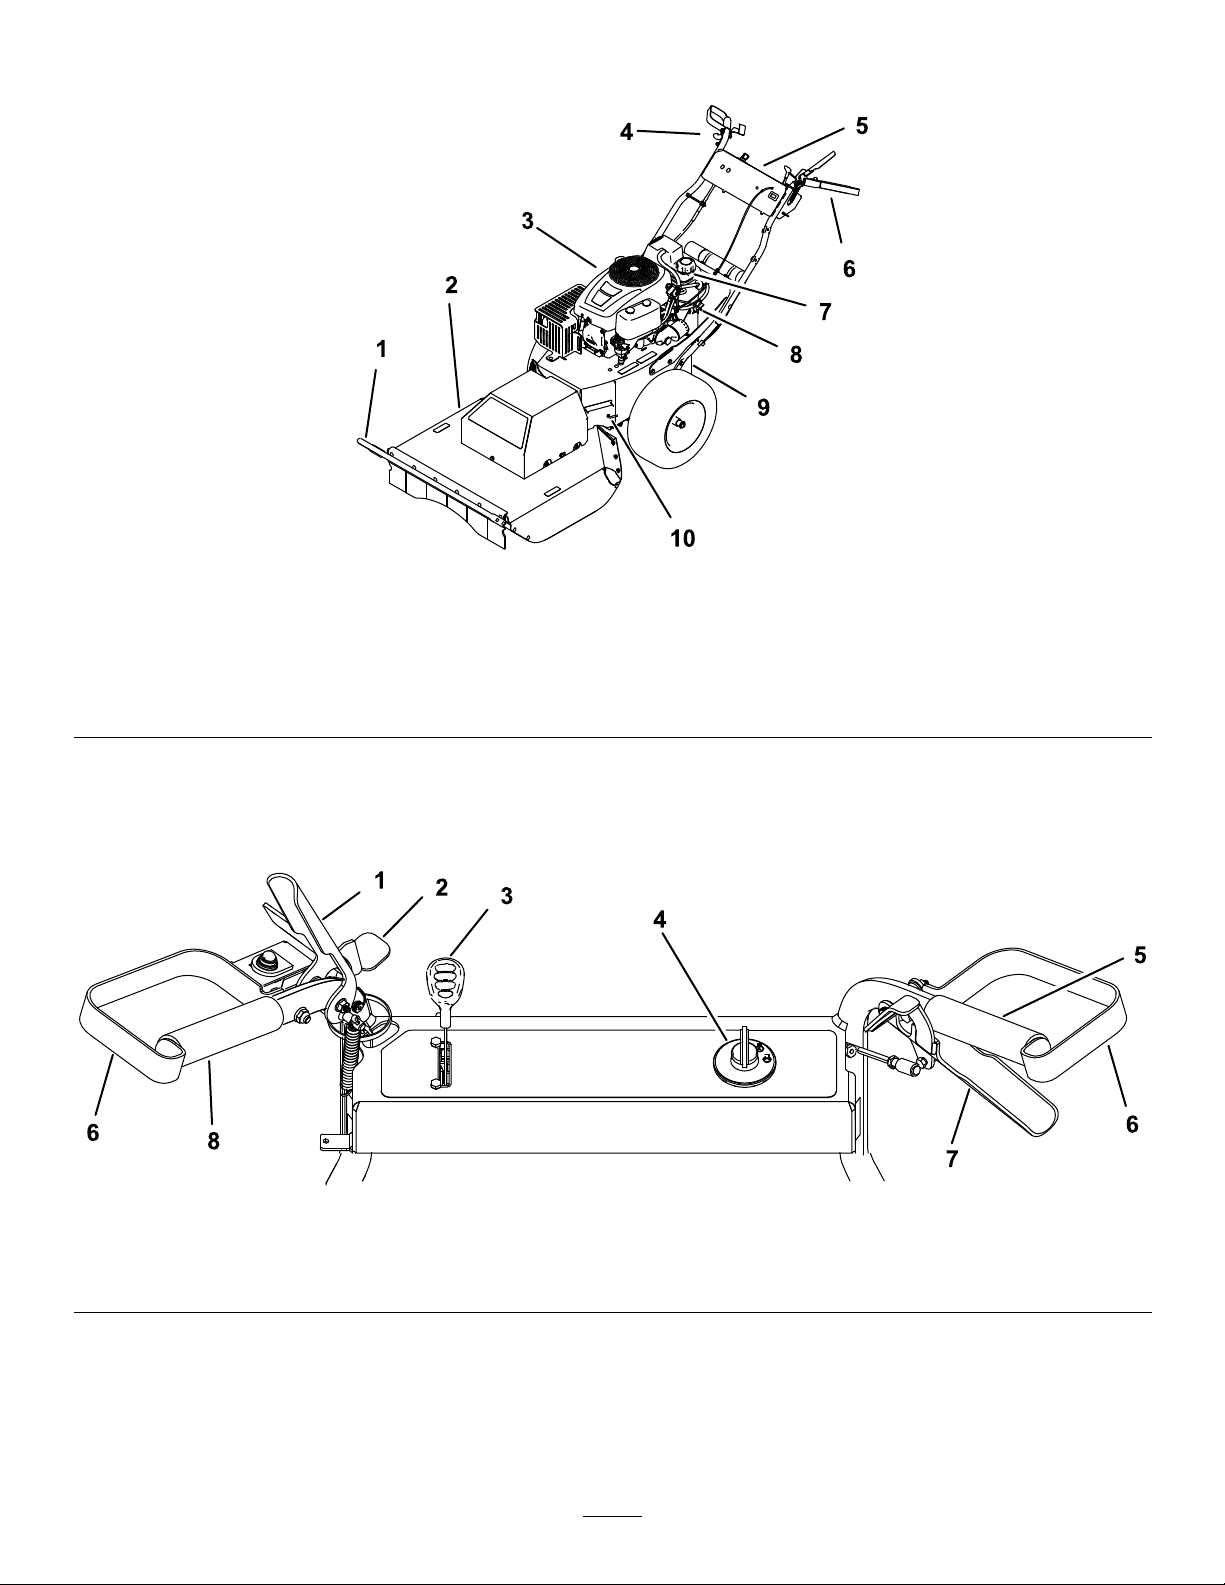
ProductOverview
g186623
Figure7
1.Brushbar4.Righthandgripandtraction
control
7.Fuel-tankcap10.Bypasslever
2.Cutterdeck5.Controlpanel8.Fuel-shutoffvalve
3.Engine6.Lefthandgripand
blade-controlclutch
9.Parkingbrake
Controls
Becomefamiliarwithallthecontrols(Figure7andFigure8)beforeyoustarttheengineandoperatethemachine.
g186771
Figure8
1.Blade-controlclutch3.Throttle/chokecontrol5.Righthandgrip7.Tractioncontrol
2.Safetylatch4.Ignitionswitch6.Handguard8.Lefthandgrip
10
Blade-ControlClutch
Usetheblade-controlclutchtoengageanddisengagethe
mowerblade.
IgnitionSwitch
Theignitionswitchhas3positions:OFF,RUN,andSTART.
ThekeyturnstoSTARTandmovesbacktoRUNuponrelease.
TurningthekeytotheOFF(“STOP”)positionshutsoffthe
engine;however,alwaysremovethekeyfromtheignition
switchwhenleavingthemachinetopreventsomeonefrom
accidentallystartingtheengineandtopreventthebattery
frominadvertentlydraining(Figure9).
g192199
Figure9
1.Offposition3.Startposition
2.Runposition
Throttle/ChokeLever
Thethrottleandchokecontrolsarecombinedinto1control
lever.Thethrottlecontrolstheenginespeedandhasa
continuous-variablesettingfromSLOWtoFAST.Engagethe
chokebymovingtheleverpasttheFASTsettinguntilitstops
TractionControl
Usethetractioncontroltomovethemachineforwardand
rearwardwithcontinuouslyvariablespeed.
Fuel-ShutoffValve
Closethefuel-shutoffvalvefortransport,maintenance,and
storage.
Ensurethatthefuel-shutoffvalveisopenwhenstartingthe
engine.
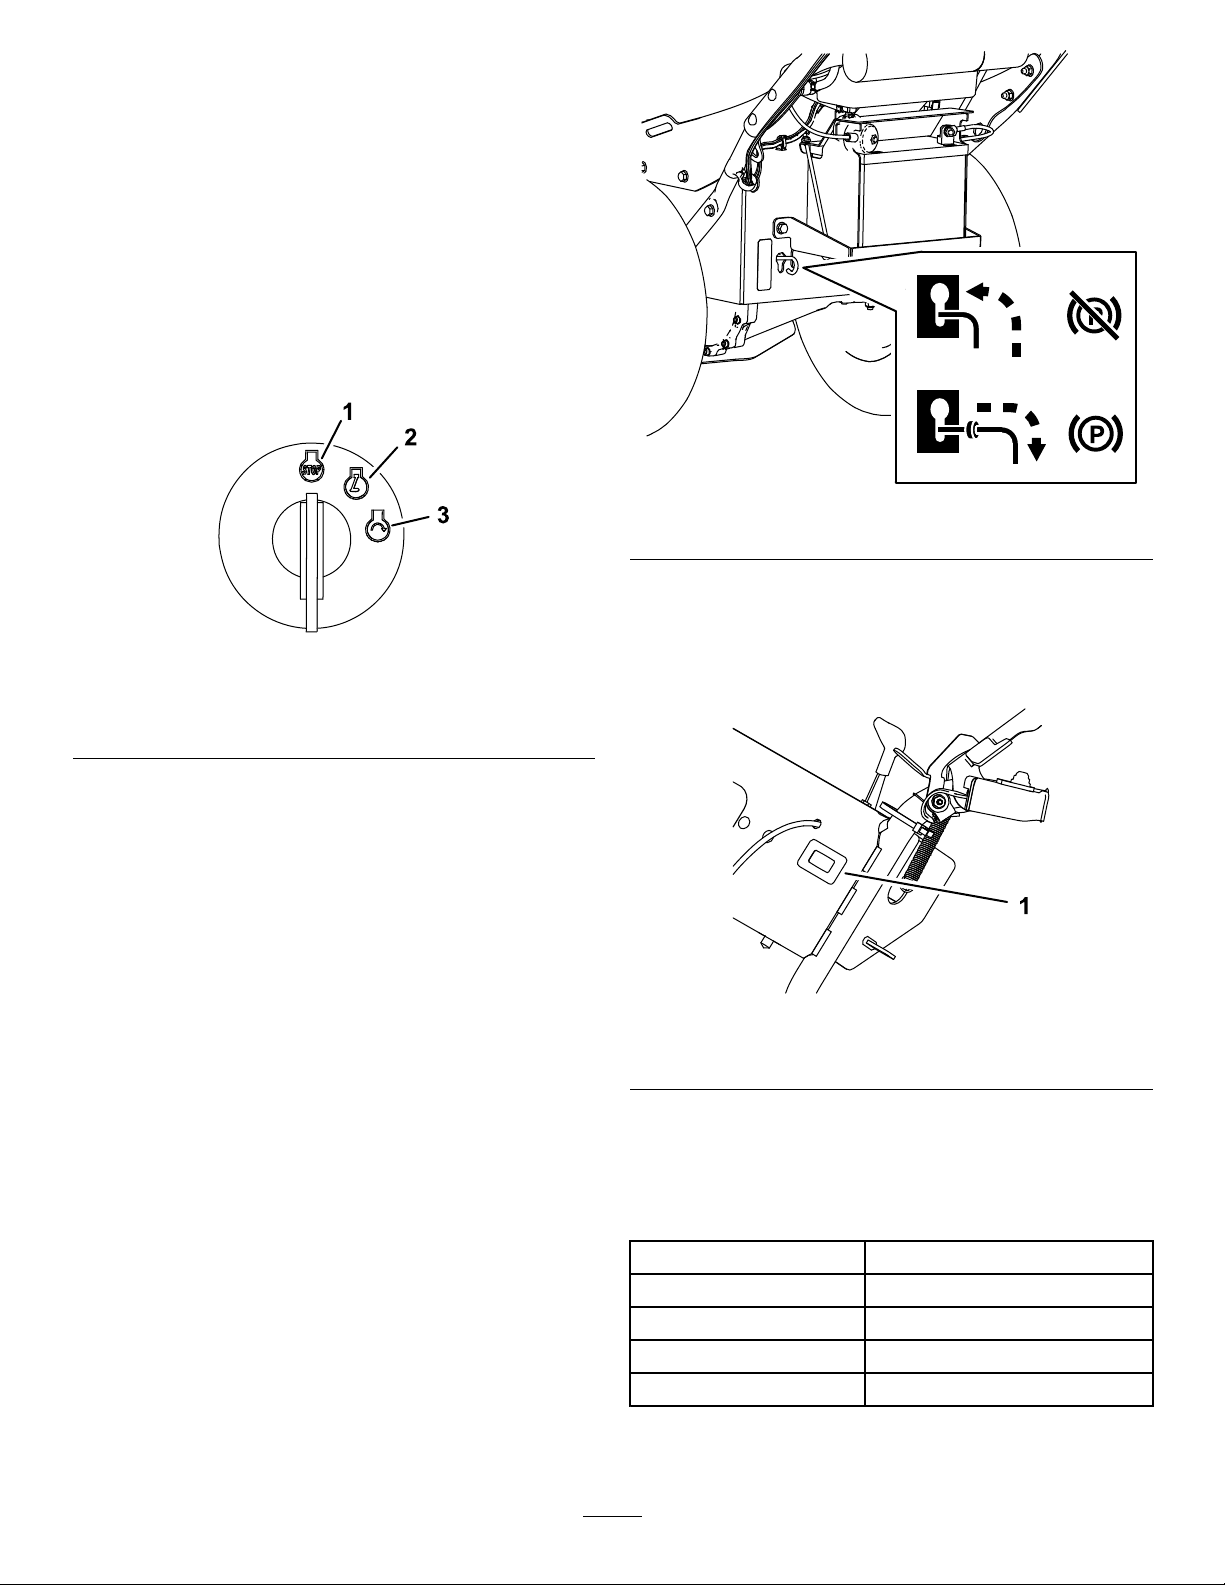
ParkingBrake
Theparkingbrakeislocatednearthebattery.Toengagethe
parkingbrake,pulltheleveroutwardthroughthekeyholeand
downtolockitinplace(Figure10).Todisengagetheparking
brake,liftuptheleverandpushitinwardthroughthekeyhole.
g195543
Figure10
HourMeter
Thehourmeterdisplaysthenumberofhoursofoperation
thathavebeenloggedonthemachine(Figure11).
g186773
Figure11
1.Hourmeter
Specications
Note:Specicationsanddesignaresubjecttochange
withoutnotice.
Length227cm(89inches)
Width88cm(35inches)
Height101cm(40inches)
Weight171kg(376lb)
Cuttingwidth71cm(28inches)
11

Operation
BeforeOperation
Note:Determinetheleftandrightsidesofthemachine
fromthenormaloperatingposition.
BeforeOperationSafety
GeneralSafety
•Becomefamiliarwiththesafeoperationoftheequipment,
operatorcontrols,andsafetysigns.
•Checkthatallguardsandsafetydevicesareinplaceand
workingproperly.
•Alwaysinspectthemachinetoensurethattheblade,blade
bolts,andcuttingassemblyarenotwornordamaged.
•Inspecttheareawhereyouwillusethemachineand
removeallobjectsthatthemachinecouldthrow .
FuelSafety
DANGER
Fuelisextremelyammableandhighlyexplosive.
Areorexplosionfromfuelcanburnyouand
othersandcandamageproperty.
•Topreventastaticchargefromignitingthefuel,
placethecontainerand/ormachinedirectlyon
thegroundbeforelling,notinavehicleoron
anobject.
•Fillthefueltankoutdoors,inanopenarea,when
theengineiscold.Wipeupanyfuelthatspills.
•Donothandlefuelwhensmokingoraroundan
openameorsparks.
•Storefuelinanapprovedcontainerandkeepit
outofthereachofchildren.
WARNING
Fuelisharmfulorfatalifswallowed.Long-term
exposuretovaporscancauseseriousinjuryand
illness.
•Avoidprolongedbreathingofvapors.
•Keepyourhandsandfaceawayfromthenozzle
andthefuel-tankopening.
•Keepfuelawayfromyoureyesandskin.
RecommendedFuel
•Forbestresults,useonlyclean,fresh(lessthan30days
old),unleadedgasolinewithanoctaneratingof87or
higher((R+M)/2ratingmethod).
•Ethanol:Gasolinewithupto10%ethanol(gasohol)
or15%MTBE(methyltertiarybutylether)byvolume
isacceptable.EthanolandMTBEarenotthesame.
Gasolinewith15%ethanol(E15)byvolumeisnot
approvedforuse.Neverusegasolinethatcontains
morethan10%ethanolbyvolume,suchasE15
(contains15%ethanol),E20(contains20%ethanol),or
E85(containsupto85%ethanol).Usingunapproved
gasolinemaycauseperformanceproblemsand/orengine
damagewhichmaynotbecoveredunderwarranty.
•Donotusegasolinecontainingmethanol.
•Donotstorefueleitherinthefueltankorfuelcontainers
overthewinterunlessyouuseafuelstabilizer.
•Donotaddoiltogasoline.
UsingStabilizer/Conditioner
Useafuelstabilizer/conditionerinthemachinetoprovide
thefollowingbenets:
•Keepsgasolinefreshduringstorageof90daysorless.
Forlongerstorageitisrecommendedthatthefueltank
bedrained.
•Cleanstheenginewhileitruns
•Eliminatesgum-likevarnishbuildupinthefuelsystem,
whichcauseshardstarting
Important:Donotusefueladditivescontaining
methanolorethanol.
Addthecorrectamountoffuelstabilizer/conditioner
tothegasoline.
Note:Afuelstabilizer/conditionerismosteffective
whenmixedwithfreshgasoline.Tominimizethechance
ofvarnishdepositsinthefuelsystem,usefuelstabilizer
atalltimes.
12

FillingtheFuelTank
1.Parkthemachineonalevelsurfaceandshutoffthe
engine.
2.Allowtheenginetocool.
3.Cleanaroundthefuel-tankcapandremoveit(Figure
7).
4.Addfueltothefueltankuntiltheleveloffuelisatthe
bottomofthellerneck.
5.Installthefuel-tankcapsecurely.
6.Wipeupanyfuelthatmayhavespilled.
CheckingtheEngine-OilLevel
Beforeyoustarttheengineandusethemachine,check
theoillevelintheenginecrankcase;refertoCheckingthe
Engine-OilLevel(page19).
ThinkSafetyFirst
Carefullyreadallthesafetyinstructionsanddecalsinthe
safetysection.Knowingthisinformationcouldhelpyouor
bystandersavoidinjury.
CAUTION
Thismachineproducessoundlevelsinexcessof
85dBAattheoperator'searandcancausehearing
lossfromextendedperiodsofexposure.
Wearhearingprotectionwhenoperatingthis
machine.
Useprotectiveequipmentforyoureyes,ears,hands,feet,
andhead.
G009027
12
g009027
Figure12
1.Weareyeprotection.2.Wearhearingprotection.
DuringOperation
DuringOperatingSafety
GeneralSafety
•Wearappropriateclothing,includingeyeprotection;
slip-resistant,substantialfootwear;thicklypaddedgloves;
andhearingprotection.Tiebacklonghair,secureloose
clothing,anddonotwearjewelry.
•Donotoperatethemachinewhileill,tired,orunderthe
inuenceofalcoholordrugs.
•Thebladeissharp;contactingthebladecanresultin
seriouspersonalinjury.Shutofftheengineandwaitfor
allmovingpartstostopbeforeleavingtheoperating
position.
•Whenyoureleasetheblade-controlclutch,theblade
shouldstopwithin7seconds.Ifnot,stopusingyour
machineimmediatelyandcontactanAuthorizedService
Dealer.
•Operatethemachineonlyingoodvisibilityand
appropriateweatherconditions.Donotoperatethe
machinewhenthereistheriskoflightning.
•Wetgrassorleavescancauseseriousinjuryifyouslipand
contacttheblade.Avoidmowinginwetconditions.
•Useextremecarewhenapproachingblindcorners,
shrubs,trees,orotherobjectsthatmayblockyourview .
•Watchforholes,ruts,bumps,rocks,orotherhidden
objects.Uneventerraincouldcauseaslip-and-fall
accident.
•Shutoffthemachineandinspectthebladeafterstriking
anobjectorifthereisanabnormalvibrationinthe
machine.Makeallnecessaryrepairsbeforeresuming
operation.
•Beforeleavingtheoperatingposition,shutofftheengine,
andwaitforallmovingpartstostop.
•Iftheenginehasbeenrunningthemuferwillbehotand
canseverelyburnyou.Keepawayfromthehotmufer.
•UseaccessoriesandattachmentsapprovedbytheThe
Toro®Companyonly.
SlopeSafety
•Usethemachineacrossthefaceofslopes;neverupand
down.Useextremecautionwhenchangingdirectionon
slopes.
•Donotusethemachineonexcessivelysteepslopes.Poor
footingcouldcauseaslip-and-fallaccident.
•Usethemachinewithcautionneardrop-offs,ditches,
orembankments.
13

OperatingtheIgnitionSwitch
1.TurntheignitionkeytotheSTARTposition(Figure13).
Note:Whentheenginestarts,releasethekey.
Important:Donotengagethestarterformore
than5secondsatatime.Iftheenginefailsto
start,wait15secondsbetweenattempts.Failureto
followtheseinstructionscanburnoutthestarter
motor.
Note:Youmayneedmultipleattemptstostartthe
enginewhenyoustartitthersttimeafterthefuel
systemhasbeenwithoutfuelcompletely.
g192135
Figure13
2.TurntheignitionkeytotheSTOPpositiontoshutoff
theengine.
StartingandShuttingOffthe
Engine
StartingtheEngine
1.MovethethrottleleverforwardpasttheFASTposition
andholditagainsttheforwardstoptoactivatethe
choke.
2.TurntheignitionswitchtotheSTARTposition.
3.Whentheenginestarts,releasethekeyandmovethe
throttleleverbacktotheFASTposition.
ShuttingOfftheEngine
1.Releasetheblade-controlclutchtodisengagetheblade.
2.TurntheignitionswitchtotheOFFpositionand
removethekey.
OperatingtheTractionControl
Tomovethemachineforward,squeezethetractioncontrol
towardthehandgrip(Figure13).
Tomovethemachinerearward,pushthethumbpaddownto
movethetractioncontrolawayfromthehandgrip(Figure
13).
Themoreyoumovethetractioncontrolineitherdirection,
thefasterthemachinemovesinthatdirection.
Todisengagethetractiondrive,releasethetractioncontrol.
g186864
Figure14
1.Tractioncontrol2.Thumbpad
14
OperatingtheBlade-Control
Clutch
Thismachineiscapableofcuttingbrushandsaplingsupto
1.8m(6feet)talland5.1cm(2inches)indiameter.The
cuttingdeckpivotstofollowthegroundcontourasyoumove
themachine.
Toengagetheblade,useyourrighthandtoopenthesafety
latchandthenuseyourlefthandtosqueezetheblade-control
clutchtothelefthandle(Figure14).
Todisengagetheblade,releasetheblade-controlclutch.
g188811
Figure15
AfterOperation
AfterOperationSafety
GeneralSafety
•Cleangrassanddebrisfromthemachinetohelpprevent
res.Cleanupoilorfuelspills.
•Allowtheenginetocoolbeforestoringthemachinein
anyenclosure.
•Neverstorethemachineorfuelcontainerwherethereis
anopename,spark,orpilotlight,suchasonawater
heateroronotherappliances.
HaulingSafety
•Usecarewhenloadingorunloadingthemachineintoa
trailerortruck.
•Securethemachinefromrolling.
15
MovingaNonfunctioning
Machine
1.Parkthemachineonalevelsurfaceanddisengagethe
blade-controlclutch.
2.Engagetheparkingbrake,shutofftheengine,remove
thekey,andwaitforallmovingpartstostop.
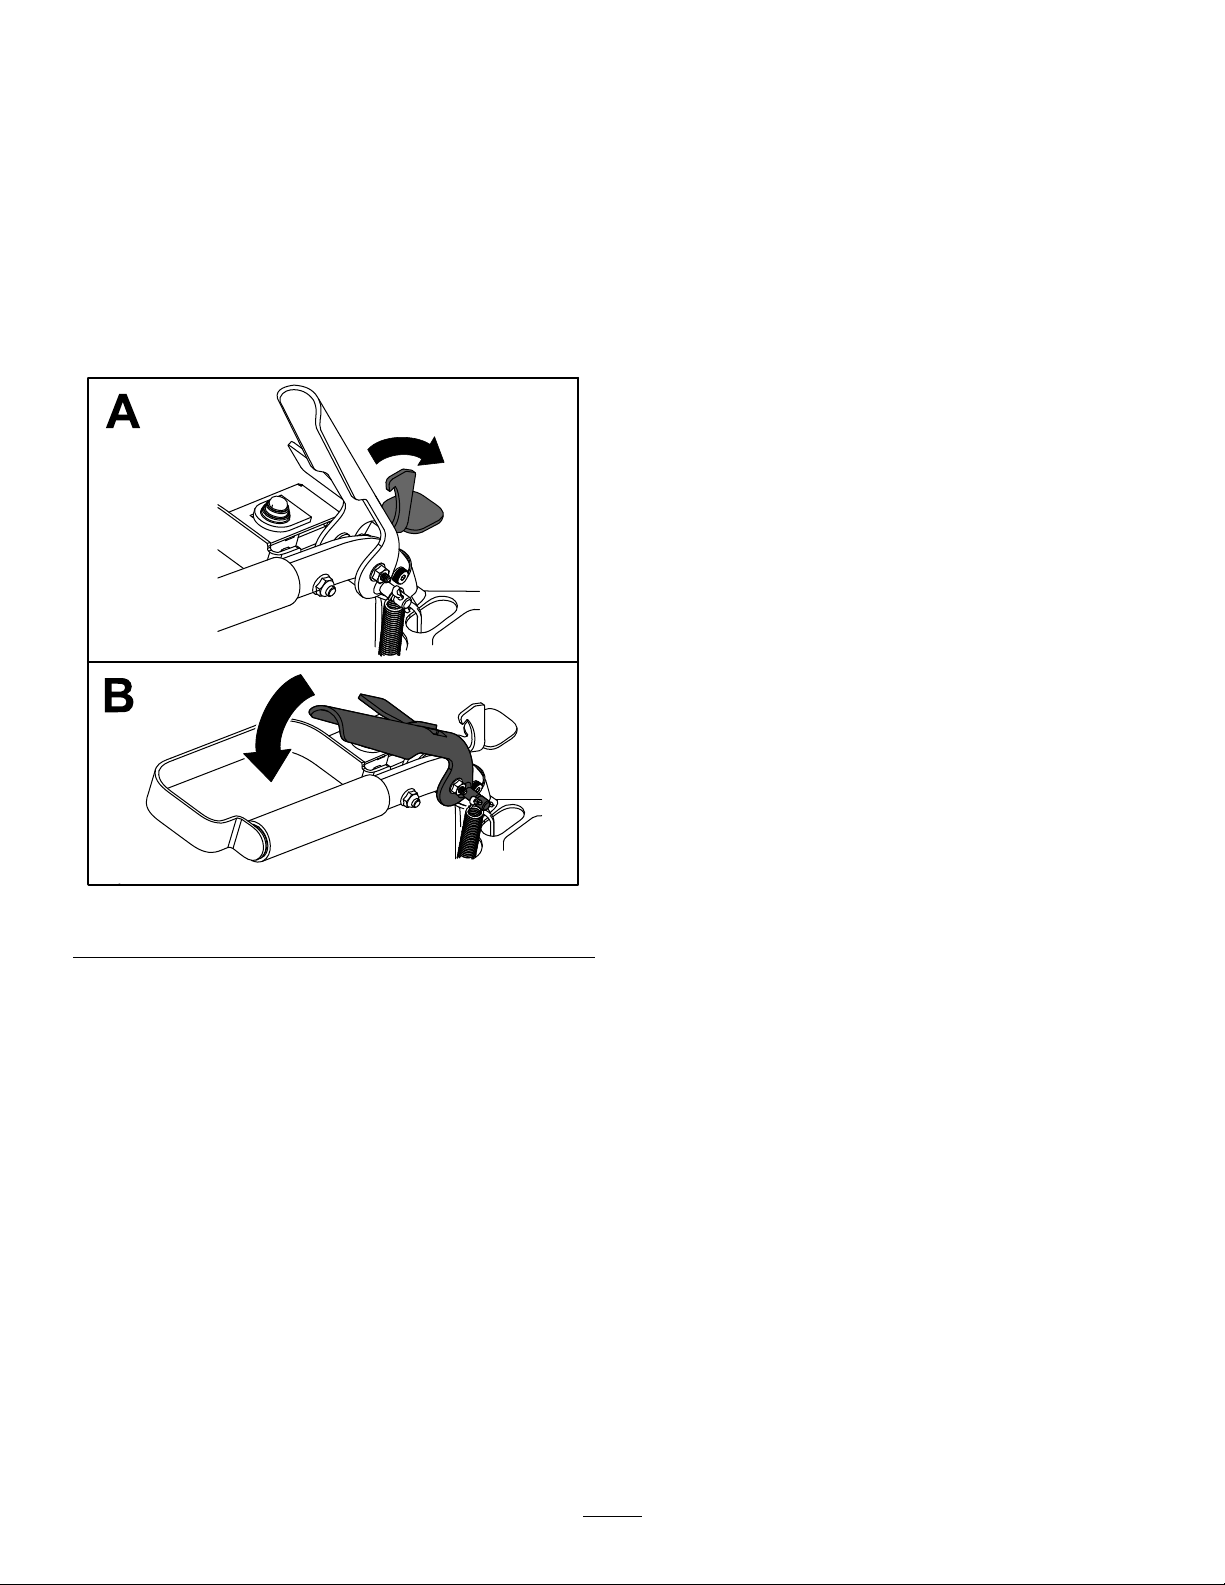
3.Movethebypassleveroutwardthroughthekeyhole
anddowntolockitinplace.
4.Disengagetheparkingbrake.
5.Pushthemachineasrequired.
6.Engagetheparkingbrake.
7.Movethebypassleverupandinwardthroughthe
keyholetodisengagethebypass.
g188886
g188887
Figure16
TransportingtheMachine
Useaheavy-dutytrailerortrucktotransportthemachine.
Ensurethatthetrailerortruckhasallnecessarybrakes,
lighting,andmarkingasrequiredbylaw .Pleasecarefullyread
allthesafetyinstructions.Knowingthisinformationcould
helpyou,yourfamily,pets,orbystandersavoidinjury.
1.Ifusingatrailer,connectittothetowingvehicleand
connectthesafetychains.
2.Ifapplicable,connectthetrailerbrakes.
3.Loadthemachineontothetrailerortruck.
4.Shutofftheengine,removethekey,engagetheparking
brake,andclosethefuelvalve.
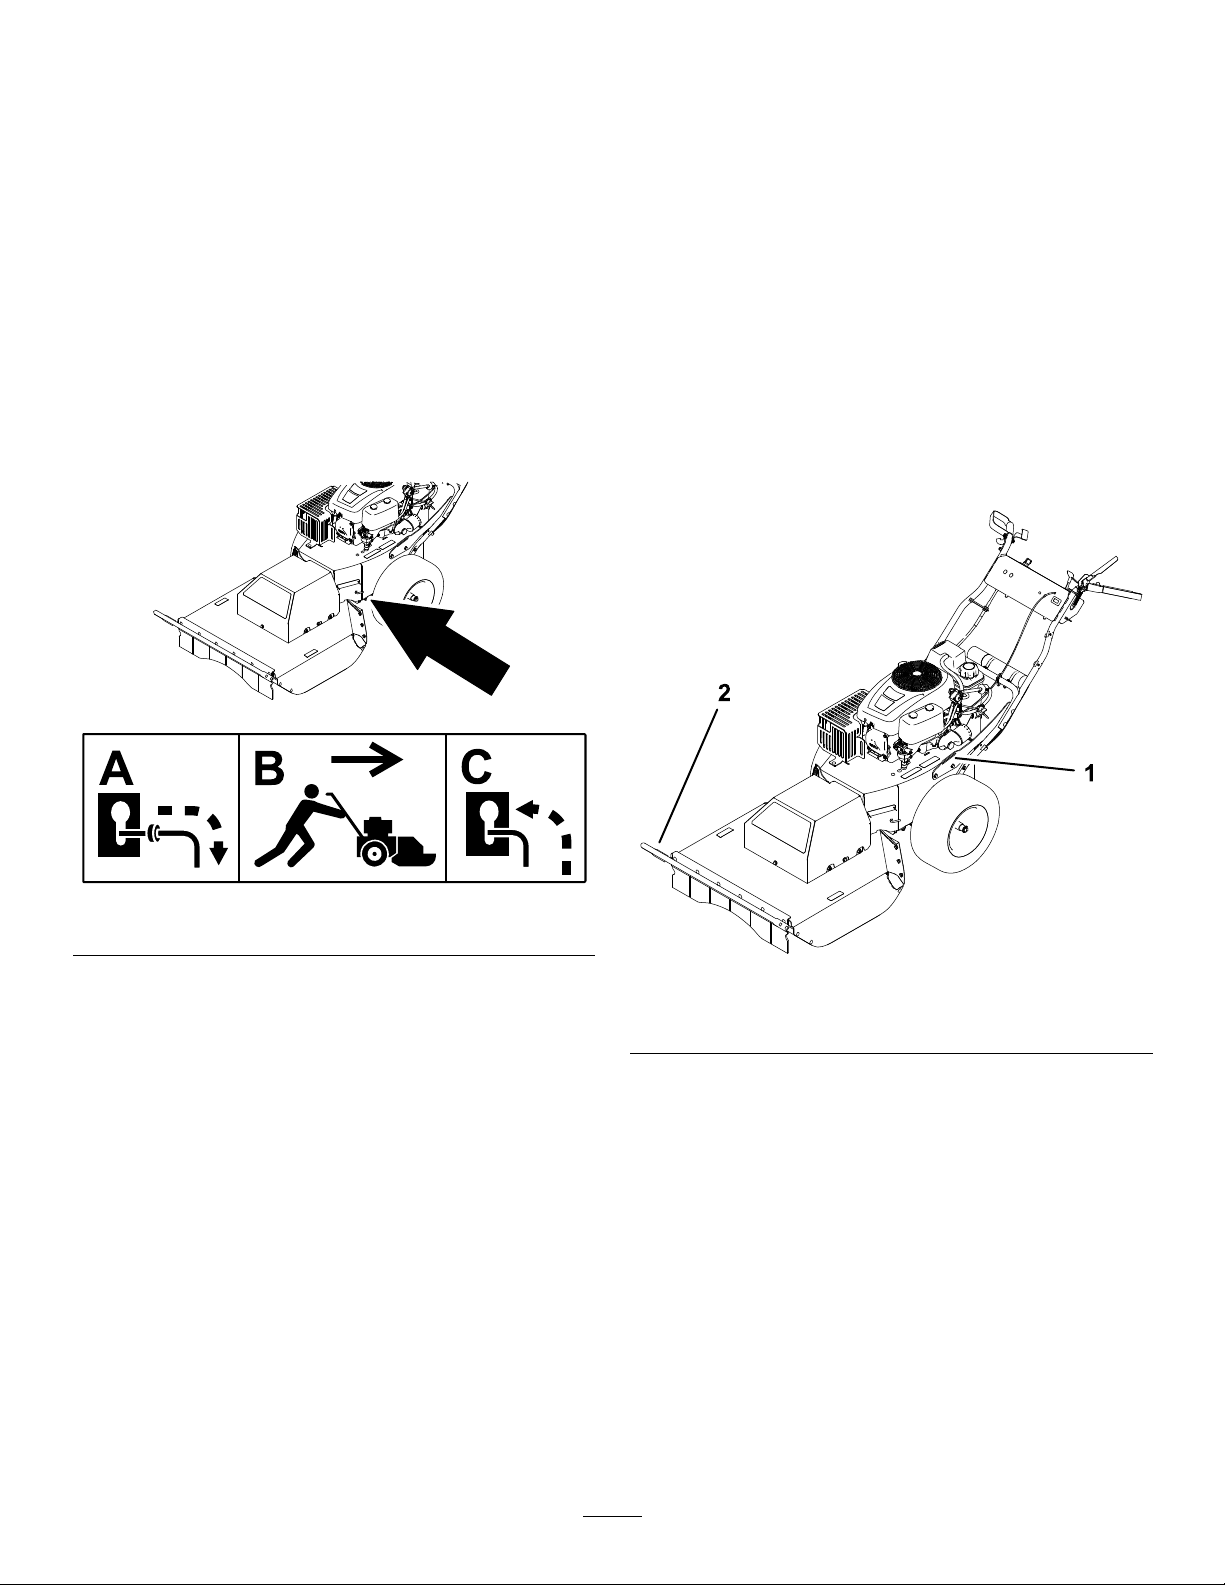
5.Usethebrushbarand2tie-downloopsonthemachine
tosecurelyfastenthemachinetothetrailerortruck
withstraps,chains,cable,orropes(Figure17).
g188889
Figure17
1.Lefttie-downloop2.Brushbar
16

Maintenance
Note:Determinetheleftandrightsidesofthemachinefromthenormaloperatingposition.
RecommendedMaintenanceSchedule(s)
MaintenanceService
IntervalMaintenanceProcedure
Aftertherst5hours•Changetheengineoilandlter.
Beforeeachuseordaily
•Cleanandchecktheair-cleanerfoamandpaperelements.
•Checktheengine-oillevel.
•Inspecttheconditionofthetires.
•Cleantheengineair-intakescreen.
•Inspecttheblade.
•Removedebrisfromthemachine.
Every25hours•Checktirepressure.
•Checkthebeltsforwear/cracks.
Every50hours•Replacetheair-cleanerfoamandpaperelements.
•Checkthesparkplug.
Every100hours
•Changetheengineoilandlter(changeitmoreoftenunderaheavyloadorin
hightemperatures).
•Replacethesparkplug.
•Replacethein-linefuellter.
•Cleantheengine-coolingnsandshrouds.
Beforestorage
•Chargethebatteryanddisconnectbatterycables.
•Changetheengineoilandlter.
•Servicetheaircleaner.
•Emptythefueltank.
•Lubricateinsidetheenginecylinder.
MaintenanceSafety
•Disconnectthespark-plugwirefromthesparkplugbeforeperforminganymaintenanceprocedure.
•Wearglovesandeyeprotectionwhenservicingthemachine.
•Thebladeissharp;contactingthebladecanresultinseriouspersonalinjury.Weargloveswhenservicingtheblade.
•Nevertamperwithsafetydevices.Checktheirproperoperationregularly.
•Tippingthemachinemaycausethefueltoleak.Fuelisammableandexplosive,andcancausepersonalinjury.Runthe
enginedryorremovethefuelwithahandpump;neversiphonthefuel.
17

EngineMaintenance
EngineSafety
Shutofftheenginebeforecheckingtheoiloraddingoilto
thecrankcase.
ServicingtheAirCleaner
ServiceInterval:Beforeeachuseordaily—Cleanandcheck
theair-cleanerfoamandpaperelements.
Every50hours—Replacetheair-cleanerfoamand
paperelements.
Note:Servicetheaircleanermorefrequentlyiftheoperating
conditionsareextremelydustyorsandy.
RemovingtheFoamandPaper
Elements
1.Parkthemachineonalevelsurface,shutofftheengine,
waitforallmovingpartstostop,andremovethekey
fromtheignitionswitchbeforeleavingtheoperating
position.
2.Cleanaroundtheaircleanertopreventdirtfrom
gettingintotheengineandcausingdamage.
3.Removetheair-cleanercoverbyunscrewingthe2
knobs(Figure18).
G017862
g017862
Figure18
1.Air-cleanercover2.Knobs
4.Removethe2nutssecuringthelterassemblytothe
housing(Figure19).
g037326
Figure19
1.Foamelement3.Nuts
2.Paperelement
5.Carefullyremovethefoamandpaper-lterelements
fromtheair-cleanerhousing.
6.Separatethefoamandpaperelements.
CleaningtheFoamandPaperElements
FoamElement:
1.Washthefoamelementinliquidsoapandwarmwater.
2.Whentheelementisclean,rinseitthoroughly.
3.Drytheelementbysqueezingitinacleancloth.
Note:Donotoiltheelement.
Important:Replacethefoamelementifitistorn
orworn.
4.Installthefoamelementontoacleanpaperelement.
PaperElement:
1.Tapthepaperelementonasolid,atsurface,andblow
itoutfromtheinsidewithcompressedairtoremove
dustanddirt.
2.Inspecttheelementfortears,anoilylm,anddamage
totherubberseal.
Important:Donotcleanthepaperelementwith
liquids,suchassolvents,gasoline,orkerosene.
Replacethepaperelementifitisdamagedor
cannotbecleanedthoroughly.
3.Cleantheinsideoftheair-cleanercoverofalldirt,dust,
anddebris.
18

InstallingtheFoamandPaperElements
Important:Topreventenginedamage,alwaysoperate
theenginewiththecompletefoamandpaper-aircleaner
assemblyinstalled.
1.Installthefoamlterontothepaperlter(Figure19).
2.Installthefoamandpaperlterintotheair-cleaner
housing.
3.Securethelterassemblytothehousingusingthe2
nuts(Figure19).
4.Installtheair-cleanercover,andtightenthe2knobs
(Figure18).
ServicingtheEngineOil
OilType:Detergentoil(APIserviceSF,SG,SH,SJ,or
higher)
CrankcaseCapacity:1.4L(48oz)whenyouchangethe
lter.
Viscosity:Seethetablebelow .
SAE 5W -30, 10W -30
SAE 30
SYNTHETIC 5W -20, 5W -30, 10W -30
g029683
g029683
Figure20
CheckingtheEngine-OilLevel
ServiceInterval:Beforeeachuseordaily
Note:Checktheoilwhentheengineiscold.
WARNING
Contactwithhotsurfacesmaycausepersonal
injury.
Keephands,feet,face,clothingandotherbody
partsawaythemuferandotherhotsurfaces.
Important:Donotoverllthecrankcasewithoiland
runtheengine;enginedamagemayresult.
1.Parkthemachineonalevelsurface,shutofftheengine,
waitforallmovingpartstostop,andremovethekey
fromtheignitionswitchbeforeleavingtheoperating
position.
2.Checktheengine-oillevel(Figure21).
B
A
CDE
G029368
FG H
I J K
g029368
Figure21
ChangingtheEngineOilandFilter
ServiceInterval:Aftertherst5hours
Every100hours(changeitmoreoftenunderaheavy
loadorinhightemperatures).
Note:Changetheengine-oilltermorefrequentlywhenthe
operatingconditionsareextremelydustyorsandy.
1.Parkthemachineonalevelsurface,shutofftheengine,
waitforallmovingpartstostop,andremovethekey
fromtheignitionswitchbeforeleavingtheoperating
position.
2.Draintheoilfromtheengine(Figure22).
19

B
A
C
E F
D
GH
g029369
g029369
Figure22
3.Removetheengine-oillter(Figure23).Aftertheoilis
drained,installanewoillter.
Note:Ensurethenewoil-ltergaskettouchesthe
engine,andthenanextra3/4turniscompleted.
B
A
C D
EF
3/4
g027477
g027477
Figure23
4.Slowlypourapproximately80%ofthespecied
amountofoilintothellhole(Figure24).
5.Allow3to5minutesfortheoiltosettle,thencheck
theoillevel(Figure24).
20
Other manuals for 23522
1
This manual suits for next models
1
Table of contents
Other Toro Brush Cutter manuals


Popular Brush Cutter manuals by other brands


McCulloch
McCulloch MAC 250 L instruction manual

Makita
Makita RBC413U instruction manual

Tonino Lamborghini
Tonino Lamborghini PB 43SB TL Translation of the original operating instructions

Bosch
Bosch AHS 45-26 Original instructions

Maruyama
Maruyama B420H Owner's/operator's manual

AS MOTOR
AS MOTOR 620KM user manual