Toro 22197 User manual

FormNo.3357-400RevA
21inHeavy-DutyRecycler®/Rear
BaggerLawnMower
ModelNo.22197—SerialNo.310000001andUp
ToregisteryourproductordownloadanOperator'sManualorPartsCatalogatnocharge,gotowww.Toro.com.OriginalInstructions(EN)

WARNING
CALIFORNIA
Proposition65Warning
Theengineexhaustfromthisproduct
containschemicalsknowntotheStateof
Californiatocausecancer,birthdefects,
orotherreproductiveharm.
Important:Thisengineisnotequippedwitha
sparkarrestermufer.ItisaviolationofCalifornia
PublicResourceCodeSection4442touseoroperate
theengineonanyforest-covered,brush-covered,or
grass-coveredland.Otherstatesorfederalareas
mayhavesimilarlaws.
ThissparkignitionsystemcomplieswithCanadian
ICES-002.
Theenclosed
Engine Owner’ s Man ual
issupplied
forinformationregardingtheUSEnvironmental
ProtectionAgency(EPA)andtheCalifornia
EmissionControlRegulationofemissionsystems,
maintenance,andwarranty.Replacementsmaybe
orderedthroughtheenginemanufacturer.
Introduction
Thisrotary-blade,walk-behindlawnmoweris
intendedtobeusedbyresidentialhomeowners
orprofessional,hiredoperators.Itisdesigned
primarilyforcuttinggrassonwell-maintainedlawns
onresidentialorcommercialproperties.Itisnot
designedforcuttingbrushorforagriculturaluses.
Readthisinformationcarefullytolearnhowtooperate
andmaintainyourproductproperlyandtoavoidinjury
andproductdamage.Youareresponsibleforoperating
theproductproperlyandsafely.
YoumaycontactTorodirectlyatwww .Toro.comfor
productandaccessoryinformation,helpndinga
dealer,ortoregisteryourproduct.
Wheneveryouneedservice,genuineToroparts,or
additionalinformation,contactanAuthorizedService
DealerorToroCustomerServiceandhavethemodel
andserialnumbersofyourproductready.Figure1
identiesthelocationofthemodelandserialnumbers
ontheproduct.Writethenumbersinthespace
provided.
Figure1
1.Modelandserialnumberplate
ModelNo.
SerialNo.
Thismanualidentiespotentialhazardsandhas
safetymessagesidentiedbythesafetyalertsymbol
(Figure2),whichsignalsahazardthatmaycauseserious
injuryordeathifyoudonotfollowtherecommended
precautions.
Figure2
1.Safetyalertsymbol
Thismanualuses2wordstohighlightinformation.
Importantcallsattentiontospecialmechanical
informationandNoteemphasizesgeneralinformation
worthyofspecialattention.
©2010—TheToro®Company
8111LyndaleAvenueSouth
Bloomington,MN554202
Contactusatwww.Toro.com.
PrintedintheUSA
AllRightsReserved

Contents
Introduction.................................................................2
Safety...........................................................................4
GeneralLawnMowerSafety.................................4
Training................................................................4
Preparation..........................................................4
Operation.............................................................5
MaintenanceandStorage......................................5
SafetyandInstructionalDecals.............................6
Setup............................................................................7
1InstallingtheHandle..........................................7
2InstallingtheStarterRope..................................8
3InstallingtheFuelTank......................................8
4InstallingtheDischargeTunnelPlug...................8
5FillingtheCrankcasewithOil.............................9
ProductOverview......................................................10
Controls.............................................................10
Operation...................................................................10
CheckingtheEngineOilLevel............................10
FillingtheFuelTankwithGasoline.....................11
StartingtheEngine.............................................12
StoppingtheEngine...........................................13
UsingtheSelf-propelDrive................................13
UsingtheDischargeTunnelPlug........................13
AdjustingtheCuttingHeight..............................14
UsingtheGrassBag...........................................14
OperatingTips...................................................15
Maintenance...............................................................17
RecommendedMaintenanceSchedule(s)................17
Lubrication.............................................................18
LubricatingthePivotArms.................................18
LubricatingtheGearCase...................................18
EngineMaintenance...............................................18
ServicingtheAirFilter........................................18
ChangingtheEngineOil....................................19
ChangingtheOilFilter.......................................19
ServicingtheSparkPlug.....................................20
FuelSystemMaintenance.......................................20
EmptyingtheFuelTankandCleaningthe
FuelFilter.......................................................20
DriveSystemMaintenance.....................................21
AdjustingtheSelf-propelDrive...........................21
ControlsSystemMaintenance.................................21
AdjustingtheBladeBrakeCable.........................21
BladeMaintenance.................................................22
MaintainingtheCuttingBlade.............................22
Cleaning.................................................................23
CleaningundertheLawnMowerHousing...........23
CleaningtheDischargeTunneland
Plug................................................................24
CleaningundertheBeltCover.............................24
Storage.......................................................................25
PreparingtheFuelSystem...................................25
PreparingtheEngine..........................................25
GeneralInformation..........................................25
RemovingtheLawnMowerfromStorage............25
Troubleshooting.........................................................26
3

Safety
ThislawnmowermeetstheCPSCbladesafety
requirementsforwalk-behindrotarylawnmowers
andtheB71.4specicationsoftheAmerican
NationalStandardsInstituteineffectatthetime
ofproduction.
Improperlyusingormaintainingthislawnmower
canresultininjury.Toreducethepotentialfor
injury,complywiththesesafetyinstructions.
Torodesignedandtestedthislawnmowerfortooffer
reasonablysafeservice;however,failuretocomply
withthefollowinginstructionsmayresultin
personalinjury.
WARNING
Engineexhaustcontainscarbonmonoxide,an
odorless,deadlypoisonthatcankillyou.
Donotruntheengineindoorsorinanenclosed
area.
Toensuremaximumsafety,bestperformance,and
togainknowledgeoftheproduct,itisessentialthat
youandanyotheroperatorofthelawnmowerread
andunderstandthecontentsofthismanualbefore
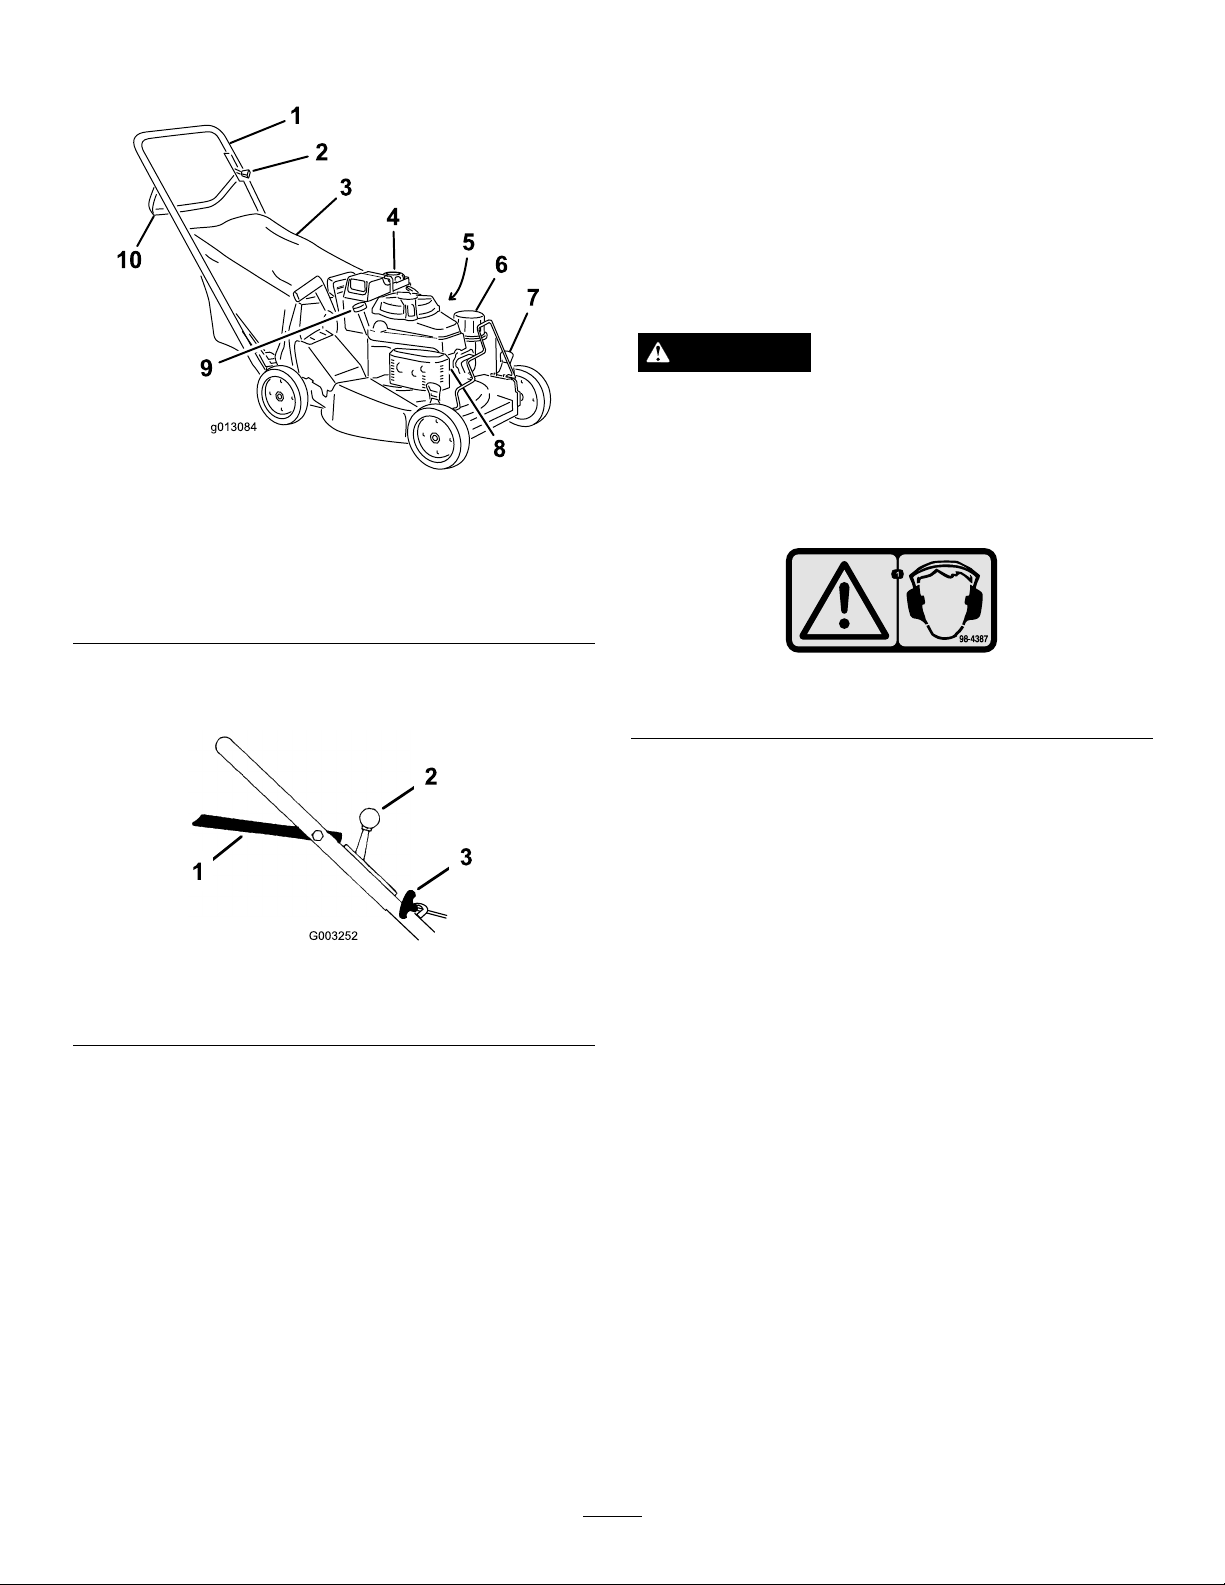
theengineiseverstarted.Payparticularattention
tothesafetyalertsymbol(Figure2)whichmeans
Caution,Warning,orDanger—“personalsafety
instruction.”Readandunderstandtheinstruction
becauseithastodowithsafety.Failuretocomply
withtheinstructionmayresultinpersonalinjury.
GeneralLawnMowerSafety
Thislawnmoweriscapableofamputatinghandsand
feetandofthrowingobjects.Failuretoobservethe
followingsafetyinstructionscouldresultinserious
injuryordeath.
ThefollowinginstructionsarefromtheANSI/OPEI
B71.4–2004standard.
Training
•ReadtheOperator’sManualandothertraining
material.
•Iftheoperator(s)ormechanic(s)cannotreadEnglish
itistheowner’sresponsibilitytoexplainthismaterial
tothem.
•Becomefamiliarwiththesafeoperationofthe
equipment,operatorcontrols,andsafetysigns.
•Alloperatorsandmechanicsshouldbetrained.The
ownerisresponsiblefortrainingtheusers.
•Neverletchildrenoruntrainedpeopleoperateor
servicetheequipment.Localregulationsmayrestrict
theageoftheoperator.
•Theowner/usercanpreventandisresponsiblefor
accidentsorinjuriesoccurringtothemselves,other
peopleorproperty.
Preparation
•Evaluatetheterraintodeterminewhataccessories
andattachmentsareneededtoproperlyandsafely
performthejob.
•Onlyuseaccessoriesandattachmentsapprovedby
themanufacturer.
•Wearappropriateclothing,includingsafetyglasses
andhearingprotection.Longhair,looseclothingor
jewelrymaygettangledinmovingparts.
•Inspecttheareawheretheequipmentistobeused
andremoveallobjectssuchasrocks,toysandwire
whichcanbethrownbythemachine.
•Useextracarewhenhandlinggasolineandother
fuels.
–Theyareammableandvaporsareexplosive.
–Useonlyanapprovedcontainer.
–Neverremovegascaporaddfuelwhenengine
isrunning.
–Donotsmoke.
–Neverrefuelordrainthemachineindoors.
•Checkthatoperator’spresencecontrols,safety
switchesandshieldsareattachedandfunctioning
properly.Donotoperateunlesstheyarefunctioning
properly.
4

Operation
•Neverrunanengineinanenclosedarea.
•Onlyoperateingoodlight,keepingawayfromholes
andhiddenhazards.
•Besurealldrivesareinneutralbeforestartingengine.
•Onlystartenginefromtheoperator’sposition.
•Besureofyourfootingwhileusingpedestrian
controlledequipment,especiallywhenbackingup.
•Walk,don’trun.
•Neveroperateonwetgrass.Reducedfootingcould
causeslipping.
•Slowdownanduseextracareonhillsides.Besure
totravelsidetosideonhillsides.
•Usecautionwhileoperatingneardrop-offs.
•Slowdownandusecautionwhenmakingturnsand
whenchangingdirectionsonslopes.
•Neverraisedeckwiththebladesrunning.
•Donotchangetheenginegovernorsettingor
overspeedtheengine.
•Stoponlevelgroundandshutoffenginebefore
leavingtheoperator’spositionforanyreason
includingemptyingthecatchersoruncloggingthe
chute.
•Stopequipmentandinspectbladesafterstriking
objectsorifanabnormalvibrationoccurs.Make
necessaryrepairsbeforeresumingoperations.
•Keephandsandfeetawayfromthecuttingunits.
•Lookbehindanddownbeforebackinguptobesure
ofaclearpath.
•Donotoperatethemowerundertheinuenceof
alcoholordrugs.
•Usecarewhenloadingorunloadingthemachine
intoatrailerortruck.
•Usecarewhenapproachingblindcorners,shrubs,
trees,orotherobjectsthatmayobscurevision.
MaintenanceandStorage
•Waitforallmovementtostopbeforeadjusting,
cleaningorrepairing.
•Cleangrassanddebrisfromcuttingunit,mufer,
andenginetohelppreventres.
•Cleanupoilorfuelspillage.
•Letenginecoolbeforestoringanddonotstorenear
ame.
•Donotstorefuelnearamesordrainindoors.
•Neverallowuntrainedpersonneltoservicemachine.
•Usecarewhencheckingblade.
•Wrapthebladeorweargloves,andusecautionwhen
servicing.
•Onlyreplaceblade.Neverstraightenorweldthem.
•Keephandsandfeetawayfrommovingparts.
•Ifpossible,donotmakeadjustmentswiththeengine
running.
•Keepallpartsingoodworkingconditionandall
hardwaretightened.
•Replaceallwornordamageddecals.
5

SafetyandInstructionalDecals
Safetydecalsandinstructionsareeasilyvisibletotheoperatorandarelocatednearanyareaof
potentialdanger.Replaceanydecalthatisdamagedorlost.
Manufacturer’sMark
1.Indicatesthebladeisidentiedasapartfromtheoriginal
machinemanufacturer.
68-7410
74-1970
1.Transmissionspeeds2.Neutral
98-4387
1.Warning—wearhearingprotection.
106-0690
110-4989
117-2718
6

Setup
LooseParts
Usethechartbelowtoverifythatallpartshavebeenshipped.
ProcedureDescriptionQty.Use
Handle1
Bolt(5/16x1-1/4inches)2
Washer4
Thinlocknut(5/16inch)2
Bolt(5/16x1-1/2inches)2
Locknut(5/16inch)2
Bagsupportrod1
Caplocknut2
1
Cabletie1
Installthehandle.
2Nopartsrequired–Installthestarterrope.
Self-tappingscrew2
3Fueltank1Installthefueltank.
4Dischargetunnelplug1Installthedischargetunnelplug.
5Nopartsrequired–Fillthecrankcasewithoil.
Note:Determinetheleftandrightsidesofthemachine
fromthenormaloperatingposition.
1
InstallingtheHandle
Partsneededforthisprocedure:
1Handle
2Bolt(5/16x1-1/4inches)
4Washer
2Thinlocknut(5/16inch)
2Bolt(5/16x1-1/2inches)
2Locknut(5/16inch)
1Bagsupportrod
2Caplocknut
1Cabletie
Procedure
1.Mountthehandletotheoutsideofthelawnmower
housing(usingthebottomhole)with2bolts(5/16
x1-1/4inches),washers,andthinlocknuts(5/16
inch)(Figure3).
Figure3
1.Handlelatch4.Handle
2.Bagsupportrod5.Bolt(5/16x1-1/2inches)
3.Caplocknut(2)6.Bolt(5/16x1-1/4inches)
2.Securethehandlelatchestothehandlewith2bolts
(5/16x1-1/2inches),washers,andlocknuts(5/16
inch)(Figure3).
Note:Youcanadjustthehandleheightfor
comfortableoperation.Standbehindthehandleto
determinetheheight.Toadjustthehandleheight,
positionthecapscrewsandthelocknutsthatsecure
7

thehandlelatchestothehandleintotheother
mountingholesinthelatches.
3.Slidethebagsupportrodthroughthesecondfrom
thetopmountingholesinthehandleandsecure
eachendwithacaplocknut(Figure3).
4.Useacabletietosecurethecontrolcablestotheleft
handlebelowthebagsupportrod.
2
InstallingtheStarterRope
NoPartsRequired
Procedure
Pullthestarterropethroughtheropeguideonthe
handle(Figure4).
Figure4
1.Starterrope2.Ropeguide
Note:Tomaketheropeeasiertoinstall,squeezethe
controlbaronthehandle.
3
InstallingtheFuelTank
Partsneededforthisprocedure:
2Self-tappingscrew
1Fueltank
Procedure
1.Slidetheplasticclipsonthefrontofthefueltank
ontothefueltankmount(Figure5).
Figure5
1.Plasticclip(2)
2.Securethebottomofthefueltanktothefueltank
bracketbyinstallingtheself-tappingscrewsfrom
thebottom.Torquethescrewsto40to50in-lb
(4.5to5.6N-m).
8

4
InstallingtheDischargeTunnel
Plug
Partsneededforthisprocedure:
1Dischargetunnelplug
Procedure
1.Openthedischargedoorbypullingforwardonthe
handleandmovingitrearward(Figure6).Holdthe
dischargedoorhandletopreventthespring-loaded
doorfromclosingwhileyouinserttheplug.
Figure6
1.Dischargedoorhandle2.Plug,rotatedclockwise
2.Sincetheplugisslightlywiderthanthedischarge
tunnelopening,rotatetheplugclockwiseslightly
whileinsertingit(Figure6).
Note:Ensurethatthearrowontheplugdecal
pointsupward.
3.Pushtheplugallthewayinuntilthespringclipon
thebottomoftheplugclicksintoplace,lockingthe
plugsecurelyintothedischargetunnel(Figure7).
Figure7
1.Springclip
4.Releasethedischargedoorhandletolockthetop
oftheplug.
5
FillingtheCrankcasewithOil
NoPartsRequired
Procedure
Theenginecrankcaseisshippedwithoutoil.You
mustlltheenginecrankcasewithoilbeforestartingthe
engine.RefertoCheckingtheEngineOilLevelforoil
specicationsandinstructions.
9

ProductOverview
Figure8
1.Handle6.Airlter
2.Throttlecontrollever7.Cuttingheightlever
3.Grassbag8.Sparkplug
4.Fueltank9.Oilll/dipstick
5.Oillter10.Bladecontrolbar
Controls
Figure9
1.Bladecontrolbar3.Recoilstarterhandle
2.Throttlecontrollever
Operation
Note:Determinetheleftandrightsidesofthe
machinefromthenormaloperatingposition.
Eachtimebeforeyoumow,makesurethatthe
self-propeldriveandthebladecontrolbaroperate
properly.Whenyoureleasethebladecontrolbar,the
bladeandself-propeldriveshouldstop.Iftheydonot,
contactanAuthorizedServiceDealer.
CAUTION
Thismachineproducessoundlevelsinexcessof
85dBAattheoperator’searandcancausehearing
lossthroughextendedperiodsofexposure.
Wearhearingprotectionwhenoperatingthis
machine.
Figure10
1.Warning—wearhearingprotection.
CheckingtheEngineOilLevel
ServiceInterval:Beforeeachuseordaily
Theoilcapacityoftheenginecrankcase(withoil
lter)is29ounces(0.85liters).Useonlyhigh-quality
SAE30orSAE10W30weightdetergentoilthat
hastheAmericanPetroleumInstitute(API)service
classicationSF,SG,SH,orSJ.
Beforeeachuse,ensurethattheoillevelisbetweenthe
AddandFullmarksonthedipstick(Figure11).
10

Figure11
1.Dipstick3.Add
2.Full
1.Movethelawnmowertoalevelsurface.
2.Cleanaroundthedipstick(Figure11).
3.Removethedipstickbyrotatingthecap
counterclockwiseandpullingitout.
Note:Whenthecrankcaseisempty,pourabout
3/4ofthecrankcasecapacityofoilinthecrankcase.
4.Wipethedipstickcleanwithacleancloth.
5.Insertthedipstickintothellerneck,thenremove
it.
Note:Toensureanaccurateoillevelreading,you
mustfullyinstallthedipstick.
6.Readtheoillevelonthedipstick(Figure11).
7.IftheoillevelreadingisbelowtheAddmarkon
thedipstick,slowlypouronlyenoughoilintothe
llerholetoraisetheoilleveltotheFullmarkon
thedipstick.
Important:Donotoverllthecrankcasewith
oilandruntheengine;enginedamagewill
result.Draintheexcessoiluntiltheoillevelon
thedipstickreadsFull.
8.Insertthedipstickintothellerneckandrotatethe
capclockwiseuntilitistight.
FillingtheFuelTankwith
Gasoline
Forbestresults,useclean,fresh,lead-freegasolinewith
anoctaneratingof87orhigher.Toensurefreshness,
purchaseonlythequantityofgasolinethatyouexpectto
usein30days.Usingunleadedgasolineresultsinfewer
combustiondepositsandlongerenginelife.Youmay
useleadedgasolineifunleadedgasolineisnotavailable.
Important:Donotaddoiltothegasoline.
Important:Donotusemethanol,gasoline
containingmethanol,gasoholcontainingmore
than10%ethanol,premiumgasoline,orwhitegas.
Usingthesefuelscandamagetheengine’sfuel
system.
Important:Donotusegasolinethathasbeen
storedsincethelastmowingseasonorlonger.
DANGER
Incertainconditions,gasolineisextremely
ammableandhighlyexplosive.Areorexplosion
fromgasolinecanburnyouandothersandcan
damageproperty.
•Fillthefueltankoutdoors,inanopenarea,and
whentheengineiscold.Wipeupanygasoline
thatspills.
•Fillthefueltanktothebottomofthellerneck.
Donotlltothetopofthellerneck.
•Neversmokewhenhandlinggasoline,andstay
awayfromanopenameorwhereasparkmay
ignitethegasolinefumes.
•Storegasolineinanapprovedfuelcontainer
andkeepitoutofthereachofchildren.
•Neverbuymorethana30-daysupplyof
gasoline.
11

DANGER
Whenfueling,undercertaincircumstances,a
staticchargecandevelop,ignitingthegasoline.A
reorexplosionfromgasolinecanburnyouand
othersanddamageproperty.
•Alwaysplacegasolinecontainersontheground
andawayfromyourvehiclebeforelling.
•Donotllgasolinecontainersinsideavehicle
oronatruckortrailerbedbecauseinterior
carpetsorplastictruckbedlinersmayinsulate
thecontainerandslowthelossofanystatic
charge.
•Whenpractical,removegasoline-powered
equipmentfromthetruckortrailerandrefuel
theequipmentwithitswheelsontheround.
•Ifthisisnotpossible,thenrefuelsuch
equipmentonatruckortrailerfromaportable
container,notfromagasolinedispensernozzle.
•Ifyoumustuseagasolinedispensernozzle,
keepthenozzleincontactwiththerimofthe
fueltankorcontaineropeningatalltimesuntil
fuelingiscomplete.
Useafuelstabilizer/conditionerregularlyduring
operationandstorage.Astabilizer/conditionercleans
theengineduringoperationandpreventsgum-like
varnishdepositsfromformingintheengineduring
periodsofstorage.
Important:Donotusefueladditivesotherthan
afuelstabilizer/conditioner.Donotusefuel
stabilizerswithanalcoholbasesuchasethanol,
methanol,orisopropanol.
1.Cleanaroundthefueltankcap(Figure12).
Figure12
1.Fueltankcap3.Aircleaner
2.Oilll/dipstick4.Sparkplug
2.Removethecapfromthetank.
3.Fillthefueltankwithunleadedgasolineuptothe
bottomofthellerneck.Donotllintotheller
neck.
4.Installthefueltankcapandwipeupanyspilled
gasoline.
StartingtheEngine
1.Connectthewiretothesparkplug(Figure12).
2.Openthefuelvalve(Figure22).
3.MovethethrottlecontroltotheChokeposition.
4.MovethegroundspeedcontroltotheNeutral(N)
position(Figure13).
Figure13
1.Groundspeedcontrol
5.Pullthestarterhandlelightlyuntilyoufeel
resistance,thenpullitsharply.
6.Regulatethethrottleandthegroundspeedcontrol
asdesiredwhentheenginestarts.
Note:Iftheenginefailstostartafter3pulls,repeat
steps3through6.
12

StoppingtheEngine
1.Releasethebladecontrolbarandmovethethrottle
controltotheOffposition.
2.Disconnectthewirefromthesparkplugifyoudo
notusethelawnmowerorifyouleaveitunattended.
UsingtheSelf-propelDrive
Thelawnmowerhas3groundspeeds:1isslow,2is
medium,and3isfast.thegroundspeedcontrolis
locatedattherearofthebeltcover(Figure14).
Figure14
1.Groundspeedcontrol
1.MovethegroundspeedcontroltotheNeutral(N)
position.
2.Starttheengine.
3.Squeezethebladecontrolbaragainstthehandleto
theRun/Driveposition(Figure15).
Figure15
1.Run/Driveposition3.Stopposition
2.Run/Shiftposition
Note:Donotshiftspeedswhileyousqueeze
thebladecontrolbaragainstthehandlein
theRun/Driveposition;thiscandamagethe
transmission.Movethebladecontrolbartothe
Run/Shiftposition(Figure15)whenyouchange
thegroundspeed.
Note:Youcanvarythegroundspeedbyincreasing
ordecreasingthedistancebetweenthecontrolbar
andthehandle.Lowerthecontrolbartoslowthe
lawnmowerwhenmakingaturnorifthelawn
mowerismovingtoofastforyou.Ifyoulower
thecontrolbartoofar,thelawnmowerstops
self-propelling.Squeezethecontrolbarcloserto
thehandletoincreasethegroundspeed.When
youholdthecontrolbartightagainstthehandle,
thelawnmowerself-propelsatthemaximum
groundspeed.Movethegroundspeedcontrolto
theNeutral(N)positionwhenyouusethelawn
mowerfortrimmingandwheneveryouleavethe
lawnmower.
UsingtheDischargeTunnel
Plug
1.Stoptheengineandwaitforallmovingpartsto
stop.
2.Inserttheplug;refertoInstallingtheDischarge
TunnelPlug.
3.Toremovetheplug,movethedischargedoor
handlerearwardandliftupthespringcliponthe
bottomoftheplug.Whentheplugisunlocked,pull
itoutofthedischargetunnel.
Note:Whengrassisthickandlush,clippingsmay
collectonandaroundthedischargetunnelplug.
Thismaymakeremovingtheplugdifcult.Clean
theplugthoroughlyaftereachuse.
13

AdjustingtheCuttingHeight
Eachwheelisadjustedindividuallywithawheelheight
adjustmentlever.Cuttingheightsare1inch(25mm),
1-1/2inches(38mm),2inches(51mm),2-1/2inches
(64mm),3inches(76mm),and3-1/2inches(89mm).
DANGER
Adjustingthecuttingheightleverscouldbring
yourhandsintocontactwithamovingbladeand
resultinseriousinjury.
•Stoptheengineandwaitforallmovementto
stopbeforeadjustingthecuttingheight.
•Donotputyourngersunderthehousing
whenadjustingthecuttingheight.
1.Pullthewheelheightadjustmentlevertowardthe
wheel(Figure16)andmoveittothedesiredsetting.
Figure16
1.Wheelheightadjustmentlever
2.Releasethewheelheightadjustmentleverandseat
itsecurelyinthenotch.
3.Adjustallthewheelstothesamecuttingheight
setting.
UsingtheGrassBag
Occasionally,youmaywishtousethegrassbagfor
baggingextralonggrass,lushgrass,orleaves.
InstallingtheGrassBag
1.Stoptheengineandwaitforallmovingpartsto
stop.
2.Ensurethatthedischargedoorhandleisfully
forwardandthatthepinisengagedinthecatch
(Figure17).
Figure17
1.Bagframeonretaining
post
3.Handlefullyforward;
dischargedoorclosed
2.Pinengagedincatch
3.Slidetheholeinthebagframeontotheretaining
postonthedischargetunnel(Figure17).
4.Settherearofthebagframeontothebagsupport
rod.
5.Pullthedischargedoorhandleforwarduntilthepin
clearsthecatch,andmovethehandlerearwarduntil
thepinlocksinthebagnotch(Figure18).
Figure18
1.Pinlockedinbagnotch
Note:Thedischargedoorinthelawnmower
housingisnowopen.
MowingwiththeGrassBag
WARNING
Aworngrassbagcouldallowsmallstones
andothersimilardebristobethrowninthe
operator’sorbystander’sdirectionandresultin
seriouspersonalinjuryordeathtotheoperatoror
bystanders.
Checkthegrassbagfrequently.Ifitisdamaged,
installanewTororeplacementbag.
14

RemovingtheGrassBag
1.Stoptheengineandwaitforallmovingpartsto
stop.
2.Raisethedischargedoorhandleandmoveitforward
toengagethepinwiththecatch(Figure17).
3.Graspthehandlesatthefrontandtherearofthe
bagandliftthebagoffthelawnmower.
4.Graduallytipthebagforwardtoemptytheclippings.
5.Toinstallthebag,refertoInstallingtheGrassBag.
DANGER
Ifthedischargedoordoesnotclosecompletely,the
lawnmowercouldthrowobjects,causingserious
personalinjuryordeath.
Ifyoucannotclosethedoorbecausethegrass
clippingsclogthedischargearea,stoptheengine
andgentlymovethedischargedoorhandleback
andforthuntilyoucanclosethedoorcompletely.
Ifyoustillcannotclosethedoor,removethe
obstructionwithastick,notyourhand.
DANGER
Thelawnmowercanthrowgrassclippingsand
otherobjectsthroughanopendischargetunnel.
Objectsthrownwithenoughforcecouldcause
seriouspersonalinjuryordeathtotheoperatoror
bystander.
Neveropenthedooronthedischargetunnelwhen
theengineisrunning.
OperatingTips
GeneralTips
•Reviewthesafetyinstructionsandreadthismanual
carefullybeforeoperatingthelawnmower.
•Cleartheareaofsticks,stones,wire,branches,and
otherdebristhatthebladecouldhitandthrow.
•Keepeveryone,especiallychildrenandpets,away
fromtheareaofoperation.
•Avoidstrikingtrees,walls,curbs,orothersolid
objects.Neverdeliberatelymowoveranyobject.
•Ifthelawnmowerstrikesanobjectorstartsto
vibrate,immediatelystoptheengine,disconnectthe
wirefromthesparkplug,andexaminethelawn
mowerfordamage.
•Maintainasharpbladethroughoutthecutting
season.Periodicallyledownnicksontheblade.
•Replacethebladewhennecessarywithanoriginal
Tororeplacementblade.
•Mowonlydrygrassorleaves.Wetgrassandleaves
tendtoclumpontheyardandcancausethelawn
mowertoplugortheenginetostall.
WARNING
Wetgrassorleavescancauseseriousinjuryif
youslipandcontacttheblade.
Mowonlyindryconditions.
•Cleantheundersideofthelawnmowerdeckafter
eachmowing.SeeCleaningtheUndersideofthe
LawnMowerHousing.
•Keeptheengineingoodrunningcondition.
•Settheenginespeedtothefastestpositionforthe
bestcuttingresults.
WARNING
Operatingalawnmowerwithitsengine
runningataspeedgreaterthanthefactory
settingcancausethelawnmowertothrowa
partofthebladeorengineintotheoperator’sor
bystander’sareaandresultinseriouspersonal
injuryordeath.
–Donotchangetheenginespeedsetting.
–Ifyoususpecttheenginespeedisfaster
thannormal,contactanAuthorizedService
Dealer.
•Cleantheairlterfrequently.Mulchingstirsup
moreclippingsanddustwhichclogstheairlter
andreducesengineperformance.
CuttingGrass
•Grassgrowsatdifferentratesatdifferenttimesof
theyear.Inthesummerheat,itisbesttocutgrass
atthe2inch(51mm),2-1/2inch(64mm),or
3inch(76mm)cuttingheightsettings.Cutonly
aboutathirdofthegrassbladeatatime.Donot
cutbelowthe2inch(51mm)settingunlessthe
grassissparseoritislatefallwhengrassgrowth
beginstoslowdown.
•Whencuttinggrassover6inches(15cm)tall,rst
mowatthehighestcuttingheightsettingandwalk
slower;thenmowagainatalowersettingforthe
bestlawnappearance.Ifthegrassistoolongand
theleavesclumpontopofthelawn,thelawn
mowermayplugandcausetheenginetostall.
•Alternatethemowingdirection.Thishelpsdisperse
theclippingsoverthelawnforevenfertilization.
15

Ifthenishedlawnappearanceisunsatisfactory,try
oneormoreofthefollowing:
•Sharpentheblade.
•Walkataslowerpacewhilemowing.
•Raisethecuttingheightonyourlawnmower.
•Cutthegrassmorefrequently.
•Overlapcuttingswathsinsteadofcuttingafull
swathwitheachpass.
•Setthecuttingheightonthefrontwheelsone
notchlowerthantherearwheels.Forexample,set
thefrontwheelsat2inches(51mm)andtherear
wheelsat2-1/2inches(64mm).
CuttingLeaves
•Aftercuttingthelawn,ensurethathalfofthelawn
showsthroughthecutleafcover.Youmayneedto
makemorethanonepassovertheleaves.
•Forlightleafcoverage,setallthewheelsatthesame
cuttingheightsetting.
•Iftherearemorethan5inches(12.7cm)ofleaves
onthelawn,setthefrontcuttingheight1or2
notcheshigherthantherearcuttingheight.This
makesiteasiertofeedtheleavesunderthelawn
mowerdeck.
•Slowdownyourmowingspeedifthelawnmower
doesnotcuttheleavesnelyenough.
•Ifyoumowoveroakleaves,youcanaddlimeto
thegrassinthespringtoreducetheacidityofthe
oakleaves.
16

Maintenance
Note:Determinetheleftandrightsidesofthemachinefromthenormaloperatingposition.
RecommendedMaintenanceSchedule(s)
MaintenanceService
IntervalMaintenanceProcedure
Aftertherst8hours•Changetheengineoilwithouttheoillter.
Beforeeachuseordaily
•Checktheengineoillevel.
•Ensurethattheenginestopswithin3secondsafterreleasingthebladecontrolbar.
•Inspectthemowerbladesforwearordamage.
•Cleanunderthelawnmowerhousing.
•Cleanthedischargetunnelandplug.
Every25hours•Lubricatethepivotarms.
•Cleanthefoampre-cleaner(morefrequentlyindustyconditions).
Every50hours
•Changetheengineoil(moreoftenindustyconditions).
•Checkthefuelhoseandreplaceitifnecessary.
•Cleanunderthebeltcover.
Every100hours
•Lubricatethegearcase.
•Changetheoillter.
•Checkthesparkplug.
•Cleanthefuellter.
•Adjusttheself-propeldrive.
•Adjustthebladebrakecable.
•Cleantheaircoolingns.
Every300hours•Replacethepaperairlter(morefrequentlyindustyconditions).
Yearlyorbeforestorage•Emptythefueltank.
Important:Refertoyour
Engine Operator’ s Man ual
foradditionalmaintenanceprocedures.
CAUTION
Ifyouleavethewireonthesparkplug,someonecouldaccidentlystarttheengineandseriouslyinjure
youorotherbystanders.
Disconnectthewirefromthesparkplugbeforeyoudoanymaintenance.Setthewireasidesothatitdoes
notaccidentlycontactthesparkplug.
17

Lubrication
LubricatingthePivotArms
ServiceInterval:Every25hours
1.Movetherearwheelcuttingheightleverstothe
centersetting.
2.Wipethegreasettingswithacleanrag(Figure19).
Figure19
1.Greasetting
3.Installagreasegunontothettingandgentlyapply2
or3pumpsof#2multi-purposelithium-basegrease.
Important:Excessivegreasepressuremay
damagetheseals.
LubricatingtheGearCase
ServiceInterval:Every100hours
1.Removethegrassbag.
2.Wipethegreasettingswithacleanrag(Figure20).
Figure20
1.Beltcover2.Greasetting
3.Installagreasegunontothettingthroughthebelt
coveropening(Figure20).
4.Gentlyapplyoneto2pumpsof#2multi-purpose
lithium-basegrease.
5.Installthegrassbag.
EngineMaintenance
ServicingtheAirFilter
ServiceInterval:Every25hours—Cleanthefoam
pre-cleaner(morefrequentlyindusty
conditions).
Every300hours—Replacethepaper
airlter(morefrequentlyindusty
conditions).
Important:Donotoperatetheenginewithoutthe
airlterassembly;extremeenginedamagewill
occur.
1.Stoptheengineandwaitforallmovingpartstostop.
2.Disconnectthewirefromthesparkplug(Figure12).
3.Removethecoverandcleanitthoroughly(Figure21).
Figure21
1.Cover3.Airlterbase
2.Paperairlter
4.Removeandinspectthepaperairlter(Figure21),
anddiscarditifitisexcessivelydirty.
Important:Donottrytocleanapaperlter.
5.Removethefoampre-cleanerandwashitwithamild
detergentandwater,thenblotitdry(Figure21).
6.Installthefoampre-cleanerontothepaperairlter.
7.Installtheairlterassembly.
Note:Installanewpaperairlterifyoudiscarded
theoldone.
8.Installthecover.
18

ChangingtheEngineOil
ServiceInterval:Aftertherst8hours
Every50hours
OilCapacity
Withoillter29ounces(0.85L)
Withoutoillter22ounces(0.65L)
1.Runtheenginetowarmtheengineoil.
Note:Warmoilowsbetterandcarriesmore
contaminants.
WARNING
Oilmaybehotafterenginehasbeenrun,and
contactwithhotoilcancauseseverepersonal
injury.
Avoidcontactingthehotengineoilwhenyou
drainit.
2.Stoptheengineandwaitforallmovingpartstostop.
3.Disconnectthewirefromthesparkplug(Figure12).
4.Drainthegasolinefromthefueltank;referto
EmptyingtheFuelTankandCleaningtheFuelFilter.
5.Placeasuitabledrainpanundertherightsideofthe
lawnmower.
6.Removethedipstickbyrotatingthecap
counterclockwiseandpullingitout.
7.Raisetheleftsideofthelawnmowertodraintheoil
intothedrainpan.
Note:Youcanalsoremovetheoilfromthe
crankcaseusinganoilextractor.
8.Lowertheleftsideofthelawnmower.
9.Insertthedipstickintothellerneckandrotatethe
capclockwiseuntilitistight.
10.Recycletheusedoilaccordingtolocalcodes.
11.FillthecrankcasetotheFulllineonthedipstickwith
freshoil.RefertotheFillingtheCrankcasewithOil.
12.Wipeupanyspilledoil.
ChangingtheOilFilter
ServiceInterval:Every100hours
1.Runtheenginetowarmtheoil.
WARNING
Oilmaybehotaftertheenginehasbeenrun,
andcontactwithhotoilcancausesevere
personalinjury.
Avoidcontactingthehotengineoilwhenyou
drainit.
2.Stoptheengineandwaitforallmovingpartstostop.
3.Disconnectthewirefromthesparkplug(Figure12).
4.Drainthegasolinefromthefueltank;referto
EmptyingtheFuelTankandCleaningtheFuelFilter.
5.Draintheengineoil;refertoChangingtheEngine
Oil.
6.Placearagundertheoilltertocatchanyoilthat
mayleakoutasyouremovethelter.
7.Removetheoillter.
Figure22
1.Fuelvalve2.Oillter
8.Useyourngertocoatthegasketonthenewlter
withoil(Figure23).
Figure23
1.Gasket
19

9.Installthenewlterandhandtightenit2/3turn
only.
10.FillthecrankcasetotheFulllineonthedipstickwith
freshoilRefertoFillingtheCrankcasewithOil.
11.Connectthewiretothesparkplug.
12.Runtheengineforabout3minutes.
13.Stoptheengine,waitforallmovingpartstostop,
andcheckforoilleakagearoundthelter.
14.Addoiltocompensatefortheoilintheoillter.
RefertoCheckingtheEngineOilLevel.
15.Recycletheusedoillteraccordingtolocalcodes.
ServicingtheSparkPlug
ServiceInterval:Every100hours
UseanNGKBPR5ESsparkplugorequivalent.
1.Stoptheengineandwaitforallmovingpartstostop.
2.Disconnectthewirefromthesparkplug(Figure12).
3.Cleanaroundthesparkplug.
4.Removethesparkplugfromthecylinderhead.
Important:Replaceacracked,fouled,or
dirtysparkplug.Donotcleantheelectrodes
becausegritenteringthecylindercandamage
theengine.
5.Setthegapontheplugto0.030in.(0.76mm)
(Figure24).
Figure24
1.Centerelectrodeinsulator
2.Sideelectrode
3.Airgap(nottoscale)
6.Installthesparkplugandthegasketseal.
7.Torquetheplugto17ft-lb(23N⋅m).
8.Connectthewiretothesparkplug.
FuelSystem
Maintenance
EmptyingtheFuelTankand
CleaningtheFuelFilter
ServiceInterval:Every50hours—Checkthefuelhose
andreplaceitifnecessary.
Every100hours—Cleanthefuel
lter.
Yearlyorbeforestorage—Emptythe
fueltank.
Thefuellter(screen)elementislocatedinsidethefuel
tank.
1.Stoptheengineandwaitforittocooldown.
Important:Draingasolinefromacoldengine
only.
2.Disconnectthewirefromthesparkplug(Figure12).
3.Closethefuelvalve(Figure22).
4.Disconnectthefuellinebylooseningthetubeclamp
atthecarburetor.
5.Openthefuelvalve.
6.Drainthegasolinecompletelyfromthetankandfuel
lineintoanapprovedfuelcontainer.
7.Removethefueltankfromthemower.
8.Closethefuelvalve.
9.Pourasmallamountoffuelinthefueltank,move
thefuelaroundinthetank,andpouritoutintoan
approvedfuelcontainer.
10.Installthefueltankandfuelline;refertoInstalling
theFuelTankandtheFuelLine.
20
Other manuals for 22197
1
Table of contents
Other Toro Lawn Mower manuals

Toro
Toro 78370 User manual

Toro
Toro 74582 User manual

Toro
Toro Z Master G3 User manual

Toro
Toro Greensmaster 04251 User manual

Toro
Toro 20899 User manual

Toro
Toro Super Recycler 20837 User manual

Toro
Toro 74923TE User manual

Toro
Toro 74234 User manual

Toro
Toro Flex-Force Power System 20367 User manual

Toro
Toro Z Master Professional 7000 Series User manual
Popular Lawn Mower manuals by other brands

Husqvarna
Husqvarna 96043004700 Operator's manual

Husqvarna
Husqvarna 96795370100 Operator's manual

Jacobsen
Jacobsen R-311T 69171 Parts & maintenance manual

Ariens
Ariens 911173 Owner's/operator's manual

Stiga
Stiga XM 130 Instructions for use

Elem Garden Technic
Elem Garden Technic TDE1846T-AC Original instructions