Toro 30605TE User manual

FormNo.3440-728RevA
Groundsmaster®4000or4010
RotaryMower
ModelNo.30605—SerialNo.403450001andUp
ModelNo.30605TE—SerialNo.400000000andUp
ModelNo.30635—SerialNo.403450001andUp
ModelNo.30635TE—SerialNo.400000000andUp
Registeratwww.Toro.com.
OriginalInstructions(EN)*3440-728*

ThisproductcomplieswithallrelevantEuropean
directives;fordetailspleaseseetheseparateproduct
specicDeclarationofConformity(DOC)sheet.
ItisaviolationofCaliforniaPublicResourceCode
Section4442or4443touseoroperatetheengineon
anyforest-covered,brush-covered,orgrass-covered
landunlesstheengineisequippedwithaspark
arrester,asdenedinSection4442,maintainedin
effectiveworkingorderortheengineisconstructed,
equipped,andmaintainedforthepreventionofre.
Theenclosedengineowner'smanualissupplied
forinformationregardingtheUSEnvironmental
ProtectionAgency(EPA)andtheCaliforniaEmission
ControlRegulationofemissionsystems,maintenance,
andwarranty.Replacementsmaybeorderedthrough
theenginemanufacturer.
WARNING
CALIFORNIA
Proposition65Warning
Dieselengineexhaustandsomeofits
constituentsareknowntotheStateof
Californiatocausecancer,birthdefects,
andotherreproductiveharm.
Batteryposts,terminals,andrelated
accessoriescontainleadandlead
compounds,chemicalsknownto
theStateofCaliforniatocause
cancerandreproductiveharm.Wash
handsafterhandling.
Useofthisproductmaycauseexposure
tochemicalsknowntotheStateof
Californiatocausecancer,birthdefects,
orotherreproductiveharm.
Introduction
Thismachineisamulti-purposemachineintended
tobeusedbyprofessional,hiredoperatorsin
commercialapplications.Itisdesignedprimarilyfor
mowinggrassonwell-maintainedlawnsinparks,golf
courses,sportselds,andoncommercialgrounds.
Usingthisproductforpurposesotherthanitsintended
usecouldprovedangeroustoyouandbystanders.
Readthisinformationcarefullytolearnhowtooperate
andmaintainyourproductproperlyandtoavoid
injuryandproductdamage.Youareresponsiblefor
operatingtheproductproperlyandsafely.
Visitwww.Toro.comforproductsafetyandoperation
trainingmaterials,accessoryinformation,helpnding
adealer,ortoregisteryourproduct.
Wheneveryouneedservice,genuineToroparts,or
additionalinformation,contactanAuthorizedService
DealerorToroCustomerServiceandhavethemodel
andserialnumbersofyourproductready.Figure1
identiesthelocationofthemodelandserialnumbers
ontheproduct.Writethenumbersinthespace
provided.
Important:Withyourmobiledevice,youcan
scantheQRcodeontheserialnumberdecal(if
equipped)toaccesswarranty,parts,andother
productinformation.
g239270
Figure1
1.Modelandserialnumberlocation
ModelNo.
SerialNo.
Thismanualidentiespotentialhazardsandhas
safetymessagesidentiedbythesafety-alertsymbol
(Figure2),whichsignalsahazardthatmaycause
seriousinjuryordeathifyoudonotfollowthe
recommendedprecautions.
g000502
Figure2
1.Safety-alertsymbol
Thismanualuses2wordstohighlightinformation.
Importantcallsattentiontospecialmechanical
informationandNoteemphasizesgeneralinformation
worthyofspecialattention.
©2020—TheToro®Company
8111LyndaleAvenueSouth
Bloomington,MN554202
Contactusatwww.Toro.com.
PrintedintheUSA
AllRightsReserved

Contents
Safety.......................................................................4
GeneralSafety...................................................4
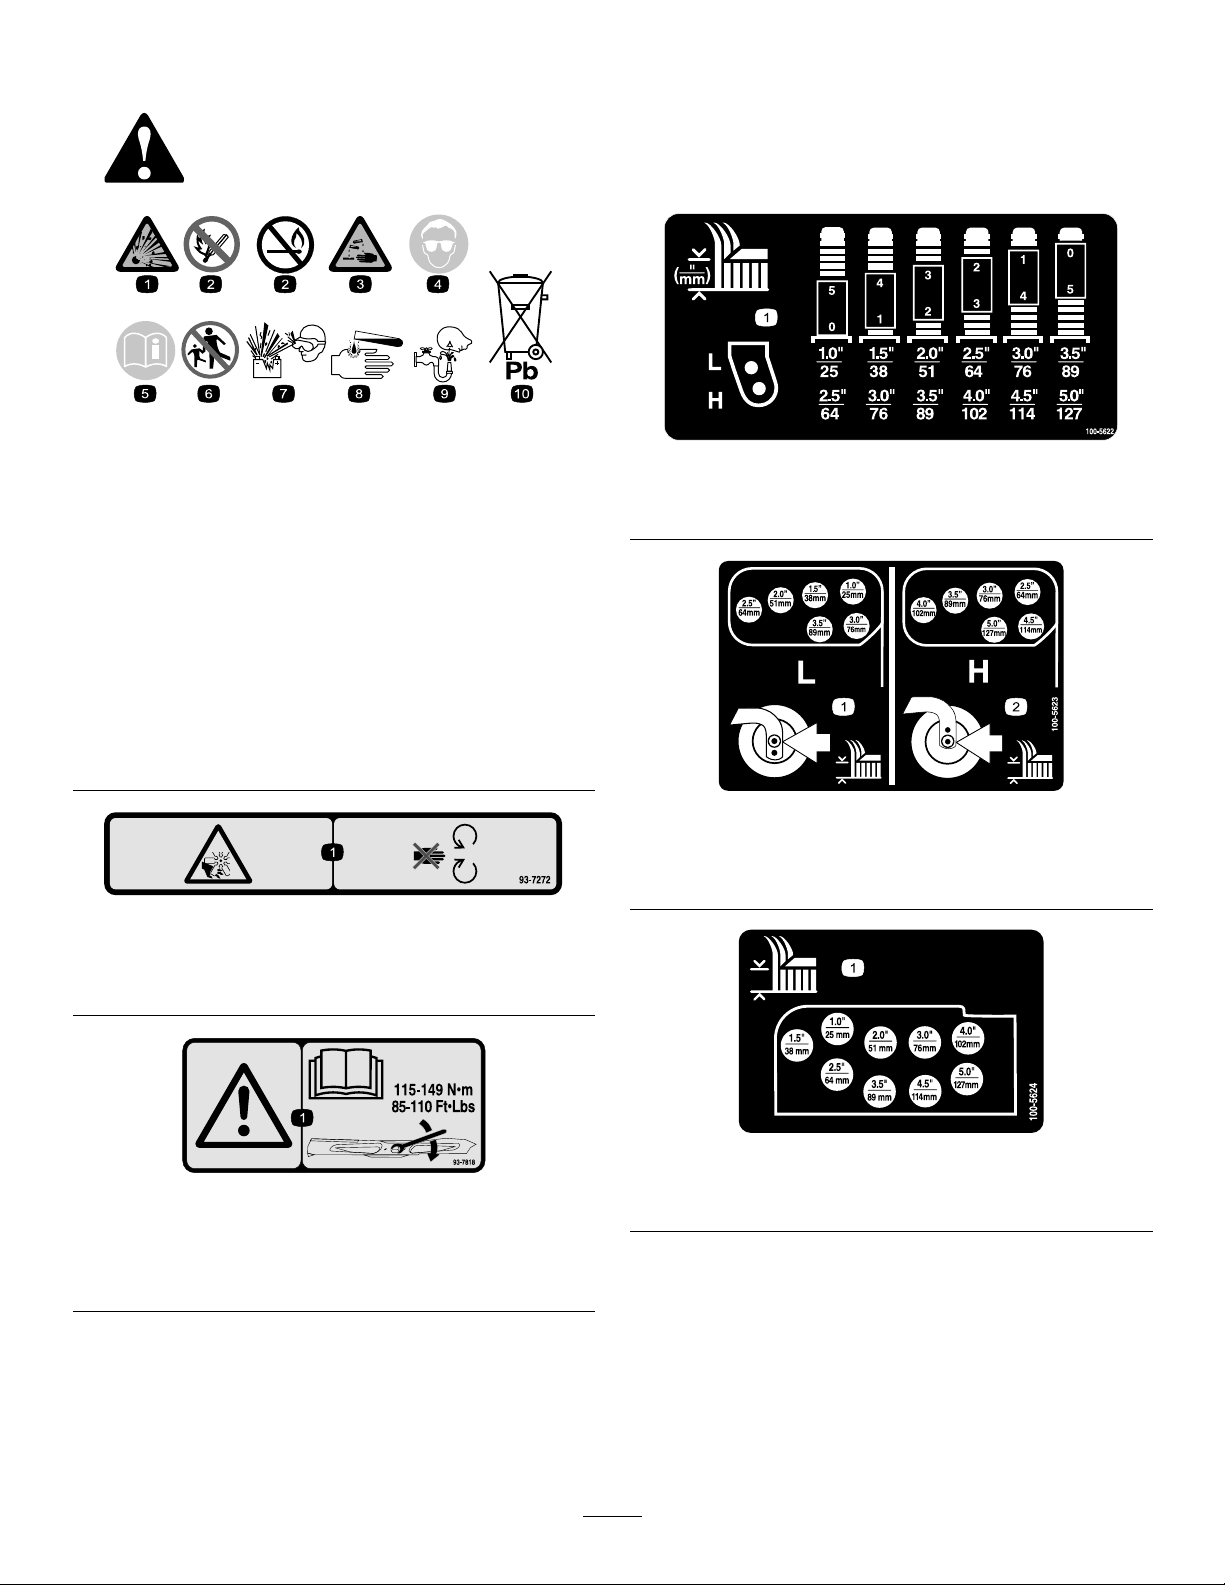
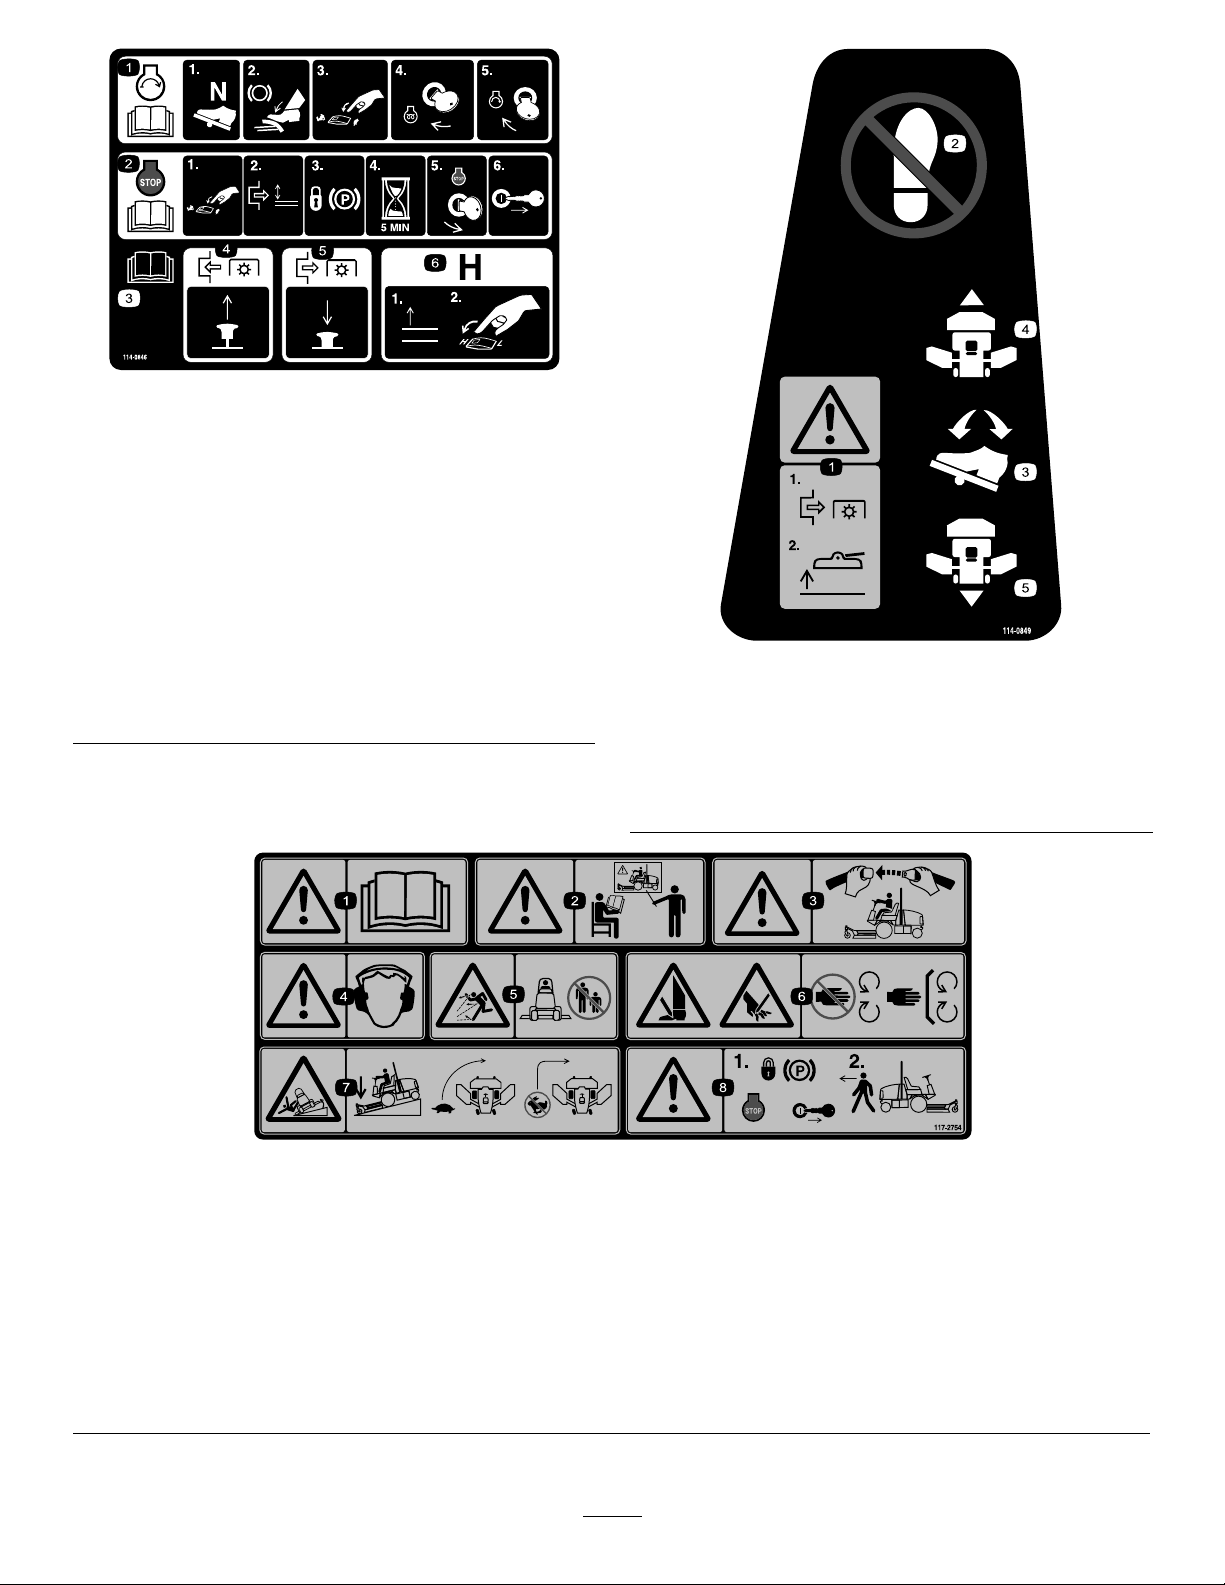
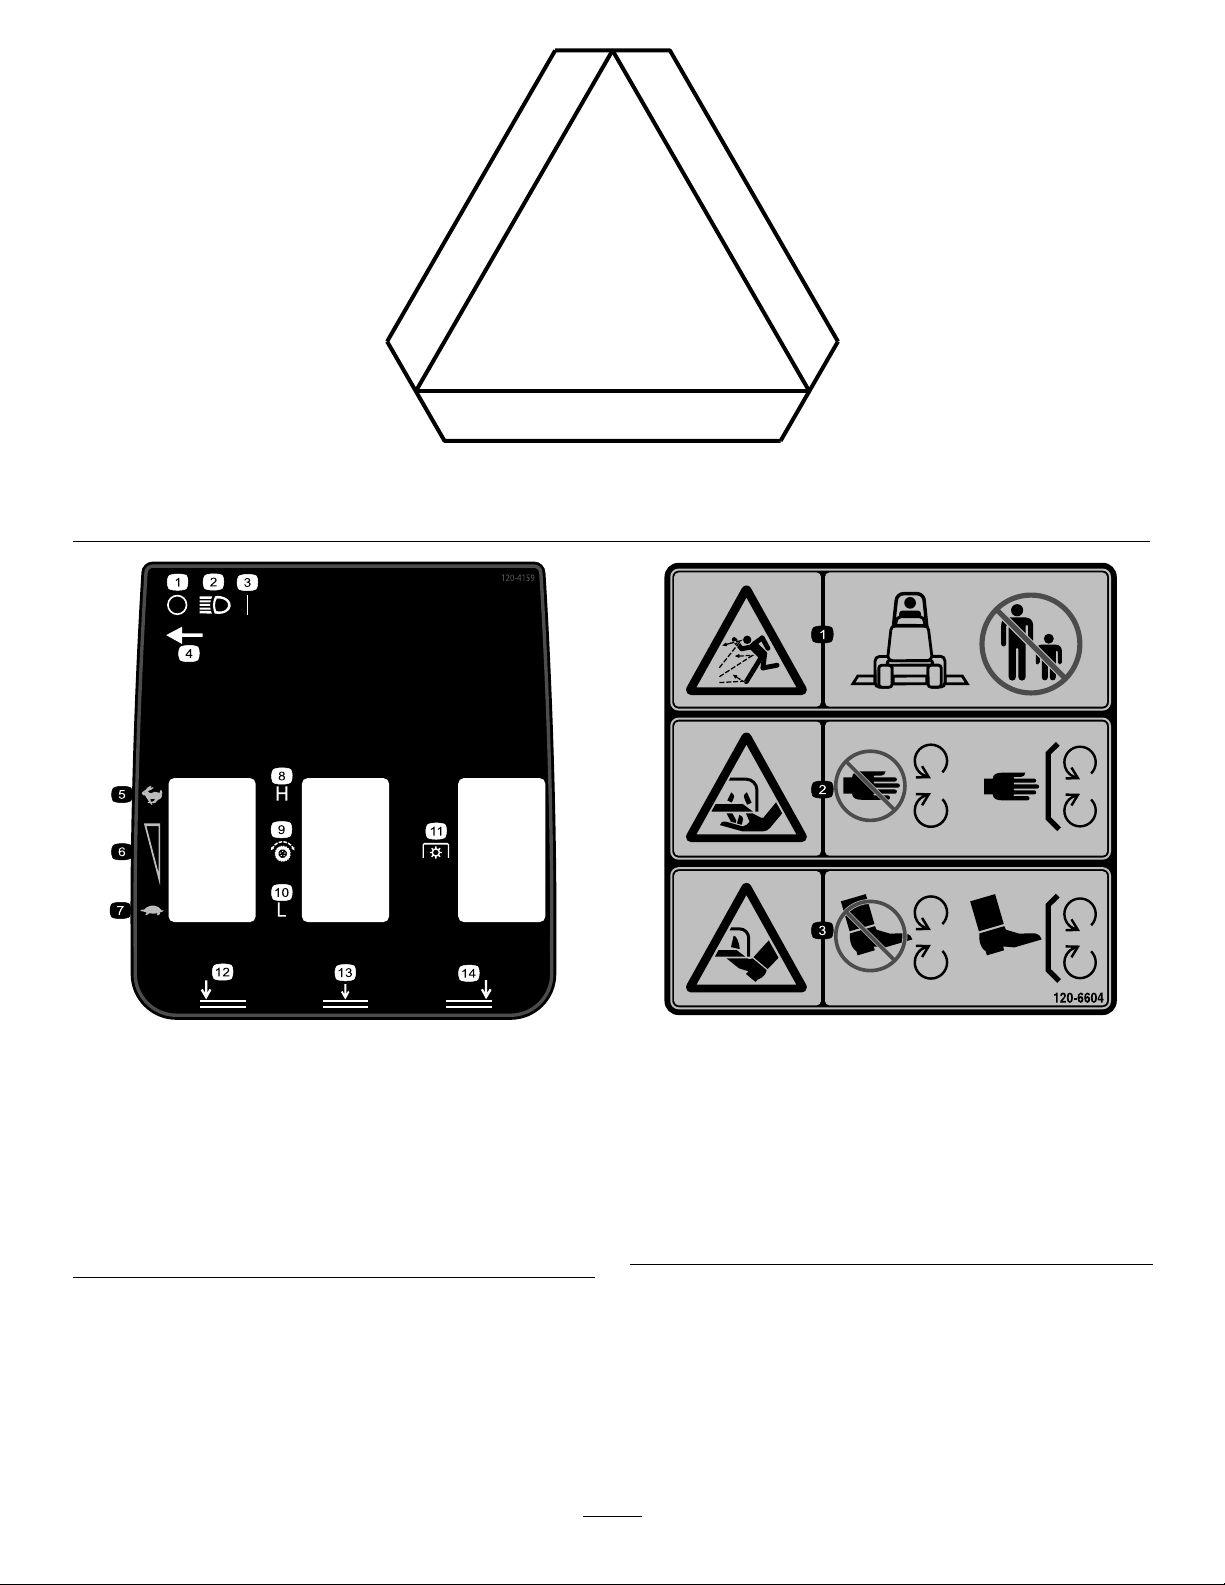
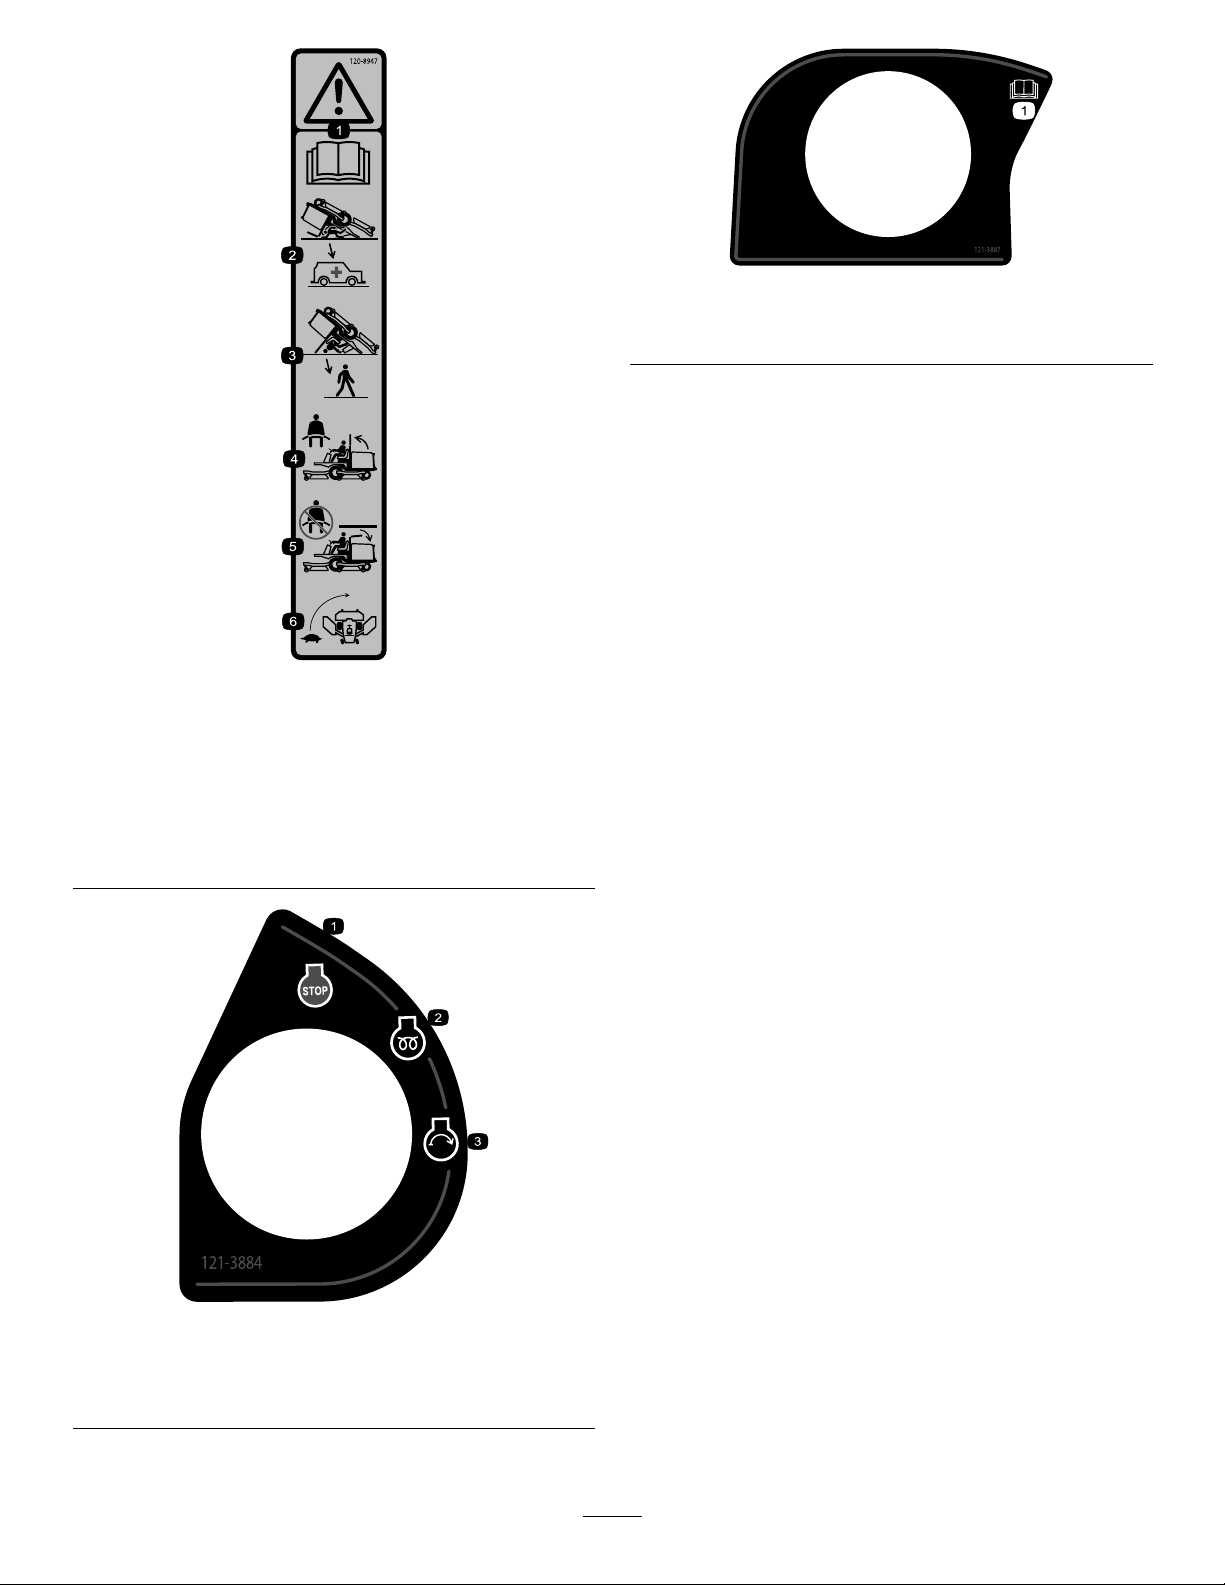
SafetyandInstructionalDecals..........................5
Setup......................................................................15
1GreasingtheMachine....................................15
2CheckingtheTirePressure............................15
3CheckingtheFluidLevels..............................15
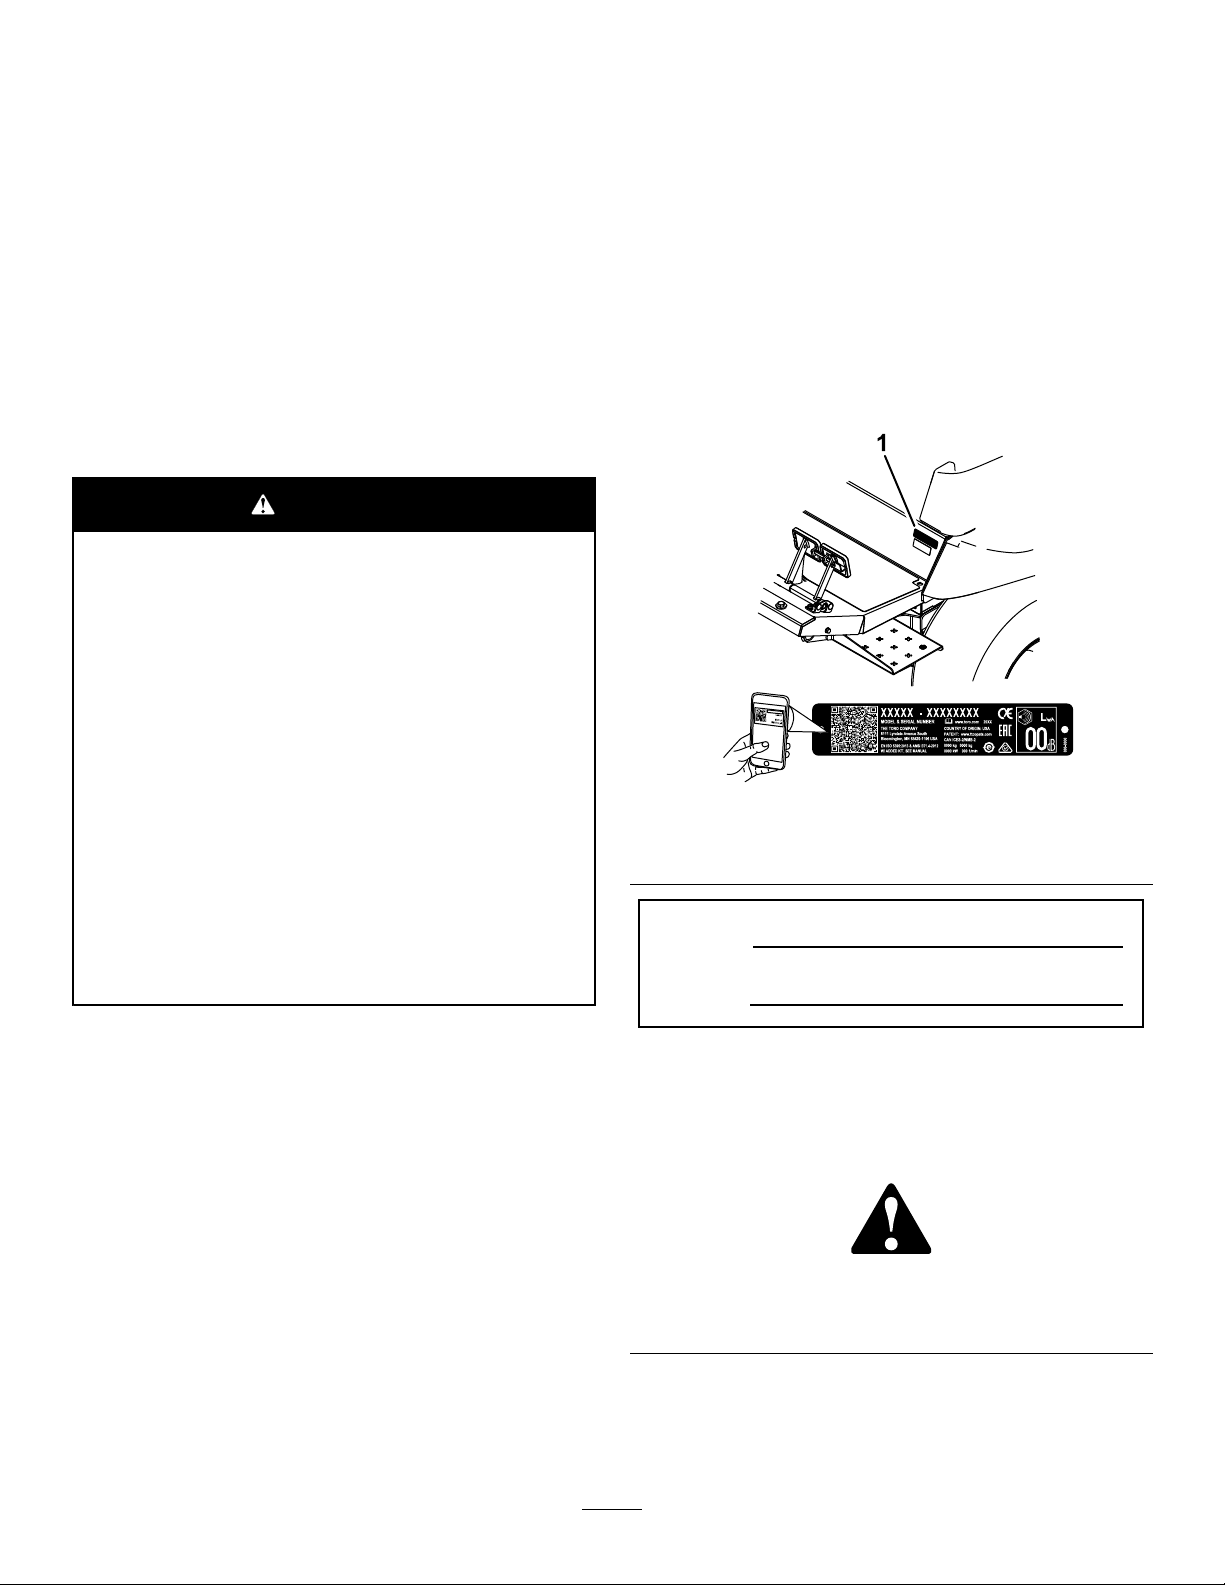
4InstallingtheDecal(CEMachines
Only).............................................................16
ProductOverview...................................................17
Controls...........................................................17
CabControls.................................................19
Specications..................................................20
Attachments/Accessories.................................21
BeforeOperation.................................................21
BeforeOperationSafety...................................21
CheckingtheEngine-OilLevel..........................22
CheckingtheCoolingSystem...........................22
CheckingtheHydraulicSystem........................22
FillingtheFuelTank..........................................22
CheckingtheTirePressure...............................23
CheckingtheTorqueoftheWheelLug
Nuts..............................................................23
CheckingthePlanetary-Gear-Drive
Oil.................................................................24
CheckingtheRear-AxleLubricant....................24
CheckingtheRear-Axle-Gearbox
Lubricant.......................................................24
AdjustingtheRollBar.......................................25
AdjustingtheHeightofCut...............................25
AdjustingtheSkids...........................................28
AdjustingtheCuttingUnitRollers......................29
CorrectingaMismatchBetweentheCutting
Units..............................................................29
CheckingtheSafety-InterlockSwitches............31
AdjustingtheMirrors.........................................31
AimingtheHeadlights.......................................31
ActivatingtheQuietMode.................................31
SelectingaBlade..............................................32
UsingtheInfoCenterControl............................32
UsingtheMenus...............................................34
ProtectedMenus..............................................35
AccessingProtectedMenus.............................35
SettingtheAutoIdle.........................................36
SettingtheMaximumAllowedMow
Speed...........................................................36
SettingtheMaximumAllowedTransport
Speed...........................................................36
SettingtheServiceDueTimer...........................36
DuringOperation.................................................36
GeneralSafety.................................................36
RolloverProtectionSystem(ROPS)
Safety............................................................37
AdditionalROPSSafetyforMachineswitha
CaboraFixedRollBar.................................37
AdditionalROPSSafetyforMachineswitha
FoldableRollBar...........................................37
SlopeSafety.....................................................37
UnderstandingtheOperatingCharacteristics
oftheMachine..............................................38
OperatingtheMachine.....................................38
UnderstandingCounterbalance........................39
UsingtheBrakePedals....................................39
UnderstandingToroSmartPower™.................39
PerformingaFan-ReverseOperation...............39
UnderstandingAutoIdle...................................39
StartingtheEngine...........................................39
UsingCruiseControl.........................................40
ShuttingOfftheEngine.....................................40
UsingtheEngine-SpeedSwitch........................40
AdjustingtheMowingSpeed............................40
AdjustingtheTransportSpeed..........................40
OperatingTips.................................................41
AfterOperation....................................................41
GeneralSafety.................................................41
PushingorTowingtheMachine........................42
LocatingtheJackingPoints..............................42
HaulingtheMachine.........................................42
LocatingtheTie-DownPoints...........................43
Maintenance...........................................................44
MaintenanceSafety..........................................44
RecommendedMaintenanceSchedule(s)...........44
DailyMaintenanceChecklist.............................46
Pre-MaintenanceProcedures..............................47
RemovingtheHood..........................................47
Lubrication..........................................................47
GreasingtheBearingsandBushings................47
EngineMaintenance...........................................50
EngineSafety...................................................50
ServicingtheEngineOil....................................50
ServicingtheAirCleaner..................................51
FuelSystemMaintenance...................................53
ServicingtheFuelSystem................................53
ServicingtheWaterSeparator..........................53
ServicingtheFuelFilter....................................54
ElectricalSystemMaintenance...........................54
ElectricalSystemSafety...................................54
ServicingtheBattery.........................................54
LocatingtheFuses...........................................55
DriveSystemMaintenance..................................56
AdjustingtheTraction-PedalAngle...................56
ChangingthePlanetary-Gear-Drive
Oil.................................................................56
ChangingtheRear-AxleOil..............................57
CheckingtheRearWheelT oe-In......................58
CoolingSystemMaintenance..............................58
CoolingSystemSafety.....................................58
CheckingtheCoolingSystem...........................58
ServicingtheEngine-CoolingSystem...............59
BrakeMaintenance.............................................60
AdjustingtheServiceBrakes............................60
BeltMaintenance................................................60
ServicingtheAlternatorBelt.............................60
3

ServicingtheCompressorBelt..........................60
TensioningtheBlade-DriveBelts......................61
ReplacingtheBlade-DriveBelt.........................61
HydraulicSystemMaintenance...........................62
HydraulicSystemSafety...................................62
ServicingtheHydraulicSystem........................62
CuttingUnitMaintenance.....................................65
Pivoting(Tilting)theFrontCuttingUnittothe
UprightPosition.............................................65
PivotingtheFrontCuttingUnitDown.................66
AdjustingtheCuttingUnitPitch.........................66
ServicingtheCaster-ArmBushings..................67
ServicingtheCasterWheelsand
Bearings........................................................67
BladeMaintenance..............................................68
BladeSafety.....................................................68
CheckingforaBentBlade................................68
RemovingandInstallingtheCutting-Unit
Blade(s)........................................................69
InspectingandSharpeningtheCuttingUnit
Blade(s)........................................................69
CorrectingaCuttingUnitMismatch...................70
CabMaintenance.................................................71
CleaningtheCab..............................................71
CleaningtheCabAirFilters..............................71
CleaningtheCabPre-Filter..............................72
CleaningtheAir-ConditioningAssembly
......................................................................72
Storage...................................................................73
StorageSafety..................................................73
PreparingtheMachineforStorage...................73
Safety
Thismachinehasbeendesignedinaccordancewith
ANSIB71.4-2017andwithENISO5395whenset-up
iscompletedandtheCEKitisinstalled,perthe
DeclarationofConformity.
GeneralSafety
Thisproductiscapableofamputatinghandsand
feetandofthrowingobjects.Alwaysfollowallsafety
instructionstoavoidseriouspersonalinjury.
•Readandunderstandthecontentsofthis
Operator’sManualbeforestartingtheengine.
•Useyourfullattentionwhileoperatingthe
machine.Donotengageinanyactivitythat
causesdistractions;otherwise,injuryorproperty
damagemayoccur.
•Donotoperatethemachinewithoutallguards
andothersafetyprotectivedevicesinplaceand
functioningproperlyonthemachine.
•Keepyourhandsandfeetawayfromrotating
parts.Keepclearofthedischargeopening.
•Keepbystandersandchildrenoutoftheoperating
area.Neverallowchildrentooperatethemachine.
•Shutofftheengine,removethekey,andwait
forallmovementtostopbeforeyouleavethe
operator’sposition.Allowthemachinetocool
beforeadjusting,servicing,cleaning,orstoringit.
Improperlyusingormaintainingthismachinecan
resultininjury.Toreducethepotentialforinjury,
complywiththesesafetyinstructionsandalways
payattentiontothesafety-alertsymbol,which
meansCaution,Warning,orDanger—personalsafety
instruction.Failuretocomplywiththeseinstructions
mayresultinpersonalinjuryordeath.
4

SafetyandInstructionalDecals
Safetydecalsandinstructionsareeasilyvisibletotheoperatorandarelocatednearanyarea
ofpotentialdanger.Replaceanydecalthatisdamagedormissing.
decalbatterysymbols
BatterySymbols
Someorallofthesesymbolsareonyourbattery.
1.Explosionhazard6.Keepbystandersaway
fromthebattery.
2.Nore,opename,or
smoking
7.Weareyeprotection;
explosivegasescan
causeblindnessandother
injuries.
3.Causticliquid/chemical
burnhazard
8.Batteryacidcancause
blindnessorsevereburns.
4.Weareyeprotection.9.Flusheyesimmediately
withwaterandgetmedical
helpfast.
5.ReadtheOperator's
Manual.
10.Containslead;donot
discard
decal93-7272
93-7272
1.Cutting/dismembermenthazard;fan—stayawayfrom
movingparts.
decal93-7818
93-7818
1.Warning—readtheOperator'sManualforinstructionson
torquingthebladebolt/nutto115to149N∙m(85to110
ft-lb).
decal100-5622
100-5622
1.Height-of-cutadjustment
decal100-5623
100-5623
1.Lowheight-of-cut
adjustment
2.Highheight-of-cut
adjustment
decal100-5624
100-5624
1.Height-of-cutadjustment
5

decal100-5693
100-5693
1.Height-of-cutadjustment
decal100-5694
100-5694
1.Height-of-cutadjustment
decal100-6578
100-6578
1.Entanglementhazard,belt—donotoperatethemachine
withtheshieldsorguardsremoved;alwayskeeptheshields
andguardsinplace;stayawayfrommovingparts.
decal104-3578
104-3578
1.Height-of-cutadjustment
decal104-3579
104-3579
1.Lowheight-of-cut
adjustment
2.Highheight-of-cut
adjustment
decal106-6754
106-6754
1.Warning—donottouchthehotsurface.
2.Cutting/dismembermenthazard,fan;entanglementhazard,
belt—stayawayfrommovingparts.
decal106-6755
106-6755
1.Enginecoolantunder
pressure.
3.Warning—donottouchthe
hotsurface.
2.Explosionhazard—read
theOperator'sManual.
4.Warning—readthe
Operator'sManual.
6

decal114-0846
114-0846
1.ReadtheOperator’sManualforinformationonstartingthe
engine—1)Settoneutral;2)Engagethebrake;3)Setthe
enginespeedtoslow;4)Turnthekeytopreheat;5)Turn
thekeytostarttheengine.
2.ReadtheOperator’sManualforinformationonshuttingoff
theengine—1)Settheenginespeedtoslow;2)Disengage
thedeck;3)Locktheparkingbrake;4)Wait5minutes;5)
Turnthekeytoshutofftheengine;6)Removethekey
fromtheswitch.
3.ReadtheOperator’sManual.
4.PulltheknobouttoengagethePTO.
5.PushtheknobintodisengagethePTO.
6.RaisethedeckstogotoHrange.
decal114-0849
114-0849
1.Warning—1)Disengage
thePTO;2)Raisethedeck
4.Forwarddirection
2.Donotplaceyourfoot
here.
5.Reversedirection
3.Directionpedal
decal117-2754
117-2754
1.Warning—readtheOperator'sManual.
2.Warning—donotoperatethismachineunlessyouaretrained.
3.Warning—weartheseatbeltwhenseatedintheoperator'sposition.
4.Warning—wearhearingprotection.
5.Thrownobjecthazard—keepbystandersaway.
6.Cuttinghazardofhandorfoot—stayawayfrommovingparts;keepallguardsandshieldsinplace.
7.Tippinghazard—lowerthecuttingunitwhendrivingdownslopes;slowthemachinebeforeturning;donotturnathighspeeds.
8.Warning—engagetheparkingbrake,shutofftheengine,andremovethekeybeforeleavingthemachine.
7

decal117-2766
117-2766
Note:Thismachinecomplieswiththeindustrystandardstabilitytestinthestaticlateralandlongitudinaltestswiththemaximum
recommendedslopeindicatedonthedecal.ReviewtheinstructionsforoperatingthemachineonslopesintheOperator’sManualas
wellastheconditionsinwhichyouwouldoperatethemachinetodeterminewhetheryoucanoperatethemachineintheconditionson
thatdayandatthatsite.Changesintheterraincanresultinachangeinslopeoperationforthemachine.
1.Warning—readtheOperator'sManual.
2.Warning—alloperatorsshouldbetrainedbeforeoperatingthemachine.
3.Warning—weartheseatbelt.
4.Warning—wearhearingprotection.
5.Thrownobjecthazard—keepbystandersaway.
6.Cutting/dismembermenthazardofhandsorfeet—stayawayfrommovingparts;keepallguardsandshieldsinplace.
7.Tippinghazard—lowerthecuttingunitwhendrivingdownslopes;donotoperateonslopesgreaterthan15°.
8.Warning—engagetheparkingbrake,shutofftheengine,andremovethekeybeforeleavingthemachine.
decal117-4765
117-4765
1.ReadtheOperator'sManual.
2.Donotusestartingaids.
8

decal120-0250
120-0250
1.Slow-movingvehicle
decal120-4159
120-4159
1.Off8.High
2.Lights9.Tractiondrive
3.On10.Low
4.Lightswitchlocation11.PTO
5.Fast12.Lowerleftdeck
6.Variablespeedadjustment13.Lowercenterdeck
7.Slow14.Lowerrightdeck
decal120-6604
120-6604
1.Thrownobjecthazard—keepbystandersawayfromthe
machine.
2.Cutting/dismembermenthazardofhand,mower
blade—stayawayfrommovingparts,keepallguardsand
shieldsinplace.
3.Cutting/dismembermenthazardoffoot,mowerblade—stay
awayfrommovingparts,keepallguardsandshieldsin
place.
9

decal120-8947
120-8947
1.Warning—readthe
Operator’sManual.
4.Iftherollbarisraised,
weartheseatbelt.
2.Thereisnorollover
protectionwhentheroll
barisdown.
5.Iftherollbarislowered,
donotweartheseatbelt.
3.Thereisrolloverprotection
whentherollbarisup.
6.Driveslowlywhenturning.
decal121-3884
121–3884
1.Engine—stop3.Engine—start
2.Engine—preheat
decal121-3887
121–3887
1.ReadtheOperator’sManual.
10

decal121-8378
121-8378
ModelwithCabOnly
1.Fan(off)3.Coldair5.Externalair7.Airconditioner(off)
2.Fan(onfull)4.Hotair6.Internalair8.Airconditioner(on)
decal125-9688
125-9688
1.Off3.On
2.Windshieldwipers4.Spraywindshieldwasher
uid.
decal127-3700
127-3700
1.Raisetheleftdeck.4.Locktheenginespeed.
2.Raisethecenterdeck.5.Unlocktheenginespeed.
3.Raisetherightdeck.
11

decal130-0594
130-0594
1.Warning—readtheOperator’sManual;whensittinginthe
cab,alwayswearaseatbelt;wearhearingprotection.
decal130-0611
130-0611
1.Warning—removethepin,raisethedoors,andexitthecab.
decal130-5355
130-5355
1.Closetherearwindow.2.Raisethehood.
decal130-5356
130-5356
1.Usethefootpedaltomoveforwardorinreverse.
decal132-3600
132-3600
ModelwithCabOnly
1.ReadtheOperator's
Manualformore
informationonfuses.
5.Workinglight(20A)
2.Headlight(25A)6.Auxiliarypower(15A)
3.CondenserfanandA/C
clutch(30A)
7.Cablight(15A)
4.Fan(25A)8.Windshieldwipers(15A)
decal133-5618
133-5618
12

decal136-4436
136-4436
1.ReadtheOperator’sManualforinformationonfuses.7.Infocenter—2A
2.Enginepreheat—60A8.Headlights—15A
3.Powersupply—7.5A9.Powerseat—10A
4.Turnsignals—10A10.Lighter—10A
5.Enginecontrolunit—10A11.Horn—10A
6.Systempower—10A
decal137-5496
137-5496
1.ReadtheOperator’sManual.
13

decal137-5497
137-5497
1.ReadtheOperator’sManual.
14

Setup
LooseParts
Usethechartbelowtoverifythatallpartshavebeenshipped.
ProcedureDescriptionQty.Use
1Nopartsrequired–Greasethemachine.
2Nopartsrequired–Checkthetirepressure.
3Nopartsrequired–Checktheuidlevels.
4Production-yeardecal1Installthedecal(CEmachinesonly).
MediaandAdditionalParts
DescriptionQty.Use
Operator'sManual1Reviewbeforeoperatingthemachine.
Engineowner’smanual1Usetoreferenceengineinformation.
DeclarationofConformity1
CasterCapWrench1Usetoadjustcasterwheelassemblies.
Note:Determinetheleftandrightsidesofthe
machinefromthenormaloperatingposition.
1
GreasingtheMachine
NoPartsRequired
Procedure
Greasethemachinebeforeuse;refertoLubrication
(page47).
Important:Failuretoproperlygreasethe
machinewillresultinprematurefailureofcritical
parts.
2
CheckingtheTirePressure
NoPartsRequired
Procedure
Checkthetirepressure;refertoCheckingtheTire
Pressure(page23).
Important:Maintainpressureinalltiresto
ensureagoodquality-of-cutandpropermachine
performance.Donotunderinatethetires.
15

3
CheckingtheFluidLevels
NoPartsRequired
Procedure
1.Checktheengine-oillevel;refertoCheckingthe
Engine-OilLevel(page50).
2.Checkthehydraulic-uidlevel;refertoChecking
theHydraulicFluid(page62).
3.Checkthecoolingsystem;refertoCheckingthe
CoolingSystem(page58).
4.Checktheplanetary-gear-driveoil;referto
CheckingthePlanetary-Gear-DriveOil(page
24).
5.Checktherear-axlelubricant;refertoChecking
theRear-AxleLubricant(page24).
6.Checktherear-axle-gearboxlubricant;refer
toCheckingtheRear-Axle-GearboxLubricant
(page24).
4
InstallingtheDecal(CE
MachinesOnly)
Partsneededforthisprocedure:
1Production-yeardecal
Procedure
OnmachinesrequiringCEcompliance,installthe
production-yeardecalincludedintheloosepartsand
theCEKit,soldseparately(Figure3).
g279510
Figure3
1.Production-yeardecal
16

ProductOverview
Controls
Note:Determinetheleftandrightsidesofthe
machinefromthenormaloperatingposition.
g203048
Figure4
1.Brakepedal4.Parking-brakelatch
2.Pedal-lockinglatch5.Tilt-steeringlever
3.Tractionpedal
TractionPedal
Tostopthemachine,reduceyourfootpressureon
thetractionpedalandallowittoreturntothecenter
position(Figure4).
BrakePedals
Thereare2footpedalsthatoperateindividualwheel
brakesforturningassistance,parking,andtoaidin
betterside-hilltraction.Alatchconnectsthepedals
forparking-brakeoperationandtransport(Figure4).
Pedal-LockingLatch
Thepedal-lockinglatchconnectsthepedalstogether
toengagetheparkingbrake(Figure4).
Tilt-SteeringLever
Pressthetilt-steeringleverdowntotiltthesteering
wheeltothedesiredposition,thenreleasethelever
tolocktheadjustment(Figure4).
Parking-BrakeLatch
Toengagetheparkingbrake,connectthetwopedals
togetherwiththelockinglatchlocatedbehindthe
pedalpads,andpushdownontheparking-brakelatch
whileyouarepushingonthebrakepedals(Figure4).
Toreleasetheparkingbrake,pressthebrakepedals
andthelatchwilldisengageallowingthepedalsto
cometothedisengagedposition.Ensurethepedals
havefullyretractedafterdisengagingtheparking
brake.
KeySwitch
Thekeyswitch(Figure5)has3positions:OFF,
ON/PREHEAT,andSTART.
g028453
Figure5
1.Liftswitches5.High-Lowspeedcontrol
2.PTOswitch6.Engine-speedswitch
3.Keyswitch7.Lightswitch(optional)
4.InfoCenter
Engine-SpeedSwitch
Theengine-speedswitch(Figure5)has2modesto
changetheenginespeed.T aptheswitchtoincrease
ordecreasetheenginespeedin100rpmincrements.
HolddowntheswitchtoautomaticallymovetoHigh
orLowidle,dependingonwhichendoftheswitch
youpress.
PTOSwitch
ThePTOswitchhas2positions:OUT(START)and
IN(STOP).PullthePTObuttonouttoengagethe
mower-deckblades.Pushthebuttonintodisengage
themower-deckblades(Figure5).
High-LowSpeedControl
Theswitch(Figure5)allowsthespeedrangeto
increasefortransportingthemachine.T oswitch
betweentheHighandLowspeedranges,raisethe
cuttingunits,disengagethePTOandthecruise
control,putthetractionpedalintotheNEUTRAL
position,andmovethemachineataslowspeed.
17

Note:Thecuttingunitsdonotoperateand/orcannot
beloweredfromthetransportpositionwhenthe
switchisinthehighrange.
LiftSwitches
Theliftswitchesraiseandlowerthecuttingunits
(Figure5).Presstheswitchesforwardtolowerthe
cuttingunitsandrearwardtoraisethecuttingunits.
Whenstartingthemachine,withthecuttingunitsin
thedownposition,presstheliftswitchdowntoallow
thecuttingunitstooatandmow.
Note:Thecuttingunitsdonotlowerwhileinthe
high-speedrangeandtheydonotraiseorlowerifyou
areoutoftheseatwhiletheengineisrunning.Also,
thecuttingunitslowerwiththekeyintheONposition
andyouareintheseat.
Cruise-ControlSwitch
Thecruise-controlswitchlocksinthepedalposition
tomaintainthedesiredgroundspeed(Figure6).
Pressingtherearoftheswitchturnsoffthecruise
control,themiddlepositionoftheswitchenablesthe
cruise-controlfunction,andthefrontoftheswitchsets
thedesiredgroundspeed.
Note:Pressingeitherbrakepedalormovingthe
tractionpedalintothereverseposition,for1second,
alsodisengagesthepedalposition.
g028454
Figure6
1.Power-pointswitch2.Cruise-controlswitch
Power-PointPort
Usethepower-pointporttopoweroptionalelectrical
accessories(Figure6).
SeatAdjustments
Seat-AdjustmentLever
Movetheseat-adjustmentleveronthesideofthe
seatoutward,slidetheseattothedesiredposition,
andreleasethelevertolocktheseatintoposition
(Figure7).
g205649
Figure7
1.Weightgauge4.Seat-backadjustment
lever
2.Weight-adjustmentlever5.Armrest-adjustmentknob
(notshown;locatedunder
armrest)
3.Seat-adjustmentlever
Armrest-AdjustmentKnob
Rotatetheknobtoadjustthearmrestangle.
Note:Theadjustmentknobislocatedunderthe
armrest.
Seat-Back-AdjustmentLever
Movethelevertoadjusttheseat-backangle(Figure
7).
WeightGauge
Theweightgaugeindicateswhentheseatisadjusted
totheweightoftheoperator(Figure7).Adjustthe
heightbypositioningthesuspensionwithintherange
ofthegreenregion.
Weight-AdjustmentLever
Usethislevertoadjusttotheproperweightofthe
operator(Figure7).Pullupthelevertoincrease
theairpressureandpushdowntodecreasetheair
pressure.Theproperadjustmentiscorrectwhenthe
weightgaugeisinthegreenregion.
18

CabControls
g032672
Figure8
1.Air-conditioningswitch4.Temperaturecontrol
2.Air-recirculationcontrol5.Windshield-wiperswitch
3.Fancontrol6.Blankswitchesforoptional
kits
Air-RecirculationControl
Theair-recirculationcontrolsetsthecabtoeither
recirculatetheairinthecabinortodrawairintothe
cabinfromoutside(Figure8).
•Setittorecirculatetheairwhenusingthe
air-conditioning.
•Setittodrawairinwhenusingtheheaterorfan.
Fan-ControlKnob
Rotatethefan-controlknobtoregulatethespeedof
thefan(Figure8).
Temperature-Control-Knob
Rotatethetemperature-controlknobtoregulatethe
airtemperatureinthecab(Figure8).
Windshield-WiperSwitch
Usethisswitchtoturnthewindshieldwipersonor
off(Figure8).
Air-ConditioningSwitch
Usethisswitchtoturntheairconditioningonoroff
(Figure8).
WindshieldLatch
Liftupthelatchestoopenthewindshield(Figure
9).PressinthelatchtolockwindshieldtotheOPEN
position.Pulloutanddownonthelatchtocloseand
securethewindshield.
g196911
Figure9
1.Windshieldlatch
RearWindowLatch
Liftupthelatchestoopentherearwindow.Pressin
onthelatchtolockthewindowinOPENposition.Pull
outanddownonthelatchtocloseandsecurethe
window(Figure9).
Important:Closetherearwindowbeforeopening
thehoodordamagemayoccurtothehoodorrear
window.
InfoCenterLCDDisplay
TheInfoCenterLCDdisplay(Figure5)shows
informationaboutyourmachine,suchastheoperating
status,variousdiagnostics,andotherinformation
aboutthemachine
Thescreensthatdisplaydependonwhichbuttons
youselect.Thepurposeofeachbuttonmaychange
dependingonwhatisrequiredatthetime.
19

Specications
Note:Specicationsanddesignaresubjecttochangewithoutnotice.
g278707
Figure10
20
This manual suits for next models
5
Table of contents
Other Toro Lawn Mower manuals

Toro
Toro 4019 User manual

Toro
Toro 30849 User manual

Toro
Toro Z Master Professional 7500-DSeries Manual

Toro
Toro 2000 Series User manual

Toro
Toro 21864 User manual

Toro
Toro 22282 Series User manual

Toro
Toro 78469 User manual

Toro
Toro 79018 User manual

Toro
Toro Sand Pro 2040Z User manual

Toro
Toro 74416 User manual

Toro
Toro TimeCutter SW 4200 User manual

Toro
Toro Groundsmaster 4000 User manual

Toro
Toro 30434 User manual

Toro
Toro Groundsmaster 3300 Series User manual

Toro
Toro 74538 User manual

Toro
Toro Z Master G3 User manual

Toro
Toro 04054 Greensmaster 800 User manual

Toro
Toro ProLine 30167 User manual

Toro
Toro 30551 User manual

Toro
Toro 78922 User manual