Toro 4036 User manual

FormNo.3367-413RevA
Greensmaster®2000and2600
Walk-BehindMower
ModelNo.04036—SerialNo.311000001andUp
ModelNo.04037—SerialNo.311000001andUp
ToregisteryourproductordownloadanOperator'sManualorPartsCatalogatnocharge,gotowww.Toro.com.OriginalInstructions(EN)

ThisproductcomplieswithallrelevantEuropean
directives,fordetailspleaseseetheseparateproduct
specicDeclarationofConformity(DOC)sheet.
WARNING
CALIFORNIA
Proposition65Warning
Theengineexhaustfromthisproduct
containschemicalsknowntotheStateof
Californiatocausecancer,birthdefects,
orotherreproductiveharm.
ThissparkignitionsystemcomplieswithCanadian
ICES-002.
Introduction
Thismachineisawalkbehind,reel-bladelawnmower
intendedtobeusedbyprofessional,hiredoperatorsin
commercialapplications.Itisprimarilydesignedfor
cuttinggrassonwell-maintainedlawnsinparks,golf
courses,sportselds,andoncommercialgrounds.Itis
notdesignedforcuttingbrush,mowinggrassandother
growthalongsidehighways,orforagriculturaluses.
Readthisinformationcarefullytolearnhowtooperate
andmaintainyourproductproperlyandtoavoidinjury
andproductdamage.Youareresponsibleforoperating
theproductproperlyandsafely.
YoumaycontactTorodirectlyatwww.Toro.comfor
productandaccessoryinformation,helpndinga
dealer,ortoregisteryourproduct.
Wheneveryouneedservice,genuineToroparts,or
additionalinformation,contactanAuthorizedService
DealerorToroCustomerServiceandhavethemodel
andserialnumbersofyourproductready.Themodel
andserialnumbersarelocatedonaplateontherear
frame.Writethenumbersinthespaceprovided.
ModelNo.
SerialNo.
Thismanualidentiespotentialhazardsandhas
safetymessagesidentiedbythesafetyalertsymbol
(Figure1),whichsignalsahazardthatmaycauseserious
injuryordeathifyoudonotfollowtherecommended
precautions.
Figure1
1.Safetyalertsymbol.
Thismanualusestwootherwordstohighlight
information.Importantcallsattentiontospecial
mechanicalinformationandNoteemphasizesgeneral
informationworthyofspecialattention.
©2010—TheToro®Company
8111LyndaleAvenueSouth
Bloomington,MN554202
Contactusatwww.Toro.com.
PrintedintheUSA.
AllRightsReserved

Contents
Introduction.................................................................2
Safety...........................................................................4
SafeOperatingPractices.......................................4
ToroMowerSafety...............................................5
SoundPressure.....................................................6
SoundPower........................................................6
Vibration(Model04036)......................................6
Vibration(Model04037)......................................6
SafetyandInstructionalDecals.............................7
Setup............................................................................9
1InstallingandAdjustingtheHandle....................9
2InstalltheLiftHandles.....................................11
3InstallingtheKickstand(Model04037
Only)..............................................................11
4InstallingtheTransportWheels........................12
5AdjustingtheCuttingUnit...............................13
6InstallingtheGrassBasket...............................13
ProductOverview......................................................14
Controls.............................................................14
Specications.....................................................15
Attachments/Accessories...................................15
Operation...................................................................16
ThinkSafetyFirst...............................................16
CheckingtheEngineOilLevel............................16
FillingtheFuelTank...........................................16
CheckingtheInterlockSwitchOperation............17
StartingandStoppingtheEngine........................17
DrivingtheMachineinTransport.......................17
PreparingtoMow...............................................18
Mowing..............................................................18
OperatingTips...................................................18
Maintenance...............................................................19
RecommendedMaintenanceSchedule(s)................19
DailyMaintenanceChecklist...............................20
Lubrication.............................................................21
GreasingtheMachine.........................................21
EngineMaintenance...............................................22
ServicingtheEngineOil.....................................22
ServicingtheAirCleaner....................................23
ReplacingtheSparkPlug....................................23
FuelSystemMaintenance.......................................24
CleaningtheFuelFilter.......................................24
ElectricalSystemMaintenance................................25
ServicingtheInterlockSwitch............................25
BrakeMaintenance.................................................25
AdjustingtheService/ParkingBrake...................25
BeltMaintenance....................................................27
AdjustingtheBelts.............................................27
ReplacingtheDifferentialBelt............................29
ControlsSystemMaintenance.................................30
AdjustingtheTractionControl...........................30
CuttingUnitMaintenance.......................................30
LevelingtheRearDrumtotheReel.....................30
AdjustingtheBedknifetotheReel......................31
AdjustingtheHeightofCut................................31
AdjustingtheGrassShieldHeight.......................32
AdjustingtheCut-OffBar..................................33
BedbarIdentication..........................................33
SettingtheMachinetoMatchTurf
Conditions.....................................................34
ServicingtheBedbar...........................................35
BacklappingtheReel..........................................35
Storage.......................................................................36
3

Safety
ThismachinemeetsorexceedsCENstandard
EN836:1997,ISOstandard5395:1990,andANSI
B71.4-2004specicationsineffectatthetimeof
productionwhentheOperatorPresenceKit,PartNo.
105–5363isinstalled.
Improperuseormaintenancebytheoperatoror
ownercanresultininjury.Toreducethepotential
forinjury,complywiththesesafetyinstructionsand
alwayspayattentiontothesafetyalertsymbol,which
meansCaution,Warning,orDanger—personalsafety
instruction.Failuretocomplywiththeinstructionmay
resultinpersonalinjuryordeath.
SafeOperatingPractices
ThefollowinginstructionsarefromtheCENstandard
EN836:1997,ISOstandard5395:1990,andANSI
B71.4-2004.
Training
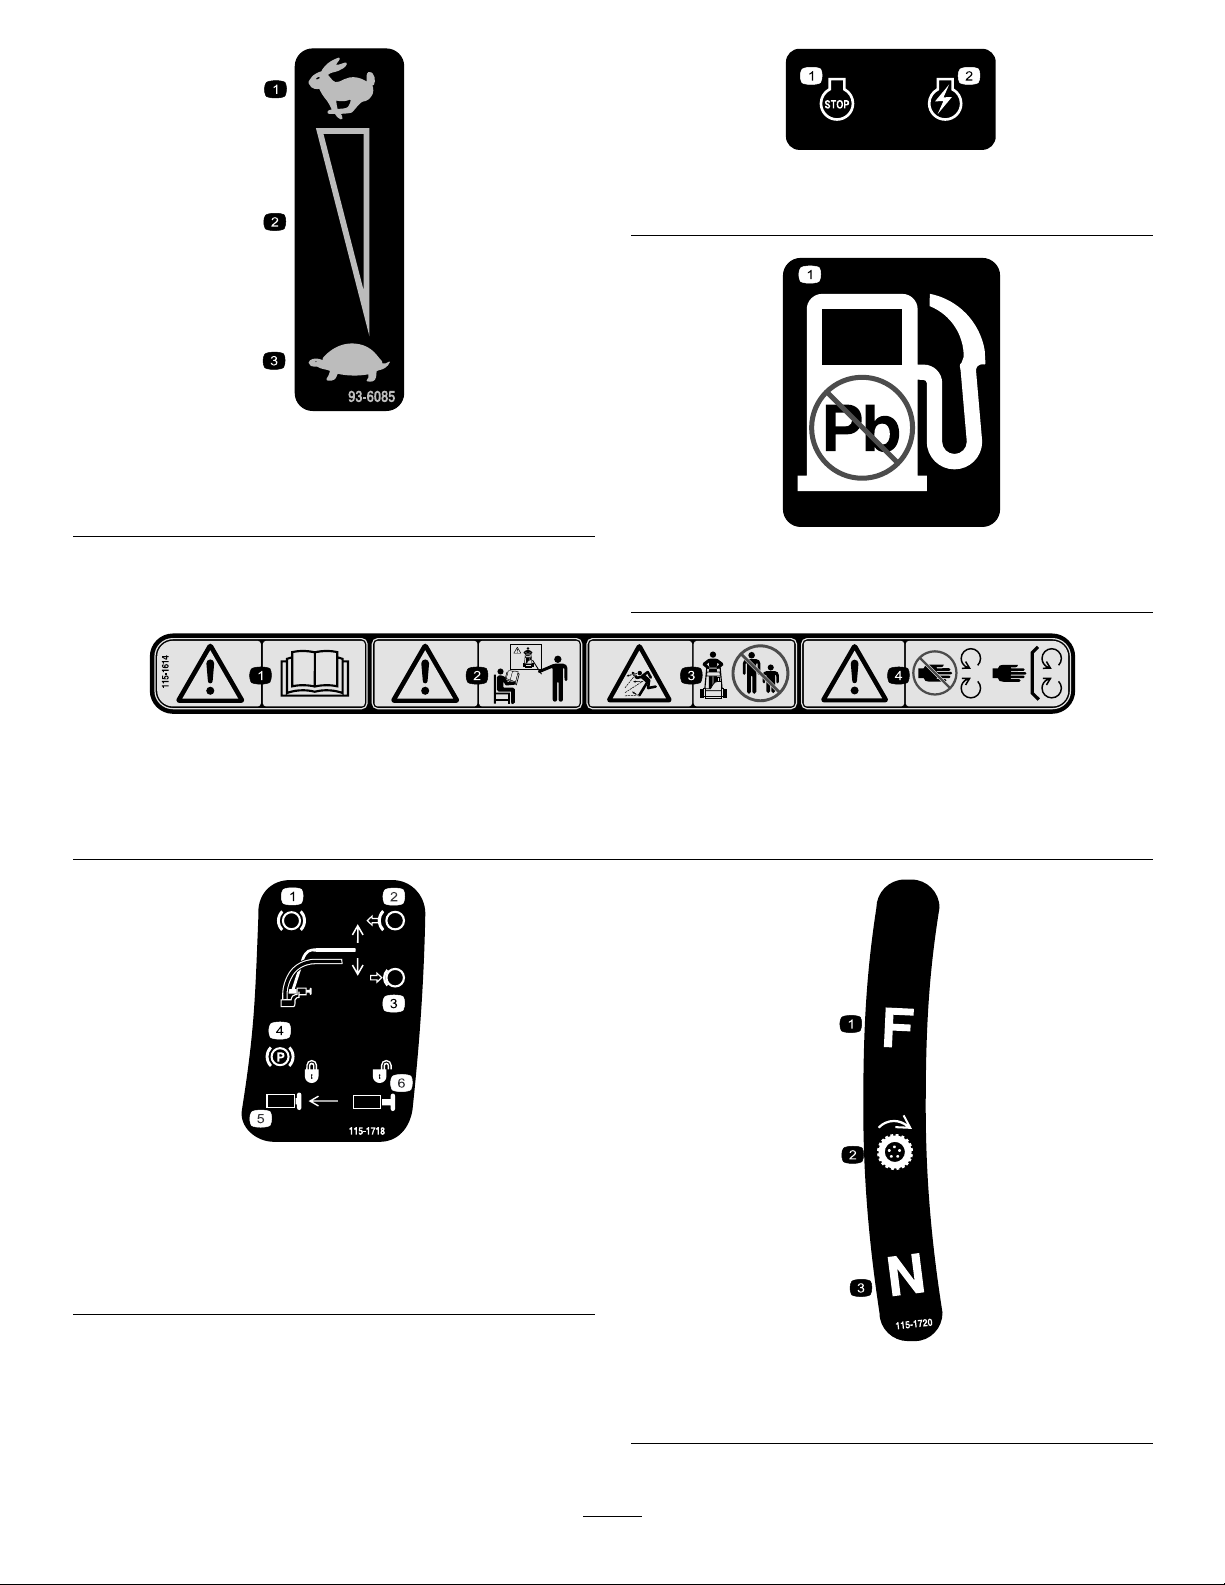
•ReadtheOperator’sManualandothertraining
materialcarefully.Befamiliarwiththecontrols,
safetysigns,andtheproperuseoftheequipment.
•Iftheoperatorormechaniccannotreadthe
languageoftheOperator’sManualitistheowner’s
responsibilitytoexplainthismaterialtothem.
•Neverallowchildrenorpeopleunfamiliarwiththese
instructionstouseorservicethemower.Local
regulationsmayrestricttheageoftheoperator.
•Nevermowwhilepeople,especiallychildren,orpets
arenearby.
•Keepinmindthattheoperatororuserisresponsible
foraccidentsorhazardsoccurringtootherpeopleor
theirproperty.
•Theowner/usercanpreventandisresponsiblefor
accidentsorinjuriesoccurringtohimselforherself,
otherpeople,orproperty.
•Alloperatorsormechanicsmustbetrained.Itisthe
owner’sresponsibilityfortrainingusers.
Preparation
•Whilemowing,alwayswearsubstantialfootwear,
longtrousers,hardhat,safetyglasses,andhearing
protection.Longhair,looseclothing,orjewelrymay
gettangledinmovingparts.Donotoperatethe
equipmentwhenbarefootorwearingopensandals.
•Thoroughlyinspecttheareawheretheequipment
istobeusedandremoveallobjectswhichmaybe
thrownbythemachine.
•Warning—Fuelishighlyammable.Takethe
followingprecautions:
–Storefuelincontainersspecicallydesignedfor
thispurpose.
–Refueloutdoorsonlyanddonotsmokewhile
refuelling.
–Addfuelbeforestartingtheengine.Never
removethecapofthefueltankoraddfuelwhile
theengineisrunningorwhentheengineishot.
–Iffuelisspilled,donotattempttostartthe
enginebutmovethemachineawayfromthe
areaofspillageandavoidcreatinganysourceof
ignitionuntilfuelvaporshavedissipated.
–Replaceallfueltanksandcontainercapssecurely.
•Replacefaultysilencers.
•Evaluatetheterraintodeterminewhataccessories
andattachmentsareneededtoproperlyand
safelyperformthejob.Onlyuseaccessoriesand
attachmentsapprovedbythemanufacturer.
•Checkthatoperatorspresencecontrols,safety
switchesandshieldsareattachedandfunctioning
properly.Donotoperateunlesstheyarefunctioning
properly.
Operation
•Donotoperatetheengineinaconnedspacewhere
dangerouscarbonmonoxidefumescancollect.
•Mowonlyindaylightoringoodarticiallight.
•Beforeattemptingtostarttheengine,disengageall
bladeattachmentclutches,shiftintoneutral,and
engagetheparkingbrake.
•Stayalertforholesintheterrainandotherhidden
hazards.
•Watchoutfortrafcwhencrossingornearroadways.
•Stopthebladesrotatingbeforecrossingsurfaces
otherthangrass.
•Whenusinganyattachments,neverdirectdischarge
ofmaterialtowardbystandersnorallowanyonenear
themachinewhileinoperation.
•Neveroperatethemachinewithdamagedguards,
shields,orwithoutsafetyprotectivedevicesinplace.
Besureallinterlocksareattached,adjustedproperly,
andfunctioningproperly.
•Donotchangetheenginegovernorsettingsor
overspeedtheengine.Operatingtheengineat
excessivespeedmayincreasethehazardofpersonal
injury.
•Beforeleavingtheoperatorsposition:
4

–stoponlevelground;
–disengagethecuttingunitandtractiondrive;
–settheparkingbrake;
–stoptheengine.
•Disengagedrivetocuttingunitwhentransportingor
notinuse.
•Stoptheengineanddisengagedrivetocuttingunit:
–beforerefuelling;
–beforeremovingthegrasscatcher;
–beforemakingheightadjustment.
–beforeclearingblockages;
–beforechecking,cleaningorworkingonthe
mower;
–afterstrikingaforeignobjectorifanabnormal
vibrationoccurs.Inspectthemowerfordamage
andmakerepairsbeforerestartingandoperating
theequipment.
•Reducethethrottlesettingbeforestoppingengine
andclosethefuelshutoffvalveattheconclusion
ofmowing.
•Keephandsandfeetawayfromthecuttingunit.
•Slowdownandusecautionwhenmakingturns
andcrossingroadsandsidewalks.Stopreelifnot
mowing.
•Donotoperatethemowerundertheinuenceof
alcoholordrugs
•Lightningcancausesevereinjuryordeath.If
lightningisseenorthunderisheardinthearea,do
notoperatethemachine;seekshelter.
•Usecarewhenloadingorunloadingthemachine
intoatrailerortruck
•Usecarewhenapproachingblindcorners,shrubs,
trees,orotherobjectsthatmayobscurevision.
MaintenanceandStorage
•Keepallnuts,boltsandscrewstighttobesurethe
equipmentisinsafeworkingcondition.
•Neverstoretheequipmentwithfuelinthetank
insideabuildingwherefumesmayreachanopen
ameorspark.
•Allowtheenginetocoolbeforestoringinany
enclosure.
•Toreducetherehazard,keeptheengine,silencer
andfuelstorageareafreeofgrass,leaves,orexcessive
grease.
•Checkthegrasscatcherfrequentlyforwearor
deterioration.
•Keepallpartsingoodworkingconditionandall
hardwareandhydraulicttingstightened.Replaceall
wornordamagedpartsanddecals.
•Ifthefueltankhastobedrained,dothisoutdoors.
•Becarefulduringadjustmentofthemachineto
prevententrapmentofthengersbetweenmoving
bladesandxedpartsofthemachine.
•Disengagedrives,disengagethecuttingunit,set
parkingbrake,stopengineanddisconnectsparkplug
wire.Waitforallmovementtostopbeforeadjusting,
cleaningorrepairing.
•Cleangrassanddebrisfromcuttingunit,drives,
mufers,andenginetohelppreventres.Cleanup
oilorfuelspillage.
•Carefullyreleasepressurefromcomponentswith
storedenergy.
•Removethesparkplugwirebeforemakingany
repairs.
•Usecarewhencheckingthereel.Wearglovesand
usecautionwhenservicingthem.
•Keephandsandfeetawayfrommovingparts.If
possible,donotmakeadjustmentswiththeengine
running.
ToroMowerSafety
Thefollowinglistcontainssafetyinformationspecic
toToroproductsorothersafetyinformationthatyou
mustknowthatisnotincludedintheCEN,ISO,or
ANSIstandard.
Thisproductiscapableofamputatinghandsand
feetandthrowingobjects.Alwaysfollowallsafety
instructionstoavoidseriousinjuryordeath.
Useofthisproductforpurposesotherthanitsintended
usecouldprovedangeroustouserandbystanders.
•Knowhowtostoptheenginequickly.
•Donotoperatethemachinewhilewearingtennis
shoesorsneakers.
•Wearingsafetyshoesandlongpantsisadvisableand
requiredbysomelocalordinancesandinsurance
regulations.
•Handlegasolinecarefully.Wipeupanyspills.
•Checkthesafetyinterlockswitchesdailyforproper
operation.Ifaswitchshouldfail,replacetheswitch
beforeoperatingthemachine.
•Usingthemachinedemandsattention.Toprevent
lossofcontrol:
–Donotoperateclosetosandtraps,ditches,
creeks,orotherhazards.
5

–Reducespeedwhenmakingsharpturns.Avoid
suddenstopsandstarts.
–Whennearorcrossingroads,alwaysyieldthe
right-of-way.
–Reduceenginespeedandapplytheservicebrake
whengoingdownhilltokeepforwardspeedslow
andtomaintaincontrolofthemachine.
•Donottouchtheengine,mufer,orexhaustpipe
whiletheengineisrunningorsoonafterithas
stoppedbecausetheseareascouldbehotenough
tocauseburns.
•Whenapersonorpetappearsunexpectedlyinor
nearthemowingarea,stopmowing.Careless
operation,combinedwithterrainangles,ricochets,
orimproperlypositionedguardscanleadtothrown
objectinjuries.Donotresumemowinguntilthe
areaiscleared.
MaintenanceandStorage
•Checkallfuellinesfortightnessandwearona
regularbasis.Tightenorrepairthemasneeded.
•Iftheenginemustberunningtoperforma
maintenanceadjustment,keephands,feet,clothing,
andanypartsofthebodyawayfromthecuttingunit
andanymovingparts.Keepeveryoneaway.
•Toensuresafetyandaccuracy,haveanAuthorized
ToroDistributorcheckthemaximumenginespeed
withatachometer.Maximumgovernedenginespeed
shouldbe3600±100RPM.
•Ifmajorrepairsareeverneededorifassistanceis
desired,contactanAuthorizedToroDistributor.
•UseonlyToroapprovedattachmentsand
replacementparts.Thewarrantymaybevoidedif
usedwithunapprovedattachments.
SoundPressure
Thisunithasamaximumsoundpressurelevelatthe
operatorsearof84dBA,basedonmeasurementsof
identicalmachinesperEN836andISO11201.
SoundPower
Thisunithasaguaranteedsoundpowerlevelof95
dBA,basedonmeasurementsofidenticalmachinesper
ISO11094.
Vibration(Model04036)
Thisunitdoesnotexceedahand/armvibrationlevelof
4.50m/s2,basedonmeasurementsofidenticalmachines
perEN1033andEN836.
Vibration(Model04037)
Thisunitdoesnotexceedahand/armvibrationlevelof
4.50m/s2,basedonmeasurementsofidenticalmachines
perEN1033andEN836.
6

SafetyandInstructionalDecals
Safetydecalsandinstructionsareeasilyvisibletotheoperatorandarelocatednearanyareaof
potentialdanger.Replaceanydecalthatisdamagedorlost.
93-7348
1.Warning—readtheOperator’sManual.
2.Firehazard—nore,openames,orsmoking;whenadding
fueltothetank,leavespacebetweenthefuelandthetopof
thetank.
3.Thrownobjecthazard—keepbystandersasafedistance
fromthemachine.
4.Cuttinghazardofhandorfoot—stayawayfrommoving
parts
115-1613
1.Warning—readthe
Operator’sManual.
3.Thrownobject
hazard—keepbystanders
asafedistancefromthe
machine.
2.Warning—remove
thesparkplugwire
beforeperformingany
maintenanceonthe
machine.
4.Cutting,dismemberment
hazardofhandor
foot—stayawayfrom
movingparts.
93-9356
1.Entanglementhazard—stayawayfrommovingparts.
115-1615
1.Warning—donottouchthehotsurface.
93-7346
1.Reeldrive3.Disengage
2.Engage
7

93-6085
1.Fast3.Slow
2.Continuousvariable
setting
112-9408
1.Engine—stop2.Engine—run
93-9886
1.Useunleadedgasoline.
115-1614
1.Warning—readtheOperator’sManual.3.Thrownobjecthazard—keepbystandersasafedistancefrom
themachine.
2.Warning—donotoperatethemachineunlessyouaretrained.4.Warning—stayawayfrommovingparts;keepallguardsin
place.
115-1718
1.Brake4.Parkingbrake
2.Releasethehandleto
disengagethebrake
5.Pushintheswitchtolock
theparkingbrake
3.Compressthehandleto
engagethebrake
6.Pullouttheswitchto
unlocktheparkingbrake
115-1720
1.Forward3.Neutral
2.Drivewheel
8

Setup
LooseParts
Usethechartbelowtoverifythatallpartshavebeenshipped.
ProcedureDescriptionQty.Use
Handle1
1Cabletie2Installthehandle.
Lifthandle2
Clamp4
2Locknut8
Installthelifthandles.
Kickstandassembly1
Spring2
Smallspacer2
Largespacer2
Largebolt2
Smallbolt2
Locknut2
3
Washer2
Installthekickstand(model04037only).
Wheelshaft,right1
Wheelshaft,left1
4Transportwheels(obtainseparately)2
Installthetransportwheels.
5Nopartsrequired–Adjustthecuttingunit.
6Grassbasket1Installthegrassbasket.
MediaandAdditionalParts
DescriptionQty.Use
Operator’sManual1
EngineOperator’sManual1
PartsCatalog1
OperatorTrainingMaterial1
CerticateofCompliance1
Readorviewbeforeoperatingthemachine
Note:Determinetheleftandrightsidesofthemachine
fromthenormaloperatingposition.
9

1
InstallingandAdjustingthe
Handle
Partsneededforthisprocedure:
1Handle
2Cabletie
InstallingtheHandle
1.Removethebolt,washer,andlockwasherfromthe
mountingpinoneachsideofthemower(Figure2).
Figure2
1.Mountingpins3.Boltandlocknut
2.Handlearms4.Hairpincotterandringpin
2.Removetheboltsandlocknutssecuringthebottom
ofthehandlearmstoeachsideofthemower
(Figure2).
3.Removethehairpincottersandringpinssecuring
thehandlearmstotherearoftheframe(Figure2).
4.Insertthehandleendsthrutheholesinthehandle
armsandaligntheholeswiththemountingpins
(Figure2).
5.Squeezethehandleendsinwardandinstallthemon
themountingpins(Figure3).
Figure3
1.Handleend
6.Securethehandleendstothemountingpinswiththe
bolts,washers,andlockwasherspreviouslyremoved
(Figure3).
7.Securethebottomofhandlearmstoeachsideof
themowerwiththeboltsandlocknutspreviously
removed(Figure3).Ensurethatyouinstallthe
bushingsinthehandlearmmountingholes.
8.Securethehandlearmstotherearoftheframewith
thehairpincottersandringpinspreviouslyremoved
(Figure3).
AdjustingtheHandle
1.Removethehairpincottersfromtheringpinson
eachsideofthemower(Figure2).
2.Whilesupportingthehandle,removetheringpins
fromeachsideandraiseorlowerthehandletothe
desiredoperatingposition(Figure2).
3.Installtheringpinsandhairpincotters.
10

2
InstalltheLiftHandles
Partsneededforthisprocedure:
2Lifthandle
4Clamp
8Locknut
Procedure
1.Looselymountalifthandletoeachsideofthe
handlewith2clampsand4locknuts(Figure4).
Figure4
1.Lifthandle3.Clamp
2.Locknut
2.Positionthehandlesabout6inchesbelowthe
controlpanel(Figure4).Tightenthemountingnuts.
Note:Thelifthandlesmayberelocatedfor
operatorcomfort.
3.Securethecontrolcablestothehandle,belowthelift
handles,withcableties.
3
InstallingtheKickstand(Model
04037Only)
Partsneededforthisprocedure:
1Kickstandassembly
2Spring
2Smallspacer
2Largespacer
2Largebolt
2Smallbolt
2Locknut
2Washer
Procedure
1.Positionthekickstandbetweenthetabsontherear
oftheframe.
2.Installawasherontothesmallbolt.Installtheright
sideofthekickstandtotheframewiththeboltand
washer,thesmallspacer,andlocknut(Figure5).
Ensuretheboltisinstalledfromtheinsideofthe
frameasshowninFigure5.
3.Installawasherontothelargebolt.
4.Installthespacerintothespringandinstallthelarge
boltintothespacer.
Important:Wheninstallingthespring,place
oneendofthespringundertherearframe
(Figure5).
5.Installtheleftsideofthekickstandtotheframewith
theboltandwasher,thelargespacerandspring,and
locknut(Figure5).Ensuretheboltisinstalledfrom
theinsideoftheframeasshowninFigure5.
11

Figure5
1.Largebolt5.Smallspacer
2.Washer6.Lefthandleend
3.Spring7.Largespacer
4.Smallbolt8.Locknut
6.Placeanutrunnerovertheendofthespringpointing
towardstherearandmovetheendofthespringover
andunderthekickstandspacer(Figure6).
Figure6
1.Nutrunner3.Movethespringendunder
thekickstandspacer
2.Spring4.Springendunderframe
4
InstallingtheTransport
Wheels
Partsneededforthisprocedure:
1Wheelshaft,right
1Wheelshaft,left
2Transportwheels(obtainseparately)
Procedure
1.Pushthekickstanddownwithyourfootandpull
uponthehandletosupportthemoweronthekick
stand.
2.Apply#242Loctitetothethreadsofthewheel
shafts.
3.Threadtherightwheelshaftintothedrivepulleyon
therightsideofthemachine(Figure7).
Note:Therightwheelshafthaslefthandthreads.
Figure7
1.Rightwheelshaft
4.Torquetheshaftto65to75ft-lb(88to101N-m).
5.Slidethewheelontotheaxle(Figure8).
6.Pivotthewheellockingclipawayfromcenterof
thewheelallowingittoslidefartherontotheaxle
(Figure8).
12

Figure8
1.Lockingclip
7.Rotatewheelbackandforthuntilitslidescompletely
ontoaxleandlockingclipissecuredingrooveon
axleshaft.
8.Repeatprocedureonoppositesideofmachine.
9.Inatethetiresto12to15psi.(574to718Pa).
5
AdjustingtheCuttingUnit
NoPartsRequired
Procedure
Beforeoperatingthemachine,completethefollowing
adjustments:
•Levelthereardrumtothereel.
•Adjustthebedknifetothereel.
•Adjusttheheight-of-cut.
•Adjustthegrassshieldheight
•Adjustthecutoffbar.
RefertotheCuttingUnitMaintenancesectionin
Maintenanceforinstructionsonperformingthese
procedures.
6
InstallingtheGrassBasket
Partsneededforthisprocedure:
1Grassbasket
Procedure
Graspbasketbytoplipandslideitontothebasket
mountingrods(Figure9).
Figure9
1.Grassbasket2.Basketmountingrod
13

ProductOverview
Controls
Figure10
1.Tractiondrivelever4.Servicebrake
2.Throttlecontrol5.Parkingbrake
3.On/offswitch
TractionDriveLever
Thetractiondrivelever(Figure10)islocatedonthe
frontrightsideofthecontrolpanel.Ithastwopositions:
NeutralandForward.Pushingtheleverforwardengages
thetractiondrive.
ThrottleControl
Thethrottlecontrol(Figure10)islocatedontopright
sideofthecontrolpanel.Theleverconnectstoand
operatesthrottlelinkagetothecarburetor.Theengine
speedcanbevariedfrom1600to3600RPM.
On/OffSwitch
Theon/offswitch(Figure10)islocatedonthetopof
thecontrolpanel.MoveswitchtotheOnpositionto
starttheengineandtheOffpositiontostoptheengine.
ServiceBrake
Theservicebrake(Figure10)islocatedontopleftside
ofcontrolpanel.Youcanusethebraketosloworstop
themachine.
ParkingBrake
Theparkingbrake(Figure10&Figure11)islocatedat
thebaseoftheservicebrake.Fullyengagetheservice
brake,pushintheparkingbrakeknobandallowthe
servicebraketorestontheparkingbrakepin.Engage
theservicebraketoreleasetheparkingbrake.Youmust
releasethebrakebeforetractiondriveisengaged.
Figure11
ReelDriveLever
Thereeldrivelever(Figure12)islocatedonthe
rightfrontcornerofthemachine.Theleverhastwo
positions:EngageandDisengage.Pulluponthelever
toengagethereelorpushitdowntodisengagethereel.
Figure12
1.Reeldrivelever
14

ChokeLever
Thechokelever(Figure13)islocatedonleftfrontof
theengine.Theleverhastwopositions:RunandChoke.
MovethelevertotheChokepositionwhenstarting
acoldengine.AfterenginestartsmovelevertoRun
position.
Figure13
1.Chokelever2.Fuelshutoffvalve
FuelShut-OffValve
Thefuelshutoffvalve(Figure13)islocatedonleft
frontofengine.Thevalvehastwopositions:Closed
andOpen.Movethelevertotheclosedpositionwhen
storingortransportingmachine.Openthevalvebefore
startingtheengine.
RecoilStarter
Pullrecoilstarterhandle(Figure14)tostartengine.
Figure14
1.Recoilstarter2.Kickstand
Kickstand
Thekickstand(Figure14)ismountedtotherearof
machineandisusedtoraisetherearofmachinefor
installationorremovalofthetransportwheels.
Specications
Model04036Model04037
Width36inches(91cm)41inches(104cm)
Height47inches(119cm)41-1/2inches
(105.4cm)
Lengthwithbasket59inches(150cm)54-1/4inches
(137.8cm)
Dryweight(with
basketandWiehle
roller;without
wheelsorgrooming
reel)
208lb(94kg.)229lb(104kg)
Widthofcut21inches(53cm)26inches(66cm)
Heightofcut1/8to1-1/4inches
(0.3to3.2cm)
1/8to1-1/4inches
(0.3to3.2cm)
Clip0.15inch(3.7mm)0.15inch(3.7mm)
EnginespeedLowidle–1600
±100,Highidle–
3600±100
Lowidle–1600
±100,Highidle–
3600±100
Attachments/Accessories
AselectionofToroapprovedattachmentsand
accessoriesareavailableforusewiththemachineto
enhanceandexpanditscapabilities.Contactyour
AuthorizedServiceDealerorDistributororgoto
www.Toro.comforalistofallapprovedattachments
andaccessories.
15

Operation
Note:Determinetheleftandrightsidesofthe
machinefromthenormaloperatingposition.
ThinkSafetyFirst
Pleasecarefullyreadallofthesafetyinstructionsand
decalsinthesafetysection.Knowingthisinformation
couldhelpyouorbystandersavoidinjury.
CheckingtheEngineOilLevel
Checktheengineoillevelbeforeeachuseorevery8
operatinghours,refertoCheckingtheEngineOilLevel
inEngineMaintenance(page22).
FillingtheFuelTank
Important:Neverusemethanol,gasoline
containingmethanol,gasoholcontainingmore
than10%ethanol,gasolineadditives,premium
gasoline,orwhitegasbecausethefuelsystem
couldbedamaged.Donotmixoilwithgasoline.
g014638
Figure15
1.Fueltankcap
1.Cleanaroundfueltankcapandremovecapfrom
tank(Figure15).
2.Usingunleadedgasoline,llfueltanknohigher
thantobottomoflterscreen.Donotoverll.
3.Installfueltankcapandwipeupanyspilledgasoline.
DANGER
Incertainconditions,gasolineisextremely
ammableandhighlyexplosive.Areorexplosion
fromgasolinecanburnyouandothersandcan
damageproperty.
•Fillthefueltankoutdoors,inanopenarea,
whentheengineiscold.Wipeupanygasoline
thatspills.
•Neverllthefueltankinsideanenclosedtrailer.
•Donotllthefueltankcompletelyfull.Add
gasolinetothefueltankuntilthelevelis1inch
(2.5cm)belowthebottomofthellerneck.
Thisemptyspaceinthetankallowsgasoline
toexpand.
•Neversmokewhenhandlinggasoline,andstay
awayfromanopenameorwheregasoline
fumesmaybeignitedbyaspark.
•Storegasolineinanapprovedcontainerand
keepitoutofthereachofchildren.Neverbuy
morethana30daysupplyofgasoline.
•Donotoperatewithoutentireexhaustsystem
inplaceandinproperworkingcondition.
WARNING
Gasolineisharmfulorfatalifswallowed.
Long-termexposuretovaporscancauseserious
injuryandillness.
•Avoidprolongedbreathingofvapors.
•Keepfaceawayfromnozzleandgastankor
conditioneropening.
•Keepgasawayfromeyesandskin.
16

DANGER
Incertainconditionsduringfueling,static
electricitycanbereleasedcausingasparkwhich
canignitethegasolinevapors.Areorexplosion
fromgasolinecanburnyouandothersandcan
damageproperty.
•Alwaysplacegasolinecontainersontheground
awayfromyourvehiclebeforelling.
•Donotllgasolinecontainersinsideavehicle
oronatruckortrailerbedbecauseinterior
carpetsorplastictruckbedlinersmayinsulate
thecontainerandslowthelossofanystatic
charge.
•Whenpractical,removegas-powered
equipmentfromthetruckortrailerandrefuel
theequipmentwithitswheelsontheground.
•Ifthisisnotpossible,thenrefuelsuch
equipmentonatruckortrailerfromaportable
container,ratherthanfromagasolinedispenser
nozzle.
•Ifagasolinedispensernozzlemustbeused,
keepthenozzleincontactwiththerimofthe
fueltankorcontaineropeningatalltimesuntil
fuelingiscomplete.
CheckingtheInterlockSwitch
Operation
ServiceInterval:Beforeeachuseordaily
CAUTION
Ifsafetyinterlockswitchesaredisconnectedor
damagedthemachinecouldoperateunexpectedly
causingpersonalinjury.
•Donottamperwiththeinterlockswitches.
•Checktheoperationoftheinterlockswitches
dailyandreplaceanydamagedswitchesbefore
operatingthemachine.
1.Pushthekickstanddownwithyourfootandpull
upandbackonthehandletoraisethewheelsoff
oftheground.
2.PlacetractionleverintoEngagepositionandengine
controlsinstartingposition.
3.Attempttostartengine.
Theengineshouldnotstart.Ifenginestarts,the
interlockswitchneedsservice.Correctproblem
beforeoperating.RefertoServicingInterlock
Switch.
4.Carefullyliftuponhandletoreleasekickstand.
StartingandStoppingthe
Engine
Note:Forillustrationsanddescriptionsofthecontrols
referencedinthissection,refertotheControlssection
inProductOverview.
StartingtheEngine
Note:Ensurethatthesparkplugwireisinstalledon
thesparkplug.
1.Ensurethatthetractionandreeldriveleversarein
theDisengagedposition.
Note:Theenginewillnotstartifthetractionlever
isintheEngagedposition.
2.Openthefuelshutoffvalveontheengine.
3.Movetheon/offswitchtotheOnposition.
4.MovethethrottlecontroltotheFastposition.
5.MovethechokeleverhalfwaybetweentheOnand
Offpositionswhenstartingacoldengine.The
chokemaynotberequiredwhenstartingawarm
engine.
6.Pulltherecoilstarterhandleoutuntilpositive
engagementresults,thenpullitvigorouslytostart
theengine.
Important:Donotpullrecoilropetoitslimit
orletgoofstarterhandlewhenropeispulled
outbecauseropemaybreakorrecoilassembly
maybedamaged.
7.MovethechoketotheOffpositionastheengine
warmsup.
StoppingtheEngine
1.Movethetractionandreeldrivecontrolstothe
Disengagedposition,thethrottlecontroltothe
Slowposition,andtheOn/OffswitchtotheOff
position.
2.Pullthesparkplugwireoffofthesparkplugto
preventthepossibilityofaccidentalstartingbefore
storingthemachine.
3.Closethefuelshutoffvalvebeforestoringor
transportingthemowerinavehicle.
DrivingtheMachinein
Transport
1.Pushthekickstanddownwithyourfootandpull
uponthehandletoraisetherearofmowerand
installthetransportwheels.
17

2.Toreleasethekickstand,pulluponthehandle,
pushthemowerforward,andthenlowertherearof
mowerontothetransportwheels.
3.Ensurethatthetractionandreeldrivecontrolsare
intheDisengagedpositionandstarttheengine.
4.SetthethrottlecontroltoSlow,raisethefrontofthe
machineupslightly,graduallyengagethetraction
driveandslowlyincreasetheenginespeed.
5.Adjustthethrottletooperatethemoweratthe
desiredgroundspeedandtransportthemowerto
thedesireddestination.
PreparingtoMow
1.ReturnthetractioncontrollevertotheDisengage
position,thethrottletotheSlowposition,andstop
theengine.
2.Pushthekickstanddownwithyourfootandpull
upandbackonthehandletoraisethewheelsoff
oftheground.
3.Pushthelockingclipsonthewheelsoutofthe
groovesintheshafts.
4.Slidethewheelsoffoftheshafts.
5.Movetheunitoffofthekickstand.
Mowing
Properuseofthemachineprovidesthesmoothest
turfcuttingavailable.ReferalsotoOperatingTips
forfundamentalsuggestionstoobtaintheutmost
performancefromyourmower.
Important:Excessiveoperationofthecuttingunit
withtheabsenceofgrassclippings(lubricant)can
damagethecuttingunit.
1.Starttheengine,setthethrottleatreducedspeed,
pushdownonthehandletoraisethecuttingunit,
movethetractionlevertotheEngagedposition,
andtransportthemowerontocollarofthegreen.
2.MovethetractionlevertotheDisengagedposition
andmovethereeldrivelevertotheEngaged
position.
3.MovethetractionlevertotheEngagedposition,
increasethethrottlespeeduntilthemoweris
travelingatthedesiredgroundspeed,drivethe
mowerontothegreen,lowerthefrontofthe
mower,andcommenceoperation.
4.Whennishedmowing,driveoffofthegreen,
movethetractioncontrollevertotheDisengage
position,stoptheengineandpushthereeldrive
leverintotheDisengageposition.
5.Emptythegrassbasketofclippings,installthegrass
basket,andcommencetransportoperation.
OperatingTips
BeforeMowing
•Ensurethatthemoweriscarefullyadjustedand
issetevenlyonbothsidesofthereel.Improper
moweradjustmentismagniedmanytimesoverin
theappearanceoftheclippedturf.
•Removeallforeignobjectsfromtheturfpriorto
mowing.
•Ensurethateveryone,especiallychildrenandpets,
areclearoftheworkarea.
MowingTechniques
•Mowagreeninastraightbackandforthdirection,
acrossthegreen.
•Avoidcircularmowingorturningthemowerona
greenbecausescufngmayoccur.Turnthemower
offofthegreenbyraisingthecuttingreel(pushing
thehandledown)andturningonthetractiondrum.
•Mowatanormalwalkingpace.Fastspeedsaves
verylittletimeandwillresultinaninferiormowing
job.
18

Maintenance
Note:Determinetheleftandrightsidesofthemachinefromthenormaloperatingposition.
RecommendedMaintenanceSchedule(s)
MaintenanceService
IntervalMaintenanceProcedure
Aftertherst8hours•Changetheengineoil.
Aftertherst25hours•Cleanthefuellter.
Beforeeachuseordaily•Checktheinterlockswitchoperation.
•Checktheengineoillevel.
Every25hours
•Greasethemachine.(Greasethettingsimmediatelyaftereverywashingregardless
oftheintervallisted.)
•Cleanandoiltheaircleanerfoamelement.(Moreoftenindirtyordustyconditions)
Every50hours•Changetheengineoil.(Morefrequentlyindustyordirtyconditions)
•Cleanthefuellter.
Every100hours•Cleanorreplacethepaperairlterelement.(Moreoftenindirtyordustyconditions)
•Checkthesparkplug.
Every200hours•Decarbontheengine.
Every300hours•Changetheairlterpaperelement
•Checktheconditionandtensionofbelts.
Beforestorage•Paintchippedsurfaces.
•RefertoStorageSectionforadditionalinformation
Important:Refertoyour
Engine Operator’ s Man ual
foradditionalmaintenanceprocedures.
19

DailyMaintenanceChecklist
Important:Duplicatethispageforroutineuse.
Fortheweekof:
Maintenance
CheckItemMon.Tues.Wed.Thurs.Fri.Sat.Sun.
Checkthe
safetyinterlock
operation.
Checktheparking
brakeoperation.
Checkthefuel
level.
Checktheengine
oillevel.
Checktheair
lter.
Cleantheengine
coolingns.
Checkforunusual
enginenoises.
Checkforunusual
operatingnoises.
Checkthe
reel-to-bedknife
adjustment.
Checkthe
height-of-cut
adjustment.
Greaseallttings.
Touchup
damagedpaint.
NotationforAreasofConcern
Inspectionperformedby:
ItemDateInformation
20
This manual suits for next models
3
Table of contents
Other Toro Lawn Mower manuals

Toro
Toro Reelmaster 5610-D User manual

Toro
Toro Recycler 20374 User manual

Toro
Toro TimeMaster 21200 User manual

Toro
Toro 22188 User manual

Toro
Toro 30857 User manual

Toro
Toro 4380 User manual

Toro
Toro 78395 User manual

Toro
Toro Master Commercial 3000 Series User manual

Toro
Toro Z Master 4000 Series User manual

Toro
Toro 73550 User manual

Toro
Toro 30403 User manual

Toro
Toro 22045 User manual

Toro
Toro 30149 User manual

Toro
Toro TimeCutter MX5060 User manual

Toro
Toro 78452 User manual

Toro
Toro Flex-Force Power System 60V MAX 21in Recycler... User manual

Toro
Toro TimeCutter ZS 3200 User manual

Toro
Toro Recycler 20990 User manual

Toro
Toro 03170 User manual

Toro
Toro 30821 User manual