Toro 22163 User manual

FormNo.3358-226RevB
PT21CommercialLawnMower
ModelNo.22163—SerialNo.270000001andUp
ModelNo.22164—SerialNo.270000001andUp
Registeratwww.Toro.com.OriginalInstructions(EN)

Introduction
Readthisinformationcarefullytolearnhowtooperate
andmaintainyourproductproperlyandtoavoidinjury
andproductdamage.Youareresponsibleforoperating
theproductproperlyandsafely.
YoumaycontactTorodirectlyatwww .Toro.comfor
productandaccessoryinformation,helpndinga
dealer,ortoregisteryourproduct.
Wheneveryouneedservice,genuineToroparts,or
additionalinformation,contactanAuthorizedService
DealerorToroCustomerServiceandhavethemodel
andserialnumbersofyourproductready.Figure1
identiesthelocationofthemodelandserialnumbers
ontheproduct.Writethenumbersinthespace
provided.
Figure1
1.Modelandserialnumberplate
ModelNo.
SerialNo.
Thismanualidentiespotentialhazardsandhas
safetymessagesidentiedbythesafetyalertsymbol
(Figure2),whichsignalsahazardthatmaycauseserious
injuryordeathifyoudonotfollowtherecommended
precautions.
Figure2
1.Safetyalertsymbol
Thismanualuses2wordstohighlightinformation.
Importantcallsattentiontospecialmechanical
informationandNoteemphasizesgeneralinformation
worthyofspecialattention.
Contents
Introduction.................................................................2
Safety...........................................................................3
GeneralLawnMowerSafety.................................3
SafetyandInstructionalDecals.............................4
Setup............................................................................5
1InstallingtheHandle..........................................5
2FillingtheCrankcasewithOil.............................6
3AdjustingtheHandleHeight..............................6
ProductOverview........................................................7
Operation.....................................................................8
CheckingtheEngineOilLevel..............................8
FillingtheFuelTankwithGasoline.......................9
StartingtheEngine.............................................10
StoppingtheEngine...........................................11
UsingtheSelf-propelDrive................................11
AdjustingtheCuttingHeight..............................11
RecyclingtheClippings.......................................12
Side-dischargingtheClippings............................12
OperatingTips...................................................13
Maintenance...............................................................15
RecommendedMaintenanceSchedule(s)................15
Lubrication.............................................................16
LubricatingtheWheelGears...............................16
EngineMaintenance...............................................16
ServicingtheAirFilter........................................16
ChangingtheEngineOil....................................17
ServicingtheSparkPlug.....................................17
FuelSystemMaintenance.......................................18
EmptyingtheFuelTankandCleaningthe
FuelFilter.......................................................18
BladeMaintenance.................................................18
MaintainingtheCuttingBlade.............................18
Cleaning.................................................................20
CleaningundertheMowerHousing....................20
Storage.......................................................................21
PreparingtheFuelSystem...................................21
PreparingtheEngine..........................................21
GeneralInformation..........................................21
RemovingtheLawnMowerfromStorage............21
Troubleshooting.........................................................22
©2007—TheToro®Company
8111LyndaleAvenueSouth
Bloomington,MN554202
Contactusatwww.Toro.com.
PrintedintheUSA.
AllRightsReserved

Safety
ThislawnmowermeetsorexceedstheCPSC
bladesafetyrequirementsforwalk-behindrotary
lawnmowersandtheB71.4specicationsofthe
AmericanNationalStandardsInstituteineffectat
thetimeofproduction.
Improperlyusingormaintainingthislawnmower
canresultininjury.Toreducethepotentialfor
injury,complywiththesesafetyinstructions.
Torodesignedandtestedthislawnmowerfortooffer
reasonablysafeservice;however,failuretocomply
withthefollowinginstructionsmayresultin
personalinjury.
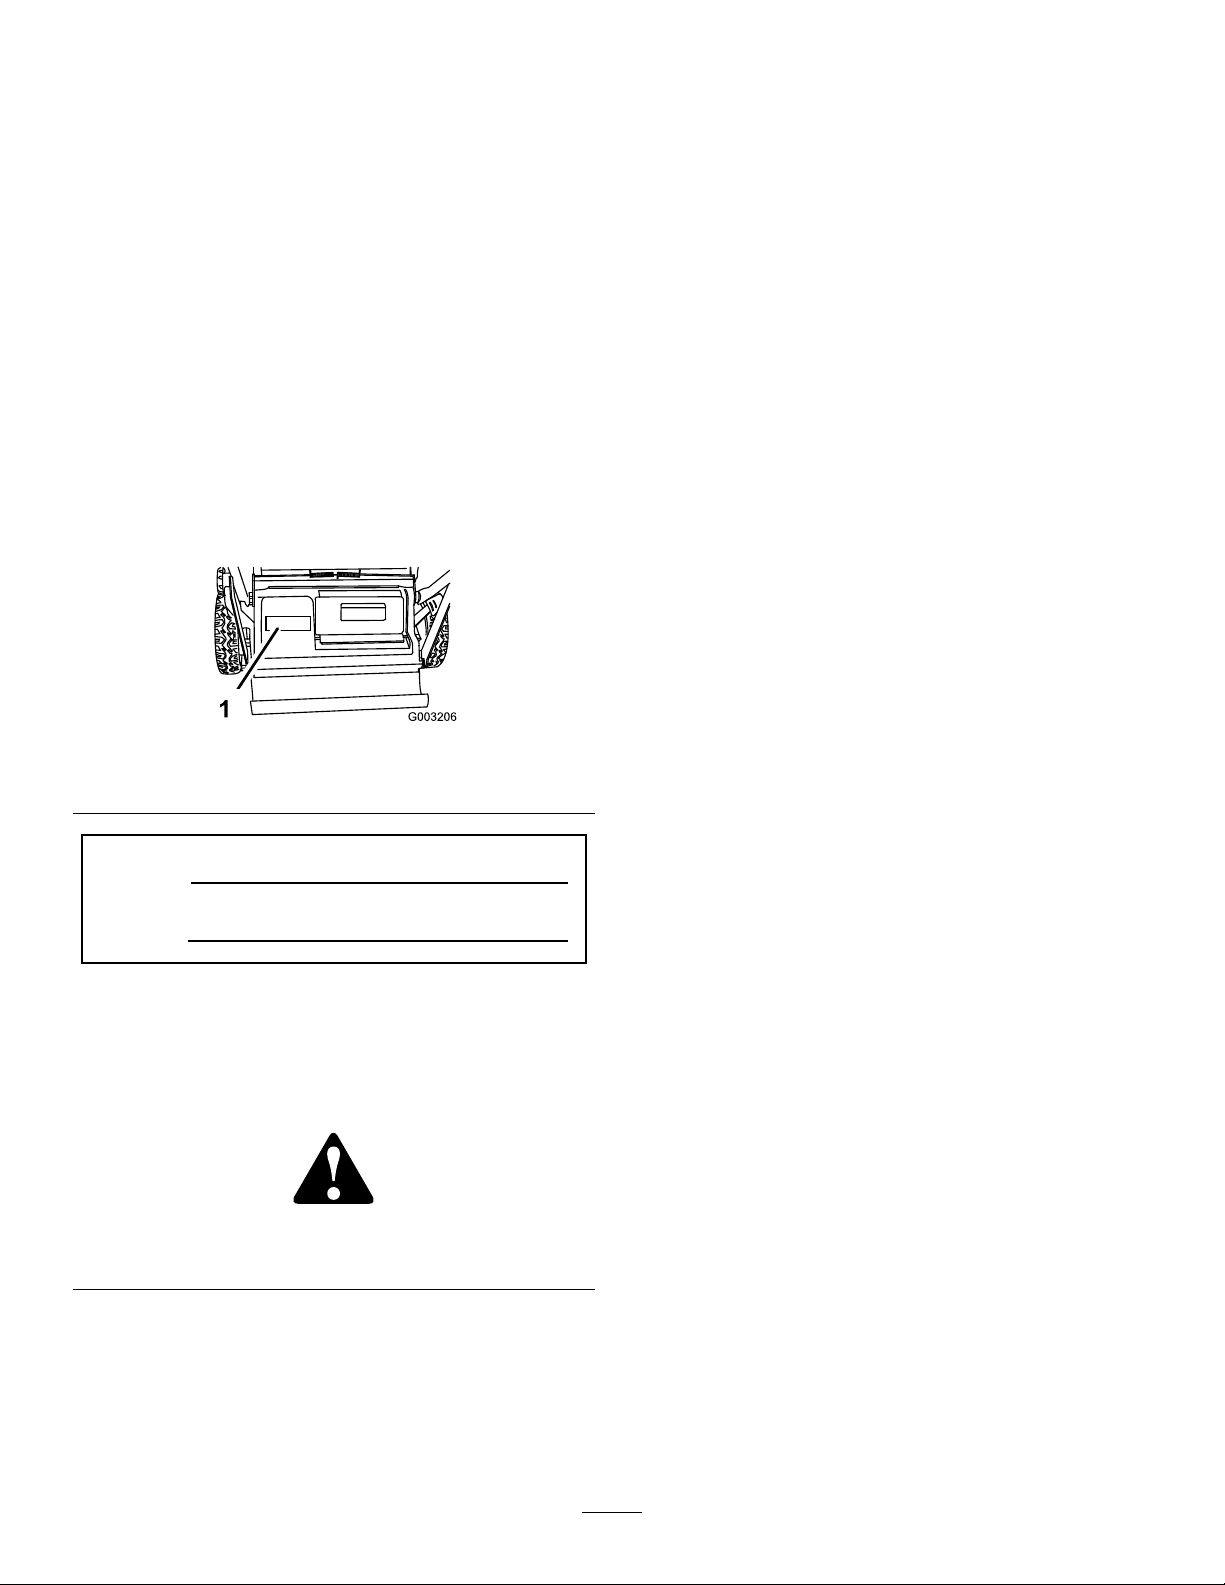
Engineexhaustcontainscarbonmonoxide,an
odorless,deadlypoisonthatcankillyou.
Donotruntheengineindoorsorinanenclosed
area.
Toensuremaximumsafety,bestperformance,and
togainknowledgeoftheproduct,itisessentialthat
youandanyotheroperatorofthelawnmowerread
andunderstandthecontentsofthismanualbefore
theengineiseverstarted.Payparticularattention
tothesafetyalertsymbol(Figure2)whichmeans
Caution,Warning,orDanger—“personalsafety
instruction.”Readandunderstandtheinstruction
becauseithastodowithsafety.Failuretocomply
withtheinstructionmayresultinpersonalinjury.
GeneralLawnMowerSafety
Thislawnmoweriscapableofamputatinghandsand
feetandofthrowingobjects.Failuretoobservethe
followingsafetyinstructionscouldresultinserious
injuryordeath.
ThefollowinginstructionsarefromtheANSI/OPEI
B71.4-2004standard.
Training
•ReadtheOperator’sManualandothertraining
material.Iftheoperator(s)ormechanic(s)cannot
readEnglishitistheowner’sresponsibilitytoexplain
thismaterialtothem.
•Becomefamiliarwiththesafeoperationofthe
equipment,operatorcontrols,andsafetysigns.
•Alloperatorsandmechanicsshouldbetrained.The
ownerisresponsiblefortrainingtheusers.
•Neverletchildrenoruntrainedpeopleoperateor
servicetheequipment.Localregulationsmayrestrict
theageoftheoperator.
•Theowner/usercanpreventandisresponsiblefor
accidentsorinjuriesoccurringtothemselves,other
people,orproperty.
Preparation
•Onlyuseaccessoriesandattachmentsapprovedby
themanufacturer.
•Wearappropriateclothingincludinghardhat,safety
glasses,andearprotection.Longhair,looseclothing
orjewelrymaygettangledinmovingparts.
•Inspecttheareawheretheequipmentistobeused
andremoveallobjectssuchasrocks,toysandwire
whichcanbethrownbythemachine.
•Useextracarewhenhandlinggasolineandother
fuels.Theyareammableandvaporsareexplosive.
–Useonlyanapprovedcontainer.
–Neverremovegascaporaddfuelwithengine
running.Allowenginetocoolbeforerefueling.
Donotsmoke.
–Neverrefuelordrainthemachineindoors.
•Checkthatoperator’spresencecontrols,safety
switchesandshieldsareattachedandfunctioning
properly.Donotoperateunlesstheyarefunctioning
properly.
Operation
•Neverrunanengineinanenclosedarea.
•Onlyoperateingoodlight,keepingawayfromholes
andhiddenhazards.
•Onlystartenginefromtheoperator’sposition.
•Besureofyourfooting,especiallywhenbacking
up.Walk,don’trun.Neveroperateonwetgrass.
Reducedfootingcouldcauseslipping.
•Slowdownanduseextracareonhillsides.Besure
totravelsidetosideonhillsides.Turfconditions
canaffectthemachine’sstability.Usecautionwhile
operatingneardrop-offs.
•Donotoperatethelawnmowerwithouteitherthe
grasscatcherortheguardinplace.
•Donotchangetheenginegovernorsettingor
overspeedtheengine.
•Stoponlevelgroundandshutoffenginebefore
leavingtheoperator’spositionforanyreason
3

includingemptyingthecatcheroruncloggingthe
chute.
•Stopequipmentandinspectbladeafterstriking
objectsorifanabnormalvibrationoccurs.Make
necessaryrepairsbeforeresumingoperations.
•Keephandsandfeetawayfromthecuttingunits.
•Lookbehindanddownbeforebackinguptobesure
ofaclearpath.
•Keeppetsandbystandersaway.
•Slowdownandusecautionwhencrossingroadsand
sidewalks.Stopbladeifyouarenotmowing.
•Beawareofthemowerdischargedirectionanddo
notpointitatanyone.
•Donotoperatethemowerundertheinuenceof
alcoholordrugs.
•Usecarewhenloadingorunloadingthemachine
intoatrailerortruck.
•Usecarewhenapproachingblindcorners,shrubs,
trees,orotherobjectsthatmayobscurevision.
MaintenanceandStorage
•Stopengineanddisconnectsparkplugwire.Wait
forallmovementtostopbeforeadjusting,cleaning
orrepairing.
•Cleangrassanddebrisfromcuttingunit,drive,
mufer,andenginetohelppreventres.Cleanup
oilorfuelspillage.
•Letenginecoolbeforestoringanddonotstorenear
ame.
•Shutofffuelwhilestoringortransporting.Donot
storefuelnearamesordrainindoors.
•Neverallowuntrainedpersonneltoservicemachine.
•Removesparkplugwirebeforemakinganyrepairs.
•Usecarewhencheckingblade.Wrapthebladeor
weargloves,andusecautionwhenservicingthem.
Onlyreplaceblade.Neverstraightenorweldit.
•Keephandsandfeetawayfrommovingparts.If
possible,donotmakeadjustmentswiththeengine
running.
•Keepallpartsingoodworkingconditionandall
hardwaretightened.Replaceallwornordamaged
decals.
SafetyandInstructional
Decals
Safetydecalsandinstructionsareeasily
visibletotheoperatorandarelocated
nearanyareaofpotentialdanger.
Replaceanydecalthatisdamagedor
lost.
Manufacturer’sMark
1.Indicatesthebladeisidentiedasapartfromtheoriginal
machinemanufacturer.
98-4387
1.Warning—wearhearingprotection.
105-6838
110-4989
4

Setup
LooseParts
Usethechartbelowtoverifythatallpartshavebeenshipped.
ProcedureDescriptionQty.Use
Oval-headbolt(Model22163only)2
Oval-headbolt(Model22164only)6
Hexheadbolt(Model22164only)2
Locknut(Model22163only)2
Locknut(Model22164only)6
Upperhandle(Model22164only)1
1
Cabletie1
Installthehandle.
2Nopartsrequired–Fillthecrankcasewithoil.
3Nopartsrequired–Adjustthehandleheight.
Note:Determinetheleftandrightsidesofthemachine
fromthenormaloperatingposition.
1
InstallingtheHandle
Partsneededforthisprocedure:
2Oval-headbolt(Model22163only)
6Oval-headbolt(Model22164only)
2Hexheadbolt(Model22164only)
2Locknut(Model22163only)
6Locknut(Model22164only)
1Upperhandle(Model22164only)
1Cabletie
Procedure
1.Attachtheupperhandletothelowerhandleusing4
oval-headboltsand4locknuts(model22164only).
Note:Ensurethattheboltheadsaretotheoutside
ofthehandle.
2.Removetheboltsandwashersfromthemower
housingthatwillholdthehandletothehousing
(model22163only).
3.Movethehandletotheoperatingposition.
4.Attachthehandletothemowerhousingwiththe
boltsandwashersthatyouremovedinstep2(model
22163only)butdonottightenthem(Figure3).
Figure3
1.Endcaponreardoorrod4.Handlebrace(2)
2.Boltandwasher(2)5.Boltheadalignedwiththe
handle.
3.Locknut(2)
5.Attachthehandlebracestothelowerhandlesides
with2oval-headboltsandsecurethemngertight
using2locknuts(Figure3).
Important:Ensurethattheboltheadsareto
the
inside
ofthehandle.
5

Important:Ifthehandlehasroundholes,the
squareshankoftheboltswillnottintothe
holesinthehandleatthistime.
6.Securethehandleasfollows:
•Iftheholesinthehandlearesquare,alignand
insertthesquareshankoftheoval-headboltsinto
thehandlesothattheboltheadsaretightagainst
thehandleandtightenthelocknuts(Figure3).
•Iftheholesinthehandleareround,alignthe
ovalboltheadswiththehandleasshownin
Figure3;then,holdingtheheadsinthatposition,
tighteneachnutwithawrenchtopullthesquare
shankintothehandleuntiltheboltheadsare
tightagainstthehandle.
7.Tightenallthefastenersonthehandleandhandle
braces.
8.Usethecabletieprovidedtosecurethecontrol
cable(s)tothehandle.
Note:Attachthecabletieaslowaspossibleonthe
handletopreventthecable(s)fromhookingonto
theendcaponthereardoorrodandinterferingwith
theself-propelsystem(Figure3).
2
FillingtheCrankcasewithOil
NoPartsRequired
Procedure
Theenginecrankcaseisshippedwithoutoil.Youmust
llitwithapproximately22ounces(0.65liters)ofoil
beforestartingtheengine.RefertoCheckingtheEngine
OilLevelin,pageforoilspecicationsandinstructions.
3
AdjustingtheHandleHeight
NoPartsRequired
Procedure
Youmayraiseorlowerthehandletoaposition
comfortableforyou.
1.Removethefastenerthatattachesthehandlebraces
tothelowerhandleends.
2.Inserttheboltthroughtheholeineachofthehandle
bracesthatsetsthehandletothedesiredposition
andtighten(Figure4).
Figure4
1.Highestposition3.Lowestposition
2.Middleposition(either
hole)
6

ProductOverview
Figure5
Model22163
1.Recoilstarthandle6.Airlter
2.Bladecontrolbar7.Cuttingheightlever(4)
3.Fueltank8.Sparkplug
4.Oilll/dipstick9.Primer
5.Sidedischarge
Figure6
Model22164
1.Upperhandle6.Airlter
2.Recoilstarthandle7.Primer
3.Bladecontrolbar8.Cuttingheightlever(4)
4.Fueltank9.Sparkplug
5.Oilll/dipstick10.Sidedischarge
Figure7
1.Sidedischargechute2.Reardischargeplug
(installed)
7

Operation
Note:Determinetheleftandrightsidesofthe
machinefromthenormaloperatingposition.
Eachtimebeforeyoumow,makesurethatthe
self-propeldriveandthebladecontrolbaroperate
properly.Whenyoureleasethebladecontrolbar,the
bladeandself-propeldriveshouldstop.Iftheydonot,
contactanAuthorizedServiceDealer.
Thismachineproducessoundlevelsinexcess
of85dBAattheoperator’searandcancause
hearinglossthroughextendedperiodsof
exposure.
Wearhearingprotectionwhenoperatingthis
machine.
Figure8
1.Warning—wearhearingprotection.
CheckingtheEngineOilLevel
ServiceInterval:Beforeeachuseordaily
Initially,llthecrankcasewith22ounces(0.65liters)
ofoil.Useonlyhigh-qualitySAE30orSAE10W30
weightdetergentoilthathastheAmericanPetroleum
Institute(API)serviceclassicationSF,SG,SH,orSJ.
Beforeeachuse,ensurethattheoillevelisbetweenthe
AddandFullmarksonthedipstick(Figure9).
Figure9
1.Dipstick3.Add
2.Full
Note:Whenthecrankcaseisempty,pourabout3/4
ofthecrankcasecapacityofoilinthecrankcase,then
followtheprocedureinthissection.
1.Movethelawnmowertoalevelsurface.
2.Cleanaroundthedipstick(Figure9).
3.Removethedipstickbyrotatingthecap
counterclockwiseandpullingitout.
4.Wipethedipstickcleanwithacleancloth.
5.Insertthedipstickintothellerneck,butdonot
screwitin.
6.Removethedipstickandreadtheoillevelonthe
dipstick(Figure9).
7.IftheoillevelreadingisbelowtheAddmarkon
thedipstick,slowlypouronlyenoughoilintothe
llerholetoraisetheoilleveltotheFullmarkon
thedipstick.
Important:Donotoverllthecrankcasewith
oilandruntheengine;enginedamagewill
result.Draintheexcessoiluntiltheoillevelon
thedipstickreadsFull.
8.Insertthedipstickintothellerneckandrotatethe
capclockwiseuntilitistight.
8

FillingtheFuelTankwith
Gasoline
Forbestresults,useclean,fresh,lead-freegasolinewith
anoctaneratingof87orhigher.Toensurefreshness,
purchaseonlythequantityofgasolinethatyouexpectto
usein30days.Usingunleadedgasolineresultsinfewer
combustiondepositsandlongerenginelife.Youmay
useleadedgasolineifunleadedgasolineisnotavailable.
Important:Donotaddoiltothegasoline.
Important:Donotusemethanol,gasoline
containingmethanol,gasoholcontainingmore
than10%ethanol,premiumgasoline,orwhitegas.
Usingthesefuelscandamagetheengine’sfuel
system.
Important:Donotusegasolinethathasbeen
storedsincethelastmowingseasonorlonger.
Incertainconditions,gasolineisextremely
ammableandhighlyexplosive.Areor
explosionfromgasolinecanburnyouand
othersandcandamageproperty.
•Fillthefueltankoutdoors,inanopenarea,
andwhentheengineiscold.Wipeupany
gasolinethatspills.
•Donotllthefueltankcompletelyfull.Add
gasolinetothefueltankuntilthelevelis1/4
to1/2in.(6to13mm)belowthebottomof
thellerneck.Thisemptyspaceinthetank
allowsthegasolinetoexpand.
•Neversmokewhenhandlinggasoline,and
stayawayfromanopenameorwherea
sparkmayignitethegasolinefumes.
•Storegasolineinanapprovedfuelcontainer
andkeepitoutofthereachofchildren.
•Neverbuymorethana30-daysupplyof
gasoline.
Whenfueling,undercertaincircumstances,a
staticchargecandevelop,ignitingthegasoline.
Areorexplosionfromgasolinecanburnyou
andothersanddamageproperty.
•Alwaysplacegasolinecontainersonthe
groundandawayfromyourvehiclebefore
lling.
•Donotllgasolinecontainersinsidea
vehicleoronatruckortrailerbedbecause
interiorcarpetsorplastictruckbedliners
mayinsulatethecontainerandslowtheloss
ofanystaticcharge.
•Whenpractical,removegasoline-powered
equipmentfromthetruckortrailerand
refueltheequipmentwithitswheelsonthe
round.
•Ifthisisnotpossible,thenrefuelsuch
equipmentonatruckortrailerfroma
portablecontainer,notfromagasoline
dispensernozzle.
•Ifyoumustuseagasolinedispensernozzle,
keepthenozzleincontactwiththerimof
thefueltankorcontaineropeningatall
timesuntilfuelingiscomplete.
Useafuelstabilizer/conditionerregularlyduring
operationandstorage.Astabilizer/conditionercleans
theengineduringoperationandpreventsgum-like
varnishdepositsfromformingintheengineduring
periodsofstorage.
Important:Donotusefueladditivesotherthan
afuelstabilizer/conditioner.Donotusefuel
stabilizerswithanalcoholbasesuchasethanol,
methanol,orisopropanol.
1.Cleanaroundthefueltankcap(Figure10).
9

Figure10
1.Oilll/dipstick3.Aircleaner
2.Fueltankcap
2.Removethecapfromthetank.
3.Fillthefueltankwithunleadedgasolinetowithin
1/4to1/2inch(6to13mm)fromthetopofthe
tank.Donotllintothellerneck.
Important:Donotllthetankmorethan1/4
inch(6mm)fromthetopofthetankbecause
thegasolinemusthaveroomtoexpand.
4.Installthefueltankcapandwipeupanyspilled
gasoline.
StartingtheEngine
1.Connectthewiretothesparkplug(Figure11).
Figure11
1.Spark-plugwire
2.Firmlypushintheprimeroncewithyourthumb
(Figure12).
Note:Donotpushintheprimerexcessivelyto
preventoodingtheenginewithfuel.
Figure12
3.Holdthebladecontrolbaragainstthehandle
(Figure13)or(Figure14).
Figure13
Model22163
Figure14
Model22164
10

4.Pulltherecoilstarter(Figure15)or(Figure16).
Figure15
Model22163
Figure16
Model22164
5.Ifthemowerdoesnotstartin1or2pulls,pressthe
primerbutton1or2timesandtrystartingitagain.
Note:Ifthemowerstilldoesnotstart,contactan
AuthorizedServiceDealer.
StoppingtheEngine
1.Releasethebladecontrolbar(Figure17).
Figure17
2.Whentheenginestops,removetheignitionkey
whenyouleavethemower.
Important:Whenyoureleasethebladecontrol
bar,boththeengineandbladeshouldstop
within3seconds.Iftheydonotstopproperly,
stopusingyourmowerimmediatelyandcontact
anAuthorizedServiceDealer.
UsingtheSelf-propelDrive
Model22164only
Tooperatetheself-propeldrive,simplywalkwithyour
handsontheupperhandleandyourelbowsatyour
sides,andthemowerwillautomaticallykeeppacewith
you(Figure18).
Figure18
AdjustingtheCuttingHeight
Adjustingthecuttingheightmaybringyouinto
contactwiththemovingblade,causingserious
injury.
•Stoptheengineandwaitforallmovingparts
tostop.
•Donotputyourngersunderthehousing
whenadjustingthecuttingheight.
Iftheenginehasbeenrunning,themuferwill
behotandcanseverelyburnyou.Keepaway
fromthehotmufer.
Adjustthecuttingheightasdesired.Setallfourwheels
tothesameheight.
Note:Toraisethemower,moveall4cuttingheight
leversforward;tolowerthemower,movethemall
rearward(Figure19).
11

Figure19
RecyclingtheClippings
Yourmowercomesfromthefactoryreadytorecycle
thegrassandleafclippingsbackintothelawn.
Ifthegrassbagisonthemower,removeit(referto
RemovingtheGrassBag)beforerecyclingtheclippings.
Ifthesidedischargechuteisonthemower,removeit
andlockthesidedischargedoor(refertoRemovingthe
SideDischargeChute)beforerecyclingtheclippings.
Important:Ensurethatthereardischarge
plugisinplacebeforeyourecycletheclippings
(Figure20).
Figure20
Side-dischargingthe
Clippings
Usethesidedischargeforcuttingverytallgrass.
Ifthebagisonthemower,removeitandinsertthe
reardischargeplug(refertoRemovingtheGrassBag)
beforeside-dischargingtheclippings.
Important:Ensurethatthereardischarge
plugisinplacebeforeyourecycletheclippings
(Figure21).
Figure21
Thebladeissharp;contactingthebladecan
resultinseriouspersonalinjury.
Stoptheengineandwaitforallmovingpartsto
stopbeforeleavingtheoperatingposition.
InstallingtheSideDischargeChute
1.Unlockthesidedischargedoor(Figure22).
12

Figure22
2.Liftopenthesidedischargedoor(Figure23).
Figure23
3.Installthesidedischargechuteandclosethedoor
ontothechute(Figure24).
Figure24
RemovingtheSideDischargeChute
Toremovethesidedischargechute,reversethesteps
above.
Important:Lockthesidedischargedoorafteryou
closeit(Figure25).
Figure25
OperatingTips
GeneralTips
•Maintainasharpbladethroughoutthecutting
season.Periodicallyledownnicksontheblade.
•Replacethebladewhennecessarywithanoriginal
Tororeplacementblade.
•Mowonlydrygrassorleaves.Wetgrassandleaves
tendtoclumpontheyardandcancausethemower
toplugortheenginetostall.
Wetgrassorleavescancauseseriousinjuryif
youslipandcontacttheblade.
Mowonlyindryconditions.
•Cleanunderthemowerhousingaftereachmowing.
SeeCleaningundertheMowerHousing.
•Keeptheengineingoodrunningcondition.
•Settheenginespeedtothefastestpositionforthe
bestcuttingresults.
Operatingamowerwithitsenginerunningat
aspeedgreaterthanthefactorysettingcan
causethemowertothrowapartofthebladeor
engineintotheoperator’sorbystander’sarea
andresultinseriouspersonalinjuryordeath.
–Donotchangetheenginespeedsetting.
–Ifyoususpecttheenginespeedisfaster
thannormal,contactanAuthorizedService
Dealer.
•Cleantheairlterfrequently.Mulchingstirsup
moreclippingsanddustwhichclogstheairlter
andreducesengineperformance.
CuttingGrass
•Grassgrowsatdifferentratesatdifferenttimesof
theyear.Inthesummerheat,itisbesttocutgrass
atthe2-1/4inch(57mm),2-3/4inch(70mm),or
3-1/4inch(83mm)cuttingheightsettings.Cut
onlyaboutathirdofthegrassbladeatatime.Do
notcutbelowthe2-1/4inch(57mm)settingunless
thegrassissparseoritislatefallwhengrassgrowth
beginstoslowdown.
•Whencuttinggrassover6inches(15cm)tall,rst
mowatthehighestcuttingheightsettingandwalk
13

slower;thenmowagainatalowersettingforthe
bestlawnappearance.Ifthegrassistoolongand
theleavesclumpontopofthelawn,themowermay
plugandcausetheenginetostall.
•Alternatethemowingdirection.Thishelpsdisperse
theclippingsoverthelawnforevenfertilization.
Ifthenishedlawnappearanceisunsatisfactory,try
oneormoreofthefollowing:
•Sharpentheblade.
•Walkataslowerpacewhilemowing.
•Raisethecuttingheightonyourmower.
•Cutthegrassmorefrequently.
•Overlapcuttingswathsinsteadofcuttingafull
swathwitheachpass.
•Setthecuttingheightonthefrontwheelsonenotch
lowerthantherearwheels.Forexample,setthe
frontwheelsat2-1/4inches(57mm)andtherear
wheelsat2-3/4inches(70mm).
CuttingLeaves
•Aftercuttingthelawn,ensurethathalfofthelawn
showsthroughthecutleafcover.Youmayneedto
makemorethanonepassovertheleaves.
•Forlightleafcoverage,setallthewheelsatthesame
cuttingheightsetting.
•Iftherearemorethan5inches(12.7cm)ofleaves
onthelawn,setthefrontcuttingheight1or2
notcheshigherthantherearcuttingheight.This
makesiteasiertofeedtheleavesunderthemower
housing.
•Slowdownyourmowingspeedifthemowerdoes
notcuttheleavesnelyenough.
•Ifyoumowoveroakleaves,youcanaddlimeto
thegrassinthespringtoreducetheacidityofthe
oakleaves.
14

Maintenance
Note:Determinetheleftandrightsidesofthemachinefromthenormaloperatingposition.
RecommendedMaintenanceSchedule(s)
MaintenanceService
IntervalMaintenanceProcedure
Aftertherst8hours•Changetheengineoil.
Beforeeachuseordaily
•Checktheengineoillevel.
•Inspectthemowerbladesforwearordamage.
•Cleanunderthemowerhousing.
Every25hours•Lubricatetherearwheelgears.
•Cleanthefoampre-cleaner(morefrequentlyindustyconditions).
Every50hours•Changetheengineoil(moreoftenindustyconditions).
Every100hours•Checkthesparkplug.
Every300hours•Replacethepaperairlter(morefrequentlyindustyconditions).
Yearly•Emptythefueltankandcleanthefuellter.
Important:Refertoyour
Engine Operator’ s Man ual
foradditionalmaintenanceprocedures.
Ifyouleavethewireonthesparkplug,someonecouldaccidentlystarttheengineandseriouslyinjure
youorotherbystanders.
Disconnectthewirefromthesparkplugbeforeyoudoanymaintenance.Setthewireasidesothatit
doesnotaccidentlycontactthesparkplug.
15

Lubrication
LubricatingtheWheelGears
ServiceInterval:Every25hours
Lubricateeachrearwheelwithgreaseyearly.
1.Wipethegreasettingsjustinsidetherearwheels
withacleanrag(Figure26).
Figure26
1.Greasetting
2.Installagreasegunontoeachttingandgentlyapply
2or3pumpsof#2multi-purposelithium-base
grease.
EngineMaintenance
ServicingtheAirFilter
ServiceInterval:Every25hours
Every300hours
Cleanthefoampre-cleanerevery25operatinghours.
Replacethepaperairlteronceeveryseasonorevery
300operatinghours;replaceitmorefrequentlyindusty
conditions.
Important:Donotoperatetheenginewithoutthe
airlterassembly;extremeenginedamagewill
occur.
1.Stoptheengineandwaitforallmovingpartstostop.
2.Removethescrewthatsecurestheairlter
coverFigure27).
Figure27
1.AirFilterhousing4.Cover
2.Foampre-cleaner5.Screw
3.Paperairlter
3.Removethecoverandcleanitthoroughly(Figure27).
4.Removeandinspectthepaperairlter(Figure27),
anddiscarditifitisexcessivelydirty.
Important:Donottrytocleanapaperlter.
5.Removethefoampre-cleanerandwashitwitha
milddetergentandwater,thenblotitdry.
6.Saturatethepre-cleanerwithoil,thensqueezeit(do
nottwist)toremovetheexcessoil.
7.Installthefoampre-cleaner.
8.Installthepaperairlter.
16

Note:Installanewpaperairlterifyoudiscarded
theoldone.
9.Installthecoverandsecureitwiththescrew.
ChangingtheEngineOil
ServiceInterval:Aftertherst8hours
Every50hours
Changetheoilaftertherst8operatinghoursandthan
afterevery50operatinghoursoreveryseason(more
frequentlyindustyordirtyconditions).
1.Runtheenginetowarmtheengineoil.
Note:Warmoilowsbetterandcarriesmore
contaminants.
Oilmaybehotafterenginehasbeenrun,and
contactwithhotoilcancauseseverepersonal
injury.
Avoidcontactingthehotengineoilwhenyou
drainit.
2.Stoptheengineandwaitforallmovingpartstostop.
3.Disconnectthewirefromthesparkplug(Figure11).
4.Placeasuitabledrainpanundertherightsideof
themower.
5.Removethedipstickbyrotatingthecap
counterclockwiseandpullingitout.
6.Tipthemowerontoitsrightsidetodraintheoil
intothedrainpan.
Note:Youcanalsoremovetheoilfromthe
crankcaseusinganoilextractor.
7.Returnthemowertoitsoperatingposition.
8.Insertthedipstickintothellerneckandrotatethe
capclockwiseuntilitistight.
9.Recycletheusedoilaccordingtolocalcodes.
10.FillthecrankcasetotheFulllineonthedipstickwith
freshoil.RefertotheFillingtheCrankcasewithOil.
11.Wipeupanyspilledoil.
ServicingtheSparkPlug
ServiceInterval:Every100hours
Checkthesparkplugafterevery100operatinghours.
UseanNGKBPR5ESsparkplugorequivalent.
1.Stoptheengineandwaitforallmovingpartstostop.
2.Disconnectthewirefromthesparkplug(Figure11).
3.Cleanaroundthesparkplug.
4.Removethesparkplugfromthecylinderhead.
Important:Replaceacracked,fouled,or
dirtysparkplug.Donotcleantheelectrodes
becausegritenteringthecylindercandamage
theengine.
5.Setthegapontheplugto0.030in.(0.76mm)
(Figure28).
Figure28
1.Centerelectrodeinsulator
2.Sideelectrode
3.Airgap(nottoscale)
6.Installthesparkplugandthegasketseal.
7.Torquetheplugto17ft-lb(23N⋅m).
8.Connectthewiretothesparkplug.
17

FuelSystem
Maintenance
EmptyingtheFuelTankand
CleaningtheFuelFilter
ServiceInterval:Yearly
Thefuellter(screen)elementislocatedinsidethefuel
tank.Cleanthefuellterelementyearly.
1.Stoptheengineandwaitforittocooldown.
Note:Draingasolinefromacoldengineonly.
2.Disconnectthewirefromthesparkplug(Figure11).
3.Disconnectthefuellinebylooseningthetubeclamp
atthecarburetor.
4.Openthefuelvalve.
5.Drainthegasolinecompletelyfromthetankandfuel
lineintoanapprovedfuelcontainer.
6.Removethefueltankfromthemower.
7.Pourasmallamountoffuelinthefueltank,move
thefuelaroundinthetank,andpouritoutintoan
approvedfuelcontainer.
8.Installthefueltankandfuelline;refertoInstalling
theFuelTankandtheFuelLine.
BladeMaintenance
MaintainingtheCuttingBlade
Alwaysmowwithasharpblade.Asharpbladecuts
cleanlyandwithouttearingorshreddingthegrassblades.
1.Stoptheengineandwaitforallmovingpartstostop.
2.Disconnectthewirefromthesparkplug(Figure11).
3.Drainthegasolinefromthefueltank;referto
EmptyingtheFuelTankandCleaningtheFuelFilter.
4.Tipthemowerontoitssidewiththeairlterup
(Figure29).
Figure29
InspectingtheBlade
ServiceInterval:Beforeeachuseordaily
Carefullyexaminethebladeforsharpnessandwear,
especiallywheretheatandthecurvedpartsmeet
(Figure30A).Becausesandandabrasivematerialcan
wearawaythemetalthatconnectstheatandcurved
partsoftheblade,checkthebladebeforeusingthe
mower.Ifyounoticeaslotorwear(Figure30Band
Figure30C),replacetheblade;refertoRemovingthe
Blade.
18

Figure30
1.Sail3.Wear
2.Flatpartoftheblade4.Slotformed
Note:Forthebestperformance,installanewblade
beforethecuttingseasonbegins.Duringtheyear,le
downanysmallnickstomaintainthecuttingedge.
Awornordamagedbladecanbreak,anda
pieceofthebladecouldbethrownintothe
operator’sorbystander’sarea,resultingin
seriouspersonalinjuryordeath.
•Inspectthebladeperiodicallyforwearor
damage.
•Replaceawornordamagedblade.
RemovingtheBlade
Grasptheendofthebladeusingaragorathickly
paddedglove.Removethebladebolt,accelerator,and
theblade(Figure29).
SharpeningtheBlade
Filethetopsideofthebladetomaintainitsoriginal
cuttingangle(Figure31A)andinnercuttingedgeradius
(Figure31B).Thebladewillremainbalancedifyou
removethesameamountofmaterialfrombothcutting
edges.
Figure31
1.Sharpenatthisangleonly.2.Maintaintheoriginalradius
here.
BalancingtheBlade
1.Checkthebalanceofthebladebyplacingthecenter
holeofthebladeoveranailorscrewdrivershank
clampedhorizontallyinavise(Figure32).
Figure32
Note:Youcanalsocheckthebalanceusinga
commerciallymanufacturedbladebalancer.
2.Ifeitherendofthebladerotatesdownward,lethat
end(notthecuttingedgeortheendnearthecutting
edge).Thebladeisproperlybalancedwhenneither
enddrops.
InstallingtheBlade
1.Installasharp,balancedToroblade,theaccelerator,
andthebladebolt.Torquethebladeboltto60
ft-lb(82N⋅ ⋅
⋅m).
2.Returnthemowertoitsoperatingposition.
3.Connectthewiretothesparkplug.
19

Cleaning
CleaningundertheMower
Housing
Toensurethebestperformance,keeptheundersideof
themowerhousingclean.
WashingMethod
ServiceInterval:Beforeeachuseordaily
1.Positionthemoweronaatconcreteorasphalt
surfacenearagardenhose.
2.Starttheengine.
3.Holdtherunninggardenhoseathandleleveland
directthewatertoowonthegroundjustinfront
oftherightrearwheel(Figure33).
Figure33
1.Rightrearwheel
Note:Thebladewillsplashintothepathofthe
blade,cleaningouttheclippings.
4.Stoptheengineandwaitforallmovingpartstostop.
5.Turnoffthewater.
6.Startthemowerandletitrunforafewminutes
todryoutthemoistureonthemowerandits
components.
ScrapingMethod
Ifwashingdoesnotremovealldebrisfromunderthe
mower,scrapeitclean.
1.Disconnectthewirefromthesparkplug(Figure11).
2.Drainthefuelfromthefueltank.RefertoEmptying
theFuelTankandCleaningtheFuelFilter.
Tippingthemowermaycausethefueltoleak
fromthecarburetororthefueltank.Gasoline
isextremelyammable,highlyexplosive,and,
undercertainconditions,cancausepersonal
injuryorpropertydamage.
Avoidfuelspillsbyrunningtheenginedryor
byremovingthegasolinewithahandpump;
neversiphon.
3.Tipthemowerontoitsrightside.
4.Removethedirtandgrassclippingswithahardwood
scraper.Avoidburrsandsharpedges.
5.Returnthemowertoitsoperatingposition.
6.Fillthefueltank.
7.Connectthewiretothesparkplug.
20
This manual suits for next models
2
Table of contents
Other Toro Lawn Mower manuals

Toro
Toro 74182 User manual

Toro
Toro Recycler 20961 User manual

Toro
Toro Reelmaster 3555 Series User manual

Toro
Toro 20899 User manual

Toro
Toro Recycler 20353 User manual

Toro
Toro 30518 User manual

Toro
Toro Z Master Z500 Series Manual

Toro
Toro LX500 User manual

Toro
Toro TimeCutter ZD Series Manual

Toro
Toro 31236 User manual

Toro
Toro SUPER RECYCLER 20055 User manual

Toro
Toro 03530 User manual

Toro
Toro 77505 User manual

Toro
Toro 73542 User manual

Toro
Toro ProLine 22026 User manual

Toro
Toro Greensmaster 800 User manual

Toro
Toro 4019 User manual

Toro
Toro Reelmaster 5410 User manual

Toro
Toro 20068 User manual

Toro
Toro Z334 Z Master Manual