Toro 75750W User manual

FormNo.3441-868RevA
TimeCutter®5000orMX5000
RidingMower
ModelNo.75750—SerialNo.407800000andUp
ModelNo.75750W—SerialNo.407150000andUp
ModelNo.75759—SerialNo.407700000andUp
Registeratwww.Toro.com.
OriginalInstructions(EN)*3441-868*

ItisaviolationofCaliforniaPublicResourceCode
Section4442or4443touseoroperatetheengineon
anyforest-covered,brush-covered,orgrass-covered
landunlesstheengineisequippedwithaspark
arrester,asdenedinSection4442,maintainedin
effectiveworkingorderortheengineisconstructed,
equipped,andmaintainedforthepreventionofre.
GrossorNetTorque:Thegrossornettorque
ofthisenginewaslaboratoryratedbytheengine
manufacturerinaccordancewiththeSocietyof
AutomotiveEngineers(SAE)J1940orJ2723.As
conguredtomeetsafety,emission,andoperating
requirements,theactualenginetorqueonthisclass
ofmowerwillbesignicantlylower.Pleasereferto
theenginemanufacturer’sinformationincludedwith
themachine.
Gotowww.T oro.comtoviewspecicationsonyour
model.
Theenclosedengineowner'smanualissupplied
forinformationregardingtheUSEnvironmental
ProtectionAgency(EPA)andtheCaliforniaEmission
ControlRegulationofemissionsystems,maintenance,
andwarranty.Replacementsmaybeorderedthrough
theenginemanufacturer.
WARNING
CALIFORNIA
Proposition65Warning
Theengineexhaustfromthisproduct
containschemicalsknowntotheStateof
Californiatocausecancer,birthdefects,
orotherreproductiveharm.
Batteryposts,terminals,andrelated
accessoriescontainleadandlead
compounds,chemicalsknownto
theStateofCaliforniatocause
cancerandreproductiveharm.Wash
handsafterhandling.
Useofthisproductmaycauseexposure
tochemicalsknowntotheStateof
Californiatocausecancer,birthdefects,
orotherreproductiveharm.
Introduction
Thisrotary-blade,ridinglawnmowerisintendedtobe
usedbyhomeownersinresidentialapplications.Itis
designedprimarilyforcuttinggrassonwell-maintained
lawns.Usingthisproductforpurposesotherthan
itsintendedusecouldprovedangeroustoyouand
bystanders.
Readthisinformationcarefullytolearnhowtooperate
andmaintainyourproductproperlyandtoavoid
injuryandproductdamage.Youareresponsiblefor
operatingtheproductproperlyandsafely.
Visitwww.Toro.comforproductsafetyandoperation
trainingmaterials,accessoryinformation,helpnding
adealer,ortoregisteryourproduct.
Wheneveryouneedservice,genuineToroparts,or
additionalinformation,contactanAuthorizedService
DealerorT oroCustomerServiceandhavethemodel
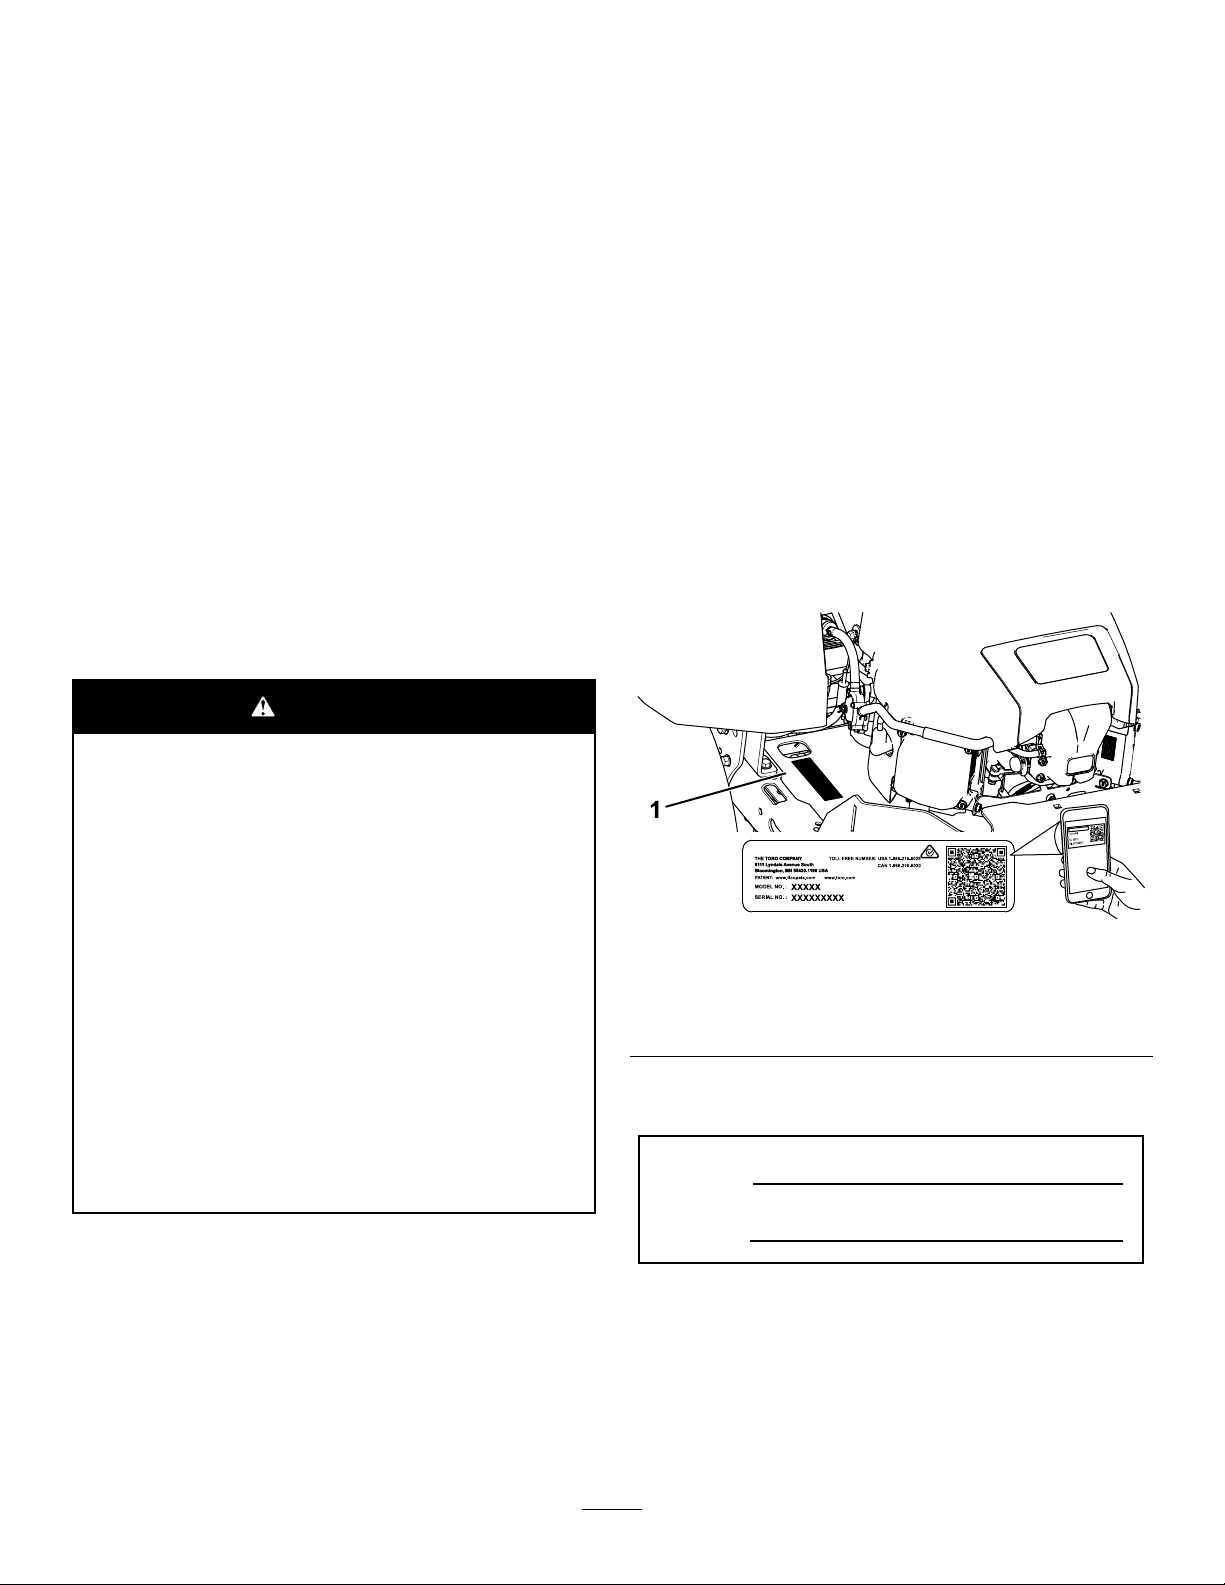
andserialnumbersofyourproductready.Figure1
identiesthelocationofthemodelandserialnumbers
ontheproduct.Writethenumbersinthespace
provided.
Important:Withyourmobiledevice,youcan
scantheQRcodeontheserialnumberdecal(if
equipped)toaccesswarranty,parts,andother
productinformation.
g297763
Figure1
Behindtheseat
1.Modelandserialnumberlocation
Writetheproductmodelandserialnumbersinthe
spacebelow:
ModelNo.
SerialNo.
Thismanualuses2wordstohighlightinformation.
Importantcallsattentiontospecialmechanical
informationandNoteemphasizesgeneralinformation
worthyofspecialattention.
Thesafety-alertsymbol(Figure2)appearsbothin
thismanualandonthemachinetoidentifyimportant
safetymessagesthatyoumustfollowtoavoid
©2020—TheToro®Company
8111LyndaleAvenueSouth
Bloomington,MN554202
Contactusatwww.Toro.com.
PrintedintheUSA
AllRightsReserved

accidents.Thissymbolwillappearwiththeword
Danger,Warning,orCaution.
•Dangerindicatesanimminentlyhazardous
situationwhich,ifnotavoided,willresultindeath
orseriousinjury.
•Warningindicatesapotentiallyhazardous
situationwhich,ifnotavoided,couldresultin
deathorseriousinjury.
•Cautionindicatesapotentiallyhazardoussituation
which,ifnotavoided,mayresultinminoror
moderateinjury.
sa-black
Figure2
1.Safety-alertsymbol
Contents
Safety.......................................................................4
GeneralSafety...................................................4
SlopeIndicator...................................................5
SafetyandInstructionalDecals..........................6
ProductOverview....................................................11
Controls...........................................................13
BeforeOperation.................................................14
BeforeOperationSafety...................................14
AddingFuel......................................................15
PerformingDailyMaintenance..........................16
BreakinginaNewMachine..............................16
UsingtheSafety-InterlockSystem....................16
PositioningtheSeat..........................................17
AdjustingtheMyRide™Suspension
System..........................................................17
AdjustingtheMotion-ControlLevers.................18
DuringOperation.................................................18
DuringOperationSafety...................................18
OperatingtheMowerBlade-ControlSwitch
(PTO)............................................................20
OperatingtheThrottle.......................................21
OperatingtheChoke.........................................21
StartingtheEngine...........................................21
ShuttingOfftheEngine.....................................22
UsingtheMotion-ControlLevers.......................22
DrivingtheMachine..........................................22
UsingtheSmartSpeedTMControl
System..........................................................23
UsingtheSideDischarge.................................24
AdjustingtheHeightofCut...............................24
AdjustingtheAnti-ScalpRollers........................25
OperatingTips.................................................25
AfterOperation....................................................26
AfterOperationSafety......................................26
PushingtheMachinebyHand..........................27
TransportingtheMachine.................................27
Maintenance...........................................................30
MaintenanceSafety..........................................30
RecommendedMaintenanceSchedule(s)...........30
Pre-MaintenanceProcedures..............................31
RaisingtheMachine.........................................31
Lubrication..........................................................31
GreasingtheBearings......................................31
EngineMaintenance...........................................32
EngineSafety...................................................32
ServicingtheAirCleaner..................................32
ServicingtheEngineOil....................................33
ServicingtheSparkPlug...................................35
CleaningtheCoolingSystem............................35
FuelSystemMaintenance...................................36
ReplacingtheIn-LineFuelFilter.......................36
ElectricalSystemMaintenance...........................37
ElectricalSystemSafety...................................37
ServicingtheBattery.........................................37
ServicingtheFuses..........................................38
DriveSystemMaintenance..................................39
3

CheckingtheTirePressure...............................39
ReleasingtheElectricBrake.............................39
AdjustingtheTracking......................................39
BeltMaintenance................................................40
InspectingtheBelts..........................................40
ReplacingtheMowerBelt.................................40
MowerMaintenance.............................................41
BladeSafety.....................................................41
ServicingtheCuttingBlades.............................41
LevelingtheMowerDeck..................................44
RemovingtheMowerDeck...............................46
InstallingtheMowerDeck.................................47
Cleaning..............................................................48
WashingtheUndersideoftheMower
Deck..............................................................48
DisposingofWaste...........................................48
Storage...................................................................49
StorageSafety..................................................49
CleaningandStorage.......................................49
StoringtheBattery............................................50
Troubleshooting......................................................51
Schematics.............................................................53
Safety
Thismachinehasbeendesignedinaccordancewith
ANSIB71.1-2017.
GeneralSafety
Thisproductiscapableofamputatinghandsand
feetandofthrowingobjects.Alwaysfollowallsafety
instructionstoavoidseriouspersonalinjury.
•Readandunderstandthecontentsofthis
Operator’sManualbeforestartingtheengine.
•Keepbystandersandchildrenaway.
•Donotallowchildrenoruntrainedpeopleto
operateorservicethemachine.Allowonlypeople
whoareresponsible,trained,familiarwiththe
instructions,andphysicallycapabletooperateor
servicethemachine.
•Donotoperatethemachineneardrop-offs,
ditches,embankments,water,orotherhazards,or
onslopesgreaterthan15°.
•Donotputyourhandsorfeetnearmoving
componentsofthemachine.
•Donotoperatethemachinewithoutallguards,
safetyswitches,andothersafetyprotective
devicesinplaceandfunctioningproperly.
•Shutofftheengine,removethekey,andwait
forallmovingpartstostopbeforeleavingthe
operator’sposition.Allowthemachinetocool
beforeservicing,adjusting,fueling,cleaning,or
storingit.
4

SlopeIndicator
g011841
Figure3
Youmaycopythispageforpersonaluse.
1.Themaximumslopeyoucanoperatethemachineonis15degrees.Usetheslopecharttodeterminethedegreeofslopeof
hillsbeforeoperating.Donotoperatethismachineonaslopegreaterthan15degrees.Foldalongtheappropriateline
tomatchtherecommendedslope.
2.Alignthisedgewithaverticalsurface,atree,building,fencepole,etc.
3.Exampleofhowtocompareslopewithfoldededge
5

SafetyandInstructionalDecals
Safetydecalsandinstructionsareeasilyvisibletotheoperatorandarelocatednearanyarea
ofpotentialdanger.Replaceanydecalthatisdamagedormissing.
decalbatterysymbols
BatterySymbols
Someorallofthesesymbolsareonyourbattery.
1.Explosionhazard6.Keepbystandersaway
fromthebattery.
2.Nore,opename,or
smoking
7.Weareyeprotection;
explosivegasescan
causeblindnessandother
injuries.
3.Causticliquid/chemical
burnhazard
8.Batteryacidcancause
blindnessorsevereburns.
4.Weareyeprotection.9.Flusheyesimmediately
withwaterandgetmedical
helpfast.
5.ReadtheOperator's
Manual.
10.Containslead;donot
discard
decaloemmarkt
Manufacturer'sMark
1.Thismarkindicatesthatthebladeisidentiedasapart
fromtheoriginalmachinemanufacturer.
decal93-7009
93-7009
1.Warning—donotoperatethemowerwiththedeectorup
orremoved;keepthedeectorinplace.
2.Cutting/dismembermenthazardofhandorfoot,mower
blade—stayawayfrommovingparts.
decal99-3943
99-3943
1.Beltrouting
2.Engine
decal112-9840
112-9840
1.ReadtheOperator's
Manual.
3.Removetheignitionkey
andreadtheinstructions
beforeservicingor
performingmaintenance.
2.Heightofcut
6

decal121-2989b
121-2989
1.Bypassleverpositionfor
pushingthemachine
2.Bypassleverpositionfor
operatingthemachine
decal132-0872
132-0872
1.Thrownobject
hazard—keepbystanders
awayfromthemachine.
3.Severinghazardofhand
orfoot—keepawayfrom
movingparts.
2.Thrownobjecthazard,
raiseddeector—donot
operatethemachinewith
anopendeck;usea
baggeroradeector.
4.Entanglement
hazard—keepaway
frommovingparts;keep
allguardsandshieldsin
place.
decal133-8062
133-8062
decal138-2456
138-2456
1.ReadtheOperator’s
Manual.
3.Donotoverllthefuel
tank.
2.Parkthemachineona
levelsurfacewhenlling
thefueltank.
decal139-2388
139-2388
1.Slow3.Fast
2.Hauling
decal139-2391
139-2391
1.Fast2.Slow
7

decal139-2392
139-2392
decal139-2394
139-2394
1.Tractioncontrols4.Neutral
2.Fast5.Reverse
3.Slow6.Parkingbrake
decal139-2395
139-2395
1.Parkingbrake4.Neutral
2.Fast5.Reverse
3.Slow6.Tractioncontrols
8

Decal132-0869isformodelswithMyRideonly.
decal132-0869
132-0869
Note:Thismachinecomplieswiththeindustrystandardstabilitytestinthestaticlateralandlongitudinaltestswiththemaximum
recommendedslopeindicatedonthedecal.ReviewtheinstructionsforoperatingthemachineonslopesintheOperator’sManualas
wellastheconditionsinwhichyouwouldoperatethemachinetodeterminewhetheryoucanoperatethemachineintheconditionson
thatdayandatthatsite.Changesintheterraincanresultinachangeinslopeoperationforthemachine.
1.Warning—readthe
Operator'sManual.
3.Cutting/dismemberment
hazardofthehand,mower
blade;entanglement
hazardofthehand,
belt—stayawayfrom
movingparts;keepall
guardsandshieldsinplace.
5.Tippinghazard—donot
usedualrampswhen
loadingontoatrailer;use
1rampwideenoughfor
themachine;usearamp
withaslopelessthan15°;
backuptherampwhen
loadingthemachineand
driveforwardofftheramp
whenunloading.
7.Tippinghazard—donotuse
themachineneardrop-offs
oronslopesgreaterthan
15°;onlyoperateacross
slopeslessthan15°.
2.Warning—readthe
Operator'sManualbefore
performingmaintenance;
engagetheparkingbrake,
removethekey,and
disconnectthesparkplug.
4.Thrownobject
hazard—keepbystanders
away;pickupdebris
beforeoperating;keepthe
deectorinplace.
6.Runoverhazard—donot
carrypassengers;look
behindyouwhenmowing
inreverse.
9

Decal135-3295isformodelswithoutMyRideonly.
decal135-3295
135-3295
Note:Thismachinecomplieswiththeindustrystandardstabilitytestinthestaticlateralandlongitudinaltestswiththemaximum
recommendedslopeindicatedonthedecal.ReviewtheinstructionsforoperatingthemachineonslopesintheOperator’sManualas
wellastheconditionsinwhichyouwouldoperatethemachinetodeterminewhetheryoucanoperatethemachineintheconditionson
thatdayandatthatsite.Changesintheterraincanresultinachangeinslopeoperationforthemachine.
1.Warning—readtheOperator'sManual.4.Runoverhazard—donotcarrypassengers;lookbehindyou
whenmovinginreverse.
2.Cutting/dismembermenthazardofhand,mowerblade;
entanglementhazardofhand,belt—stayawayfrommoving
parts;keepallguardsandshieldsinplace.
5.Tippinghazard—whenloadingontoatrailer,donotuse
dualramps;onlyuseasingularrampwideenoughforthe
machine;donotusearampwithaslopegreaterthan15°;
backuptheramp(inreverse)anddriveforwardofftheramp.
3.Thrownobjecthazard—keepbystandersaway;pickupdebris
beforemowing;keepthedeectorshieldlowered.
6.Tippinghazard—donotusethemachineneardrop-offsor
onslopesgreaterthan15°;onlyoperateacrossslopesless
than15°.
10

ProductOverview
g298516
Figure4
ModelswithMyRide
1.Engine4.Motion-controllevers7.Deck-liftpedal10.Reardrivewheel
2.Operatorseat5.Frontcasterwheel8.Height-of-cutlever11.Controlpanel
3.Fuel-tankcap6.SmartSpeed™lever9.Deector12.MyRide™adjustmentlever
11

g299962
Figure5
ModelswithoutMyRide
1.Deck-liftpedal4.Motion-controllevers7.Fuel-tankcap10.Deector
2.SmartSpeed™lever5.Controlpanel8.Anti-scalproller
3.Height-of-cutlever6.Engine9.Frontcasterwheel
12

Controls
Becomefamiliarwithallthecontrolsbeforeyoustart
theengineandoperatethemachine.
ControlPanel
g293303
Figure6
1.Throttlecontrol3.Blade-controlswitch
(powertakeoff)
2.Chokecontrol4.Keyswitch
KeySwitch
Thekeyswitch,usedtostartandshutofftheengine,
has3positions:OFF,RUN,andSTART(Figure6).
RefertoStartingtheEngine(page21).
ThrottleControl
Thethrottlecontrolstheenginespeed,andithasa
continuous-variablesettingfromtheSLOWtoFAST
position(Figure6).
ChokeControl
Usethechokecontroltostartacoldengine(Figure6).
Blade-ControlSwitch(Power
Takeoff)
Theblade-controlswitch,representedbya
power-takeoff(PTO)symbol,engagesand
disengagespowertothemowerblades(Figure6).
Motion-ControlLevers
Usethemotion-controlleverstodrivethemachine
forward,reverse,andturneitherdirection(Figure5).
ParkPosition
Movethemotion-controlleversoutwardfromthe
centertothePARKpositionwhenexitingthemachine
toengagetheelectricbrake(Figure22).Always
positionthemotion-controlleversintothePARK
positionwhenyoustopthemachineorleaveit
unattended.
MyRide™AdjustmentLever
ForMachineswiththeMyRide™Suspension
System
UsetheMyRide™adjustmentlevertoadjusttheseat
suspension(Figure4).
SmartSpeed™ControlSystem
Lever
TheSmartSpeed™Control-Systemlever,located
belowtheoperatingposition,givesyouachoiceto
drivethemachineat3speedranges—trim,tow,and
mow(Figure25).
Fuel-PresenceWindow
Youcanusethefuelwindow,locatedontheleftside
ofthemachine,toverifythepresenceoffuelinthe
tank(Figure7).
g292100
Figure7
1.Fuel-presencewindow
13

Height-of-CutLever
Usetheheight-of-cutlevertolowerandraisethedeck
fromtheseatedposition.Movingtheleverup(toward
you)raisesthedeckfromthegroundandmovingthe
leverdown(awayfromyou)lowersthedecktoward
theground.Adjusttheheight-of-cutonlywhilethe
machineisnotmoving(Figure26).
FootPedalDeck-LiftSystem
Thefootpedaldeck-liftsystemallowsyoutolower
andraisethedeckfromtheseatedposition.You
canusethefootpedaltoliftthedeckbrieytoavoid
obstacles(Figure4).
Attachments/Accessories
AselectionofToroapprovedattachmentsand
accessoriesisavailableforusewiththemachine
toenhanceandexpanditscapabilities.Contact
yourAuthorizedServiceDealerorauthorizedToro
distributororgotowww.T oro.comforalistofall
approvedattachmentsandaccessories.
Toensureoptimumperformanceandcontinuedsafety
certicationofthemachine,useonlygenuineT oro
replacementpartsandaccessories.Replacement
partsandaccessoriesmadebyothermanufacturers
couldbedangerous,andsuchusecouldvoidthe
productwarranty.
Operation
Note:Determinetheleftandrightsidesofthe
machinefromthenormaloperatingposition.
BeforeOperation
BeforeOperationSafety
GeneralSafety
•Donotallowchildrenoruntrainedpeopleto
operateorservicethemachine.Localregulations
mayrestricttheageoftheoperator.Theowner
isresponsiblefortrainingalloperatorsand
mechanics.
•Inspecttheareawhereyouwillusethemachine,
andremoveallobjectsthatcouldinterferewith
theoperationofthemachineorthatthemachine
couldthrow.
•Becomefamiliarwiththesafeoperationofthe
equipment,operatorcontrols,andsafetysigns.
•Checkthatoperator-presencecontrols,safety
switches,andguardsareattachedandworking
properly.Donotoperatethemachineunlessthey
arefunctioningproperly.
•Shutofftheengine,removethekey,andwait
forallmovingpartstostopbeforeleavingthe
operator’sposition.Allowthemachinetocool
beforeservicing,adjusting,fueling,cleaning,or
storingit.
•Beforemowing,inspectthemachinetoensure
thatthecuttingassembliesareworkingproperly.
•Evaluatetheterraintodeterminetheappropriate
equipmentandanyattachmentsoraccessories
requiredtooperatethemachineproperlyand
safely.
•Wearappropriateclothing,includingeye
protection;longpants;substantial,slip-resistant
footwear;andhearingprotection.Tiebacklong
hairanddonotwearlooseclothingorloose
jewelry.
•Donotcarrypassengersonthemachine.
•Keepbystandersandpetsawayfromthemachine
duringoperation.Shutoffthemachineand
attachment(s)ifanyoneentersthearea.
•Donotoperatethemachineunlessallguardsand
safetydevices,suchasthedeectorsandthe
entiregrasscatcher,areinplaceandfunctioning
properly.Replacewornordeterioratedpartswhen
necessary.
14

FuelSafety
•Fuelisextremelyammableandhighlyexplosive.
Areorexplosionfromfuelcanburnyouand
othersandcandamageproperty.
–Topreventastaticchargefromignitingthefuel,
placethecontainerand/ormachinedirectlyon
thegroundbeforelling,notinavehicleoron
anobject.
–Fillthefueltankoutdoorsonlevelground,in
anopenarea,andwhentheengineiscold.
Wipeupanyfuelthatspills.
–Donothandlefuelwhensmokingoraroundan
openameorsparks.
–Donotremovethefuelcaporaddfueltothe
tankwhiletheengineisrunningorhot.
–Ifyouspillfuel,donotattempttostartthe
engine.Avoidcreatingasourceofignitionuntil
thefuelvaporshavedissipated.
–Storefuelinanapprovedcontainerandkeep
itoutofthereachofchildren.
•Fuelisharmfulorfatalifswallowed.Long-term
exposuretovaporscancauseseriousinjuryand
illness.
–Avoidprolongedbreathingofvapors.
–Keepyourhandsandfaceawayfromthe
nozzleandthefuel-tankopening.
–Keepfuelawayfromyoureyesandskin.
•Donotstorethemachineorfuelcontainerwhere
thereisanopename,spark,orpilotlight,such
asonawaterheateroronotherappliances.
•Donotllcontainersinsideavehicleoronatruck
ortrailerbedwithaplasticliner.Alwaysplace
containersonthegroundandawayfromyour
vehiclebeforelling.
•Removetheequipmentfromthetruckortrailer
andrefuelitwhileitisontheground.Ifthisisnot
possible,thenrefuelfromaportablecontainer
ratherthanfromafuel-dispensernozzle.
•Donotoperatethemachinewithouttheentire
exhaustsysteminplaceandinproperworking
condition.
•Keepthefuel-dispensernozzleincontactwith
therimofthefueltankorcontaineropeningat
alltimesuntilfuelingiscomplete.Donotusea
nozzlelock-opendevice.
•Ifyouspillfuelonyourclothing,changeyour
clothingimmediately.
•Donotoverllthefueltank.Replacethefuelcap
andtightenitsecurely.
•Cleangrassanddebrisfromthecuttingunit,
mufer,drives,grasscatcher,andengine
compartmenttohelppreventres.Cleanupoilor
fuelspills.
AddingFuel
RecommendedFuel
TypeUnleadedgasoline
Minimumoctanerating87(US)or91(research
octane;outsidetheUS)
EthanolNomorethan10%byvolume
MethanolNone
MTBE(methyltertiarybutyl
ether)
Lessthan15%byvolume
OilDonotaddtothefuel
Useonlyclean,fresh(nomorethan30daysold),fuel
fromareputablesource.
UsingStabilizer/Conditioner
Usefuelstabilizer/conditionerinthemachinetokeep
thefuelfreshlongerwhenusedasdirectedbythe
fuel-stabilizermanufacturer.
Important:Donotusefueladditivescontaining
methanolorethanol.
Addtheamountoffuelstabilizer/conditionertofresh
fuelasdirectedbythefuel-stabilizermanufacturer.
FillingtheFuelTank
1.Parkthemachineonalevelsurface.
2.Movethemotion-controlleversoutwardtothe
PARKposition.
3.Shutofftheengineandremovethekey.
4.Cleanaroundthefuel-tankcap.
5.Fillthefueltanktothebottomofthellerneck
(Figure8).
Note:Donotllthefueltankcompletelyfull.
Theemptyspaceinthetankallowsthefuelto
expand.
15

g293796
Figure8
PerformingDaily
Maintenance
Beforestartingthemachineeachday,performthe
EachUse/DailyprocedureslistedinMaintenance
(page30).
BreakinginaNewMachine
Newenginestaketimetodevelopfullpower.Mower
decksanddrivesystemshavehigherfrictionwhen
new,placingadditionalloadontheengine.Allow
40to50hoursofbreak-intimefornewmachinesto
developfullpowerandbestperformance.
UsingtheSafety-Interlock
System
WARNING
Ifthesafety-interlockswitchesare
disconnectedordamaged,themachinecould
operateunexpectedly,causingpersonal
injury.
•Donottamperwiththeinterlockswitches.
•Checktheoperationoftheinterlock
switchesdailyandreplaceanydamaged
switchesbeforeoperatingthemachine.
Understandingthe
Safety-InterlockSystem
Thesafety-interlocksystemisdesignedtopreventthe
enginefromstartingunless:
•Theblade-controlswitch(PTO)isdisengaged.
•Themotion-controlleversareinthePARKposition.
Thesafety-interlocksystemalsoisdesignedtoshut
offtheenginewheneverthecontrolleversareoutof
thePARKpositionandyourisefromtheseat.
TestingtheSafety-Interlock
System
Testthesafety-interlocksystembeforeyouusethe
machineeachtime.Ifthesafetysystemdoesnot
operateasdescribedbelow,haveanAuthorized
ServiceDealerrepairthesafetysystemimmediately.
1.Sitontheseat,movethemotion-controllevers
inthePARKposition,andmovetheblade-control
switchtotheONposition.Trystartingthe
engine;theengineshouldnotcrank.
2.Sitontheseatandmovetheblade-controlswitch
totheOFFposition.Moveeithermotion-control
levertothecenter,unlockedposition.Try
startingtheengine;theengineshouldnotcrank.
Repeatwiththeothermotion-controllever.
3.Sitontheseat,movetheblade-controlswitch
totheOFFposition,andlockthemotion-control
leversinthePARKposition.Starttheengine.
Whiletheengineisrunning,engagethe
blade-controlswitch,andriseslightlyfromthe
seat;theengineshouldshutoff.
4.Sitontheseat,movetheblade-controlswitch
totheOFFposition,andlockthemotion-control
leversinthePARKposition.Starttheengine.
Whiletheengineisrunning,movethe
motion-controlleverstothecenter,unlocked
positionandriseslightlyfromtheseat;the
engineshouldshutoff.
16

PositioningtheSeat
Theseatcanmoveforwardandbackward.Position
theseatwhereyouhavethebestcontrolofthe
machineandaremostcomfortable(Figure9orFigure
10).
g027632
Figure9
MachineswithMyRide
g293874
Figure10
MachineswithoutMyRide
AdjustingtheMyRide™
SuspensionSystem
MachineswithMyRideOnly
TheMyRide™suspensionsystemadjuststoprovidea
smoothandcomfortableride.Positionthesuspension
systemwhereyouaremostcomfortable.
Theslotsforthesuspensionadjustmenthavedetent
positionsforreference.
Thefollowinggraphicshowsthepositionforasoftor
rmrideandthedifferentdetentpositions(Figure11).
1.Parkthemachineonalevelsurface,disengage
theblade-controlswitch,andmovethe
motion-controlleversoutwardtothePARK
position.
2.Shutofftheengine,removethekey,andwait
forallmovingpartstostopbeforeleavingthe
operatingposition.
3.Stepoffthemachine.
4.Whilestandingontherightsideofthemachine,
movetheadjustmentleverlefttowardthe–
symboltodecreasetheseatsuspension.
Movetheadjustmentleverrighttowardthe+
symboltoincreasetheseatsuspension.
g292102
Figure11
1.MyRideadjustmentlever3.Increaseseatsuspension
2.Decreaseseatsuspension
17

Adjustingthe
Motion-ControlLevers
AdjustingtheHeight
Youcanadjustthemotion-controllevershigheror
lowerformaximumcomfort(Figure12).
g333847
Figure12
AdjustingtheTilt
Youcanadjustthemotion-controlleversforwardor
rearwardforyourcomfort.
1.Loosentheupperboltholdingthecontrollever
tothecontrol-armshaft.
2.Loosenthelowerboltjustenoughtopivotthe
controlleverforwardorrearward.
g333846
Figure13
3.Tightenbothboltstosecurethecontrolleverin
thenewposition.
4.Repeattheadjustmentfortheothercontrollever.
DuringOperation
DuringOperationSafety
GeneralSafety
•Theowner/operatorcanpreventandisresponsible
foraccidentsthatmaycausepersonalinjuryor
propertydamage.
•Useyourfullattentionwhileoperatingthe
machine.Donotengageinanyactivitythat
causesdistractions;otherwise,injuryorproperty
damagemayoccur.
•Donotoperatethemachinewhileill,tired,or
undertheinuenceofalcoholordrugs.
•Contactingthebladecanresultinseriouspersonal
injury.Shutofftheengine,removethekey,and
waitforallmovingpartstostopbeforeleavingthe
operatingposition.Whenyouturnthekeytothe
OFFposition,theengineshouldshutoffandthe
bladeshouldstop.Ifnot,stopusingyourmachine
immediatelyandcontactanAuthorizedService
Dealer.
•Operatethemachineonlyingoodvisibilityand
appropriateweatherconditions.Donotoperate
themachinewhenthereistheriskoflightning.
•Keepyourhandsandfeetawayfromthecutting
units.Keepclearofthedischargeopening.
•Donotmowwiththedischargedeector
raised,removed,oralteredunlessthereisa
grass-collectionsystemormulchkitinplaceand
workingproperly.
•Donotmowinreverseunlessitisabsolutely
necessary.Alwayslookdownandbehindyou
beforemovingthemachineinreverse.
•Useextremecarewhenapproachingblind
corners,shrubs,trees,orotherobjectsthatmay
blockyourview.
•Stopthebladeswheneveryouarenotmowing.
•Ifthemachinestrikesanobjectorstartstovibrate,
immediatelyshutofftheengine,removethekey
(ifequipped),andwaitforallmovingpartstostop
beforeexaminingthemachinefordamage.Make
allnecessaryrepairsbeforeresumingoperation.
•Slowdownandusecautionwhenmakingturns
andcrossingroadsandsidewalkswiththe
machine.Alwaysyieldtheright-of-way.
•Beforeyouleavetheoperatingposition,dothe
following:
–Parkthemachineonalevelsurface.
–Disengagethepowertakeoffandlowerthe
attachments.
–Engagetheparkingbrake.
18

–Shutofftheengineandremovethekey.
–Waitforallmovingpartstostop.
•Operatetheengineonlyinwell-ventilatedareas.
Exhaustgasescontaincarbonmonoxide,which
islethalifinhaled.
•Neverleavearunningmachineunattended.
•Attachtowedequipmenttothemachineonlyat
thehitchpoint.
•Donotoperatethemachineunlessallguardsand
safetydevices,suchasthedeectorsandthe
entiregrasscatcher,areinplaceandfunctioning
properly.Replacewornordeterioratedpartswhen
necessary.
•Useonlyaccessoriesandattachmentsapproved
byT oro.
•Thismachineproducessoundlevelsinexcess
of85dBAattheoperator’searandcancause
hearinglossthroughextendedperiodsof
exposure.
g229846
Figure14
1.Wearhearingprotection.
•Cleangrassanddebrisfromthecuttingunit,
drives,mufer,andenginetohelppreventres.
•Starttheenginewithyourfeetwellawayfromthe
blades.
•Neverraisethemowerdeckwhilethebladesare
moving.
•Beawareofthemowerdischargepathanddirect
thedischargeawayfromothers.Avoiddischarging
materialagainstawallorobstructionbecausethe
materialmayricochetbacktowardyou.
•Stoptheblades,slowdownthemachine,anduse
cautionwhencrossingsurfacesotherthangrass
orwhentransportingthemachinetoandfromthe
operatingarea.
•Donotchangetheenginegovernorspeedor
overspeedtheengine.
•Childrenareoftenattractedtothemachineand
themowingactivity.Neverassumethatchildren
willremainwhereyoulastsawthem.
•Keepchildrenoutoftheoperatingareaandunder
thewatchfulcareofaresponsibleadultotherthan
theoperator.
•Bealertandshutoffthemachineifchildrenenter
theoperatingarea.
•Beforebackinguporturningthemachine,look
downandallaroundforsmallchildren.
•Donotcarrychildrenonthemachine,evenwhen
thebladesarenotmoving.Childrencouldfall
offandbeseriouslyinjuredorpreventyoufrom
safelyoperatingthemachine.Childrenwhohave
beengivenridesinthepastcouldappearinthe
operatingareawithoutwarningandberunoveror
backedoverbythemachine.
SlopeSafety
•Slopesareamajorfactorrelatedtolossofcontrol
androlloveraccidents,whichcanresultinsevere
injuryordeath.Theoperatorisresponsiblefor
safeslopeoperation.Operatingthemachineon
anysloperequiresextracaution.Beforeusingthe
machineonaslope,dothefollowing:
–Reviewandunderstandtheslopeinstructions
inthemanualandonthemachine.
–Useanangleindicatortodeterminethe
approximateslopeangleofthearea.
–Neveroperateonslopesgreaterthan15°.
–Evaluatethesiteconditionsofthedayto
determineiftheslopeissafeformachine
operation.Usecommonsenseandgood
judgmentwhenperformingthisevaluation.
Changesintheterrain,suchasmoisture,can
quicklyaffecttheoperationofthemachineon
aslope.
•Identifyhazardsatthebaseoftheslope.Do
notoperatethemachineneardrop-offs,ditches,
embankments,water,orotherhazards.The
machinecouldsuddenlyrolloverifawheelgoes
overtheedgeortheedgecollapses.Keepasafe
distance(twicethewidthofthemachine)between
themachineandanyhazard.Useawalk-behind
machineorahandtrimmertomowthegrassin
theseareas.
•Avoidstarting,stopping,orturningthemachineon
slopes.Avoidmakingsuddenchangesinspeedor
direction;turnslowlyandgradually.
•Donotoperateamachineunderanyconditions
wheretraction,steering,orstabilityisinquestion.
Beawarethatoperatingthemachineonwet
grass,acrossslopes,ordownhillmaycausethe
machinetolosetraction.Lossoftractiontothe
drivewheelsmayresultinslidingandalossof
brakingandsteering.Themachinecanslideeven
ifthedrivewheelsarestopped.
•Removeormarkobstaclessuchasditches,holes,
ruts,bumps,rocks,orotherhiddenhazards.Tall
grasscanhideobstacles.Uneventerraincould
overturnthemachine.
•Useextracarewhileoperatingwithaccessoriesor
attachments,suchasgrass-collectionsystems.
19

Thesecanchangethestabilityofthemachine
andcausealossofcontrol.Followdirectionsfor
counterweights.
•Ifpossible,keepthedeckloweredtotheground
whileoperatingonslopes.Raisingthedeckwhile
operatingonslopescancausethemachineto
becomeunstable.
g229111
Figure15
1.SafeZone—usethe
machinehereonslopes
lessthan15°oratareas.
4.W=Widthofthemachine
2.DangerZone—usea
walk-behindmowerand/or
ahandtrimmeronslopes
greaterthan15°andnear
drop-offsorwater.
5.Keepasafedistance
(twicethewidthofthe
machine)betweenthe
machineandanyhazard.
3.Water
TowingSafety
•Donotattachtowedequipmentexceptatthehitch
point.
•Donotusethemachineasatowingvehicleunless
ithasahitchinstalled.
•Donotexceedtheweightlimitsfortowed
equipmentandtowingonslopes.Thetowed
weightmustnotexceedtheweightofthemachine
andoperator.
•Neverallowchildrenorothersnearthetowed
equipment.
•Onslopes,theweightofthetowedequipmentmay
causelossoftraction,increasedriskofrollover,
andlossofcontrol.Reducethetowedweightand
slowdown.
•Thestoppingdistancemayincreasewiththe
weightofatowedload.Travelslowlyandallow
extradistancetostop.
•Makewideturnstokeeptheattachmentclearof
themachine.
OperatingtheMower
Blade-ControlSwitch(PTO)
Theblade-controlswitch(PTO)startsandstopsthe
mowerbladesandanypoweredattachments.
EngagingtheBlade-Control
Switch(PTO)
g008945
Figure16
Note:Alwaysengagethebladeswiththethrottlein
theFASTposition(Figure17).
g295538
Figure17
DisengagingtheBlade-Control
Switch(PTO)
g009174
Figure18
20
This manual suits for next models
4
Table of contents
Other Toro Lawn Mower manuals

Toro
Toro 22172 User manual

Toro
Toro 03673 Reelmaster 5410-G User manual

Toro
Toro LX427 User manual

Toro
Toro 30856 User manual

Toro
Toro Recycler 21311 User manual

Toro
Toro 20816 User manual

Toro
Toro 30308 User manual

Toro
Toro 30672 User manual

Toro
Toro GreensPro 1260 Greens Roller User manual

Toro
Toro 78216 User manual

Toro
Toro Groundsmaster 4000 Series User manual

Toro
Toro 25433 User manual

Toro
Toro 22045 User manual

Toro
Toro GrandStand Revolution Manual

Toro
Toro GrandStand 74536 Manual

Toro
Toro Recycler 20372 User manual

Toro
Toro 20049 User manual

Toro
Toro Recyler 20353 User manual

Toro
Toro 04353 Greensmaster 3100 User manual

Toro
Toro 16-38XL Wheel Horse User manual