Toro HoverPro 550 User manual

FormNo.3448-560RevA
HoverPro®550Machine
02617
HoverPro®550-Maschine
02617
MáquinaHoverPro®550
02617
TondeuseHoverPro®550
02617
HoverPro®550machine
02617
www.T oro.com.*3448-560*


FormNo.3448-536RevA
HoverPro®550Machine
ModelNo.02617—SerialNo.400000000andUp
Registeratwww.Toro.com.
OriginalInstructions(EN)*3448-536*

ThisproductcomplieswithallrelevantEuropean
directives.Fordetails,seetheseparateproduct
specicDeclarationofConformity(DOC)sheet.
GrossorNetTorque:Thegrossornettorque
ofthisenginewaslaboratoryratedbytheengine
manufacturerinaccordancewiththeSocietyof
AutomotiveEngineers(SAE)J1940orJ2723.As
conguredtomeetsafety,emission,andoperating
requirements,theactualenginetorqueonthisclass
ofmowerwillbesignicantlylower.Pleasereferto
theenginemanufacturer’sinformationincludedwith
themachine.
Introduction
Thismachineisintendedtobeusedbyhired,
commercialoperatorsandresidentialhomeownersfor
maintainingturfonslopes,tightundulations,areas
nearwater,orbunkerlips.Usingthisproductfor
purposesotherthanitsintendedusecouldprove
dangeroustoyouandbystanders.
Readthisinformationcarefullytolearnhowtooperate
andmaintainyourproductproperlyandtoavoid
injuryandproductdamage.Youareresponsiblefor
operatingtheproductproperlyandsafely.
Visitwww.https://www.toro.com/en-GBformore
information,includingsafetytips,trainingmaterials,
accessoryinformation,helpndingadealer,orto
registeryourproduct.
Wheneveryouneedservice,genuineToroparts,or
additionalinformation,contactanAuthorizedService
DealerorToroCustomerServiceandhavethemodel
andserialnumbersofyourproductready.Figure1
identiesthelocationofthemodelandserialnumbers
ontheproduct.Writethenumbersinthespace
provided.
Important:Withyourmobiledevice,youcan
scantheQRcodeontheserialnumberdecal(if
equipped)toaccesswarranty,parts,andother
productinformation.
g364631
Figure1
1.Modelandserialnumberlocation
Writetheproductmodelandserialnumbersinthe
spacebelow:
ModelNo.
SerialNo.
Thismanualidentiespotentialhazardsandhas
safetymessagesidentiedbythesafety-alertsymbol
(Figure2),whichsignalsahazardthatmaycause
seriousinjuryordeathifyoudonotfollowthe
recommendedprecautions.
g000502
Figure2
Safety-alertsymbol
Thismanualuses2wordstohighlightinformation.
Importantcallsattentiontospecialmechanical
informationandNoteemphasizesgeneralinformation
worthyofspecialattention.
©2021—TheToro®Company
8111LyndaleAvenueSouth
Bloomington,MN554202
Contactusatwww.Toro.com.
PrintedintheUK
AllRightsReserved

Contents
Safety.......................................................................3
GeneralSafety...................................................3
SafetyandInstructionalDecals..........................4
Setup........................................................................5
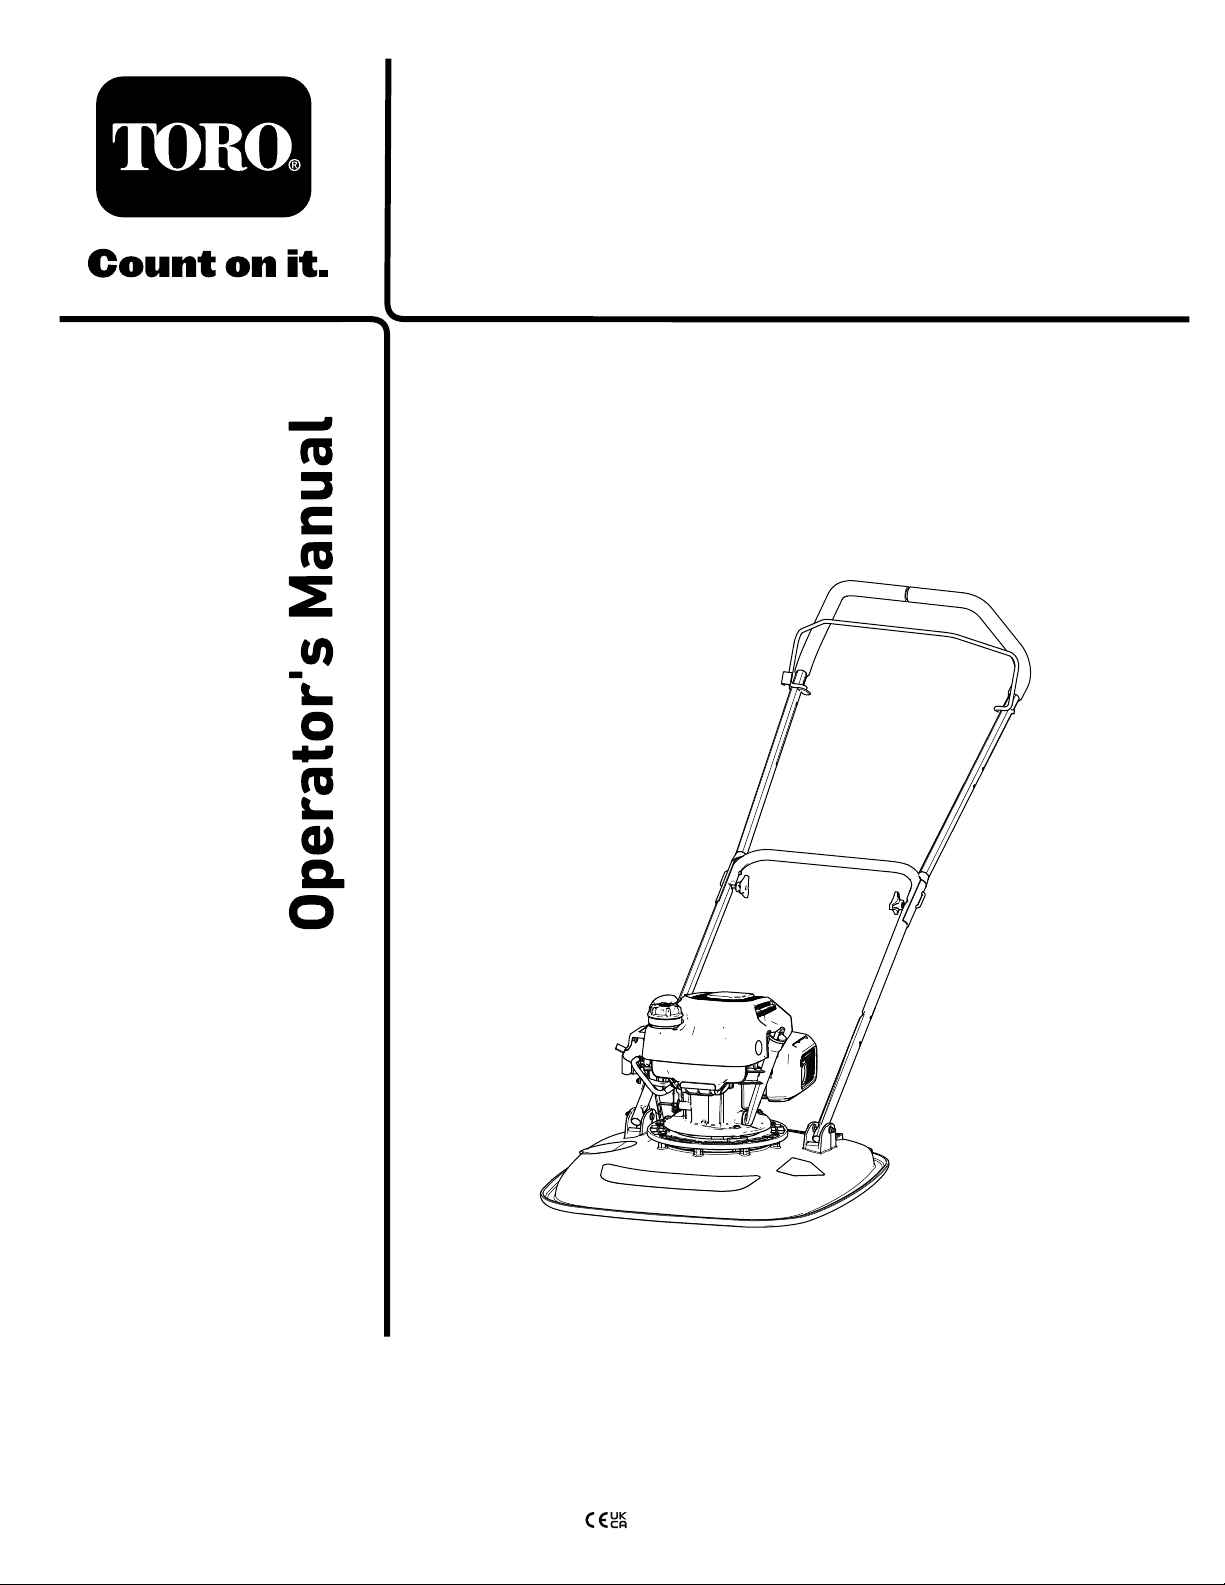
1InstallingtheHandlebarFootstop.....................5
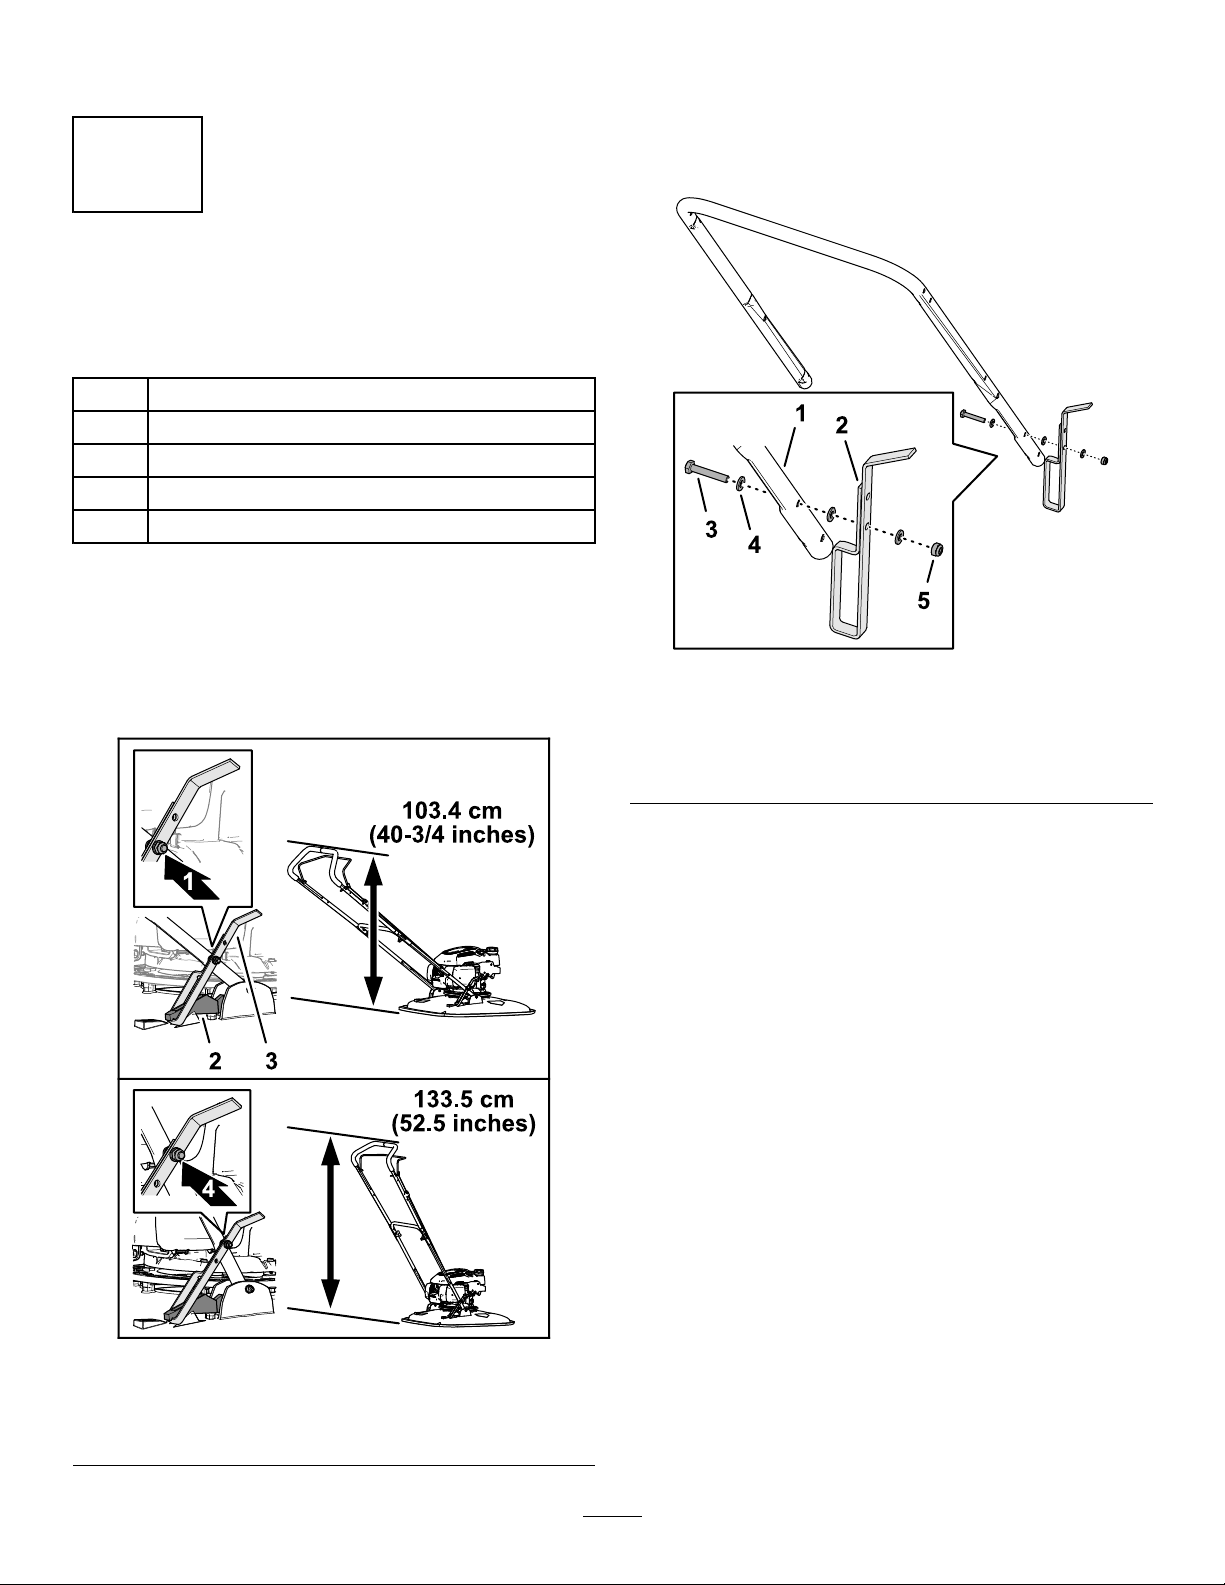
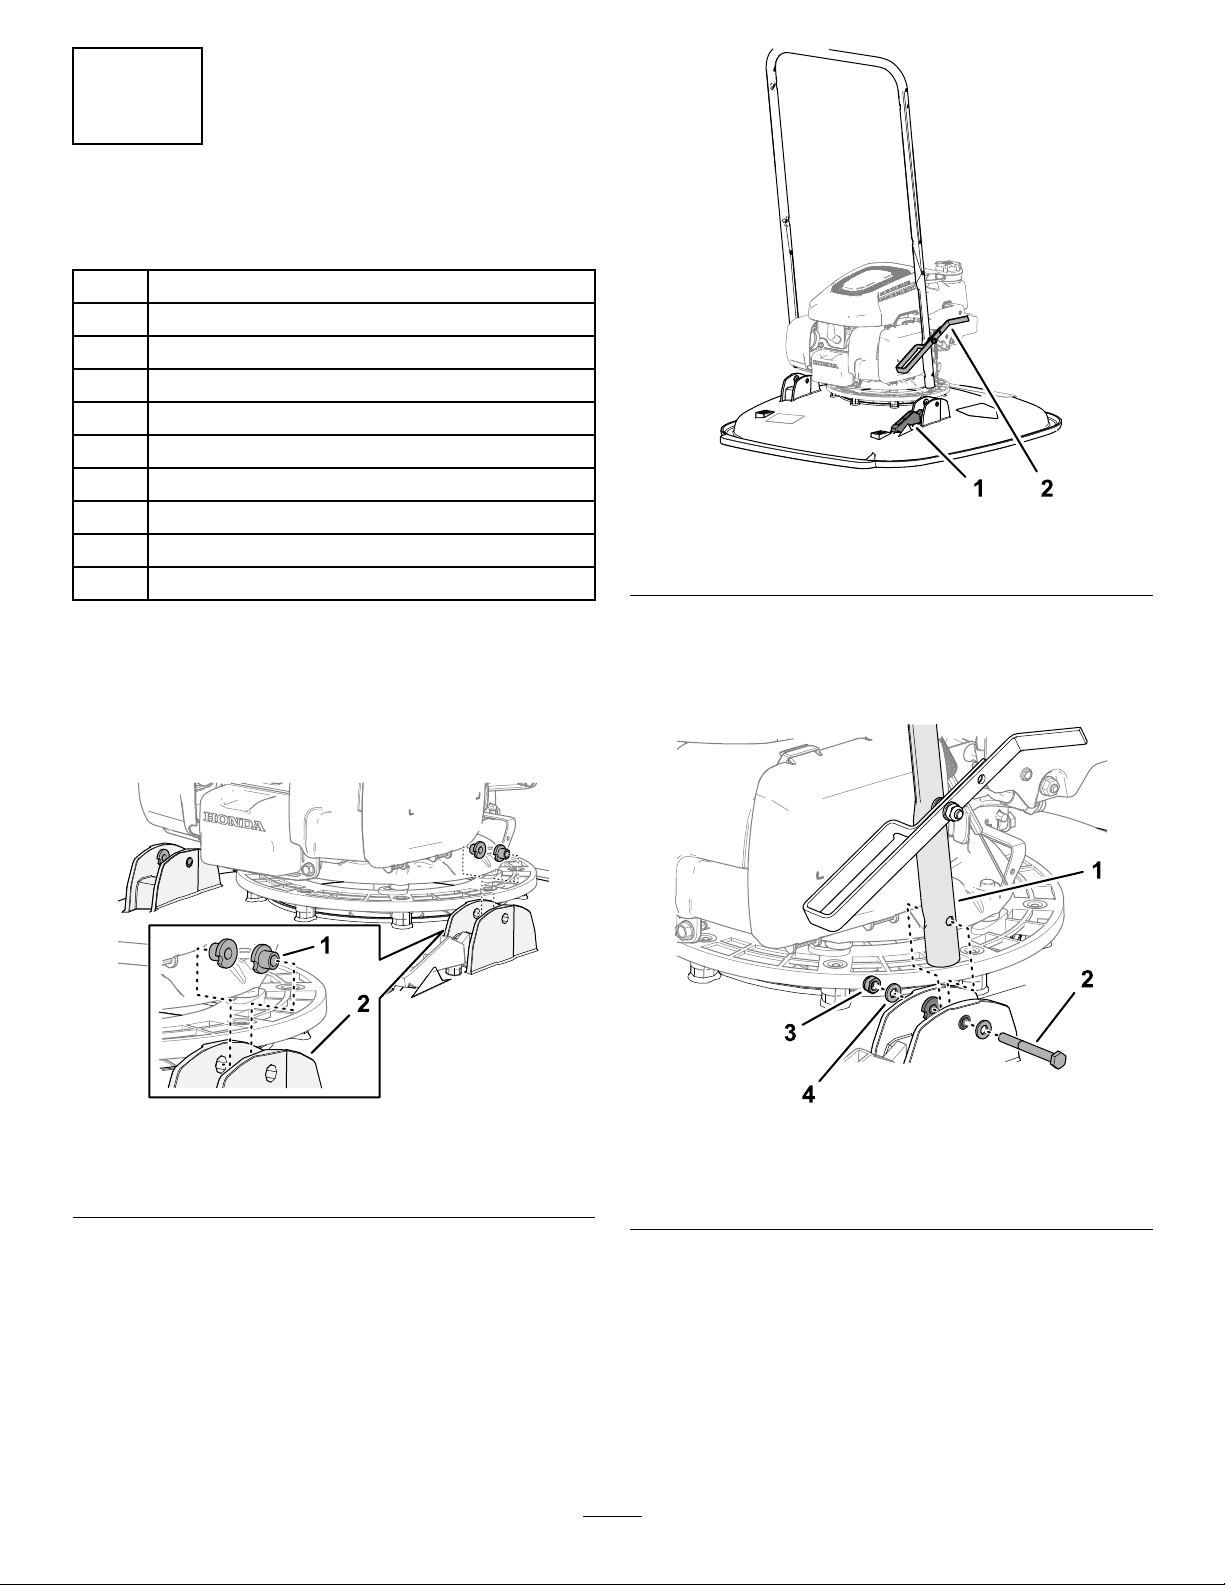
2InstallingtheHandlebar...................................5
3AddingOiltotheEngine...................................8
ProductOverview.....................................................9
Controls...........................................................10
Specications..................................................10
Attachments/Accessories.................................10
BeforeOperation..................................................11
BeforeOperationSafety....................................11
FuelSpecication..............................................11
FillingtheFuelTank...........................................11
CheckingtheEngineOilLevel..........................12
DuringOperation.................................................12
DuringOperationSafety...................................12
FuelShutoffValve.............................................13
StartingtheEngine...........................................13
ShuttingOfftheEngine.....................................14
SupportingtheHandlebarwiththe
Footstop........................................................14
AdjustingtheCuttingHeight.............................14
OperatingTips.................................................16
AfterOperation....................................................16
AfterOperationSafety......................................16
Maintenance...........................................................18
RecommendedMaintenanceSchedule(s)...........18
MaintenanceSafety..........................................18
PreparingforMaintenance...............................18
ReplacingtheAirCleaner.................................19
EngineOilSpecication....................................20
CheckingtheEngine-OilLevel..........................20
ChangingtheEngineOil...................................20
ServicingtheSparkPlug...................................21
BladeMaintenance...........................................22
Storage...................................................................24
StorageSafety..................................................24
PreparingtheMachineforStorage...................24
Troubleshooting......................................................25
Safety
Thismachinehasbeendesignedinaccordancewith
ENISO5395.
GeneralSafety
Important:Readtheseinstructionscarefully
beforeusingthemachine,andkeepthemfor
futurereference.
Thisproductiscapableofamputatinghandsand
feetandofthrowingobjects.Alwaysfollowallsafety
instructionstoavoidseriouspersonalinjury.
•Readandunderstandthecontentsofthis
Operator’sManualbeforestartingtheengine.
•Donotputyourhandsorfeetnearmoving
componentsofthemachine.
•Donotoperatethemachinewithoutallguards
andothersafetyprotectivedevicesinplaceand
functioningproperlyonthemachine.
•Keepbystandersandchildrenoutoftheoperating
area.Donotallowchildrentooperatethemachine.
Allowonlypeoplewhoareresponsible,trained,
familiarwiththeinstructions,andphysically
capabletooperatethemachine.Localregulations
mayrestricttheageoftheoperator.
•Shutofftheengine,removethekey(ifequipped),
andwaitforallmovementtostopbeforeyouleave
theoperator’sposition.Allowthemachinetocool
beforeadjusting,servicing,cleaning,orstoringit.
Improperlyusingormaintainingthismachinecan
resultininjury.T oreducethepotentialforinjury,
complywiththesesafetyinstructionsandalways
payattentiontothesafety-alertsymbol,which
meansCaution,Warning,orDanger—personalsafety
instruction.Failuretocomplywiththeseinstructions
mayresultinpersonalinjuryordeath.
3

SafetyandInstructionalDecals
Safetydecalsandinstructionsareeasilyvisibletotheoperatorandarelocatednearanyarea
ofpotentialdanger.Replaceanydecalthatisdamagedormissing.
decalh295159
H295159
1.Enginestop
decal111-9826
111-9826
1.Cutting/dismemberment
hazardofhandorfoot,
cuttingunit—keepyour
handsandfeetawayfrom
movingparts.
2.ReadtheOperator’s
Manual.
decal134-7020
134-7020
1.Beforetippingthemachineforservice,disconnectthespark
plugandreadtheOperator'sManual.
decal134-7039
134-7039
1.Warning—Receivetrainingontheproduct;readthe
Operator’sManual.
4.Thrownobjecthazard;keepbystandersaway.
2.Cutting/dismembermenthazardofhandorfoot,nylonline;
disconnectthewirefromthesparkplugbeforeworkingon
themachine.
5.Warning—donottouchhotsurfaces.
3.Warning—weareyeandhearingprotection.6.Warning—stayawayfrommovingparts;keepguardsinplace.
4

Setup
1
InstallingtheHandlebar
Footstop
Partsneededforthisprocedure:
1Lowerhandlebar
1Footstop
1Bolt(6x35mm)
3Washer(6mm)
1Locknut(6mm)
Procedure
Note:Youcanonlyusethefootstoptosupportthe
handlebarintheverticalpositionwhenyouassemble
thehandlebarinthelowerposition103.4cm(40-3/4
inches).
g367240
Figure3
1.Low-handlebarposition3.Footstop
2.Upstopbracket4.High-handlebarposition
1.Determinethehandlebarheightwhenthe
footstopissecuredtotheupstopbracket(Figure
3).
2.Aligntheholeinthefootstopwiththeholeinthe
lowerhandlebar(Figure4).
g364679
Figure4
1.Lowerhandlebar4.Washer(6mm)
2.Footstop5.Locknut(6mm)
3.Bolt(6x35mm)
3.Assemblethefootstoptothehandlebarwitha
bolt(6x35mm),3washers(6mm),andlocknut
(6mm).
4.Tightenthelocknutandbolt.
Note:Ensurethatyoucanpivotthefootstop.
5

2
InstallingtheHandlebar
Partsneededforthisprocedure:
4T-bushings
2Bolt(6x55mm)
6Washer(6mm)
2Locknut(6mm)
2Knob
2U-bolt
Handlebartting
1Upperhandlebar
1Bolt(1/4x1-3/4inches)
1Locknut(1/4inch)
AssemblingtheLowerHandlebar
totheMachine
1.Assemble2T-bushingsintothehandlebar
angesofthemowerdeck(Figure5).
g364682
Figure5
1.T-bushings2.Handlebaranges(mower
deck)
2.Alignthefootstopofthehandlebartotheup-stop
bracketonthedeck(Figure6).
g364680
Figure6
1.Up-stopbracket2.Footstop
3.Aligntheholeinthehandlebarwiththeholesin
thebushings(Figure7),andsecurehandlebar,
tothemachinewithabolt(6x55mm),2
washers(6mm),andalocknut(6mm).
g364681
Figure7
1.Lowerhandlebar3.Washer(6mm)
2.Bolt(6x55mm)4.Locknut(6mm)
4.Repeatstep3attheothersideofthemachine.
6

AssemblingtheUpperandLower
Handlebars
1.Aligntheholesontheupperhandlebarwiththe
holesinthelowerhandlebar(Figure8).
g364684
Figure8
1.Lowerhandlebar4.Upperhandlebar
2.Knob5.U-bolt
3.Washer(6mm)
2.Assembletheupperhandlebartothelower
handlebarwitthe2U-bolts,2washer(6mm),
and2knobs.
AssemblingtheCabletothe
Operator-PresenceBail
1.Insertthettingattheendofthecablesheath
intotheuppersocketofthehandlebartting
(Figure9).
g367356
Figure9
1.Handlebartting2.Fitting(cablesheath)
2.Squeezethelegoftheoperator-presencebail
untilyoucanremoveitfromtheupperhandlebar,
andremovethebailfromthemachine(Figure
10).
g367353
Figure10
3.Insertthecablettingthroughtheholeinthe
bracketoftheoperator-presencebailasshown
inFigure11.
g367355
Figure11
1.Bracket
(operator-presencebail)
2.Cabletting
4.Inserttheendoftheoperator-presencebailinto
thehandlebar,squeezetheotherlegofbail
slightly,andinsertthebailintothehandlebar
(Figure12).
7

g367358
Figure12
5.Securethehandlebarttingtotheupper
handlebar(Figure13)withthebolt(1/4x1-3/4
inches)andlocknut(1/4inch).
g367354
Figure13
1.Bolt(1/4x1-3/4inches)3.Handlebartting
2.Upperhandlebar4.Locknut(1/4inch)
3
AddingOiltotheEngine
NoPartsRequired
Procedure
Important:Yourmachinedoesnotcomewithoil
intheengine.Beforestartingtheengine,addoil
totheengine.
APIServiceClassication:SJorhigher
OilViscosity:10W-30oil
OilCapacity:0.40L(13.5oz)
1.Movethemachinetoalevelsurface.
2.Removethedipstickfromtheoil-llerneckand
wipethedipstickwithacleanrag(Figure14).
g364715
Figure14
3.Slowlypourthespeciedengineoilintothe
oil-llerneck(Figure15),andwait3minutes.
8

g364716
Figure15
4.Insertthedipstickintotheoil-llerneck,then
removethedipstick.
5.Checktheoillevelonthedipstick(Figure16).
Note:Ifyouoverlltheenginewithoil,drain
theexcessoil;refertoDrainingtheEngineOil
(page20).
g364717
Figure16
1.Theoillevelisatits
maximum.
3.Theoillevelistoo
low—addoiltothe
crankcase.
2.Theoillevelistoo
high—removeoilfrom
thecrankcase.
6.Iftheoillevelisbelowtheupperlimit,wipe
thedipstickwithacleanragandrepeatsteps
3through5untiltheengine-oillevelisatthe
upperlimitmark.
7.Insertthedipstickintotheoil-llerneckand
handtightenthedipsticksecurely.
ProductOverview
g364714
Figure17
1.Handlebar4.Handlebarfootstop
2.Operator-presencebail5.Handlebarknobs
3.Mowerdeck
g364713
Figure18
1.Recoil-startergrip5.Fuelcap
2.Sparkplug6.Dipstick
3.Aircleaner7.Muferguard
4.Fuel-shutoffvalve
9

Controls
g364793
Figure19
1.Operator-presencebail2.Fuel-shutoffvalve
Operator-PresenceBail
Theoperator-presencebail(Figure19)controlsthe
ywheelbrakeandignitionoftheengine.
•Squeezethebailtothehandlebartorunthe
engine.
•Releasethebailtothehandlebartoshutoffthe
engine.
Fuel-ShutoffValve
Usethefuel-shutoffvalve(Figure19)tocontrolthe
owoffueltotheengine.
•Closethefuel-shutoffvalvewhenyoutransport,
maintain,orstorethemachine.
•Openthefuel-shutoffvalvetoruntheengine.
Specications
ModelCuttingwidthProductwidth
0261753cm(21inches)63.5cm(25inches)
Attachments/Accessories
AselectionofT oroapprovedattachmentsand
accessoriesisavailableforusewiththemachine
toenhanceandexpanditscapabilities.Contact
yourAuthorizedServiceDealerorauthorizedToro
distributororgotowww.https://www.toro.com/en-GB
foralistofallapprovedattachmentsandaccessories.
Toensureoptimumperformanceandcontinuedsafety
certicationofthemachine,useonlygenuineToro
replacementpartsandaccessories.Replacement
partsandaccessoriesmadebyothermanufacturers
couldbedangerous,andsuchusecouldvoidthe
productwarranty.
10

Operation
BeforeOperation
BeforeOperationSafety
GeneralSafety
•Shutofftheengine,removethekey(ifequipped),
andwaitforallmovementtostopbeforeyouleave
theoperator’sposition.Allowthemachinetocool
beforeadjusting,servicing,cleaning,orstoringit.
•Becomefamiliarwiththesafeoperationofthe
equipment,operatorcontrols,andsafetysigns.
•Checkthatallguardsandsafetydevicesarein
placeandworkingproperly.
•Alwaysinspectthemachinetoensurethatthe
blades,bladebolts,andcuttingassemblyarenot
wornordamaged.
•Inspecttheareawhereyouwillusethemachine
andremoveallobjectsthatcouldinterferewith
theoperationofthemachineorthatthemachine
couldthrow.
•Adjustingthecuttingheightmaybringyouinto
contactwiththemovingblade,causingserious
injury.
•Replaceafaultymufer.
FuelSafety
•Fuelisextremelyammableandhighly
explosive.Areorexplosionfromfuelcanburn
youandothersandcandamageproperty.
–Topreventastaticchargefromignitingthefuel,
placethecontainerand/ormachinedirectlyon
thegroundbeforelling,notinavehicleoron
anobject.
–Addordrainfueltothefueltankoutdoors,in
anopenarea,whentheengineiscold.Wipe
upanyfuelthatspills.
–Fillthefueltankoutdoors,inanopenarea,
whentheengineiscold.Wipeupanyfuelthat
spills.
–Donothandlefuelwhensmokingoraroundan
openameorsparks.
–Donotremovethefuelcaporaddfueltothe
tankwhiletheengineisrunningorhot.
–Ifyouspillfuel,donotattempttostartthe
engine.Avoidcreatingasourceofignitionuntil
thefuelvaporshavedissipated.
–Storefuelinanapprovedcontainerandkeep
itoutofthereachofchildren.
–Replacethecaponthefueltankandallfuel
containerssecurely.
•Fuelisharmfulorfatalifswallowed.Long-term
exposuretovaporscancauseseriousinjuryand
illness.
–Avoidprolongedbreathingofvapors.
–Keepyourhandsandfaceawayfromthe
nozzleandthefuel-tankopening.
–Keepfuelawayfromyoureyesandskin.
FuelSpecication
TypeUnleadedgasoline
Minimumoctanerating87(US)or91(research
octane;outsidetheUS)
EthanolNomorethan10%byvolume
MethanolNone
MTBE(methyltertiarybutyl
ether)
Lessthan15%byvolume
OilDonotaddtothefuel
Useonlyclean,fresh(nomorethan30daysold),fuel
fromareputablesource.
Important:Toreducestartingproblems,addfuel
stabilizer/conditionertofreshfuelasdirectedby
thefuel-stabilizer/conditionermanufacturer.
FillingtheFuelTank
Note:Refertoyourengineowner’smanualfor
additionalinformation.
1.Cleanaroundthefuel-tankcapandremovethe
capfromthetank.
2.Fillthefueltankwiththespeciedfuelasshown
inFigure20.
11

g364718
Figure20
1.53mm(2inches)2.Upperfuellevel
3.Installthecaptothefueltank.
CheckingtheEngineOil
Level
RefertoCheckingtheEngine-OilLevel(page20).
DuringOperation
DuringOperationSafety
GeneralSafety
•Wearappropriateclothing,includingeye
protection;longpants;substantial,slip-resistant
footwear;andhearingprotection.Tiebacklong
hairanddonotwearlooseclothingorloose
jewelry.
•Useyourfullattentionwhileoperatingthe
machine.Donotengageinanyactivitythat
causesdistractions;otherwise,injuryorproperty
damagemayoccur.
•Donotoperatethemachinewhileill,tired,or
undertheinuenceofalcoholordrugs.
•Disengagethebladeandalldriveclutchesbefore
staringtheengine.
•Starttheengineaccordingtotheinstructionsand
withyourfeetwellawayfromtheblade.
•Donottiltthemachinemorethannecessaryto
starttheengine,andliftonlythepartthatisaway
fromyou.
•Shutofftheengine,removethekey(ifequipped),
andwaitforallmovementtostopbeforeyouleave
theoperator’sposition.Allowthemachinetocool
beforeadjusting,servicing,cleaning,orstoringit.
•Whenyoureleasetheoperator-presencecontrol,
theengineshouldshutoffandthebladeshould
stopwithin3seconds.Ifnot,stopusingyour
machineimmediatelyandcontactanAuthorized
ServiceDealer.
•Keepbystanders,especiallychildrenandpets,out
oftheoperatingarea.Keepsmallchildrenoutof
theoperatingareaandunderthewatchfulcare
ofaresponsibleadultwhoisnotoperatingthe
machine.Stopthemachineifanyoneentersthe
area.
•Operatethemachineonlyingoodvisibilityand
appropriateweatherconditions.Donotoperate
themachinewhenthereistheriskoflightning.
•Wetgrassorleavescancauseseriousinjuryif
youslipandcontacttheblade.Avoidmowingin
wetconditionsifpossible.
•Useextremecarewhenapproachingblind
corners,shrubs,trees,orotherobjectsthatmay
blockyourview.
•Watchforholes,ruts,bumps,rocks,orother
hiddenobjects.Uneventerraincouldcauseyou
toloseyourbalanceorfooting.
•Ifthemachinestrikesanobjectorstartsto
vibrate,immediatelyshutofftheengine,waitfor
allmovingpartstostop,anddisconnectthewire
fromthesparkplugbeforeexaminingthemachine
fordamage.Makeallnecessaryrepairsbefore
resumingoperation.
•Neverpickuporcarrythemachinewhilethe
engineisrunning.
•Iftheenginehasbeenrunning,itwillbehotand
canseverelyburnyou.Keepawayfromthehot
engine.
•Engineexhaustcontainscarbonmonoxide,which
islethalifinhaled.Donotruntheengineindoors
orinanenclosedarea.
•Useaccessoriesandattachmentsapprovedby
Toroonly.
SlopeSafety
•Slopesareamajorfactorrelatedtolossof
controlaccidents,whichcanresultinsevereinjury
ordeath.Youareresponsibleforsafeslope
operation.Operatingthemachineonanyslope
12

requiresextracaution.Beforeusingthemachine
onaslope,dothefollowing:
–Reviewandunderstandtheslopeinstructions
inthemanual.
–Evaluatethesiteconditionsofthedayto
determineiftheslopeissafeformachine
operation.Usecommonsenseandgood
judgmentwhenperformingthisevaluation.
Changesintheterrain,suchasmoisture,can
quicklyaffecttheoperationofthemachineon
aslope.
•Alwaysbesureofyourfooting,andkeeparm
holdonthehandles.Walk;neverrun.
•Trimacrossthefaceofslopes,neverupanddown.
•Exerciseextremecautionwhenchangingdirection
onslopes.
•Donottrimonsteepslopes.
•Useextremecautionwhenreversingorpullingthe
machinetowardyou.
•Avoidmowingonwetgrass.Poorfootingcould
causeaslip-and-fallaccident.
•Removeormarkobstaclessuchasditches,holes,
ruts,bumps,rocks,orotherhiddenhazards.T all
grasscanhideobstacles.
•Mowwithcautionneardrop-offs,ditches,or
embankments.
•Whenusingthemachine,alwayskeepbothhands
onthehandle.
•Whencuttingfromthetopofaslopeandyouneed
alongerreach,useanapprovedextendedhandle.
FuelShutoffValve
g364758
Figure21
1.Open(fuelshutoffvalve)2.Closed(fuelshutoffvalve)
•Rotatethehandleofthefuelshutoffvalve
horizontaltoopenthevalve.
•Rotatethehandleofthefuelshutoffvalvevertical
toclosethevalve.
StartingtheEngine
1.Openthefuel-shutoffvalve;refertoFuelShutoff
Valve(page13).
2.Closetheoperator-presencebailagainstthe
handlebar.
g017334
Figure22
1.Handlebar2.Operator-presencebail
3.Placeyourfootonthedeckandtiltthemachine
towardyou(Figure23).
g364773
Figure23
4.Whileholdingtheoperator-presencebail,pull
therecoil-startergrip.
Note:Ifthemachinedoesnotstartafterseveral
attempts,contactanAuthorizedServiceDealer
orauthorizedTorodistributor.
13

ShuttingOfftheEngine
ServiceInterval:Beforeeachuseordaily
Toshutofftheengine,releasetheoperator-presence
bail(Figure24).
Important:Whenyoureleasethe
operator-presencebail,boththeengine
andcuttingdiscshouldstopwithin3seconds.
Iftheydonotstopproperly,stopusingyour
machineimmediatelyandcontactanAuthorized
ServiceDealerorauthorizedTorodistributor.
g017366
Figure24
SupportingtheHandlebar
withtheFootstop
HandlebarAssembledinthe
LowerPosition
Note:Ifyouassembledtothelow-handlebarposition
103.4cm(40-3/4inches),usethefootstoptosupport
thehandlebarintheverticalposition
g367257
Figure25
1.Footstoprotatedforward2.Footstoprotatedrearward
•Toreleasethehandlebar,liftthehandlebarand
rotatethefootstopforward(Figure25).
•Tosupportthehandlebar,positionthehandlebar
androtatethefootstoprearward.
AdjustingtheCutting
Height
WARNING
Adjustingthecuttingheightmaybringyou
intocontactwiththemovingblade,causing
seriousinjury.
•Shutofftheengineandwaitforallmoving
partstostop.
•Wearcut-resistantgloveswhilehandling
theblade.
CAUTION
Iftheenginehasbeenrunning,themufer
willbehotandcanseverelyburnyou.
Keepawayfromthehotmufer.
RemovingtheBlade
1.Closethefuel-shutoffvalve;refertoFuel-Shutoff
Valve(page10).
2.Disconnectthewirefromthesparkplug.
3.Tipthemachineonitsside,withthedipstick
down.
Important:Alwaystipthemachineontoits
sidewiththedipstickaligneddown.Ifthe
machineistippedinanotherdirection,oil
mayllthevalvetrain—requiringatleast30
minutestodrain.
g364720
Figure26
14

4.Useablockofwoodtoholdthebladesteady
(Figure27).
g364888
Figure27
5.Usethewrenchprovidedwiththemachine
toremovethebladebyrotatingthebolt
counterclockwise(Figure27).
Important:Wearsafetyglassesand
cut-resistantgloveswhenremovingthe
blade.
PositioningtheBladeSpacers
Changethepositionofthespacerstoadjustthe
cuttingheightasshowninFigure28.
Note:Eachspacerchangesthecuttingheightofthe
blade6.3mm(1/4inch).
g364990
Figure28
1.Conicalspacer4.Retainer
2.Spacers5.Bolt
3.Blade
InstallingtheBlade
1.Alignthecurvedendsofthebladetowardmower
deck,andassembletheretainer,blade,spacers,
andconicalspacertotheimpellerwiththebolt.
Important:Alwaysassembletheconical
spacerdirectlybelowtheimpellerandthe
retainerundertheheadofthebolt.
g364923
Figure29
1.Impeller3.Retainer
2.Conicalspacer4.Bolt
2.Torquethebladeboltto25N∙m(18ft-lb).
Note:Abolttorquedto25N∙m(18ft-lb)is
verytight.Whileholdingthecuttingbladewith
blockofwood,putyourweightbehindthetorque
wrench,andtightenthebolt.
g364889
Figure30
3.Tipthemachineup,connectthespark-plug
wiretothesparkplug,andopenthefuel-shutoff
valve.
15

OperatingTips
GeneralMowingTips
•Placethehoopofthefootstopundertheupstopto
increasehandlingofthemachine.
g367278
Figure31
•Inspecttheareawhereyouwillusethemachine
andremoveallobjectsthatthemachinecould
throw.
•Avoidstrikingsolidobjectswiththeblade.Never
deliberatelymowoveranyobject.
•Ifthemachinestrikesanobjectorstartstovibrate,
immediatelyshutofftheengine,disconnect
thewirefromthesparkplug,andexaminethe
machinefordamage.
•Forbestperformance,ensurethatthebladeis
sharpbeforethecuttingseasonbegins.
•ReplaceadamagedbladewithanewT oro
replacementblade.
•Ensurethatasharpenedbladeisthesamelength
astheintactcuttingline.
CuttingGrass
•Cutonlyaboutathirdofthegrassbladeatatime.
Donotcutbelowthehighestsetting(30mmor
1-1/4inches)unlessthegrassissparse,oritis
latefallwhengrassgrowthbeginstoslowdown;
refertoAdjustingtheCuttingHeight(page14).
•Donotmowgrassover15cm(6inches)long
becausethemachinemayplugortheenginemay
stall.
•Wetgrassandleavestendtoclumpontheyard
andcancausethemachinetoplugortheengine
tostall.Mowonlyindryconditionsifpossible.
WARNING
Wetgrassorleavescancauseserious
injuryifyouslipandcontacttheblade.
Mowonlyindryconditionsifpossible.
•Beawareofapotentialrehazardinverydry
conditions,followalllocalrewarnings,andkeep
themachinefreeofdrygrassandleafdebris.
•Ifthenishedlawnappearanceisunsatisfactory,
try1ormoreofthefollowing:
–Inspectthecuttingunitand/orreplacethe
blade.
–Walkataslowerpacewhilemowing.
–Raisethecuttingheightonyourmachine.
–Cutthegrassmorefrequently.
–Overlapcuttingswathsinsteadofcuttingafull
swathwitheachpass.
CuttingLeaves
•Aftercuttingthelawn,ensurethathalfofthelawn
showsthroughthecutleafcover.Youmayneed
tomakemorethanasinglepassovertheleaves.
•Mowinggrassover15cm(6inches)inlengthis
notrecommended.Iftheleafcoveristoothick,the
machinemayplugandcausetheenginetostall.
•Slowdownyourmowingspeedifthemachine
doesnotcuttheleavesnelyenough.
AfterOperation
AfterOperationSafety
GeneralSafety
•Shutofftheengine,removethekey(ifequipped),
andwaitforallmovementtostopbeforeyouleave
theoperator’sposition.Allowthemachinetocool
beforeadjusting,servicing,cleaning,orstoringit.
•Cleangrassanddebrisfromthemachinetohelp
preventres.Cleanupoilorfuelspills.
•Neverstorethemachineorfuelcontainerwhere
thereisanopename,spark,orpilotlight,such
asonawaterheateroronotherappliances.
HaulingSafety
•Securethemachine.
•Usecarewhenloadingandunloadingthe
machine.
16

CleaningtheMachine
ServiceInterval:Aftereachuse
WARNING
Themachinemaydislodgematerialfrom
underthemachinehousing.
•Weareyeprotection.
•Stayintheoperatingposition(behindthe
handle).
•Donotallowbystandersinthearea.
1.Tipthemachineonitsside,withthedipstick
down.
Important:Alwaystipthemachineontoits
sidewiththedipstickaligneddown.Ifthe
machineistippedinanotherdirection,oil
mayllthevalvetrain—requiringatleast30
minutestodrain.
2.Useabrushorcompressedairtoremovegrass
anddebrisfromtheexhaustguard,thetopcowl,
andthesurroundingdeckareas.
3.Cleanthecoolingsystem;removegrass
clippings,debris,ordirtfromtheengineair
coolingnsandstarter.
Note:Cleanthecoolingsystemmorefrequently
indirtyorhigh-chaffconditions.
17

Maintenance
RecommendedMaintenanceSchedule(s)
MaintenanceService
IntervalMaintenanceProcedure
Aftertherst5hours•Changetheengineoil.
Beforeeachuseordaily
•Ensurethattheengineshutsoffwithin3secondsafterreleasingthe
operator-presencebail.
•Checktheengine-oillevel.
•Checkthebladeforwearordamage.Ifthebladeisdamaged,replaceitimmediately.
Aftereachuse•Cleangrassclippingsanddirtfromtheentiremachine.
Every100hours•Checkthesparkplugandreplaceitifnecessary.
Yearly
•Replacetheairlter;replaceitmorefrequentlyindustyoperatingconditions.
•Changetheengineoil.
•Replacethebladeorhaveitsharpened(morefrequentlyiftheedgedullsquickly).
MaintenanceSafety
•Shutofftheengine,removethekey(ifequipped),
andwaitforallmovementtostopbeforeyouleave
theoperator’sposition.Allowthemachinetocool
beforeadjusting,servicing,cleaning,orstoringit.
•Disconnectthespark-plugwirefromthesparkplug
beforeperforminganymaintenanceprocedure.
•Wearglovesandeyeprotectionwhenservicing
themachine.
•Examinethemachineregularlyandreplaceany
wornordamagedparts.Donotreplacethecutting
meanswithmetalparts;useonlythecutting
elementsthataresuitableforuseattheoperating
speedofthemachine.
•Nevertamperwithsafetydevices.Checktheir
properoperationregularly.
•Tippingthemachinemaycausethefueltoleak.
Fuelisammableandexplosive,andcancause
personalinjury.Runtheenginedryorremovethe
fuelwithahandpump;neversiphonthefuel.
•Keepallfastenerstighttoensurethatthemachine
isinsafeworkingcondition.
•Donotchangetheenginegovernorsettingor
overspeedtheengine.
•Toensureoptimumperformanceofthemachine,
useonlygenuineT ororeplacementpartsand
accessories.Replacementpartsandaccessories
madebyothermanufacturerscouldbedangerous,
andsuchusecouldvoidtheproductwarranty.
PreparingforMaintenance
WARNING
Tippingthemachinemaycausethefuelto
leak.Fuelisammable,explosiveandcan
causepersonalinjury.
Runtheenginedryorremovethefuelwitha
handpump;neversiphon.
Important:Alwaystipthemachineontoitsside
withthedipstickaligneddown.Ifthemachineis
tippedwiththedipstickalignedup,oilmayllthe
valvetrain—requiringatleast30minutestodrain.
1.Shutofftheengineandwaitforallmovingparts
tostop.
2.Movethemachinetoalevelsurface.
3.Disconnectthespark-plugwirefromthespark
plug(Figure32).
18
This manual suits for next models
1
Table of contents
Languages:
Other Toro Lawn Mower manuals

Toro
Toro 78268 User manual

Toro
Toro TimeCutter MR4275T User manual

Toro
Toro 22282 Series User manual

Toro
Toro 30520 User manual

Toro
Toro 20658 User manual

Toro
Toro 73580 User manual

Toro
Toro Recycler 21131 User manual

Toro
Toro 74882 User manual

Toro
Toro 20052 User manual

Toro
Toro Eurocycler 21080 User manual

Toro
Toro 29639 User manual

Toro
Toro Recycler 20333 User manual

Toro
Toro Recycler 20334 User manual

Toro
Toro 2770 User manual

Toro
Toro 30834 User manual

Toro
Toro Super Recycler 20054 User manual

Toro
Toro TurfMaster HDX User manual

Toro
Toro Proline Recycler PRO530 User manual

Toro
Toro 74437 User manual

Toro
Toro 76601 User manual