Toro Super Recycler 20383 User manual

FormNo.3371-302RevA
SuperRecycler®LawnMower
ModelNo.20383—SerialNo.312000001andUp
Operator'sManual
Introduction
Readthisinformationcarefullytolearnhowtooperate
andmaintainyourproductproperlyandtoavoidinjury
andproductdamage.Youareresponsibleforoperating
theproductproperlyandsafely.
YoumaycontactTorodirectlyatwww.Toro.comfor
productandaccessoryinformation,helpndingadealer,
ortoregisteryourproduct.
Wheneveryouneedservice,genuineToroparts,
oradditionalinformation,contactanAuthorized
ServiceDealerorToroCustomerServiceandhave
themodelandserialnumbersofyourproductready.
Figure1identiesthelocationofthemodelandserial
numbersontheproduct.
G017486
Figure1
1.Modelandserialnumberplate
Writetheproductmodelandserialnumbersinthespace
below:
ModelNo.
SerialNo.
Thismanualidentiespotentialhazardsandhassafety
messagesidentiedbythesafetyalertsymbol(Figure2),
whichsignalsahazardthatmaycauseseriousinjury
ordeathifyoudonotfollowtherecommended
precautions.
Figure2
1.Safetyalertsymbol
Thismanualuses2wordstohighlightinformation.
Importantcallsattentiontospecialmechanical
informationandNoteemphasizesgeneralinformation
worthyofspecialattention.
WARNING
CALIFORNIA
Proposition65Warning
Theengineexhaustfromthisproduct
containschemicalsknowntotheStateof
Californiatocausecancer,birthdefects,
orotherreproductiveharm.
Important:Thisengineisnotequippedwitha
sparkarrestermufer.ItisaviolationofCalifornia
PublicResourceCodeSection4442touseoroperate
theengineonanyforest-covered,brush-covered,or
grass-coveredland.Otherstatesorfederalareas
mayhavesimilarlaws.
ThissparkignitionsystemcomplieswithCanadian
ICES-002.
Thegrossornettorqueofthisenginewaslaboratory
ratedbytheenginemanufacturerinaccordancewith
theSocietyofAutomotiveEngineers(SAE)J1940.
Asconguredtomeetsafety,emission,andoperating
requirements,theactualenginetorqueonthisclassof
mowerwillbesignicantlylower.
Gotowww .Toro.comtoviewspecicationsonyour
mowermodel.
©2011—TheToro®Company
8111LyndaleAvenueSouth
Bloomington,MN55420
Registeratwww.Toro.com.OriginalInstructions(EN)
PrintedintheUSA
AllRightsReserved

Safety
ThislawnmowermeetsorexceedstheCPSCblade
safetyrequirementsforwalk-behindrotarylawnmowers
andtheB71.1specicationsoftheAmericanNational
StandardsInstituteineffectatthetimeofproduction.
Readandunderstandthecontentsofthismanual
beforeyoustarttheengine.
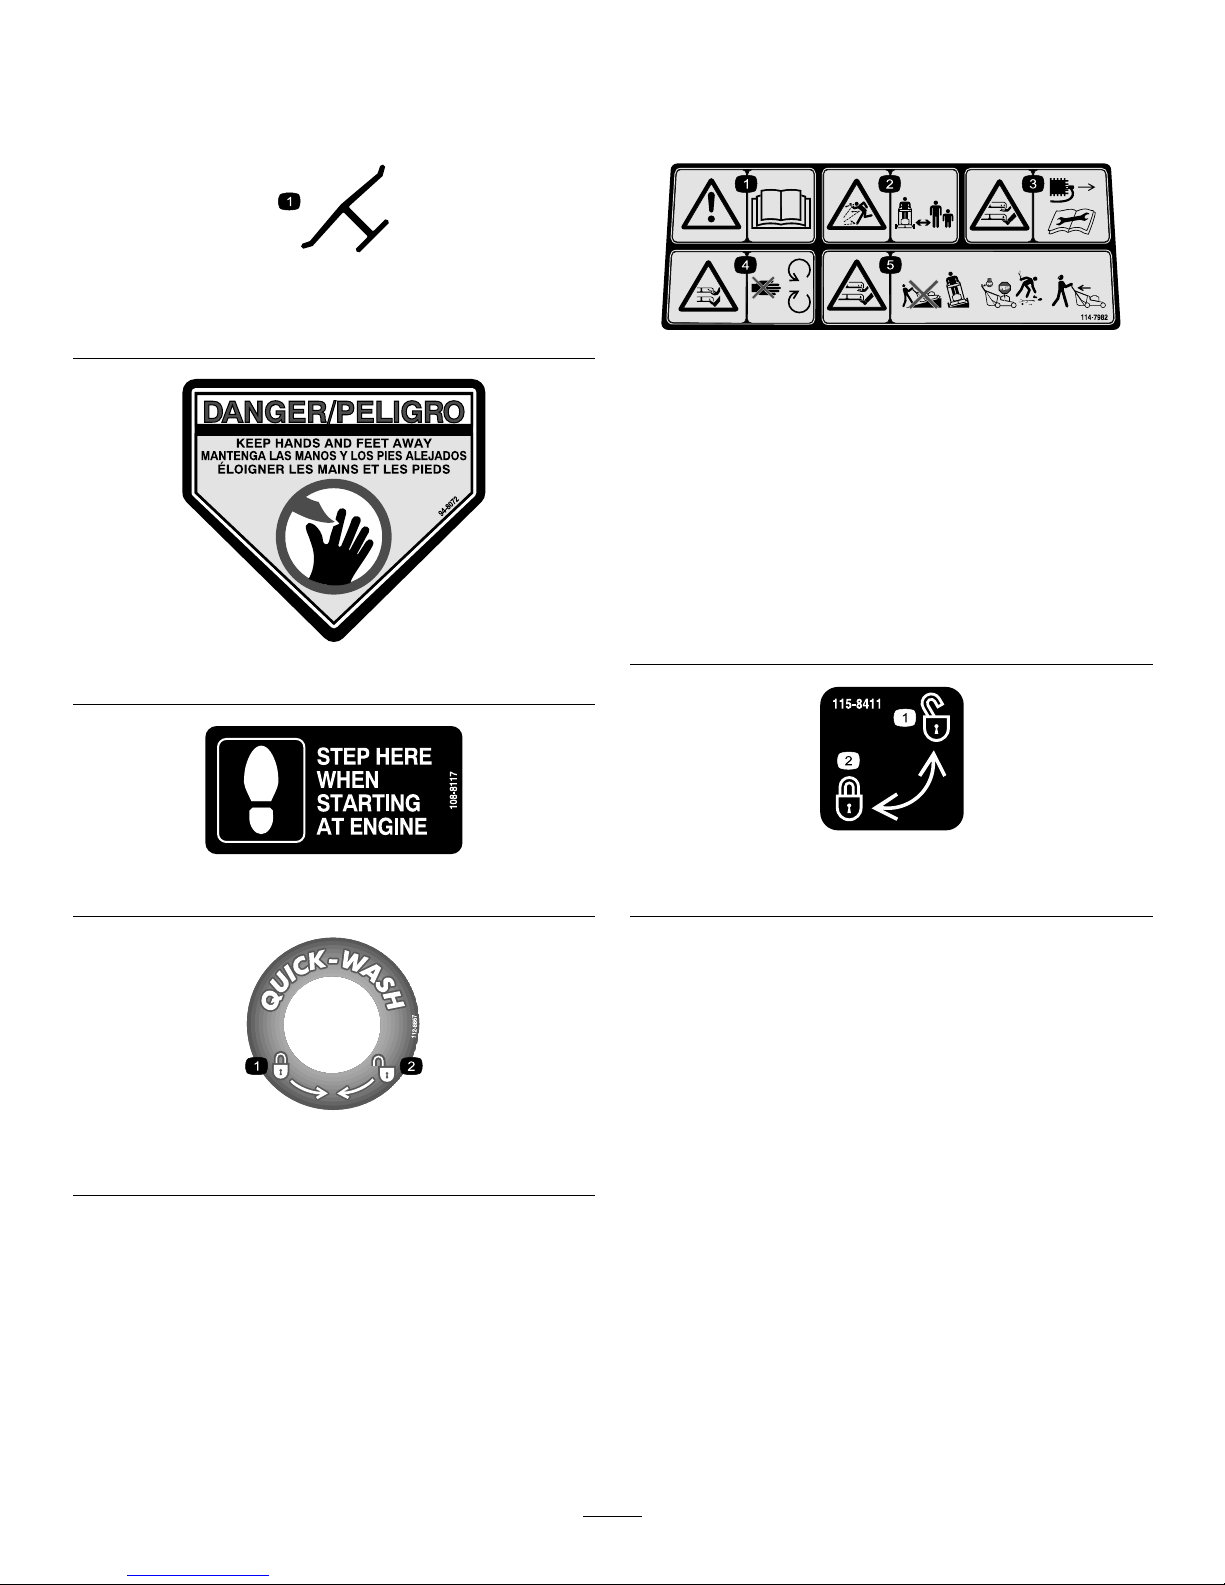
Thesafetyalertsymbol(Figure2)isusedtoalertyou
topotentialpersonalinjuryhazards.Obeyallsafety
messagesthatfollowthissymboltoavoidpossibleinjury
ordeath.Improperlyusingormaintainingthismower
couldresultininjuryordeath.Toreducethispotential,
complywiththefollowingsafetyinstructions.
Thefollowinginstructionshavebeenadaptedfromthe
ANSI/OPEIstandardB71.1-2003.
Thiscuttingmachinecanamputatehandsandfeet
andthrowobjects.Failuretoobservethefollowing
safetyinstructionscouldresultinseriousinjuryor
death.
GeneralOperation
•Read,understand,andfollowallinstructionsonthe
machineandinthemanual(s)beforestarting.
•Donotputhandsorfeetnearorunderthemachine.
Keepclearofthedischargeopeningatalltimes.
•Onlyallowresponsibleadults,whoarefamiliarwith
theinstructions,tooperatethismachine.
•Cleartheareaofobjectssuchasrocks,wire,toys,
etc.,whichcouldbethrownbytheblade.Staybehind
thehandlewhentheengineisrunning.
•Besuretheareaisclearofbystandersbefore
operating.Stopmachineifanyoneentersthearea.
•Donotoperatemachinebarefootedorwhilewearing
sandals.Alwayswearsubstantialfootwear.
•Donotpullmachinebackwardunlessabsolutely
necessary.Alwayslookdownandbehindbeforeand
whilemovingbackward.
•Neverdirectdischargedmaterialtowardanyone.
Avoiddischargingmaterialagainstawallor
obstruction.Materialmayricochetbacktoward
theoperator.Stopthebladewhencrossinggravel
surfaces.
•Donotoperatemachinewithouttheentiregrass
catcher,dischargeguard,rearguard,orothersafety
protectivedevicesinplaceandworking.
•Neverleavearunningmachineunattended.
•Stoptheengineandwaituntilthebladecomes
toacompletestopbeforecleaningthemachine,
removinggrasscatcher,oruncloggingthedischarge
guard.
•Operatemachineonlyindaylightorgoodarticial
light.
•Donotoperatemachinewhileundertheinuence
ofalcoholordrugs.
•Neveroperatemowerinwetgrass.Alwaysbesure
ofyourfooting;walk;neverrun.
•Disengagethedrivesystem,ifsoequipped,before
startingtheengine.
•Ifthemachineshouldstarttovibrateabnormally,
stoptheengineandcheckforthecauseimmediately.
Vibrationisgenerallyawarningoftrouble.
•Alwaysweareyeprotectionwhenoperatingmachine.
•Seemanufacturer'sinstructionsforproperoperation
andinstallationofaccessories.Onlyuseaccessories
approvedbythemanufacturer.
SlopeOperation
Slopesareamajorfactorrelatedtoslipandfallaccidents,
whichcanresultinsevereinjury.Operationonallslopes
requireextracaution.Ifyoufeeluneasyonaslope,do
notmowit.
•Mowacrossthefaceofslopes;neverupanddown.
Exerciseextremecautionwhenchangingdirection
onslopes.
•Watchforholes,ruts,bumps,rocks,orotherhidden
objects.Uneventerraincouldcauseaslipandfall
accident.Tallgrasscanhideobstacles.
•Donotmowonwetgrassorexcessivelysteepslopes.
Poorfootingcouldcauseaslipandfallaccident.
•Donotmowneardrop-offs,ditches,or
embankments.Youcouldloseyourfootingor
balance.
Children
Tragicaccidentscanoccuriftheoperatorisnotalertto
thepresenceofchildren.Childrenareoftenattractedto
themachineandthemowingactivity.Neverassume
thatchildrenwillremainwhereyoulastsawthem.
•Keepchildrenoutofthemowingareaandunderthe
watchfulcareofaresponsibleadultotherthanthe
operator.
•Bealertandturnmoweroffifachildentersthearea.
•Neverallowchildrentooperatethemachine.
•Useextracarewhenapproachingblindcorners,
shrubs,trees,orotherobjectsthatmayblockyour
viewofachild.
2

Service
SafeHandlingofGasoline
Toavoidpersonalinjuryorpropertydamage,use
extremecareinhandlinggasoline.Gasolineis
extremelyammableandthevaporsareexplosive.
•Extinguishallcigarettes,cigars,pipes,andother
sourcesofignition.
•Useonlyanapprovedgasolinecontainer.
•Neverremovegascaporaddfuelwiththeengine
running.Allowenginetocoolbeforerefueling.
•Neverrefuelthemachineindoors.
•Neverstorethemachineorfuelcontainerwhere
thereisanopename,spark,orpilotlightsuchas
onawaterheateroronotherappliances.
•Neverllcontainersinsideavehicleoronatruck
ortrailerbedwithaplasticliner.Alwaysplace
containersonthegroundawayfromyourvehicle
beforelling.
•Removegas-poweredequipmentfromthetruck
ortrailerandrefuelitontheground.Ifthisisnot
possible,thenrefuelsuchequipmentwithaportable
container,ratherthanfromagasolinedispenser
nozzle.
•Keepthenozzleincontactwiththerimofthefuel
tankorcontaineropeningatalltimesuntilfuelingis
complete.Donotuseanozzlelock-opendevice.
•Iffuelisspilledonclothing,changeclothing
immediately.
•Neveroverllfueltank.Replacegascapandtighten
securely.
WARNING
Exhaustcontainscarbonmonoxide,anodorless,
deadlypoisonthatcankillyou.
Donotruntheengineindoorsorinanenclosed
area.
GeneralService
•Neveroperatemachineinaclosedarea.
•Keepallnutsandboltstighttobesuretheequipment
isinsafeworkingcondition.
•Nevertamperwithsafetydevices.Checktheir
properoperationregularly.
•Keepmachinefreeofgrass,leaves,orotherdebris
build-up.Cleanupoilorfuelspillageandremove
anyfuel-soakeddebris.Allowmachinetocool
beforestoring.
•Ifyoustrikeaforeignobject,stopandinspectthe
machine.Repair,ifnecessary,beforestarting.
•Nevermakeanyadjustmentsorrepairswiththe
enginerunning.Disconnectthesparkplugwireand
groundagainstenginetopreventunintendedstarting.
•Checkgrasscatchercomponentsandthedischarge
guardfrequentlyandreplacewithmanufacturer's
recommendedparts,whennecessary.
•Mowerbladesaresharp.Wrapthebladeorwear
gloves,anduseextracautionwhenservicingthem.
•Donotchangetheenginegovernorsettingor
overspeedtheengine.
•Maintainorreplacesafetyandinstructionlabels,as
necessary.
3

SafetyandInstructionalDecals
Important:Safetyandinstructiondecalsarelocatednearareasofpotentialdanger.Replacedamaged
decals.
Manufacturer'sMark
1.Indicatesthebladeisidentiedasapartfromtheoriginal
machinemanufacturer.
94-8072
108-8117
112-8867
1.Lock2.Unlock
114-7982
1.Warning—readtheOperator'sManual.
2.Thrownobjecthazard—keepbystandersasafedistance
fromthemachine.
3.Cutting/dismembermenthazardofhandorfoot,mower
blade—disconnectthesparkplugwireandreadthe
instructionsbeforeservicingorperformingmaintenance.
4.Cutting/dismembermenthazardofhandorfoot,mower
blade—stayawayfrommovingparts.
5.Cutting/dismembermenthazardofhandorfoot,mower
blade—donotoperateupanddownslopes;operatesideto
sideonslopes;stoptheenginebeforeleavingtheoperating
position;andlookbehindyouwhenbackingup.
115-8411
1.Unlocked2.Locked
4

Setup
Important:Removeanddiscardtheprotective
plasticsheetthatcoverstheengine.
1
InstallingtheBladeControl
Bar
NoPartsRequired
Procedure
Installthebladecontrolbarintotheupperhandle
(Figure3).
Figure3
2
AssemblingandUnfoldingthe
Handle
NoPartsRequired
Procedure
WARNING
Assemblingandunfoldingthehandleimproperly
candamagethecables,causinganunsafeoperating
condition.
•Donotdamagethecableswhenassemblingand
unfoldingthehandle.
•Ensurethatthecablesareroutedtotheoutside
ofthehandle.
•Ifacableisdamaged,contactanAuthorized
ServiceDealer.
1.Raisetherearofthemowerhousingtoitshighest
cuttingheightsettingbymovingthe2rearcutting
heightleversallthewayforward.RefertoAdjusting
theCuttingHeightintheOperationsection.
2.Attachthehandleendstothemowerhousingwith
2washersand2handlebolts(Figure4),butdonot
tightenthehandlebolts.
G017457
Figure4
1.Washer3.Handleend
2.Handlebolt
Important:Routethecablestothe
outside
of
thehandle(Figure4).
3.Rotatethehandlerearward(Figure5).
5

G017458
Figure5
4.Lockthehandleatyourdesiredheight.Referto
AdjustingtheHandleHeightintheOperation
section.
5.Torquethehandleboltsto120to160in-lb(14to
17N-m).
6.Adjustthecuttingheight.RefertoAdjustingthe
CuttingHeight.
3
InstallingtheStarterRope
NoPartsRequired
Procedure
Pullthestarterropethroughtheropeguideonthe
handle(Figure6).
Figure6
1.Starterrope2.Ropeguide
Note:Tomaketheropeeasiertoinstall,squeezethe
controlbaronthehandle.
4
FillingtheEnginewithOil
NoPartsRequired
Procedure
Important:Yourmowerdoesnotcomewithoil
intheengine.Beforestartingtheengine,llthe
enginewithoil.
Max.ll:20oz.(0.59l),type:SAE30orSAE10W-30
detergentoilwithanAPIserviceclassicationofSF,
SG,SH,SJ,SL,orhigher.
1.Movethemowertoalevelsurface.
2.Removethedipstick(Figure7).
6

G017459
Figure7
1.Theoillevelisatits
maximum.
3.Theoillevelistoo
low—addoiltothe
crankcase.
2.Theoillevelistoo
high—removeoilfrom
thecrankcase.
3.Slowlypouroilintotheoilllhole,waitafew
minutes,andchecktheoillevelonthedipstickby
wipingthedipstickcleanandtheninserting,butnot
screwingin,theoilllcapintothehole(Figure7).
Note:Filltheenginecrankcasewithoiluntilthe
dipstickindicatesthattheengineoilleveliscorrect
asshowninFigure7.Ifyouoverlltheenginewith
oil,removetheexcessoilasdirectedinChanging
theEngineOil.
4.Installthedipstickandhandtightenitsecurely.
Important:
Change the engine oil after the r st
5 operating hour s
;changeityearlythereafter.
RefertoChangingtheEngineOil.
ProductOverview
G017646
1
2
3
456
7
89
10
11
12
13
Figure8
1.Cuttingheightlever(4)8.Bladecontrolbar
2.Sparkplug9.Upperhandle
3.Recoilstarthandle10.Enginestopswitch
4.Oilll/Dipstick(notshown)11.Grassbag
5.Fueltankcap12.Washoutport
6.Dischargedeector13.Airlter
7.Controlbarlock
Figure9
1.Grassbag3.Reardischargeplug
(installed)
2.Sidedischargechute
7

Operation
FillingtheFuelTank
DANGER
Gasolineisextremelyammableandexplosive.A
reorexplosionfromgasolinecanburnyouand
others.
•Topreventastaticchargefromignitingthe
gasoline,placethecontainerand/ormower
directlyonthegroundbeforelling,notina
vehicleoronanobject.
•Fillthetankoutdoorswhentheengineiscold.
Wipeupspills.
•Donothandlegasolinewhensmokingoraround
anopenameorsparks.
•Storegasolineinanapprovedfuelcontainer,out
ofthereachofchildren.
Fillthefueltankwithfreshunleadedregulargasoline
fromamajorname-brandservicestation(Figure10).
Useunleadedregulargasolinesuitableforautomotive
use(87pumpoctaneminimum).Leadedregulargasoline
maybeusedifunleadedregularisnotavailable.
Note:Neverusemethanol,gasolinecontaining
methanol,orgasolinecontainingmorethan10%ethanol
becausethefuelsystemcouldbedamaged.Donotmix
oilwithgasoline.
Important:Toreducestartingproblems,add
fuelstabilizertothefuelallseason,mixingitwith
gasolinelessthan30daysold.
½ inch (1 cm)
G017461
Figure10
CheckingtheEngineOilLevel
ServiceInterval:Beforeeachuseordaily
1.Movethemowertoalevelsurface.
2.Removethedipstickandwipeitwithacleancloth.
3.Insert,butdonotscrewin,thedipstickintothe
oilllhole.
4.Removethedipstickandcheckit.
5.Todeterminetheproperoillevelonthedipstick,
refertoFigure11).
G017459
Figure11
1.Theoillevelisatits
maximum.
3.Theoillevelistoo
low—addoiltothe
crankcase.
2.Theoillevelistoo
high—removeoilfrom
thecrankcase.
6.Iftheoillevelislow,slowlypouroilintotheoilll
hole,waitafewminutes,andchecktheoillevelon
thedipstickbywipingthedipstickcleanandthen
inserting,butnotscrewingin,theoilllcapinto
thehole.
Note:Max.ll:20oz.(0.59l),type:SAE30
orSAE10W-30detergentoilwithanAPIservice
classicationofSF,SG,SH,SJ,SL,orhigher.
Note:Filltheenginecrankcasewithoiluntilthe
dipstickindicatesthattheengineoilleveliscorrect
asshowninFigure11.Ifyouoverlltheenginewith
oil,removetheexcessoilasdirectedinChanging
theEngineOil.
7.Installthedipstickandhandtightenitsecurely.
Important:
Change the engine oil after the r st
5 operating hour s
;changeityearlythereafter.
RefertoChangingtheEngineOil.
8

AdjustingtheCuttingHeight
WARNING
Adjustingthecuttingheightmaybringyouinto
contactwiththemovingblade,causingserious
injury.
•Stoptheengineandwaitforallmovingparts
tostop.
•Donotputyourngersunderthehousingwhen
adjustingthecuttingheight.
CAUTION
Iftheenginehasbeenrunning,themuferwillbe
hotandcanseverelyburnyou.Keepawayfromthe
hotmufer.
Adjustthecuttingheightasdesired.Setallfourwheels
tothesameheight.
Note:Toraisethemower,moveall4cuttingheight
leversforward;tolowerthemower,movethemall
rearward(Figure12).
G017462
Figure12
AdjustingtheHandleHeight
Youmayraiseorlowerthehandletoaposition
comfortableforyou.
Rotatethehandlelock,movethehandletooneofthree
positions,andlockthehandleintoposition(Figure13).
Figure13
1.Handlelock2.Handlepositions
9

StartingtheEngine
Starttheengineinoneof2ways:
•Pulltherecoilstarterfromtheoperatingposition
(Figure14).
Figure14
•Pulltherecoilstarterfromtheengine(Figure15).
G017647
Figure15
Note:Ifthemowerdoesnotstart,contactan
AuthorizedServiceDealer.
UsingtheSelf-propelDrive
Tooperatetheself-propeldrive,simplywalkwithyour
handsontheupperhandleandyourelbowsatyour
sides,andthemowerwillautomaticallykeeppacewith
you(Figure16).
Figure16
StoppingtheEngine
1.Pressandholdtheenginestopswitchuntilthe
enginestops(Figure17).
Figure17
1.Enginestopswitch
2.Whentheenginestops,removetheignitionkey
whenyouleavethemower.
EngagingtheBlade
Whenyoustartyourengine,thebladedoesnotturn.
Youmustengagethebladetomow.
1.Pullthecontrolbarlockback(Figure18).
10

Figure18
2.Pullthebladecontrolbartothehandle(Figure19).
Figure19
3.Holdthebladecontrolbaragainstthehandle
(Figure20).
Figure20
RecyclingtheClippings
Yourmowercomesfromthefactoryreadytorecyclethe
grassandleafclippingsbackintothelawn.
Ifthegrassbagisonthemower,removeit(referto
RemovingtheGrassBag)beforerecyclingtheclippings.
Ifthesidedischargechuteisonthemower,removeit
andlockthesidedischargedoor(refertoRemovingthe
SideDischargeChute)beforerecyclingtheclippings.
Important:Ensurethatthereardischargeplug
islockedinplace.Tolocktheplug:Raisethe
dischargedeector(Figure21),rmlypushthe
pluginuntilitsnapsintoplacebehindthetabs,and
rotatetheleverontheplugtotheleft(Figure22).
G017463
Figure21
1.Dischargedeector2.Reardischargeplug
Figure22
1.Lever2.Tabs
Note:Tounlocktheplug,rotatetheleverontheplug
totheright(Figure22).
11

BaggingtheClippings
Usethegrassbagwhenyouwanttocollectgrassand
leafclippingsfromthelawn.
Note:Ensurethebagisseatedinthecorrectposition.
WARNING
Aworngrassbagcouldallowdebristobethrown
andresultinseriouspersonalinjuryordeathtothe
operatororbystanders.
Checkthegrassbagfrequently.Ifitisdamaged,
installanewTororeplacementbag.
Ifthesidedischargechuteisonthemower,removeit
andlockthesidedischargedoor(refertoRemovingthe
SideDischargeChute)beforebaggingtheclippings.
WARNING
Thebladeissharp;contactingthebladecanresult
inseriouspersonalinjury.
Stoptheengineandwaitforallmovingpartstostop
beforeleavingtheoperatingposition.
InstallingtheGrassBag
1.Routethestarterropearoundthelowerropeguide
(Figure23).
G017473
Figure23
1.Lowerropeguide
Note:Thelowerropeguidereleasesthestarterrope
whenyoupulltherecoilstarthandle.
2.Raiseandholdupthedischargedeector(Figure24).
G017464
Figure24
1.Dischargedeector2.Reardischargeplug
3.Pulloutthereardischargeplug(Figure24).
4.Hangtheupperfrontedgeofthebagonthenotches
(Figure25).
G017474
Figure25
1.Dischargedeector2.Grassbag
Note:Ensurethatthegrassbagissecurelyinstalled
ontothemachine.
5.Lowerthedischargedeector.
12

RemovingtheGrassBag
1.Routethestarterropearoundthelowerropeguide
(Figure26).
G017473
Figure26
1.Lowerropeguide
Note:Thelowerropeguidereleasesthestarterrope
whenyoupulltherecoilstarthandle.
2.Raiseandholdupthedischargedeector.
3.Liftthegrassbagupbythehandleoffthenotches.
4.Installthereardischargeplug(Figure27).
G017463
Figure27
1.Dischargedeector2.Reardischargeplug
Important:Ensurethatthereardischargeplug
islockedinplace.Tolocktheplug,rmlypush
thepluginuntilitsnapsintoplacebehindthe
tabs,androtatetheleverontheplugtotheleft
(Figure28).
Figure28
1.Lever2.Tabs
Note:Tounlocktheplug,rotatetheleveronthe
plugtotheright(Figure28).
5.Lowerthedischargedeector.
13

Side-dischargingtheClippings
Usethesidedischargeforcuttingverytallgrass.
Ifthebagisonthemower,removeitandinserttherear
dischargeplug(refertoRemovingtheGrassBag)before
side-dischargingtheclippings.
Important:Ensurethatthereardischargeplug
islockedinplace.Tolocktheplug:Raisethe
dischargedeector(Figure29),rmlypushthe
pluginuntilitsnapsintoplacebehindthetabs,and
rotatetheleverontheplugtotheleft(Figure30).
G017463
Figure29
1.Dischargedeector2.Reardischargeplug
Figure30
1.Lever2.Tabs
Note:Tounlocktheplug,rotatetheleverontheplug
totheright(Figure22).
WARNING
Thebladeissharp;contactingthebladecanresult
inseriouspersonalinjury.
Stoptheengineandwaitforallmovingpartstostop
beforeleavingtheoperatingposition.
14

InstallingtheSideDischargeChute
1.Unlockthesidedischargedoor(Figure31).
Figure31
2.Liftopenthesidedischargedoor(Figure32).
Figure32
3.Installthesidedischargechuteandclosethedoor
ontothechute(Figure33).
Figure33
RemovingtheSideDischargeChute
Toremovethesidedischargechute,reversethesteps
above.
Important:Lockthesidedischargedoorafteryou
closeit(Figure34).
Figure34
OperatingTips
GeneralMowingTips
•Cleartheareaofsticks,stones,wire,branches,and
otherdebristhatthebladecouldhit.
•Avoidstrikingsolidobjectswiththeblade.Never
deliberatelymowoveranyobject.
•Ifthemowerstrikesanobjectorstartstovibrate,
immediatelystoptheengine,disconnectthewire
fromthesparkplug,andexaminethemowerfor
damage.
•Forbestperformance,installanewbladebeforethe
cuttingseasonbegins.
•ReplacethebladewhennecessarywithaToro
replacementblade.
CuttingGrass
•Cutonlyaboutathirdofthegrassbladeatatime.
Donotcutbelowthe2-inch(51mm)settingunless
thegrassissparseoritislatefallwhengrassgrowth
beginstoslowdown.RefertoAdjustingtheCutting
Height.
•Whencuttinggrassover6inches(15cm)tall,mow
atthehighestcuttingheightsettingandwalkslower;
thenmowagainatalowersettingforthebestlawn
appearance.Ifthegrassistoolong,themowermay
plugandcausetheenginetostall.
•Mowonlydrygrassorleaves.Wetgrassandleaves
tendtoclumpontheyardandcancausethemower
toplugortheenginetostall.
WARNING
Wetgrassorleavescancauseseriousinjuryif
youslipandcontacttheblade.Mowonlyindry
conditions.
•Alternatethemowingdirection.Thishelpsdisperse
theclippingsoverthelawnforevenfertilization.
•Ifthenishedlawnappearanceisunsatisfactory,try
oneormoreofthefollowing:
–Replacethebladeorhaveitsharpened.
–Walkataslowerpacewhilemowing.
–Raisethecuttingheightonyourmower.
–Cutthegrassmorefrequently.
–Overlapcuttingswathsinsteadofcuttingafull
swathwitheachpass.
–Setthecuttingheightonthefrontwheelsone
notchlowerthantherearwheels.Forexample,
setthefrontwheelsat2-1/4inches(60mm)and
therearwheelsat2-3/4inches(70mm).
15

CuttingLeaves
•Aftercuttingthelawn,ensurethathalfofthelawn
showsthroughthecutleafcover.Youmayneedto
makemorethanonepassovertheleaves.
•Iftherearemorethan5inches(13cm)ofleaves
onthelawn,setthefrontcuttingheightoneortwo
notcheshigherthantherearcuttingheight.
•Slowdownyourmowingspeedifthemowerdoes
notcuttheleavesnelyenough.
Maintenance
Note:Determinetheleftandrightsidesofthemachinefromthenormaloperatingposition.
RecommendedMaintenanceSchedule(s)
MaintenanceService
IntervalMaintenanceProcedure
Aftertherst5hours•Changetheengineoil.
Beforeeachuseordaily•Checktheengineoillevel.
•Cleangrassclippingsanddirtfromunderthemower.
Every25hours•Lubricatetherearwheelgears.
•Cleanthebladebrakeclutchshield.
Beforestorage•Emptythefueltankbeforerepairsasdirectedandbeforeannualstorage.
Yearly
•Replacetheairlter;replaceitmorefrequentlyindustyoperatingconditions.
•Changetheengineoil.
•Replacethebladeorhaveitsharpened(morefrequentlyiftheedgedullsquickly).
16

PreparingforMaintenance
1.Stoptheengineandwaitforallmovingpartstostop.
2.Disconnectthesparkplugwirefromthesparkplug
(Figure35)beforeperforminganymaintenance
procedure.
G017466
1
Figure35
1.Spark-plugwire
3.Afterperformingthemaintenanceprocedure(s),
connectthesparkplugwiretothesparkplug.
Important:Beforetippingthemowertochange
theoilorreplacetheblade,allowthefueltank
torundrythroughnormalusage.Ifyoumust
tipthemowerpriortorunningoutoffuel,usea
handfuelpumptoremovethefuel.Alwaystip
themowerontoitssidewiththeairlterup.
WARNING
Tippingthemowermaycausethefueltoleak.
Gasolineisammable,explosiveandcancause
personalinjury.
Runtheenginedryorremovethegasolinewith
ahandpump;neversiphon.
ReplacingtheAirCleaner
ServiceInterval:Yearly
1.Pressdownonthelatchtabsontopoftheaircleaner
cover(Figure36).
Figure36
1.Latchtabs3.Foampre-lter
2.Paperairlter
2.Openthecover.
3.Removethepaperairlterandthefoampre-lter
(Figure36).
4.Inspectthefoampre-lter,andreplaceitifitis
damagedorexcessivelydirty.
5.Inspectthepaperairlter.
A.Ifthepaperairlterisdamagedoriswetwithoil
orfuel,replaceit.
B.Ifthepaperairlterisdirty,tapitonahard
surfaceseveraltimesorblowcompressedairless
than30psi(207kPa)throughthesideofthe
lterthatfacestheengine.
Note:Donotbrushthedirtoffthelter;
brushingforcesdirtintothebers.
6.Removedirtfromtheaircleanerbodyandcover
usingamoistrag(totrapthedirtandkeepitfrom
fallingintotheengine).Donotwipedirtintothe
airduct.
7.Insertthefoampre-lterandthepaperairlterinto
theaircleaner.
8.Installthecover.
17

ChangingtheEngineOil
ServiceInterval:Aftertherst5hours
Yearly
1.Ensurethatthefueltankcontainslittleornofuelso
thatfueldoesnotleakoutwhenyoutipthemower
ontoitsside.
2.Runtheengineafewminutesbeforechangingthe
oiltowarmit.
Note:Warmoilowsbetterandcarriesmore
contaminants.
3.Disconnectthewirefromthesparkplug.Referto
PreparingforMaintenance.
4.Removethedipstick.
5.Tipthemowerontoitsside,withthedipstickdown,
todraintheusedoiloutthroughtheoillltube
(Figure37).
G017475
Figure37
6.Returnthemowertotheoperatingposition.
7.Slowlypouroilintotheoilllhole,waitafew
minutes,andchecktheoillevelonthedipstickby
wipingthedipstickcleanandtheninserting,butnot
screwingin,theoilllcapintothehole.
Note:Max.ll:20oz.(0.59l),type:SAE30
orSAE10W-30detergentoilwithanAPIservice
classicationofSF,SG,SH,SJ,SL,orhigher.
Note:Filltheenginecrankcasewithoiluntilthe
dipstickindicatesthattheengineoilleveliscorrect
asshownin(Figure38).Ifyouoverlltheengine
withoil,removetheexcessoilasdirectedinstep5.
G017459
Figure38
1.Theoillevelisatits
maximum.
3.Theoillevelistoo
low—addoiltothe
crankcase.
2.Theoillevelistoo
high—removeoilfrom
thecrankcase.
8.Installthedipstickandhandtightenitsecurely.
9.Disposeoftheusedoilproperlyatalocalrecycling
center.
LubricatingtheWheelGears
ServiceInterval:Every25hours
1.Wipethegreasettingsjustinsidetherearwheels
withacleanrag(Figure39).
Figure39
1.Greasetting
2.Installagreasegunontoeachttingandgentlyapply
2or3pumpsof#2multi-purposelithium-base
grease.
18

ReplacingtheBlade
ServiceInterval:Yearly—Replacethebladeorhave
itsharpened(morefrequentlyifthe
edgedullsquickly).
Important:
Y ou will need a torque wr ench to install
the blade pr oper l y
.Ifyoudonothaveatorque
wrenchorareuncomfortableperformingthis
procedure,contactanAuthorizedServiceDealer.
Examinethebladewheneveryourunoutofgasoline.If
thebladeisdamagedorcracked,replaceitimmediately.
Ifthebladeedgeisdullornicked,haveitsharpenedand
balanced,orreplaceit.
WARNING
Thebladeissharp;contactingthebladecanresult
inseriouspersonalinjury.
Weargloveswhenservicingtheblade.
1.Disconnectthesparkplugwirefromthesparkplug.
RefertoPreparingforMaintenance.
2.Tipthemowerontoitssidewiththeairlterup.
3.Removethe2bladenutsandthestiffener(Figure40).
Figure40
1.Bladenuts2.Stiffener
4.Removetheblade(Figure40).
5.Installthenewblade(Figure40).
6.Installthestiffeneryoupreviouslyremoved.
7.Installthebladenutsandtorquethemto15to
27ft-lb(20to37N-m).
CleaningtheBladeBrake
ClutchShield
ServiceInterval:Every25hours
Cleanthebladebrakeclutchshieldyearlytopreventthe
bladefromstallingwhileyoumow.
1.Disconnectthesparkplugwirefromthesparkplug.
RefertoPreparingforMaintenance.
2.Tipthemowerontoitssidewiththeairlterup.
3.Removethe2bladenutsandthestiffener(Figure41).
Figure41
1.Bladenuts4.Bladedriver
2.Stiffener5.Disk
3.Blade6.Bladebrakeclutchshield
4.Removetheblade(Figure41).
5.Removethebladedriveranddisk(Figure41).
6.Removethebladebrakeclutchshield(Figure41).
7.Brushorblowoutdebrisfromtheinsideofthe
shieldandaroundalltheparts.
8.Installthebladebrakeclutchshieldthatyou
previouslyremoved.
9.Installthebladedriveranddiskthatyoupreviously
removed.
10.Installthebladeandthestiffenerthatyoupreviously
removed(Figure41).
11.Installthebladenutsandtorquethemto15to
27ft-lb(20to37N-m).
CleaningtheMower
ServiceInterval:Beforeeachuseordaily
WARNING
Themowermaydislodgematerialfromunderthe
mowerhousing.
•Weareyeprotection.
•Stayintheoperatingposition(behindthe
handle)whentheengineisrunning.
•Donotallowbystandersinthearea.
Forbestresults,cleanthemowersoonafteryouhave
completedmowing.
19

1.Lowerthemowertoitslowestcuttingheightsetting.
RefertoAdjustingtheCuttingHeight.
2.Movethemowerontoaatpavedsurface.
3.Attachagardenhosethatisconnectedtoawater
supplytothewashoutportonthemowerhousing
(Figure42).
G017477
1
Figure42
1.Washoutport
4.Turnthewateron.
5.Starttheengineandrunituntiltherearenomore
clippingsthatcomeoutfromunderthemower
housing.
6.Stoptheengine.
7.Shutoffthewateranddisconnectthegardenhose
fromthemower.
8.Starttheengineandrunitforafewminutestodry
thehousing.
Storage
Storethemowerinacool,clean,dryplace.
PreparingtheMowerfor
Storage
WARNING
Gasolinevaporscanexplode.
•Donotstoregasolinemorethan30days.
•Donotstorethemowerinanenclosurenearan
opename.
•Allowtheenginetocoolbeforestoringit.
1.Onthelastrefuelingoftheyear,addfuelstabilizer
tothefuelasdirectedonthelabel.
2.Runthemoweruntiltheenginestopsfromrunning
outoffuel.
3.Allowtheenginetorununtilitstops.Whenyoucan
nolongerstarttheengine,itissufcientlydry.
4.Removethewirefromthesparkplugandconnect
thewireontotheretainingpost.
5.Removethesparkplug,add1oz.(30ml)ofoil
throughthesparkplughole,andpullthestarterrope
slowlyseveraltimestodistributeoilthroughoutthe
cylindertopreventcylindercorrosionduringthe
off-season.
6.Installthesparkplugandtightenitwithatorque
wrenchto15ft-lb(20N-m).
7.Tightenallnuts,bolts,andscrews.
FoldingtheHandle
WARNING
If,whilefoldingthehandleforstoringor
transportingthemower,youaccidentlybumpthe
keyandengagethebladecontrolbar,theengine
couldstartandrotatetheblade,causingserious
personalinjury.
Alwaysremovetheignitionkeybeforeyoufoldthe
handle.
1.Rotatethehandleforward(Figure43).
Important:Routethecablestotheoutsideof
thehandleknobsasyoufoldtheupperhandle.
20
Other manuals for Super Recycler 20383
3
Table of contents
Other Toro Lawn Mower manuals

Toro
Toro 74096 Manual

Toro
Toro MX 5050 User manual

Toro
Toro Groundsmaster 1200 Series User manual

Toro
Toro Groundsmaster 4000 Series User manual

Toro
Toro TimeCutter SS3225 User manual

Toro
Toro Z Master Professional 5000 Series User manual

Toro
Toro 30476 User manual

Toro
Toro 31200 User manual

Toro
Toro Recycler 20654 User manual

Toro
Toro 74603 User manual

Toro
Toro 20816 User manual

Toro
Toro Greensmaster eFlex 1820 User manual

Toro
Toro 74142TE User manual

Toro
Toro 22290 Reference manual

Toro
Toro 4384 User manual

Toro
Toro 78218 User manual

Toro
Toro HoverPro 450 User manual

Toro
Toro LX Series 2006 User manual

Toro
Toro Groundsmaster 228-D User manual

Toro
Toro 20018 User manual