Toro 38988 User manual

FormNo.3362-496RevA
CommercialWalk-BehindMower
FixedDeck,PistolGrip,HydroDrivewitha
48inTURBOFORCE®CuttingUnit
ModelNo.38988—SerialNo.290000001andUp
ToregisteryourproductordownloadanOperator'sManualorPartsCatalogatnocharge,gotowww.Toro.com.OriginalInstructions(EN)

Warning
CALIFORNIA
Proposition65Warning
Theengineexhaustfromthisproduct
containschemicalsknowntotheStateof
Californiatocausecancer,birthdefects,
orotherreproductiveharm.
ThissparkignitionsystemcomplieswithCanadian
ICES-002.
Important:Thisengineisnotequippedwitha
sparkarrestermufer.ItisaviolationofCalifornia
PublicResourceCodeSection4442touseoroperate
theengineonanyforest-covered,brush-covered,or
grass-coveredland.Otherstatesorfederalareas
mayhavesimilarlaws.
Theenclosed
Engine Owner’ s Man ual
issupplied
forinformationregardingtheUSEnvironmental
ProtectionAgency(EPA)andtheCalifornia
EmissionControlRegulationofemissionsystems,
maintenance,andwarranty.Replacementsmaybe
orderedthroughtheenginemanufacturer.
Introduction
Readthisinformationcarefullytolearnhowtooperate
andmaintainyourproductproperlyandtoavoidinjury
andproductdamage.Youareresponsibleforoperating
theproductproperlyandsafely.
YoumaycontactTorodirectlyatwww .Toro.comfor
productandaccessoryinformation,helpndinga
dealer,ortoregisteryourproduct.
Wheneveryouneedservice,genuineToroparts,or
additionalinformation,contactanAuthorizedService
DealerorToroCustomerServiceandhavethemodel
andserialnumbersofyourproductready.Figure1
identiesthelocationofthemodelandserialnumbers
ontheproduct.Writethenumbersinthespace
provided.
Figure1
1.Modelandserialnumberlocation
ModelNo.
SerialNo.
Thismanualidentiespotentialhazardsandhas
safetymessagesidentiedbythesafetyalertsymbol
(Figure2),whichsignalsahazardthatmaycauseserious
injuryordeathifyoudonotfollowtherecommended
precautions.
Figure2
1.Safetyalertsymbol
Thismanualuses2otherwordstohighlightinformation.
Importantcallsattentiontospecialmechanical
informationandNoteemphasizesgeneralinformation
worthyofspecialattention.
Contents
Introduction.................................................................2
Safety...........................................................................4
SafeOperatingPractices.......................................4
ToroMowerSafety...............................................5
SlopeChart..........................................................7
SafetyandInstructionalDecals.............................8
ProductOverview......................................................11
Controls.............................................................11
Specications.....................................................12
Attachments/Accessories...................................12
Operation...................................................................12
AddingFuel.......................................................12
ThinkSafetyFirst...............................................13
©2009—TheToro®Company
8111LyndaleAvenueSouth
Bloomington,MN554202
Contactusatwww.Toro.com.
PrintedintheUSA.
AllRightsReserved

OperatingtheParkingBrake...............................13
StartingandStoppingtheEngine........................14
OperatingtheNeutralLocks...............................15
OperatingtheMowerBladeControlKnob
(PTO)............................................................15
TheSafetyInterlockSystem................................16
DrivingtheMachineForwardand
Backward.......................................................17
BringingtheMachinetoNeutralPosition............17
StoppingtheMachine.........................................17
PushingtheMachinebyHand.............................17
AdjustingtheFlowBafe...................................18
PositioningtheFlowBafe.................................18
TransportingMachines.......................................20
SideDischargingorMulchingtheGrass..............20
AdjustingtheHeight-of-Cut...............................20
AdjustingtheCasterPosition..............................21
AdjustingtheHandleHeight..............................22
HeightofCutChart............................................23
Maintenance...............................................................24
RecommendedMaintenanceSchedule(s)................24
Lubrication.............................................................24
HowtoGrease...................................................25
LubricatingtheCasterandWheel
Bearings.........................................................25
GreasingtheMowerBeltIdler............................25
GreasingthePumpControlandBell
Crank.............................................................25
EngineMaintenance...............................................26
ServicingtheAirCleaner....................................26
ServicingtheEngineOil.....................................27
ServicingtheSparkPlugs....................................28
FuelSystemMaintenance.......................................29
ServicingtheFuelTank......................................29
ServicingtheFuelFilter......................................30
DriveSystemMaintenance.....................................31
AdjustingtheSpeedControlLinkage..................31
AdjustingtheNeutralControlLinkages..............31
AdjustingtheHydroControlLinkages................32
AdjustingtheControlRod..................................34
AdjustingtheTracking.......................................35
AdjustingtheSpringAnchorLinks.....................35
CheckingtheTirePressure.................................36
CoolingSystemMaintenance..................................36
CleaningtheAirIntakeScreen............................36
CleaningtheCoolingSystem...............................36
BrakeMaintenance.................................................37
ServicingtheBrake.............................................37
BeltMaintenance....................................................38
CheckingtheBelts..............................................38
ReplacingtheMowerBelt...................................38
AdjustingtheMowerBeltTension......................38
HydraulicSystemMaintenance...............................41
ServicingtheHydraulicSystem...........................41
MowerDeckMaintenance......................................43
ServicingtheCuttingBlades...............................43
AdjustingtheBladeBrake...................................45
ReplacingtheGrassDeector.............................46
Storage.......................................................................47
Troubleshooting.........................................................48
Schematics.................................................................50
3

Safety
Note:Theadditionofattachmentsmadeby
othermanufacturersthatdonotmeetAmerican
NationalStandardsInstitutecerticationwillcause
noncomplianceofthismachine.
Improperuseormaintenancebytheoperatororowner
canresultininjury.Toreducethepotentialforinjury,
complywiththesesafetyinstructionsandalwayspay
attentiontothesafetyalertsymbol,whichmeans
CAUTION,WARNING,orDANGER-“personalsafety
instruction."Failuretocomplywiththeinstructionmay
resultinpersonalinjuryordeath.
SafeOperatingPractices
ThefollowinginstructionsarefromANSIstandard
B71.4-2004.
Training
•ReadtheOperator’sManualandothertraining
material.Iftheoperator(s)ormechanic(s)cannot
readEnglishitistheowner’sresponsibilitytoexplain
thismaterialtothem.
•Becomefamiliarwiththesafeoperationofthe
equipment,operatorcontrols,andsafetysigns.
•Alloperatorsandmechanicsshouldbetrained.The
ownerisresponsiblefortrainingtheusers.
•Neverletchildrenoruntrainedpeopleoperateor
servicetheequipment.Localregulationsmayrestrict
theageoftheoperator.
•Theowner/usercanpreventandisresponsiblefor
accidentsorinjuriesoccurringtohimselforherself,
otherpeopleorproperty.
Preparation
•Evaluatetheterraintodeterminewhataccessories
andattachmentsareneededtoproperlyand
safelyperformthejob.Onlyuseaccessoriesand
attachmentsapprovedbythemanufacturer.
•Wearappropriateclothingincludinghardhat,safety
glassesandhearingprotection.Longhair,loose
clothingorjewelrymaygettangledinmovingparts.
•Inspecttheareawheretheequipmentistobeused
andremoveallobjectssuchasrocks,toysandwire
whichcanbethrownbythemachine.
•Useextracarewhenhandlinggasolineandother
fuels.Theyareammableandvaporsareexplosive.
–Useonlyanapprovedcontainer
–Neverremovegascaporaddfuelwithengine
running.Allowenginetocoolbeforerefueling.
Donotsmoke.
–Neverrefuelordrainthemachineindoors.
•Checkthatoperator’spresencecontrols,safety
switchesandshieldsareattachedandfunctioning
properly.Donotoperateunlesstheyarefunctioning
properly.
Operation
•Neverrunanengineinanenclosedarea.
•Onlyoperateingoodlight,keepingawayfromholes
andhiddenhazards.
•Besurealldrivesareinneutralandparkingbrakeis
engagedbeforestartingengine.Onlystartengine
fromtheoperator’sposition.
•Besureofyourfootingwhileusingthismachine,
especiallywhenbackingup.Walk,don’trun.Never
operateonwetgrass.Reducedfootingcouldcause
slipping.
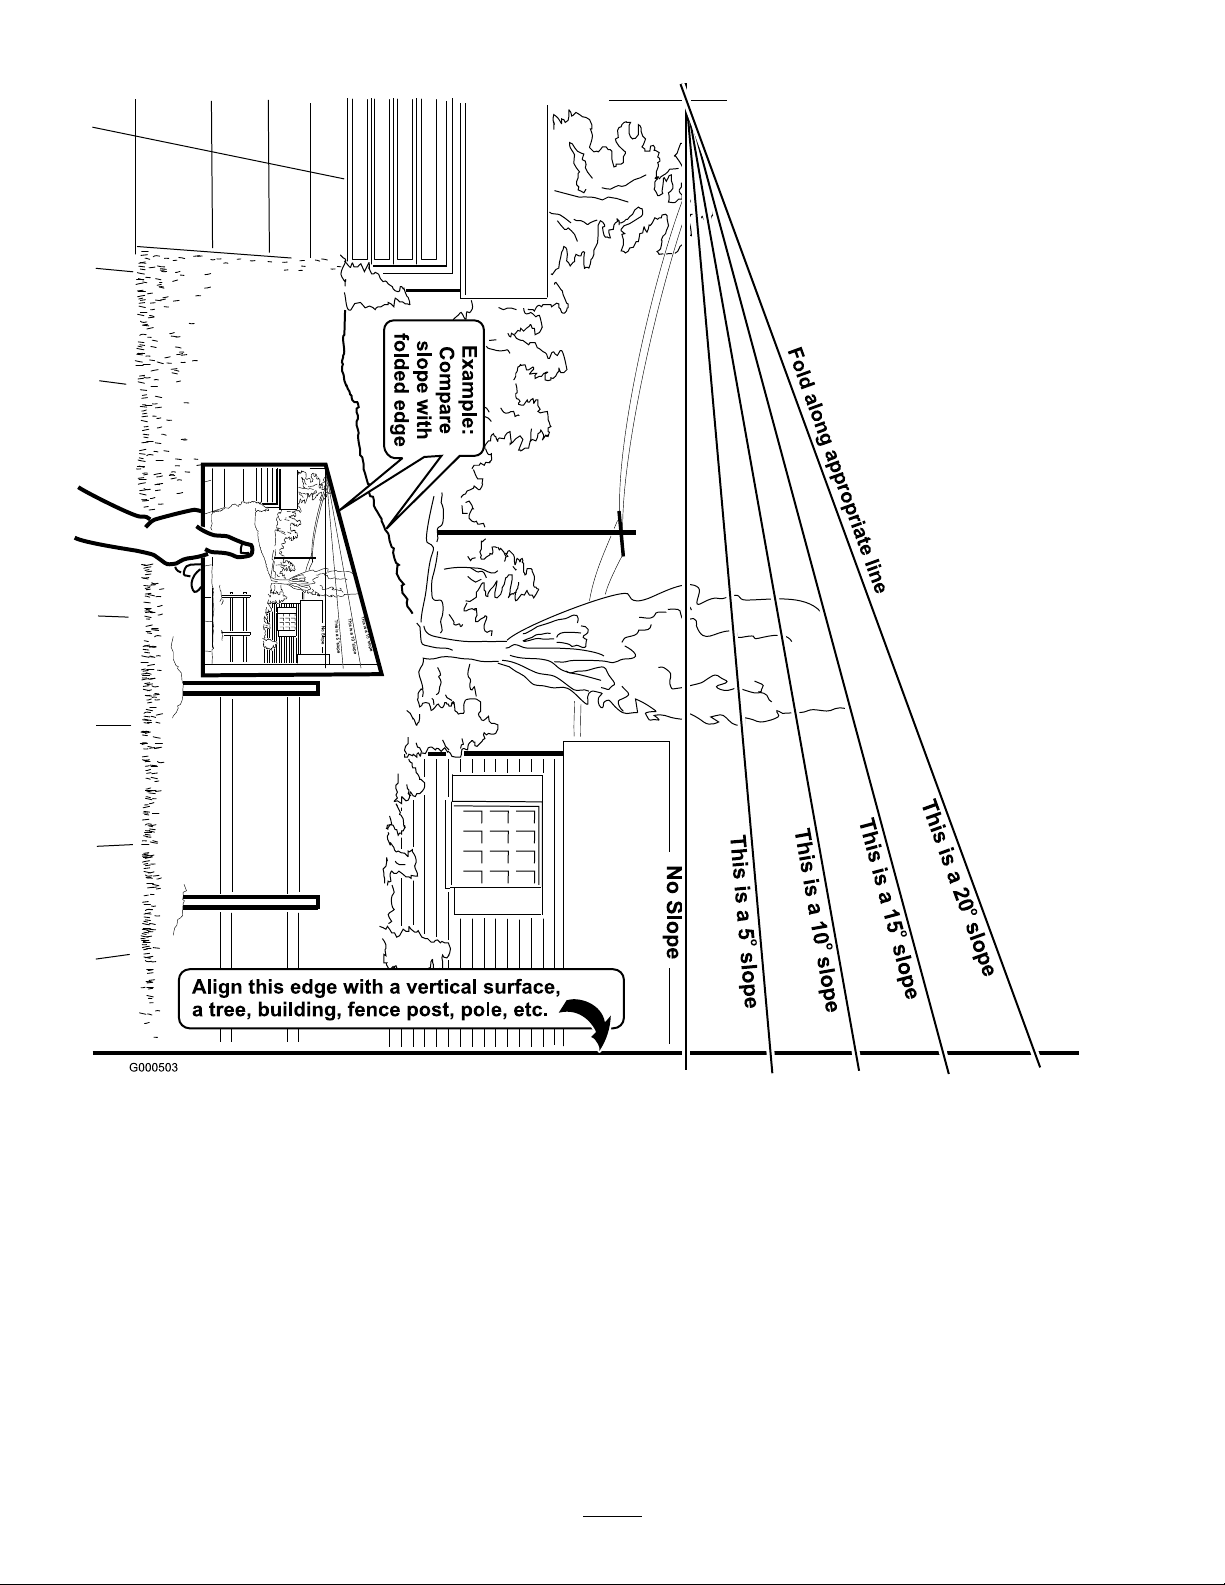
•Slowdownanduseextracareonhillsides.Besure
totravelsidetosideonhillsides.Turfconditions
canaffectthemachine’sstability.Usecautionwhile
operatingneardrop-offs.
•Slowdownandusecautionwhenmakingturnsand
whenchangingdirectionsonslopes.
•Neverraisedeckwiththebladesrunning.
•NeveroperatewiththePTOshield,orotherguards
notsecurelyinplace.Besureallinterlocksare
attached,adjustedproperly,andfunctioningproperly.
•Neveroperatewiththedischargedeectorraised,
removedoraltered,unlessusingagrasscatcher.
•Donotchangetheenginegovernorsettingor
overspeedtheengine.
•Stoponlevelground,disengagedrives,engage
parkingbrake(ifprovided),shutoffenginebefore
leavingtheoperator’spositionforanyreason
includingemptyingthecatchersoruncloggingthe
chute.
•Stopequipmentandinspectbladesafterstriking
objectsorifanabnormalvibrationoccurs.Make
necessaryrepairsbeforeresumingoperations.
•Keephandsandfeetawayfromthecuttingunit.
•Lookbehindanddownbeforebackinguptobesure
ofaclearpath.
•Keeppetsandbystandersaway.
•Slowdownandusecautionwhenmakingturnsand
crossingroadsandsidewalks.Stopbladesifnot
mowing.
4

•Beawareofthemowerdischargedirectionanddo
notpointitatanyone.
•Donotoperatethemowerundertheinuenceof
alcoholordrugs.
•Usecarewhenloadingorunloadingthemachine
intoorfromatrailerortruck.
•Usecarewhenapproachingblindcorners,shrubs,
trees,orotherobjectsthatmayobscurevision.
Maintenanceandstorage
•Disengagedrives,setparkingbrake,stopengineand
removekeyordisconnectsparkplugwire.Waitfor
allmovementtostopbeforeadjusting,cleaningor
repairing.
•Cleangrassanddebrisfromcuttingunit,drives,
mufers,andenginetohelppreventres.Cleanup
oilorfuelspillage.
•Letenginecoolbeforestoringanddonotstorenear
ame.
•Shutofffuelwhilestoringortransporting.Donot
storefuelnearamesordrainindoors.
•Parkmachineonlevelground.Setparkingbrake.
Neverallowuntrainedpersonneltoservicemachine.
•Usejackstandstosupportcomponentswhen
required.
•Carefullyreleasepressurefromcomponentswith
storedenergy.
•Disconnectthebatteryorremovesparkplugwire
beforemakinganyrepairs.Disconnectthenegative
terminalrstandthepositivelast.Reconnectthe
positiverstandnegativelast.
•Usecarewhencheckingblades.Wraptheblade(s)or
weargloves,andusecautionwhenservicingthem.
Onlyreplaceblades.Neverstraightenorweldthem.
•Keephandsandfeetawayfrommovingparts.If
possible,donotmakeadjustmentswiththeengine
running.
•Keepallpartsingoodworkingconditionandall
hardwaretightened.Replaceallwornordamaged
decals.
ToroMowerSafety
Thefollowinglistcontainssafetyinformationspecic
toToroproductsandothersafetyinformationyoumust
know .
Thisproductiscapableofamputatinghandsand
feetandthrowingobjects.Alwaysfollowallsafety
instructionstoavoidseriousinjuryordeath.
Thisproductisdesignedforcuttingandrecyclinggrass
or,whenequippedwithagrassbagger,forcatching
cutgrass.Anyuseforpurposesotherthanthesecould
provedangeroustouserandbystanders.
GeneralOperation
•Besuretheareaisclearofotherpeoplebefore
mowing.Stopthemachineifanyoneentersthearea.
•Donottouchequipmentorattachmentpartswhich
maybehotfromoperation.Allowtocoolbefore
attemptingtomaintain,adjustorservice.
•UseonlyToro-approvedattachments.Warrantymay
bevoidedifusedwithunapprovedattachments.
•Checkcarefullyforoverheadclearances(i.e.
branches,doorways,electricalwires)before
operatingunderanyobjectsanddonotcontact
them.
SlopeOperation
Allslopesandrampsrequireextracaution.Ifyoufeel
uneasyonaslope,donotmowit.
•Removeobstaclessuchasrocks,treelimbs,etc.from
themowingarea.
•Watchforholes,rutsorbumps.Tallgrasscanhide
obstacles.
•Usecautionneardrop-offs,ditches,orembankments.
Themachinecouldsuddenlyturnoverifawheel
goesovertheedgeofaclifforditch,orifanedge
cavesin.
•Useextracarewithgrasscatchersorother
attachments.Thesecanchangethestabilityofthe
machine.
•Keepallmovementonslopesslowandgradual.Do
notmakesuddenchangesinspeedordirection.
•Mowslopessidetoside.
•Donotmowslopesgreaterthan20degrees.
Service
•Neverstorethemachineorfuelcontainerinside
wherethereisanopename,suchasnearawater
heaterorfurnace.
•Keepnutsandboltstight,especiallytheblade
attachmentboltsandnuts.Keepequipmentingood
condition.
•Nevertamperwithsafetydevices.Checksafety
systemsforproperoperationbeforeeachuse.
5

•Useonlygenuinereplacementpartstoensurethat
originalstandardsaremaintained.
•Checkbrakeoperationfrequently.Adjustandservice
asrequired.
6

SlopeChart
7

SafetyandInstructional
Decals
Safetydecalsandinstructionsareeasilyvisibletotheoperatorandarelocatednearanyareaof
potentialdanger.Replaceanydecalthatisdamagedorlost.
1-523552
43-8480
66-1340
95-2814
98-0776
98-5130
1.Warning—readtheOperator’sManualforinstructionson
torquingthebladebolt/nutto75-80ft-lb(102-106N-m).
95-5537
1.ReadtheOperator’s
Manualforinstructionson
operatingthecuttingblade
3.Pushforwardtoengage
2.Pullbacktodisengage
98-5954
8

99-3943
1.Engine
103—2103
104-8569
105-4109
105-4110
106-0699
106-2733
1.Fast3.Slow
2.Continuousvariable
setting
106-2743
9

110-2067
110-2068
1.ReadtheOperator’sManual.
Manufacturer’sMark
1.Indicatesthebladeisidentiedasapartfromtheoriginal
machinemanufacturer.
106-2738
1.Park4.Engine—stop7.Fast10.Neutral
2.Drive5.Engine—run8.Continuousvariablesetting
3.Neutral6.Warning—wearear
protection.
9.Slow
10

ProductOverview
Figure3
1.Sidedischarge5.Controls
2.Mowerdeck6.Handle
3.Recoilstarter7.Casterwheel
4.Gastank
Controls
Becomefamiliarwithallthecontrols(Figure4)before
youstarttheengineandoperatethemachine.
Figure4
1.Throttlecontrol6.Handle
2.Speedcontrollever7.DriveLever
3.Ignitionswitch8.Bladecontrolknob(PTO)
4.Neutrallock9.Choke
5.OperatorPresence
Controllevers(OPC)
10.Fuelshut-offvalve
ThrottleControl
Thethrottlecontrolhastwopositions:FastandSlow.
OperatorPresenceControl(OPC)
Levers
WhenyousqueezetheOPCleversagainstthehandles,
theOPCsystemsensesthattheoperatorisinthe
normaloperatingposition.WhenyoureleasetheOPC
levers,theOPCsystemsensesthattheoperatorhasleft
thenormaloperatingposition,andthesystemwillstop
theengineifeitherthespeedcontrolleverisnotinthe
neutralpositionorthebladecontrol(PTO)knobis
engaged.
BladeControlKnob(PTO)
Thebladecontrolknob(PTO)isusedtoengageand
disengagethedrivebelttodrivethemowerbladeswith
theOPCleverspressedagainstthehandles.Pullthe
knobuptoengagethebladesanddowntodisengage
theblades.
11

IgnitionSwitch
Thisswitchisusedinconjunctionwithrecoilstarterand
hastwopositions:RunandOff.
SpeedControlLever
Thismachinehasavariablespeedcontrolwithaneutral
position.Thiscontrolshowfastthemachinewilltravel.
DriveLevers
Releasedriveleverstoengageforwardtractionoperation
andsqueezetheleversuntilanincreaseinforceisfelt
togointoneutralpositionandcontinuetosqueezeto
goinreverse.Squeezerightsideofdrivelevertoturn
rightandleftsidetoturnleft.
NeutralLock
Squeezethedriveleversuntilanincreaseinforceisfelt
andmovelockstotherearforneutrallock.
RecoilStarter
Pulltherecoilstarterhandletostartengine(Figure3).
FuelShut-offValve
Closethefuelshut-offvalvewhentransportingor
storingmower.
Choke
Usethechoketostartacoldengine.
Specications
Note:Specicationsanddesignaresubjecttochange
withoutnotice.
Widthwithdeectordown63–1/2inches(161.3cm)
Length78–3/8inches(198.9cm)
Height44inches(111.8cm)
Weight570lb(259kg)
Attachments/Accessories
AselectionofToroapprovedattachmentsand
accessoriesareavailableforusewiththemachineto
enhanceandexpanditscapabilities.Contactyour
AuthorizedServiceDealerorDistributororgoto
www.Toro.comforalistofallapprovedattachments
andaccessories.
Operation
AddingFuel
UseUnleadedRegularGasolinesuitablefor
automotiveuse(85pumpoctaneminimum).Leaded
regulargasolinemaybeusedifunleadedregularisnot
available.
Important:Neverusemethanol,gasoline
containingmethanol,orgasoholcontainingmore
than10%ethanolbecausethefuelsystemcouldbe
damaged.Donotmixoilwithgasoline.
Incertainconditions,gasolineisextremely
ammableandhighlyexplosive.Areor
explosionfromgasolinecanburnyouand
othersandcandamageproperty.
•Fillthefueltankoutdoors,inanopenarea,
whentheengineiscold.Wipeupany
gasolinethatspills.
•Neverllthefueltankinsideanenclosed
trailer.
•Donotllthefueltankcompletelyfull.Add
gasolinetothefueltankuntilthelevelis1/4
to1/2inch(6to13mm)belowthebottomof
thellerneck.Thisemptyspaceinthetank
allowsgasolinetoexpand.
•Neversmokewhenhandlinggasoline,and
stayawayfromanopenameorwhere
gasolinefumesmaybeignitedbyaspark.
•Storegasolineinanapprovedcontainerand
keepitoutofthereachofchildren.Never
buymorethana30-daysupplyofgasoline.
•Donotoperatewithoutentireexhaust
systeminplaceandinproperworking
condition.
12

Incertainconditionsduringfueling,static
electricitycanbereleasedcausingaspark
whichcanignitethegasolinevapors.Are
orexplosionfromgasolinecanburnyouand
othersandcandamageproperty.
•Alwaysplacegasolinecontainersonthe
groundawayfromyourvehiclebeforelling.
•Donotllgasolinecontainersinsidea
vehicleoronatruckortrailerbedbecause
interiorcarpetsorplastictruckbedliners
mayinsulatethecontainerandslowtheloss
ofanystaticcharge.
•Whenpractical,removegas-powered
equipmentfromthetruckortrailerand
refueltheequipmentwithitswheelsonthe
ground.
•Ifthisisnotpossible,thenrefuelsuch
equipmentonatruckortrailerfroma
portablecontainer,ratherthanfroma
gasolinedispensernozzle.
•Ifagasolinedispensernozzlemustbeused,
keepthenozzleincontactwiththerimof
thefueltankorcontaineropeningatall
timesuntilfuelingiscomplete.
Gasolineisharmfulorfatalifswallowed.
Long-termexposuretovaporscancauseserious
injuryandillness.
•Avoidprolongedbreathingofvapors.
•Keepfaceawayfromnozzleandgastankor
conditionerbottleopening.
•Keepgasawayfromeyesandskin.
UsingStabilizer/Conditioner
Useafuelstabilizer/conditionerinthemachineto
providethefollowingbenets:
•Keepsgasolinefreshduringstorageof90daysor
less.Forlongerstorageitisrecommendedthatthe
fueltankbedrained.
•Cleanstheenginewhileitruns
•Eliminatesgum-likevarnishbuildupinthefuel
system,whichcauseshardstarting
Important:Donotusefueladditives
containingmethanolorethanol.
Addthecorrectamountofgas
stabilizer/conditionertothegas.
Note:Afuelstabilizer/conditionerismost
effectivewhenmixedwithfreshgasoline.To
minimizethechanceofvarnishdepositsinthefuel
system,usefuelstabilizeratalltimes.
FillingtheFuelTank
1.Shuttheengineoffandsettheparkingbrake.
2.Cleanaroundfueltankcapandremovethecap.
Addunleadedregulargasolinetofueltank,untilthe
levelis1/4to1/2inch(6to13mm)belowthe
bottomofthellerneck.Thisspaceinthetank
allowsgasolinetoexpand.Donotllthefueltank
completelyfull.
3.Installfueltankcapsecurely.Wipeupanygasoline
thatmayhavespilled.
ThinkSafetyFirst
Carefullyreadallthesafetyinstructionsanddecalsin
thesafetysection.Knowingthisinformationcould
helpyouoranybystandersavoidinjury.
Theuseofprotectiveequipmentforeyes,hearing,feet
andheadisrecommended.
Thismachineproducessoundlevelsinexcess
of85dBAattheoperator’searandcancause
hearinglossthroughextendedperiodsof
exposure.
Wearhearingprotectionwhenoperatingthis
machine.
Figure5
1.Warning—wearhearingprotection.
OperatingtheParkingBrake
Alwayssettheparkingbrakewhenyoustopthe
machineorleaveitunattended.Beforeeachuse,check
theparkingbrakeforproperoperation.
13

Iftheparkingbrakedoesnotholdsecurely,adjustit.
RefertoServicingtheParkingBrake.
Childrenorbystandersmaybeinjuredifthey
moveorattempttooperatethemachinewhile
itisunattended.
Alwaysremovetheignitionkeyandsetthe
parkingbrakewhenleavingthemachine
unattended,evenifjustforafewminutes.
SettingtheParkingBrake
Pulltheparkingbrakeleverrearward(Figure6).
Figure6
1.Parkingbrakelever(inthereleasedposition)
ReleasingtheParkingBrake
Pushtheparkingbrakeleverforward.
StartingandStoppingthe
Engine
StartingtheEngine
1.Connectthewirestothesparkplugs.
2.Openthefuelvalve.
Note:Acoldweatherstaringkithasbeen
incorporatedtoassistenginestartingincold
weatherorwhentheunithasnotbeenrunfora
periodoftime.
Tousethecoldstartkit:
•Graspsplitring(Figure7)onrightsideof
machine,pullringandchainstraightoutfrom
sideofmachineandhookringovercontrol
shieldbolt.
Figure7
1.Splitring2.Controlshieldbolt
•Aftertheengineisstarted,pullthechainstraight
outfromsideofmachineuntilringcanbe
removedfromshieldbolt.Slowlyreleasetension
onchain.
3.Disengagethebladecontrolknob(PTO)andmove
thespeedcontrollevertoneutral.
4.Movethedriveleverstoneutralandsettheneutral
locks.
5.Settheparkingbrake.
6.Turntheignitionkeytotherunposition(Figure4).
7.Tostartacoldengine,movethethrottlecontrol
midwaybetweenthefastandslowpositions.
8.Tostartawarmengine,movethethrottlecontrol
tothefastposition.
9.Pullthechokeknobiftheengineiscold(Figure4).
Note:Awarmorhotengineusuallydoesnot
requireanychoking.
10.Grasptherecoilstarterhandlermlyandpullit
outuntilpositiveengagementresults;thenpullthe
handlevigorouslytostarttheengine.Allowthe
ropetorecoilslowly.
11.Pushthechoketooffastheenginewarmsup
(Figure8).
12.Iftheengineiscold,allowittowarmupandthen
movethethrottlecontroltothefastposition.
StoppingtheEngine
1.Movethethrottlelevertoslow(Figure8).
2.Movedriveleverstoneutralandsetneutrallocks.
3.Disengagethebladecontrolknob(PTO)andmove
thespeedcontrollevertoneutral.
14

4.Letengineidlefor30to60secondsbeforeturning
theengineoff.
5.Tostoptheengine,turntheignitionkeytooff.
Figure8
1.Throttlelever3.Choke
2.Ignitionswitch
Important:Makesurefuelshutoffvalveis
closedbeforetransportingorstoringmachine,
asfuelleakagemayoccur.Beforestoring
machine,pullwireoffsparkplug(s)toprevent
possibilityofaccidentalstarting.
OperatingtheNeutralLocks
Alwayssettheneutrallockwhenyoustopthemachine.
Settheparkingbrakeifitisleftunattended.
SettingtheNeutralLock
1.Squeezethedriveleversbackuntilanincreasein
forceisfelt.
2.Placethumbsontheupperpartofthelocksand
movethemback(Figure9).
Figure9
1.Handle4.Drivelever
2.Neutrallock5.Fullspeedforward
3.Neutralposition6.Reverseposition
ReleasingtheNeutralLock
1.Squeezethedriveleversbackuntilanincreasein
forceisfelt.
2.Placethumbsontheupperpartoflocksandmove
themforwarduntilthepinsareintheforwardslot
(Figure10).
Figure10
1.Handle4.Pininfullspeedforward
2.Neutrallock5.Handle
3.Drivelever6.Forwardslot
OperatingtheMowerBlade
ControlKnob(PTO)
Thebladecontrolknob(PTO)isusedinconjunction
withtheOperatorPresenceControl(OPC)leversto
engageanddisengagethemowerblades.
EngagingtheMowerBlades(PTO)
1.Toengageblades,squeezetheOperatorPresence
Control(OPC)leversagainsthandlegrips
(Figure11).
2.Pullbladecontrolknob(PTO)up.HoldtheOPC
leversagainsthandlegrip.
Note:TheenginewillkilliftheOPCleversare
releasedwiththemowerrunningandthespeed
controlleverisnotinneutral.
3.Restarttheengineandrepeattheprocedureto
engagethemowerbladesiftheoperatorpresence
control(OPC)leversarereleased.
15

Figure11
1.Throttlelever4.DriveLever
2.OperatorPresence
Controllevers(OPC)
5.Bladecontrolknob(PTO)
3.Handle
DisengagingtheMowerBlades(PTO)
Themowerbladescanbedisengagedbyoneofthe
followingsteps.
1.Pushthebladecontrolknob(PTO)downtooff
(Figure11).
2.ReleasingtheOperatorPresenceControl(OPC)
leverswillkilltheengineandstoptheblades
(Figure11)withthebladecontrolleverengaged.
TheSafetyInterlockSystem
Ifsafetyinterlockswitchesaredisconnected
ordamagedthemachinecouldoperate
unexpectedlycausingpersonalinjury.
•Donottamperwiththeinterlockswitches.
•Checktheoperationoftheinterlock
switchesdailyandreplaceanydamaged
switchesbeforeoperatingthemachine.
UnderstandingtheSafetyInterlock
System
Thesafetyinterlocksystemisdesignedtopreventthe
mowerfromstartingunless:
•Thebladecontrolknob(PTO)ispushedoff.
•Thespeedcontrolleverisinneutral.
Thesafetyinterlocksystemisdesignedtokillthe
enginewhen:
•TheOperatorPresenceControl(OPC)leversare
releasedwiththemowerengagedand/orthespeed
controlisoutofneutral.
•Thespeedcontrolleverisshiftedoutofneutral
withoutholdingOPCleversorwiththebrake
engaged.
•Thebladecontrolknob(PTO)ispulledupwithout
holdingtheOPClevers.
TestingtheSafetyInterlockSystem
Testthesafetyinterlocksystembeforeyouusethe
machineeachtime.Ifthesafetysystemdoesnot
operateasdescribed,haveanAuthorizedService
Dealerrepairthesafetysystemimmediately.
Whiletestingthesafetyinterlocksystem,the
machinemaymoveforwardandcausepersonal
injuryorpropertydamage.
•Performthesafetyinterlocktestinanopen
area.
•Ensurenooneisstandinginfrontof
themachinewhileperformingthesafety
interlocktest.
1.Settheneutrallocksandplacespeedcontrollever
inneutral.
2.Starttheengine;refertoStartingandStoppingthe
Engine.
3.WithoutholdingtheOperatorPresenceControl
(OPC)levers,pullthebladecontrolknob(PTO)up.
Theengineshouldkill.
4.Pushthebladecontrolknobdowntooff.
5.Withenginerunning,holddowntheOPClevers.
Pullthebladecontrolknob(PTO)up.Thedrive
beltshouldengageandthemowerbladesbegin
rotating.
6.Withenginerunning,releasetheOPClevers.The
engineshouldkill.
7.Withtheenginerunning,movethespeedcontrol
leverforwardslightly.ReleasetheOPClevers.The
engineshouldkill.
8.Ifalltheaboveconditionsarenotmethavean
AuthorizedServiceDealerrepairthesafetysystem
immediately.
16

DrivingtheMachineForward
andBackward
Thethrottlecontrolregulatestheenginespeedas
measuredinRPM(revolutionsperminute).Placethe
throttlecontrolinthefastpositionforbestmowing
performance.
DrivingForward
1.Releasetheparkingbrake.
2.Togoforward,movethespeedcontrolleverto
desiredspeed.
3.Releasetheneutrallock.RefertoReleasingthe
NeutralLock.
4.Slowlyreleasethedriveleverstomoveforward
(Figure12).
Togostraight,releasedriveleversequally
(Figure12).
Toturn,squeezethedriveleveronthesideand
directionyouwanttoturn(Figure12).
Figure12
1.Drivelever2.Speedcontrollever
DrivingBackward
Fromneutral,slowlysqueezethedriveleverstomove
rearward(Figure12).
BringingtheMachineto
NeutralPosition
Alwayssettheneutrallockandparkingbrakewhenyou
stopthemachine.
1.Squeezethedriveleverstoneutralposition.
2.Settheneutrallocks.RefertoOperatingNeutral
Locks.
3.Movespeedcontrollevertoneutralposition.
Note:Thespeedcontrollevercanalsobeusedto
bringthemowertoneutralpositionandthenset
theneutrallocks.
StoppingtheMachine
1.Tostopthemachine,squeezethedriveleversto
neutralpositionandengageneutrallocks.
2.Movespeedcontrolleverintoneutral.
3.Stoptheengine;refertoStoppingtheEngine.
4.Waitforallmovingpartstostopbeforeleavingthe
operatingposition.Settheparkingbrake.
Childrenorbystandersmaybeinjuredifthey
moveorattempttooperatethemachinewhile
itisunattended.
Alwaysremovetheignitionkeyandsetthe
parkingbrakewhenleavingthemachine
unattended,evenifjustforafewminutes.
PushingtheMachinebyHand
Theby-passvalvesallowthemachinetobepushedby
handwithouttheenginerunning.
Important:Alwayspushthemachinebyhand.
Nevertowthemachinebecausehydraulicdamage
mayoccur.
ToPushtheMachine
1.DisengagethePTO,movethemotioncontrol
leverstotheneutrallockedpositionandsetthe
parkingbrake.
2.Opentheby-passvalvesbyturningthemcounter
clockwise1to2turns.Thisallowshydraulicuid
toby-passthepumpsandthewheelstoturn
(Figure13).
3.Releasetheparkingbrake.
4.Pushthemachinetothedesiredlocation.
5.Settheparkingbrake.
6.Closetheby-passvalves,butdonotovertighten
them.
Note:Rotatetheby-passvalvesamaximumof2
turnssothevalvedoesnotcomeoutofthebody
causinguidtorunout.
17

Important:Donotstartoroperatethe
machinewiththeby-passvalvesopen.Damage
tosystemmayoccur.
Figure13
1.By-passvalve
AdjustingtheFlowBafe
Themowerdischargeowcanbeadjustedfordifferent
typesofmowingconditions.Positionthecamlockand
bafetogivethebestqualityofcut.
1.DisengagethePTO,movethemotioncontrol
leverstotheneutrallockedpositionandsetthe
parkingbrake.
2.Stoptheengine,removethekey,andwaitforall
movingpartstostopbeforeleavingtheoperating
position.
3.Toadjustthecamlock,swingtheleveruptoloosen
thecamlock(Figure14).
4.Adjustthebafeandcamlockintheslottothe
desireddischargeow.
5.Swingtheleverbackovertotightenthebafeand
camlock(Figure14).
6.Ifthecamdoesnotlockthebafeintoplaceoritis
tootight,loosentheleverandthenrotatethecam
lock.Adjustthecamlockuntilthedesiredlocking
pressureisachieved.
Figure14
1.Camlock3.Rotatecamtoincreaseor
decreaselockingpressure
2.Lever4.Slot
PositioningtheFlowBafe
Thefollowingguresareonlyrecommendationsfor
use.Adjustmentswillvarybygrasstype,moisture
content,andheightofgrass.
Note:Iftheenginepowerdrawsdownandthemower
groundspeedisthesame,openupthebafe.
PositionA
Thisisthefullrearposition(seeFigure15).The
suggesteduseforthispositionisafollows.
•Useforshort,lightgrassmowingconditions.
•Useindryconditions.
•Forsmallergrassclippings.
•Propelsgrassclippingsfartherawayfromthe
mower.
18

Figure15
PositionB
Usethispositionwhenbagging(Figure16).
Figure16
PositionC
Thisisthefullopenposition.Thesuggestedusefor
thispositionisasfollows(Figure17).
•Useintall,densegrassmowingconditions.
•Useinwetconditions.
•Lowerstheenginepowerconsumption.
•Allowsincreasedgroundspeedinheavyconditions.
•ThispositionissimilartothebenetsoftheToro
SFSmower.
19

Figure17
TransportingMachines
Useaheavy-dutytrailerortrucktotransportthe
machine.Ensurethatthetrailerortruckhasall
necessarylightingandmarkingasrequiredbylaw.
Pleasecarefullyreadallthesafetyinstructions.
Knowingthisinformationcouldhelpyou,yourfamily,
petsorbystandersavoidinjury.
Totransportthemachine:
1.Stoptheengine,removethekey,setthebrake,and
closethefuelvalve.
2.Securelyfastenthemachinetothetrailerortruck
withstraps,chains,cable,orropes.
3.Secureatrailertotowingvehiclewithsafetychains.
4.Ifapplicable,connectthetrailerbrakes.
SideDischargingorMulching
theGrass
Thismowerhasahingedgrassdeectorthatdisperses
clippingstothesideanddowntowardtheturf.
Withoutthegrassdeector,dischargecover,
orcompletegrasscatcherassemblymounted
inplace,youandothersareexposedtoblade
contactandthrowndebris.Contactwith
rotatingmowerblade(s)andthrowndebriswill
causeinjuryordeath.
•Neverremovethegrassdeectorfrom
themowerbecausethegrassdeector
routesmaterialdowntowardtheturf.Ifthe
grassdeectoriseverdamaged,replaceit
immediately.
•Neverputyourhandsorfeetunderthe
mower.
•Nevertrytocleardischargeareaormower
bladesunlessyoureleasethebailandthe
powertakeoff(PTO)isoff.Rotatethe
ignitionkeytoOff.Alsoremovethekeyand
pullthewireoffthesparkplug(s).
AdjustingtheHeight-of-Cut
Thismachinehasa1to4-1/4inch(26to108mm)
rangeforheight-of-cut.Thiscanbeachievedby
adjustingbladespacers,rearaxleheightandfrontcaster
spacers.UsetheHeight-of-Cutcharttoselectthe
combinationofadjustmentsrequired
AdjustingtheBladeHeight
AdjusttheBladesbyusingthe4spacers(1/4inch)
spacersonthebladespindlebolts.Thisallowsfora
1-inch(25mm)adjustmentrangeofcuttingheight,
in1/4inch(6mm)increments,inanyaxleposition.
Usethesamenumberofbladespacersonallbladesto
achievealevelcut(2aboveand2below,1aboveand3
below,etc.).
1.DisengagethePTOandpullthethrottletothe
slowposition.
2.Turntheignitionswitchtooff.
3.Waitforallmovingpartstostopbeforeleavingthe
operatingposition.Settheparkingbrake.
20
Table of contents
Other Toro Mower manuals