Torrot KidsE10 User manual

V1 012015
User Manual
Maintenance+Warranty


In this manual you will nd information about how to
use and how to do the maintenance of your KIDS.
You will also nd information about theTorrot Electric’s
two years warranty that your new motorcycle has.
Welcome to Torrot Electric
Thank you for becoming the owner of one of
our funny electric motorbikes KIDS T10, E10 or
S10 for young riders!

KIDS
SCHOOL
USB
MAPPING
2 YEARS
TORROT
ELECTRIC
WARRANTY
BRUSHLESS
GEARED 48V
MOTOR
POWER FROM
350 TO 1050W
LITHIUM
BATTERY
BRAKE DISCSYOUNG
ELECTRIC
3-7

5
KIDS
INTRODUCTION 06
THE KIDS 07
SPECIFICATIONS 08
COMPONENTS 11
CONTROLS 12
BEFORE USING IT 13
MAINTENANCE 15
BATTERY 16
RECHARGE 17
FAIRING REMOVAL 18
BATTERY REMOVAL 19
ECU MAPPING 20
WIRING DIAGRAM 22
FAQ 23
WARRANTY 24
DEALERS 27
User Manual
Table of
contents

6
KIDS
The KIDS electric motorbike series for young riders allow a very powerful
learning curve in both off-road and on-road riding. There is nothing similar to
these miniaturized endurcross and supermotard!
The KIDS have been designed to give a realistic and authentic rst impression
in terms of handling, ergonomics and performance. Furthermore, very
high passive safety standards have been added to allow a 100% positive
experience.
Besides fast learning and a lot of fun, the KIDS bring to your son strong
pedagogical values: equilibrium, concentration and responsibility. Also we
can’t forget that these e-motorcycles are clean, quiet, and very reliable. The
future is here ;- )
To experience them with the maximum intensity and security, we recommend
you to read this manual, this way you will know when and how to charge the
battery, how to do the basic maintenance of the motorbike, check the brakes,
etc. with simple and practical advices.
From Torrot Electric, we insistently advise you to use always a helmet and the
proper protection equipment to have a satisfactory, funny and 100% secure
experience.
If you still have any doubt after consulting this manual, go to your Torrot
*No contractual images. Due to our constant improvement policy, Torrot Electric Europa
reservesitsrightstointroducechangeswithoutnoticeinproductsortechnicalspecications.
The images of the product showed here can dier noticeably from the product delivered.
User Manual
INTRODUCTION

7
KIDS
The KIDS 10 SERIES are children’s electric motorbikes conceived exclusively
for boys and girls from 3 to 7 years old and until 25kg. They are designed
with care and passion by our technicians to take the rst steps and initiate
in the motorcycling world. The KIDS are authentic miniaturized motorbikes,
and with them, the youngest in the household will learn, progress and have
fun, turning into ‘little big’ riders. The KIDS are not toys: please, parents or
guardian must supervise the child when using the motorbike!
With knobby tyres specic for trial practise, the T10 offers to the young pilot
a perfect architecture to take its rst steps, with a very similar motorbike
that the one that is used by professionals. As a result of the most genuine
experience and developed by professional riders, lovers of this modality.
This trial motorbike can turn into a E10 off-road motorbike with the special
kit. Take it into account!
The enduro electric motorbike of Torrot Electric has no rivals. Devilishly
beautiful, they will delight any child (and so do their parents), because of
the power offered thanks to their brushless geared motor and their lithium
batteries, they will offer (depending on the kind of use and other facts as the
ground or the rider’s weight) fun and ‘pro’ learning for 40 or more minutes (at
full speed). Their strong dynamics, their Italian EBS standard suspensions,
their almost indestructible fairing, their programmable power maps or their
off-road rims turn them into a unique motorbike.
Our supermotard has been designed to make an easier on-road learning
and progression in closed circuits (go-kart racing circuits, speed circuits...).
They have soft tyres for high speeds, with a good grip for a maximum speed
of 42 km/h offered by this model. They inherit the ergonomics of their E10
siblings, for young riders and future child prodigies that desire to begin in the
motorcycling world.
T10
S10
E10
QUALITY
User Manual
THE KIDS
8
KIDS
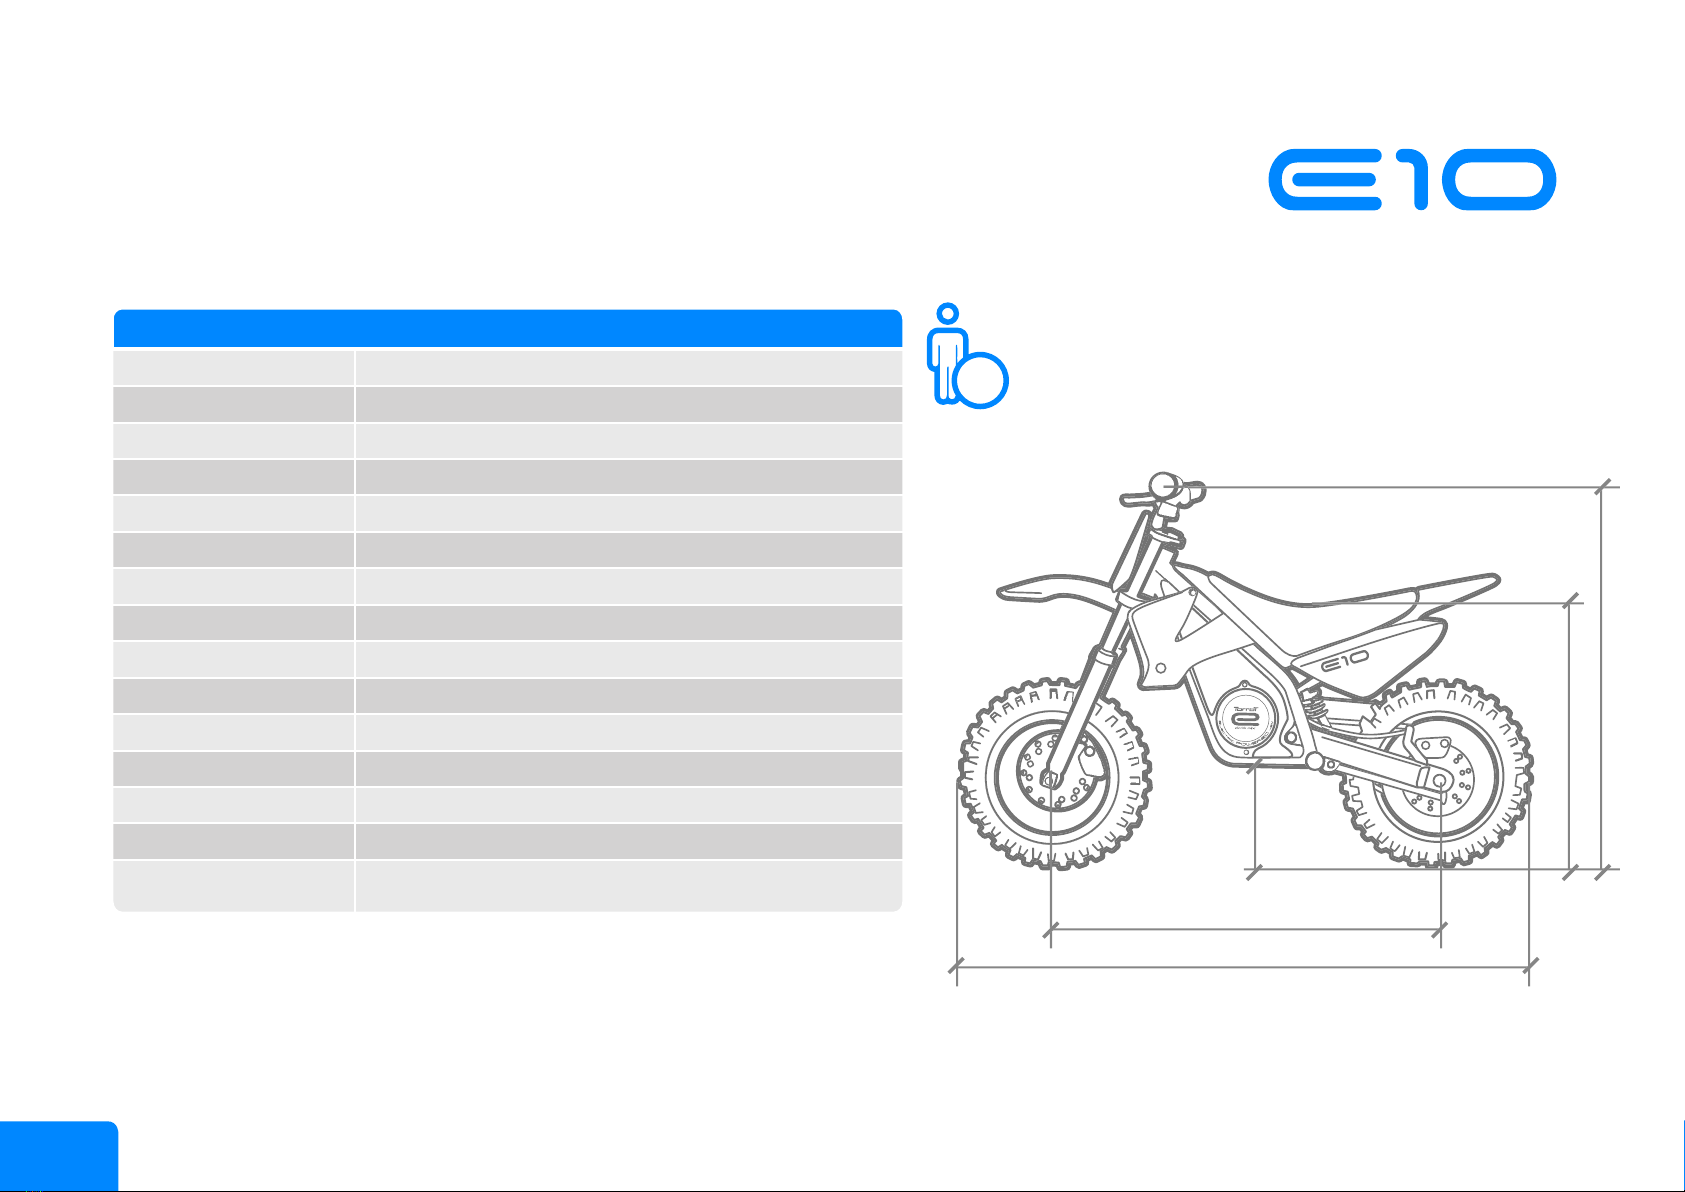
E10 SPECIFICATIONS
CHASSIS TUBULAR CrMo STEEL FRAME
FRONT SUSPENSION EBR HYDRAULIC FORK
REAR SUSPENSION STEEL SWING ARM – 100mm SHOCK ABSORBER
BRAKES NIFO FRONT/REAR DISC BRAKES
TRANSMISSION CHAIN
MOTOR BRUSHLESS GEARED 48V
POWER 350W-1050W / TOP SPEED 40KM/H
CLUTCH ELECTRONIC
BATTERY LiMnCo 6AH
RIMS MADE OF ALUMINIUM – 10” FRONT/REAR
TYRES SUPERCROSS 2,50/10” FRONT./REAR.
WEIGHT 22KG (WITHOUT BATTERY)
RIDER’S MAX. WEIGHT 25KG
OTHERS 48V-1.1 Ah BATTERY CHARGER
OTHERS INCLUDES ECU MAPPING SOFTWARE AND A SWITCH
TO OBTAIN 50% OR 100% OF THE POWER
* Designed and made in Barcelona
3-7
HANDLEBAR WIDTH 580mm
1200mm
850mm
545mm
790mm
220mm
User Manual
SPECIFICATIONS
9
KIDS
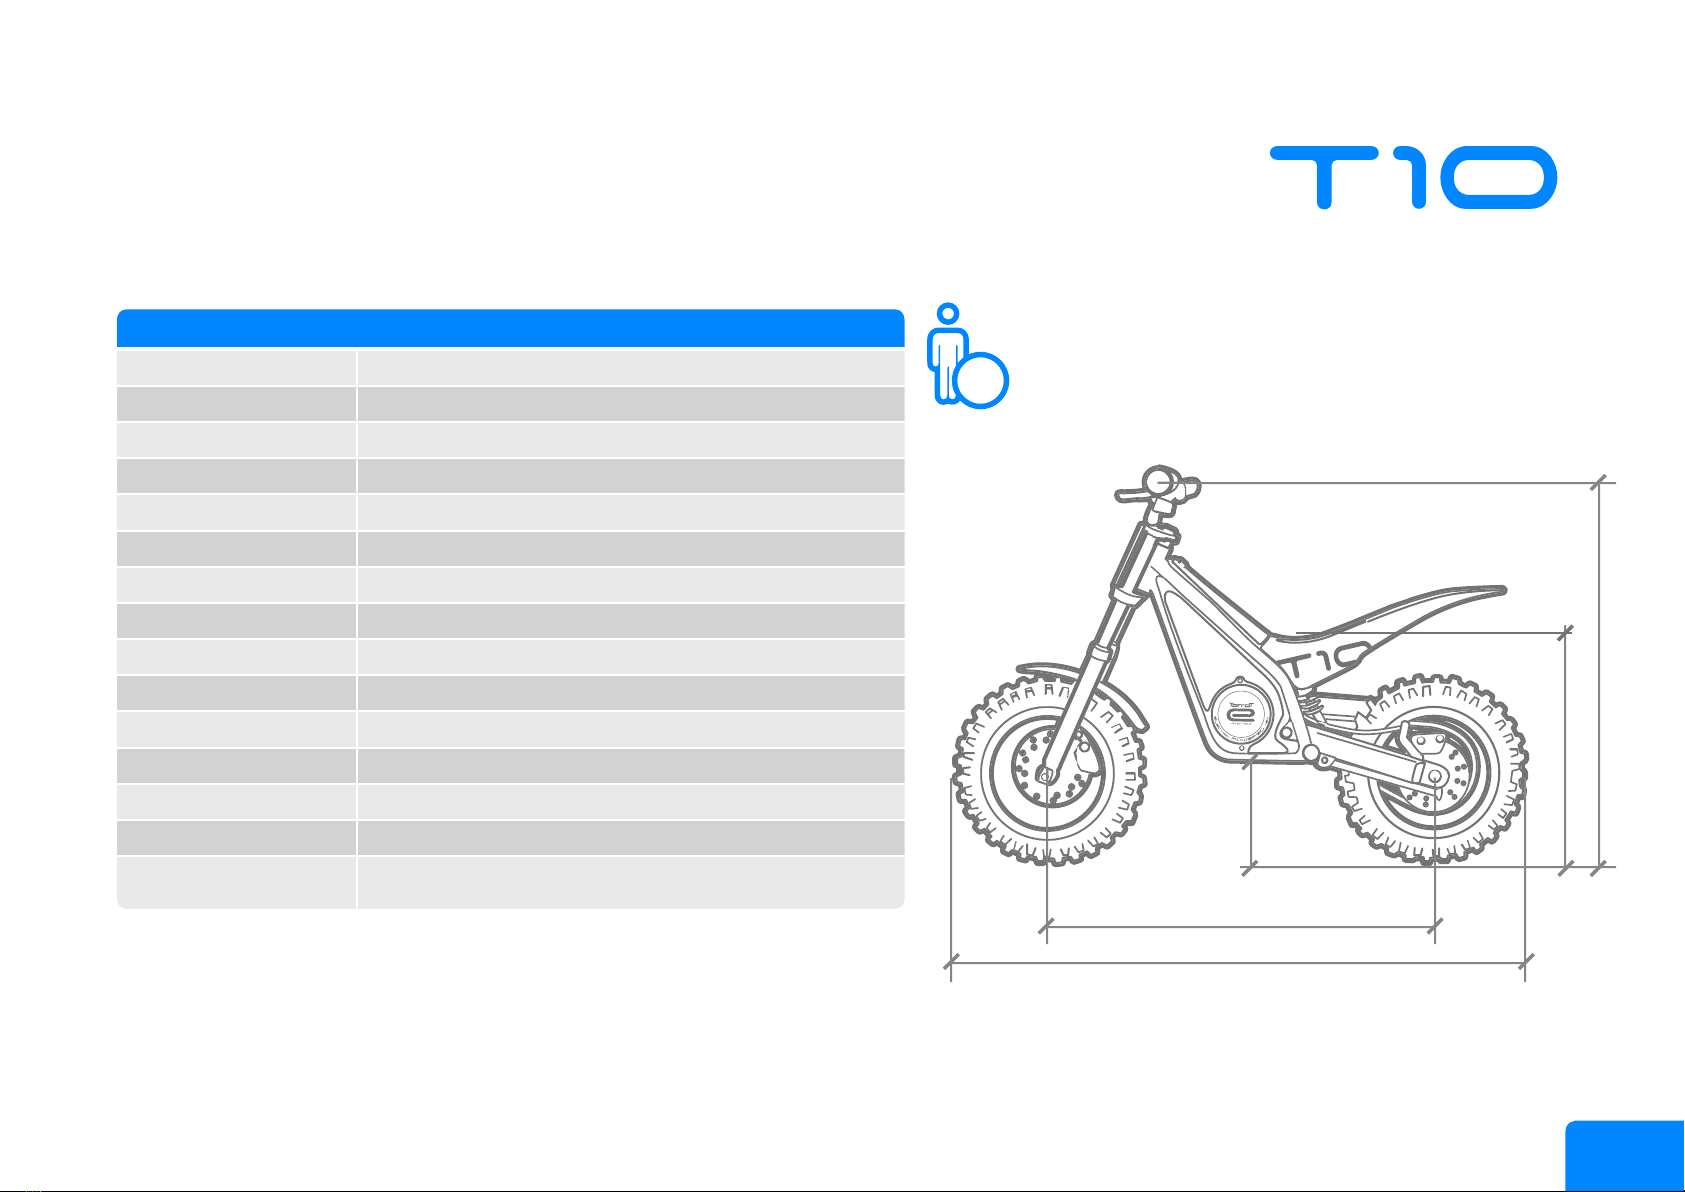
T10 SPECIFICATIONS
CHASSIS TUBULAR CrMo STEEL FRAME
FRONT SUSPENSION EBR HYDRAULIC FORK
REAR SUSPENSION STEEL SWING ARM – 100mm SHOCK ABSORBER
BRAKES NIFO FRONT/REAR DISC BRAKES
TRANSMISSION CHAIN
MOTOR BRUSHLESS GEARED 48V
POWER 350W-1050W / TOP SPEED 40KM/H
CLUTCH ELECTRONIC
BATTERY LiMnCo 6AH
RIMS MADE OF ALUMINIUM – 10” FRONT/REAR
TYRES TRIAL 2,50/10” FRONT./REAR.
WEIGHT 22KG (WITHOUT BATTERY)
RIDER’S MAX. WEIGHT 25KG
OTHERS 48V-1.1 Ah BATTERY CHARGER
OTHERS INCLUDES ECU MAPPING SOFTWARE AND A SWITCH
TO OBTAIN 50% OR 100% OF THE POWER
* Designed and made in Barcelona
3-7
HANDLEBAR WIDTH 580mm
1200mm
850mm
440mm
790mm
220mm
User Manual
SPECIFICATIONS

10
KIDS
S10 SPECIFICATIONS
CHASSIS TUBULAR CrMo STEEL FRAME
FRONT SUSPENSION EBR HYDRAULIC FORK
REAR SUSPENSION STEEL SWING ARM – 100mm SHOCK ABSORBER
BRAKES NIFO FRONT/REAR DISC BRAKES
TRANSMISSION CHAIN
MOTOR BRUSHLESS GEARED 48V
POWER 350W-1050W / TOP SPEED 40KM/H
CLUTCH ELECTRONIC
BATTERY LiMnCo 6AH
RIMS MADE OF ALUMINIUM – 10” FRONT/REAR
TYRES SUPERMOTARD 2,50/10” FRONT./REAR.
WEIGHT 22KG (WITHOUT BATTERY)
RIDER’S MAX. WEIGHT 25KG
OTHERS 48V-1.1 Ah BATTERY CHARGER
OTHERS INCLUDES ECU MAPPING SOFTWARE AND A SWITCH
TO OBTAIN 50% OR 100% OF THE POWER
* Designed and made in Barcelona
3-7
HANDLEBAR WIDTH 580mm
1190mm
850mm
535mm
780mm
195mm
User Manual
SPECIFICATIONS

11
KIDS
a
b
c
d
e
f
g
h
i
j
k
l
b
m
e
d
g
a
b
c
d
e
f
g
h
i
k
l
m
n
o
j
n
o
f
p
p
q
r
s
u
q
r
s
t
t
u
BRAKE DISC
TYRE
RIM
FORK
MUDGUARD
HANDLEBAR
BRAKE CALIPER
CHASSIS
FOOTREST
SHOCK ABSORBER
SWING ARM
SIDESTAND
SEAT
CHAIN
CHAIN TENSIONER
ON/OFF SWITCH
CHARGING PLUG
SERIAL NUMBER
POWER MODE SWITCH
CONTROLLER
MOTOR
BATTERY
User Manual
COMPONENTS
12
KIDS
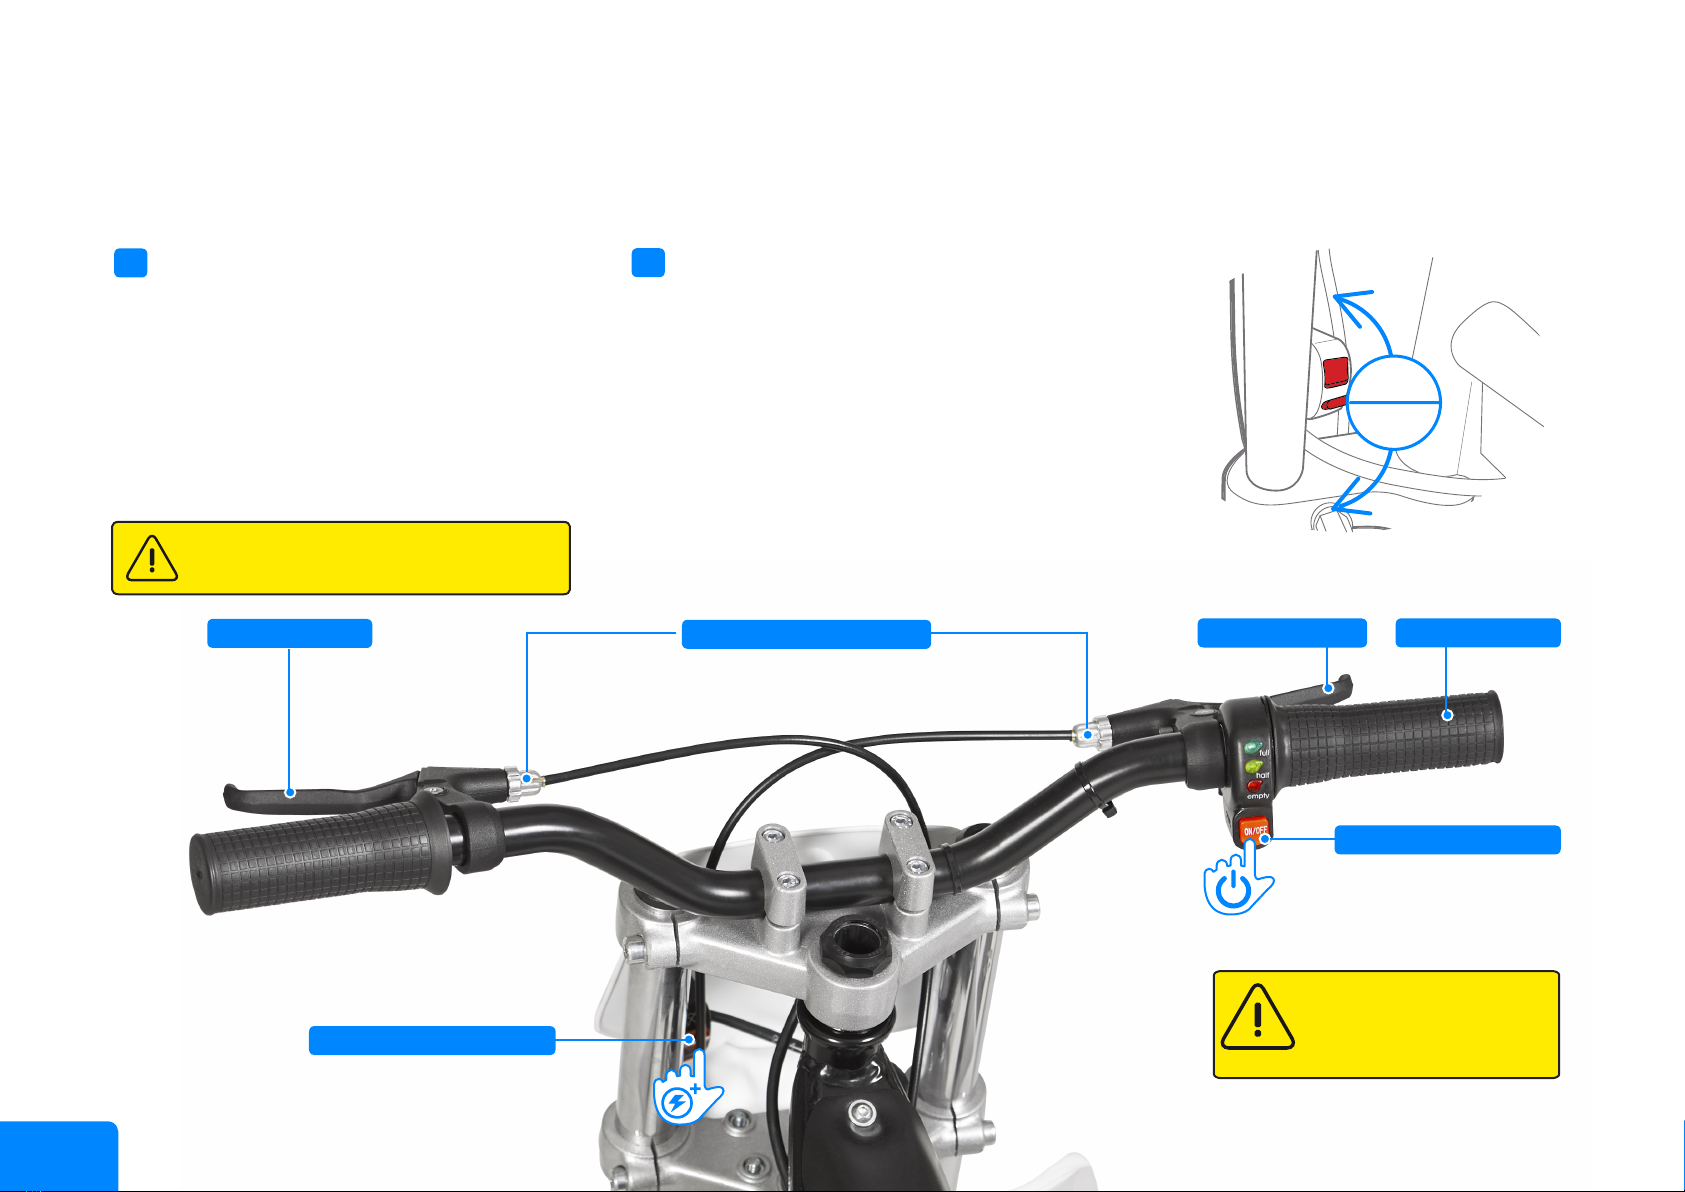
To turn on the motorcycle press the red
“ON/OFF” button placed in the handlebar, next
to the throttle grip. When pushing it inwards the
KIDS is ready to ride. turn slightly the throttle
grip to check if the motor is working. To switch it
off, press again the same button.
Do not forget to fold the sidestand before riding
the motorbike.
The KIDS has a switch in the lower left-
hand part of the number plate. You can choose
between the full power option (100% of power)
or limit it to 50% of power.
* It is possible to map the control unit with a
RS232 connector. To do it, check the pages 20
and 21 of this manual
REMEMBER TO SWITCH OFF
YOUR KIDS WHEN YOU ARE
NOT USING IT OR WHEN IS
GETTING CHARGED.
a. On/O Switch
b. Throttlec. Front Brakee. Brake adjustment
d. Rear Brake
f. Power Mode Switch
a
YOU MUST DO A FULL BATTERY CHARGE
BEFORE THE FIRST USE.
f
100%
50%
User Manual
CONTROLS

13
KIDS
If you receive your KIDS in a box, verify that it contains the following
elements:
KIDS Motorbike with the handlebar disassembled.
4 allen M6 screws (preassembled in the handlebar clamp).
A box with a charger and a the power cord.
An information leaet.
HANDLEBAR ASSEMBLY
Unscrew the 4 preassembled M6 screws with a Nº 5 allen key. Extract
the plastic pipe and put the handlebar in its place. Check that the brake
lines have a natural position, in front of the KIDS.
Put the handlebar clamp on top of the handlebar and screw it slightly.
Adjust the handlebar position so it remains centered.
Rotate the handlebar so the brake levers are in a proper angle. To nish,
screw the four screws in a crossed sequence.
When we assemble each motorcycle in our factory Vidreres, we test the
proper operation one by one. However, we want to ask you to check again
some components and t them to your necessities and tastes:
TYRE PRESSURE
A standard pressure of 1 bar (kgf/cm2) is recommended for our models.
The correct pressure will increase the battery range and its drivability.
Check the attached table with recommendations for each model.
ALLEN Nº5
10/20º
1
2
3
x4
1
2
3
* RECOMMENDED PRESSURE FOR DRY, WET AND WITH MUD ENVIRONMENTS,
AND FOR A 20KG RIDER. TO ADJUST THE CORRECT PRESSURE IN THE TRIAL
MOTORBIKE, YOU WILL NEED A SPECIAL MANOMETER.
RECOMMENDED PRESSURES TABLE* BAR (Kg/cm2)
MODEL FRONT REAR
0,9 0,6-0,8
1,0 1,2
1,2 1,4
User Manual
BEFORE USING IT
14
KIDS
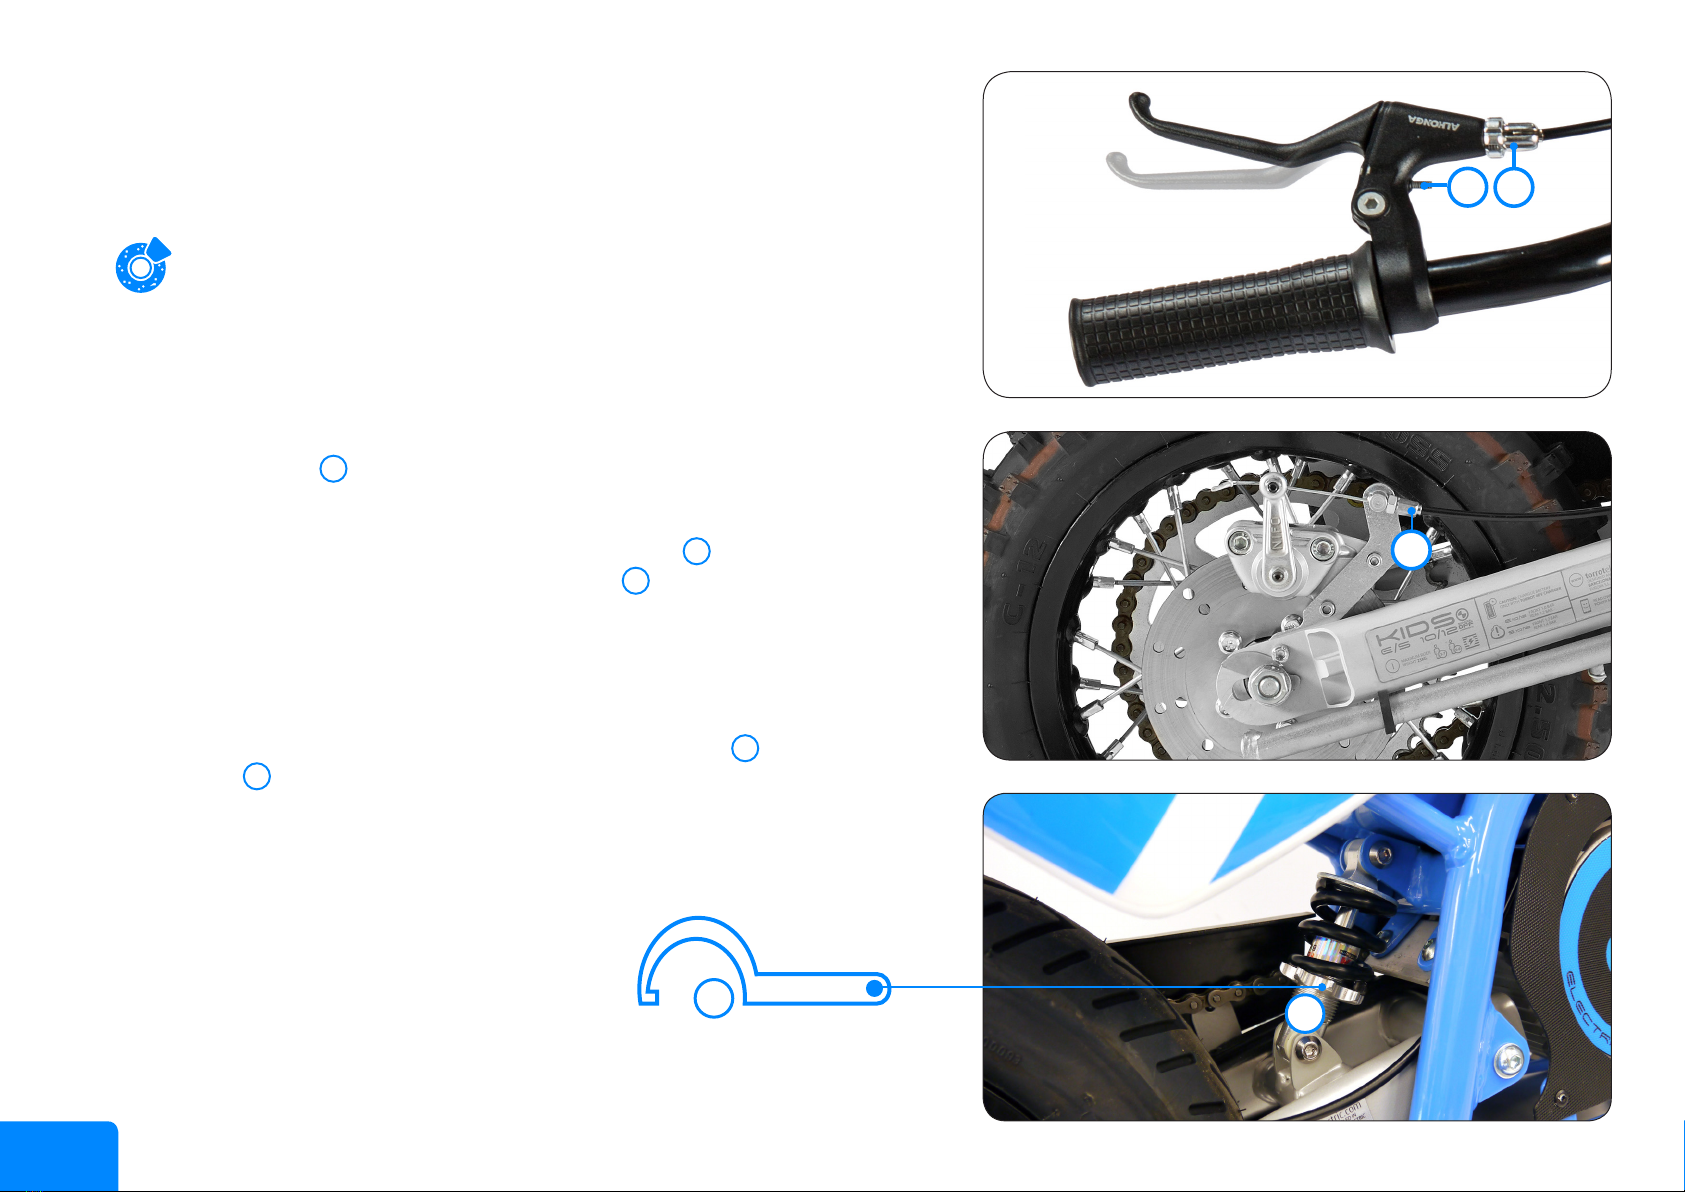
BRAKES
The KIDS are equipped with a cable-actuated disc brakes system. Check that
both front and rear brakes work properly using the left and right brake levers
while moving the motorcycle slightly.
If the brake lever is far from your child’s ngers, you can bring them closer to the
grip using the screw with an allen key.
If the brake lever has too much travel, you can adjust the tension of the brake
cable tightening the two nuts situated in the same lever or also doing the
same with the nuts situated near the brake calipers .
HOW TO ADJUST THE PRELOAD OF THE SHOCK ABSORBER
You can adjust the preload of the shock absorber to adapt the rear suspension to
the weight and preferences of your child. Using a hook wrench for dampers,
turn the nut which supports the spring. The more you compress the spring,
the more preload you will get.
1
5
2
3
12
4
3
45
User Manual
BEFORE USING IT
15
KIDS
10-20 mm
1
23
User Manual
MAINTENANCE
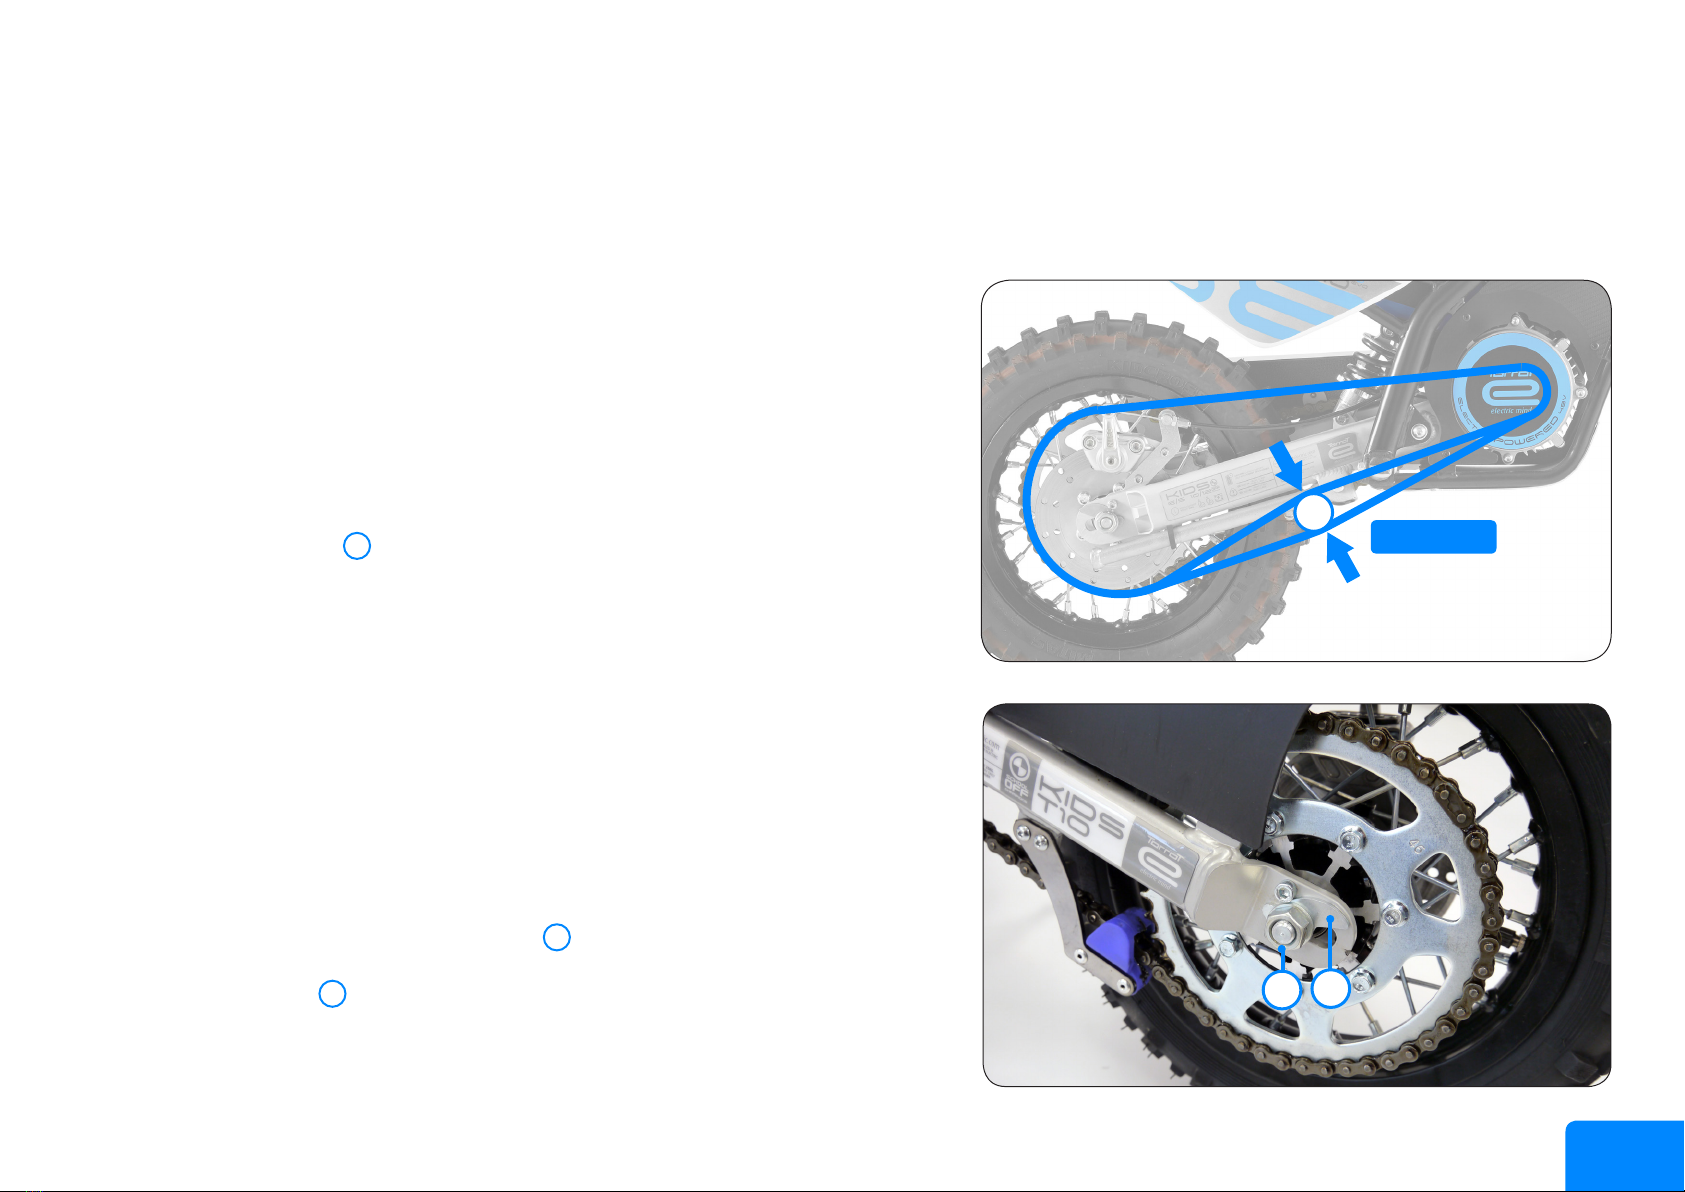
CHAIN TENSION EXAM
The lifespan of the chain depends on its correct lubrication and adjustment. A bad
maintenance can cause a premature wear or damages to the chain and to the
rear/front sprockets.
Before doing the maintenance to the chain, turn OFF the ON/OFF switch and put
the sidestand.
Check the movement up and down in the centre of the lower part of the chain as
is showed in the image . The tension must allow a vertical movement from 10
to 20mm.
Turn the wheel slightly and check the chain movement in different points,
measuring always the gap in the same place.
Examine the teeth in the front and rear sprocket to see if they are wore away or
damaged.
ADJUST YOU MOTORCYCLE CHAIN TENSION
If the vertical movement of the chain is not inside the recommended values,
adjust the tension as indicated below:
- With a 19 mm wrench unbolt the rear axle .
- Turn the eccentrics of both sides by pushing the wheel backwards to stretch
the chain and push it frontwards to do the opposite.
- Screw the axle again ensuring that the chain and the front and rear sprockets
are aligned. Check the movement of the chain again.
1
2
3
16
KIDS
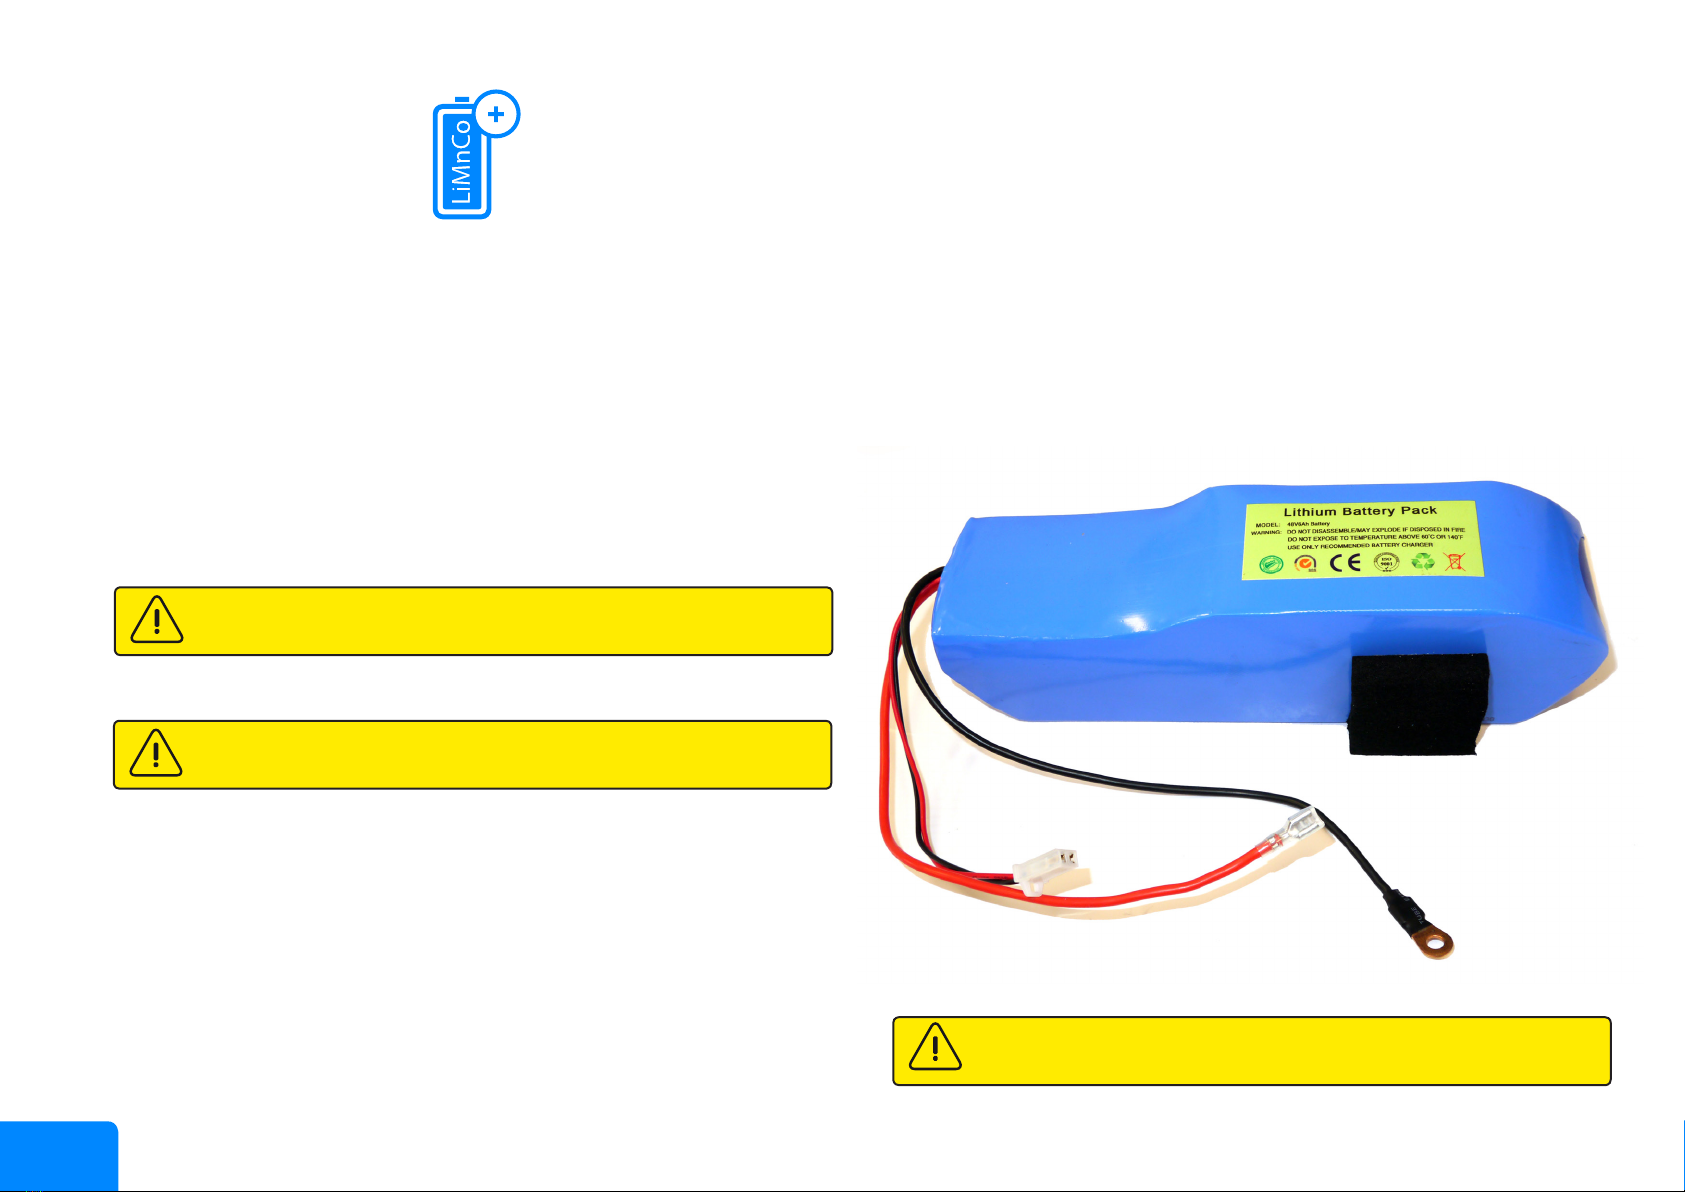
The KIDS is provided with a LiMnCo 48v and 6Ah (288Wh of capacity)
battery which supplies the motor.
This kind of battery does not have the ‘memory effect’ and can be recharged
even if they are not fully discharged.
- The complete capacity of the battery will be achieved after several charge
and discharge cycles. Then you will get more battery range after the rst
uses.
- The KIDS is delivered with the battery at half capacity.
- Always try to charge the battery completely.
- For the correct maintenance of the KIDS, it is recommended to do a full
discharge and charge cycle at least once per month even if the motorbike
is not used.
- If you prevent that you KIDS is will not be used in 3 months or more
and is not possible to charge the battery at least once in a month, you
should disconnect it. To do it, follow the steps indicated in page 18.
-The charger is a component that can heat up noticeably during its use.
Therefore they must be always used in places with good air circulation.
Never cover it up and let it get wet.
- Use only the charger provided by Torrot Electric to charge the battery.
- The charge of the battery must be done in temperature conditions between
5 and 40ºC. Below 5ºC, the charge cycle will be increased and above 40ºC,
the battery can be damaged.
IT IS VERY IMPORTANT TO CHARGE THE BATTERY COMPLETELY
BEFORE THE FIRST TIME USE.
DO NOT LEAVE THE BATTERY DORMANT FOR LONG PERIODS OF TIME,
THEY CAN BE DAMAGED.
ENSURE THAT YOU DO NOT LEAVE THE MOTORBIKE TURNED ON,
THIS WILL DISCHARGE THE BATTERY
User Manual
BATTERY
17
KIDS
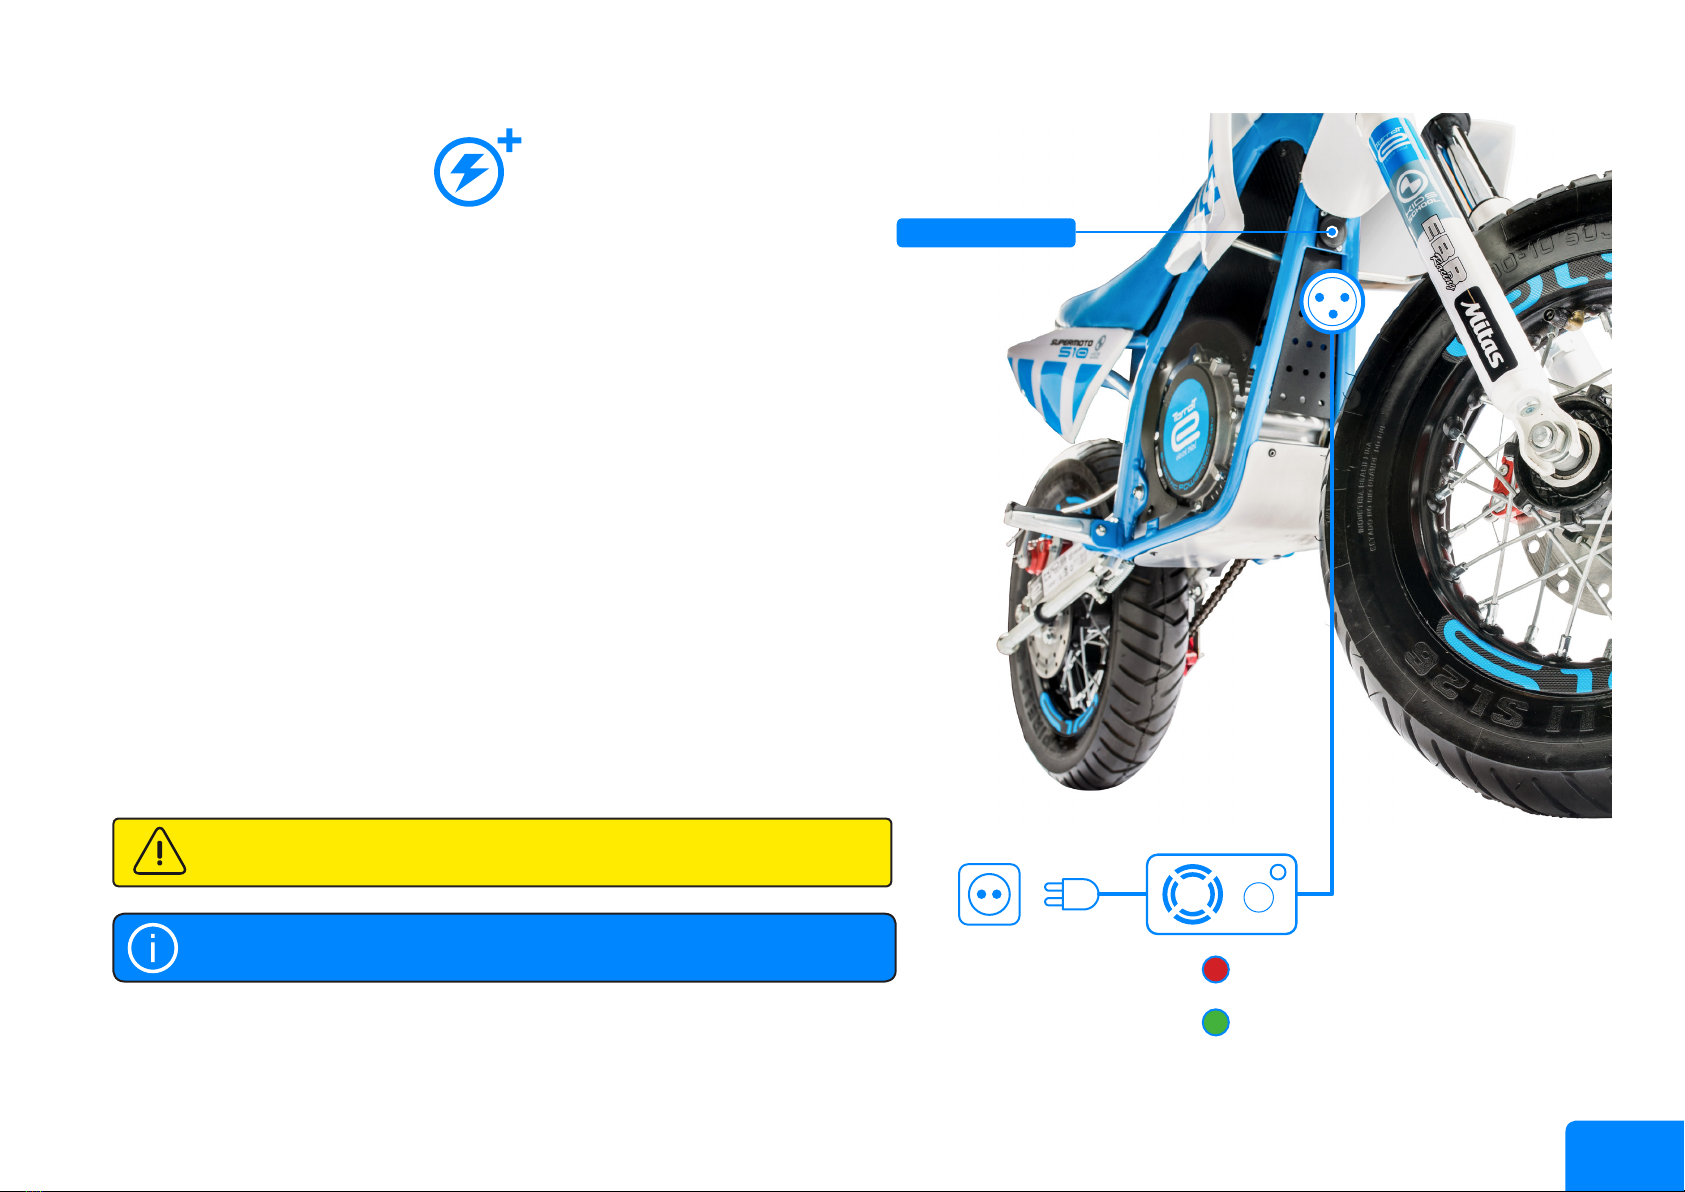
To recharge the battery, follow these steps:
- First ensure that your motorbike is turned off with the ON/OFF switch outwards.
- Then plug the 3 pin connector to the KIDS. The charge connexion for the battery
is located in the front side of the chassis. It has a protection cover. Turn it to allow
the access to the plug.
- Next, plug the charger to the socket (220-230V). After that, the led on the charger
will turn red to indicate that the battery is charging.
- The led will turn green when the battery will have nished the charge cycle. It
will take for about 4 hours to a complete recharge.
- After the charge cycle, disconnect rstly the plug from the outlet and, only after
that, the plug from the charger to the battery. In this moment your KIDS will be
ready to use it.
TO EXTEND THE LIFESPAN OF YOUR BATTERY, AVOID MID-CHARGES. WAIT
UNTIL THE LED TURN GREEN!
Recharge plug
REMEMBER TO COVER ALWAYS THE CHARGE PLUG TO AVOID THE DIRT
ENTRANCE
LED The battery is charging.
LED The battery is fully charged.
FUSE
LED
User Manual
RECHARGE

18
KIDS
We explain you here how to remove the fairing to have
access to the battery in case you want to disconnect it
or change it for a new one.
First locate the screw that is used to attach
the saddle to the subchassis (only in the E10/S10
models). This is situated under the rear mudguard of
the motorbike. Unscrew it and remove the lock nut
with a 10mm wrench. Then remove the saddle.
Now you will see the battery and the main fuse, which
is green . Remove the main fuse of the motorbike.
The next step is unscrew with a number 5 allen key all
the screws that tighten the fairing pieces in the order
indicated in the following image. When you unscrew
the screw number , you will release the terminals
which are connected to ground (to the chassis).
If you have the KIDS T10 it will be easier. You will only
have to unscrew 3 screws following the order indicated
in the following image.
10mm WRENCH
5mm ALLEN KEY
T
T
F
1
2
3
2
3
51
8
4
7
6
F
2T10
E10/S10
User Manual
FAIRING REMOVAL

19
KIDS
Having the all the fairing removed, now is the moment
to disconnect the cords:
Remember to remove the main fuse!
- First, disconnect the terminals connected to the
ground (the chassis)
- Unplug the connector that goes to the recharge point
- Finally disconnect the red cord (battery positive) of the
fuse holder
In this moment you can remove the battery. This will
leave as it can be seen in the image of the page 16.
To mount the battery again, follow the instructions in
reverse order.
THE VOLTAGE IN THE KIDS IS VERY HIGH. BE CAREFUL
WHEN YOU WORK WITH THE CORDS AND THE BATTERY
TERMINALS. A SHORT-CIRCUIT IN THE BATTERY
TERMINALS WILL DAMAGE THE BATTERY AND IT CAN
CAUSE A FIRE AND INJURIES TO THE PERSON.
1
2
3
1
2
3
User Manual
BATTERY REMOVAL

20
KIDS
User Manual
ECU MAPPING
Apart from the power maps that can be selected with the switch
situated behind the number plate, the KIDS allows to programme
other power maps that t to your tastes and necessities.
To programme the KIDS controller you will need a RS232 connector
(or an USB-to-RS232 converter and the appropriate drivers, in case
your PC does not have a RS232 port) and the Torrot ePower software
installed in a PC. This software can be downloaded in the webpage
www.torrotelectric.com.
Before connecting the computer to the controller ensure that your
motorbike is switched on but the motor has been turned off. That is,
the throttle must not be activated in any moment.
To access to the controller and to the RS232 connector you will
have to remove part of the fairing. Check the page 18 to see how it
can be disassembled. The controller is situated just behind the head
tube.
Once you have the cord connected to the computer and to the
controller, and you have turned on the computer and the motorbike,
open the software
1
1
THE EASIEST THING IS TO GO TO YOUR CLOSEST TORROT
ELECTRIC DEALER AND LET THEM CONFIGURE THE CONTROLLER
AS YOU WANT.
This manual suits for next models
2
Table of contents
Other Torrot Motorcycle manuals


