manuals.online logo
Brands
  1. Home
  2. •
  3. Brands
  4. •
  5. Toshiba
  6. •
  7. Air Conditioner
  8. •
  9. Toshiba RAS-M10UKPX4 User manual

Toshiba RAS-M10UKPX4 User manual

FILE NO. FILE NO.
SVM-05039SVM-05039
SERVICE MANUALSERVICE MANUAL
AIR CONDITIONERAIR CONDITIONER
MULTI SPLIT WALL TYPEMULTI SPLIT WALL TYPE
RAS-M10UKPX4 , RAS-M13UKPX4RAS-M10UKPX4 , RAS-M13UKPX4
JunJun
e,e,
200200
55
−−
11
−−
FILE NO. FILE NO.
SVM-05039SVM-05039
CONTENTSCONTENTS
1. SPECIFICATIONS1. SPECIFICATIONS
2. 2.
CONSTRUCTION CONSTRUCTION
VIEWSVIEWS
2-2-
11
InIn
dodo
or Uor U
nini
tt
3. 3.
WIRING WIRING
DIAGRAMDIAGRAM
4. 4.
SPECIFICATION SPECIFICATION
OF OF
ELECTRICAL ELECTRICAL
PARTSPARTS
4-1 4-1
Indoor Indoor
UnitUnit
5. 5.
CONTROL CONTROL
BLOCK BLOCK
DIAGRAMDIAGRAM
6. 6.
OPERATION OPERATION
DESCRIPTIONDESCRIPTION
6-1 6-1
Outline of Outline of
Air ConditionAir Condition
er Controler Control
6-2 6-2
Description Description
of Opeof Ope
ration Circuitration Circuit
6-3 6-3
Low-TemperatuLow-Temperatu
re Limit re Limit
ControlControl
6-4 6-4
Auto Auto
Restart Restart
FunctionFunction
6-5 6-5
Filter Filter
Check Check
LampLamp
7. 7.
INSTALLATION INSTALLATION
PROCEDUREPROCEDURE
7-1 7-1
Safety Safety
CautionsCautions
7-2 7-2
Installation Installation
Diagram of Diagram of
Indoor UnitsIndoor Units
7-3 7-3
Indoor Indoor
UnitUnit
7-4 7-4
How to SeHow to Se
t Remote Ct Remote C
ontrol Selectontrol Select
or Switchor Switch
7-5 Others7-5 Others
8. 8.
TROUBLESHOOTING TROUBLESHOOTING
CHARTCHART
9-1 9-1
TroubleshootinTroubleshootin
g g
ProcedureProcedure
9-2 9-2
Basic Basic
Check Check
ItemsItems
9-3 9-3
Primary Primary
JudgementJudgement
9-4 9-4
Self-Diagnosis Self-Diagnosis
by Remote by Remote
Control (ChecControl (Chec
k Code)k Code)
9-5 9-5
TroubleshootTroubleshoot
ing ing
FlowchartsFlowcharts
9-6 9-6
TroubleshootinTroubleshootin
g for Remote Control (Inclug for Remote Control (Inclu
ding The Indooding The Indoo
r P.C. Board)r P.C. Board)
9. 9.
PARTS PARTS
REPLACEMENTREPLACEMENT
9-1 9-1
Indoor Indoor
UnitUnit
10. 10.
EXPLODED VIEWS EXPLODED VIEWS
AND PARTS AND PARTS
LISTLIST
10-1 Indoor Unit (E-Parts Assy)10-1 Indoor Unit (E-Parts Assy)
10-2 Indoor10-2 Indoor
6-6 6-6
Self-cleaning Self-cleaning
function.function.
−−
11
−−
FILE NO. FILE NO.
SVM-05039SVM-05039
CONTENTSCONTENTS
1. SPECIFICATIONS1. SPECIFICATIONS
2. 2.
CONSTRUCTION CONSTRUCTION
VIEWSVIEWS
2-2-
11
InIn
dodo
or Uor U
nini
tt
3. 3.
WIRING WIRING
DIAGRAMDIAGRAM
4. 4.
SPECIFICATION SPECIFICATION
OF OF
ELECTRICAL ELECTRICAL
PARTSPARTS
4-1 4-1
Indoor Indoor
UnitUnit
5. 5.
CONTROL CONTROL
BLOCK BLOCK
DIAGRAMDIAGRAM
6. 6.
OPERATION OPERATION
DESCRIPTIONDESCRIPTION
6-1 6-1
Outline of Outline of
Air ConditionAir Condition
er Controler Control
6-2 6-2
Description Description
of Opeof Ope
ration Circuitration Circuit
6-3 6-3
Low-TemperatuLow-Temperatu
re Limit re Limit
ControlControl
6-4 6-4
Auto Auto
Restart Restart
FunctionFunction
6-5 6-5
Filter Filter
Check Check
LampLamp
7. 7.
INSTALLATION INSTALLATION
PROCEDUREPROCEDURE
7-1 7-1
Safety Safety
CautionsCautions
7-2 7-2
Installation Installation
Diagram of Diagram of
Indoor UnitsIndoor Units
7-3 7-3
Indoor Indoor
UnitUnit
7-4 7-4
How to SeHow to Se
t Remote Ct Remote C
ontrol Selectontrol Select
or Switchor Switch
7-5 Others7-5 Others
8. 8.
TROUBLESHOOTING TROUBLESHOOTING
CHARTCHART
9-1 9-1
TroubleshootinTroubleshootin
g g
ProcedureProcedure
9-2 9-2
Basic Basic
Check Check
ItemsItems
9-3 9-3
Primary Primary
JudgementJudgement
9-4 9-4
Self-Diagnosis Self-Diagnosis
by Remote by Remote
Control (ChecControl (Chec
k Code)k Code)
9-5 9-5
TroubleshootTroubleshoot
ing ing
FlowchartsFlowcharts
9-6 9-6
TroubleshootinTroubleshootin
g for Remote Control (Inclug for Remote Control (Inclu
ding The Indooding The Indoo
r P.C. Board)r P.C. Board)
9. 9.
PARTS PARTS
REPLACEMENTREPLACEMENT
9-1 9-1
Indoor Indoor
UnitUnit
10. 10.
EXPLODED VIEWS EXPLODED VIEWS
AND PARTS AND PARTS
LISTLIST
10-1 Indoor Unit (E-Parts Assy)10-1 Indoor Unit (E-Parts Assy)
10-2 Indoor10-2 Indoor
6-6 6-6
Self-cleaning Self-cleaning
function.function.
−−
22
−−
FILE NO. SVM-050FILE NO. SVM-050
3939
1. SPECIFICATIONS1. SPECIFICATIONS
ITEMITEM
PhasePhase
VV
HzHz
PP
oo
ww
ee
r r
cc
oo
nn
ss
uu
mm
pp
tt
ii
oo
nn
WW
PP
oo
ww
ee
r r
ff
aa
cc
tt
oo
rr
%%
RR
uu
nn
nn
ii
nn
g g
cc
uu
rr
rr
ee
nn
tt
AA
MM
oo
ii
ss
tt
uu
rr
e e
rr
ee
mm
oo
vv
aa
ll
LL
ii
tt
ee
rr
//
hh
NN
oo
ii
ss
e e
((
HH
//
MM
//
LL
))
dd
BB
GG
aa
s s
ss
ii
dd
e e
ss
ii
zz
ee
mm
mm
InIn
tt
ee
rr
cc
onon
nn
ee
ctct
ii
oo
nn
CC
oo
nnnn
ee
cc
tt
ii
on on
tt
yy
pp
ee
pp
ii
pp
ee
LL
ii
qq
uu
ii
d d
ss
ii
dd
e e
ss
ii
zz
ee
mm
mm
Connection typeConnection type
HH
ee
ii
gg
hh
tt
mm
mm
DD
ii
mm
ee
nn
ss
ii
oo
nn
ss
WW
ii
dd
tt
hh
mm
mm
DD
ee
pp
tt
hh
mm
mm
NN
ee
t t
ww
ee
ii
gg
hh
tt
kk
gg
Evaporator typeEvaporator type
Indoor fan typeIndoor fan type
High High
fan fan
mm
33
/h/h
Air Air
volume volume
Medium Medium
fan fan
mm
33
/h/h
Low Low
fan fan
mm
33
/h/h
FF
aa
n n
mm
oo
tt
oo
r r
oo
uu
tt
pp
uu
tt
WW
Air filterAir filter
Specifications are subject to change without notice.Specifications are subject to change without notice.
Honeycomb woven filter with PP frameHoneycomb woven filter with PP frame
2020
630630
550550
460460
Cross flow fanCross flow fan
610610
490490
370370
790790
208208
1010
Finned tubeFinned tube
Flare connectionFlare connection
6.356.35
Flare connectionFlare connection
275275
33
99
//
33
33
//
22
66
44
11
//
33
55
//
33
11
∅∅
9.529.52
∅∅
12.712.7
3030
8787
0.150.15
11
..
22
22
..
00
RR
AA
SS
--
MM
11
00
UU
KK
PP
XX
4 4
RR
AA
SS
--
MM
11
33
UU
KK
PP
XX
44
MODELMODEL
Power sourcePower source
11
∅∅
220 - 240220 - 240
5050
––
FILE NO. SVM-0FILE NO. SVM-0
50395039
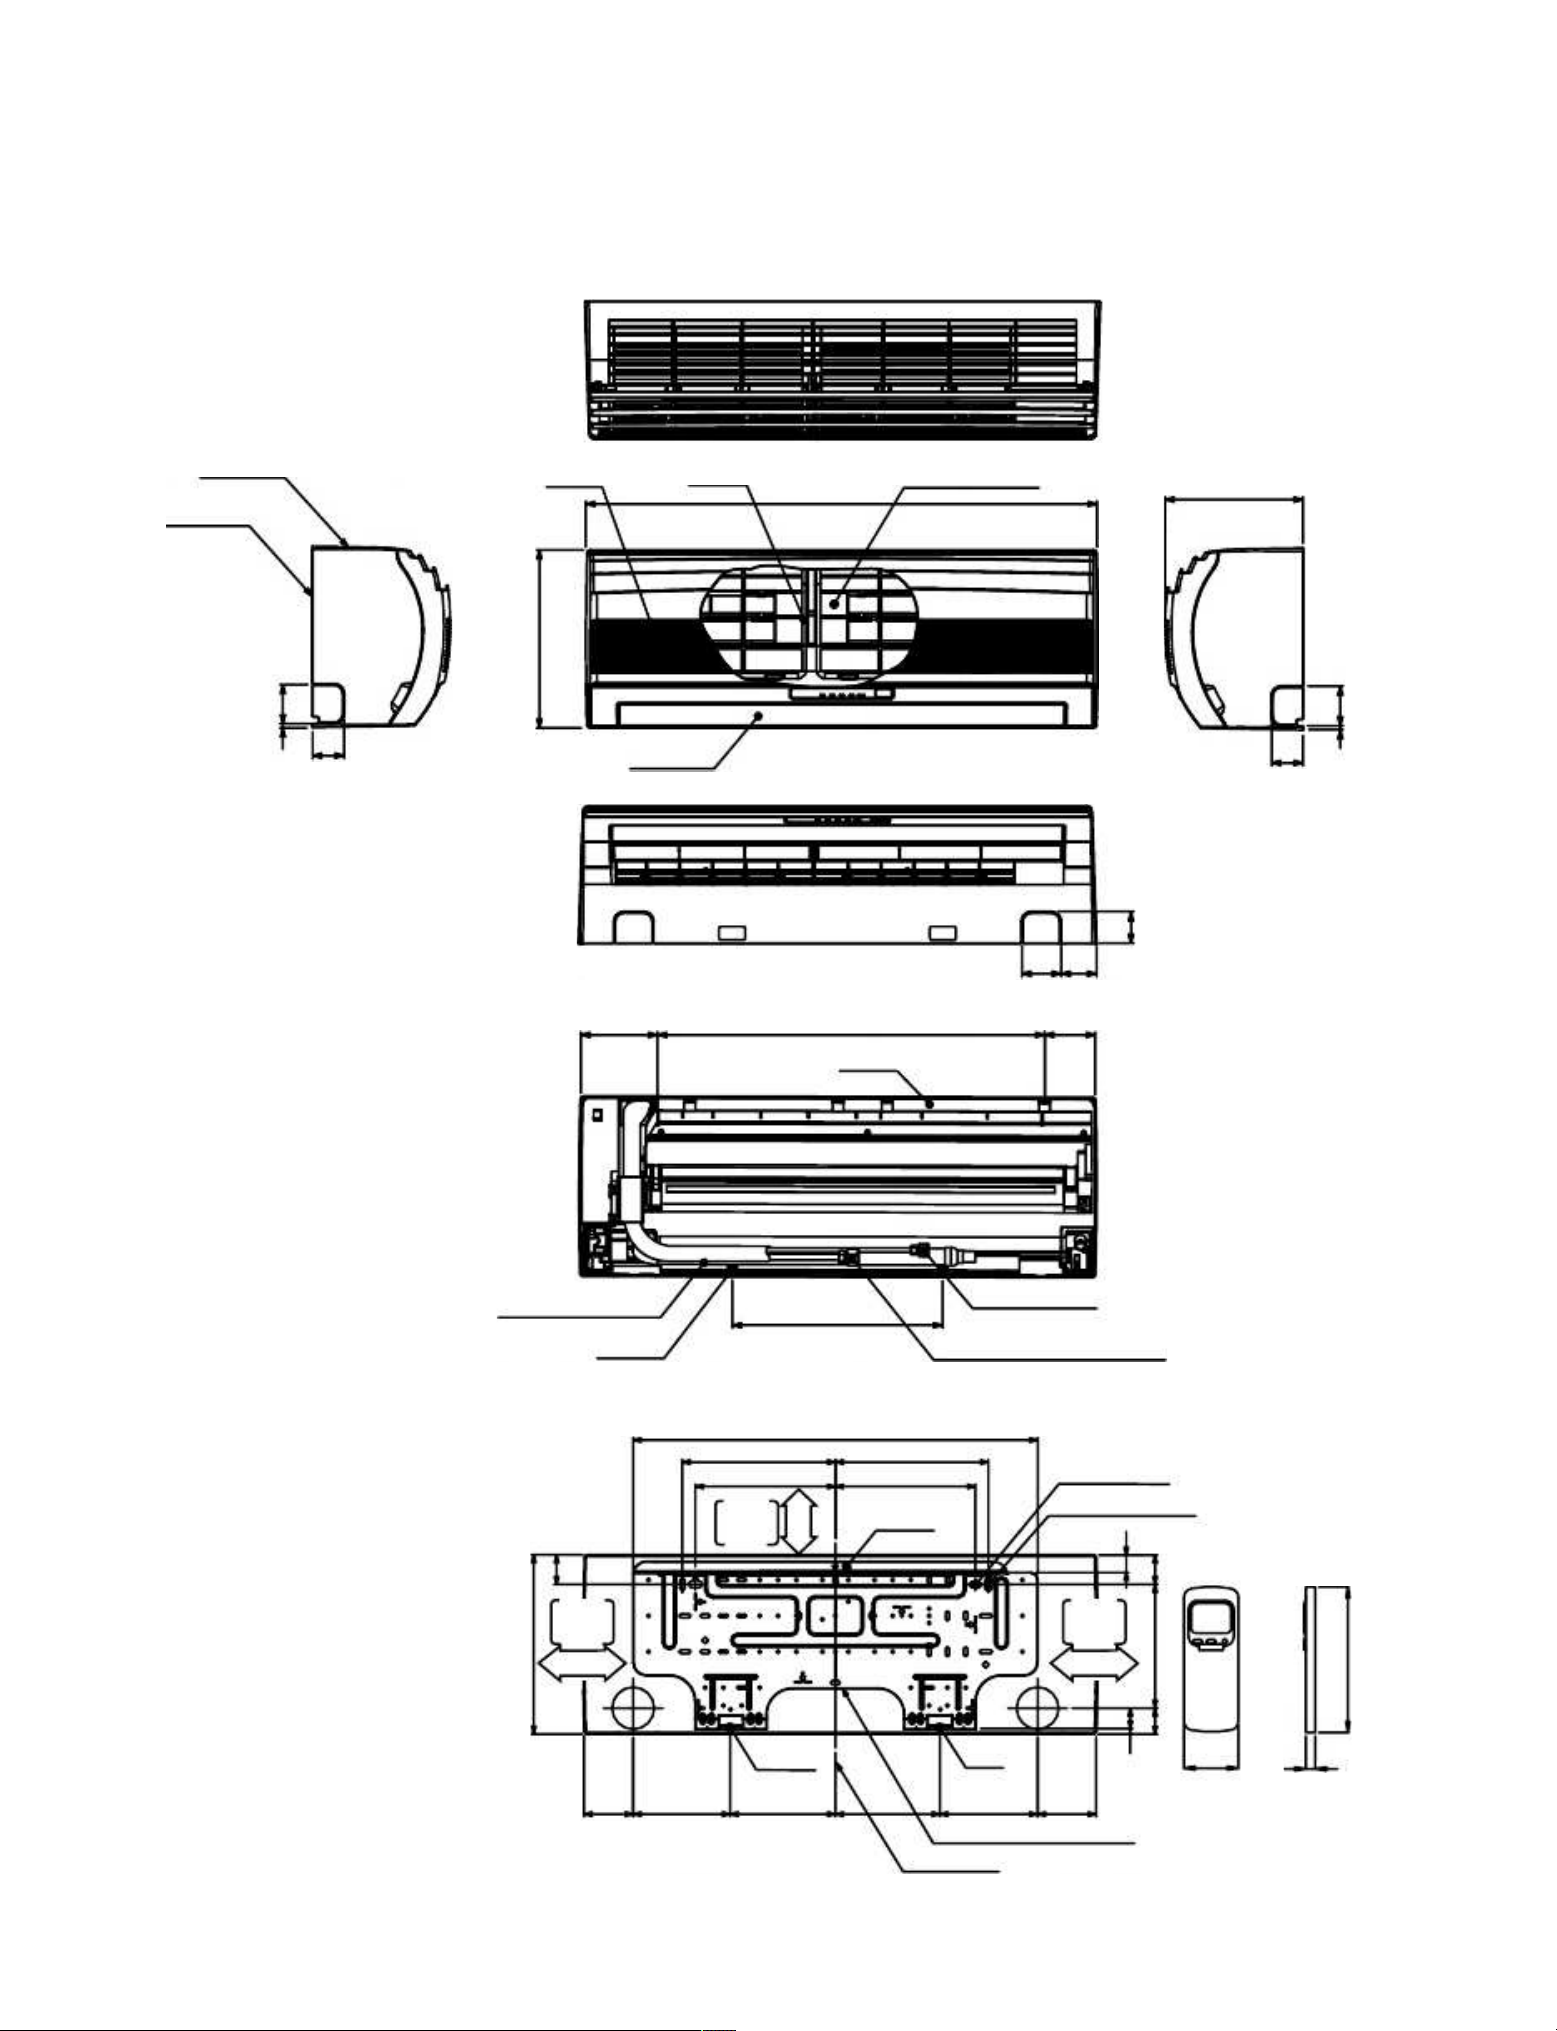
2. CONSTRUCTION VIEWS2. CONSTRUCTION VIEWS
2-1. Indoor Unit2-1. Indoor Unit
−−
33
−−
Knock out systemKnock out system
Back bodyBack body
Front panelFront panel
Air outletAir outlet
Air inletAir inlet
Air filterAir filter
Heat exchangerHeat exchanger
Knock out systemKnock out system
66
66
00
22
77
55
790790
208208
4848
44
88
22
66
44
55
11
99
00
44
00
33
22
6464
590590
320320
620620
22
33
55
22
33
55
22
11
55
22
11
55
9090
9090
22
77
55
44
55
150150
11
55
00
11
66
00
160160
11
22
00
88
00
5353
66
66
00
HangerHanger
HangerHanger
HangerHanger
HangerHanger
HangerHanger
Drain hose (0.54m)Drain hose (0.54m)
Connecting pipe (0.43m)Connecting pipe (0.43m)
(Flare(Flare
∅∅
6.35)6.35)
For stud boltFor stud bolt
((
∅∅
8~8~
∅∅
10)10)
For stud bolt (For stud bolt (
∅∅
6)6)
Installation plate outlineInstallation plate outline
Center lineCenter line
MinimumMinimum
distancedistance
to ceilingto ceiling
170 or170 or
moremore
MinimumMinimum
distancedistance
to ceilingto ceiling
170 or170 or
moremore
66
55
oo
rr
mm
oo
rr
ee
MinimumMinimum
distancedistance
to ceilingto ceiling
Wireless remote controlWireless remote control
55
77
11
88
11
66
00
(For 13 series ; Flare(For 13 series ; Flare
∅∅
12.712.7
For 10 series ; FlareFor 10 series ; Flare
∅∅
9.52)9.52)
Connecting pipe (0.33m)Connecting pipe (0.33m)
–
5
–
FILE NO. SVM-0
5039
4.
SPECIF
ICA
TION OF
ELECTRI
CAL P
ARTS
4-1. Indoor Unit
N
o
.
P
a
r
t
s
n
a
m
e
T
y
p
e
S
p
e
c
i
f
i
c
a
t
i
o
n
s
1
Fan
motor
(for
indoor)
SKF
-2
2
0-20-4A-1
AC
Motor
with
1
50
°C thermo fuse
2
T
h
e
r
m
o
s
e
n
s
o
r
(
T
A
-
s
e
n
s
o
r
)
—
—
—
1
0
k
Ω
at 25°C
3
Switching
transformer
 TT-10
4
Microcontroller
unit
(IC30)
TMP87CM40AN-
5CK9
5
H
e
a
t e
x
c
h
a
n
g
e
r s
e
n
s
o
r
———
10k
Ω
at 25°C
(TC-sensor)
6
L
i
n
e
f
i
l
t
e
r
(
L
0
1
)
L
C
*
S
S
1
1
V
-
0
6
2
7
0
2
7
m
H
,
6
0
0
m
A
7
Bridge
rectifier
(DB01)
KBP06M/51 1.5
A, 600V
8
Capacitor
(C02)
 PF1E222MNN1625
47
µ
F, 400V
9
Fuse
(F01)
 BET6.3A
T6.3A,
250VAC
1
0
V
a
r
i
s
t
o
r
(
R
2
1
,
R
2
2
)
1
5
G
5
6
1
K
5
6
0
V
1
1
Louver
motor
MP24
Z
12VDC
1
2
Relay
(Comp.,
RY01)
DI1
U
Rating 2
5
A/AC250V
,
3~48
VDC
−
6
−
REMO
FILE NO. SVM-050
39
TE CONTROL
5.
CONTROL
BLOCK
DIAGRAM
Heat Exchange sensor
M
a
i
n
U
n
i
t
C
o
n
t
r
o
l
P
a
n
e
l
M
.
C
.
U
.
Functions
Operation
Display
Timer
Display
Filter Sign
Display
Fan Only
Sign Display
Indoor Fan
Motor
Louver
Motor
Louver
ON/OFF
Signal
Compressor
ON/OFF
Signal
Power Supply
Circuit
N
o
i
s
e
F
i
l
t
e
r
R
e
l
a
y
D
r
i
v
e
r
,
L
o
u
v
e
r
D
r
i
v
e
r 
Relay
RY01
220
−
2
4
0 V~,
5
0Hz
Compressor, Outdoor Fan Motor
Initiallizing Circuit
Clock Frequency
Oscillator Circuit
•
Louver Control
•
3-minutes Delay at Restart
for Compressor
•
Processing
(Temperature Processing)
•
Motor Revolution Control
•
Timer
Thermo. Sensor
Infrared Rays Signal Reciver
Operation (
)
Operation (
)
Remote Control
Operation Mode Selection
AUTO, COOL
, DRY
, FAN ONL
Y
Temperature Setting
Fan Speed Selection
ON TIMER Setting
OFF TIMER Setting
Louver Auto Swing
Louver Direction Setting
ECO
Hi power
TIMER
1.3.5.9H
Infrared Rays
COMFORT SLEEP
QUIET
(From Outdoor unit)
6.
OPERATION
DESCRIPTION
T
able 7-1-
1
The air conditioner is controlled by
the controller
mounted in the indoor unit.
6
-1-1.
Louver contr
The controller oper
ol
ates all
(1)
components based on the commands tr
V
ansmitted from
er
the remote control and the f
tical air flo
eedbac
w louv
k data of the sensor
er
is as f
P
ollo
osition of v
w:
er
•
itcal air flo
The temper
w louv
ature measurement at the air inlet of
er is automatically
the indoor heat e
controlled according to the operation mode
xchanger b
.
y the indoor
Besides
temperature sensor
, position of v
•
er
The temper
tical air flo
ature measurement at the indoor
w louv
heat e
er can be
xchanger b
arbitr
y the indoor heat e
ar
xchanger
ily set b
temperature sensor
y
pressing
[FIX]
b
•
utton.
Indoor f
The louv
an motor oper
er position which is set b
ation control
y [FIX] b
•
utton is
Louv
stored in the microcontroller
er motor control
, and the louv
•
er is
LED displa
automatically set at the stored position f
y control
or the ne
•
xt
Outdoor f
oper
an motor oper
ation.
ation control
(2)
•
Swing
Compressor oper
If [SWING] b
ation control
utton is pressed when the indoor unit
•
is in oper
Receiving the inf
ation, the v
or
er
mation of the oper
tical air flo
ation
w louv
status and judging the inf
er star
or
ts
mation or the
swinging. When [
SWING
] button is pressed
again
,
it stops
swinging.
6
-1.
Outline of
Air Conditioner
Control
This is a fixed capacity type a
ir conditioner, which uses
AC motor f
or an indoor fan.
The AC motor
drive
circuit is mounted in the indoor
unit. And electrical
parts which
driving
the compressor and the outdoor
fan motor, are mounted in the outdoor unit.
FILE NO. SVM-05039
−
7
−
6
-1-2. Indoor fan control (AC Fan motor)
(1)
The i
ndoor f
an is op
erat
ed by t
he step
less sp
eed
change AC motor.
(2)
Fo
r air fl
ow le
vel
, speed of
the ind
oor f
an motor
is
controlled in
five steps (LOW, LOW
+
, MED, MED
+
and HIGH). If AUTO mode is selected, the fan
motor speed is automatically controlled by the
difference between the preset temperature and
the room temperature.
LOW
+
=
MED
+
=
LOW+MED
2
MED+HIGH
2
C
o
o
l
i
n
g
U
H
H
M
L L
-
U
L
S
L
OPERATION
Fan only
H
M
L
L-
D
r
y
M
L
L
-
U
L
S
L
MODE
r
p
m
1
3
5
0
1
3
0
0
1
2
5
0 1
0
5
0 1
0
0
0 9
5
0
9
0
0
8
0
0
7
5
0
7
0
0
6
5
0
Air flow v
olume (m
3
/
h
)
6
5
0
6
3
0
6
1
0
4
9
0
4
6
0
4
3
0
4
0
0
3
4
0
3
1
0
2
8
0
2
5
0
RAS-10UK Series
M
o
d
e
l
RAS-13UK Series
rpm
Air flow v
olume (m
3
/h)
1
3
5
0
1
3
0
0
1
1
5
0
1
1
0
0
1
0
5
0
1
0
0
0
9
5
0
9
0
0
8
5
0
7
5
0
6
5
0
6
3
0
5
5
0
5
2
0
4
9
0
4
6
0
4
3
0
4
0
0
3
7
0
3
1
0
800
340
700
280
FAN TAP
indication of errors.
-
8
-
6-
2.
De
scri
ption of Ope
ration Circuit
(1)
When tu
rning on
the br
eaker
, the o
perat
ion la
mp
blinks.
This means that
the power supply
is on.
(2)
When
pressing
[
]
button
on
the
remote
control,
receiving beep sounds from the indoor unit, and
the next operation is performed together with
opening the
vertical air flow louver.
(3)
Once th
e oper
ation
mode i
s set,
it is
memori
zed in
the microcontroller so that the previous operation
can be effected thereafter simply by pressing
[
]
button.
(1)
When [F
AN] bu
tton is set t
o AU
TO
, the indo
or fan
motor operates as shown in Fig.
6
-2-1.
 When
NOTE :
*1:
The v
alues
marke
d wit
h *1 a
re cal
culat
ed and
controlled by the difference in motor speed
between M+ and L
-
.
Fig.
6-2-
1 Setting o
f air f
low
[FAN:AUTO
]
(2)
The Hi POWER, ECO and COMFORT SLEEP
6
-2-2. Cooling operation
([MODE] button on the remote control is set
to the cooling operation.)
(1)
The
compresso
r
, outdoor fan and operation
display on the remote control are
controlled
as shown in Fig.
6
-2-2.
Fig.
6
-2-2
(2)
When [F
AN] b
utton is s
et to A
UT
O, t
he indoor f
an
motor operates as shown in Fig.
6
-2-3. When
[FAN] button is set to LOW,
LOW
+
,
MED
, MED
+
or
HIGH, the motor
operates with a
constant air flow.
NOTE :
*1:
The v
alues
marked
with
*1 ar
e calc
ulate
d and
controlled by the difference in motor speed
between M+ and L
-
.
Fig.
6-2-
3 Setting o
f air f
low
[FAN:AUTO
]
*1
*1
*1
L
+3
°C
+2.5
+2
+1.5
+1
+0.5
-0.5
0
M+
(
R
o
o
m
t
e
m
p
.
)
−
(
P
r
e
s
e
t
t
e
m
p
.
)
Preset
temp.
+2
+2.5
+3
°C
+1.5
+1
+0.5
0
M+
*1
*1
*1
L
(
R
o
o
m
t
e
m
p
.
)
(
P
r
e
s
e
t
t
e
m
p
.
)
Preset
(Preset temp.: 2
2
°C)
temp.
0.5
°C
0
Preset
temp.
O
N
O
N
O
F
F
O
F
F
O
N
C
o
m
p
r
e
s
s
o
r
O
u
t
d
o
o
r
f
a
n
O
P
E
R
A
T
I
O
N
d
i
s
p
l
a
y
(
R
o
o
m
t
e
m
p
.
)
(
P
r
e
s
e
t
t
e
m
p
.
)
-
-
-
-
FILE NO. SVM-05039
operation cannot be set.
6
-2-1.
Fa
n only
operation
([MODE] button on the remote control is set
to the
fan only
operation.)
[FAN] button is set to LOW, LOW
+
, MED, MED
+
or HIGH, the motor operates with a constant air
flow.
-
9
-
6
-2-3. Dry operation
([MODE] button on the remote control is set
to the dry
operation.)
(1)
The compressor
, outdoor
fan
and operation
display on the remote control are
controlled
as shown in Fig.
6
-2-4.
Fig.
6
-2-4
(2)
The m
icroc
ontrol
ler t
urns th
e comp
ressor
on and
off at the regular inter
vals (4 to 6 minutes). While
the compressor is turn
ing off, the indoor fan motor
operates in the SUPER LOW position.
The pattern of operation depending on the relation
between room temperature and preset
temperatures is shown in
Fig.
6
-2-5.
Fig.
6
-2-5
(3)
[F
AN] bu
tton on the r
emote con
trol is se
t to A
UT
O
only.
(4) The
Hi POWER, ECO, COMFORT SLEEP and
Room temp.
Preset temp.+1
Preset temp.
Compressor
Outdoor fan
Indoor fan
L
*
SL SL
L
L SL L
O
N
O
N
O
N
O
N
O
F
F
O
F
F
O
F
F
*
Super Low
Preset
temp.
ON
+3
°C
+2
+1
0
OFF
O
u
t
d
o
o
r
f
a
n
O
P
E
R
A
T
I
O
N
d
i
s
p
l
a
y
C
o
m
p
r
e
s
s
o
r
O
N
:
6
m
i
n
.
O
F
F
:
4
m
i
n
.
O
N
:
5
m
i
n
.
O
F
F
:
5
m
i
n
.
OFF
O
N
:
6
m
i
n
.
O
F
F
:
4
m
i
n
.
O
N
:
5
m
i
n
.
O
F
F
:
5
m
i
n
.
(
R
o
o
m
t
e
m
p
.
)
(
P
r
e
s
e
t
t
e
m
p
.
)
-
FILE NO. SVM-05039
6
-2-
4
. Automatic operation
([MODE] button on the remote control is set
to the automatic operation.)
(1)
One of 2
operations (Cooling
or F
an only )
is selected according to
difference between the
preset temperature and the room temperature at
which the automatic operation has started, as
shown in Fig.
6
-2-6. T
he Fan only
operation
continues until the room temperature reaches a
level at which another mode is selected.
(2
)
T
em
po
ra
ry A
ut
o
When the [TEMPORAR
Y] button on the
indoor unit
is pushed, the preset temperature is fix
ed at 24
°C
and the indoor unit is controlled as shown in
Fig.
6
-2-6.
Fig.
6
-2-
6
(
R
o
o
m
t
e
m
p
.
)
(
P
r
e
s
e
t
t
e
m
p
.
)
°C
+4
0
1
The louver moves to the position same
as Hi POWER operation.
Cooling operation
Cooling operation
Fan only operation
-
-
QUIET operations connot be set.
6
-
4
.
Low-Temperature Limit
Control
The microcontroller detects the indoor heat
exchanger
temperature to prevent the indoor heat exchanger from
freezing.
The compressor and outdoor fan motor are controlled
as shown in Fig.
6
-
4
-1 and
6
-
4
-2.
13UK
Series
Fig.
6
-
4
-1
10UK
Series
Fig.
6
-
4
-2
7
(°C)
5
Compressor
Heat exchanger
temperature
Outdoor fan
ON
Less than 5°C continues
for 5 minutes
OFF
6
(°C)
2
Compr
essor
Outdo
or
fan
ON
Less than 2°C continues
for 5 minutes
OFF
Heat exchanger
temperature
FILE NO. SVM-05039
•
FAN speed : [AUTO]
If the room temperature is higher than the
setting temperature by 3.5
°
C or more, the air
conditioner operates at maximum airflow level.
If the room temperature is higher than the
setting temperature by less than 3.5
°
C, the air
conditioner operates at normal airflow level.
•
FAN speed : One of 5 levels
If the room temperature is higher than the
setting temperature by 3.5
°
C or more, the air
conditioner operates at higher consecutive
airflow level. If the room temperature is higher
than the setting temperature by less than 3.5
°
C,
the air conditioner operates at normal airflow
level.
(3)
The Hi POWER m
ode can not be set in Dry of fan
only operation.
-
10
-
6
-3. Hi POWER Mode
([Hi POWER] button on the remote
control is pressed.)
When [Hi POWER] button is pressed while the indoor
unit is in Auto, Cooling or Heating operation, Hi
POWER mark is indicated on the d
isplay of the remote
control and the unit op
erates as follows.
(1)
Au
tom
ati
c
oper
ati
on
The indoor unit operates in according to the
current operation.
·
(2)
Coo
lin
g
op
era
tio
n
•
The setting temperature drops 3
°
C.
(The value of the setting temperature on the
remote control does not change.)
•
If the room temperature is higher than the
setting temperature by 3.5
°
C or more, the
horizontal louver moves to the Hi POWER
position automatically. Then when the room
temperature is 1
°
C less than the setting
temperature the horizontal louver returns
automatically.
6
-
5
. Auto Restart Function
The indoor unit is equipped with an automatic
restarting function which allows the unit to restart
operating with the set operating conditions
in the event
of power supply b
eing accidentally shut
down.
The
operation will resume without warning three minutes
after power is restored.
This function is not set to work when shipped from the
factory
.
Therefore it is necessar
y to set
it to work.
When the unit is on standby (Not operating)
When the unit is in operation
O
p
e
r
a
t
i
o
n
M
o
t
i
o
n
s
Pus
h [
TEM
POR
AR
Y]
but
ton
fo
r m
ore
The
uni
t i
s on
sta
ndb
y
.
than three seconds.
T
h
e
u
n
i
t
s
t
a
r
t
s
t
o
o
p
e
r
a
t
e
.
T
h
e
g
r
e
e
n
l
a
m
p
i
s
o
n
.
After approx.
three seconds,
T
h
e
u
n
i
t
b
e
e
p
s
t
h
r
e
e
t
i
m
e
s
T
h
e
l
a
m
p
c
h
a
n
g
e
s
f
r
o
m
a
n
d
c
o
n
t
i
n
u
e
s
t
o
o
p
e
r
a
t
e
.
g
r
e
e
n
t
o
o
r
a
n
g
e
.
If the unit is not
required to operate at this
time, push [TEMPORAR
Y]
button once more or use the remote control to turn it off.
6
-
5
-1. How to set auto restart
function
T
o set the
auto restart
function, proceed as
follows:
The power supply to the
unit must be on; the function
will not set if the power is
off.
Push the [TEMPORARY] b
utton located in the
center
of the front panel
continuously for three seconds.
The unit receives the signal and beeps three times.
The unit then restarts operating automatically in the
event of power supply being accidentally shut down.
While the filter check lamp is on,
the
[TEMPORAR
Y] button has
the function of
filter
reset button.
O
p
e
r
a
t
i
o
n
M
o
t
i
o
n
s
P
u
s
h
[
T
E
M
P
O
R
A
R
Y
]
b
u
t
t
o
n
f
o
r
m
o
r
e
T
h
e
u
n
i
t
i
s
i
n
o
p
e
r
a
t
i
o
n
.
T
h
e
g
r
e
e
n
l
a
m
p
i
s
o
n
.
than three seconds.
T
h
e
u
n
i
t
s
t
o
p
s
o
p
e
r
a
t
i
n
g
.
T
h
e
g
r
e
e
n
l
a
m
p
i
s
t
u
r
n
e
d
o
f
f
.
After approx.
three seconds,
The unit beeps three times
If the unit is required
to operate at this time, push
[TEMPORAR
Y]
button once more or use the remote control to turn it on.
While this function is being set, if the unit is in
operation, the orange lamp is on.
This function can not be set if the timer operation
has been selected.
When the unit is turned on by this function, the
louver will not swing even though it
was swinging
automatically before shutting down.
0
3S
[TEMPORARY] button
0
3S
¯
¯
¯
¯
·
·
·
·
FILE NO. SVM-05039
[TEMPORARY] button
1
1
-
-
-
1
2
-
6
-
5
-2. How to cancel auto restart function
T
o cancel au
to restart
function, proceed as
follows:
Repeat the setting prodedure: the unit receives the
signal and beeps three times.
The unit will be required to be turned on with the
remote control after the main power supply is turned
off.
When the unit is on standby (Not operating)
When the unit is in operation
While this function is being set, if the unit is in
operation, the orange lamp is on.
6
-
5
-3. Power failure during timer
operation
When the unit is in Timer operation, if it is
turned off
because of power failure, the timer operation is
cancelled.
Therefore, set the timer operation
again.
6
-
6
.
Filter Check Lamp
When the elapsed time reaches 1000 hours, the filter
check lamp indicates. After cleaning the filters, turn off
the filter check lamp.
6
-
6
-1. How to turn off filter check lamp
Push [TEMPORAR
Y] button on
the indoor
unit.
Note:
If [TEMPORAR
Y] button is pushed
while the filter
check lamp is not indicating, the indoor unit will start
the Automatic Operation.
O
p
e
r
a
t
i
o
n
M
o
t
i
o
n
s
Pus
h [T
EMP
ORA
R
Y]
but
ton
fo
r m
ore
The
uni
t i
s on
sta
ndb
y
.
than three seconds.
T
h
e
u
n
i
t
s
t
a
r t
s
t
o
o
p
e
r
a
t
e
.
T
h
e
o
r
a
n
g
e
l
a
m
p
i
s
o
n
.
After approx.
three seconds,
T
h
e
u
n
i
t
b
e
e
p
s
t
h
r
e
e
t
i
m
e
s
T
h
e
l
a
m
p
c
h
a
n
g
e
s
f
r
o
m
a
n
d
c
o
n
t
i
n
u
e
s
t
o
o
p
e
r
a
t
e
.
o
r
a
n
g
e
t
o
g
r
e
e
n
.
If the unit is not requ
ired to operate at this time, push
[TEMPORAR
Y]
button once more or use the remote control to turn it off.
O
p
e
r
a
t
i
o
n
M
o
t
i
o
n
s
P
u
s
h [
T
E
M
P
O
R
A
R
Y
]
b
u
t
t
o
n f
o
r
m
o
r
e
T
h
e
u
n
i
t
i
s
i
n o
p
e
r
a
t
i
o
n
.
T
h
e o
r
a
n
g
e
l
a
m
p
i
s
o
n
.
than three seconds.
T
h
e
u
n
i
t
s
t
o
p
s
o
p
e
r
a
t
i
n
g
.
T
h
e
o
r
a
n
g
e
l
a
m
p
i
s
t
u
r
n
e
d
o
f
f
.
After approx.
three seconds,
The unit beeps three times
If the unit is required to
operate at this time, push [TEMPORARY]
button once more or use the remote control to turn it on.
0
3S
[TEMPORARY] button
0
3S
¯
¯
¯
¯
¯
·
FILE NO. SVM-05039
[TEMPORARY] button
–
13
–
FILE NO. SVM-05039
6
-7. Self-Cleaning function
Self-Cleaning function is designed to reduce humidity that causes mold to form inside the air conditioning unit.
This advanced, efficient system reduces moisture in the coil. When air conditioner is turned off, the internal fan
activates and dries the moisture in the coil for 20 minutes, then it turns off automatically.
O
p
e
r
a
t
i
o
n
d
i
s
p
l
a
y
O
N
O
F
F
O
F
F
FCU fan
O
N
O
N
OFF
rpm
is
depend
on
presetting.
rpm
is
SL
speed.
F
C
U
l
o
u
v
e
r
O
P
E
N
C
L
O
S
E
C
L
O
S
E
Timer display
ON or OFF
ON
ON or OFF
d
e
p
e
n
d
o
n
p
r
e
s
e
t
t
i
n
g
o
f
t
i
m
e
r
f
u
n
c
t
i
o
n
.
d
e
p
e
n
d
o
n
p
r
e
s
e
t
t
i
n
g
o
f
t
i
m
e
r
f
u
n
c
t
i
o
n
.
Compressor
ON or OFF
O
F
F
O
F
F
depend on presetting per room temperature.
C
D
U
f
a
n
O
N
o
r
O
F
F
O
F
F
O
F
F
depend on presetting per room temperature.
8
-
8
Cool mode or dry mode
operation more than 10 mins.
Self-Cleaning mode
operate 20 mins.
Automatically turn-off.
Operation time
T
urn off by remote
controller or
timer-off function.
•
The Self-Cleaning function is set as default at ex-factory.
•
Self-Cleaning operation can stop manually by press [
] button of the remote control two more time.
6
-7-2. How to set Self-Cleaning function.
To set the Self-Cleaning function, proceed as follows.
•
Press [TEMPORARY]
button
one
time
or
use
remote
control to turn on air conditioner. The OPERATION
display will show in orange color (When AUTO-
RESET is ON) or green color (When AUTO-
REST
ART is
OFF).
•
Hold
down
the
[TEMPORARY] button
for
more
than
20 seconds. (The air conditioner will stop suddenly
when the [TEMPORARY] button is pressed but keep
holding it continue. Then will beep 3 times is the first
3 seconds but it is not related to Self-Cleaning
function)
•
After holding about 20 seconds, the air conditioner
will beep 5 times and OPERATION display blinks
5 times.
•
The Self-Cleaning function had been set.
Remarks
•
Per setting of Self-Cleaning function above, AUTO-
REST
ART functio
n had
been cance
lled. T
o set
AUT
O-REST
ART again,
please follow
item
6
-5-1.
6
-7-1. How to cancel Self-Cleaning function
To cancel the Self-Cleaning function, proceed as
follows:
•
Press [T
EMPORARY]
button
one
time o
r use
remote
control to turn on air conditioner. The OPERATION
display will show in orange color (When AUTO-
RESTART is ON) or green color (When AUTO-
REST
ART is O
FF).
•
Hold
down
the
[TEMPORARY] button
for
more than
20 seconds. (The air conditioner will stop suddenly
when the [TEMPORARY] button is pressed but keep
holding it continue. Then will beep 3 times in the first
3 seconds but it is not related to Self-Cleaning
function)
•
After holding about 20 seconds, the air conditioner
will beep 5 times without any blinking of display.
•
The Self-Cleaning Operation had been cancelled.
Remarks
•
Per setting of Self-Cleaning function above, AUTO-
REST
ART function
had been
cancelled. T
o set
AUTO-REST
ART again,
please follow
item
6
-5-1.
When the [QUIET] button is pressed, the fan of the
indoor unit will be restricted the revolving speed at
-
until the [QUIET] button is pressed once
Remarks :
1. Quiet mode is unable to work in dry mode.
2. Quiet mode is appropriate to work with less
cooling load and less heating load condition.
6
-9. COMFORT SLEEP mode
The principles of comfort sleep mode are:
•
Quietness for more comfortable.
•
Save energy by changing room temperature
•
The air condition can shut down by itself
Remarks:
1. Comfort sleep mode will not operate in dry mode
FILE NO. SVM-05039
6
-
8
.
QUIET Mode
Quiet mode is the system
which, control the
revolving speed of indoor fan to work constantly
at lower than
speed L.
In addition, noise level of
indoor unit is less than usual.
speed L
again (cancel Quiet mode).
Because of the fan speed L- may cause not
enough the cooling capacity or heating capacity.
automatically.
and fan only mode.
2. Comfort sleep mode is appropriate to work with less
cooling load and less heating load condition.
Because of the fan speed L- may cause not enough
the cooling capacity or heating capacity.
6
-9-1. Cooling mode
•
The fan speed of indoor unit operates automatically,
it relates with the compressor's operation.
Compressor’s
Operation
Fan
Speed
ON
L
-
OFF
SL
•
The preset temperature will increase 1°C after the
Comfort sleep mode has operated for 1 hour and
automatically.
the temperature
will increase another
1°
C after the
comfort sleep mode
has operated for
2 hour.
(The
value of the preset temperature on the remote control
does not change.)
•
Press the [COMFORT SLEEP] button to choose the
operating hours.
Repeat pressing to
select the hours.
(1hr, 3hr, 5hr or 9hr)
•
If the [COMFORT SLEEP] button is
pressed again
means cancel comfort sleep mode.
6
-9-2. Heating mode
•
The fan speed of indoor unit operates automatically,
it relates with the compressor's operation.
Compressor’s
Operation
Fan
Speed
ON
L
-
OFF SL
•
The preset tem
perature will dr
op down 1°
C after the
comfort sleep mode has operated for 1 hour and the
temperature will de
crease another 1°
C after the
comfort sleep mode
has operated for
2 hour.
(The
value of the preset temperature on the remote control.
dose not change.)
operating hours.
Repeat pressing to
select the hours.
•
Press the [COMFORT SLEEP] button to choose the
(1hr, 3hr, 5hr or 9 hr)
•
If the [COMFORT SLEEP] button is
pressed again
means cancel comfort sleep mode.
–
15
–
FILE NO. SVM-0
5039
7
.
INST
ALLA
TION
PROCEDURE
7-
1. Safety Cautions
DANGER
•
FOR USE
BY QUALIFIED
PERSONS
ONL
Y
.
•
TURN OFF MAIN POWER SUPPLY BEFORE ATTEMPTING ANY ELECTRICAL WORK. MAKE SURE
ALL POWER
SWITCHES ARE
OFF
. F
AILURE
TO DO SO
MA
Y CAUS
E ELECTRIC SHO
CK.
•
CONNECT THE CONNECTING CABLE CORRECTLY. IF THE CONNECTING CABLE IS CONNECTED
WRONGLY, ELECTRIC PARTS MAY BE DAMAGED.
•
CHECK THE EARTH WIRE THAT IT IS NOT BROKEN OR DISCONNECTED BEFORE INSTALLATION.
•
DO NOT INSTALL NEAR CONCENTRATIONS OF COMBUSTIBLE GAS OR GAS VAPORS.
FAILURE TO FOLLOW THIS INSTRUCTION CAN RESULT IN FIRE OR EXPLOSION.
•
TO PREVENT OVERHEATING THE INDOOR UNIT AND CAUSING A FIRE HAZARD, PLACE THE UNIT
WELL
AW
A
Y (MORE THA
N 2
M) FROM
HEA
T SOUR
CES SUCH
AS RADI
A
TORS, HEA
TORS,
FURNACE, STOVES, ETC.
•
WHEN MOVING THE AIR-CONDITIONER FOR INSTALLING IT IN ANOTHER PLACE AGAIN, BE VERY
CAREFUL NOT TO GET THE SPECIFIED REFRIGERANT (R22) WITH ANY OTHER GASEOUS BODY
INTO THE REFRIGERATION CYCLE. IF AIR OR ANY OTHER GAS IS MIXED IN THE REFRIGERANT,
THE GAS PRESSURE IN THE REFRIGERATION CYCLE BECOMES ABNORMALLY HIGH AND IT
RESULTINGLY CAUSES BURST OF THE PIPE AND INJURIES ON PERSONS.
•
IN THE EVENT THAT THE REFRIGERANT GAS LEAKS OUT OF THE PIPE DURING THE
INSTALLATION WORK, IMMEDIATELY LET FRESH AIR INTO THE ROOM. IF THE REFRIGERANT GAS
IS HEATED BY FIRE OR SOMETHING ELSE, IT CAUSES GENERATION OF POISONOUS GAS.
WARNING
•
Never modify this unit by removing any of
the safety guards or bypassing any
of the safety interlock
switches.
•
Do not install in a place which cannot bear the weight of the unit.
Personal injury and property damage can result if the unit falls.
•
Before doing the electrical work, attach an approved plug to the power supply cord.
Also, mak
e sure the equipment is properly earthed.
•
Appliance shall be installed in accordance with national wiring regulations.
If you detect any
damage, do not
install the
unit. Contact your TOS
HIBA dealer immediately.
CAUTION
•
Exposure of unit to water or other moisture before installation could result in electric shock.
Do not store it i
n a wet basement or
expose to rain or water.
•
After unpacking the unit, e
xamine it carefully for possible damage.
•
Do not install in a place that can increase the vibration of the unit. Do not install in a place that can amplify
the noise level of the unit or where noise and discharged air might disturb neighbors.
•
T
o avoid personal injur
y
, be careful when
handling par
ts with sharp
edges.
•
Please read this installation manual carefully before installing the unit. It contains further important
instructions for proper installation.
CAUTION
This appliance must be connected to the main power supply by means of a circuit breaker or a switch with a
contact separation of at least 3 mm.
If this is not possible, a power supply plug with earth must be used. This plug must be easily accessible after
installation. The plug must be disconnected from the power supply socket in order to disconnect the
appliance completely from the mains.
To Disconnect the Appliance
from the Main Power Supply
For general public use
Power supply cord of parts of appliance for Outdoor use shall be at least polychloroprene sheathed flexible
cord (design H07 RN-F), or cord designation 245 IEC 66.
–
16
–
FILE NO. SVM-0
5039
REQUIREMENT OF
REPORT T
O THE LOCAL POWER SU
PPLIER
Please make absolutely sure that the installation of this appliance is reported to the local power supplier
before installation. If you experience any problems, or if the
installation is no
t accepted by the suppli
er, the
service agency will take adequate countermeasures.
−
17
−
FILE NO. SVM-050
39
7
-2.
Installati
on Diagram
of Indoor and
Outdoor Units
Shield
pipe
A
i
r
f
i
l
t
e
r
Hook
(
A
t
t
a
c
h
t
o
t
h
e
f
r
o
n
t
p
a
n
e
l
)
2
Wireless remote
control
6
5
m
m
o
r
m
o
r
e
1
7
0
m
m
o
r
m
o
r
e
8
Pan head wood screw
Bio-enzyme & Gingko
filter
Sasa-Zeolite
4
Remote control holder
H
o
o
k
The auxiliary piping can be
connected the left, rear left,
rear right, right, bottom right
or bottom left.
Right
Rear right
Bottom right
Insulate the refrigerant
pipes separately with
insulation, not together.
For the rear left and left
piping
Insert the cushion between
the indoor unit and
wall,
and tilt the indoor unit
for
better operation.
1
Installation
plate
Wall
Left
Rear left
Bottom left
6 mm thick heat resisting
polyethylene foam
Do not allow the drain hose
to get slack.
Make sure to run the drain
hose sloped downward.
Cut the piping hole
sloped slightly
Before installing the
wireless remote control
•
With the remote control cover
open, load the batteries supplied
correctly, observing their
polarity.
2
2
2
2
2
Wireless remote control
Cover
3
3
3
3
3
Batteries
1
7
0
m
m
o
r
m
o
r
e
plus
filter
6
7
−
18
−
FILE NO.
SVM-05039
7-2-1.
Accessory and
installation
parts
Part
No.
1
2
3
Part name (Q'ty)
Installation plate x 1
Wireless remote control x 1
Battery x 2
Part name (Q'ty)
Remote control holder x 1
B label x 1
Sasa-Zeolite Plus filter x 1
Part
No.
4
5
6
Part
No.
7
8
Others
Name
Owner’s manual
Installation manual
Part name (Q'ty)
Bio-enzyme & Gingko filter x 1
Flat head wood screw
∅
3.1 x 16
s
x 2
B
Mounting screw
∅
4 x 25
s
x 6
9

This manual suits for next models

1

Other Toshiba Air Conditioner manuals

Toshiba MMY-MAP0804HT5P User manual

Toshiba

Toshiba MMY-MAP0804HT5P User manual

Toshiba RAS-05J2KVG-EE User manual

Toshiba

Toshiba RAS-05J2KVG-EE User manual

Toshiba RAS-24PKVSG-E User manual

Toshiba

Toshiba RAS-24PKVSG-E User manual

Toshiba RAS-18YKH-E User manual

Toshiba

Toshiba RAS-18YKH-E User manual

Toshiba TCB-LK2801DP-E User manual

Toshiba

Toshiba TCB-LK2801DP-E User manual

Toshiba RB-N105S-G User manual

Toshiba

Toshiba RB-N105S-G User manual

Toshiba RAS-07PKVP-E User manual

Toshiba

Toshiba RAS-07PKVP-E User manual

Toshiba TCB-LK801D-E User manual

Toshiba

Toshiba TCB-LK801D-E User manual

Toshiba RAV-CT100/150/200/250BH-M/L Installation instructions

Toshiba

Toshiba RAV-CT100/150/200/250BH-M/L Installation instructions

Toshiba RBC-TRP100E User manual

Toshiba

Toshiba RBC-TRP100E User manual

Toshiba RBC-AXU31C-E User manual

Toshiba

Toshiba RBC-AXU31C-E User manual

Toshiba RAV-GM1101AT8P-E User manual

Toshiba

Toshiba RAV-GM1101AT8P-E User manual

Toshiba RAV-SM560AT-E User manual

Toshiba

Toshiba RAV-SM560AT-E User manual

Toshiba MMY-MUP0801HT8JP User manual

Toshiba

Toshiba MMY-MUP0801HT8JP User manual

Toshiba MML-UP0071NHP-E User manual

Toshiba

Toshiba MML-UP0071NHP-E User manual

Toshiba RAS-18J2AVSG-E User manual

Toshiba

Toshiba RAS-18J2AVSG-E User manual

Toshiba RBM-Y0611FUPUL User manual

Toshiba

Toshiba RBM-Y0611FUPUL User manual

Toshiba RAS-H10BACVS-V User manual

Toshiba

Toshiba RAS-H10BACVS-V User manual

Toshiba CARRIER RAV-SP240UT-UL User manual

Toshiba

Toshiba CARRIER RAV-SP240UT-UL User manual

Toshiba RAS-B10N4KVRG-E1 User manual

Toshiba

Toshiba RAS-B10N4KVRG-E1 User manual

Toshiba RAV-SM2242DT-E User manual

Toshiba

Toshiba RAV-SM2242DT-E User manual

Toshiba RAS-B10UFV User manual

Toshiba

Toshiba RAS-B10UFV User manual

Toshiba RAV-HM1101KRTP-E User manual

Toshiba

Toshiba RAV-HM1101KRTP-E User manual

Toshiba RAV-SM564UT-E User manual

Toshiba

Toshiba RAV-SM564UT-E User manual

Popular Air Conditioner manuals by other brands

Daikin FXLQ12MVJU installation manual

Daikin

Daikin FXLQ12MVJU installation manual

Mitsubishi Electric PUHY-EP200 Service handbook

Mitsubishi Electric

Mitsubishi Electric PUHY-EP200 Service handbook

Hitachi RAS-07BH2 Instruction and installation manual

Hitachi

Hitachi RAS-07BH2 Instruction and installation manual

York Y34 Technical guide

York

York Y34 Technical guide

Bryant 450D installation instructions

Bryant

Bryant 450D installation instructions

Bard WG-Series User's information manual

Bard

Bard WG-Series User's information manual

LG LW5016.AT1AUSB owner's manual

LG

LG LW5016.AT1AUSB owner's manual

Whirlpool ACE082XS2 Use & care guide

Whirlpool

Whirlpool ACE082XS2 Use & care guide

Honeywell CL30XC owner's manual

Honeywell

Honeywell CL30XC owner's manual

Soleus Air PH5 Series operating instructions

Soleus Air

Soleus Air PH5 Series operating instructions

GE AEM24 Series Owner's manual and installation instructions

GE

GE AEM24 Series Owner's manual and installation instructions

Mitsubishi Electric CITY MULTI PQHY-P-YEM-A Series installation manual

Mitsubishi Electric

Mitsubishi Electric CITY MULTI PQHY-P-YEM-A Series installation manual

Beko EFE7030W user manual

Beko

Beko EFE7030W user manual

Mitsubishi Electric MXZ-2C30VA installation manual

Mitsubishi Electric

Mitsubishi Electric MXZ-2C30VA installation manual

aircon A17EM4C4M09 Service manual

aircon

aircon A17EM4C4M09 Service manual

Vivax ACP-09PT25AEB Service manual

Vivax

Vivax ACP-09PT25AEB Service manual

Heiko JZ100-A1 installation manual

Heiko

Heiko JZ100-A1 installation manual

EINHELL MSK 3000 Split operating instructions

EINHELL

EINHELL MSK 3000 Split operating instructions

manuals.online logo
manuals.online logoBrands
  • About & Mission
  • Contact us
  • Privacy Policy
  • Terms and Conditions

Copyright 2025 Manuals.Online. All Rights Reserved.