Tosumi TOM1031 User manual

Instruction Manual
TOM1031
DVD PLAYER

WARNING: TO REDUCE THE RISK OF FIRE OR ELECTRIC SHOCK, DO NOT
EXPOSE THIS APPLIANCE TO RAIN OR MOISTURE.
CAUTION: TO REDUCE THE RISK OF ELECTRIC SHOCK, DO NOT REMOVE COVER
(OR BACK). NO USER SERVICEABLE PARTS INSIDE. REFER SERVICING TO
QUALIFIED SERVICE PERSONNEL.
The lightening flash with arrowhead symbol, within an equilateral triangle, is
intended the alert the user to the presence of uninsulated dangerous voltage within
the products enclosure that may be of sufficient magnitude to constitute a risk of
electric shock to persons.
The exclamation point within an equilateral triangle is intended to alert user to the
presence of important operating and maintenance (servicing) instructions in the
literature accompanying the appliance.
Laser product symbol: located on the rear panel of the unit, indicate this player is a class
laser product, only use weak laser and no hazardous radiation outside of the unit.
1.Read through this instruction manual before installation and use.
2.Do not touch the power plug with wet hands.
3.Switch off the main power when the unit is not in use. (Disconnect the power plug from the
power outlet when you do not intend to use the unit for a prolonged period of time). Before
moving the unit, remove the disc from the unit/ tray first.
4.If the product malfunctions DO NOT REMOVE THE COVER contact the point of sale.
Only qualified technicians may service this product.
5.Do not expose the unit to direct sunlight or nearby objects that radiate heat such as room
heaters, fires or radiators.
6.Do not place the unit in moist and humid conditions, the laser optic may become covered
with moisture, causing the player not to work.
7.Place the unit on a flat surface and with good ventilation. Please ensure the ventilation
holes are not covered to avoid overheating and malfunction.
GB-1

GB-2
8. To clean the panel and case use a soft dry cloth only, do not apply any kind of thinner, or
alcoholbasedliquids.
9. The apparatus shall not be exposed to dripping or splashing and that no objects filled with
liquids, such as vases, shall be placed on the apparatus
10.If not using the player for some time disconnect from the mains supply.
Macrovision:
This product incorporates copyright protection technology that is protected by method
claims of certain U.S patents and other intellectual property rights owned by Macrovision
Corporation, and is intended for home and other limited viewing uses only unless otherwise
authorized by Macrovision Corporation. Reverse engineering or disassembly is prohibited.
DOLBY PROLOGIC:
Manufactured under license from Dolby Laboratories.
"Dolby", "Pro Logic", and the double-D symbol are trademarks of Dolby Laboratories.

GB-3
Contents
1.Precautions--------------------------------------------------------------------------------------------------4
2.Front Panel and Rear Panel Illustration --------------------------------------------------------------5
3.Remote Control----------------------------------------------------------------------------------------------6
4.Connections-------------------------------------------------------------------------------------------------8
5.Function Operation----------------------------------------------------------------------------------------11
6.Digital Audio/WMA playing------------------------------------------------------------------------------15
7.Digital PictureCD Playback----------------------------------------------------------------------------17
8.System Setup-----------------------------------------------------------------------------------------------18
9.Troubleshooting-------------------------------------------------------------------------------------------22
10.Technical Specification----------------------------------------------------------------------------------24
11.Recycling--------------------------------------------------------------------------------------------------25

GB-4
1. PRECAUTIONS
Before using this unit, be sure to read the applicable items of the operating instructions and
these safety suggestions carefully.
Afterwards keep them handy for future reference.
Take special care to follow the warnings indicated on the unit itself as well as in the
operating instructions.
Safety
Power Source-The unit should be connected to power supply only of the type described in
the operating instructions or as marked on the unit.
Environment
1. Water and moisture
For example, near a bathtub, wash bowl, swimming pool, or the like, Damp basements
should also be avoided.
2. Condensation-moisture may form on the lens in the following conditions.
Immediately after a heater has been turned on.
In a steamy or very humid room.
When the unit is suddenly moved from a cold environment to a warm one, if moisture
forms inside this unit, it may not operate properly, to correct this problem wait about one
hour for the moisture to evaporate.
3. Heat .
Never use or place this unit near a heat source.
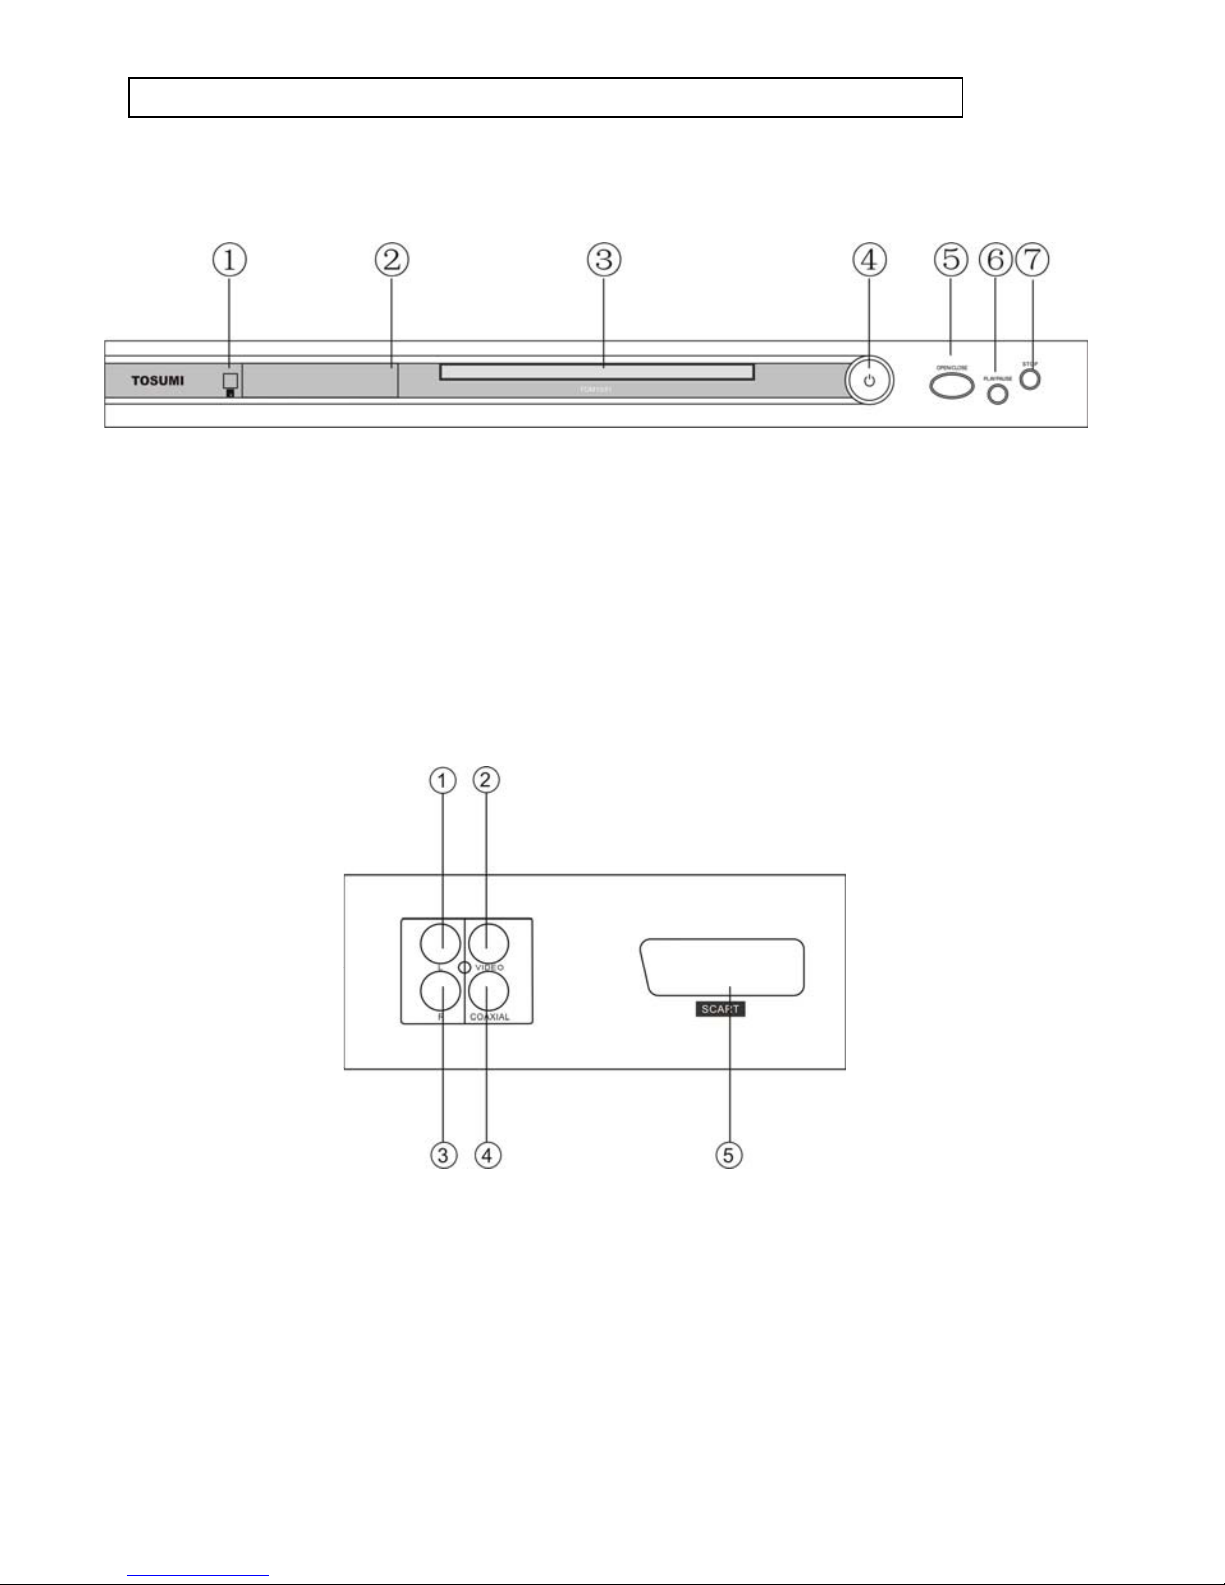
2. FRONT PANEL AND REAR PANEL ILLUSTRATION
Front panel
①Sensor ②Display Screen ③Disc Tray ④Power ⑤Open/Close
⑥Play/Pause ⑦STOP
Rear panel
① Downmix Left
② Composite Video Output
③ Downmix Right
④ Coaxial Output
⑤ Scart Output
GB-5

3. REMOTE CONTROL
1. Power
2. Repeat
3. N/P
4.Subtitle
5.Angle
6. Language
7.Setup
8.Upbutton
9. Left button
10.Enterbutton
11.PBC
12.Volume-
13.Zoom
14.Return
15.L/R
16.Program
17.Clear
18.PREV
19.Next
20.V-Mode
21.Stop
22.Open/Close
23.A-B
24.NumericButton
25.Time
26.Title
27.Right Button
28.Menu
29.DownButton
30.Volume+
31.Slow
32.Step
33.Display
34.Mute
35.FWD
36.REV
37.Play/Pause
GB-6
Using the Remote Control

GB-7
Unless stated other wise, the remote control can operate all the features of the DVD Player.
Always point the remote control directly at the remote sensor on the front of the DVD Player,
not the TV.
Battery Installation
Remove the battery compartment lid on the rear of the remote control by sliding the lid down,
then off.
Place two AAA batteries inside the battery compartment with their + and ends aligned as
indicated.
Do not mix old and new batteries or different types of batteries.
Replace the battery compartment lid. Slide the lid until you hear it click into place.
Important:
When batteries are replaced, do NOT break open or throw on a fire . Dispose of exhausted
batteries in accordance with your local waste authority.

4.CONNECTIONS
* Turn off the power before connection are made.
* Turn on the power when connections are completed.
Ensure the mains connection is firmly fitted in the wall socket.
DVD+TV
Notes :
These are the following ways of connecting the player AV output to the TV set:
● Composite video cable and left/right audio cable (set the video type to composite.)
● Scart cable (press V-MODE button to switch the video mode to RGB and set the video
type to RGB)
GB-8

DVD+ AV Amplifier:
Notes :
These are the following ways of connecting the player with an audio amplifier:
* left/right audio output
* coaxial audio output
GB-9

GB-10
Warning:
Do not connect any amplifier with coaxial connector that does not contain Dolby digital AC 3
or DTS decoder. Any attempt to do so ,playing of a DVD disc, could result in damaging
your speakers and causing possible hearing injury.
Setting of TV system
If the picture is in Mono chrome or has incorrect size features the player may not be set
correctly to the Tv standard. Press the N/P button on the remote control to select PAL.

GB-11
5. FUNCTION OPERATION
5.1 Function Buttons On the Front Panel
These button’s function are the same as the corresponding buttons on the remote control.
For detailed information, please see the following texts.
5.2 Function Buttons On the Remote Control
POWER
Press the button to switch the power ON and OFF.
OPEN/CLOSE
To open the disc tray, press OPEN/CLOSE; To close the disc tray, press OPEN/CLOSE
again.
SUBTITLE
Press the button to display different languages. Each press will select another language.
(Requires support from disc)
LANGUAGE
Press the button to choose different dubbing languages Each press will select another
language. (Requires support from disc)
TIME
For DVD discs, press the button to choose the desired title and chapter and search the
desired title time and chapter time.
For Super VCD, VCD, CD discs, press this button to search the desired disc time and track
time and choose the desired track.
Note: During VCD playback, the PBC mode must be set to OFF.
0-10+ keys
These keys are used to input the time, as well as title, chapter and track numbers.
When a numeric item is displayed on the screen, press the 0-10+ keys to select the desired
entry, and press ENTER to confirm.
When a VCD is playing (with PBC off), press the 0-9 keys to select a track directly.
CLEAR
Press CLEAR to delete numbers you have entered.
MENU
During DVD playback, press MENU to display the disc menu of the current title.
Note: This function is subject to the disc
SETUP
Press the button to enter the system setting menu. Press the button again to exit the menu.

GB-12
DISPLAY
Press the button to show the information of the current playing disc.
TITLE
Press the button to enter the appointed title. (Requires disc support)
Direction key (UP/DOWN/RIGHT/LEFT)
Press the keys to move the highlighted bar or cursor on any menu to your selection.
ENTER
Press the button to confirm your choice on screen.
REV:
During DVD, CD or VCD playback, press REV to scan in reverse.
The player will review the disc at different time speeds. Press PLAY/PAUSE to resume
normal playback.
REV:
During DVD, CD or VCD playback, press REV to scan in reverse.
The player will review the disc at different speeds. Press PLAY/PAUSE to resume normal
playback.
FWD
During DVD, CD or VCD playback, press FWD to scan forward.
The player will cue the disc at different speeds. Press PLAY/PAUSE to resume normal
playback.
PREV
During DVD, CD or VCD playback, press PREV to play the previous chapter, title or track.
NEXT
During DVD, CD or VCD playback, press NEXT to play the next chapter, title or track.
STEP
Press the key, You can play the disc step by step when in pause mode, in this way, you can
catch any picture on the disc (not for digital audio or CD). Press PLAY/PAUSE button to
play normally.
STOP
Press the button once and the player will be in memory stop state. Press again to fully stop
the player.

GB-13
Play/Pause
In play state, press the button for the first time and the player will be in pause state. To
button, the player will resume playing.
VOLUME +/-
Press VOL+to increase volume and press VOL–to decrease volume.
REPEAT
Each press of the REPEAT button will change the repeat mode.
During VCD, CD playback, there are three modes: repeat Single, repeat All and Off.
During DVD, playback, there are three modes: Repeat Chapter, Repeat Title and Off.
Note: During VCD playback, the PBC mode must be set to Off.
A-B
During playback, press A-B to select point A, press it again to select point B. The player will
repeat the section from A to B automatically. Press A-B a third time to cancel A-B repeat
and clear points A and B.
Note: During CD/VCD/SVCD playback, points A and B must be within the same track.
During DVD playback, points A and B can be selected from different chapters.
ANGLE
Press the button to view scenes shot from ANGLE difference angles. (Disc support is
required)
MUTE
Press MUTE to turn off the audio, press MUTE again to resume normal sound.
L/R
During VCD/SVCD playback, press L/R repeatedly to select the channel of audio-output:
Left/Right/Mix/Stereo.
N/P
In the STOP/OPEN TRAY/NO DISC state, Press the button on the remote control and
choose AUTO / NTSC or PAL for the TV system.
PBC
During VCD/SVCD playback, Press PBC to select the mode of PBC On or PBC Off.
SLOW
During DVD, VCD or SVCD playback, press SLOW for slow motion playback.
Once you press SLOW, the disc will play at different speed. Press PLAY/PAUSE to resume
normal playback.

GB-14
V-MODE
In the STOP/OPEN TRAY/NO DISC state, Press V-MODE key, you can select different
video output modes.
RETURN
When a SVCD/VCD disc is playing, press RETURN button to the main menu(PBC ON
only).
PROGRAM
The Program Playback option allows entering the order in which the chapters or tracks will
be played, up a maximum to 16.
Press Program button to display the Program Menu. According to the highlight, move the
cursor to the chapters / tracks you want to play, then press ENTER to confirm . Then press
Play or use arrow buttons to highlight the “PLAY” item and press Enter. The chapters /
tracks will play in the programmed order. During Program Playback, if Program button
pressed, the programmed order and the contents will be displayed on the screen, and the
Program Playback will be stopped. Also Stop and Play can be pressed to resume normal
playback. To clear the programmed order, use arrow buttons to highlight the “CLEAR” item,
then press Enter to modify the programmed order, use arrow buttons to highlight the
modifying item and enter the new chapter / track you want to program directly.
ZOOM
As you press the button you view the different ZOOM magnifications of the picture.
Note: This function may differ for different types of discs

6. DIGITAL AUDIO/WMA PLAYING
The Digital Audio/WMA disc has such a directory structure as shown in the right picture.
Press Direction key to choose the root directory and then press ENTER button to enter
into the sub directory. Press Direction key to choose the desired track and then press
ENTER or PLAY to enjoy the music or movie. If you want to return to the upper menu,
press Direction key to choose the icon and press ENTER button.
Filter: Allows selecting the categories of files displayed in the browser list. This
selection is done among the 3 categories: Audio, Photo and Video.
Repeat: To switch different repeat playing modes.
Mode: Select different playing modes.
GB-15
Normal:Shuffle mode is cancelled

GB-16
Shuffle: Shuffle mode enabled. When playback reaches the end of the current
chapter/track, playback jumps to a random chapter/track.
As the end of each chapter/track is reached, another random
chapter/track will be played until all tracks/chapters have been played or
the Shuffle mode is cancelled by toggling to a different "Mode" option.
Music Intro: In this mode, the media will play 10 seconds then skip to next media
Edit Mode: To enable programmed playback mode. When you select the mode ,
press LEFT Direction key to directory and press ENTER to choose the
desired track and press Add to program to start program playback.
Program view: Display program track.
Browser view: Display track directory
Add to program: Choose the track, press Add to program to add the track of the
program play directory
Clear program : Choose the track, press Clear program to delete the track of the
program play directory
7. PICTURE CD PLAYBACK
The PICTURE CD disc has such a directory structure as shown in the right picture.
Press Direction key to choose the root directory and then press ENTER button to enter
into the sub directory. Press Direction key to choose the desired picture and then press
ENTER or PLAY to enjoy the picture. If you want to return to the upper menu,
press Direction key to choose the icon and press ENTER button.
Image rotation
In picture play state, press Direction key to rotate the picture, press ANGLE button to
change the picture scan mode.
GB-17

8. SYSTEM SETUP
DVD menu setup
Press the SETUP button on the remote control, the SETUP MENU (main) will be displayed.
After accessing the setup menu, press the direction buttons for up and down movement to
select an item desired, then press the ENTER button to confirm. Press LEFT direction
button return to the menu of upper level.
To exit the setup, press the SETUP button again. In the SETUP MENU, you may choose
any of the following options as you like.
8.1 LANGUAGE SETUP
Select Language in the setup menu, and display the Language submenu:
8.1.1OSD Language
Use this item to select the language of the setup menu and screen display.
8.1.2 Subtitle
This option provides the preset subtitle language.
Follow the operating instructions stated in "DVD MENU SETUP" in combination with
the desired option.
8.1.3 Audio
Follow the operating instructions stated in "DVD MENU SETUP" in combination with
the desired option.
This option provides the built-in disc dubbing language options.
8.1.4 DVD Menu
This option provides the film's menu language options.
Follow the operating instructions stated in "DVD MENU SETUP" in combination with
the desired option.
GB-18
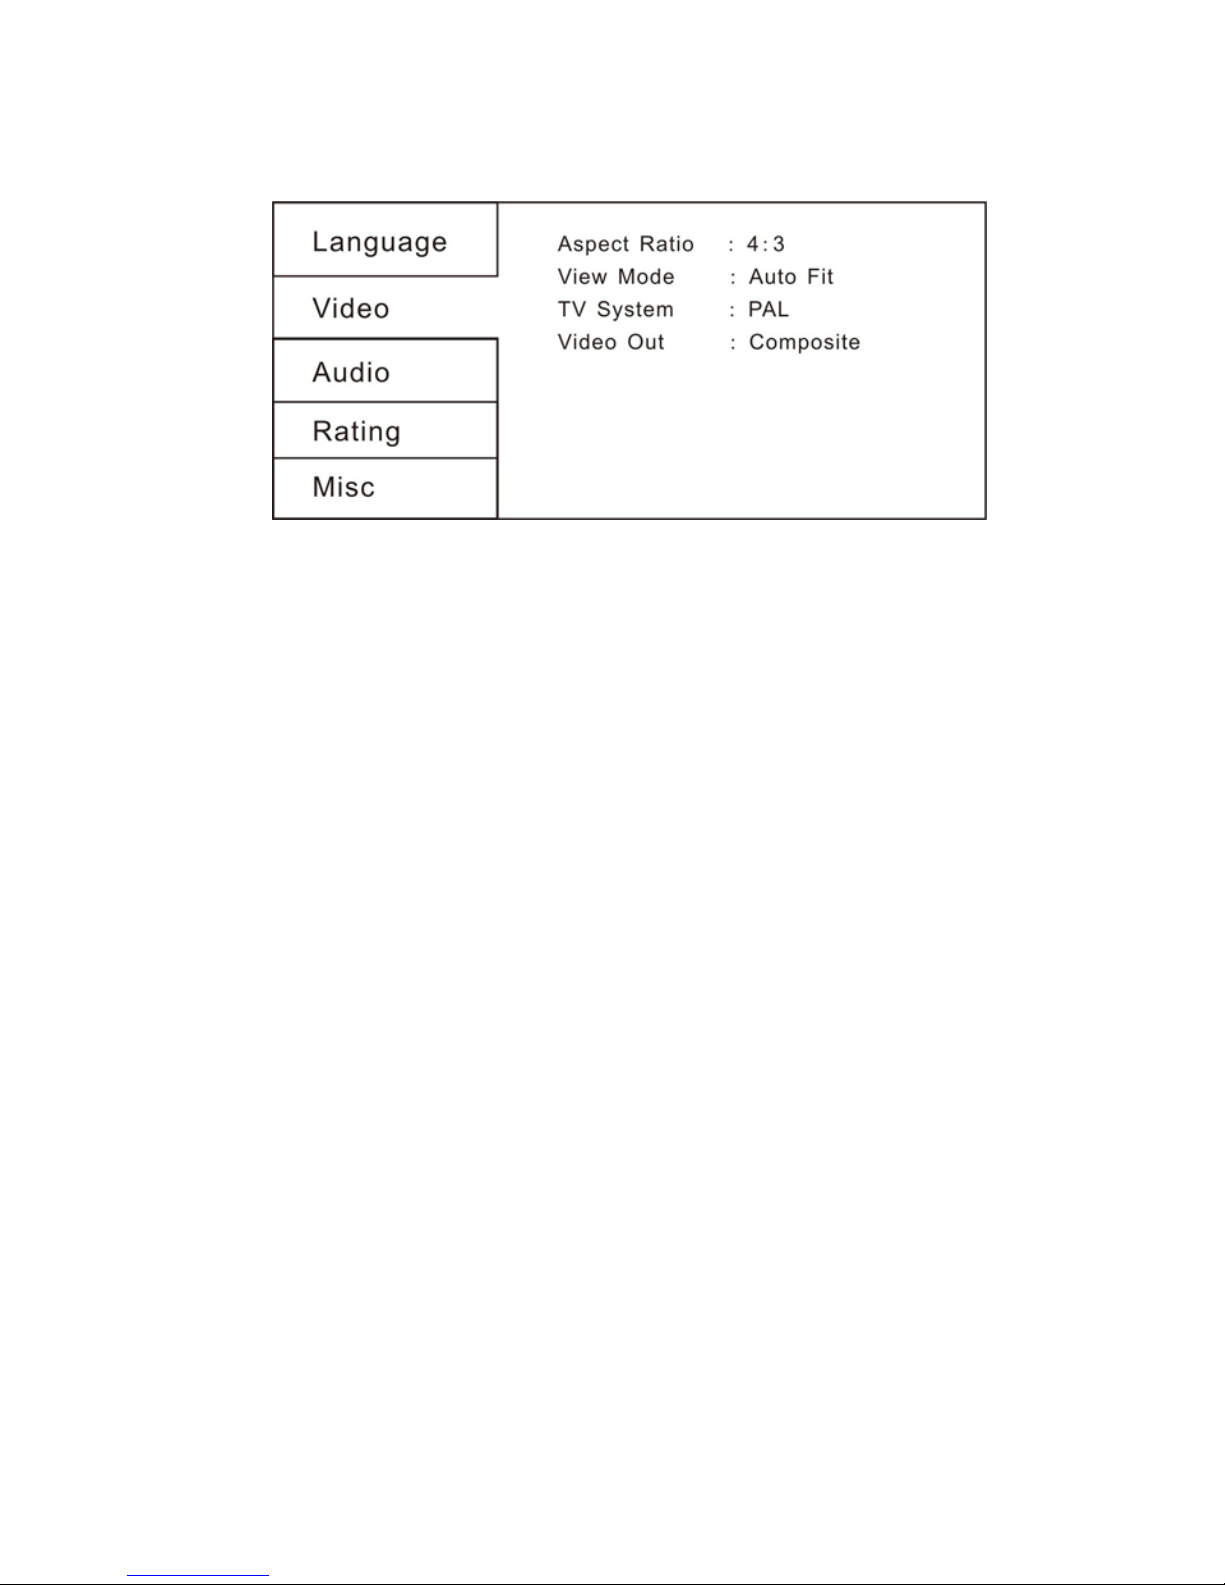
8.2 VIDEO SETUP
Select Video in the setup menu, and display the Video submenu:
8.2.1 Aspect Ratio
4:3 : Choose this setting if your DVD player is connected to a normal ratio TV. You can
fill the movie to the entire screen of your TV. This might mean that parts of the picture
(the left and right edges) won’t be seen.
16:9 : Choose this setting if your DVD player is connected to a wide screen TV. If you
choose this setting and you don’t have a wide screen TV, the images on the screen
may appear distorted due to vertical compression.
Notes:
The image display ratio is related to the recorded disc format. Some discs cannot
display images in the aspect ratio you choose. If you play a disc recorded in 4:3 format
on a wide screen TV, black bars will appear on the left and right side of the screen. You
must adjust the screen setting depending on the type of the television you have.
8.2.2 View Mode
With this option you can select the different video vision mode on the screen.
8.2.3 TV System
This product supports output of various system, including AUTO, NTSC, PAL.
If your TV set has only NTSC or PAL system, the screen will blink and become
colorless when a wrong system is selected. In this case, press the N/P button on the
Remote Control to switch the TV TYPE..
Note: For more information of output format, refer to the instructions or your TV set.
8.2.4 Video Output
Selecting the Video Output setting to switch between different video outputs
Composite: Set the video output to interlacing composite output.
RGB: Set the video output to SCART output. If you select SCART connection, you
should set up the play mode as RGB state, then it will output normally.
GB-19
Table of contents


