TP-Link Deco X50-PoE User manual

Deco X50-PoE
Multi-Scenario poE Mesh Wi-Fi
User Guide
AX3000 Whole Home Mesh
Wi-Fi 6 System with PoE
1910013250 REV1.0.0 © 2022 TP-Link
TabletopWall MountCeiling Mount
1
About This Guide
This guide provides a brief introduction to Whole Home Deco Mesh Wi-Fi 6 System with PoE and regulatory information.
Features available in Deco may vary by model and software version. Deco availability may also vary by region or ISP. All images, steps, and descriptions
in this guide are only examples and may not reect your actual Deco experience.
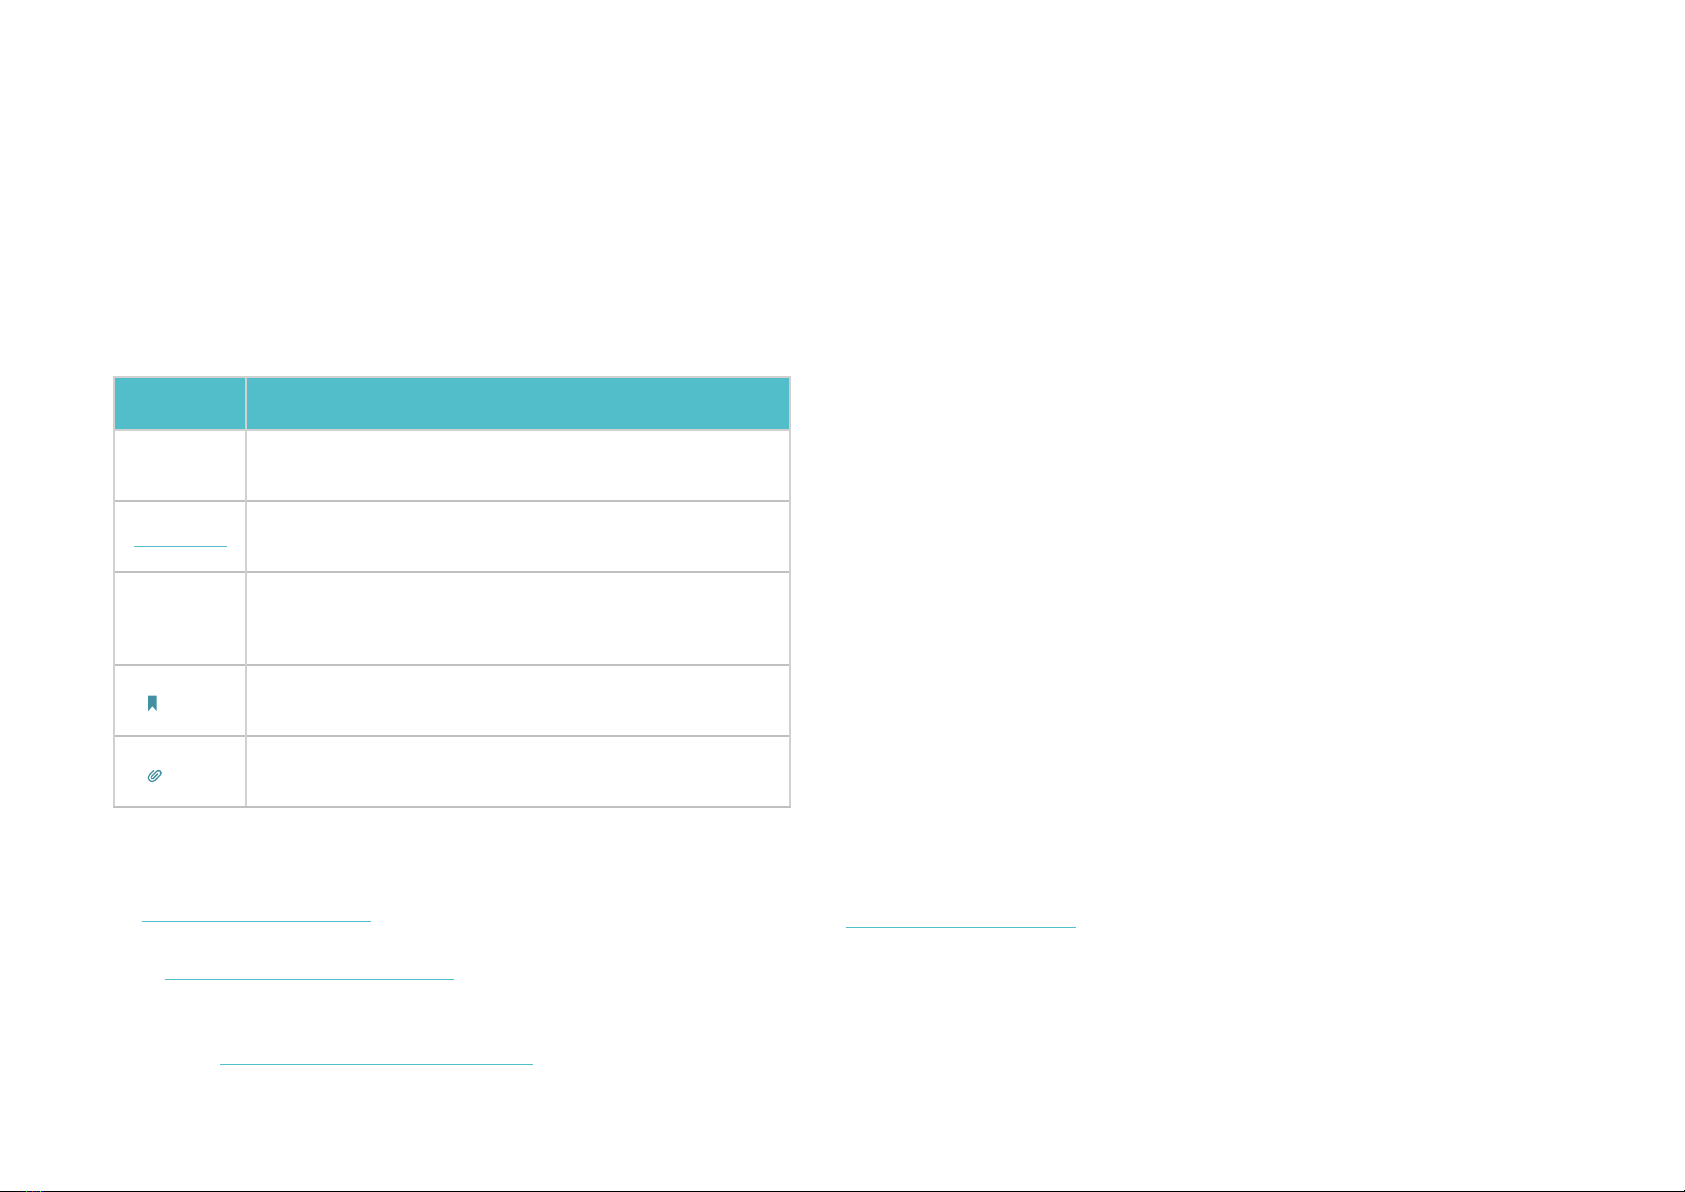
Conventions
In this guide, the following conventions are used:
Convention Description
Deco Stands for Deco Whole Home Mesh Wi-Fi System/
Unit.
Underline Hyperlinks are in teal and underlined. You can click to
redirect to a website or a specic section.
Teal
Key information appears in teal, including
management page text such as menus, items,
buttons and so on.
Note: Ignoring this type of note might result in a malfunction
or damage to the device.
Tips: Indicates important information that helps you make
better use of your device.
More Info
• Specic product information can be found on the product page at
https://www.tp-link.com.
• A Technical Community is provided for you to discuss our products
at https://community.tp-link.com.
• Our Technical Support contact information can be found at the
Help center of the Deco app and the Contact Technical Support
page at https://www.tp-link.com/support.
Speed/Coverage/Device Quantity Disclaimer
Maximum wireless signal rates are the physical rates derived from IEEE
Standard 802.11 specications. Actual wireless data throughput and
wireless coverage, and quantity of connected devices are not guaranteed
and will vary as a result of network conditions, client limitations, and
environmental factors, including building materials, obstacles, volume and
density of trac, and client location.
MU-MIMO Disclaimer
Use of MU-MIMO requires clients to also support MU-MIMO.
IoT Compatibility Disclaimer
IoT compatibility refers only to smart devices that can be controlled via the
Deco app. Other wireless devices can still connect to Deco for normal Wi-Fi
use.
Seamless Roaming Disclaimer
Clients need to support 802.11k/v/r and may require additional set up.
Performance may vary depending on the client device.
HomeShield Disclaimer
HomeShield includes the Free Basic Plan. Fees apply for the Pro Plan. Visit
tp-link.com/homeshield for more information.
2
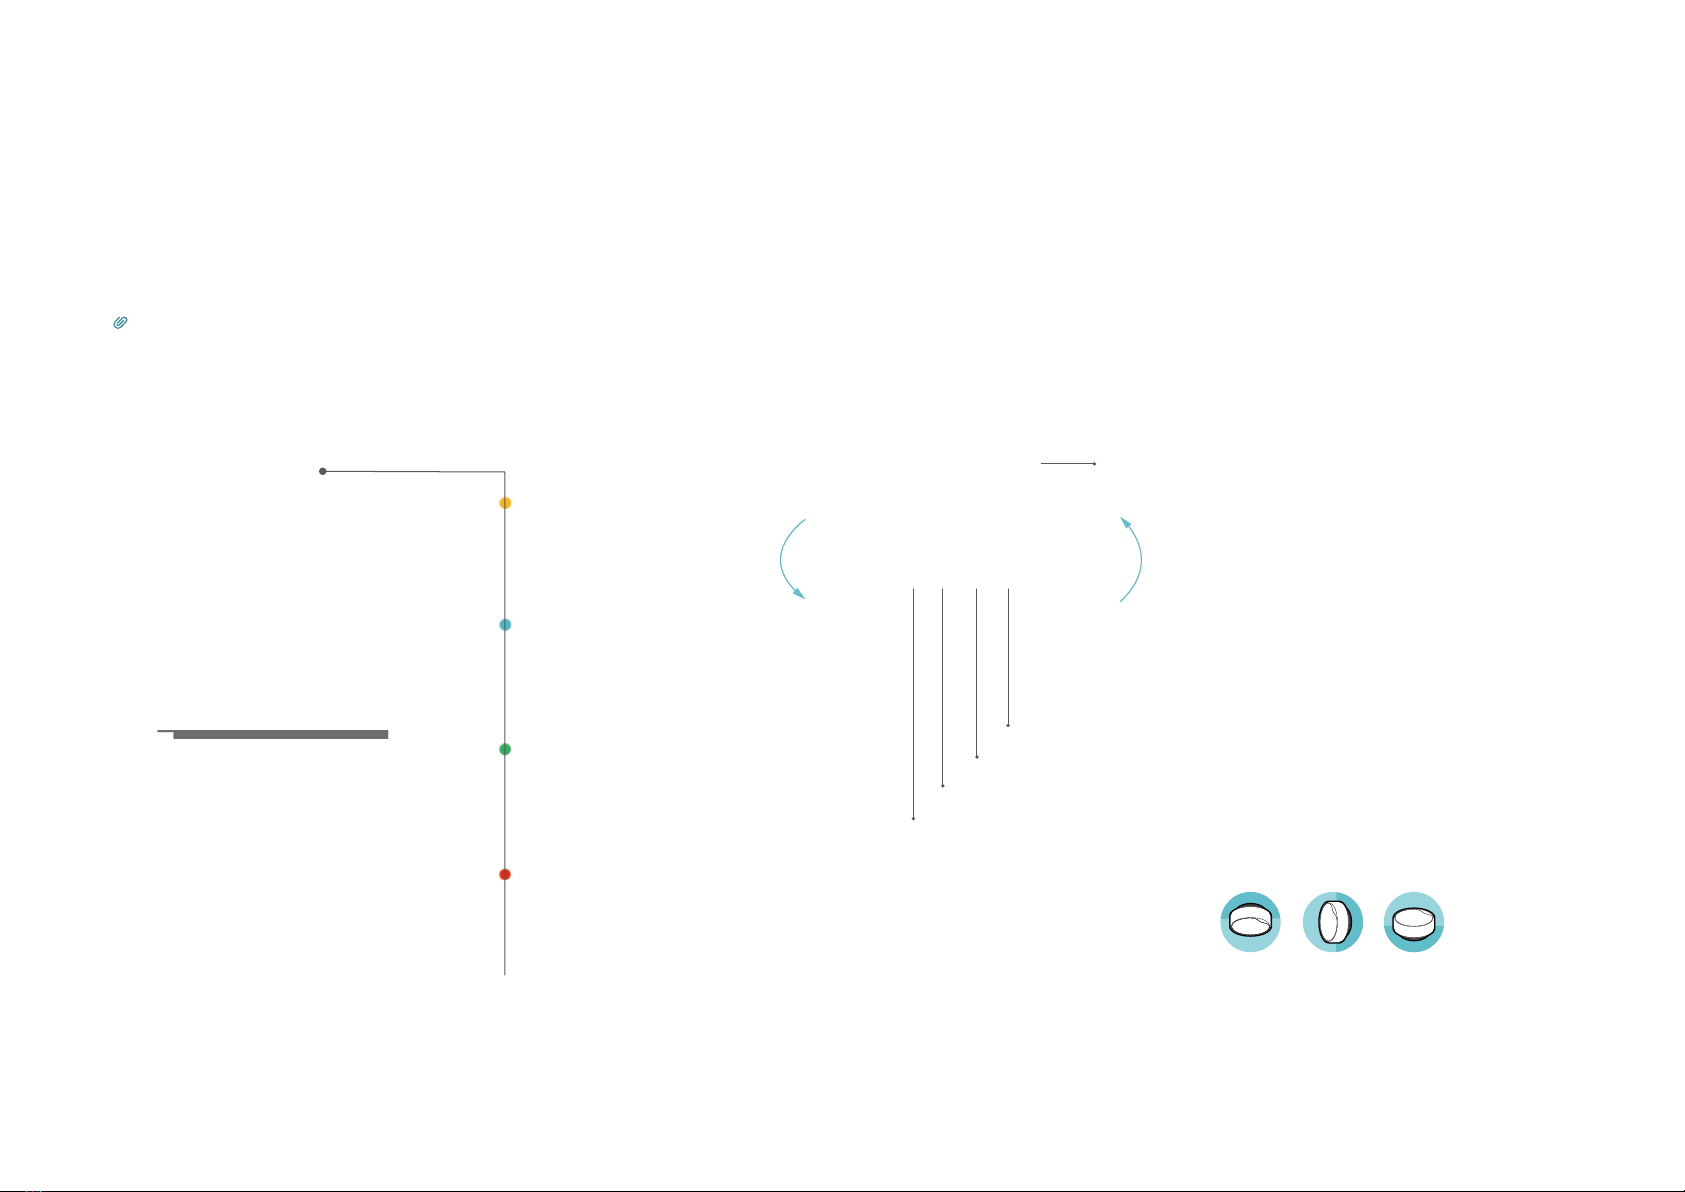
Appearance
Each Deco has an LED that changes color according to its status, one Gigabit PoE port, an advanced 2.5 Gbps PoE port, a power slot, and a reset
button.
See the explanation below:
Tip: The product label can be found at the bottom of the product.
Pulse Yellow:
Deco is resetting.
Solid Yellow:
Deco is starting up.
Pulse Blue:
Deco is ready for setup.
Solid Blue:
Deco is setting up.
Pulse Green:
Deco is upgrading rmware.
Solid Green:
Deco is all set up and connected.
Pulse Red:
The satellite Deco is disconnected
from the main Deco.
Solid Red:
Deco has an issue.
Press for 1 second and release to reset
Deco to factory default settings. The light
changing from pulsing yellow to solid
yellow indicates a successful reset.
Power Supply:
Deco can be powered via a power adapter
or a PSE device (such as a PoE switch).
Reset:
Mounting Options
Multi-Gig Internet Connection:
1× 2.5 Gbps port and 1× Gigabit port
make full use of gigabit speeds from
your local ISP. WAN/LAN support meets
all your internet demands.
Reset Button
2.5 Gbps PoE port
Power Slot
1 Gbps PoE port
TabletopWall MountCeiling Mount
Bracket

3
Power Up Your Deco
Deco can be powered via a power adapter or a PSE device (such as a PoE switch) which complies with Power Source Class 2 (PS2) or Limited Power
Source (LPS) and Electrical Energy Source Class 1(ES1) of IEC 62368-1.
Setup Video can be found at https://www.tp-link.com/support/download/deco-x50-poe/
Option1: Via PoE Switch (Compliant with 802.3at)
Connect an Ethernet cable from the PoE switch (compliant with 802.3at) to the Deco’s Ethernet port. The power should not be less than18 W.
PoE Switch (Compliant with 802.3at)
Option2: Via Power Adapter
Plug one end of the provided power adapter into the power port of the Deco and the other end to a standard electrical wall outlet.
Power Adapter
4
Set Up Your Deco Network
First let's start by setting up the Deco network. Get the TP-Link Deco app for iOS or Android, then follow the app to walk through the setup.
Setup Video can be found at https://www.tp-link.com/support/download/deco-x50-poe/
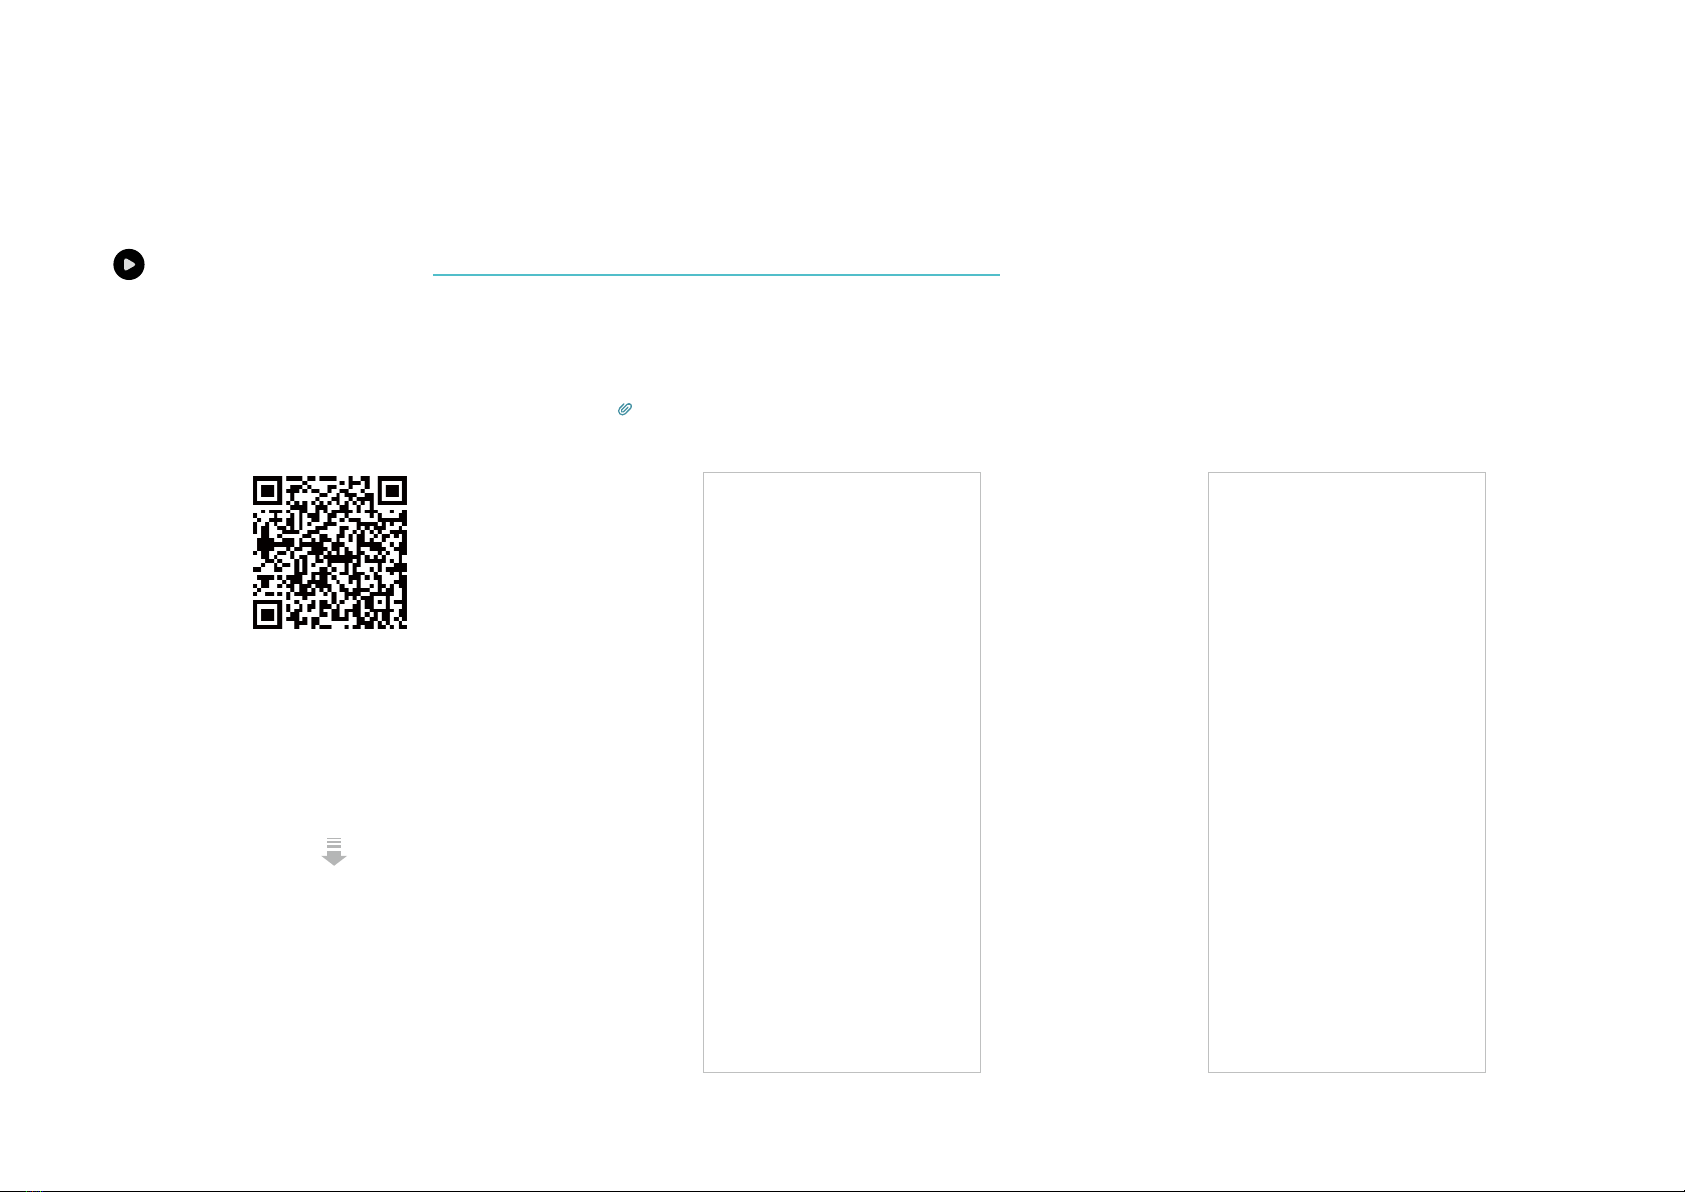
1. Get the Deco app
Download and install the Deco app from
Google Play or App Store, or by scanning the
QR code below.
2. Log in with TP-Link ID
Open the app and log in with your TP-Link ID. If
you don’t have a TP-Link ID, create one rst.
Tip: If you forgot your login password, tap Forgot Password.
The app will help you reset your password.
3. Select your Deco model
Search for and select your Deco model. If
you have more than one Deco model, tap the
question below the search box to check how
to maximize the overall network.
or

5
4. Plug in your Deco
Power o your modem, connect your Deco to
the modem, then power them both on.
If you don't have a modem, connect your
Deco directly to the Ethernet outlet.
5. Specify your Deco's location
Select or custom a location for your Deco.
The location will be used as the name of your
Deco.
6. Connect your Deco to the internet
Select the internet connection type and enter
the information. If you are not sure, contact
your internet service provider.

6
7. Create your Deco Wi-Fi
Create the network name and password for
your Deco and connect to it.
8. Setup complete
Your Deco network is now up. You can connect
your devices to the Deco network.
If you have more decos, tap Add another
Deco to add them to your network.
7
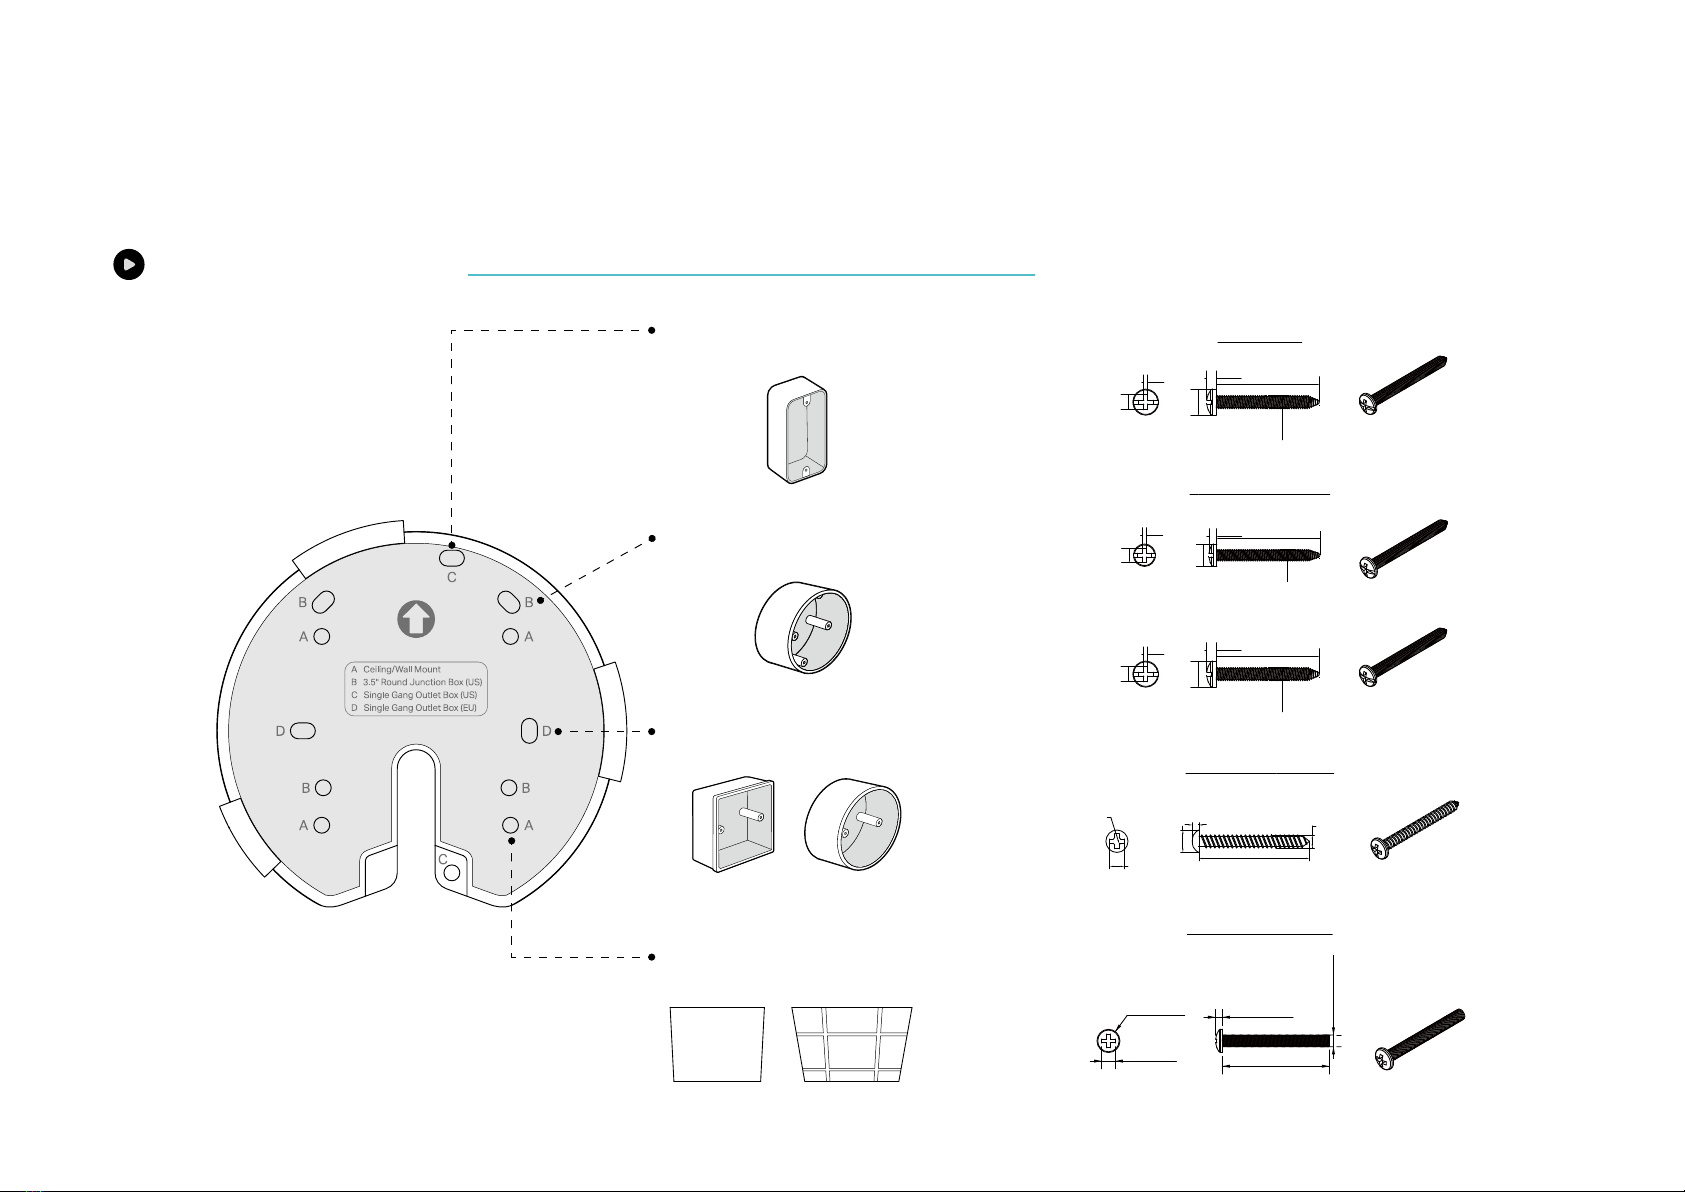
Mount Your Deco
Deco can be mounted to the wall, the ceiling, or on a junction box, using the screws in the package. Choose the appropriate mounting methods.
Mounting Video can be found at https://www.tp-link.com/support/download/deco-x50-poe/
C-hole ×2:
For Single Gang Outlet Box (US)
D-hole ×2:
For Single Gang Outlet Box (EU)
B-hole ×4:
For 3.5“ Round Junction Box (US)
A-hole ×4:
For Ceiling/Wall Mount
US: M3.5*28
EU: M3*28 / M3.5*28
Ceiling Mount: M3*30
Wall Mount: ST3.5*30
OR
3.8
REF
Ø6 0
-0.5
2.3
±0.2
28
±0.42
M3 -0.02
-0.13
4.1
REF
Ø7 0
-0.5
2.6
±0.2
28
±0.42
M3.5-0.03
-0.16
1
REF
1
REF
3.5REF
M2.9
±0.1
Ø6
0
-0.5
2#
3.5REF
3.5
±0.1
30
±0.3
4.1
REF
Ø7 0
-0.5
2.6
±0.2
28
±0.42
M3.5-0.03
-0.16
1
REF
Ø6 0
-0.5
1.8
±0.1
1.8
±0.2
30
±0.3
8
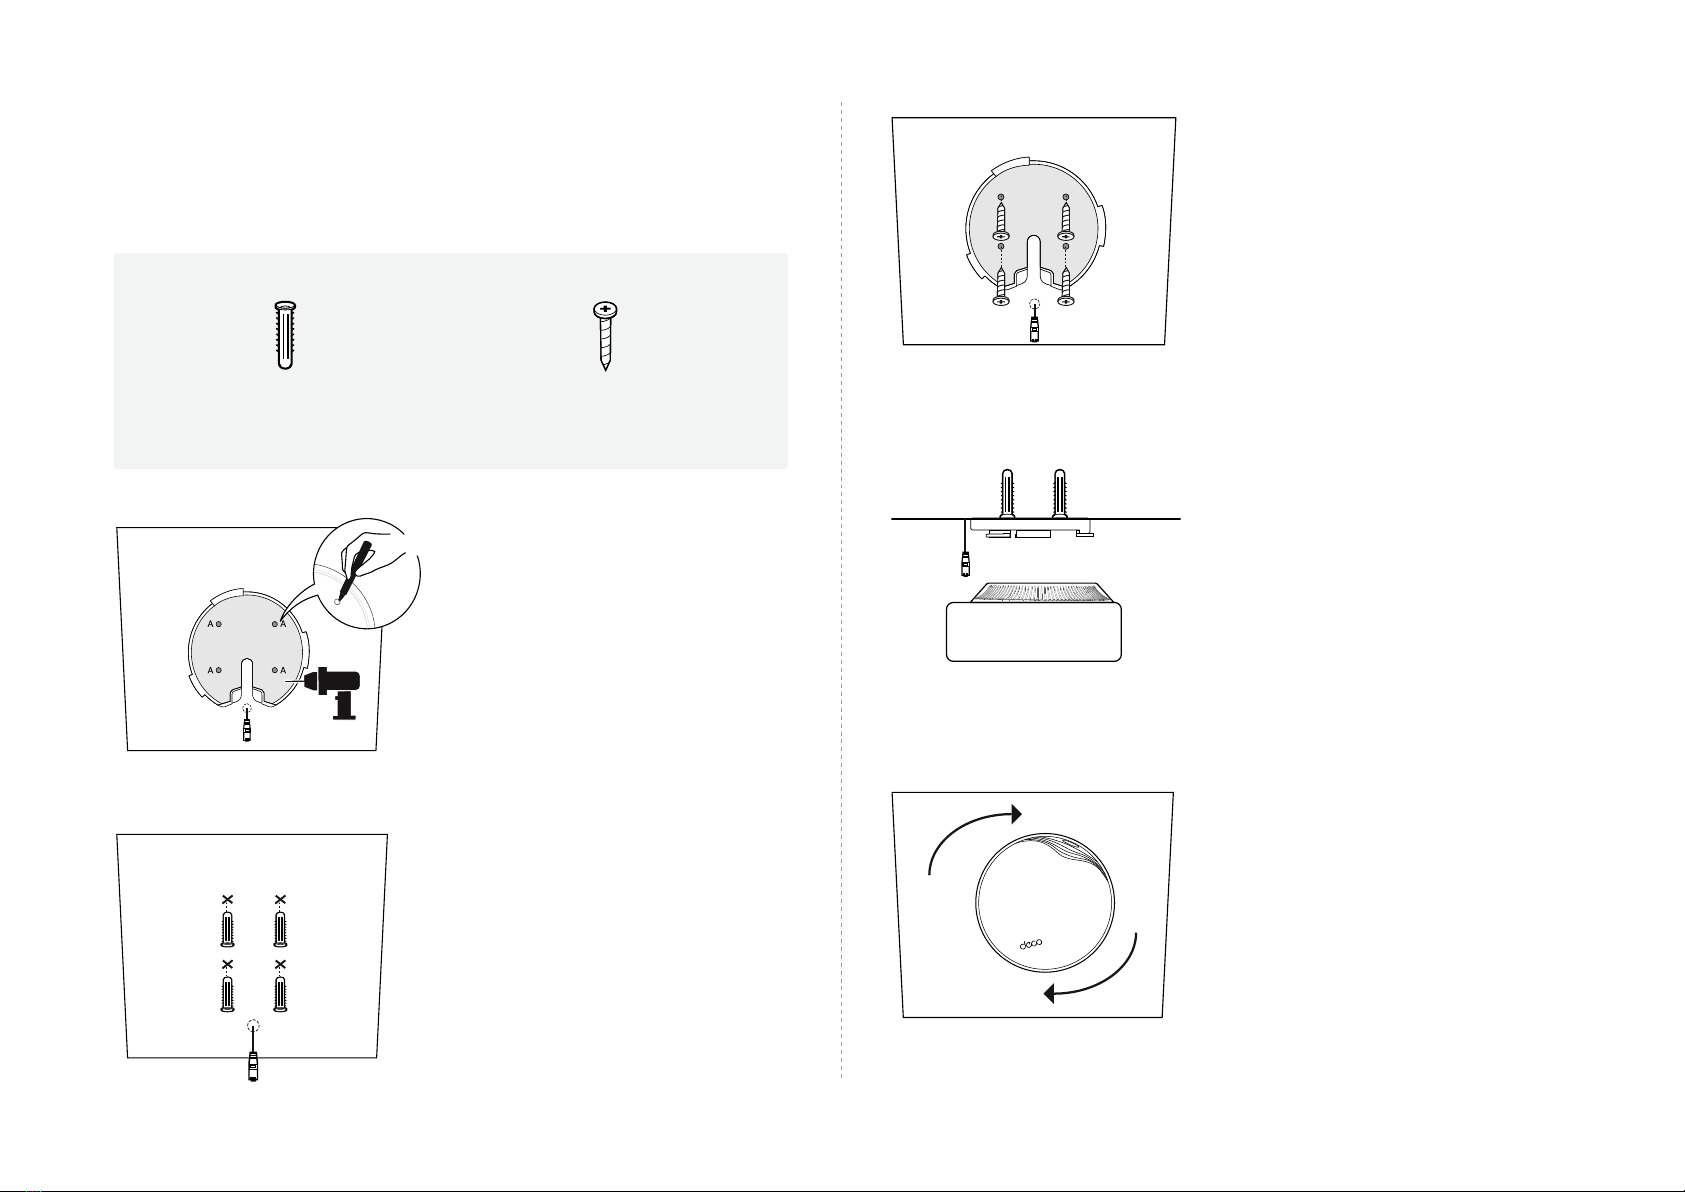
3.
Secure the mounting bracket to
the wall by driving the self-tapping
screws into the anchors.
Make sure the mounting bracket
lies at against the surface.
4.
Connect the Ethernet cable to the
Ethernet port on the Deco.
5.
Orient the Deco LED according to
the image, attach the Deco to the
mounting bracket, then rotate it
clockwise until it locks into place.
Option 1: On the Wall/Ceiling
The Deco can be mounted to the wall or the ceiling with the screws in
the package.
Self-tapping Screws *4
Plastic Wall Anchors *4
X4
1.
If your Ethernet cable feeds
through the wall, position the
mounting bracket above the cable
hole.
Mark four positions for the screw
holes and drill four 6 mm (15/64
in) diameter holes at the marked
positions.
2.
Insert the plastic wall anchors into
the 6 mm diameter holes.

9
2.
Feed the Ethernet cable through
the mounting bracket. Insert the
enclosed screws and tighten them
with a Philips screwdriver to secure
the mounting bracket.
Notes:
1. Do not over tighten the screws.
2. If the enclosed screws do not t the junction
box, use the screws attached to the junction box
instead.
3.
Connect the Ethernet cable to the
Ethernet port on the Deco.
4.
Orient the Deco LED according to
the image, attach the Deco to the
mounting bracket, then rotate it
clockwise until it locks into place.
Option 2: On a Wall Junction Box
The Deco can be mounted on a junction box. The junction box should
be pre-installed with a running-in-wall Ethernet cable. Ensure that the
mounting holes align to your junction box.
*Here the standard US wall junction box is used as an example.
C-hole D-hole D-hole B-hole
1.
Detach the faceplate of the
junction box with a Phillips
screwdriver.
10
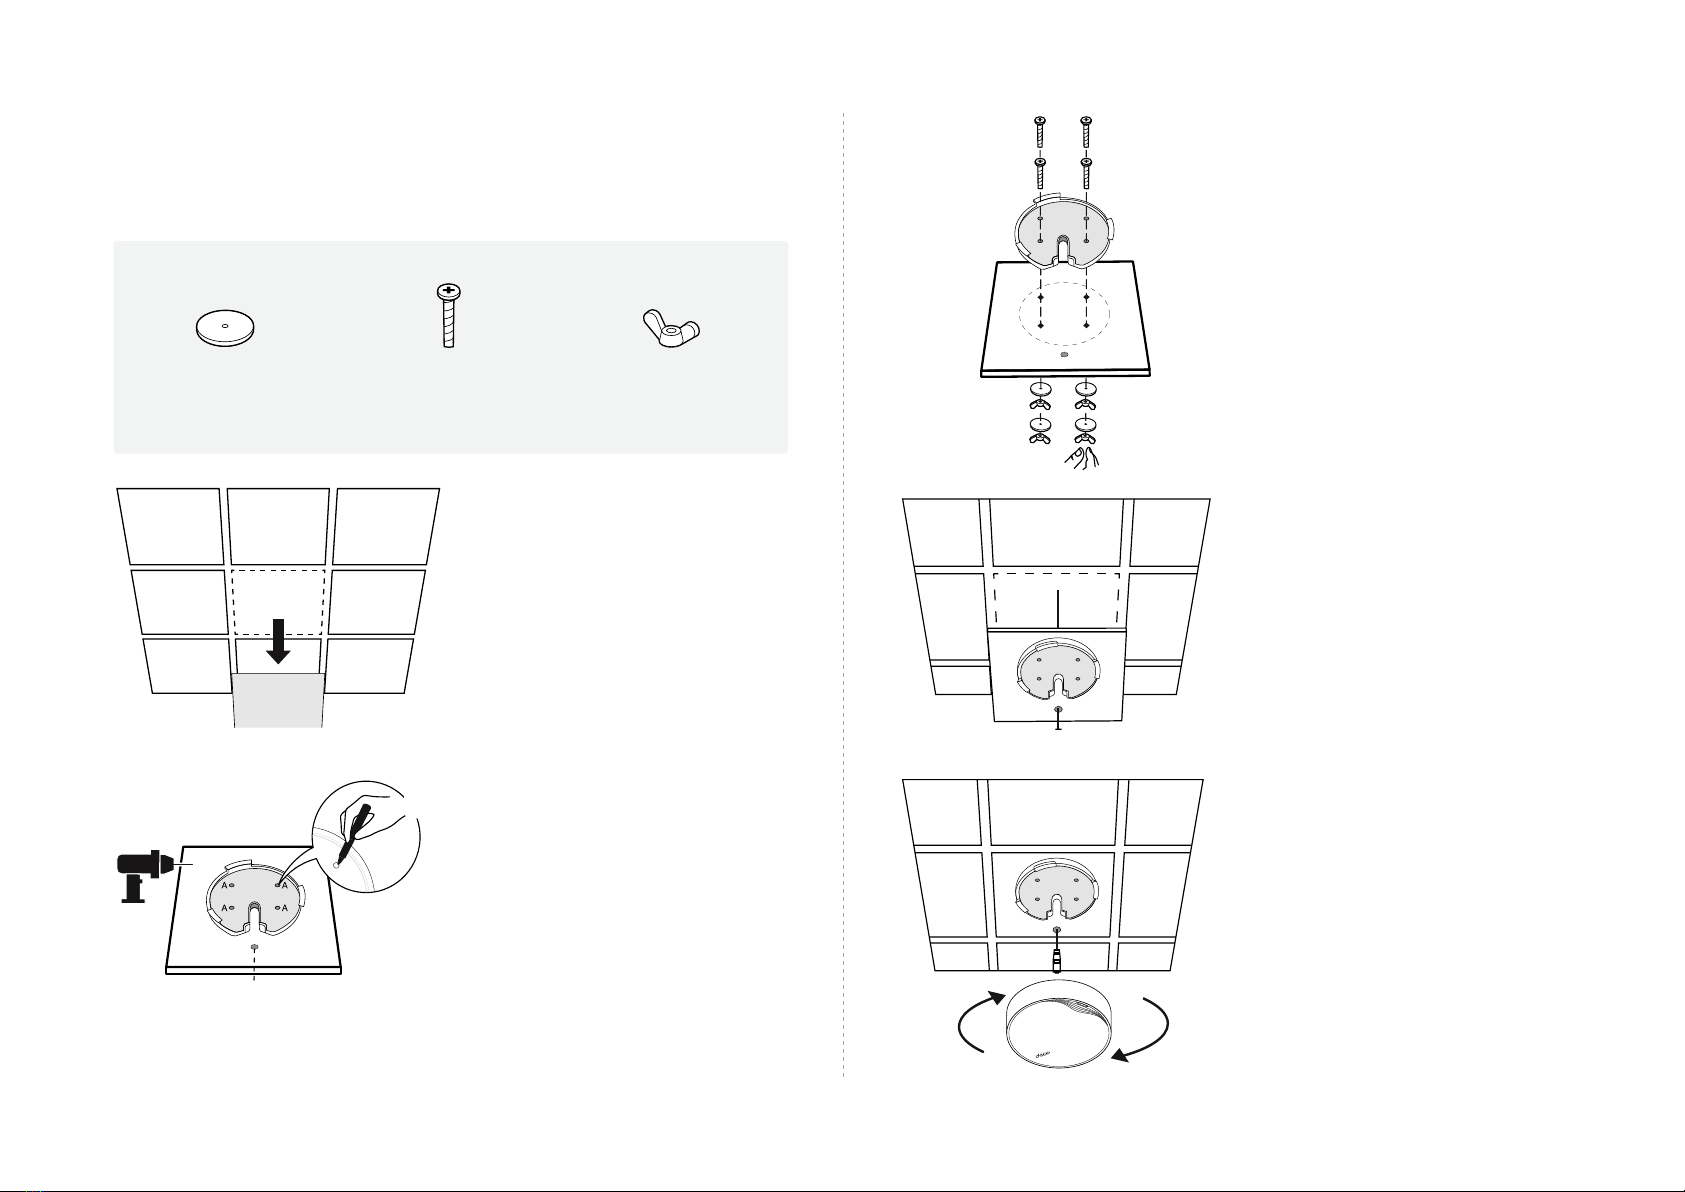
3.
Secure the mounting bracket to
the ceiling tile using four pan-head
screws, washers, and wing nuts.
4.
Feed the Ethernet cable through
the hole and set the ceiling tile
back into place.
5.
Orient the Deco LED according to
the image, attach the Deco to the
mounting bracket, then rotate it
clockwise until it locks into place.
Option 3: In a Ceiling Tile
The Deco can be installed in a ceiling tile with the screws in the
package. Make sure the ceiling tile is larger than the Deco.
Wing Nuts *4Washers *4 Pan-head Screws *4
1.
Remove the ceiling tile.
Drill Hole for Ethernet Cable
X4
2.
Place the mounting bracket in the
center of the ceiling tile. Mark four
positions for the screw holes and
a location for the Ethernet cable
hole.
Drill four 4 mm (5/32 in) diameter
holes for the screws and a 25
mm (63/64 in) diameter hole for
the Ethernet cable at the marked
positions.

11
Troubleshooting
Solutions to common problems during setup or use are provided here for reference. Follow the steps and the provided link below to diagnose and solve
problems you might experience with your Deco.
If problems still exist, contact us: https://www.tp-link.com/support
Q1. What should I do if I fail to congure the main Deco and get stuck on “We couldn't nd Deco”?
Refer to the guide https://www.tp-link.com/support/faq/2239/ or follow the video https://youtu.be/2HYuEYS9XJM
Q2. What should I do if I fail to congure the satellite Deco and get stuck on “We couldn't nd another Deco”?
Refer to the guide https://www.tp-link.com/support/faq/1447/ or follow the video https://youtu.be/iVgDzoo16T4
Q3. What should I do if I fail to congure the main Deco and get stuck on “Testing Internet Connection”?
Refer to the video https://youtu.be/OSUrGdWH-i0
Q4. What should I do if my wireless devices cannot connect to Deco?
Refer to the guide https://www.tp-link.com/support/faq/2718/
Q5. What should I do if Deco suddenly lost internet access?
Refer to the guide https://www.tp-link.com/support/faq/1454/
Q6. How can I nd a suitable spot for my Deco?
Refer to the guide https://www.tp-link.com//support/faq/1446/
Q7. What can I do if the Deco app isn't working properly?
Refer to the guide https://www.tp-link.com/support/faq/1456/
Other manuals for Deco X50-PoE
1
Table of contents
Other TP-Link Amplifier manuals


