TPG CP920 User manual

HD IP Conference Phone
CP920
Quick Start Guide
Applies to firmware version 78.81.0.10 or later.

Note: Not all features mentioned in this Yealink User Guide are available on BizPhone services.
1
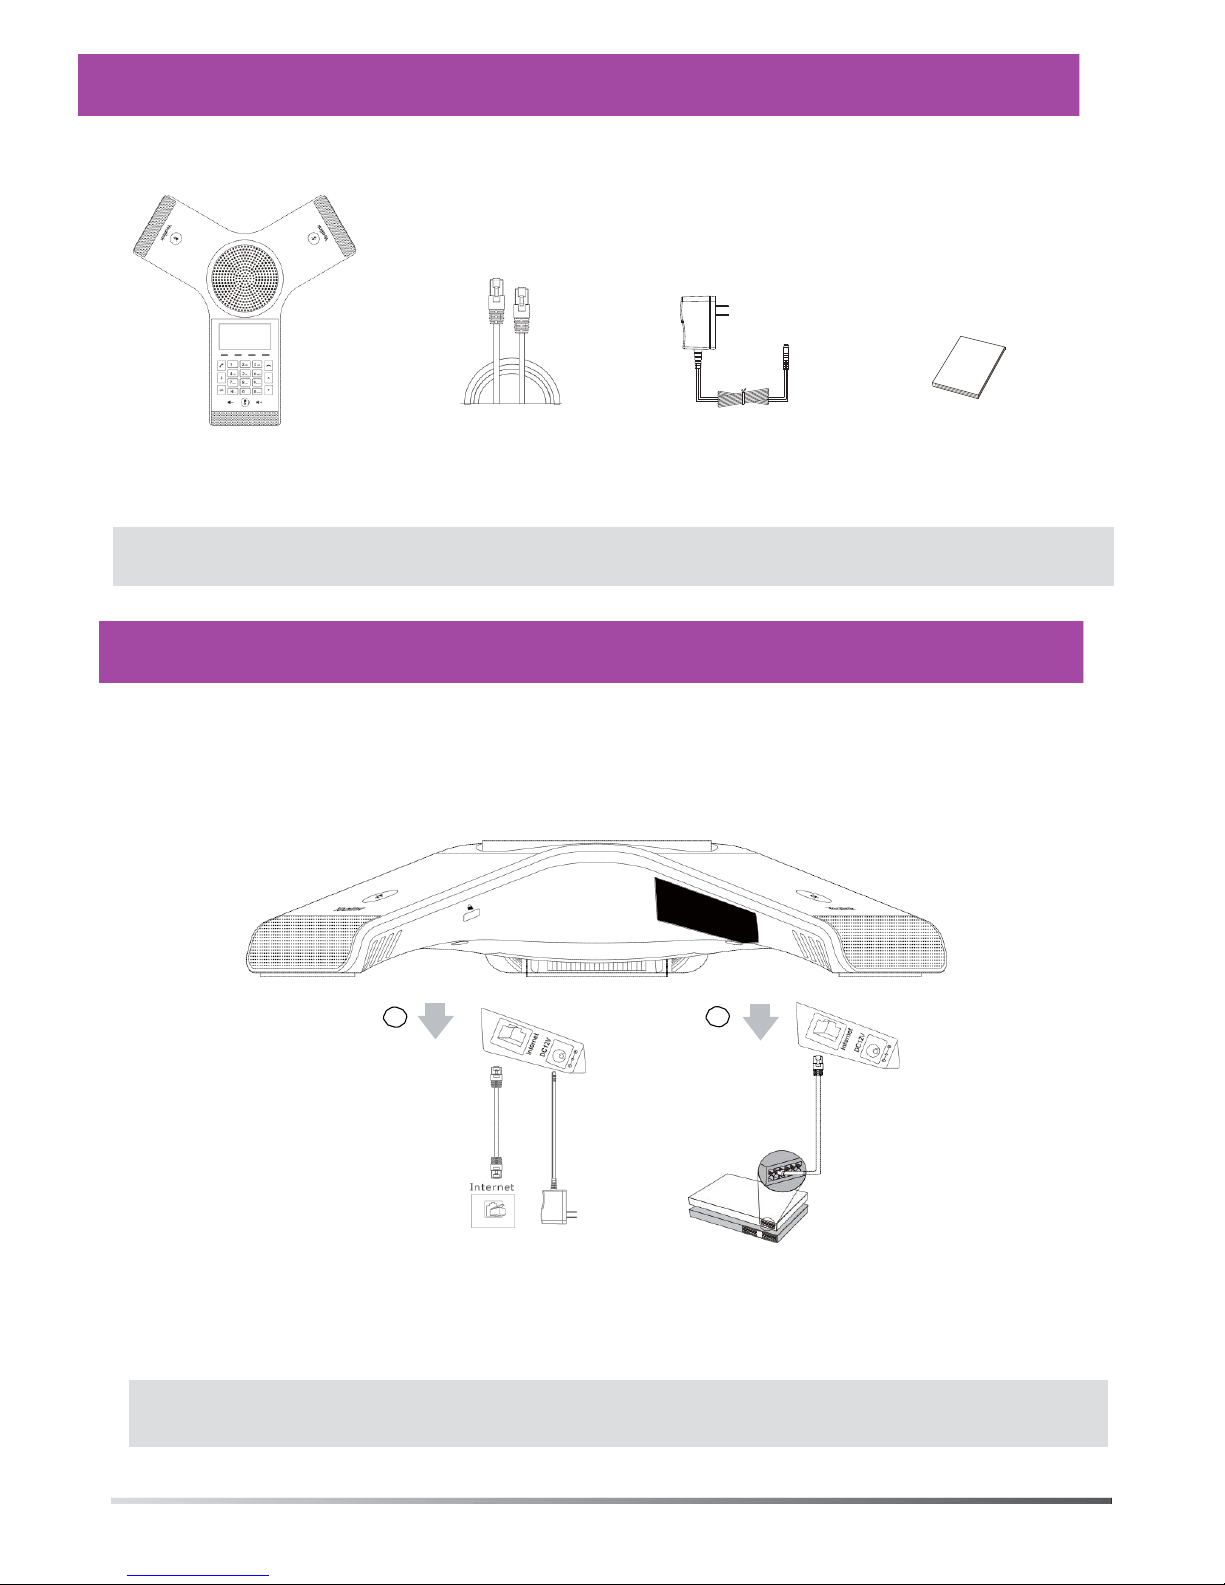
Packaging Contents
IP Conference Phone
Ethernet Cable
(7.5m CAT5E UTP cable)
E
N
G
L
I
S
H
Power
Adapter
Quick Start
Guide
Note: We recommend that you use the accessories provided or approved by Yealink. The use of unapproved third-party accessories may
result in reduced performance.
Assembling
the
Phone
1. Connect the power and wired
network.
You have two options for network and power connections. Your system administrator will advise you which one
to use.
A
AC Power
Opt
ion
B
PoE (Power over
Ethernet)
Opt
ion
Power
Adapter
IEEE 802.3af compliant
PoE Hub/Switch
You can also connect to the wireless network after startup. Refer to Wireless Network Connection mentioned
below in Configuring Your Phone for more information.
Note: The IP phone should be used with Yealink original power adapter (12V/1A) only. If inline power (PoE) is provided, you don’t need to
connect the power adapter. Make sure the hub/switch is PoE-compliant.
2
2. Connect the optional USB flash drive.
E
N
G
L
I
S
H
Startup
After the IP phone is connected to the network and supplied with
power, it automatically begins the initialization process. After
startup, the phone is ready for use. You can configure the phone
via web user interface or phone user interface.
Welcome
Initializing...Please wait
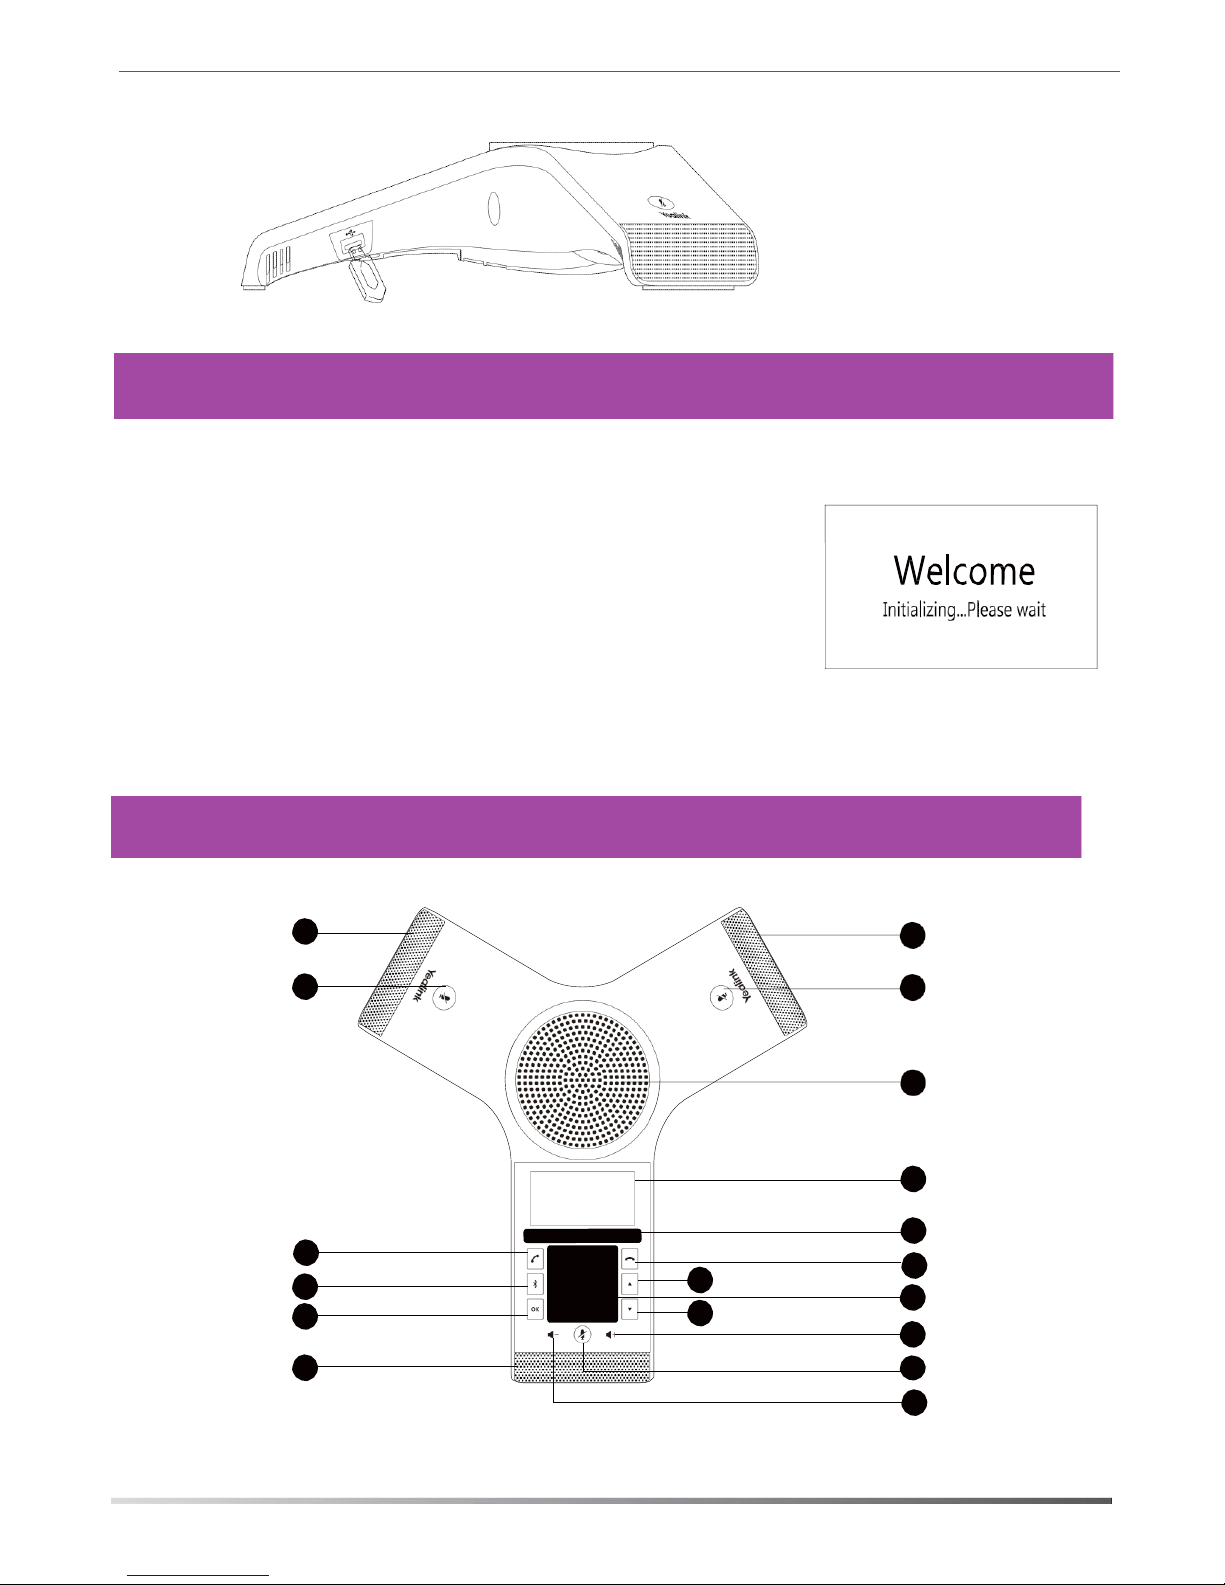
Hardware Component Instructions
1 1 Microphone
2 2 Mute Key
3
Speaker
Off-hook Key
10
Bluetooth Key
11
OK Key
12
1
Welcome
Initializing...Please wait
4
5
6
13 Up
Navigation
Key
7
14
Down Navigation
Key
8
2
9
LCD Screen
Soft Keys
On-hook Key
Keypad
Volume(+) Key
Volume(—) Key

3
H
rin Your Phone
I
S Basic Call Features
Placing a Call
Do one of the following:
- Tap .
Enter the phone number, and then tap , , or the Send soft key.
- Enter the phone number.
Tap , , or the Send soft key.
Answering a Call
Tap , , or the Answer soft key.
Ending a Call
Tap or the End Call soft key.
Call Mute and Unmute
To mute a call:
Tap , the mute key LED illuminates solid red.
To unmute a call:
Tap again to unmute the call. The mute key LED illuminates solid green.
Call Hold and Resume
To hold a call:
Tap the Hold soft key during a call.
To resume a call:
Tap the Resume soft key during a call.
Local Conference
You can host a five-way conference with up to four parties.
To create a five-way local conference:
1. Tap the Conf soft key during a active call. The call is placed on hold.
2. Enter the number of the second party, and then tap the Send soft key.
You can also select a contact from Directory to join into a conference.
3. Tap the Conf soft key again when the second party answers.
4. Repeat steps 2 to 3 to join more parties in the conference.
To manage the individual participant:
1. Tap the Manage soft key during the conference.
2. Tap or to select desired participant, do the following:
•Tap the Far Mute soft key to mute the participant. The muted participant can hear everyone, but no one can
hear the muted participant.
•Tap the Remove to soft key remove the participant from the conference.
•Tap the Split All soft key to split the conference call into individual calls on hold.

4
Call Recording
You can insert a USB flash drive into the USB port on your phone to record active calls.
To record audio calls:
E
N
1. Tap the More soft key, and then tap the StartREC soft key during a call. G
2. Tap the PauseREC soft key to pause recording, tap the Re REC soft key to resume recording. L
3. Tap the StopREC soft key to stop recording. The record file will be saved.
I
S
If you end a call during recording, the record file will be saved automatically. H
Call Forward
You can forward an incoming call to a contact, or forward all incoming calls to a contact.
To forward an incoming call to a contact:
1. Tap the Forward soft key from the Incoming Call screen.
2. Enter the number you want to forward to.
You can also select a contact from Directory. The call is forwarded to the contact directly.
3. Tap the Send soft key.
To forward all incoming calls to a contact:
1. Tap the Menu soft key.
2. Select Features->Call Forward.
3. Select the desired forwarding type:
Always Forward----Incoming calls are forwarded unconditionally.
Busy Forward----Incoming calls are forwarded when the phone is busy.
No Answer Forward----Incoming calls are forwarded if not answered after a period of time.
4. Turn on the desired forwarding type.
5. Enter the number you want to forward to in the Forward To field.
6. For No Answer Forward, select a desired ring time to wait before forwarding from the After Ring Time field.
7. Tap the Save soft key to accept the change.
Call Transfer
You can transfer a call in the following ways:
Blind Transfer
1. Tap the Transfer soft key during a call. The call is placed on hold.
2. Enter the number you want to transfer to.
You can also select a contact you want to transfer to from Directory.
3. Tap the Transfer soft key.
Semi-Attended Transfer
1. Tap the Transfer soft key during a call. The call is placed on hold.
2. Enter the number you want to transfer to.
3. Tap , or .
4. Tap the Transfer soft key when you hear the ring-back tone.
Attended Transfer
1. Tap the Transfer soft key during a call. The call is placed on hold.
2. Enter the number you want to transfer to.
3. Tap , or .
4. Tap the Transfer soft key when the second party answers.

5
Customizing Your Phone
E Local Directory
N
G To add a contact:
L 1. Tap the Directory soft key from the Idle screen.
I 2. Select Local Directory->All Contacts.
S
H 3. Tap the Add soft key to add a contact.
4. Enter a unique contact name in the Name field and contact numbers in the corresponding fields.
5. Tap the Save soft key to accept the change.
To edit a contact:
1. Tap the Directory soft key from the Idle screen.
2. Select Local Directory->All Contacts.
3. Select the desired contact, tap the Option soft key and then select Detail.
4. Edit the contact information.
5. Tap the Save soft key to accept the change.
To delete a contact:
1. Tap the Directory soft key from the Idle screen.
2. Select Local Directory->All Contacts.
3. Select the desired contact, tap the Option soft key and then select Delete.
4. Tap OK when the LCD screen prompts “Delete Selected Item?”.
Note: You can add contacts from call history easily. For more information, refer to Call History.
Call History
1. Tap the History soft key from the Idle screen.
2. Select All Calls.
3. Select an entry from the list, you can do the following:
•Tap the Send soft key to call the entry.
•Tap the Delete soft key to delete the entry from the list.
If you tap the Option soft key, you can also do the following:
•Select Detail to view detailed information about the entry.
•Select Move to Contact to add the entry to the local directory.
•Select Move to Blacklist to add the entry to the blacklist.
•Select Delete All to delete all entries from the list.
Volume Adjustment
•Tap or during a call to adjust the receiver volume.
•Tap or when the phone is idle or ringing to adjust the ringer volume.
•Tap or to adjust the media volume in the corresponding screen.
Ring Tones
1. Tap the Menu soft key from the Idle screen, and then select Settings->Basic Settings->Sound->Ring Tones.
2. Tap or to select Common or the desired account.
3. Tap or to select the desired ring tone.
4. Tap the Save soft key to accept the change.

6
Safety Instructions
Save these instructions. Read these safety instructions before use!
E
The following basic safety precautions should always be followed to reduce risk of fire, electrical shock, and other N
personal injury.
G
L
General Requirements I
•Before you install and use the device, read the safety instructions carefully and observe the situation during S
operation. H
•During the process of storage, transportation, and operation, please always keep the device dry and clean.
•During the process of storage, transportation, and operation, please avoid collision and crash of the device.
•Please attempt not to dismantle the device by yourself. In case of any discrepancy, please contact the
appointed maintenance center for repair.
•Without prior written consent, no organization or individual is permitted to make any change to the
structure or the safety design of the device. Yealink is under no circumstance liable to consequences or legal
issues caused by such changes.
•Please refer to the relevant laws and statutes while using the device. Legal rights of others should be
respected as well.
Environmental Requirements
•Place the device at a well-ventilated place. Do not expose the device under direct sunlight.
•Keep the device dry and free of dusts.
•Place the device on a stable and level platform.
•Please place no heavy objects on the device in case of damage and deformation caused by the heavy load.
•Keep at least 10 cm between the device and the closest object for heat dissipation.
•Do not place the device on or near any inflammable or fire-vulnerable object, such as rubber-made
materials.
•Keep the device away from any heat source or bare fire, such as a candle or an electric heater.
•Keep the device away from any household appliance with strong magnetic field or electromagnetic field,
such as a microwave oven or a refrigerator.
Operating Requirements
•Do not let a child operate the device without guidance.
•Do not let a child play with the device or any accessory in case of accidental swallowing.
•Please use the accessories provided or authorized by the manufacturer only.
•The power supply of the device shall meet the requirements of the input voltage of the device. Please use
the provided surge protection power socket only.
•Before plugging or unplugging any cable, make sure that your hands are completely dry.
•Do not spill liquid of any kind on the product or use the equipment near water, for example, near a bathtub,
washbowl, kitchen sink, wet basement or near a swimming pool.
•Do not tread on, pull, or over-bend any cable in case of malfunction of the device.
•During a thunderstorm, stop using the device and disconnect it from the power supply. Unplug the power
plug and the Asymmetric Digital Subscriber Line (ADSL) twisted pair (the radio frequency cable) to avoid
lightning strike.
•If the device is left unused for a rather long time, disconnect it from the power supply and unplug the power
plug.
•When there is smoke emitted from the device, or some abnormal noise or smell, disconnect the device from
the power supply, and unplug the power plug immediately. Contact the specified maintenance center for
repair.
•Do not insert any object into equipment slots that is not part of the product or auxiliary product.
•Before connecting a cable, connect the grounding cable of the device first. Do not disconnect the grounding
cable until you disconnect all other cables.
Cleaning Requirements
•Before cleaning the device, stop using it and disconnect it from the power supply.
•Use a piece of soft, dry and anti-static cloth to clean the device.
•Keep the power plug clean and dry. Using a dirty or wet power plug may lead to electric shock or other
perils.

7
Table of contents
Other TPG Conference Phone manuals

Popular Conference Phone manuals by other brands


Polycom
Polycom SoundStation IP 4000 SIP 1.6 user guide

Mitel
Mitel UC360 user guide

Polycom
Polycom SoundStation VTX1000 Quick installation guide

Konftel
Konftel 300WxNB user guide

Polycom
Polycom SoundStation Premier 500D Technical specifications

HuddleCamHD
HuddleCamHD HuddlePod Air Installation & operation manual