Trail Rover ATV User manual
1
Owner’s
Guide
&
Operations
Manual
C
.
TrailRover™ should not be ridden by
anyone under 14 years of age

2
Congratulations on the purchase of your new
Trail Rover All Terrain Vehicle.
e TrailRover™ ATV is the result of many years of experience in the nest
sporting, touring, and pace setting racing machines. is manual will provide
you with a basic understanding of the features and operation of your new
TrailRover™ ATV.
is manual includes important safety information, special techniques and skills
necessary to ride the ATV. It also includes basic maintenance and inspection
procedures. If you have any questions about the operation or maintenance of
your TrailRover™ ATV, please call us at (423) 349-2900 to speak to a factory
trained technical service representative.
Warning!
Your TrailRover™ ATV is not a toy and can be hazardous to operate. Read this
manual in its entirety before operating your ATV making sure you understand
all of the instructions prior to use.
Pay close attention to the and C labels on your TrailRover™
ATV and within this owner’s manual.
Never operate your TrailRover™ ATV without proper instruction.
Your TrailRover™ ATV should not be operated by a child under 14 years of age.
ey may not be able to safely maneuver this ATV which may result in serious
injury or death.
Never use your TrailRover™ ATV without wearing an approved helmet and other
protective clothing.

3
An Important Notice to Parents
Your TrailRover™ ATV is not a toy. Before you let your child ride this ATV,
you should understand the instructions and warnings in the owner’s manual.
You must explain the instructions and warning to your child and be sure
they understand and follow them. Each child’s skills, physical abilities and
judgment are dierent. Some children may not be able to safely operate the
TrailRover™ safely. Parents should supervise children at all times while they
are using your TrailRover™ and should only allow continued use only aer
they demonstrate they have the ability to use and operate the TrailRover™ in
safe manner
Your TrailRover™ was delivered with an adjustable speed limiter and also with
an air intake restrictor. We recommend that all beginners start o with the
speed limiter screw turned in and the air intake restrictor plate installed to
limit the amount of speed available while they learn. e limiter screw may
be gradually turned out to increase maximum speed as the beginner becomes
more familiar with safe operation. Parents should decide when to adjust the
TrailRover™ for more power as riding skills improve. Once the ATV rider can
operate with the skills required for the top speeds permitted by adjusting the
limiter alone, the air intake restrictor plate can be removed. Since removal
of this plate will result in a signicant increase in the power, turn the speed
limiter back in again and adjust it out in stages just as you did when your child
was learning to operate your TrailRover™ safely.
Read this manual carefully. You should pay special attention to sections
labeled “W” and “C”.
Failure to follow W instructions could result in severe injury or death
to the TrailRover™ operator, a bystander, or a person inspecting or repairing
your ATV.
A C indicates special precautions that must be taken to avoid damage
to the ATV.

4
• Do not operate your TrailRover™ on any paved surfaces including roads,
sidewalks, driveways and parking lots.
• is TrailRover™ is designed for operation by a single user with no
passengers.
• Never operate your Trail Rover on any public road or highway including
dirt and gravel roads. Your TrailRover™ is not designed for use on public
roads.
• Never operate your TrailRover™ without wearing an approved motorcycle
helmet that ts properly. You should also wear eye protection (goggles of
face shield), gloves, boots, a long sleeved shirt or a jacket and long pants.
• Never consume alcohol or use drugs while operating your TrailRover™.
• Never use your TrailRover™ on hills that are too steep for the ATV or your
abilities. Practice on smaller hills before operating on steeper hills.
• Do not modify your TrailRover™ through improper installation or use of
accessories.
• Never attempt wheelies, jumps or other stunts.
• Inspect your TrailRover™ prior to each use to make sure it is in safe
operating condition. Always follow the inspection and maintenance
procedures and schedules described in the manual.
• Always keep both hands on the handlebars and both feet on the footrests
of the ATV during operation.
• Always follow proper procedure for turning as described in this manual.
Practice turning at low speeds before attempting to turn at faster speeds.
Never attempt turning at excessive speeds.
• Do not allow children to add fuel. Refueling should be done only by an
adult.
• Do not allow children to start the TrailRover™. Starting should only be
done by an adult.
• Drain all fuel from the fuel tank and carburetor before transporting your
TrailRover™.
• Do not allow children too close to moving parts or allow anyone to touch
moving parts or heated areas such as the engine and exhaust pipe.
• Do not ride your TrailRover™ at night. is ATV is not equipped with
head lights.
Safety Information

5
W
POTENTIAL HAZARD
IMPROPER HANDLING OF GASOLINE
WHAT CAN HAPPEN
Gasoline can catch re and you could be severely burned.
HOW TO AVOID THE HAZARD
Always turn o the engine when adding fuel.
Do not add fuel immediately aer use while the engine is still hot.
Do not spill gasoline on the engine or exhaust pipe/muer when adding fuel.
Never add fuel while smoking or in the vicinity of sparks, open ames, or other
sources of ignition such as pilot lights of water heaters and clothes dryers.
When transporting your TrailRover™ be sure it is kept upright. Failure to do so
may allow fuel to leak out of the carburetor or fuel tank.
WHAT CAN HAPPEN
Gasoline is poisonous and can cause injuries
HOW TO AVOID THE HAZARD
If you should swallow some gasoline, inhale fumes or get gasoline in your
eyes, seek immediate medical attention. If gasoline spills on your skin, wash
with soap and water. If gasoline spills on your clothes, change your clothes and
wash them immediately.
Safety Information

6
Location of Warning and Specication Labels
Read and understand all of the labels on your TrailRover™. ese labels contain
important information for safe and proper operation
Never remove the labels from your TrailRover™. If a label becomes dicult to
read, contact your dealer for a replacement.
Serial Number Location
Engine and Frame serial numbers are used to mark your TrailRover™. If some
parts need special service, these numbers can provide information about parts
needed for service. e Engine serial number is stamped on the topside of the
engine transmission case. e Frame serial number (VIN) is located on the
frame head pipe.
Please write down these serial numbers and keep them in a safe place for future
use.
Safety Information
7
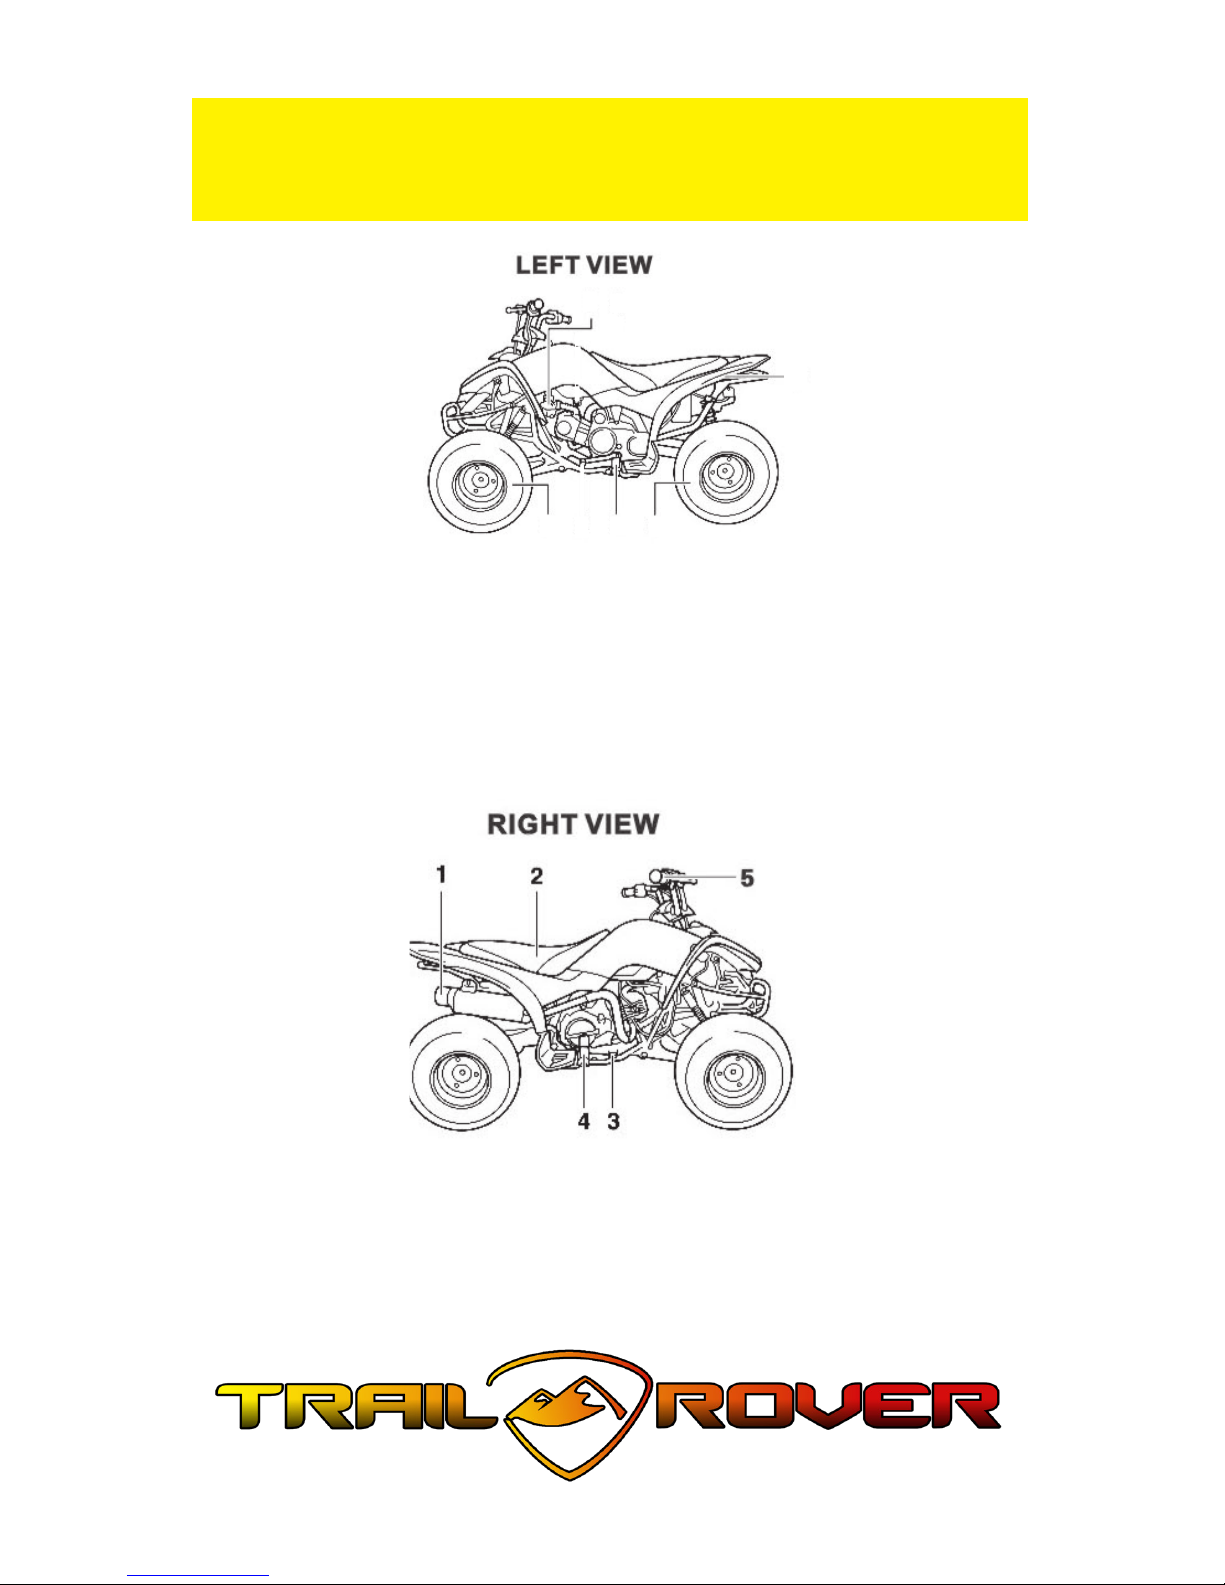
Location of Parts
1. Choke
2. Rear Wheel
3. Footrest
4. Front Wheel
5. Remote Engine Stop Switch
1. Spark Arrester
2. Seat
3. Rear Brake Pedal
4. Footrest
5. Front Brake Lever
1
234
5
8
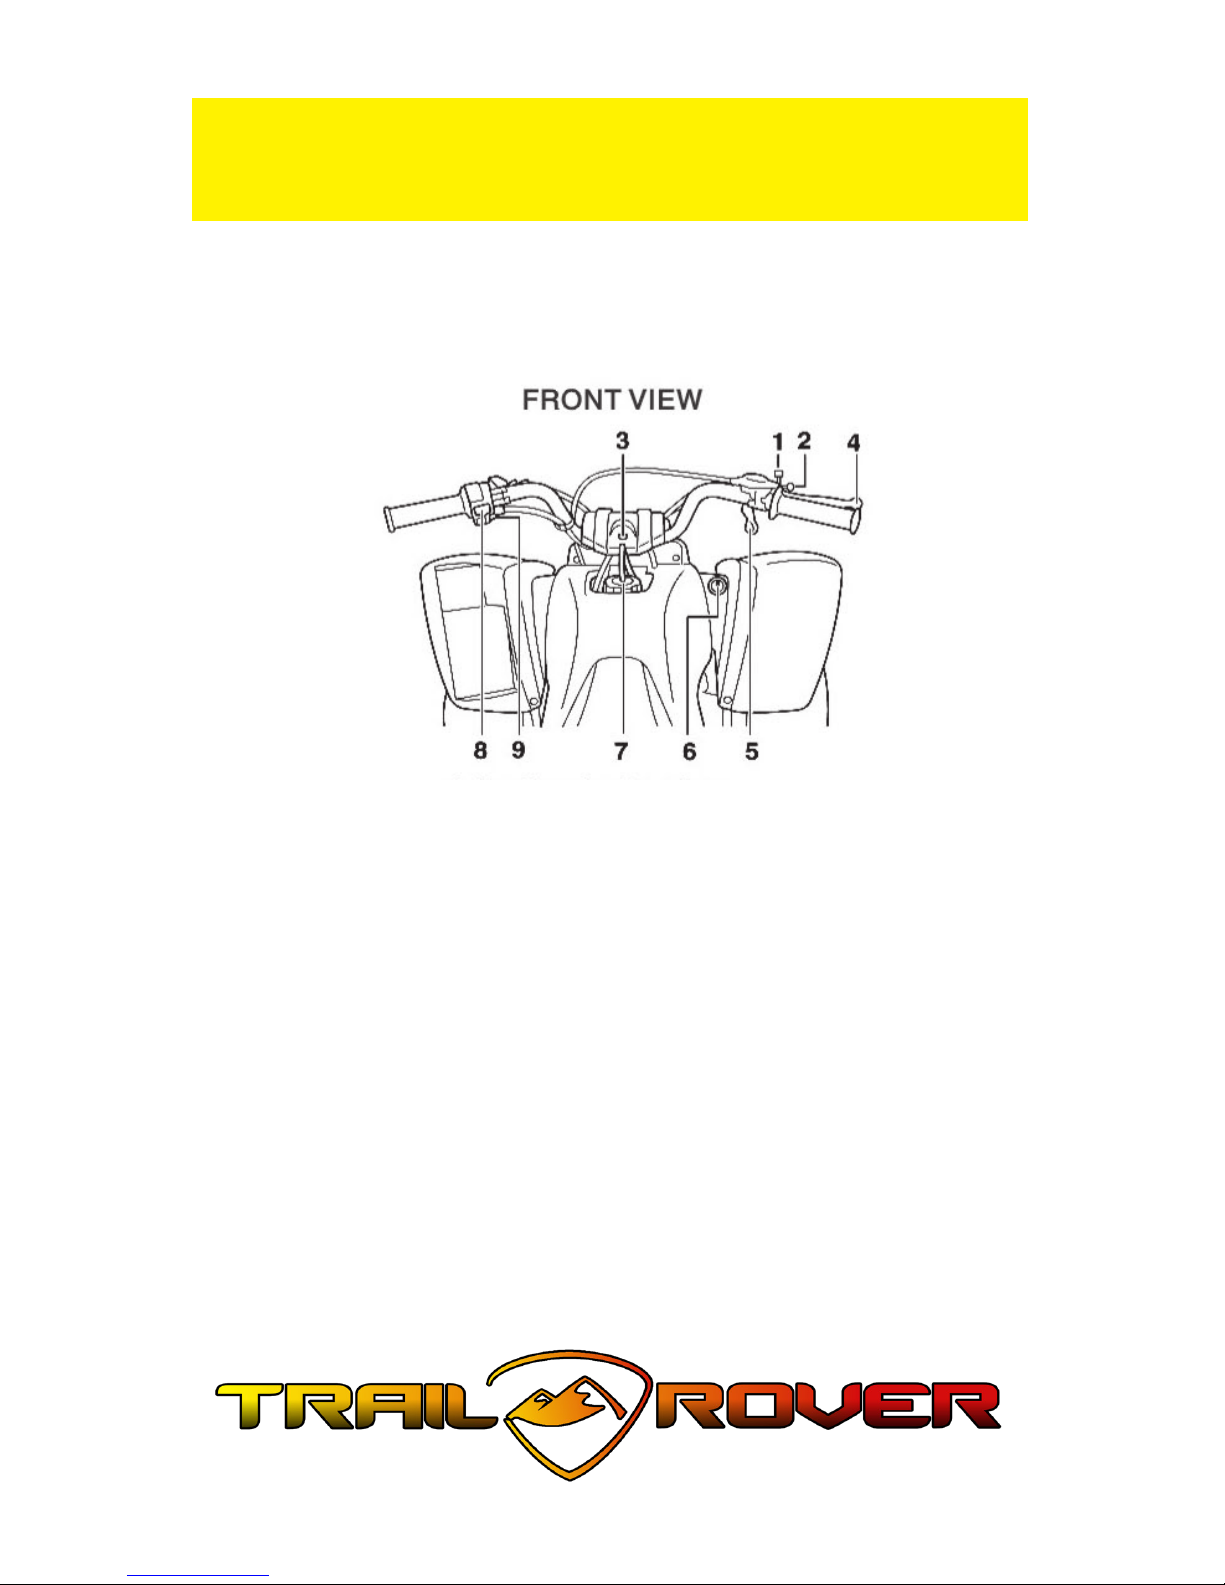
Location of Parts
1. Parking Brake Plate
2. rottle Limiter Screw
3. Neutral Indicator Light
4. Front Brake Lever
5. rottle Lever
6. Ignition Switch
7. Fuel Tank Cap
8. Engine Kill Switch
9. Start Button
9
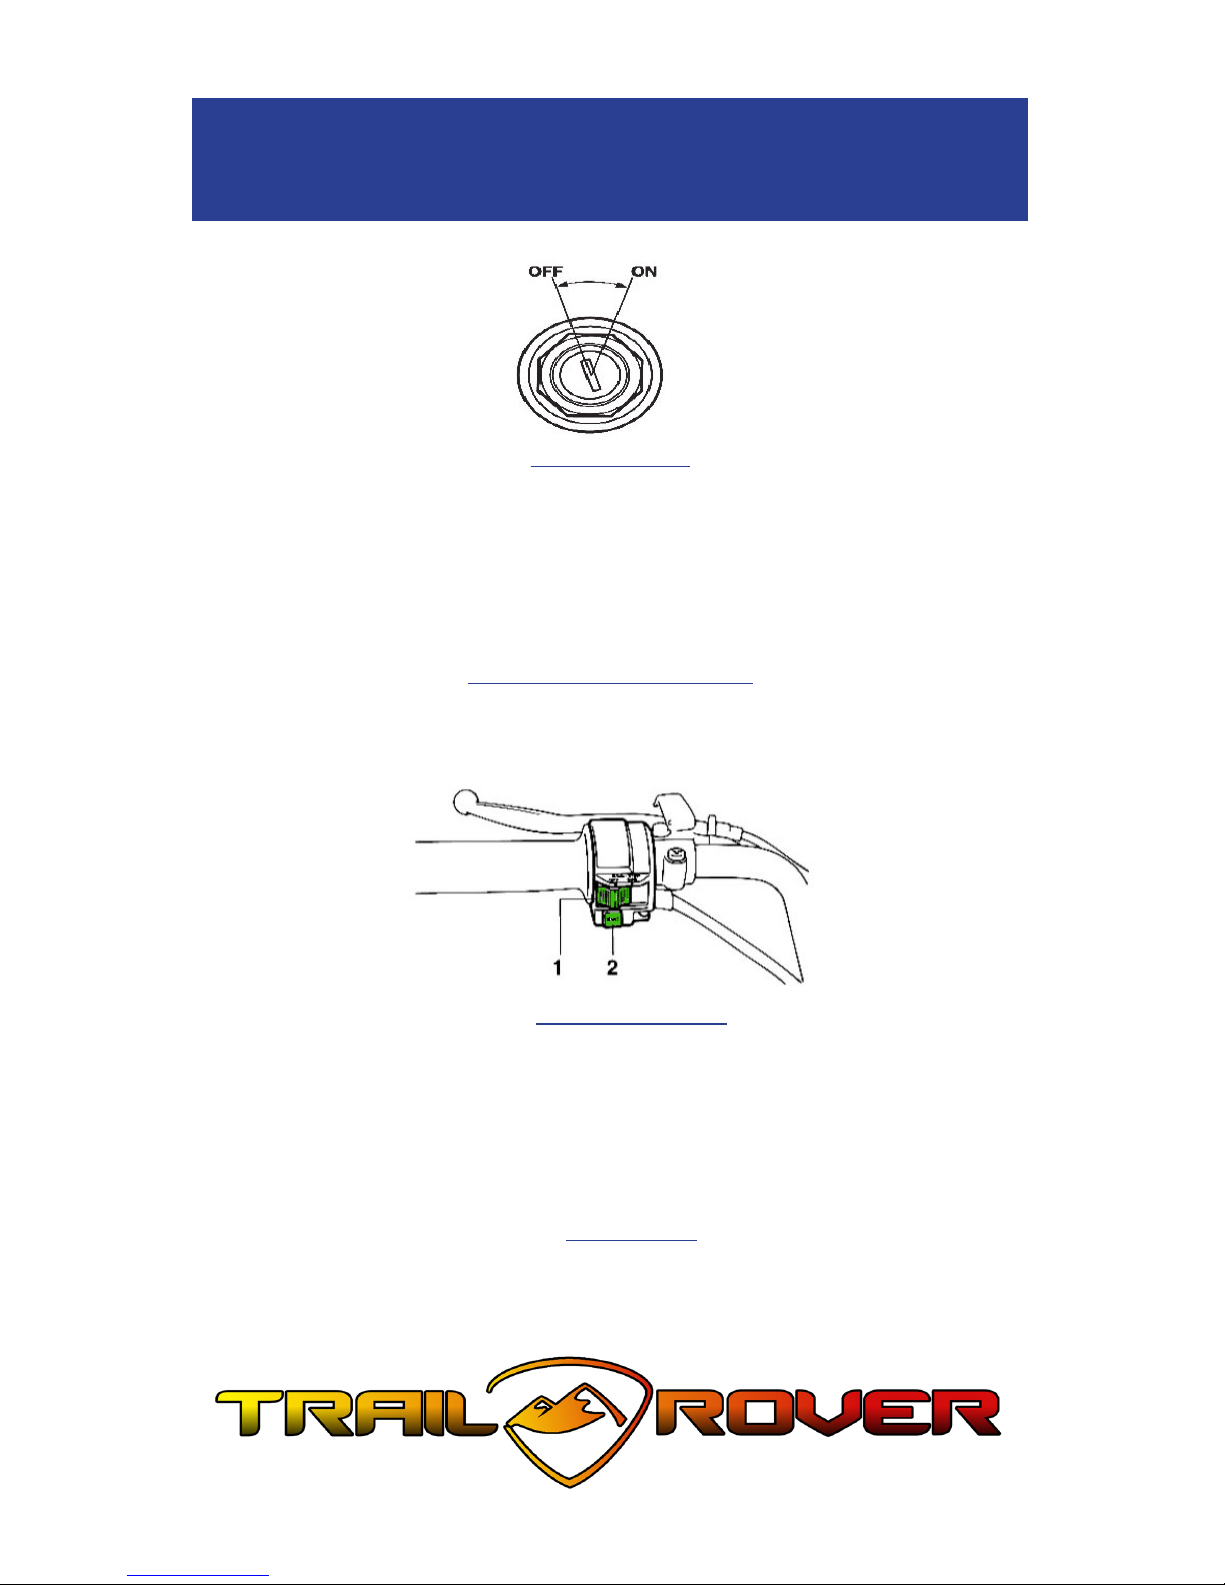
Ignition Switch
e ignition switch is located on the right side of the body, which has two
positions, “ON” and “OFF”. Removing the key can prevent unauthorized use to
your TrailRover™ ATV.
ON: Turn the key to the “ON” position.
OFF: Turn the key to the “OFF position. e vehicle cannot be started, the key
can be pulled out.
Remote Engine Stop Switch
e Remote Engine Stop Switch is located at the rear of the body and can be used
by parents to ensure safe operation by children. Pull the lanyard until the safe
plate comes o. e engine will stop running.
(1) Engine Kill Switch
e engine kill switch is located on the le handlebar and has two positions,
“RUN” and “OFF”.
RUN: In this position, the circuit is connected. e engine can be started and
driven
OFF: In this position, the circuit is disconnected. e engine cannot be started
or will die while being ridden.
(2) Start Button
Set the parking brake, press down on the start button with your le hand. e
engine can be started.
Function of Parts
10
Rear Brake Pedal
Hold rear brake pedal lever with your right foot. e rear brake pedal is active.
e vehicle speed of the vehicle will decrease until the vehicle stops. You can also
use the rear brake pedal to start the engine by holding the rear brake lever rmly
and engaging the clutch.
Front Brake Lever
e front brake lever is located on the right handlebar. To apply the front brake,
pull the front lever toward the handlebar grip, gradually applying gentle, even
pressure. Applying too much pressure, too quickly may cause bodily harm.
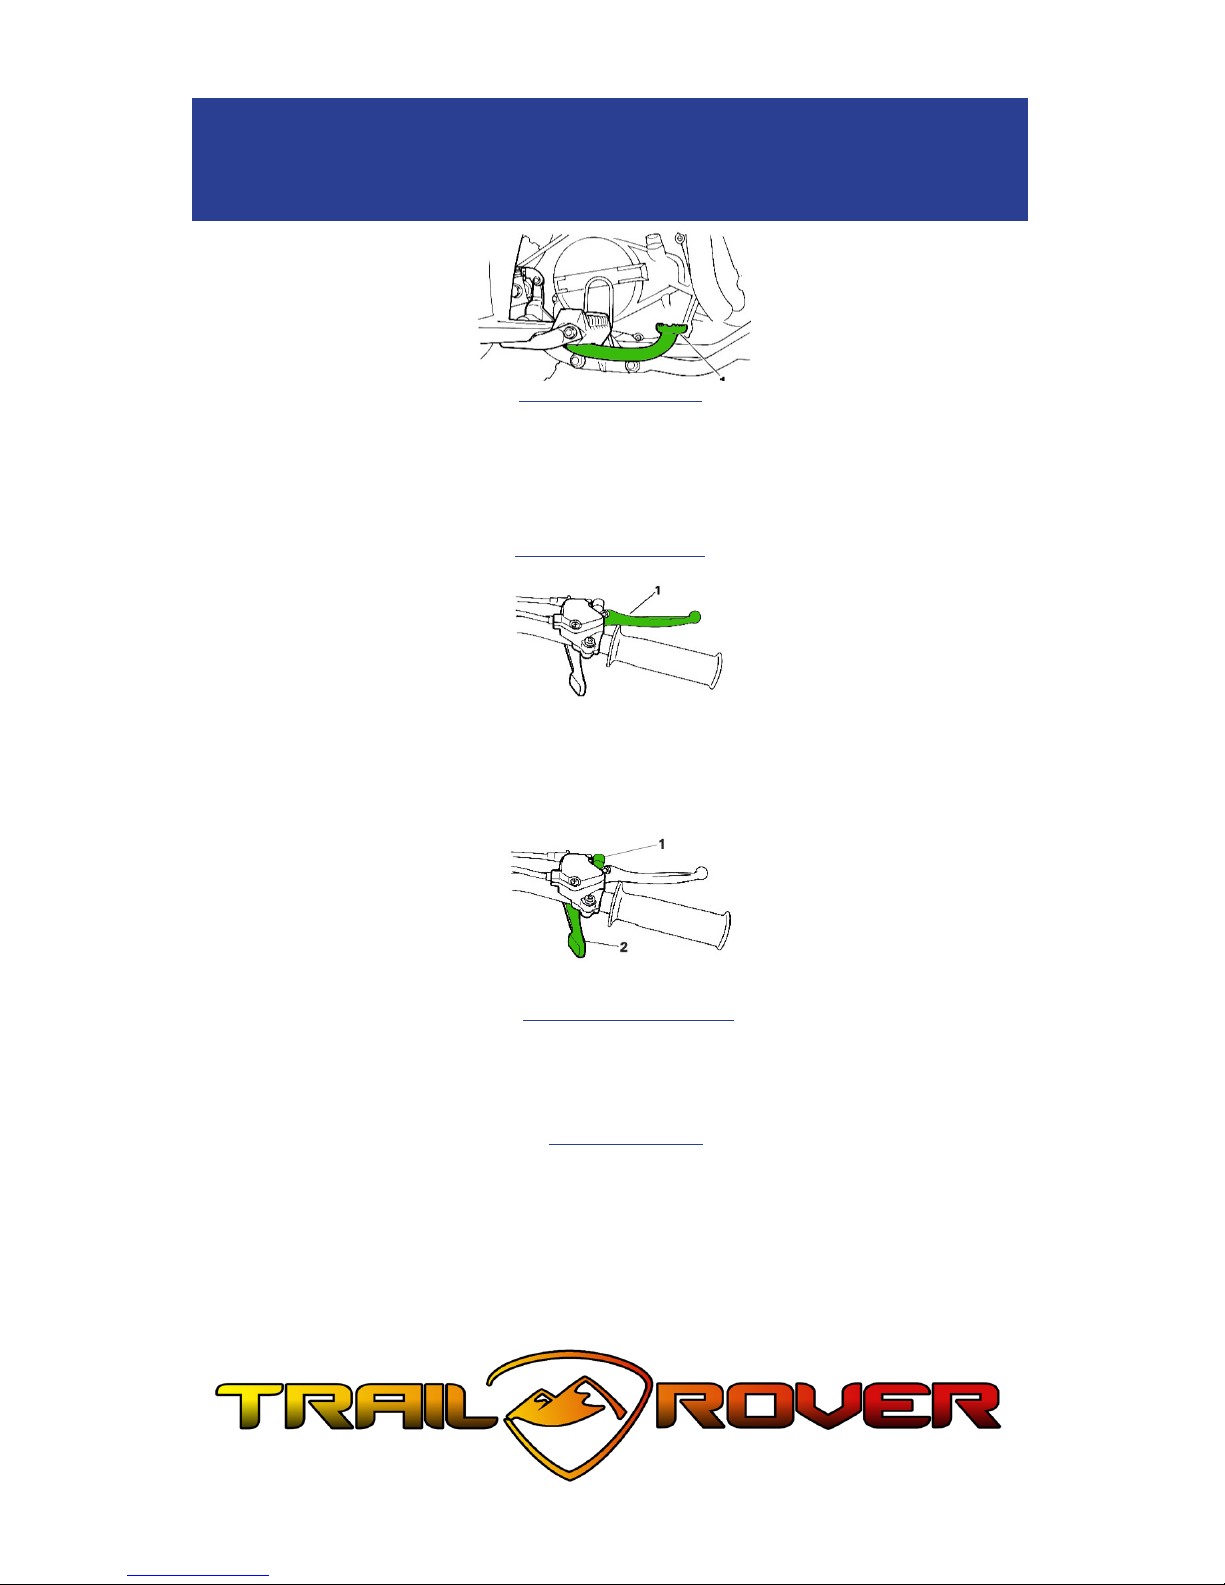
(1) Parking Brake Plate
e parking brake plate is designed to prevent your TrailRover™ from slipping.
To engage the parking brake, rmly hold the front brake lever rmly and press
down on the parking brake plate.
(2) rottle Lever
e throttle lever is used to control the speed of your TrailRover™. To increase
speed, push the throttle lever forward until your TrailRover™ reaches the desired
speed. To decrease speed, release the lever slowly until your TrailRover™ reaches
the desired or is in “idle”. Your TrailRover™ will idle if the throttle lever is not
engaged.
Function of Parts

11
rottle Limiter Screw
1. Locknut
2. Adjusting Screw
3. DO NOT Adjust more than 0.8”
e throttle limier screw restricts the speed of the TrailRover™ by limiting the
throttle lever movement. You can adjust the throttle limit screw to ensure safe
operation based on the rider’s skill and experience levels.
To decrease maximum speed, turn the throttle limiter screw clockwise.
To increase maximum speed, turn the throttle limiter screw counter-clockwise.
Aer making the desired adjustment, tighten the lock nut to hold the throttle
limiter screw in place.
Function of Parts
12
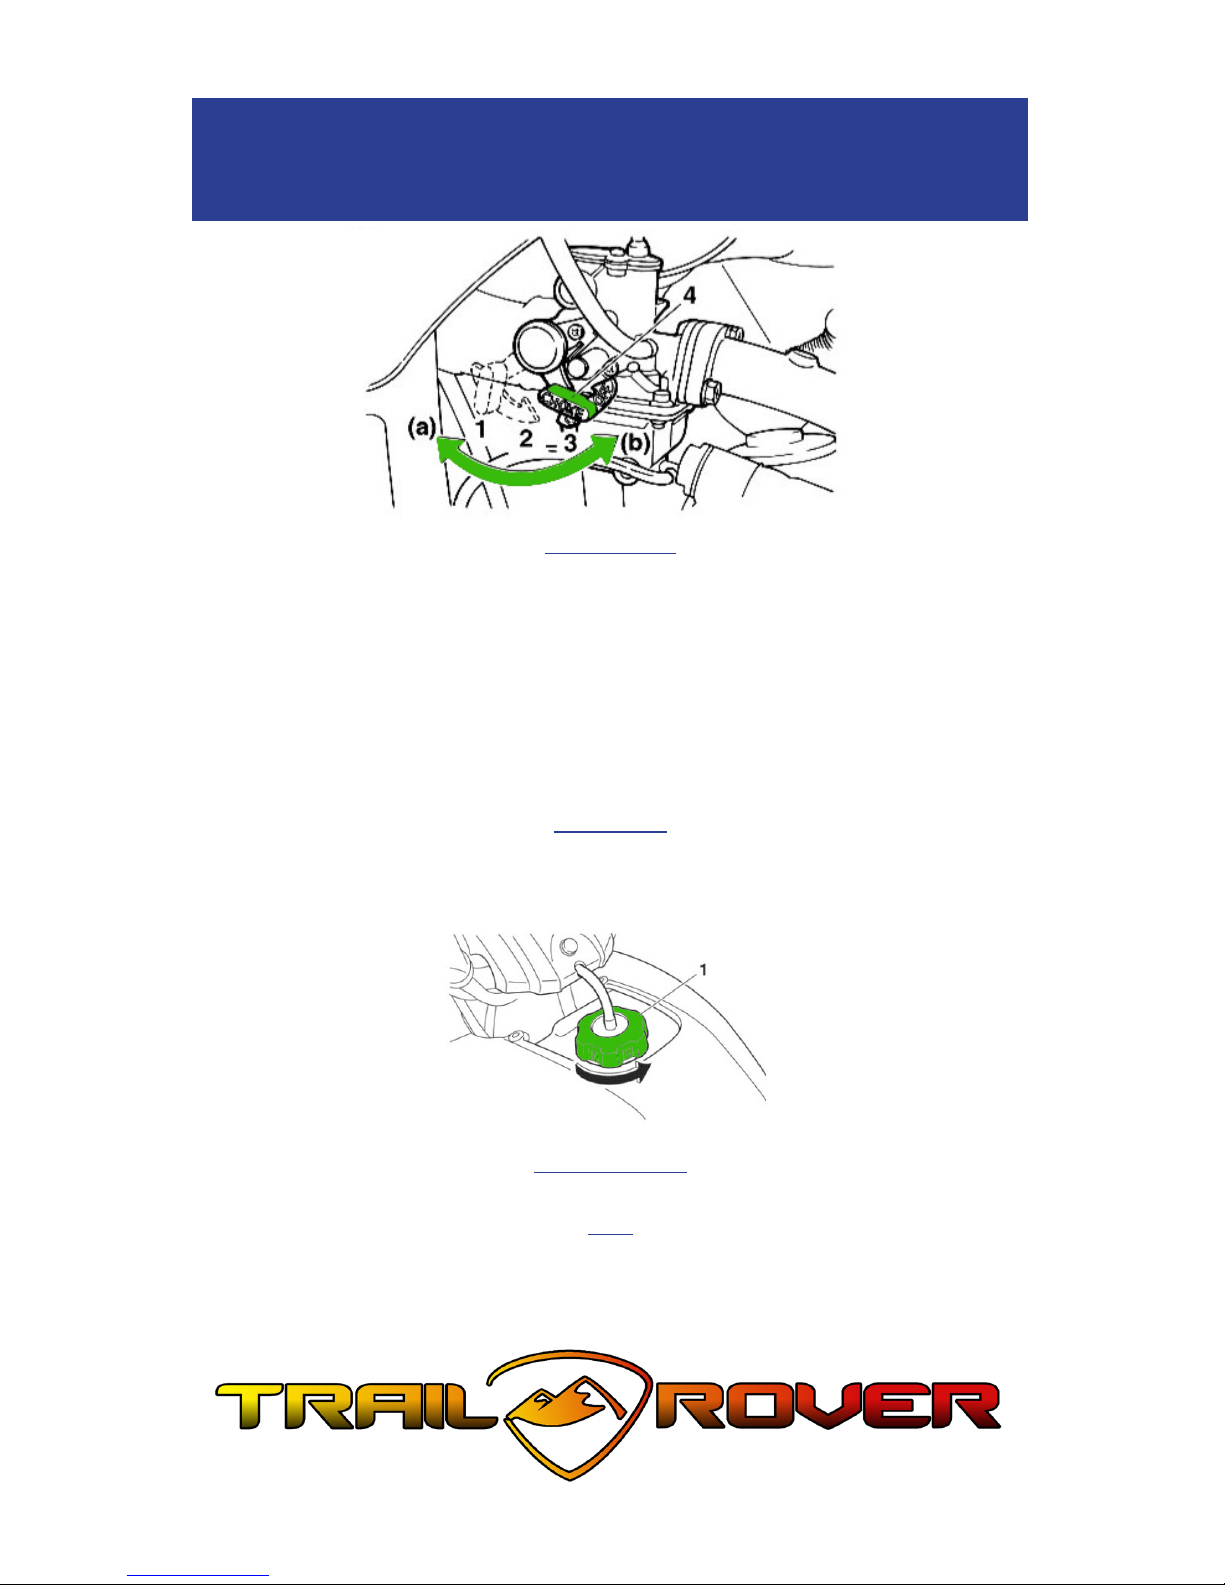
Choke Lever
e choke lever is located on the right side of the body. It is used to increase
the fuel/air mix ratio when starting the engine in a cold state. Pull the choke
lever out into “a” position. Aer your TrailRover™ starts, allow it to run for 2 -3
minutes before pushing the choke lever to the “b” position.
1. Fully open “ON”
2. Half Open “Warm Up”
3. Closed “OFF”
4. Chock
Shi Lever
Your TrailRover™ is equipped with a constant-mesh 3/4 speed transmission. e
shi lever is located on the le side of the engine.
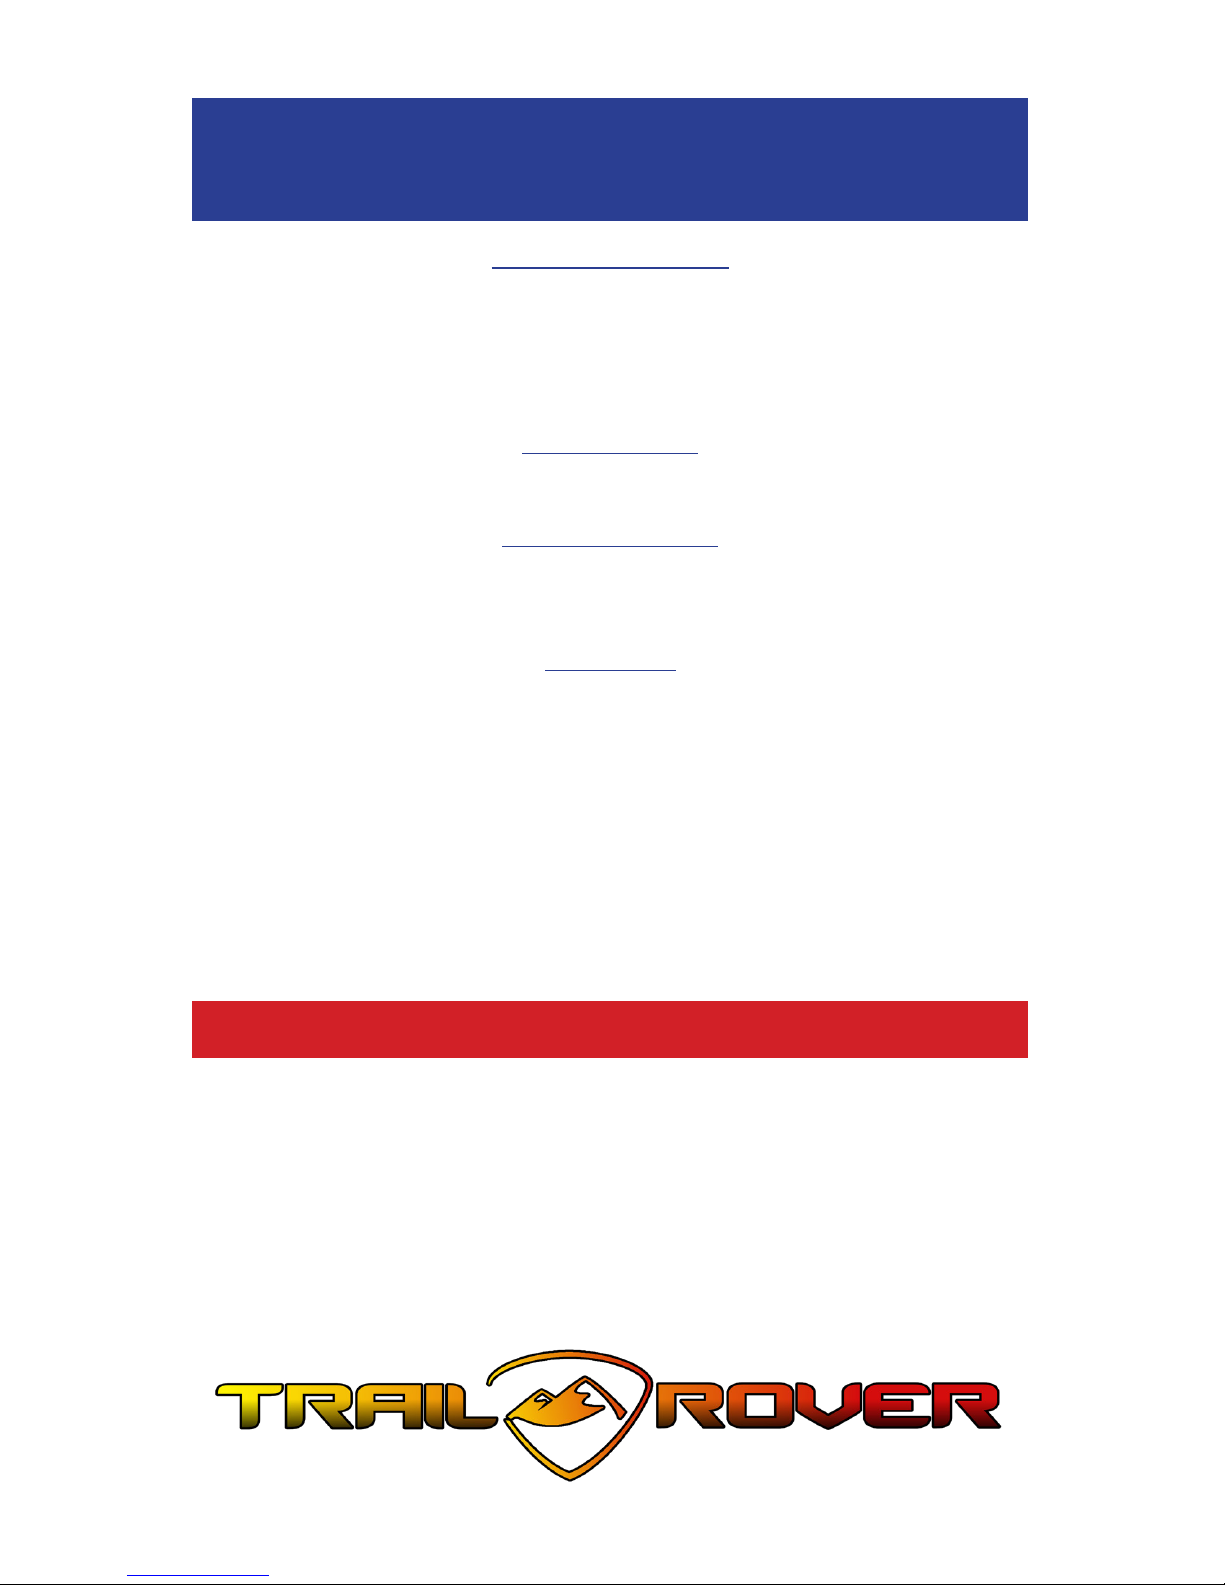
Fuel Tank Cap
Remove the fuel tank cap by turning it counter-clockwise.
Fuel
Make sure there is sucient fuel in the tank. Fill the fuel tank to the bottom of
the ller tube.
Function of Parts

13
C
Use only unleaded gasoline. e use of leaded gasoline will cause severe damage
to the internal engine parts, such as the valves and pistons.
Seat
To remove the seat, pull the lock lever upward and pull the seat at the rear.
To re-install the seat, insert the projection on the front of the seat into the seat
holder and push down on the seat at the rear.
Charging and Installing the Battery
e battery on your new TrailRover™,was installed at the factory prior to delivery.
It is a non-serviceable battery. To prolong battery life, aer charging, install
the battery into the battery case making sure it is held rmly in place with the
tightening belt.
C
Never remove the seal plug to avoid danger, to prevent water from entering the
battery and to prevent electrolyte leaks
e battery should always be held rmly in place with the tightening belt.
Always connect RED to RED (+) and BLACK to BLACK (-).
Never connect RED (+) to BLACK(-) and/or BLACK(-) to RED (+).
Never store the battery in high temperatures, near re, or smoke.
Function of Parts
C
C

14
Adding Fuel and Engine Oil
Check fuel and engine oil levels before each use. If necessary, add before turning
on the engine.
C
Spilling gasoline can harm your vehicle. Any gasoline can damage painted
surfaces.
Be careful no to spill gasoline when lling the fuel tank. Wipe up any spilled
gasoline immediately.
Refueling
Remove the gasoline cap by turning it counter-clockwise. When the correct fuel
level has been reached, replace the cap and turn clock wise to lock the cap in
place.
Your TrailRover™ is designed to operate most eciently with SAE 15W/40. Use
only high quality four-stroke premium engine oil.
Adding Engine Oil
Warm engine for about 5 minutes. Remove oil drain screw to allow oil to ow
out.
Clean the oil screw and reinstall tightly to prevent leaking.
Remove the oil gauge. Add oil until the level reaches the full level on the oil
gauge.
Re-install the oil gauge.
W
• Aer adding fuel or engine oil, the cap must be screwed on tightly.
• Fuel and engine oil should only be added by an adult.
• Add fuel in well ventilated areas, only.
• When adding fuel, the engine must be o to prevent it from coming into
contact with a warm motor.
• Do not smoke when adding fuel
• Children should be at a safe distance when adding fuel to prevent injury.
• Avoid getting fuel in contact with skin and clothing.
• Do not breathe fuel vapors.
Function of Parts
C
W
15
Front and Rear Brakes
Brake and rear pedal
Check for correct play in brake levers and brake pedal. If free play is incorrect,
make adjustments. Check for operation of the brake levers and the brake pedal.
ey should move smoothly and there should be a rm felling when the brakes
are applied. If service is required, take to your dealer for service.
Brake Operation
Test the brakes at slow speed aer starting to make sure they are in proper
working order. If they require service, take to your dealer.
Brake Fluid Leakage
Check to see if any brake uid is leaking out of the pipe joints or brake uid
reservoirs Apply the brakes rmly for one minute. If there is any leakage, get
service.
Drive Chain
Check the condition of the driver chain and check the drive chain slack.
Lubricate and adjust the drive chain as necessary.
Ride with Care and Good Judgement
Get training if you lack experience.
Beginners should get training from a certied instructor.
Become familiar with this ATV at slow speeds rst, even if you are an
experienced operator. Do not attempt to operate at maximum performance until
you are completely familiar with your TrailRover™ handling and performance.
Your TrailRover™ is not recommended for anyone under 14 years of age.
T TR™ .
C .
Function of Parts
W

16
Apparel
W
Potential Hazard
Operating your TrailRover™ without wearing an
approved motorcycle helmet, eye protection and
protective clothing.
What Can Happen
Operating without an approved motorcycle helmet
increases your chances of a severe head injury or
death in the event of an accident.
Operating without eye protection can result in
an accident and increases your chance of a severe
injury in the event of an accident. Operating without protective clothing
increases your chance of severe injury in the event of an accident.
To Avoid the Hazard, always wear
1. An approved motorcycle helmet that ts properly.
2. Eye protection (goggles or face shield)
3. Gloves
4. Boots
5. Long sleeved shirt or jacket & long pants
Do not operate aer consuming alcohol or drugs. e performance
capabilities of the operator may be reduced by the eects of alcohol or drugs.
W
Potential Hazard
Operating your TrailRover™ aer consuming alcohol or drugs.
What Can Happen
Serious negative aect on judgement
Slower reaction times
Negative impact on balance and perception
Increased risk of accident
How to Avoid the Hazard
Never consume alcohol or drugs before or while you are riding your
TrailRover™.
Function of Parts

17
Fuel Check fuel level in fuel tank and add fuel if
necessary.
Check fuel line for leaks. Correct if necessary.
Engine Oil Check oil level in engine and add oil if
necessary.
Check TrailRover™ for leaks. Correct if
necessary.
Front Brake Check operation and make corrections is
necessary.
Lubricate brake cable if necessary.
Check lever for free play and make adjustments
if needed.
Rear Brake Check operation and adjust if necessary.
Lubricate brake cable if necessary.
Check lever and pedal for free play and make
adjustments if necessary.
rottle Lever Make sure operation is smooth and check free
play
Lubricate cable and housing if necessary.
Control Cables Make sure operation is smooth and adjust if
necessary.
Wheels & Tires Check condition and replace if necessary.
Check tread depth and replace if necessary.
Check air pressure and adjust if necessary.
Brake & Shi Pedals Make sure operation is smooth. Lubricate pedal
pivoting pints if necessary.
Brake Levers Make sure operation is smooth. Lubricate pedal
pivoting pints if necessary.
Chassis Fasteners Make sure all nuts, bolts and screws are
properly tightened. Make adjustments if
necessary.
Instruments & Switches Check operation and make adjustments if
necessary.
Battery Check electrolyte level. Fill with distilled water
if necessary.
Pre-Ride Check List
Check these things before every ride!

18
Starting the Engine
With the switch in the “OFF” position, insert the key into the ignition switch,
turn the engine kill switch to the “RUN” position and the remote engine stop
switch to the installed position. Shi to Neutral.
Pull the choke out of the lever
Turn the key switch to the “ON” position. Aer mounting the TrailRover™, set
the parking brake plate, press the start button on the le side. e engine will
start.
If you are attempting to start your TrailRover™ while the engine is warm, do not
pull the choke lever; leave it in the original position.
W
Do not start the engine indoors or in areas with little ventilation.
Release the throttle temporarily aer the engine has been started.
C
Do not press and hold the start button continuously. Press and release the start
button to start the engine.
Do not press the start button while the engine is running to avoid damaging the
engine.
To prolong battery power, do not press the start button and hold for more than 5
seconds. Wait 10 seconds between pressing the start button.
If the engine fails to start aer pressing the start button 3 or 4 times, check the
vehicle for other reasons the engine may not be starting.
In cold weather, do not leave the choke lever “OPEN” aer the engine is warm
or the plug will deposit carbon which will increase oil consumption.
Aer your TrailRover™ engine has been running in idle for 30 to 40 seconds, it is
ready to ride.
Ready to Ride
W
C
19
Apply the brake
Push down to shi from “Neutral” to “Drive” ( if unit is equipped with gears)
rottle up gradually and allow your TrailRover™ to accelerate.
W
Do not throttle up too quickly aer initial start up of your TrailRover™
Riders should always ride the TrailRover™ with their feet on the foot rests making
sure the feet do not touch the wheels, reducing the rider’s ability to control the
vehicle potentially resulting in an accident or serious injury.
Turning
To turn your TrailRover™, the rider should shi body weight forward and
support their weight on the outer foot. Lean the upper body into the turn and
turn the handlebars into the direction of the turn.
W
e rider should rst practice turning technique in a wide open area until the
skill is mastered making gradual progressions before attempting to ride on more
advanced trails.
Braking
Release the throttle and hold the brake lever and apply gradual force. e speed
of your TrailRover™ will slow to a stop.
W
Avoid braking during turns. e brake should be used to slow down before
entering turns. If you must apply the brake while in a turn, the brake lever
should be gently applied with gradual pressure to avoid causing your TrailRover™
to slide and/or tip over.
Ready to Ride
W
W
W
20
C
Avoid braking quickly
Gentle pressure to the brakes should be applied in advance in inclement weather.
Stopping
When ready to stop your TrailRover™, rst gently release pressure from the
throttle until the throttle is released. en gently apply pressure to the brake
lever until your TrailRover™ comes to a complete stop. Put the engine cut o
switch into the “OFF” position. Shi into neutral.
Warning
Aer shutting o the engine, do not touch the engine or exhaust pipe, which is
hot, to avoid the risk of being burned.
Parking Brake
When parking your TrailRover™ on a slope, the parking brake should be used. To
engage the parking brake, hold the front brake lever and press the parking brake
plate. Aer releasing the brake lever, the parking brake plate will stay in the
“down” position, indicating the parking brake is engaged. To release the parking
brake, squeeze the front brake lever and the parking brake plate will disengage.
Remote Engine Switch
e remote engine switch helps adults exercise control of the TrailRover™
and pull out the remote engine stop switch before a child loses control of the
TrailRover™, preventing injury to the child and damage to the ATV. When an
adult is concerned about the safe operation by the child, the adult can kill power
to the engine by removing the remote engine kill switch. e remote engine
switch should be removed when not in use to prevent unauthorized use of your
TrailRover™.
Ready to Ride
C
W
Table of contents
Other Trail Rover Offroad Vehicle manuals


