Tramontina SAC27 Series User manual

SOPRADOR E ASPIRADOR
A COMBUSTÃO
COMBUSTION BLOWER AND VACUUM
SOPLADORA Y ASPIRADORA A COMBUSTIÓN
Manual de uso e manutenção
Use and maintenance manual
Manual de uso y mantenimiento
www.tramontina.com
GRÁTIS
ENTREGA
TÉCNICA
Procure a rede
de postos autorizados
TRAMONTINA
Listagem dentro
da caixa SAC27

2
Português
SOPRADOR E ASPIRADOR
A COMBUSTÃO SAC27
SAC27
CONHEÇA O PRODUTO
01 - Alça
02 - Interruptor Liga/Desliga
03 - Controle de Velocidade Variável
04 - Vela de Ignição
05 - Tubo Superior do Soprador
06 - Tubo Inferior do Soprador
07 - Tubo Inferior do Aspirador
08 - Zíper
09 - Saco Coletor
10 - Cinto de Aperto
11 - Alça do Saco Coletor
12 - Tubo Cotovelo do Aspirador
13 - Tubo Superior do Aspirador
14 - Tampa de Combustível
15 - Alavanca do Afogador
16 - Tampa do Silenciador
17 - Bulbo Injetor de Gasolina
18 - Corda do Motor de Partida
19 - Tampa do Filtro de Ar
20 - Gatilho
01
08
12
18
10
02 03
04
05
16
06
07
13
11
09
19 15
14
17
20

Português
3
CARACTERÍSTICAS TÉCNICAS
SÍMBOLOS
Antes de utillizar
o cortador, leia o
manual de instruções
Atenção
Use óculos de proteção Não use ou deixe o
equipamento na chuva
Risco de
ferimento
Manter as pessoas e crianças
fora da zona de perigo, que é
aproximadamente de 15 metros
GUIA RÁPIDO DE USO
• Antes de usar o equipamento, leia atentamente o manual de uso e manutenção.
• Use gasolina de boa qualidade, misturada com 4% (25:1) de óleo 2 tempos e, após o uso, não
deixar gasolina no tanque.
• Não trabalhe com o equipamento sob chuva ou em locais molhados.
• Verifique e limpe, antes de cada uso, o filtro de ar.
• Ao adquirir este produto receba GRÁTIS ENTREGA TÉCNICA, procurando a rede de postos
autorizados Tramontina.
Equipamento SAC27*
Modelo SAC27
Comprimento do tubo do soprador 755 mm
Comprimento do tubo do aspirador 790 mm
Tipo de motor 2 tempos, refrigerado a ar
Cilindrada 27 cc
Cilindros 1
Velocidade do soprador até 150 mph (240 km/h)
Lubrificação Mistura combustível/óleo
Proporção combustível/óleo Mistura de gasolina com 4% de óleo 2 tempos (25:1)
Volume do tanque de combustível 414 ml
Capacidade do saco coletor 35 l
Peso (à seco) 5,44 kg
* Todas as especificações são baseadas na informação mais recente disponível quando da impressão e
sujeitos a mudanças sem aviso prévio.

4
!
!
Português
MONTAGEM DO EQUIPAMENTO
Para evitar ferimentos pessoais graves, desligue o equipamento e espere o motor parar
antes de fixar ou remover os tubos.
Certifique-se de que os tubos e o saco coletor estejam em seus lugares antes de operar o
equipamento.
Modo Soprador
Instalação do tubo superior no soprador:
1. Alinhe a trava da extremidade do tubo superior com a ranhura da trava da
extremidade inferior da saída do soprador.
2. Insira o tubo superior na saída do soprador.
3. Gire o tubo superior no sentido horário até que este se encaixe e trave (Fig. 01).
Instalação do tubo inferior no tubo superior:
1. Alinhe a trava da extremidade superior do tubo inferior com a ranhura da
trava da extremidade do tubo superior do soprador.
2. Coloque o tubo inferior no tubo superior.
3. Gire o tubo inferior no sentido horário até travar (Fig. 02).
Remoção do tubo superior do soprador:
1. Segure o equipamento firmemente.
2. Insira uma chave de fenda no engate do tubo, gire a chave de fenda no
sentido anti-horário e segure-a.
3. Agarre o tubo superior do soprador e gire-o no sentido anti-horário.
4. Puxe o tubo superior da saída do soprador (Fig. 03).
Remoção do tubo inferior do soprador:
1. Segure o tubo superior do soprador firmemente.
2. Agarre o tubo inferior e gire-o no sentido anti-horário até que o tubo inferior destrave do tubo
superior.
3. Puxe o tubo inferior do tubo superior do soprador.
Modo Aspirador
Instalação dos tubos do aspirador:
1. Localize o furo na porta do motor.A aba da trava da porta é embutida no furo
em direção à frente do soprador. Insira uma chave de fenda no furo e pressione
a aba da trava da porta e eleve a porta para liberar a trava (Fig. 04).
Fig. 02
Fig. 03
Fig. 01
Fig. 04

5
Português
!
!
2. Enquanto mantém a porta do motor aberta, alinhe as três (3) ranhuras
do tubo superior do aspirador com as três (3) abas da trava da entrada do
motor (Fig. 05).
3. Insira o tubo superior do aspirador na entrada do motor e gire o tubo superior
no sentido horário com ambas as mãos até que a aba da trava se coloque em
seu lugar (Fig. 06).
4. Alinhe a seta no tubo inferior do aspirador com a seta no tubo superior.
As setas devem alinhar-se de modo apropriado para instalar os tubos do
aspirador corretamente (Fig. 07). Segure firmemente o tubo inferior do aspirador
com ambas as mãos e empurre o tubo inferior para dentro do tubo superior. Gire
o tubo inferior no sentido horário até que este se posicione e engate em seu
lugar. O ponto no tubo inferior se alinha com o ponto no tubo superior quando
esta adequadamente montados.
Use ambas as mãos durante esta montagem para encaixar as peças uma na outra firmemente.
A área chata no tubo superior do aspirador deve estar de frente para a alça quando instalada
corretamente.
Saco coletor
Instalação do tubo cotovelo do aspirador no soprador:
1. Se posicione de frente para o equipamento, segure a extremidade chaveada
do tubo cotovelo com a mão esquerda e a extremidade alargada com a mão
direita. Alinhe as abas da trava da extremidade chaveada com as abas da trava
na saída do soprador. (Fig. 08)
2. Insira o tubo cotovelo do aspirador no soprador e gire-o no sentido horário
até que engate e trave.
Inserção do tubo cotovelo no saco coletor:
1. Localize abertura no saco coletor. Insira a extremidade alargada do tubo
cotovelo aproximadamente 4”/10,2 cm dentro da abertura (Fig. 09).
2. Puxe a extremidade da tira de aperto para firmar a abertura do saco coletor
em volta do tubo de sucção. Aperte a tira de aperto de forma que o saco coletor
tenha movimento limitado ao longo do tubo, mas não deslize da
extremidade alargada.
Fig. 06
Fig. 07
Fig. 05
Fig. 08
Fig. 09
4”/10,2 cm

6
Português
!
!
Fig. 12 Fig. 13 Fig. 14
1
Fig. 10 Fig. 11
25:1
ABASTECIMENTO
Abastecimento de combustível
Abasteça o tanque de combustível com gasolina de boa qualidade e bem misturada com 4%
(25:1) de óleo 2 tempos.
Gasolina
Use sempre gasolina de boa qualidade e não armazene por mais de 30 dias, pois prejudica o
funcionamento do motor. O tanque possui capacidade para 414 ml. Deixe o motor esfriar por pelo
menos dois minutos antes de reabastecer com gasolina para evitar explosões. Não deixe gasolina no
tanque. Use o equipamento até terminar a gasolina para evitar que ela fique acumulada no carburador.
ACIONAMENTO
Opere este equipamento somente em uma área externa bem ventilada. As emissões de
monóxido de carbono podem ser letais em uma área confinada.
Para evitar ferimentos graves, o operador e a equipamento devem estar em uma posição
estável durante a partida. Para evitar ferimentos pessoais graves, certifique-se de que o tubo
do soprador esteja encaixado e travado.
1. Pressione o bulbo injetor de gasolina 10 vezes, ou até que o combustível esteja visível (Fig. 12).
2. Mova a alavanca do afogador para a Posição “1” (Fig. 13).
3. Agache-se na posição de início (Fig. 14).

Português
7
!
!
4. Puxe a corda 5 vezes (Fig. 15).
5. Mova a alavanca do afogador para a Posição “2” (Fig. 16).
6. Puxe a corda 3-5 vezes para dar partida no motor (Fig. 17).
7. Aperte o gatilho ou pressione o controle de velocidade variável e deixe a equipamento aquecer por
30-60 segundos (Fig. 18).
8. Continue a apertar o gatilho. Mova a alavanca do afogador para a Posição 3 (Fig. 19). Aqueça a
equipamento por mais 60 segundos. O equipamento já pode ser utilizada após este tempo.
Não deu a partida?
Repita as instruções de partida.
Se o motor não der partida após 2 tentativas, mova a alavanca do afogador para a posição 3 e puxe
a corda do motor de partida até que o motor dê partida.
Instruções de parada
1. Libere o gatilho ou ajuste o controle de velocidade variável para deixar o
motor em marcha lenta (-).
2. Pressione e segure o interruptor Liga/Desliga na posição
DESLIGA (O) até que o motor pare completamente (Fig. 20).
FUNCIONAMENTO E FORMA DE USO
Para evitar ferimentos pessoais graves, use óculos de segurança o tempo todo ao operar esta
equipamento. Use uma máscara facial ou uma máscara de pó em locais empoeirados.
Para evitar ferimentos pessoais graves ou danos à equipamento, certifique-se de que os tubos
do soprador ou os tubos do aspirador e o saco coletor estejam bem colocados antes de operar
a equipamento.
Manuseio do equipamento
Antes de operar a equipamento, coloque-se na posição de operação. Certifique-se de que:
• O operador está usando vestuário apropriado, como botas, óculos de segurança, proteção
auricular, luvas, calças compridas e uma camisa de manga longa.
Fig. 20
Fig. 15 Fig. 16 Fig. 17
2
Fig. 18 Fig. 19
3

• O equipamento está em boas condições de operação.
• Os tubos e as proteções estão firmes e bem colocados.
Uso do controle de velocidade variável
1. Uma vez que o motor tenha dado a partida e aquecido, pressione o
gatilho para acelerar a equipamento conforme necessário.
2. Para períodos de operação mais longos e para eliminar possível fadiga
dos dedos, mova o controle de velocidade variável em direção à posição
RÁPIDO (+) para aumentar de modo incremental ou manter a velocidade
do motor. Quando o controle de velocidade variável é pressionado, o gatilho
retrocederá para dentro da alça.
3. Para diminuir a velocidade do motor, mova o controle de velocidade
variável para a posição LENTO (-) e o gatilho retornará para marcha lenta
(Fig. 21).
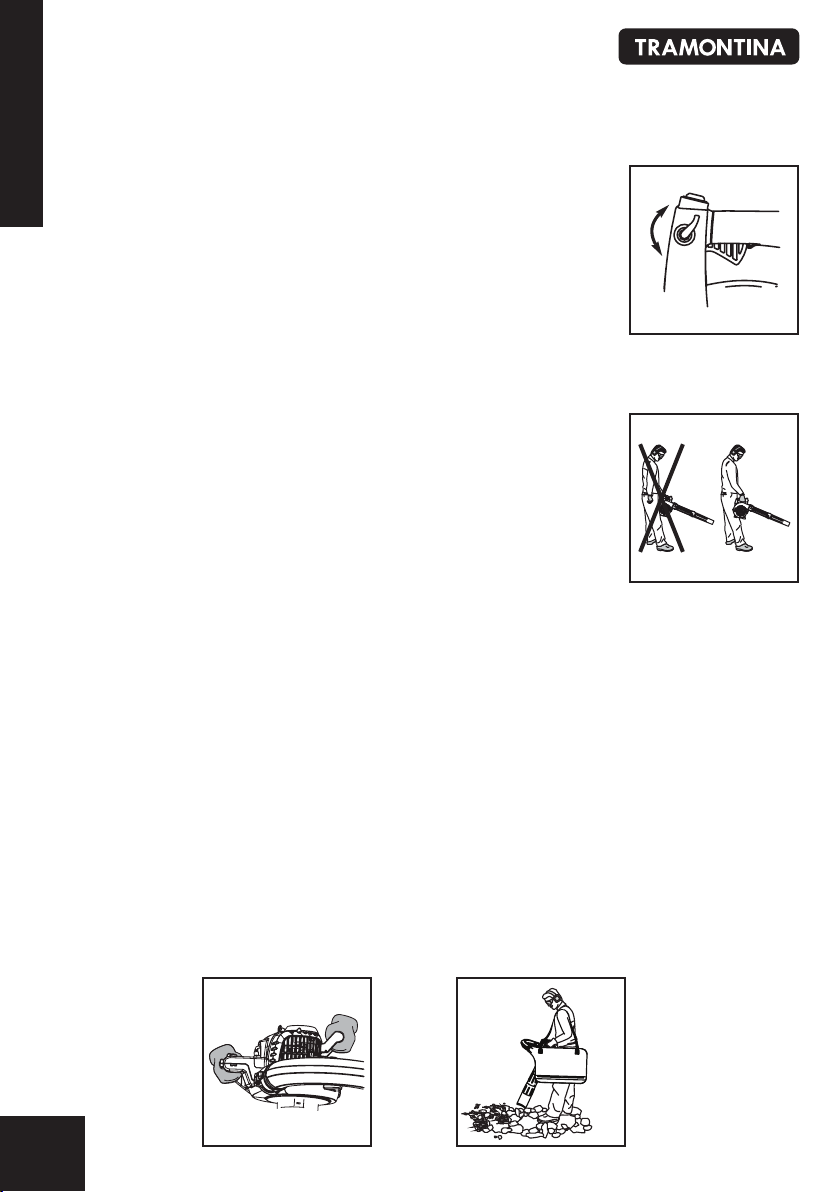
Operação do equipamento como Soprador
Após dar partida no equipamento, sempre se posicione no lado esquerdo da
equipamento para operá-lo conforme mostrado na figura 22, evitando assim
o bloqueio da entrada de ar. Use o soprador para árvores, arbustos, canteiros
e áreas de difícil limpeza. Use também o equipamento ao redor de prédios,
muros, saliências, cercas e telas e para outros procedimentos normais de
limpeza. Varra de lado a lado com o bocal posicionado vários centímetros
acima do chão ou piso. Avance o equipamento lentamente, mantendo a
pilha acumulada de detritos à sua frente. A maioria das operações de sopro
a seco tem um desempenho melhor quando realizadas a baixas velocidades.
Operação do equipamento como Aspirador
- Para evitar ferimentos graves, nunca abra o saco coletor antes de desligar a equipamento.
- Como aspirador, o equipamento foi projetada para recolher material seco, como folhas, grama,
pequenos galhos e pedaços de papel. Para evitar ferimentos pessoais graves, não tente aspirar detritos
molhados e/ou água parada, uma vez que isto pode resultar em danos ao equipamento.
- Para evitar graves danos ao motor, não aspire metal, vidro quebrado ou itens similares.
- Evite situações que possam provocar fogo no saco coletor. Não opere próximo ao fogo. Não aspire
cinza quente de lareiras, churrasqueiras, pilhas de galhos, etc. Não aspire charutos ou cigarros
descartados, a não ser que as cinzas estejam completamente frias.
- Use o equipamento para aspirar detritos leves como folhas e papel.
- Certifique-se de que o saco coletor esteja fechado antes de operar a equipamento.
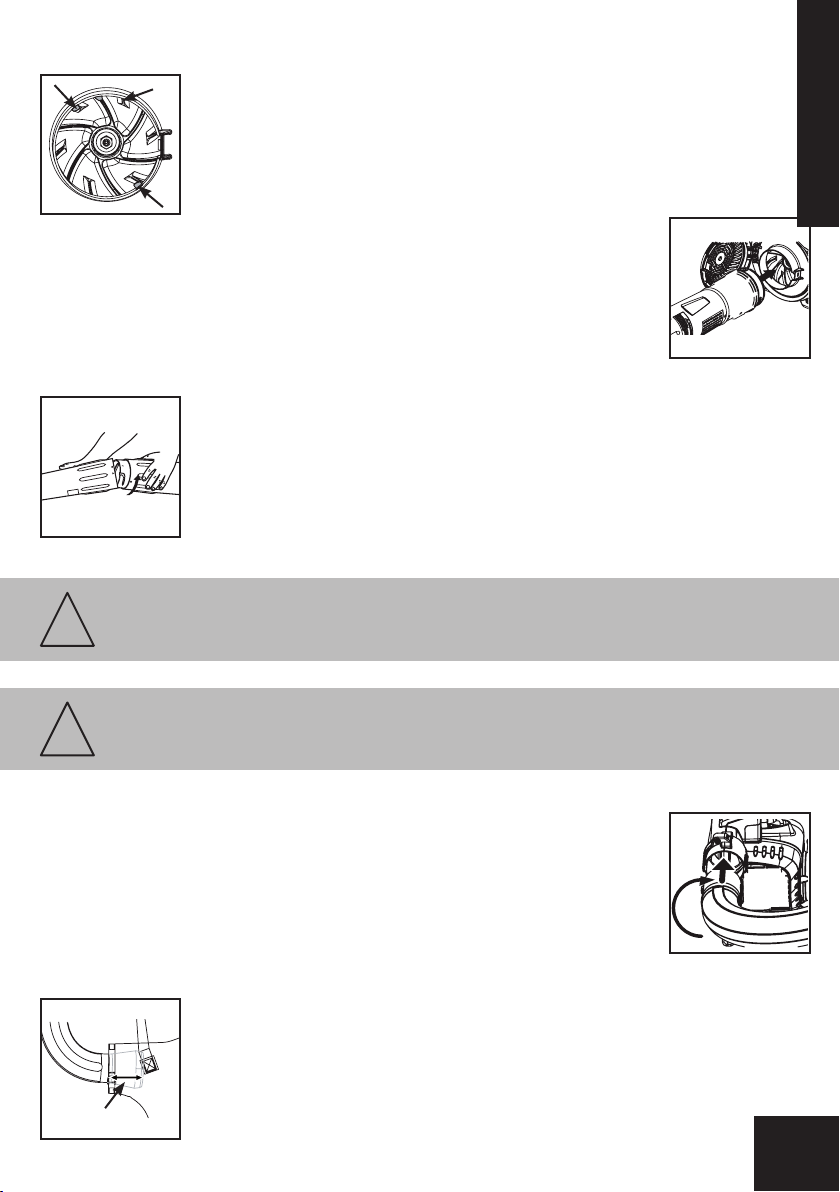
- Coloque a alça de suporte sobre a cabeça e sobre o ombro. Segure o aspirador com ambas as mãos
(Fig. 23), inclinando levemente o tubo de aspiração, e movimente o equipamento como se estivesse
varrendo para coletar os detritos leves (Fig. 24). Os detritos serão aspirados para o saco coletor. Coisas,
como folhas e galhos pequenos, serão trituradas à medida que passam pela caixa do ventilador,
permitindo que o saco coletor armazene mais detritos.
- Esvazie o saco coletor quando estiver cheio, pois a aspiração diminuirá de modo perceptível.
8
Português
Fig. 22
Fig. 21
+
-
Fig. 23 Fig. 24

9
Português
!
Esvaziar o saco coletor
Desligue o equipamento e deixe o motor parar antes de abrir o saco coletor.
1. Com os óculos de proteção e uma máscara de pó, abra o saco coletor e esvazie o conteúdo em
um saco ou recipiente de lixo.
2. Vire o saco coletor do avesso após o esvaziamento inicial e sacuda-o vigorosamente para
remover o pó e os detritos.
3. Feche e reinstale o saco coletor.
Esvazie o saco coletor após cada uso para evitar avarias e obstrução do fluxo de ar, o que reduzirá
o desempenho do aspirador.
MANUTENÇÃO
Para evitar ferimentos graves, nunca realize serviços de manutenção ou reparo com o
equipamento em funcionamento. Faça manutenção e reparos com o motor frio. Desconecte o
fio da vela de ignição para garantir que a equipamento não possa dar partida.
Programa de manutenção
Realize os procedimentos de manutenção necessários na frequência indicada na tabela. Estes
procedimentos também devem fazer parte da revisão periódica.
Manutenção do filtro de ar
Falha na manutenção apropriada do filtro de ar pode resultar em desempenho abaixo do desejável e
pode ocasionar danos permanentes ao seu motor.
1. Para abrir a tampa do filtro, empurre a aba de travamento do lado direito da tampa e puxe a tampa
do filtro de ar levemente para fora e para a esquerda (Fig. 25).
2. Retire o filtro de ar (1), (Fig. 26).
3. Lave o filtro com detergente e água. Enxágue bem e deixe o filtro secar.
4. Aplique uma quantidade suficiente de óleo de motor SAE 30 para revestir levemente o filtro.
5. Aperte o filtro para espalhar e remover o excesso de óleo.
6. Substitua o filtro (Fig. 26). Se a equipamento for operada sem o filtro de ar, a garantia será ANULADA.
7. Para reinstalar a tampa do filtro de ar, posicione os ganchos do lado esquerdo da tampa do filtro
de ar nas ranhuras do lado esquerdo da placa de apoio (2), (Fig. 26).
8. Empure a tampa para a direita e pressione-a para fechar, de forma que a aba da tampa do filtro
engate na ranhura da placa de apoio (3), (Fig. 27).
ITEM MANUTENÇÃO ANTES DE
CADA USO INTERVALOS
25 h
Parafusos e Porcas Inspeção/Aperto X
Mangueiras de Combustível Inspeção X
Filtro de Combustível Inspeção/Troca X
Filtro de Ar Limpeza/Troca X
Vela de Ignição Inspeção/Limpeza/Ajuste/Troca X
Sistema de Refrigeração Inspeção/Limpeza X
Fig. 25 Fig. 26
1
2
Fig. 27
3

10
Português
Limpeza
Use uma escova pequena para limpar o exterior da equipamento. Não use detergentes fortes.
Produtos de limpeza domésticos que contêm óleos aromáticos como pinho e limão e solventes
como querosene podem danificar a caixa do motor ou a alça de plástico. Seque toda a umidade
com um pano macio.
Armazenameto
Nunca armazene a equipamento com combustível em um local onde os gases possam entrar em
contato com fogo ou fagulhas.
Deixe o motor resfriar antes de guardar a equipamento.
Armazene a equipamento em local chaveado para evitar danos ou o uso não autorizado.
Armazene a equipamento em área seca e bem ventilada.
Mantenha fora do alcance de crianças.
NORMAS BÁSICAS DE SEGURANÇA
• Certifique-se de que o equipamento não esteja direcionada para nenhuma pessoa nem para
detritos soltos antes de dar partida na equipamento.
• Sempre segure o equipamento com segurança durante a operação. Segure a alça firmemente.
• Para reduzir o risco de perda de audição associado aos níveis de som, é necessário usar proteção
auricular.
• Verifique o seu equipamento antes da operação, especialmente o silenciador, a entrada de ar e os
filtros de ar.
• Use ancinhos e vassouras para soltar os detritos antes de soprá-los.
• Na presença de poeira e quando houver disponibilidade de água, molhe levemente as superfícies
antes de utilizar o equipamento.
• Verifique a presença de crianças, animais de estimação, janelas abertas e carros recém-lavados e
sopre os detritos com segurança na direção oposta.
• Limpe o ambiente após utilizar sopradores e outros equipamentos. Descarte os detritos de modo
apropriado.
• Desligue o motor e deixe-o esfriar pelo menos 2 minutos antes de retirar o tampão do tanque de
combustível.
• A gasolina e seus vapores são extremamente inflamáveis e explosivos. O fogo ou uma explosão
poderá provocar graves queimaduras ou morte.
• Dê a partida e faça funcionar o motor em áreas externas. Não acione nem faça funcionar o motor
em áreas fechadas, mesmo que as janelas ou as portas estejam abertas. Os motores liberam monóxido
de carbono, um gás tóxico inodoro e incolor. Respirar monóxido de carbono poderá provocar náuseas,
desmaios ou morte.
• Mantenha crianças ou animais à distância do equipamento quando ele estiver em operação.
• Não permita que pessoas inexperientes usem o equipamento sem antes ler o manual de instruções.
• Quando não utilizado, o equipamento deve permanecer fora do alcance das crianças.
• Durante o trabalho use sempre calçados fechados e é recomendável o uso do óculos de segurança.
• Nunca trabalhe com o equipamentosob chuva e utilize sempre durante o dia ou com boa iluminação.
• Nunca use o equipamento sem que os dispositivos de segurança estejam em perfeitas condições.
• Recomenda-se que as peças de reposição sejam do mesmo modelo e marca Tramontina.
TERMOS DE GARANTIA
A TRAMONTINA MULTI S.A. oferece garantia a este produto por ela comercializado contra qualquer defeito de
fabricação pelo período total de 06 (seis) meses, sendo 03 (três) meses de garantia contratual e 90 (noventa) dias de
Modelo Motor Aplicação / Uso Garantia Contratual +
Garantia Legal
Tempo total de garantia a
contar da data da compra
SAC27 27 cc Doméstico 6 meses + 90 dias 06 meses

garantia legal, conforme estabelece o artigo 26 do Código de Defesa do Consumidor.
O prazo de contagem da garantia inicia-se com a emissão da Nota Fiscal de venda do equipamento, que deverá ser anexada
ao presente termo, sendo que a garantia será válida somente mediante apresentação da nota fiscal de compra.
Dentro do prazo total de 06 meses, a TRAMONTINA MULTI S.A. compromete-se a reparar ou substituir gratuitamente as
peças que, em condições normais de uso e manutenção e, segundo avaliação técnica, apresentem defeito de fabricação.
O comprador será responsável pelas despesas de embalagem e transporte até o Serviço Autorizado Tramontina mais próximo.
O comprador é responsável pelas revisões, manutenções e limpezas periódicas necessárias ao equipamento, bem como pela
observação a todos os cuidados dispostos no manual de uso.
A garantia não cobre:
• Peças danificadas pelo desgaste natural, acidentes, uso e manutenção incorreta do aparelho ou imperícia do operador.
• Peças danificadas por montagem ou uso indevido que não cumpram com as indicações deste manual.
• Avarias decorrentes do uso de óleos lubrificantes e/ou combustíveis inadequados (fora de especificação técnica).
• Avarias decorrentes de ausência de óleo, óleo insuficiente, óleo em excesso ou diferente do recomendado.
• Revisões provocadas por problemas de combustível e óleos inadequados (limpeza interna).
• Revisões, manutenções e limpezas periódicas necessárias ao equipamento.
A garantia será anulada se o equipamento apresentar sinais de violação, utilização de peças não originais ou ter sido consertado
por pessoas não autorizadas pela Tramontina. Para outras informações, entre em contato com a rede de Assistência Técnica,
conforme listagem anexa, ou com a Tramontina.
11
Português
NOTA
TODAS AS PEÇAS COMPROVADAMENTE COM DEFEITO DE FABRICAÇÃO SERÃO
SUBSTITUÍDAS SEM CUSTO, NÃO HAVENDO A TROCA DO EQUIPAMENTO.
Imagens meramente ilustrativas
Bahia.....................(71) 3215 8266 Porto Alegre........(51) 2101 5000
Belém....................(91) 3211 7700 Recife..................(81) 3454 8800
Belo Horizonte.......(31) 3223 4026 Rio de Janeiro.....(21) 2224 5004
Curitiba.................(41) 2111 9110 São Paulo............(11) 4197 1266
Goiânia.................(62) 3272 2100
Escritórios de Vendas

BLOWER AND VACUUM
WITH COMBUSTION ENGINE
12
English
SAC27
PRODUCT INFORMATION
01 - Handle
02 - On/Off Stop Control
03 - Cruise Control
04 - Spark Plug
05 - Upper Blower Tube
06 - Lower Blower Tube
07 - Lower Vacuum Tube
08 - Zipper
09 - Vacuum Bag
10 - Cinch Strap
11 - Vacuum Bag Strap
12 - Vacuum Elbow
13 - Upper Vacuum Tube
14 - Fuel Cap
15 - Choke Lever
16 - Muffler Cover
17 - Primer Bulb
18 - Starter Rope.
19 - Air Filter Cover.
20 - Trigger.
01
08
12
18
10
02 03
04
05
16
06
07
13
11
09
19 15
14
17
20

13
English
TECHNICAL FEATURES
SYMBOLS
Attention
Use safety goggles Don’t use or leave equipment
in the rain
Risk of injury
Read the instruction
manual before using
your brush cutter
Keep people and children away
from the danger zone, which is
about 15 meters away
QUICK GUIDE FOR USAGE
• Read the user and maintenance manual.
• Use good quality gasoline mixed with 4% (25:1) 2-stroke oil, and after using, do not leave gasoline
in the fuel tank.
• Do not use the brushcutter in the rain or under wet conditions.
• Check cleanliness of air filter periodically.
• FREE TECHNICAL TRAINING is available on products purchased from authorised Tramontina
suppliers.
Equipment
SAC27*
Modelo SAC27
Tube Lenght Blower 75,5 cm
Tube Lenght Vaccum 79,00 cm
Engine Type
Air-Cooled - 2 strokes
Cubic Capacity
27 cc
Cylinders
1
Blower Velocity up to 150 mph (240 kmh)
Lubrication Fuel/Oil Mixture
Fuel/Oil Ratio
Mixture of gasoline with 4% of 2 strokes oil (25:1)
Fuel Tank Capacity
414 ml
Vacuum Bag Capacity
35 l
Dry Weight
5,44 kg
* All specifications are based on the latest product information available at the time of printing. We reserve the right to make changes at any
time without notice.

14
!
!
!
!
English
ASSEMBLY OF EQUIPMENT
To prevent serious personal injury, stop the engine and allow the impeller to stop before attaching or
removing tubes.
To prevent serious personal injury or damage to the unit, make sure the blower tubes, or vacuum tubes
and the vacuum bag, are in place before you operate the unit.
Blower assembly
Installing the Upper Blower Tube:
1. Align the bump on the end of the upper blower tube with the bump slot on the bottom end of the blower outlet.
2. Insert the upper blower tube into the blower outlet.
3. Twist the upper blower tube clockwise until it locks into place (Fig. 01, Pag. 04).
Installing the Lower Blower Tube:
1. Align the bump slot on the top end of the lower blower tube with the bump on the end of the upper blower tube.
2. Place the lower blower tube onto the upper blower tube.
3. Twist the lower blower tube clockwise until tight (Fig. 02, Pag. 04).
Removing the Upper Blower Tube:
1. Hold the unit firmly.
2. Insert a flathead screwdriver into the tube lock.Twist the screwdriver counterclockwise 1/4 turn and hold.
3. Grasp the upper blower tube and twist it counterclockwise.
4. Pull the upper blower tube from the blower outlet (Fig. 03, Pag. 04).
Removing the Lower Blower Tube:
1. Hold the upper blower tube firmly.
2. Grasp the lower blower tube and twist it counterclockwise until the lower blower tube unlocks from the upper
blower tube.
3. Remove the lower blower tube from the upper blower tube.
Vaccum Assembly
Installing the Vacuum Tubes:
1. Locate the hole in the impeller door. The door lock tab is recessed in the hole toward the front of the blower. Insert a
flat head screwdriver, into the hole and press the door lock tab in and lift the door to release the lock (Fig. 04, Pag. 04).
2. While holding the impeller door open, align the upper vacuum tube’s three (3) slots with the impeller intake’s three
(3) lock tabs (Fig. 05, Pag. 05).
3. Insert the upper vacuum tube into the impeller intake and twist the upper vacuum tube clockwise with both hands
until the lock tabs snap into place (Fig. 06, Pag. 05).
3. Align the arrow on the lower vacuum tube with the arrow on the upper vacuum tube.The arrows must align properly
to install the vacuum tubes correctly (Fig. 07, Pag. 05). Grasp the lower vacuum tube firmly with both hands and push
the lower vacuum tube into the upper vacuum tube.Turn the lower vacuum tube clockwise until it snaps into place and
locks.The dot on the lower tube aligns with the dot on the upper tube when properly assembled.
Use both hands during this assembly to fit the parts together tightly.
The flat area on the upper vacuum tube should face the handle when installed correctly.
Vacuum Bag Assembly
Installing the Vacuum Elbow onto the Blower:
1. While facing the front of the unit, hold the keyed end of the vacuum elbow in the left hand and the flared
end in the right hand.Align the lock tabs on the keyed end with the lock tabs on the blower outlet.
2. Insert the vacuum elbow into the blower and turn clockwise until it locks into place (Fig. 08, Pag. 05).

15
English
!
!
Inserting the Vacuum Elbow into the Bag:
1. Locate the small opening in the vacuum bag. Insert the flared end of the vacuum elbow approximately 4” in.
inside the small opening (Fig. 09, Pag. 05).
2. Pull the end of the cinch strap to secure the small opening of the bag around the vacuum elbow.Tighten the cinch
strap so that the bag has limited movement along the elbow, but will not slip off the flared end.
Fueling
Use good quality gasoline mixed with 4% (25:1) 2-stroke oil in the fuel tank.The tank holds 500 ml.
Gas
Always use good quality gas and do not store it for more than 30 days, since this can damage the engine operation.
The tank has a 414 ml capacity. Let the engine cool for at least two minutes before refilling with gas so as to avoid the
possibility of an explosion. Never leave gas in the tank. Use the lawn mower until the gas finishes in order to prevent
it from accumulating in the carburetor.
ACTIVATION
1. Press the primer bulb 10 times, or until fuel is visible (Fig. 12, Pag. 06).
2. Move the choke lever to Position 1 (Fig. 13, Pag. 06).
3. Crouch in the starting position (Fig. 14, Pag. 06).
4. Pull the rope 5 times (Fig. 15, Pag. 07).
5. Move the choke lever to Position 2 (Fig. 16, Pag. 07).
6. Pull the rope 3-5 times to start the engine (Fig. 17, Pag. 07).
7. Squeeze the trigger, or press down the cruise control,and allow the unit to warm up for 30-60 seconds (Fig. 18, Pag. 07).
8. Continue to squeeze the trigger. Move the choke lever to Position 3.Warm the unit for an additional 60 seconds.The
unit may be used during this time (Fig. 19, Pag. 07).
Didn’t start?
Repeat the starting instructions.
IF engine fails to start after 2 attempts, move choke lever to position 3 and pull the starter rope until engine starts.
Stopping Instrucyions
1. Release the trigger or raise the cruise control to idle the engine.
2. Press and hold the On/Off switch in the OFF (O) position until the engine comes to a complete stop (Fig. 20, Pag. 07).
OPERATION AND FORM OF USAGE
To avoid serious personal injury, wear goggles or safety glasses at all times when operating this unit.Wear a
face mask or dust mask in dusty locations.
To prevent serious personal injury or damage to the unit, make sure the blower tubes, or vacuum tubes and
the vacuum bag, are in place before you operate the unit.
Holding the Blower/Vaccum
Before operating the unit, stand in the operating position. Check for the following:
• Operator is wearing proper clothing, such as boots, safety glasses or goggles, ear/hearing protection, gloves, long
pants and long sleeve shirt
• The unit is in good working condition
• The tubes and guards are in place and secure
Using the cruise control
1. Once the engine has started and warmed up, squeeze the trigger to accelerate the unit as needed.
2. For longer periods of operation and to eliminate possible finger fatigue, move the cruise control toward the FAST (+)
position to incrementally increase or maintain the unit’s engine speed. When the cruise control is pressed, the trigger
will recede into the handle.
3. To decrease engine speed, move the cruise control to the SLOW (-) position and the trigger will return to
idle (Fig. 21, Pag. 08).

16
!
English
Operating the unit as a blower
After starting the unit, always stand on the left side of the unit to operate it as shown in figure 22 to keep from
blocking the air intake. Use the blower for trees, shrubs, flower beds and hard-to-clean areas. Also use the unit
around buildings, walls, overhangs, fences and screens, and for other normal cleaning procedures. Conserve water
by using power blowers instead of hoses for many lawn and garden applications, including areas such as gutters,
screens, patios, grills, porches and gardens. Sweep from side to side with the nozzle several inches above the ground
or floor. Slowly advance the unit, keeping the accumulated pile of debris in front of you. Most dry blowing operations
are better suited to low speeds, rather than high. High speed blowing is a better way to move heavier items like large
debris or gravel (Fig. 22, Pag. 08).
Operating the unit as a vacuum
- To avoid serious personal injury, never unzip the vacuum bag without stopping the unit first.
- As a vacuum, the unit is designed to pick up dry material such as leaves, grass, small twigs and bits of paper.To avoid
serious personal injury, do not attempt to vacuum wet debris and/or standing water as this may result in damage to the
blower/ vacuum.To avoid severe damage to the impeller, do not vacuum metal, broken glass or similar items.
- Avoid situations that could catch the vacuum bag on fire. Do not operate near an open flame. Do not vacuum warm
ash from fireplaces, barbecue pits, brush piles, etc. Do not vacuum discarded cigars or cigarettes unless the cinders are
completely cool.
- Use the unit for vacuuming up light debris like leaves and paper.
- Be sure the vacuum bag is zipped closed before operating the unit.
- Place the shoulder harness over your head and onto your shoulder. Hold the vacuum with both on hands on the handle
(Fig. 23, Pag. 09), tilting the suction tube slightly, and use a sweeping action to collect light debris (Fig. 24, Pag. 09).The
debris will flow into the vacuum bag.Things such as small leaves and small twigs will be mulched as they pass through
the fan housing, allowing the vacuum bag to hold more debris.
- Emptying the Vacuum Bag When the bag is full, suction will noticeably decrease.
Emptying the Vacuum Bag
Turn off the unit and allow the impeller to stop before you unzip the bag.
1. While wearing eye protection and a dust mask, unzip the vacuum bag and empty the contents into a garbage bag
or container.
2. Turn the bag inside out after initial emptying and vigorously shake out dust and debris.
3. Zip close and reinstall the vacuum bag.
Empty the bag after each use to avoid deterioration andobstructing air flow, which will reduce the
performance of the vacuum.
MAINTENANCE
To prevent serious injury, never perform maintenance or repairs with unit running.Always service and repair a cool unit.
Disconnect the spark plug wire to ensure that the unit cannot start.
Maintenance Schedule
Perform these required maintenance procedures at the frequency stated in the table. These procedures should also be
a part of any seasonal tune-up.
ITEM MAINTENANCE BEFORE
EACH USE
FREQUENCY
25 h
Screws, Nuts and Bolts Inspect/Tighten X
Fuel Hoses Inspect X
Fuel Filter Inspect/Replace X
Air Filter Clean/Replace X
Spark Plug Inspect/Clean/Check-Adjust/Replace X
Cooling System Inspect / Clean X

17
English
Cleaning the Air Filter
Failure to maintain your air filter properly can result in poor performance or can cause permanent damage to your
engine.
1. To open the air filter cover, push the locking tab on the right side of the cover inward and pull the air filter cover
slightly out and to the left (Fig. 25, Pag. 09).
2. Remove the air filter (Fig. 26, Pag. 09).
3. Wash the filter in detergent and water. Rinse the filter thoroughly and allow it to dry.
4. Apply enough clean SAE 30 motor oil to lightly coat the filter.
5. Squeeze the filter to spread and remove excess oil.
6. Replace the filter (Fig. 26, Pag. 09). If the unit is operated without the air filter, you will VOID the warranty.
7. To reinstall the air filter cover, position the hooks on the left side of the air filter cover into the slots at the left side of
the back plate (2), (Fig. 26, Pag. 09).
8. Swing the cover to the right and press closed so the air filter cover tab snaps into the slot on the back plate (3) (Fig.
27, Pag. 09).
Cleaning
Use a small brush to clean off the outside of the unit. Do not use strong detergents. Household cleaners that contain
aromatic oils such as pine and lemon, and solvents such as kerosene, can damage the plastic housing or handle. Wipe
off any moisture with a soft cloth.
Storage
• Never store a fueled unit where fumes may reach an open flame or spark.
• Allow the engine to cool before storing.
• Store the unit locked up to prevent unauthorized use or damage.
• Store the unit in a dry, well-ventilated area.
• Store the unit out of the reach of children.
BASIC SAFETY RULES
• Assure the unit is not directed at anybody or any loose debris before starting the unit.
• Always hold the unit securely when operating. Keep a firm grip on the handle.
• To reduce the risk of hearing loss associated with sound level(s), hearing protection is required.
• Check your equipment before operation, especially the muffler, air intakes and air filters.
• Use rakes and brooms to loosen debris before blowing.
• Watch out for children, pets, open windows or freshly washed cars, and blow debris safely away.
• Clean up after using blowers and other equipment. Dispose of debris appropriately.
• Never refuel with the engine in operation.Turn off the engine and let it cool for at least 2 minutes before removing
the fuel tank cover.
• The gas and its vapors are highly inflammable and explosive.The fire or an explosion can cause serious burn or
be fatal.
• Start up and operate the engine outdoors. Never start up or operate the engine in closed areas, even if the
windows and/or doors are opened.The engines release carbon monoxide,an odorless and colorless toxic gas.Breathing
carbon monoxide can result in nauseas, fainting and may even be fatal.
• Keep children or animals away from the lawn mower while in operation.
• Do not allow inexperienced people to use the equipment without reading the instruction manual first.When not
in use, keep the equipment out of the reach of children.
• Always wear closed shoes while working on the equipment.The use of safety goggles is highly recommended.
• Never work with the equipment when it is raining or on wet lawn. Use it only during the day or with a good
lighting.
• Never use the equipment if the safety devices are not in perfect conditions.
• We recommend the use of Tramontina spare parts of the same model.
WARRANTY TERMS
TRAMONTINA MULTI S.A. guarantees this product against any manufacturing defect for a period of 06 (six) months,
of which 3 (three) months are contractual warranty and 90 (ninety) days are legal warranty, according to
article 26 of the Consumer Protection Code. The period of this warranty dates from the date of emission of
the equipment sales receipt, which should be attached to this agreement, with the warranty only being valid
Model Engine Application/Use Contractual Warranty+Legal
Warranty Total Warranty Period From
Purchase Date
SAC27 27 cc Domestic 03 months + 90 days 06 months

on presentation of the sales receipt.
Within a total period of 06 months, TRAMONTINA MULTI S.A. undertakes to repair or replace parts free of charge
which according to technical assessment display manufacturing defects under normal conditions of use and
maintenance.
The purchaser is responsible for shipping and packaging costs to the nearestTramontina Authorised Service provider.
The purchaser is responsible for the equipment’s necessary periodical inspection, maintenance and cleaning, and
also for observing all the care requirements in the user’s manual.
The following are not covered by warranty:
• Damage caused by not following the guidance in this manual;
• Damage caused by improper use, such as: motor overload, electrical voltage different from the one specified in
the equipment, use of the equipment without protective skirt, nylon string with diameter different from the one
recommended, lack of maintenance and improper use of the equipment.
• Parts damaged by natural wear, accident, incorrect use and maintenance of the equipment or operator misuse;
• Parts damage through unsuitable use or assembly not conforming to the instructions in this manual;
• Equipment displaying signs of tampering, use of non-original parts, or repair by people not authorised by Tramontina.
NOTE
ALL PARTS PROVEN WITH MANUFACTURING DEFECT WILL BE REPLACED
WITHOUT COST, WITHOUT HAVING TO CHANGE THE EQUIPMENT.
18
English
Pictures merely illustrative

CONOZCA EL PRODUCTO
01 - Manija
02 - Control de Encendido/Apagado de Parada
03 - Control de Crucero
04 - Bujía de Encendido
05 - Tubo Superior de la Sopladora
06 - Tubo Inferior de la Sopladora
07 - Tubo Inferior de la Aspiradora
08 - Cremallera
09 - Bolsa de la Aspiradora
10 - Correa de Cincha
11 - Correa de la Bolsa de la Aspiradora
12 - Codo de la Aspiradora
13 - Tubo Superior de la Aspiradora
14 - Tapa del Tanque de Combustible
15 - Palanca del Obturador
16 - Cubierta del Silenciador
17 - Pera del Cebador
18 - Cuerda de Arranque
19 - Tapa del Filtro de Aire
20 - Gatillo
19
Español
SOPLADORA Y ASPIRADORA
CON MOTOR A COMBUSTIÓN
SAC27
01
08
12
18
10
02 03
04
05
16
06
07
13
11
09
19 15
14
17
20

20
Español
Atención
Usar lentes de protección No use o deje el equipo
en la lluvia
Riesgo de heridas
Antes de usar el equipo,
lea el manual de
instrucciones
Mantener a otras personas y niños
fuera de la zona de peligro, que es
de aproximadamente 15 metros
CARACTERÍSTICAS TÉCNICAS
SÍMBOLOS
GUÍA RÁPIDA DE USO
• Lea el manual de uso y manutención.
• Use gasolina de buena calidad, mezclada con 4% (25:1) de aceite 2 tiempos y, después del uso,
no dejar gasolina en el tanque.
• Nunca trabaje con el cortador bajo la lluvia o en céspedes mojados.
• Verifique periódicamente la limpieza del filtro de aire.
• Al adquirir este producto, reciba GRATIS ENTREGA TÉCNICA en la red de puestos autorizados
Tramontina.
Equipo
SAC27*
Modelo SAC27
Longitud del Tubo Sopladora 75,5 cm
Longitud del Tubo Aspiradora 79,00 cm
Tipo de motor Enfriado por aire, de 2 tiempos Cilindrada
Cilindradas
27 cc
Cilindros
1
Velocidad del soplador hasta 150 m/h (240 km/h)
Lubricación Mezcla de aceite/combustible
Proporción de aceite/combustible
Mezcla de gasolina com 4% de aceite 2 tiempos (25:1)
Capacidad del tanque de combustible
414 ml
Capacidad de la bolsa de la aspiradora
35 l
Peso aproximado (sin combustible)
5,44 kg
* Todas las especificaciones se basan en la información del producto más reciente disponible en el momento de la impresión.
Nos reservamos el derecho de hacer cambios en cualquier momento sin previo aviso.
This manual suits for next models
1
Table of contents
Languages:
Other Tramontina Blower manuals