Transcend PF710 User manual

PF710
User’s Manual

Table of Contents
Introduction ............................................................................................ 3
Package Contents ..................................................................................................................3
Features ..................................................................................................................................3
System Requirements............................................................................................................4
Safety Precautions................................................................................. 5
General Use ............................................................................................................................5
Backing Up Data.....................................................................................................................5
First Time Use......................................................................................... 6
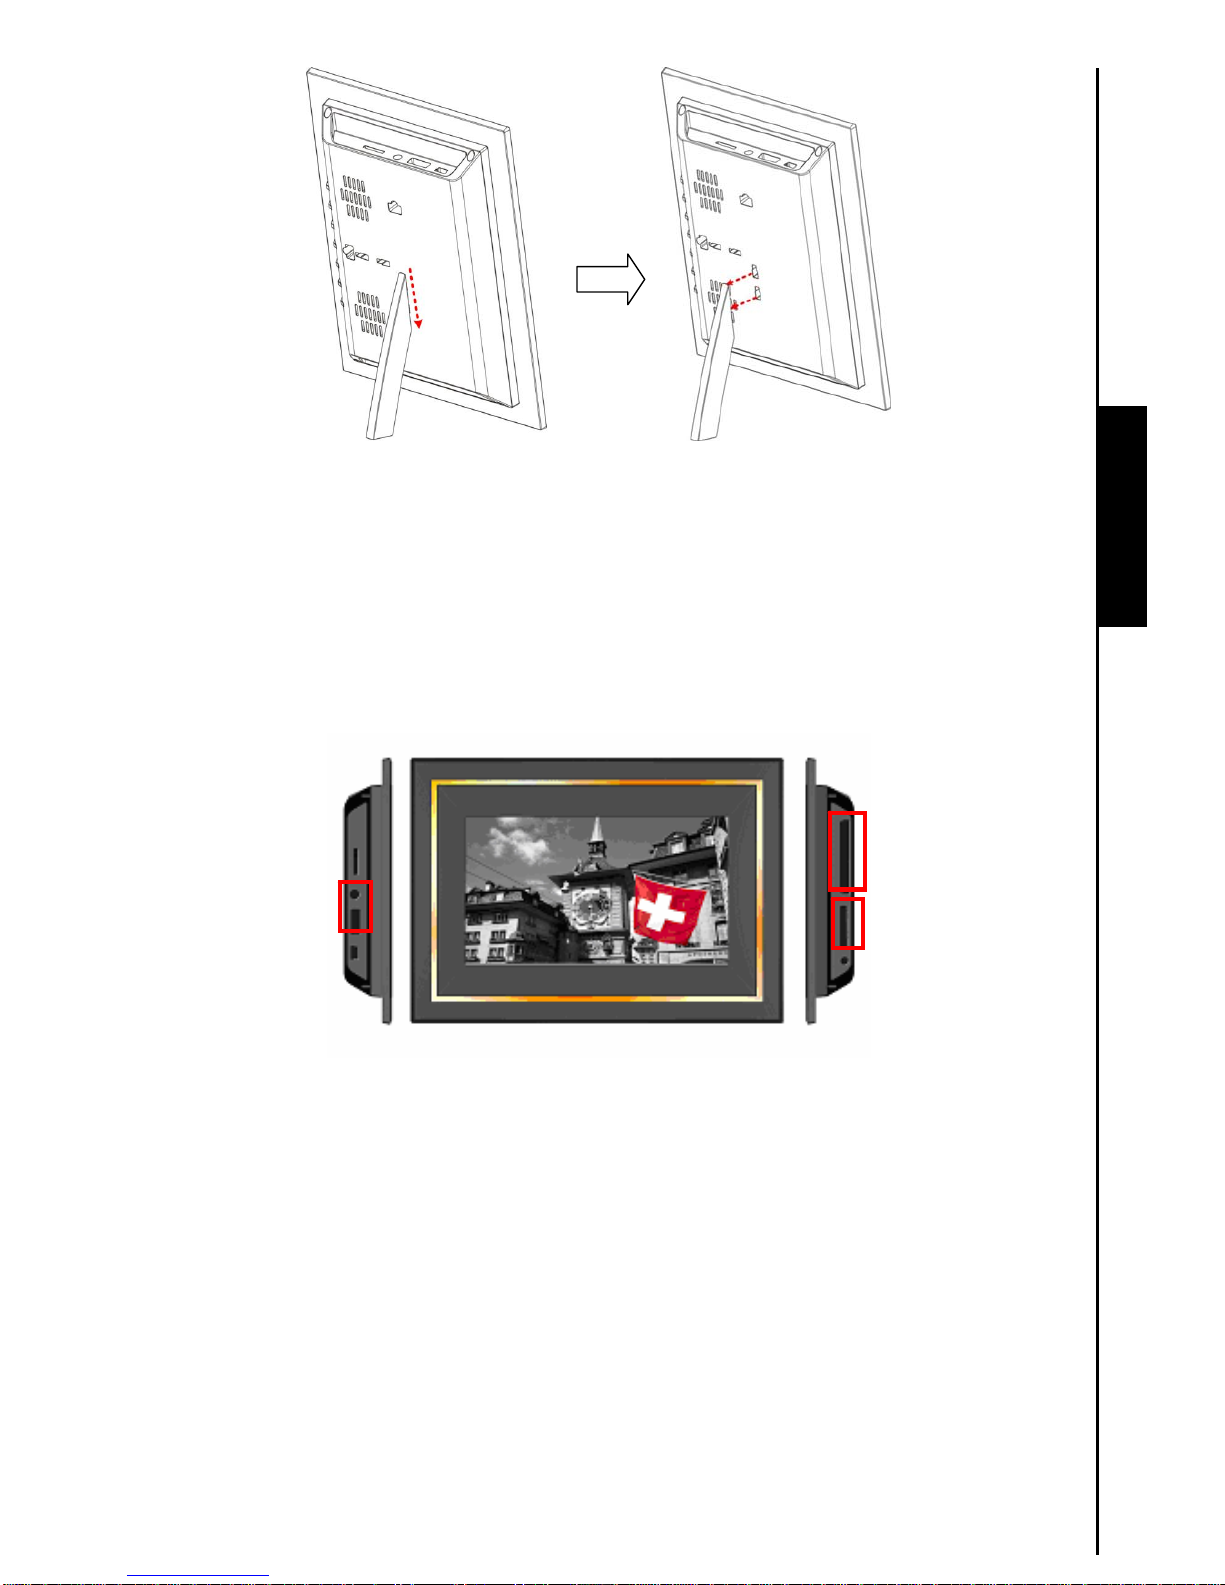
Turn on PF710 ........................................................................................................................6
Using a memory card or USB flash drive.............................................................................8
Volume control and headphones..........................................................................................8
Navigation Buttons.................................................................................................................8
Remote Control ......................................................................................................................9
Connecting to a Computer.................................................................. 10
System connection for Windows®2000, XP and Vista......................................................10
System connection for Mac™ OS 10.0 or later...................................................................11
System connection for Linux™ Kernel 2.4 or later.............................................................12
Home ..................................................................................................... 13
Photo.....................................................................................................................................13
Music.....................................................................................................................................13
Clock and Calendar..............................................................................................................13
Settings.................................................................................................................................13
Photo..................................................................................................... 14
Thumbnail Mode...................................................................................................................14
Photo View Mode..................................................................................................................15
Slideshow Mode ...................................................................................................................16
Music..................................................................................................... 19
Music Explorer......................................................................................................................19
Music Player .........................................................................................................................20
Clock and Calendar.............................................................................. 21
Clock and Calendar..............................................................................................................21
Settings................................................................................................. 23
Language ..............................................................................................................................23
Date/Time Setting.................................................................................................................24
Orientation............................................................................................................................25
Display...................................................................................................................................25
Restore defaults ...................................................................................................................26

2
Firmware upgrade ................................................................................................................26
Troubleshooting................................................................................... 27
Specifications....................................................................................... 28
Warranty................................................................................................ 29
Terminology.......................................................................................... 30

3
Introduction
Congratulations on purchasing Transcend’s PF710.Now it’s easy to display your photo collection at home
or at the office. The PF710 lets you conveniently access and playback photos and music from a variety of
sources: USB Flash drives, all sorts of memory cards, or the PF710’s own on-board memory. PF710 can
be operated easily with both its navigation buttons and the included remote control. Its easy image-rotating
feature allows you to display your PF710 in either portrait or landscape position. The on-board storage
space you save your favorite pictures and music inside PF710 for instant playback without even having to
use a memory card. PF710 can also be connected to a PC via the USB port for direct access to its internal
memory or any memory cards that are plugged into it. This User’s Manual will help you get the most from
your new device. Please read it in carefully before using the PF710.
Package Contents
Upon purchasing your Transcend PF710, please make sure each of the following is included:
zPF710 *1
zRemote control (battery included) *1
zTabletop stand *1
zPower adapter *1
zUSB cable *1
zUser’s Manual CD *1
zQuick Start Guide *1
zWarranty Card *1
Features
zBright 7” high-resolution widescreen color TFT LCD panel
zBuilt-in stereo speakers and headphone jack
zSupports USB flash drives and SD/SDHC/MMC/MS/CF memory cards
zFully compliant with Hi-Speed USB 2.0 and backwards compatible with USB 1.1
zDirect USB connection to your PC for easy file transfer
zBuilt-in memory – works even without a memory card
zAuto power on/off
zSlideshow, thumbnail, still picture, and zoom-in viewing options
zView photos with background music
zAttractive Themes to accent your pictures with
zImportant date/event reminder
zClock, alarm and calendar functions
IntroductionIntroduction

4
System Requirements
System requirements for connecting PF710 to a computer:
1. 100~240V voltage power outlet for the DC adaptor.
2. Desktop or notebook computer with a working USB port.
3. One of the following Operating Systems (OS):
zWindows®2000
zWindows®XP
zWindows®Vista
zMac™ OS 10.0, or later
zLinux™ Kernel 2.4, or later
Introduction

5
Safety Precautions
These usage and safety guidelines are IMPORTANT! Please follow them carefully to ensure your own
personal safety and help protect your PF710 from potential damage.
General Use
zAvoid using or placing this product in an extreme temperature environment.
zNever allow this product to become damp or wet from water or any other liquids.
zDo not use this product in environments with strong magnetic fields or excessive vibration.
zDo not use a damp cloth to wipe or clean the exterior case or the LCD panel.
zOnly use the Transcend provided DC adapter for use with the PF710. Use of other DC adapters may
cause a fire or explosion.
zTo protect your health and your hearing, keep the music volume of PF710 below 80 decibels and do
not listen for an extended period of time.
Backing Up Data
zTranscend does NOT take any responsibility for data loss or damage during operation. If you
plan to plug a memory card or USB pen drive into PF710, we strongly advise that you first backup the
data in those storage devices to a computer or other storage medium before using them in PF710.
zTo ensure Hi-Speed USB 2.0 data transfer rates when connecting your PF710 to a computer, please
check that the computer has the relevant USB drivers. If you are not sure how to check this, please
consult the computer or motherboard User’s Manual for USB driver information.
Precautions

6
First Time Use
Figure 1: PF710
Turn on PF710
Figure 2: Attaching the tabletop stand to PF710(Landscape)
First Time Use
CF slotLCD panel
SD/SDHC/
MMC/MS slot
DC Power
input
Volume control
Headphone jack
USB A-Type
connector
Mini-B USB
connector
Navigation
Buttons
Left speaker
Right speaker
Wall-hanging
holes
Stand holes
(landscape)
Stand holes
(portrait)

7
Figure 3: Attaching the tabletop stand to PF710(Portrait)
1. Attach the Tabletop Stand to the back of the PF710 using the stand holes (Landscape) shown above.
Landscape configuration is recommended for initial use.
2. Connect the power adapter cable to the DC input jack on your PF710.
3. Plug the power adapter into a wall outlet.
Figure 4: Plug in the power adapter
4. Press and hold the EXIT button for 3 seconds to power on/off your PF710, or press on the
remote control (with the PF710 facing you, EXIT is the navigation button on the far left).
Figure 5: Removing the tabletop stand from PF710(Landscape)
First Time Use

8
Figure 6: Removing the tabletop stand from PF710(Portrait)
Using a memory card or USB flash drive
1. Insert a memory card into its appropriate card slot on the right-hand side of PF710 or plug a USB flash
drive to the USB A-Type connector on the left-hand side.
2. Once a memory card or USB flash drive is plugged in, PF710 will automatically begin slideshow
playback of all photos available on your memory card or flash drive.
3. PF710 will revert to the Home menu if you unplug a memory card or USB flash drive while in use.
Figure 7: USB flash drive slot and memory card slots
Volume control and headphones
The volume control wheel is located on the upper left side of PF710. Move it up to increase volume, and
scroll down to decrease volume. Press inward on (click) the volume control wheel to mute. You can plug
headphones into your PF710’s headphone jack to enjoy your music more personally. The built-in
speakers will be disabled while headphones are plugged in,
Navigation Buttons
There are seven convenient navigation buttons located on the backside of the PF710, which are
represented in this manual with capital letters (ex: EXIT = “exit” button on back of unit). From left to right
(with the screen facing you) are: EXIT, OPTION, OK, UP, DOWN, LEFT, RIGHT. The menu options
displayed in the OSD are mapped to the navigation buttons located behind each icon.
First Time Use

9
Remote Control
Your PF710 comes with a compact, easy to use remote control. You can operate your PF710 with either
the navigation buttons on the back of the PF710 or by using the remote control. Note that when using the
remote control you should always aim it directly at the front of your PF710 and make sure there are no
obstacles in the way. All icons like shown in this User’s Manual and the Quick Start Guide represent
functions that you can access directly from the remote control for easy, straightforward operation of your
PF710.
z:These menus can be directly accessed by pressing one of these shortcut buttons no
matter what menu/mode the PF710 is currently in.
z: Switch between Thumbnail and Slideshow modes.
z:Select the item you want to view or function you want to perform.
z:Show additional functions available for the current mode.
z:Jump back to the Home menu no matter what menu/mode the PF710 is currently in.
z:Go back to the last page or menu.
z: Play/pause,orstopmusic.
z:Rotate or zoom-in on photos displayed in Photo View mode.
z:Adjust music volume (up / down / mute).
z:Cycle between music play modes.
Figure 8: Remote control
First Time UseFirst Time Use

10
Connecting to a Computer
If you want to transfer pictures and music between the PF710 and your computer, connect the PF710 to a
USB port on your computer using the provided Mini-B to A-Type USB cable.
1. Turn on PF710.
2. Plug the small end of the USB cable into the Mini-B USB port located on the left side of the PF710.
Figure 9: Mini USB to USB A-Type Cable
3. Plug the large end of the cable into an available USB port on your desktop or notebook computer.
WARNING! You need to plug in the power adapter to provide the power necessary to run
the PF710 when connecting to a computer.
Figure 10: Connecting PF710 to a computer
System connection for Windows®2000, XP and Vista
1. No drivers are required for connecting PF710 to your desktop or notebook computer. Windows®
Operating Systems (excl. Windows98) have built-in drivers to support your PF710. Upon successful
connection to your computer, a new Removable Disk drive with a newly assigned drive letter
representing the PF710 will automatically appear in the My Computer window and a Removable
Hardware icon will appear in the Windows System Tray.
Figure 11: The Find New Hardware Wizard auto-installs PF710
2. Your PF710 is now ready to upload/download data just like an external hard drive. A number of
Removable Disk*drives with newly assigned drive letters representing the PF710’s card slots (and its
onboard memory) will appear in the My Computer window. You can transfer your pictures and music
to the PF710 by simply by dragging-and-dropping files or folders onto these Removable Disk drive
letters.
PC Connection

11
Figure 12: The “My Computer” window with PF710 drives shown.
*Note: E:,F:,G:, and H: are example drive letters - the letters in your “My Computer” window may differ
3. Proper removal of your PF710 (from Windows):
1. Click once on the Removable Hardware icon in the system tray.
2. The Safely Remove Hardware pop-up window will appear. Select it to continue.
Figure 13: Safely Remove Hardware
3. A window will appear stating, “The ‘USB Mass Storage Device’ device can now be safely
removed from the system.” Unplug your PF710 from the USB port after this message appears.
Figure 14: Safe to Remove Hardware
System connection for Mac™ OS 10.0 or later
1. No drivers are required. Plug your PF710 into an available USB port and your computer will
automatically detect it.
Figure 15: Connecting to a Mac OS computer
PC Connection

12
2. Proper removal of your PF710 (from Mac OS):
First drag-and-drop the Disk icon corresponding to your PF710 into the trashcan then unplug your PF710
from the USB port.
System connection for Linux™ Kernel 2.4 or later
1. No drivers are required. Plug your PF710 into a USB port and mount it.
a. First create a directory for the PF710.
Example: mkdir /mnt / PF710
b. Then, mount the PF710.
Example: mount –a –t msdos /dev/sda1 /mnt / PF710
2. Proper removal of your PF710 (from Linux):
Execute umount /mnt/ PF710 to un-mount the device. Then unplug your PF710 from the USB port.
1. WARNING! To prevent data loss, always follow the above procedure when removing the
PF710 from Windows™2000, XP, and Vista.
2. When PF710 is connected to a computer, it is locked into transferring files. You will not
be able to operate your PF710 at this time. Please disconnect your PF710 from
the computer to resume normal viewing or listening.
3. The USB A-Type host controller for USB flash drives will not function while the Mini-USB
B-Type is connected to your computer.
4. NEVER format your PF710 from your computer’s OS.
PC Connection

13
The Home Menu
The Home menu acts as a convenient gateway to access all of PF710’s functions. Selecting one of the
four icons listed in Home menu (shown below) will activate the menu option listed underneath it.
Figure 16: Home menu
Photo
This option lets you display photos in Thumbnail, Photo view or slideshow mode with special effects.
Use the OSD (see note below) to select the “Photo” icon or press to enter the Thumbnail mode
directly.
Music
By selecting the Music option, you can playback music on your PF710, and even choose your favorite
song to wake you up in the morning as your alarm sound. Use the OSD to select the “Music” icon or press
to open the Music Explorer.
Clock and Calendar
The “Clock and Calendar” option turns your PF710 into an attractive desk clock/calendar with pictures.
In this mode you can mark important dates and holidays, and even choose a festive theme to go with them
(i.e. hearts for Valentine’s day). Use the OSD to select “Calendar” or press to enter Clock and
calendar mode.
Settings
This option allows you to adjust the PF710’s many settings, such as switching languages or setting
the clock. Use the OSD to select the “Settings” icon or press to enter this menu option.
Home
Note: The On-Screen Display navigation menu will appear in the top area of the screen whenever any
button is pressed. The menu options displayed in the OSD are mapped to the navigation buttons located
behind each icon. The OSD menu will disappear after 10 seconds without button input.

14
Photo
Photo has three modes: (Thumbnail mode, Photo View mode and Slideshow mode). You can use the
remote control to access these modes directly or navigate to them using the OSD.
Thumbnail Mode
Select Photo from the Home menu or press to enter this mode. The Thumbnail Mode allows
you to browse thumbnails of all photos in the current source (SD card, USB flash drive, etc.). Eight
thumbnails per page will be displayed. Use the UP, DOWN, LEFT and RIGHT buttons to navigate to the
thumbnail you want to view, then press OK or to view the selected photo in Photo View mode.
Figure 17: Thumbnail mode options menu
Switching to Photo View mode:
1. Navigate to the photo you want to view by using the UP, DOWN, LEFT and RIGHT buttons.
2. Click OK or to switch to Photo View mode. Note: If current item highlighted is a
Motion-JPEG file it will start to play when this button is pressed. PF710 will go back to the
Thumbnail mode after finishing playback of a Motion-JPEG file.
Options :
This menu shows list of options available in the Thumbnail mode: Add/Remove from My Favorites
(PF710’s internal storage), Slideshow, Photo View and Select source.
1. Click OPTION or , and use the LEFT and RIGHT buttons to select the desired function.
2. Click OK or to access the highlighted function or open its sub-menu.
a. Add to My Favorites / Remove from My Favorites: Copies the currently selected photo in
the Thumbnail viewer to the PF710’s internal memory when the source is a memory card or
USB flash drive. To remove a photo from the internal memory, select “My Favorites” as the
viewing source, navigate to the desired thumbnail to remove, and then choose “Remove from
Photo
Options
OSD

15
My Favorites.”
b. Slideshow: Switch to Slideshow mode.
c. Photo View: Switch to Photo View mode.
d. Select Source: Select the source to browse thumbnails from. The available sources are: My
Favorites (internal memory), SD/MS/MMC, CF and USB flash drive. Use the LEFT and
RIGHT buttons to highlight the desired storage media and click OK or to select it.
Exit :
Click EXIT or to go back to the Home menu.
Photo View Mode
You can view, zoom-in, or rotate a single photo in Photo View mode. Use the LEFT and RIGHT
buttons to view the next or previous photo available.
Figure 18: Photo View options menu
Switching to Slideshow mode:
Click OK or while viewing a photo to switch to Slideshow mode. Note: Motion-JPEG files will be
skipped in Slideshow mode.
Options:
This menu shows a list of options available in the Photo View mode: Slideshow, Thumbnail, Zoom,
Rotate, Themes, Background Music, Set as Clock and Calendar Picture, Save to file and Select source.
1. Click OPTION or and use the LEFT and RIGHT buttons to select the desired function.
2. Click OK to access the highlighted function or open its sub-menu.
a. Slideshow: Select this menu option or simply click on the remote to enter Slideshow
mode.
PhotoPhoto
Options
OSD

16
b. Thumbnail: Select this item or click on the remote to enter Thumbnail mode.
c. Zoom: Select this item to choose between x1, x2 and x4 zoom modes in the Zoom submenu.
You can also press on the remote to automatically zoom-in on the current photo. You
can go back to Photo View mode by pressing EXIT or .
d. Rotate: Select this item and choose between clockwise 90o, 180oand 270oin the Rotate
submenu. Pressing will rotate the current photo clockwise90oeach time you press it.
(Rotate function only enabled at x1 zoom)
e. Themes: This option brings up a submenu that lets you select theme frames to wrap around
your photos while viewing in Slideshow or Photo View. Use the LEFT or RIGHT buttons to
highlight None, X’mas, Halloween, Valentine’s Day or New Year’s Day, then click OK or
to confirm.
f. Set as Clock and Calendar Picture:Sets current photo as the wallpaper in Clock and
Calendar mode (and copies it to internal memory).
g. Save to file: Copy current photo (with theme) to “My Favorites.” The photo and its theme will
be saved as a new file in the internal memory for future access.
Exit :
Click EXIT or to go back to the Home menu.
Slideshow Mode
This mode starts slideshow playback of all photos in the selected source. Slideshow mode will play
based on the settings in the Options menu. Click the LEFT or RIGHT buttons to switch to the previous or
next photo available.
Figure 19: Slideshow options menu
Photo
Options
OSD

17
Switching to Thumbnail mode:
Click OK or while viewing a slideshow to switch to Thumbnail mode.
Options:
This menu shows a list of options available in the Slideshow Mode: Thumbnail, Photo View,
Background Music, Slideshow order, Slideshow Interval, Slideshow transition effects, Themes and Select
Source.
1. Click OPTION or , and use the LEFT or RIGHT buttons to highlight the desired function.
2. Click OK or to access the highlighted function or open its sub-menu.
a. Thumbnail: Select this item or click on the remote to jump to Thumbnail mode.
b. Photo View: Select this item to switch to Photo View mode for zoom-in and other functions.
c. Background Music: Select this item to turn background music on/off, or simply click
on the remote. Slideshow mode will remember your background music setting for next time:
Selecting “Stop” or clicking will stop playing background music, and it will not play the
next time Slideshow is started. Selecting “Play/Pause” or clicking will turn the function
back on and music will play the next time Slideshow is started.
d. Slideshow order: Select this to change the slideshow playback mode. Use the LEFT or
RIGHT buttons to select Normal (continuous sequential playback) or Random (continuous
random playback) in the submenu, and click OK or to confirm.
e. Slideshow Interval: Adjust the amount of time each picture stays on the screen. In the
Slideshow interval submenu, use LEFT or RIGHT to highlight either: 5 secs, 10secs, 30 secs,
1 min, 10 mins or 30 mins. Click OK or to confirm.
f. Slideshow transition effects: Change the way the screen transitions between each photo.
In the Transition effects submenu, Use the LEFT or RIGHT buttons to select the desired effect
and press OK or to confirm.
PhotoPhotoPhoto

18
Exit :
Click EXIT or to go back to the Home menu.
Photo

19
Music
Music Explorer
Choose “Music” from the Home menu or press to open the Music Explorer. The Music
Explorer lets you browse for individual songs in specific folders. The directory path is shown at the top
of the screen. In the Music Explorer you will see all file folders on the current storage device. Use the
UP and DOWN buttons to move to the desired folder. You can enter a folder by pressing RIGHT or
OK, and exit a folder by pressing LEFT or selecting “Upper Directory.” Once you have located the
music file you want to play, press the PLAY or OK button to start playing the song in Music Player.
Figure 20: Music Explorer options menu
Exit:
Click the EXIT button to return to the Home menu.
Option:
In the Music Explorer mode, use the OSD to navigate to this icon or press OPTION or to reveal
four submenu options:
1. Add to My Favorites / Remove from My Favorites: Copy the current highlighted music file from
your storage media (CF, USB flash drive, etc.) to PF710’s internal memory. To remove songs from
the internal memory, change the media source to “My Favorites” and select Remove from My
Favorites from the Options menu.
2. Set as My Alarm: Set the selected song as youralarm clock sound. Added music can be chosen in
the “Alarm sounds” option of the Clock. To select different alarm sounds, go to Home -> Clock and
Calendar -> Options -> “Alarm sounds.”
3. Play Mode: Choose a repeat mode to playback multiple music files: Normal, Repeat one, Repeat
all, Random, Normal in folder, Repeat in folder and Random in folder.
4. Select source: Select the media source to browse and play music from. Use LEFT and RIGHT to
select one of the available storage devices and click OK to immediately start browsing folders on
the selected device.
Music
Options
OSD
Other manuals for PF710
1
This manual suits for next models
2
Table of contents
Other Transcend Digital Photo Frame manuals

Transcend
Transcend PF 730 User manual

Transcend
Transcend PF700 User manual

Transcend
Transcend PF705 User manual

Transcend
Transcend PF 730 User manual

Transcend
Transcend TS2GPF810B User manual

Transcend
Transcend T.photo 720 User manual

Transcend
Transcend PF720 User manual

Transcend
Transcend T.photo 710 User manual

Transcend
Transcend T Photo 720 User manual

Transcend
Transcend PF830 User manual