TREKMATE GAL-002 User manual

1
User Manual
TREKMATE
GAL-002 & GL-002

2

3
Thank you for purchasing this product
TREKMATE is a water proof, analog (GAL) and digital (GL) GPS watch for
sport applications. Please read this user manual for using this sport watch
efficiently.
Care and maintenance
Please follow care and maintenance instructions described in this user guide. Do
not attempt to disassemble or repair your TREKMATE watch. Do not hit your
product. Do not expose your product to extreme high temperature or direct
sunlight. Keep your product in a clean, dry and of room temperature
environment. Clean your product with clean cloth (soaked with warm water).
Apply mild soap to clean off dirt or smears if necessary. Keep your product away
from strong chemicals such as: gasoline, acetone, alcohol, pesticides, adhesives
and paints as they may damage seals, case and coatings of your product.
Water proof
Your TREKMATE watch is water proof at 5ATM. That is, you may wear it for
swimming or other water sports but not deep water or free diving.
Important!
Do not press any button when swimming or when in contact with water.
Press any button of your product when submerged under water may lead
to product failure. Application software: Track Star.
中文操作手

4
Operation System
Windows XP SP2、Windows Vista、Windows 7
Hardware requirements:
Pentium III CPU 1GHz or better / RAM 1GB / Space of hard disk 500
MB.

5
Contents
Thank you for purchasing this product...................................3
Care and maintenance ..............................................................3
Water proof..................................................................................................3
Operation System......................................................................4
Contents .....................................................................................5
Product overview.......................................................................7
Features and functions .................................................................................7
Specification................................................................................................8
Operation instruction .................................................................................10
Use your product for the first time.............................................................12
Charge the internal battery of your watch............................14
Charge with external power cord ...............................................................14
Charge with backup battery .......................................................................14
Charge your watch.....................................................................................15
Set up time of T1 and T2.........................................................17
How to set up the T1 time zone..................................................................19
How to set up year, month, day and hours and minutes .............................19
How to reset seconds to 00 ........................................................................20
How to set up DST of T1 time zone...........................................................20
How to set up key tone (TONE).................................................................20
How to set up the T2 time zone..................................................................20
How to exit setup function.........................................................................21
How to use the stopwatch function ........................................21
How to do split timing ...............................................................................22
How to do lap timing .................................................................................23
Navigation function.................................................................23

6
How to access the navigation function.......................................................24
How to store destination data.....................................................................25
How to navigate to selected destination.....................................................26
How to delete a destination record.............................................................28
Sport mode...............................................................................29
How to enter the sport mode......................................................................29
How to review your exercise data in real time...........................................30
How to review historical exercise data.......................................................32
Set up automatic GPS signal receiving interval....................33
Alarm Function .......................................................................35
Memo Function........................................................................37
Hourly Chime Function..........................................................39
How to adjust position of dials (GAL exclusive)...................40
Disclaimer ................................................................................41
Users’ liabilities .........................................................................................41
CE..............................................................................................................41
ISO 9001 compliant limited warranty........................................................41
Disclaimer..................................................................................................42
Disposal of old product ...........................................................42
City Name List.........................................................................43

7
Product overview
Features and functions
●Analog and digital (GAL)
An innovative timepiece with both analog and digital features in combination
with synchronized GPS clock, a practical sport watches that merges high-tech
design with leisure activities.
●Digital (GL)
Digital time display with synchronized GPS clock, powered by high-capacity
battery that lasts up to 7-hour GPS actions, the GL model integrates all-weather
sporting more comprehensively, a practical sport watch that equally merges
high-tech design with leisure activities.
●GPS
Embedded mini and powerful GPS chips can receive and decode satellite signals,
record and display coordinates of location, and even provides navigation
services.
●Dual time
Your TREKMATE watch can display two time data, T1 and T2, in different time
zones concurrently. You may select any two desired time zones and have them
automatically calibrated at specified time.
●Sports mode
This is a powerful product for managing your outdoor exercise activities. You
may set up and review variety of data of each exercise session including: time,
speed, peak speed, distance, elevation, location coordinates and directions. You
may keep up to 10-20 hours of exercise tracking data. You may upload your
exercise tracking data to Track Star platform for management and permanent
record keeping.
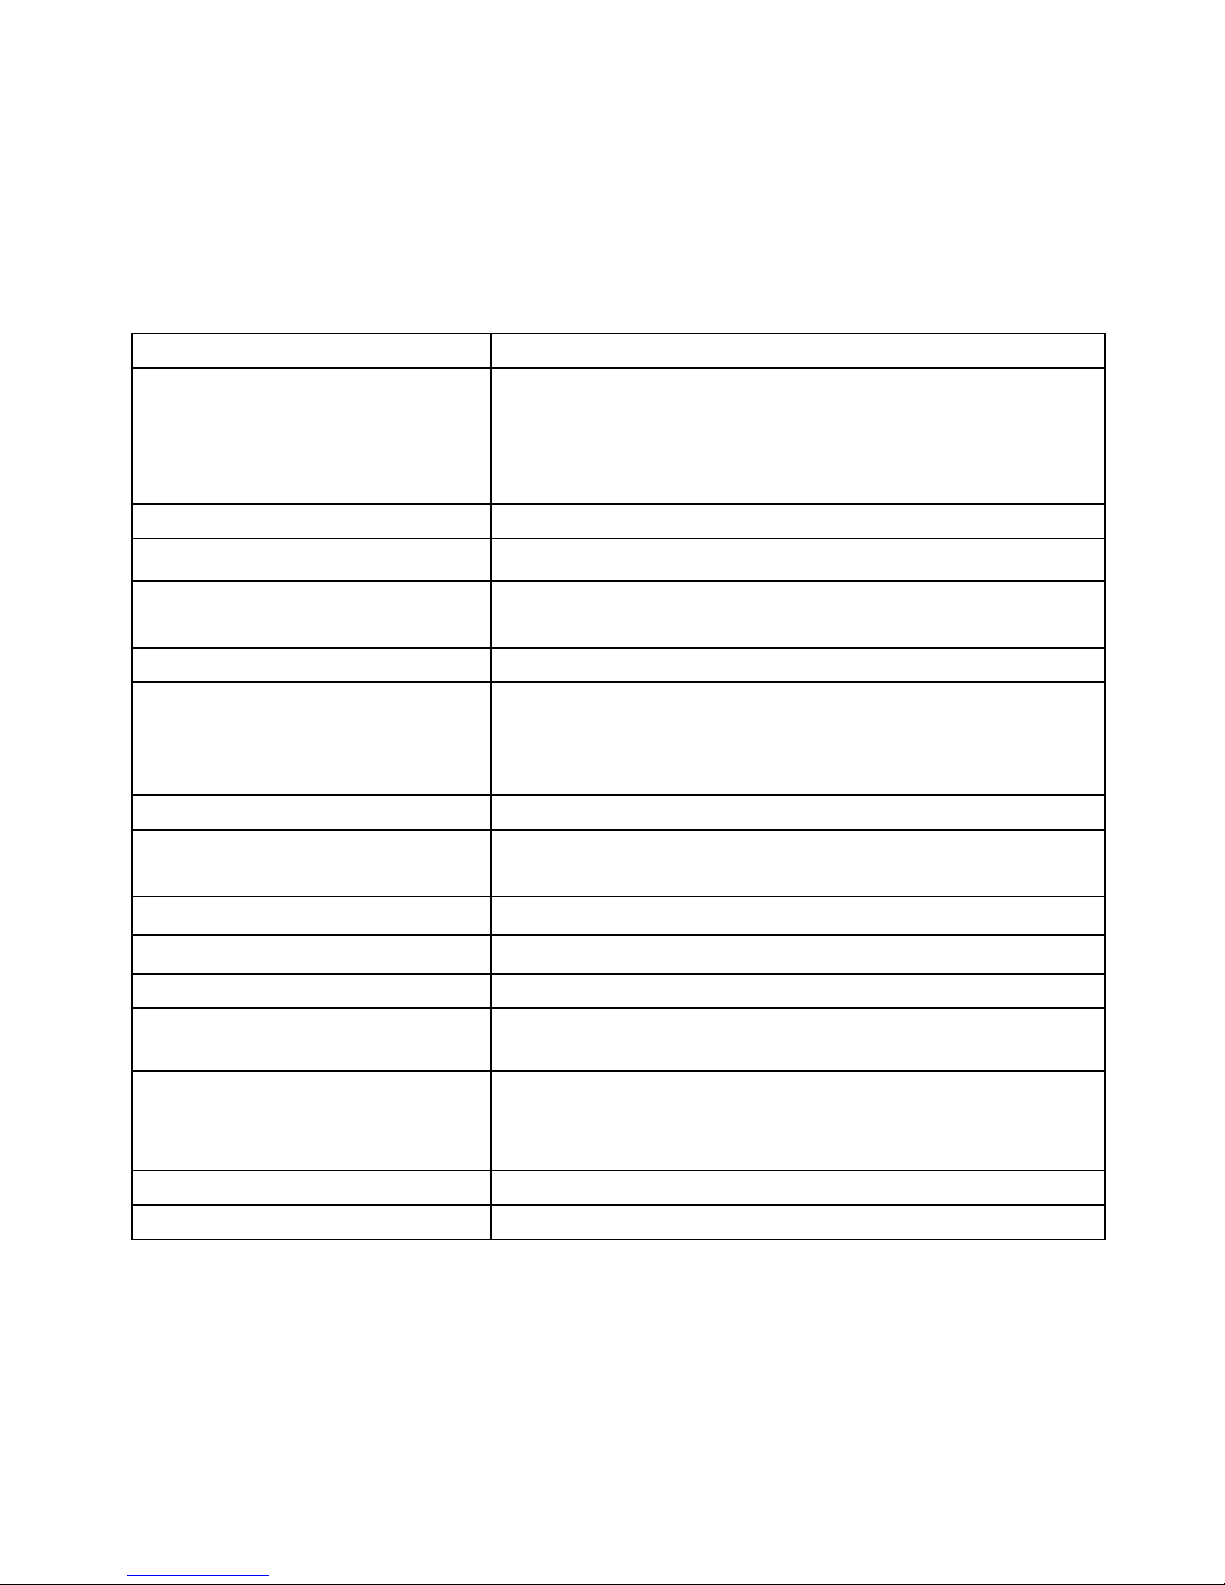
8
Specification
Analogue (GAL)
Displays hour, minute and second (12hr format)
Digital (GAL & GL)
Displays year, month, day, weekday,hour, minute
and second (24 hr format). Provides stopwatch,
navigation, exercise modes, alarm clock, memo,
and around-the-clock time report functions.
Max. number of destinations
9
Storage space
up to 10-20 hours.
Positioning accuracy
<25m radius
Antenna
Embedded
Power
Rechargeable lithium battery
GAL: PD3032(180mAh)
GL: PD3048(300mAh)
Dimensions
Φ51 XH18.8 mm
Weight
About 76.8 grams (GAL)
About 76.2 grams (GL)
Operating temperature
-10℃~45℃
Charging temperature
0℃~45℃
Water proof
50 meter depth (5ATM)
Battery life
GAL: 4 hours with GPS on, 60 days with GPS off.
GL: 7 hours with GPS on, 90 days with GPS off.
Other
Max. Navigation Distance 9999km, approx.
Speed display: max. 250 km
Altitude display: max. 9999m
Timing accuracy
GPS accuracy
Stop watch accuracy
1/100 second

9
Background light
EL Backlight
Standard accessories
Charger
USB cable
Application software CD
User manual
Optional accessories
(Not supply)
3.7V Li-ion Rechargeable Battery
(Model: Nokia BL-5B)
Notes:
Specifications and functions of this product are subject to changes without
notice.
Department of Defense may selectively interrupt GPS signals on “as
require” basis and may downgrade positioning accuracy to more than 100
meters away from the actual location.
User information, including exercise tracking and destination location data,
can be permanently kept in memory of your product without external
power supply.
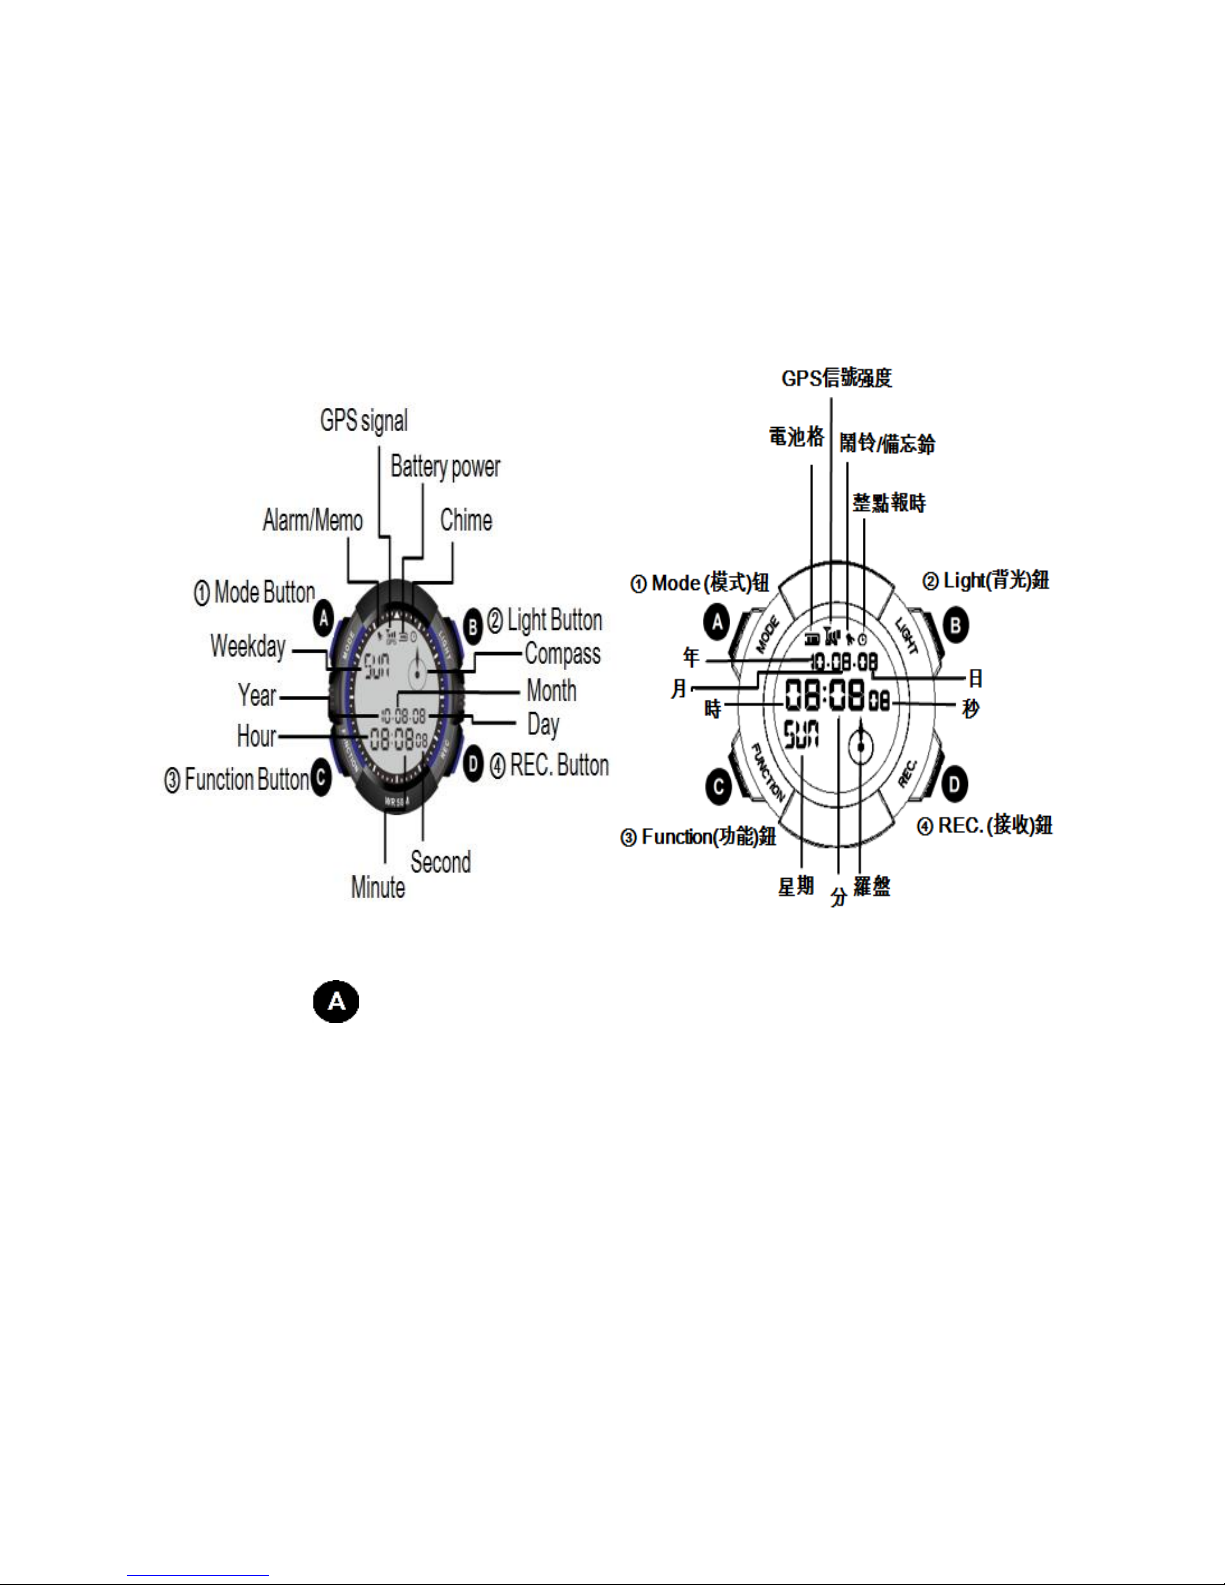
10
Operation instruction
Buttons
Mode button ( ):
Press this button in standard time mode to switch between T1 or T2
display.
Press and hold to this button in standard time mode to enter the T1 or T2
setup screen.
Press this button to confirm your modifications or back to last screen.
GAL
GL

11
Light button ( ):
Press this button in standard time mode to turn on the background light.
Press and hold this button in GPS mode to turn on the background light.
Press and hold to this button in standard time mode to use stopwatch
function.
Press or press and hold this button in menu mode to select next option or
to increase values of selected item.
Function button ( ):
Press this button to open the menu page.
Press this button in time adjustment mode to switch between settings.
REC. button ( ):
Press this button twice in standard time mode to check receiving time and
location coordinates.
Press and hold to this button in standard time mode to do a forced signal
receiving.
Press or press and hold this button in menu mode to select last option or to
decrease values of selected item.�

12
Use your product for the first time
Step 1: charge your battery
Your product is set at sleep mode to save battery power when delivered to you.
Please fully charge the battery with supplied charger before you use product for
the first time.
Please fully charge your battery at least 6 hours for the first time. Your battery
life varies with its use method. In continuous GPS mode:
GAL: max. 4 hours; 60 days (1440 hours) in standby mode; approx.
GL: max. 7 hours; 90 days (2160 hours) in standby mode; approx
See charging your battery for information about how to charge your
battery.
Step 2: set up your product
Place the watch on the charger and connect the USB cable to PC,
this will power on the watch (the Figure shows normal charging
state).
See Page 17 on how to set up date and time for T1 and T2 (default time
zone is UTC).(T1 and T2 time setting)
GAL
GL

13
For the first time using your product, the analog digital watch (GAL) must
be manually set for its hand-positions, otherwise the hands will display
incorrectly. See Page 41 (Adjusting Hands).
After one minute the digit section of your watch switches to time mode
and the dial section starts moving if no operation run at your product.
(This function is not provided in the digital model (GL)).
Step 3: receive GPS signal, calibrate date and time
(1) Date and time data are received at your product through satellite signal.
Please move to an open outdoor space after setup to do GPS data
detecting.
(2) For best receiving quality please make sure that your product’s antenna is
not blocked and is pointing to the sky above.
(3) Press and hold the D button for 2 seconds in time mode until the GPS
detecting screen displays.
(4) Remain at the same place and wait for detecting. It may take longer time
to complete the detecting if you are moving. You can move around after
the GPS detection is completed.
(5) After the GPS detection is completed, press the D button in time mode to
check the time and coordinates of signal receiving.
14
Charge the internal battery of your watch
When message "LOW" appears and battery capacity icon is flashing, or start
using your watch for the first time please do one of the following to charge its
internal battery.
Charge with external power cord
Connect the USB cable’s mini plug to the charger and the other end to a
computer’s USB port.
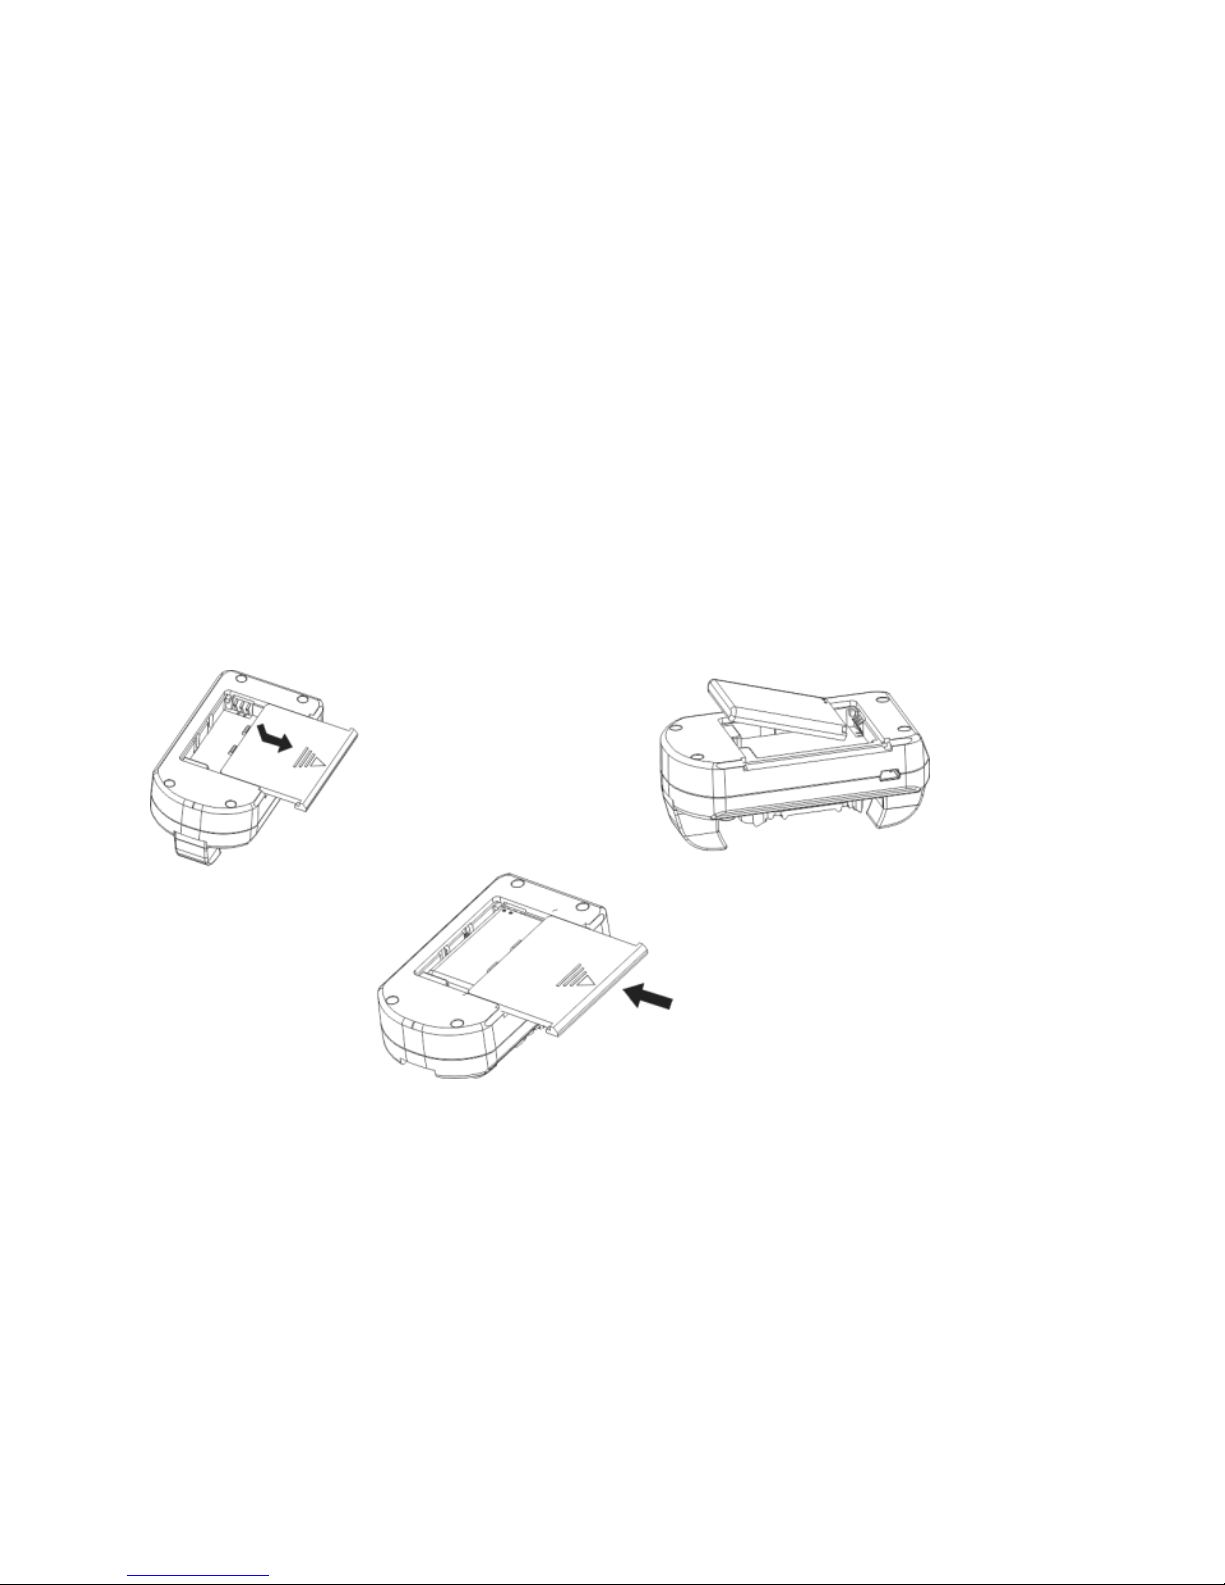
Charge with backup battery
①Open battery
cover
②Insert battery
③Close battery cover

15
Charge your watch
(1) Place your watch on top of the
charger’s charging tray.
(2) Press your watch to until it is firmly
attached to the charger.
(3) Press the charging button and
the charging indicator light turns
on in orange color.
(5) Remove your watch from the
charger.
(4) The battery is fully charged when the
Important!
If a battery remains in the charger
the later charges both the battery and
the watch. The battery is fully
charged when the indicator light
turns green.
You may charge only the battery in
charger by switch on the charging
button. The battery is fully charged
when the indicator light turns
green.
The watch will reset (resume
default setting) if you place the
water on the charger reversely.
Note the right
position
Green
Switch to OFF
position
Orange
Switch to
ON position
Press
down

16
Time required for a fully charge
It takes 4 hours to fully charge a watch having a low-power battery.
Charging times of your backup battery
A fully charged backup battery can fully charge your GAL watch for three
times or GL watch for 2 times.
After a watch is removed from the charger and the LED indicator turns
green when the charging switch is ON, then there is enough remaining
capacity in the backup battery for another charging.
If the LED indicator turns off then the backup battery is exhausted. Please
recharge it before charging another watch.
How long the internal battery of your watch can last
Around 60 days (GAL)/ 90 days (GL) for time mode only.
Up to 4 hours (GAL)/ 7 hours (GL) for continuous GPS detection.
Actual power supply time of the internal battery depends upon several
usage conditions.
Charge and discharge repeatedly may shorten the power supply time of the
internal battery.
Capacity of the internal battery
Internal battery’s capacity is low when battery capacity icon turns blank.
Please charge it immediately.
When battery capacity is low a “LOW”message displays, indicating
capacity is not enough, if you turn on the GPS function.
GPS function cannot be initiated when remaining battery capacity is low
and will be aborted when battery capacity gets low.

17
Life of the internal battery
After 400 times of charging and discharging the internal battery’s capacity
may decrease to 70% of its original one. Its actual life depends upon
several different operation conditions.
Operation
Please keep contacts of your charger clean. Smeared contacts may cause
poor connection. Wipe these contacts clean with clean cloth or lint free
paper. Do not touch these contacts with needles, pins or other metal
objects.
Performance of your internal battery may deteriorate in a low temperature
environment and speed up the prompting of "LOW" message.
Temperature range for charging is 0℃to 45℃.
If your charger does not charge, please turn of the charging switch of your
charger and turn on again for another try. If the problem persists please
contact with your local dealer.
Set up time of T1 and T2
Your TREKMATE watch features dual display of time: T1 and T2.
The dial section display time of T1.
Illustration: Switching between T1 and T2 times.
Click
Button A
Click
Button A
GAL
GL

18
T2 time
zone
DST
C
C
T1 time
zone
Year
Month
Day
Hours
Minutes
Seconds
DST
A
A
C
C
C
C
TONE
Time
function
screen
A
C
C
C
Basic setting of T1 and T2 are described below.
Location
Resident time zone: time zone where you use your product.
This setup value may affect each time value in the global time function.
Current date and time
You are required to manually set up date and time if the location you are in does
not support automatic time setup by GPS.
DST: open and close the daylight saving time function.
T1 and T2 setup flowchart:

19
How to set up the T1 time zone
(1) Press and hold button Ain Time screen until T1
and time zone screens flash alternatively.
(2) Press button B (eastward) and D (westward) to
scroll and select desired time zone.
Press and hold button B and D to scroll in fast speed.
See the City Name List section in this Manual for
details about time zone.
How to set up year, month, day and hours and minutes
Press button C to scroll and select desired setup for year,
month, day and hours and minutes
Press button B (+) or D (-) to adjust setup
value.
Date (2000/1/1~2099/12/31)
Weekday changes with date
automatically.
Daylight saving time (DST)
Sumer time, also named Daylight saving time (DST), is the practice of
temporarily advancing clocks during the summertime.
Note: This is a practice varies in different with countries/districts.
GAL
GL
GAL
GL

20
How to reset seconds to 00
Press and hold button C for several seconds then press button B or D to reset
seconds to 00.
When reset seconds from 30~59 to 00 minutes increases by 1.
When reset seconds from 00~29 to 00 minutes remains intact.
How to set up DST of T1 time zone
Press and hold button Ain time screen for 2 sec.
and than press button C 7 times to scroll to
Summer Time (DST) option.
Press button B or D to switch on or
off the DST.
How to set up key tone (TONE)
Press and hold button A in time
screen for 2 sec. and than press
button C 8 times to scroll to TONE
option
Press button B or D to switch
on or off the key tone.
How to set up the T2 time zone
(1) Press button Ato switch to T2 time zone setup function after the T1 time
setup is completed.
(2) Press button B (eastward) and D (westward) to scroll and select desired
time zone.
(3) Press button C to scroll to Summer Time (DST)
option. Press button B or D to switch on or off the
DST option.
Press and hold button B and D to scroll in fast speed.
GAL
GL
GAL
GL
This manual suits for next models
1
Table of contents


