Trevi SCD5753DAB User manual

SCD5753DAB
DAB/FM/BLUETOOTH/MP3/MicroSD/USB/AUX-IN
DAB
FM
BLUETOOTH
MicroSD/USB
AUX-IN
RADIO RIPRODUTTORE DAB/FM/BT CON IN-
GRESSO AUX-IN, MicroSD/USB
Manuale d'uso e collegamento
SYSTEM CAR-STEREO DAB/FM/BT PLAYER
WITH AUX-IN - MicroSD/USB
Instruction manual
RADIO LECTEUR DAB/FM/BT AVEC AUX-IN -
MicroSD/USB
Mode d’emploi
RADIO-DAB/FM/BT -SPIELER EINZUG AUX-IN,
MicroSD/USB
Gebrauchs- und Anschlußhandbuch
RADIO REPRODUCTOR DAB/FM/BTCON EN-
TRADA AUX-IN - MicroSD/USB
Manual de uso y conexiones
* Per informazioni integrative e aggiornamenti di questo prodotto vedi: www.trevi.it
* For additional information and updates of this product see: www.trevi.it
EN If you will not nd your language on the instruction manual, please go on our website www.trevi.it to nd it

2
SCD 5753 DAB
ESEMPIO DI INSTALLAZIONE
PRECAUZIONI DI SICUREZZA
• Non avvicinare l’orecchio all’altoparlante durante le fasi di messa punto e regolazioni del volume
• Se dei liquidi penetrano all’interno dell’apparecchio scollegare immediatamente e portare l’apparecchio al più vicino
centro assistenza autorizatoTREVI.
• L’apparecchio non deve essere esposto a stillicidio o a spruzzi d’acqua e nessun oggetto pieno di liquido, deve essere
posto sull’apparecchio.
• Mantenere il livello del volume adeguato in maniera tale da essere a conoscenza delle condizioni della strada e del
trafco.
• ll parcheggio alla luce diretta del sole può produrre temperature molto elevate all'interno del veicolo. Rinfrescare ed
areare l'interno dell'auto prima dell'utilizzo.
• L'installazione deve essere effettuata da personale qualicato.
• Conservare il presente manuale per futuri riferimenti.
CURA E MANUTENZIONE
Per la pulizia si consiglia l’ uso di un panno morbido, leggermente inumidito. Evitate solventi o sostanze abrasive.
IMPORTANTE
Questo dispositivo e’ progettato per uso domestico non professionale. La buona costruzione di questo apparecchio ne
garantisce per lungo tempo il perfetto funzionamento. Se tuttavia dovesse presentarsi qualche inconveniente, sarà opportuno
consultare il più vicino Centro Assistenza autorizzato TREVI.
PRECAUZIONI DI SICUREZZA - INSTALLAZIONE
Inserire le leve fornite nelle scanalature
su entrambi i lati dell'unità nché non si
sente un "click".
Tirando le leve è possibile rimuovere l'unità
dal cruscotto.

3
SCD 5753 DAB
A ALIMENTAZIONE
1. Libero
2. Libero
3. Libero
4. Alimentazionepermanente
+12V (alla batteria)
5. Uscita antenna elettrica
+12V
6. Libero
7. Alimentazione principale
+12V (al quadro)
8. Massa (negativo)
B ALTOPARLANTI
1. + Posteriore destra
2. - Posteriore destra
3. + Anteriore destra
4. - Anteriore destra
5. + Anteriore sinistra
6. - Anteriore sinistra
7. + Posteriore sinistra
8. - Posteriore sinistra
CONNESSIONI
CONNESSIONI
INGRESSO
ANTENNA DAB
INGRESSO ANTENNA
FM
USCITE AUDIO RCA
FL: Uscita audio preampliicata anteriore sinistra
FR: Uscita audio preampliicata anteriore destra
RL: Uscita audio preampliicata posteriore sinistra
RR: Uscita audio preampliicata posteriore destra
CONNETTORE ISO
INSTALLAZIONE ANTENNA DAB
Per questa operazione rivolgersi ad un installatore professionale.
1. L'antenna DAB fornita richiede installazione su parabrezza anteriore in posizione verticale (vedi gura).
2. Pulire il vetro nel punto in cui si desidera applicare l'antenna.
3. Rimuovere con attenzione la pellicola a protezione dell'adesivo sull'antenna e posizionarla nel punto scelto. L'antenna
deve essere posizionata in modo che il contatto di massa possa essere steso sulla carrozzeria metallica dell'auto (non
e' necessario rimuovere la vernice).
4. Posizionare il cavo all'interno del cruscotto auto no a raggiungere la posizione dell'autoradio. Collegare il cavo con
connettore dorato nell'ingresso antenna DAB sul retro dell'autoradio ed assicurarlo avvitando il connettore.
Antenna DAB
Suggerimento
di percorso del
cavo antenna
Attenzione:
- Non installare l'antenna in una posizione che ostacola la visuale del conducente.
- Non posizionare il cavo e l'antenna dove potrebbero interferire con il buon funzionamento di AirBag
o altri dispositivi di sicurezza o dove potrebbero ostacolare la guida del veicolo.
- L'utilizzo su vetri schermati riduce le prestazioni dell'antenna.

4
SCD 5753 DAB
COMANDI
COMANDI
DESCRIZIONE COMANDI UNITÀ
1. Tasto POWER/MOD, accensione/spegnimento.
2. Ricevitore telecomando
3. Controllo volume/Tasto SEL, Controllo volume e toni / accesso opzioni utente.
4 Microfono
5. Tasto BD/AS, cambio banda/ricerca automatica
6. Tasto EQ, variazione equalizzazione audio
7. Tasto MUTE, silenziamento autoradio
8. Tasto RES, ripristino dell'autoradio
9. Tasto I<<, sintonia, traccia precedente.
10. Tasto >>I, sintonia, traccia successiva.
11. Tasto CLK, mostra/imposta l'orologio
12. Tasto 1// , inizio/pausa/ripristino riproduzione.
13. Tasto 2/INT, riproduzione dei primi 10 secondi di un brano.
14. Display
15. Tasto 3/RPT, funzione ripetizione traccia.
16. Tasto 4/RDM, riproduzione casuale
17. Tasto 5/-10
18. Tasto 6/+10
19. Presa USB fast charge (presa per la sola ricarica veloce dei dispositivi)
20. Ingresso MicroSD card
21. Ingresso USB.
22. Ingresso AUX
23. Supporto per smartphone
LEVA MOBILELEVA FISSA

5
SCD 5753 DAB
ITALIANO
DESCRIZIONETELECOMANDO
1. Tasto POWER, spegnimento/accensione
2. Tasto accettazione chiamata
3. Tasto chiusura chiamata
4.
Tasto 1// , inizio/pausa/ripristino riproduzione.
5. Tasto 2/INT, riproduzione dei primi 10 secondi di un brano.
6.
Tasto 3/RPT, funzione ripetizione traccia.
7. Tasto 4/RDM, riproduzione casuale
8. Tasto 5/-10
9. Tasto 6/+10
10. Tasto 7/LOUD, attivazione funzione Loudness
11. Tasto 8/AMS, ricerca automatica
12. Tasto EQ, variazione equalizzazione audio
13. Tasto MODE, selezione funzione di riproduzione
14. Tasto VOL+, aumentare il volume
15. Tasto BAND, selezione banda FM1, 2, 3, AM1, 2
16. Tasto I<<, sintonia, traccia precedente.
17. Tasto >>I, sintonia, traccia successiva.
18. Tasto MUTE, silenziamento autoradio
19. Tasto VOL-, diminuisce il volume
20. Tasto SEL
21. Tasto CLK, mostra/imposta l'orologio
SUPPORTO PER SMARTPHONE
TREVI non si ritiene responsabile per eventuali danni allo smartphone causati da manovre errate da parte dell'utente.
Per inserire lo smartphone nel supporto dedicato (23) spingere delicatamente con lo smartphone sulla leva mobile, una
volta arrivati a ne corsa permettere l'incastro con la leva ssa.
A questo punto lo smartphone e' correttamente alloggiato, e' possibile utilizzarlo in conenssione BT con l'autoradio o
tramite app dedicata.
ATTENZIONE: non spingere mai la leva mobile con le dita, utilizzare sempre lo smartphone in maniera
molto delicata.
Nota:
E' possibile alloggiare smartphone aventi dimensione del display no a 7".
Non viene garantita la compatibilità con tutti gli smartphone anche aventi display di dimensioni inferiori ai 7".
Non viene garantita la compatibilità con smartphone che utilizzano cover di protezione
Si ricorda che l'uso dello smartphone alla guida e' vietato e pesantemente sanzionato.
Il telecomando e' alimentato da una batteria CR2025.
Per la sostituzione della batteria seguire le istruzioni
presenti sul retro del telecomando.
Se non diversamente specicato, i comandi del telecomando hanno le stesse funzioni dei comandi sull'unità

6
SCD 5753 DAB
Se non diversamente specicato, i comandi del telecomando hanno le stesse funzioni dei comandi sull'unità
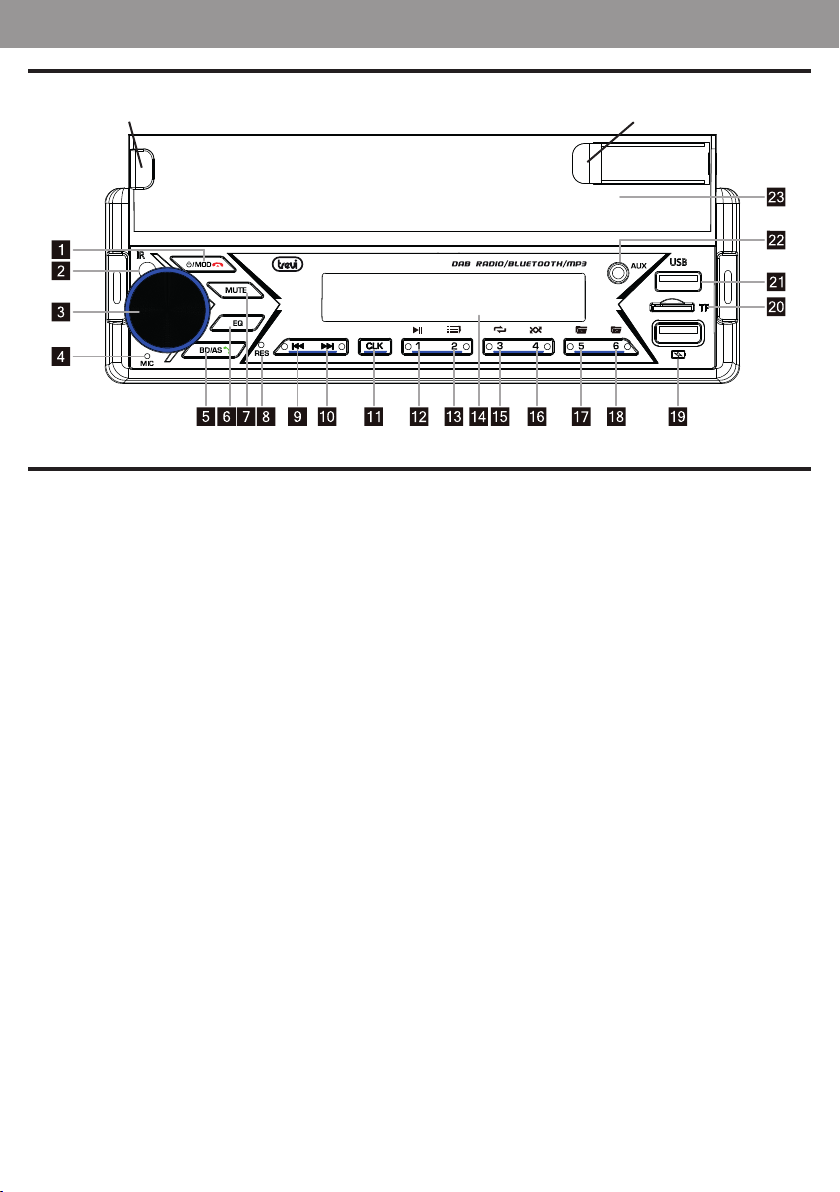
ACCENSIONE / SPEGNIMENTO
1. Premere il tasto POWER (1) per accendere l’apparecchio.
2. Premere a lungo il tasto POWER (1) per spegnere l’apparecchio.
NOTA: in caso di malfunzionamenti generali, per tornare al corretto funzionamento premere il tasto RESET(8) e accendere l'autoradio
tramite il tasto POWER(1).
REGOLAZIONE OROLOGIO
1. Premere il tasto POWER (1) per accendere l’apparecchio.
2. Premere a lungo il tasto CLK (11) no a che il display mostra l'ora lampeggiante.
3. Ruotare il Controllo volume (3) in senso orario/antiorario per regolare l'ora corrente. Premere il tasto CLK(11) per
confermare.
4. Ruotare il Controllo volume (3) in senso orario/antiorario per regolare i minuti correnti. Premere il tasto CLK(11)
per confermare.
5. Attendere alcuni secondi, l'autoradio uscirà automaticamente dal menu' di regolazione dell'orologio.
6. Per visualizzare l'orologio premere il tasto CLK(11).
SELEZIONE SORGENTE
Premere in sequenza il tasto MODE (1) per selezionare le sorgenti RADIO, DAB, SD, USB, AUX, BT.
NOTA: alcune sorgenti sono disponibili solamente se e' inserito un dispositivo di memoria.
CONTROLLI AUDIO
REGOLAZIONEVOLUME, FUNZIONE MUTE E FUNZIONE EQ
1. Ruotare il Controllo volume (3) in senso orario/antiorario per aumentare/diminuire il volume.
2. Premere il tasto MUTE(7) per silenziare immediatamente l'autoradio; premerlo di nuovo per riprendere il normale
ascolto.
3. Premere il tasto EQ(6) per selezionare l'equalizzazione preimpostata preferita. E' possibile scegliere tra JAZZ, CLASS,
ROCK, POP, FLAT, USER(nessuna equalizzazione).
REGOLAZIONETONI BASSI/ALTI
1. Premere una volta il tasto SEL (3) per selezionare la regolazione dei toni bassi.
2. Sul display appare l’indicazione del livello dei toni bassi “BASS”.
3. Ruotare il Controllo volume (3) in senso orario/antiorario per aumentare/diminuire il livello dei toni bassi.
4. Premere due volte il tasto SEL (3) per selezionare la regolazione dei toni alti.
5. Sul display appare l’indicazione del livello dei toni alti “TREBLE”.
6. Ruotare il Controllo volume (3) in senso orario/antiorario per aumentare/diminuire il livello dei toni alti.
CONTROLLO BILANCIAMENTO/FADER
1. Premere tre volte il tasto SEL (3) per selezionare il bilanciamento dei canali.
2. Sul display appare la scritta "BALANCE".
3. Ruotare il Controllo volume (3) in senso orario/antiorario per bilanciare l'audio sul canale destro/sinistro
4. Premere quattro volte il tasto SEL (3) per selezionare la regolazione del fader.
5. Sul display appare la scritta "FADER".
6. Ruotare il Controllo volume (3) in senso orario/antiorario per regolare l'audio sulle casse posteriori/anteriori.
ULTERIORI IMPOSTAZIONI
LOUDNESS
- Premere cinque volte il tasto SEL (3) per attivare/disattivare la funzione LOUD (esaltazione dei bassi).
EQUALIZZATORE PREDEFINITO
- Premere sei volte il tasto SEL (3) per selezionare l'equalizzazione preimpostata preferita. E' possibile scegliere tra JAZZ,
CLASS, ROCK, POP, FLAT, OFF(nessuna equalizzazione).
Nota: selezionando una equalizzazione preimpostata non e' possibile regolare i valori di toni alti/bassi.
STEREO/MONO (Premere sette volte il tasto SEL (3), disponibile in modo radio)
- STEREO: imposta l'ascolto della radio in stereo.
- MONO: imposta l'ascolto della radio in mono.
ITALIANO

7
SCD 5753 DAB
LOCAL (Premere otto volte il tasto SEL (3), disponibile in modo Radio)
- OFF: durante la ricerca automatica delle stazioni radio verranno ricevute tutte le stazioni, anche quelle disturbate. Questa
opzione è impostata di fabbrica.
- ON: durante la ricerca automatica delle stazioni radio verranno ricevute solo le stazione con il segnale più forte.
RADIO
SINTONIA AUTOMATICA
1. Premere il tasto BAND(5) per selezionare la banda di frequenza (FM1/FM2/FM3/AM1/AM2) che si desidera ascoltare.
2. Premere il tasto >>I (10) per sintonizzarsi automaticamente sulla stazione seguente.
3. Premere il tasto I<< (9) per sintonizzarsi automaticamente sulla stazione precedente.
SINTONIA MANUALE
1. Premere il tasto BAND(5) per selezionare la banda di frequenza (FM1/FM2/FM3/AM1/AM2) che si desidera ascoltare.
2. Tenere premuto a lungo il tasto >>I (10) o I<< (9) no a che il display mostra la scritta MANUAL, premere il tasto
>>I (10) o I<< (9) per avanzare o retrocedere la sintonizzazione di 0,05MHz in FM. Attenedere qualche secondo per
ritornare alla sintonia automatica (sul display compare AUTO).
MEMORIZZAZIONE DELLE STAZIONI
1. Sintonizzarsi sulla stazione desiderata come descritto precedentemente.
2. Tenere premuto un tasto di memoria da 1 a 6 (16) desiderato.
3. Ripetere il punto 2 per memorizzare tutte le altre stazioni in tutte le bande.
MEMORIZZAZIONE AUTOMATICA DELLE STAZIONI
Questo apparecchio è dotato di un sistema di auto memorizzazione che ricerca e memorizza le stazioni più forti.
1. Tenere premuto a lungo il tasto BAND(5). L’apparecchio ricercherà e memorizzerà automaticamente le stazioni con
il segnale più forte.
RDS (RADIO DATA SYSTEM)
Il sistema RDS prevede la trasmissione, dalle emittenti europee che lo hanno adottato, di una serie di informazioni comprendenti:
Il nome dell'emittente, le eventuali frequenze alternative su cui può essere ricevuta, l'inizio di un notiziario sul trafco, il
tipo di programma trasmesso (musica classica, jazz, rock, cultura), ecc.
Questo apparecchio è dotatodi una serie di opzioni attivabili o disattivabili a piacere dall’utente tramite la seguente procedura:
1. Tenere premuto a lungo il tasto selezione (3).
2. Premere ripetutamente il tasto selezione (3) per selezionare le opzioni disponibili.
3. Ruotare il Controllo volume (3) per scegliere l'opzione desiderata.
AF
Attiva/disattiva la funzione AF (Alternative Frequencies), frequenze alternative. Sul display apparirà l'indicatore AF.
L'apparecchio riceve la lista delle frequenze alternative dell'emittente e si sintonizza automaticamente su quella con il
segnale migliore.
Quando il segnale della stazione che si sta ascoltando peggiora, l'indicatore AF comincerà a lampeggiare, l'apparecchio
controlla la lista delle frequenze alternative trasmesse dalla stazione e si risintonizza su quella con segnale migliore.
TA
Attiva/disattiva la funzione TA (Trafc Announcement), notiziari sul trafco. Sul display apparirà l'indicatore TA.
Se la stazione che si sta ricevendo non trasmette bollettini l'apparecchio cercherà automaticamente una stazione che li
trasmette (SEEK TA).
PTY
Questa funzione permette di selezionare il tipo di programma desiderato, per esempio, musica rock, pop music, news, ecc.
La radio si sintonizzerà solo sulle stazioni che trasmettono il tipo di programma selezionato.
REG
In caso di ricerca di una stazione tramite AF (frequenza alternativa),la funzione REG (Regional) limita la scelta a stazioni
che trasmettono programmi regionali.
ITALIANO

8
SCD 5753 DAB
EON
Se la stazione in riproduzione non trasmette le informazioni sul trafco, oppure il segnale è debole quando TA è attivato, il
sistema ricercherà automaticamente un’altra stazione che trasmette le informazioni sul trafco. Quando questa funzione
è operativa, nella schermata si visualizza “EON”. Una volta che la trasmissione delle informazioni di trafco correnti è
terminata, il sistema ritornerà alla stazione precedente.
TA SEEK
Permette la ricerca di stazioni che trasmettono informazioni sul trafco
PI MUTE
Quando ci si trova in una zona di copertura nella quale due emittenti con codici identicativi di programma (PI) diversi
utilizzano la stessa AF (frequenza alternativa):
PI SOUND: La radio si sintonizza per alcuni secondi sulla nuova emittente quindi torna all'emittente precedente.
PI MUTE: La nuova emittente viene silenziata.
MASK ALL
MASK DPI: Le frequenze alternative caratterizzate da un codice identicativo di programma (PI) diverso non vengono
considerate.
MASK ALL: Le frequenze alternative caratterizzate da un codice identicativo di programma (PI) diverso e frequenze alter-
native con una potenza di segnale maggiore ma prive di informazioni RDS non vengono considerate.
RETUNE
In caso di perdita dell'identicatore del trafco:
RETUNE S: Se non si riceve alcun codice identicativo di notiziari sul trafco, la ricerca viene avviata automaticamente
dopo 30 secondi.
RETUNE L: Se non si riceve alcun codice identicativo di notiziari sul trafco, la ricerca viene avviata automaticamente
dopo 90 secondi.
COLOR AUTO
Permette la scelta del colore del display (Auto: cambio del colore automatico)
FREQ
Permette di selezionare l'area geograca di funzionamento (default: EURO)
TALK
Questa funzione permette di selezionare il volume del vivavoce durante la ricezione di una chiamata.
VER
Questa funzione mostra la versione del software installato.
RADIO DAB
1. Premere il tasto MODE(1) per selezionare la sorgente DAB.
2. Premere a lungo il tasto BAND(5) per effettuare la scansione automatica delle stazioni radio presenti, premere bre-
vemente per visualizzare informazioni sulla stazione radio in ascolto.
3. Dopo aver cercato le stazioni radio, 6 stazioni vengono automaticamente memorizzate nei tasti numerici. Premere i
tasti numerici per selezionare e riprodurre le stazioni memorizzate corrispondenti.Premere a lungo uno dei tasti per
memorizzare la stazione in ascolto nella memoria desiderata.
4. Premere il tasto >>I (10) o I<< (9) per passare alla stazione radio successiva o precedente.
INGRESSO MICROSD/USB
Se non diversamente specicato, i comandi del telecomando hanno le stesse funzioni dei comandi sull'unità
1. Inserire una scheda di memoria microSD nell'ingresso (20) con i contatti elettrici rivolti verso l'alto oppure una
memoria USB nella presa di ingresso (21).
2. La riproduzione partirà automaticamente e sul display verrà mostrato il numero della traccia riprodotta.
3. Premere il tasto 1/PAU(12) per arrestare momentaneamente la riproduzione. Premerlo nuovamente per riprendere
la riproduzione.
NOTA: L'autoradio potrebbe non supportare alcuni apparecchi esterni con presa USB, questo è dovuto all'incompatibilità dei processori.
ITALIANO

9
SCD 5753 DAB
SALTOTRACCIA
1. Premere il tasto >>I (10) durante l’ascolto per passare alla traccia successiva.
2. Premere il tasto I<< (9) durante l'ascolto per tornare all'inizio della traccia corrente. Premerlo più volte per passare
alle tracce precedenti.
3. Premere i tasti +10 / -10 per passare alla decima traccia successiva o precedente a quella in riproduzione.
RICERCAVELOCE
1. Tenere premuto il tasto >>I (10) durante l’ascolto della traccia per avanzare velocemente.
2. Tenere premuto il tasto I<< (9) durante l'ascolto della traccia per indietreggiare velocemente.
3. Premere il tasto 1/PAU(12) per riprendere la riproduzione.
FUNZIONI AVANZATE
1. Premere il tasto INT (13) per ascoltare in sequenza i primi 10 secondi di ogni traccia del disco (INTRO). Premerlo
nuovamente per tornare al normale ascolto (OFF).
2. Premere il tasto RPT (15) per attivare la ripetizione automatica della traccia in ascolto (REPEAT ONE), della cartella
(REPEAT FOD) o di tutte le tracce (REPEAT ALL).
3. Premere il tasto RDM (16) per attivare l'ascolto in sequenza casuale delle tracce sul disco (RANDOM ON).Premerlo
nuovamente per tornare alla riproduzione in sequenza delle tracce.
RICERCA PER TRACCIA
1. Premere il tasto BAND (5). Sul display verrà visualizzata la scritta TRK con il numero di traccia.
2. Ruotare il tasto SEL/Controllo volume (3) per impostare la traccia desiderata e premere il tasto SEL/Controllo volume
(3) per confermare.
3. Automaticamente verrà riprodotta la traccia selezionata.
INGRESSO AUX IN
1. Premere in sequenza il tasto MODE (1) per portarsi sulla sorgente AUX IN.
2. Collegare una qualsiasi unità provvista di uscita audio all'ingresso AUX (22) sul frontale dell'autoradio.
3. Comandare l'unità esterna dai propri comandi.
CONNESSIONETRAMITE BLUETOOTH (MODALITÀ HANDS-FREE)
È possibile effettuare chiamate dal proprio cellulare in modalità HANDS-FREE (in modalità libera) grazie alla compatibilità
con il sistema internazionale wireless Bluetooth.
- Quando effettuate una chiamata, parlare con voce forte e chiara.
- Per avere una condizione ottimale prima di effettuare o ricevere una chiamata, chiudere i nestrini dell'automobile.
- La voce può essere riprodotta in maniera distorta nel caso in cui ci siano problemi di campo telefonico.
- L'utilizzo della funzione HANDS-FREE dipende dalla compatibilità parziale/totale del telefono cellulare.
- Assicurarsi che nel proprio telefono cellulare sia disponibile la connessione Bluetooth.
CONNESSIONE
1. Premere in sequenza il tasto MODE (1) per portarsi sulla sorgente BT (NOT PAIRED) ed attivare la funzione Bluetooth
del telefono cellulare. Effettuare la ricerca degli accessori/dispositivi audio.
2. Dal telefono cellulare selezionare il dispositivo CAR BT che corrisponde all'autoradio.
3. Se richiesto, inserire il codice a 4 cifre "0000".
4. Ora la connessione è stabilita, sul display dell'autoradio comparirà la scritta LINKED / BLUETOOTH.
RICEZIONE/RIFIUTO/TERMINE DI UNA CHIAMATA
1. Quando si riceve una chiamata, l'ascolto della sorgente in riproduzione verrà interrotta e si udirà il suono di chiamata.
2. Premere il tasto (5) per avviare la conversazione oppure premere il tasto (1) per riutarla.
- L'audio della conversazione sarà udibile dall'impianto audio dell'auto.
- Durante la conversazione le funzioni dell'autoradio verranno interrotte.
3. Premere il tasto (1) per terminare la conversazione.
- Terminata la conversazione l'ascolto della sorgente in riproduzione verrà automaticamente ripresa da dove era stata
interrotta.
COMPOSIZIONE ULTIMO NUMERO CHIAMATO
1. In modalità Bluetooth, premere il tasto (5) per richiamare l'ultimo numero chiamato nel registro.
ITALIANO

10
SCD 5753 DAB
DISACCOPPIAMENTO BLUETOOTH
1. In modalità Bluetooth, premere a lungo il tasto (5) per scollegare il BT dal dispositivo accoppiato.
RIACCENSIONE AUTOMATICA
1. Ad autoradio spenta in modalità stand-by, nel caso di ricezione di una chiamata del dispositivo Bluetooth accoppiato,
l'autoradio si accenderà automaticamente per poter usufruire della funzione HANDS-FREE.
2. Al termine della chiamata l'autoradio si riporterà automaticamente in modalità di stand-by.
RIPRODUZIONE FILE AUDIO
Tramite la connessione Bluetooth è possibile riprodurre i le audio presenti nel telefono cellulare.
Nota: l'autoradio riproduce solo le audio con telefoni cellulari compatibili con il protocollo A2DP.
Consultare il manuale del proprio telefono cellulare.
Durante l'ascolto dei brani musicali da smartphone sono possibili le seguenti operazioni:
1. Premere il tasto 1/PAU(12) per arrestare momentaneamente la riproduzione. Premerlo nuovamente per riprendere
la riproduzione.
2. Premere il tasto >>I (10) durante l’ascolto per passare alla traccia successiva.
3. Premere il tasto I<< (7) durante l'ascolto per tornare all'inizio della traccia corrente.
Premerlo più volte per passare alle tracce precedenti.
PRESA FAST CHARGE
È possibile effettuare la ricarica di un dispositivo dalla presa USB Fast Charge (19).
1. Inserire il cavo di alimentazione nel dispositivo e l'altro capo del cavo nella presa usb Fast Charge (19). La ricarica
partirà automaticamente.
Nel caso di ricarichi uno smartphone e' possibile alloggiarlo nel supporto (23) durante la fase di ricarica.
Nota: questa presa non ha funzioni di lettura dispositivi di memoria, utilizzare a tale scopo la presa ingresso USB (21).
UTILIZZO CON APP SMART BT IPLUG
Scaricare ed installare l'app dai seguenti QR code:
In alternativa effettuare la ricerca dell'app SMART BT IPLUG nei principali app store.
Dopo aver installato l'app, connettere lo smartphone tramite BT all'autoradio; dopo aver effettuato il collegamento BT,
avviare l'app.
Nella prima schermata verrà richiesto quale sorgente selezionare per la riproduzione:
Accensione/spegni-
mento autoradio
Selezione sorgente
ITALIANO

11
SCD 5753 DAB
Schermata di gestione Radio FM:
Schermata di gestione Radio DAB:
Accedendo al menu' impostazioni e' possibile impostare:
Tema: e' ossibile selezionare differenti temi graci per l'app
Data e ora: e' possibile impostare data e ora
RGB: e' possibile impostare il colore del display dell'autoradio
Lingua: e' possibile impostare la lingua dell'app
Manuale: e' possibile scaricare il manuale dell'app
Touch: e' possibile attivare la vibrazione del telefono ai comandi dell'app
About: e' possibile visualizzare informazioni sull'app
Per tutte le ulteriori informazioni e' possibile visualizzare il manuale fornito dallo sviluppatore o la pagina dedicata all'app
sui vari store.
Per richieste di supporto relative all'app rivolgersi allo sviluppatore.
Trevi non si ritiene responsabile per eventuali problematiche o danni causati dall'utilizzo dell'app.
Si ricorda che l'uso dello smartphone alla guida e' vietato e pesantemente sanzionato.
Accesso menu' di
impostazioni
Regolazione volume
Richiamodiretto sta-
zioni radio salvate
nelle memorie
Ricerca e salvataggio
delle stazioni radio
Stereo/Mono
Accesso menu' di
impostazioni audio
Selezione sorgente
Ricerca automatica
stazione radio
Local ON/OFF Selezionebanda
Ricerca e salvataggio
delle stazioni radio
Informazioni sulla
stazione radio DAB
in riproduzione
Livello del segnale
ricevuto
Selezione radio
precedente/successiva
ITALIANO

12
SCD 5753 DAB
ITALIANO
CARATTERISTICHE TECNICHE
GENERALI
Alimentazione:..............................................................................................12V
Assorbimento max .....................................................................................10A
Potenza di uscita massima:........................................................................40W x 4 canali
Impedenza degli altoparlanti:....................................................................4 ohm per canale
Banda di frequenza:.....................................................................................FM 87.5MHz - 108MHz
.......................................................................................................................AM 522KHz - 1620KHz
.......................................................................................................................DAB 174 - 240 MHz
Potenza max di trasmissione Bluetooth:................................................0,8mW
Frequenza di trasmissione Bluetooth:....................................................2,4GHz
Batteria telecomando:................................................................................CR 2025
NOTA
TREVI persegue una politica di continuo miglioramento dei prodotti. Per tale motivo le caratteristiche tecniche sono soggette a
modiche senza preavviso.
INFORMAZIONI AGLI UTENTI ai sensi del Decreto Legislativo N° 49 del 14 Marzo 2014
“Attuazione della Direttiva 2012/19/UE sui riuti di apparecchiature elettriche ed elettroniche (RAEE)”
Il simbolo del cassonetto barrato riportato sull’apparecchiatura indica che il prodotto alla ne della propria vita utile deve
essere raccolto separatamente dagli altri riuti. L’utente dovrà, pertanto, conferire l’apparecchiatura integra dei componenti
essenziali giunta a ne vita agli idonei centri di raccolta differenziata dei riuti elettronici ed elettrotecnici, oppure riconse-
gnarla al rivenditore al momento dell’acquisto di nuova apparecchiatura di tipo equivalente, in ragione di uno a uno, oppure
1 a zero per le apparecchiature aventi lato maggiore inferiore a 25 cm.L’adeguata raccolta differenziata per l’avvio successivo
dell’apparecchiatura dimessa al riciclaggio, al trattamento e allo smaltimento ambientale compatibile contribuisce ad evitare
possibili effetti negativi sull’ambiente e sulla salute e favorisce il riciclo dei materiali di cui è composta l’apparecchiatura. Lo
smaltimento abusivo del prodotto da parte dell’utente comporta l’applicazione delle sanzioni amministrative di cui al D.Lgs
n. Decreto Legislativo N° 49 del 14 Marzo 2014.

13
SCD 5753 DAB
INSTALLATION EXAMPLE
SAFETY PRECAUTIONS
• Do not put your ear close to the speaker during the setting and volume adjustments
• If liquids penetrate inside the appliance, immediately disconnect and bring the appliance to the nearest authorized
TREVI service center.
• The appliance must not be exposed to dripping or splashing water and no objects lled with liquid must be placed
on the appliance.
• Maintain the appropriate volume level so that you are aware of the road and trafc conditions.
• Parking in direct sunlight can produce very high temperatures inside the vehicle. Refresh and ventilate the interior of
the car before use.
• Installation must be carried out by qualied personnel.
• Keep this manual for future reference.
CARE AND MAINTENANCE
For cleaning, we recommend the use of a soft, slightly moistened cloth. Avoid solvents or abrasive substances.
IMPORTANT
This device is designed for non-professional home use.The good construction of this appliance guarantees perfect operation
for a long time. However, should any inconvenience arise, it is advisable to consult the nearest TREVI Authorized Service Center
SAFETY PRECAUTIONS - INSTALLATION

14
SCD 5753 DAB
CONNECTIONS
INSTALLATION OF DAB ANTENNA
For this operation, contact a professional installer.
1. The DAB antenna supplied requires installation on the front windscreen in a vertical position (see gure).
2. Clean the glass where you want to attach the antenna.
3. Carefully remove the protective lm from the adhesive on the antenna and place it in the chosen location. The antenna
must be positioned so that the ground contact can be spread on the metal body of the car (it is not necessary to
remove the paint).
4. Position the cable (length 3 m) inside the car dashboard until you reach the position of the radio. Connect the cable
with golden connector to the DAB antenna input on the rear of the car radio and secure it by screwing the connector.
If a second thinner black cable is present, it must be connected to the main power supply + 12V (key).
Antenna DAB
A POWER SUPPLY
1. Free
2. Free
3. Free
4. Memory (permanent sup-
ply)
5. Auto antenna OUTPUT
6. Free
7. Main supply (positive)
8. Ground (negative)
B SPEAKERS
1. + Rear right
2. - Rear right
3. + Front right
4. - Front right
5. + Front left
6. - Front left
7. + Rear left
8. - Rear left
WIRE CONNECTIONS
Caution:
- Do not install the antenna in a position that obstructs the driver's view.
- Do not place the cable and the antenna where they could interfere with the proper functioning of the
AirBag or other safety devices or where they could impede the driving of the vehicle.
- The use on shielded glass reduces the antenna performance.

15
SCD 5753 DAB
CONTROLS
CONTROLS
DESCRIPTION OF UNIT COMMANDS
1. POWER/MOD key, on/off.
2. Remote control receiver
3. Volume control/SEL key, Volume and tone control / user options access.
4 Microphone
5. BD/AS button, band switch/auto search
6. EQ key, audio equalization variation
7. MUTE button, muting the car radio
8. RES button, restores the radio
9. I<< key, tuning, previous track.
10. >>I key, tuning, next track.
11. CLK key, show/set the clock
12. 1// key, start/pause/resume playback.
13. 2/INT key, playback of the rst 10 seconds of a track.
14. Displays
15. 3/RPT key, track repeat function.
16. 4/RDM key, random play
17. 5/-10 key
18. 6/+10 key
19. USB fast charge socket (socket for fast charging of devices only)
20. MicroSD card input
21. USB input.
22.AUX input
23. Smartphone holder
MOVING LEVERFIXED LEVER

16
SCD 5753 DAB
ENGLISH
REMOTE
1. POWER key, off/on
2. Call acceptance key
3. End call key
4. 1/
/
key, start/pause/resume playback.
5. 2/INT key, playback of the rst 10 seconds of a track.
6. 3/RPT key, track repeat function.
7. 4/RDM key, random play
8. 5/-10 key
9. 6/+10 key
10. 7/LOUD key, activation of the Loudness function
11. 8/AMS key, automatic search
12. EQ key, audio equalization variation
13. MODE key, selection of playback function
14. VOL+ key, increase the volume
15. BAND key, band selection FM1, 2, 3, AM1, 2
16. I<< key, tuning, previous track.
17. >>I key, tuning, next track.
18. MUTE button, car radio mute
19. VOL- key, decreases the volume
20. SEL key
21. CLK key, shows/sets the clock
SMARTPHONE HOLDER
TREVI is not responsible for any damage to the smartphone caused by incorrect maneuvers by the user.
To insert the smartphone into the dedicated holder (23), gently push the smartphone onto the mobile lever, once you have
reached the end of the stroke, allow it to engage with the xed lever.
At this point the smartphone is correctly housed, it is possible to use it in BT connection with the car radio or through
the dedicated app.
ATTENTION: never push the mobile lever with your ngers, always use the smartphone in a very delicate way.
Note:
Smartphones with display sizes up to 7" can be housed.
Compatibility with all smartphones is not guaranteed, even with displays smaller than 7".
Compatibility with smartphones that use protective covers is not guaranteed
Please note that the use of the smartphone while driving is prohibited and heavily sanctioned.
The remote control is powered by a CR2025 battery.
To replace the battery, follow the instructions on the
back of the remote control.
Unless otherwise noted, the remote controls have the same functions as the controls on the unit

17
SCD 5753 DAB
Unless otherwise noted, the remote controls have the same functions as the controls on the unit
ON / OFF
1. Press the POWER button (1) to turn on the device.
2. Long press the POWER button (1) to switch off the device.
NOTE: in the event of general malfunctions, to return to correct operation, press the RESET(8) button and turn on the car radio
using the POWER(1) button.
CLOCK ADJUSTMENT
1. Press the POWER button (1) to turn on the device.
2. Long press the CLK button (11) until the display shows the ashing hour.
3. Turn the Volume control (3) clockwise/counterclockwise to adjust the current time. Press the CLK(11) key to conrm.
4. Turn the Volume Control (3) clockwise/counterclockwise to adjust the current minute. Press the CLK(11) key to conrm.
5. Wait a few seconds, the car radio will automatically exit the clock setting menu.
6. To view the clock, press the CLK(11) key.
SOURCE SELECT
Press the MODE key (1) in sequence to select the RADIO, DAB, SD, USB, AUX, BT sources.
NOTE: some sources are only available if a memory device is inserted.
AUDIO CONTROLS
VOLUME ADJUSTMENT, MUTE FUNCTION AND EQ FUNCTION
1. Rotate theVolume Control (3) clockwise/counterclockwise to increase/decrease the volume.
2. Press the MUTE(7) button to immediately silence the car radio; press it again to resume normal listening.
3. Press the EQ(6) button to select your favorite preset equalization. It is possible to choose between JAZZ, CLASS, ROCK,
POP, FLAT, USER (no equalization).
BASS/TREBLETONE ADJUSTMENT
1. Press the SEL button (3) once to select bass adjustment.
2.The bass level indication “BASS” appears on the display.
3. Rotate theVolume control (3) clockwise/counterclockwise to increase/decrease the bass level.
4. Press the SEL button (3) twice to select treble adjustment.
5.The treble level indication “TREBLE” appears on the display.
6. Rotate theVolume Control (3) clockwise/counterclockwise to increase/decrease the treble level.
BALANCE/FADER CONTROL
1. Press the SEL key (3) three times to select the channel balance.
2. "BALANCE" appears on the display.
3. Rotate theVolume Control (3) clockwise/counterclockwise to balance the audio on the right/left channel
4. Press the SEL key (3) four times to select the fader setting.
5. "FADER" appears on the display.
6. Rotate the Volume Control (3) clockwise/counterclockwise to adjust the sound on the rear/front speakers.
ADDITIONAL SETTINGS
LOUDNESS
- Press the SEL key (3) ve times to activate/deactivate the LOUD function (bass enhancement).
DEFAULT EQUALIZER
- Press the SEL key (3) six times to select your preferred preset equalization. It is possible to choose between JAZZ, CLASS,
ROCK, POP, FLAT, OFF (no equalization).
Note: selecting a preset equalization it is not possible to adjust the treble/bass values.
STEREO/MONO (Press the SEL key (3) seven times, available in radio mode)
- STEREO: set to listen to the radio in stereo.
- MONO: set listening to the radio in mono.
LOCAL (Premere otto volte il tasto SEL (3), disponibile in modo Radio)
- OFF: durante la ricerca automatica delle stazioni radio verranno ricevute tutte le stazioni, anche quelle disturbate. Questa
opzione è impostata di fabbrica.
- ON: durante la ricerca automatica delle stazioni radio verranno ricevute solo le stazione con il segnale più forte.
ENGLISH

18
SCD 5753 DAB
RADIO
AUTOMATICTUNING
1. Press the BAND(5) button to select the frequency band (FM1/FM2/FM3/AM1/AM2) you want to listen to.
2. Press the >>I button (10) to automatically tune to the next station.
3. Press the I<< (9) button to automatically tune to the previous station.
MANUALTUNING
1. Press the BAND(5) button to select the frequency band (FM1/FM2/FM3/AM1/AM2) you want to listen to.
2. Long press the >>I (10) or I<< (9) key until the display shows MANUAL, press the >>I (10) or I<< (9) key to advance or
roll back the tuning by 0.05MHz in FM.Wait a few seconds to return to automatic tuning (AUTO appears on the display).
STORING STATIONS
1.Tune to the desired station as described above.
2. Press and hold a desired memory key from 1 to 6 (16).
3. Repeat step 2 to store all other stations in all bands.
AUTOMATIC STORING OF STATIONS
This unit is equipped with an auto memorization system which searches for and stores the strongest stations.
1. Long press the BAND(5) key.The unit will automatically seek and store the stations with the strongest signal.
RDS (RADIO DATA SYSTEM)
The RDS system provides for the transmission, by the European broadcasters that have adopted it, of a series of informa-
tion including:
The name of the station, any alternative frequencies on which it can be received, the start of a trafc bulletin, the type of
program being broadcast (classical, jazz, rock, culture), etc.
This appliance is equipped with a series of options that can be activated or deactivated as desired by the user using the
following procedure:
1. Press and hold the selection key (3).
2. Press the selection key (3) repeatedly to select the available options.
3. Rotate theVolume control (3) to choose the desired option.
AF
Activates/deactivates the AF (Alternative Frequencies) function, alternative frequencies. The AF indicator will appear on
the display.
The appliance receives the list of alternative frequencies from the station and automatically tunes in to the one with the
best signal.
When the signal of the station being listened to deteriorates, the AF indicator will start ashing, the unit checks the list of
alternative frequencies transmitted by the station and re-tunes to the one with the best signal.
TA
Activates/deactivates the TA (Trafc Announcement) function, trafc announcements. The TA indicator will appear on the display.
If the station you are receiving does not broadcast bulletins, the unit will automatically search for a station that broadcasts
them (SEEK TA).
PTY
This function allows you to select the type of program you want, for example, rock music, pop music, news, etc.
The radio will only tune to stations broadcasting the selected program type.
REG
When searching for a station using AF (alternative frequency), the REG (Regional) function limits the selection to stations
broadcasting regional programmes.
EON
If the station being played does not broadcast trafc information, or the signal is weak when TA is turned on, the system will
automatically search for another station broadcasting trafc information. When this function is working, “EON” is displayed
on the screen. Once the current trafc information broadcast is nished, the system will return to the previous station.
TA SEEK
Allows you to search for stations broadcasting trafc information
PI MUTE
When in a coverage area where two broadcasters with different Program Identication (PI) codes use the same AF (al-
ternative frequency):
PI SOUND:The radio tunes in for a few seconds to the new station and then returns to the previous station.
PI MUTE:The new station is muted.
ENGLISH

19
SCD 5753 DAB
MASK ALL
MASK DPI: Alternative frequencies with a different Program Identication (PI) code are not considered.
MASK ALL: Alternative frequencies with a different Program Identication (PI) code and alternative frequencies with higher
signal strength but no RDS information are ignored.
RETUNE
If you lose your trafc identier:
RETUNE S: If no trafc information code is received, the search starts automatically after 30 seconds.
RETUNE L: If no trafc information code is received, the search starts automatically after 90 seconds.
AUTO COLOR
Allows choice of display color (Auto: automatic color change)
FREQ
Allows you to select the geographical area of operation (default: EURO)
TALK
This function allows you to select the speakerphone volume when receiving a call.
VER
This feature shows the installed software version.
DAB RADIO
1. Press the MODE(1) button to select the DAB source.
2. Press and hold the BAND(5) key to automatically scan the radio stations present, press briey to display information
on the radio station being listened to.
3. After searching for radio stations, 6 stations are automatically stored in the number buttons. Press the number buttons to
select and play the corresponding stored stations. Long press one of the keys to memorize the station being listened
to in the desired memory.
4. Press the >>I (10) or I<< (9) key to switch to the next or previous radio station.
MICROSD/USB INPUT
Unless otherwise noted, the remote controls have the same functions as the controls on the unit
1. Insert a microSD memory card into the slot (20) with the electrical contacts facing up or a USB memory stick into the
input socket (21).
2. Playback will start automatically and the number of the track being played will be shown on the display.
3. Press the 1/PAU(12) key to momentarily stop playback. Press it again to resume playback.
NOTE: Your car stereo may not support some external devices with USB socket, this is due to processor incompatibility.
JUMPTRACK
1. Press the >>I (10) button while listening to go to the next track.
2. Press the I<< (9) button during playback to return to the beginning of the current track. Press it repeatedly to skip to
previous tracks.
3. Press the +10 / -10 keys to skip to the tenth track after or before the one currently playing.
FAST SEARCH
1. Press and hold the >>I (10) button while listening to the track to fast forward.
2. Press and hold the I<< (9) button while listening to the track to rewind quickly.
3. Press the 1/PAU(12) key to resume playback.
ADVANCED FEATURES
1. Press the INT button (13) to listen in sequence to the rst 10 seconds of each track on the disc (INTRO). Press it again
to return to normal listening (OFF).
2. Press the RPT key (15) to activate automatic repetition of the track being listened to (REPEAT ONE), of the folder
(REPEAT FOD) or of all the tracks (REPEAT ALL).
3. Press the RDM button (16) to activate random sequence listening of the tracks on the disc (RANDOM ON). Press it
again to return to sequential playback of tracks.
SEARCH BYTRACK
1. Press the BAND button (5).The display will showTRK with the track number.
2. Rotate the SEL/Volume control button (3) to set the desired track and press the SEL/Volume control button (3) to conrm.
3.The selected track will automatically play.
ENGLISH

20
SCD 5753 DAB
AUX-IN INPUT
1. Press the MODE key (1) in sequence to go to the AUX IN source.
2. Connect any unit equipped with an audio output to the AUX input (22) on the front of the car radio.
3. Control the outdoor unit by your commands.
CONNECTIONVIA BLUETOOTH (HANDS-FREE MODE)
It is possible to make calls from your mobile phone in HANDS-FREE mode (in free mode) thanks to the compatibility with
the international Bluetooth wireless system.
- When making a call, speak loud and clear.
- To have an optimal condition before making or receiving a call, close the car windows.
- Voice may be reproduced distorted in case of telephone eld problems.
- The use of the HANDS-FREE function depends on the partial/total compatibility of the mobile phone.
- Make sure that the Bluetooth connection is available in your mobile phone.
CONNECTION
1. Press the MODE key (1) in sequence to go to the BT source (NOT PAIRED) and activate the Bluetooth function of the
mobile phone. Search for audio accessories/devices.
2. From the mobile phone, select the CAR BT device that corresponds to the car stereo.
3. If prompted, enter the 4-digit code "0000".
4. Now the connection is established, the words LINKED / BLUETOOTH will appear on the car radio display.
RECEIVING/REJECTING/TERMINATING A CALL
1. When you receive a call, listening to the playing source will stop and you will hear the ringing sound.
2. Press the key (5) to start the conversation or press the key (1) to reject it.
- The audio of the conversation will be audible from the car audio system.
- During the conversation the radio functions will be interrupted.
3. Press the key (1) to end the conversation.
- Once the conversation is over, listening to the source being reproduced will automatically resume from where it left off.
LAST NUMBER DIALED
1. In Bluetooth mode, press the key (5) to redial the last called number in the log.
BLUETOOTH UNPAIRING
1. In Bluetooth mode, long press the key (5) to disconnect the BT from the paired device.
AUTOMATIC RESTART
1. With the car radio switched off in stand-by mode, if a call is received from the paired Bluetooth device, the car radio will
switch on automatically to use the HANDS-FREE function.
2. At the end of the call, the car radio will automatically return to stand-by mode.
AUDIO FILE PLAYBACK
Through the Bluetooth connection it is possible to play the audio les present in the mobile phone.
Note: The car stereo only plays audio les with mobile phones compatible with the A2DP protocol.
Consult the manual of your mobile phone.
While listening to music from your smartphone, the following operations are possible:
1. Press the 1/PAU(12) key to momentarily stop playback. Press it again to resume playback.
2. Press the >>I (10) button while listening to go to the next track.
3. Press the I<< (7) button during playback to return to the beginning of the current track. Press it repeatedly to skip to
previous tracks.
FAST CHARGE PLUG
A device can be recharged from the USB Fast Charge socket (19).
1. Insert the power cable into the device and the other end of the cable into the USB Fast Charge socket (19). Charging
will start automatically.
In the case of recharging a smartphone, it is possible to place it in the support (23) during the recharging phase.
Note: this socket does not have memory device reading functions, use the USB input socket (21) for this purpose.
ENGLISH
Table of contents
Languages:
Other Trevi Car Video System manuals