trig TT32 User manual


DRAFT COPY
This page intentionally left blank
EN
DRAFT COPY 1
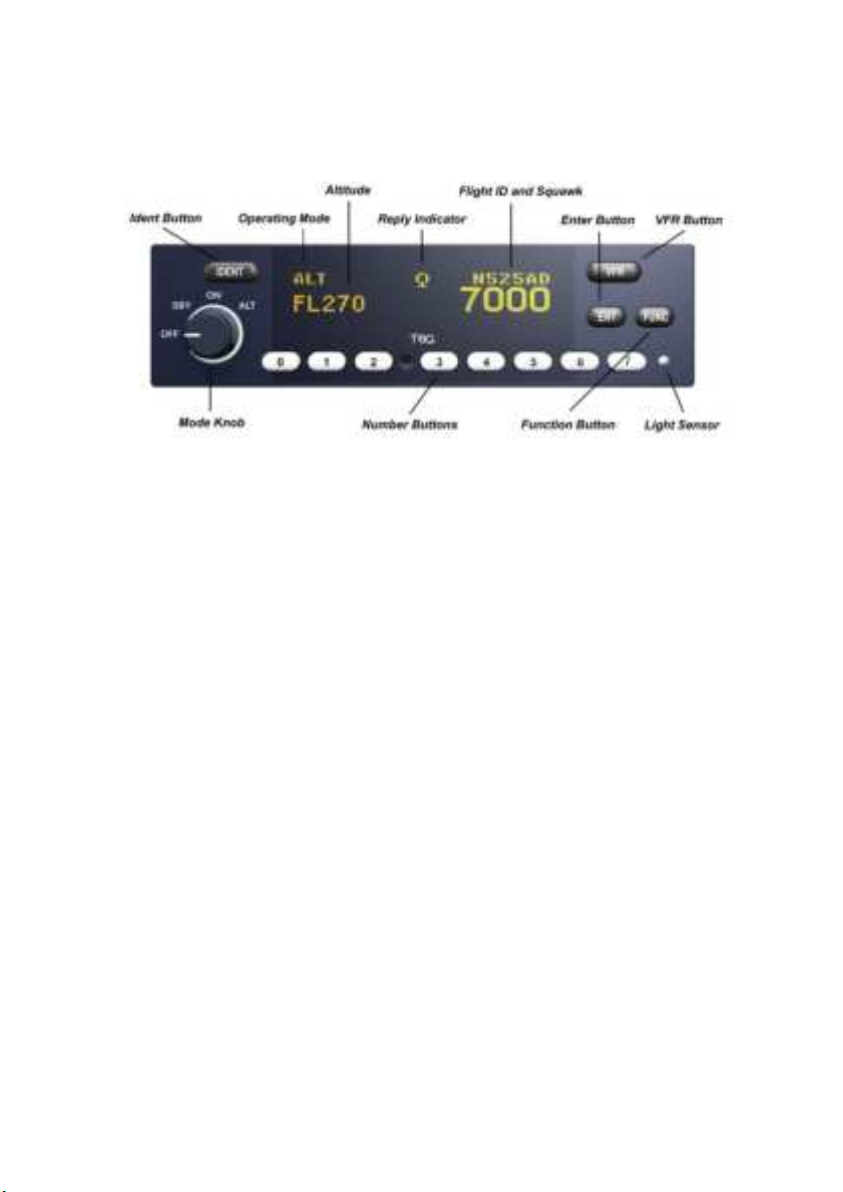
Front Panel
Display
The display shows the operating mode of the transponder, the reported pressure
altitude, and the current squawk code and Flight ID. The reply indicator is active when
the transponder replies to interrogations.
The pressure altitude is displayed as a Flight Level, which is the pressure altitude in
hundreds of feet. When non-standard atmospheric conditions apply, this may not
match the altimeter indicated altitude, but will be correctly displayed by the ATC radar.
Mode Selector Knob
The knob controls the power to the transponder and the operating mode.
OFF
Power is removed from the transponder.
SBY
The transponder is on, but will not reply to any interrogations.
ON
The transponder will respond to all interrogations, but altitude reporting is
suppressed.
ALT
The transponder will respond to all interrogations.
When airborne, the transponder should always be set to ALT unless otherwise directed
by Air Traffic Control. If your installation includes a squat switch or is configured with
an automatic air/ground system, the transponder should be left in ALT mode and it
will switch automatically to GND mode on landing or whilst taxiing. GND will appear
on the display.
Push Buttons
IDENT
Press the IDENT button when ATC instructs you to “Ident” or “Squawk Ident”.
This activates the SPI pulse in the transponder replies for 18 seconds. IDENT
will appear in the display.

EN
2 DRAFT COPY
FUNC
Pressing the FUNC button provides access to flight ID setup, flight timer,
stopwatch, ADS-B monitor (depending on installation) and altitude monitor
functions, in that order.
VFR
Pressing the VFR button sets the transponder to the pre-programmed
conspicuity code. Pressing the button again restores the previous squawk
code.
ENT
The ENT button confirms options and menu selections.
Squawk Code Entry
Press any of the numeric buttons (0 through 7) to change the squawk code. A new
squawk code is set when the fourth digit is entered. If the code entry is not completed
within 7 seconds, the changes are ignored and the previous code restored.
Some standard squawk codes are listed below
1200 VFR code in the USA
7000 VFR code commonly used in Europe
7500 Hijack code
7600 Loss of communications
7700 Emergency code
Setting Flight ID
Select the Flight ID screen using the FUNC button and press ENT to edit the Flight ID
using the number buttons corresponding to the letters A-Z and numbers 8 and 9.
Repeatedly pressing the number button will cycle through the letters shown
underneath the number on the lower portion of the display. Press ENT to select the
character and advance to the next character. The flight ID is terminated with a “space”
character located on the 7 button or when all eight characters are set. When ENT is
pressed on the last character, the new Flight ID will replace the previous value.
The Flight ID should correspond to the aircraft call sign entered on your flight plan. If
no flight plan is active, the aircraft registration should be used as your Flight ID. Use
only letters and digits.

EN
DRAFT COPY 3
Flight Timer
The Flight Timer records the time for which the transponder has been powered on and
operating in flight mode –either ON or ALT. Press the FUNC button to display the
Flight Timer.
Timer
The stopwatch can be used as a convenient timer. Press the FUNC button to display
the stopwatch. Pressing ENT will reset and start the timer. Pressing ENT again will
stop the timer.
ADS-B Position Monitor
The ADS-B Monitor is only available on installations that include an ADS-B position
source. The ADS-B Monitor provides a display of the position information that is being
transmitted in ADS-B position reports. This can provide confirmation that the correct
information is being transmitted, particularly where the GPS source is remote from the
transponder.
In the event that valid position information is NOT available from the GPS, the latitude
and longitude display will be replaced by dashes; if no valid latitude and longitude is
shown then ADS-B position information is NOT being transmitted.
Loss of ADS-B position information will also result in a WARNING message being
displayed.
Altitude Monitor
The Altitude Monitor activates an audio annunciator or annunciator light (depending
on installation) when the aircraft pressure altitude differs from the selected altitude by
more than 250 feet. Press the FUNC button to display the altitude monitor enable
screen. Pressing ENT toggles the altitude monitor at the current altitude.
When altitude monitoring is in use, a small deviation pointer appears adjacent to the
altitude display on the transponder.
Warning Messages
If the transponder detects a problem, the screen will indicate WARNING and a brief
statement of the problem. Depending on the nature of the problem, your transponder
may not be replying to interrogations. Note the message on the screen and pass that
information to your avionics maintenance organisation. Press ENT to clear the
message; if the fault is still present the message will reappear.
Fault Annunciation
If the transponder detects an internal failure, the screen will indicate FAULT and a
brief statement of the problem. No replies will be made to interrogations when a fault
is detected.

EN
4 DRAFT COPY
Some FAULT indications can be recovered by switching the transponder off and back
on again, although in all cases a FAULT code implies that there is a fault with the
transponder or the installation. Note the FAULT message at the bottom of the screen
and pass that information to your avionics maintenance organisation.
Configuration Mode
The system is configured when it is first installed by your avionics supplier.
Configuration items include the Mode S aircraft address, the interface to the other
aircraft systems, the aircraft category, and the pre-programmed values for VFR squawk
code. To view or change these settings you must use Configuration Mode.
Do not use Configuration Mode in flight. Check with your avionics installer
before changing the configuration.
To enter configuration mode, hold down the FUNC button whilst switching on the
transponder. Configuration items can be changed using the numerical buttons and
ENT button. Pressing FUNC advances to the next configuration item.
When configuration is complete, switch the transponder off. When it is switched back
on the transponder will use the new configuration.
Low Temperature Operation
The TT32 and TT32G are certified to operate correctly down to -20C, but at low
temperatures the display may be impaired. On a cold day you may need to wait for
the cockpit to warm up to ensure normal operation.

DRAFT COPY
This page intentionally left blank

DRAFT COPY
Trig Avionics Europe B.V.
Hardwareweg 3
3821 BL Amersfoort, Netherlands
Tel: +31(0)33 782 0900
Trig Avionics Limited
Heriot Watt Research Park
Edinburgh, EH14 4AP, UK
Tel: +44(0)131 449 8810
support@trig-avionics.com
www.trig-avionics.com
This manual suits for next models
1
Table of contents
Other trig Marine Radio manuals


