Tromen CRIOLLA User manual

CRIOLLA
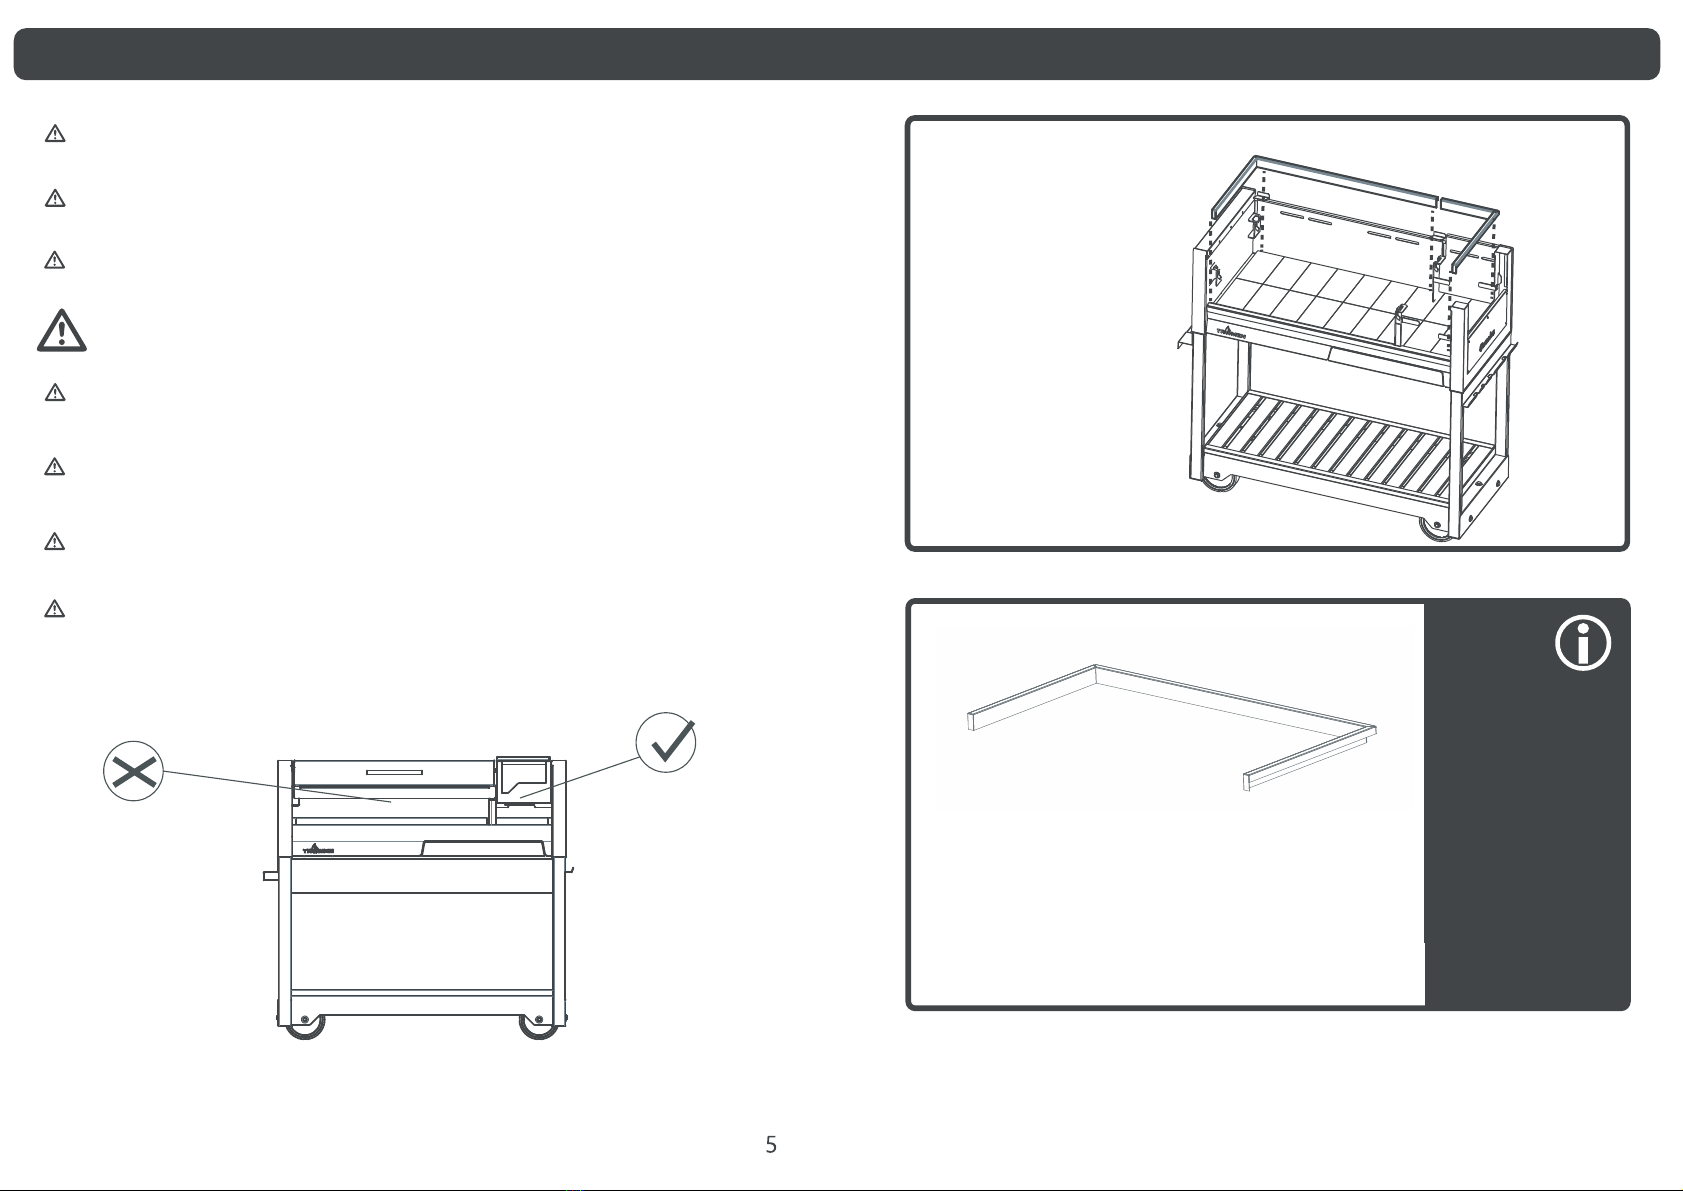
NOTA: la zona que muestra la siguiente figura es la más
expuesta al fuego y a las brasas; en ese sector la pintura
se deteriorá en los primeros usos.

No encienda el fuego en el area de la parrilla. Realicelo en el fogonero.

FOGONERO
No realizar fuego
ZONA DE COCCIÓN
Monomarco
El monomarco se
debe plegar en dos
partes siguiendo el
contorno de los
ladrillos.
El monomarco se coloca al finalizar el armado de toda
la parrilla. El mismo protege los laterales de la parrilla
de daños por quemaduras, agrupando el fuego hacia
el centro de la parrilla.
6
- Ubicarlos en la zona
resaltada
luego monte los 2 Modulos
MODULOS
7
La parrilla cuenta sobre sus lateales
con un porta utensilio del lado derecho
y de una manija de traslado del lado
izquierdo.
Cant.:6
Armado deBase
CRIOLLA
Colocar 3 Torn.Hex.
W5/16-5/8"
Por lado
Coloque la tienda y fije los bulones, con sus
arandelas correspondientes, a las tuercas
remachadas ubicadas en los laterales.
10
CRIOLLA
Modulo x2
1148
1023
542
23cm
40cm
45cm
53cm
9
COLOCAR
TORNILLO DEL
LADOINFERIOR
Cant.:4

Tapa de Parrilla
Colocar enhebrado los agujeros
para que quede posicionada en
las bisagras.
Colocar 5 tornillos
de fijación
El plegado es fácil y rápido , esta indicado por el mismo diseño .
Permitiendo al Cocinero cuidar los limites de la parrilla.
11
A
DETALLE A

Ranura de Bastidor Encastre la manija de extracción
(CRIOLLA
Apoye su fogonero
en los encastres

18
18
TORN. HEX. 5/8"
94-002-079 CRIOLLA
MONOMARCO INOX.
LATERAL FIJO
2
LLAVE DE ARMADO
LATERAL INOXIDABLE
BASE MOVIL 1
1
TAPA DE CUERPO 1
2
14
1
1
1
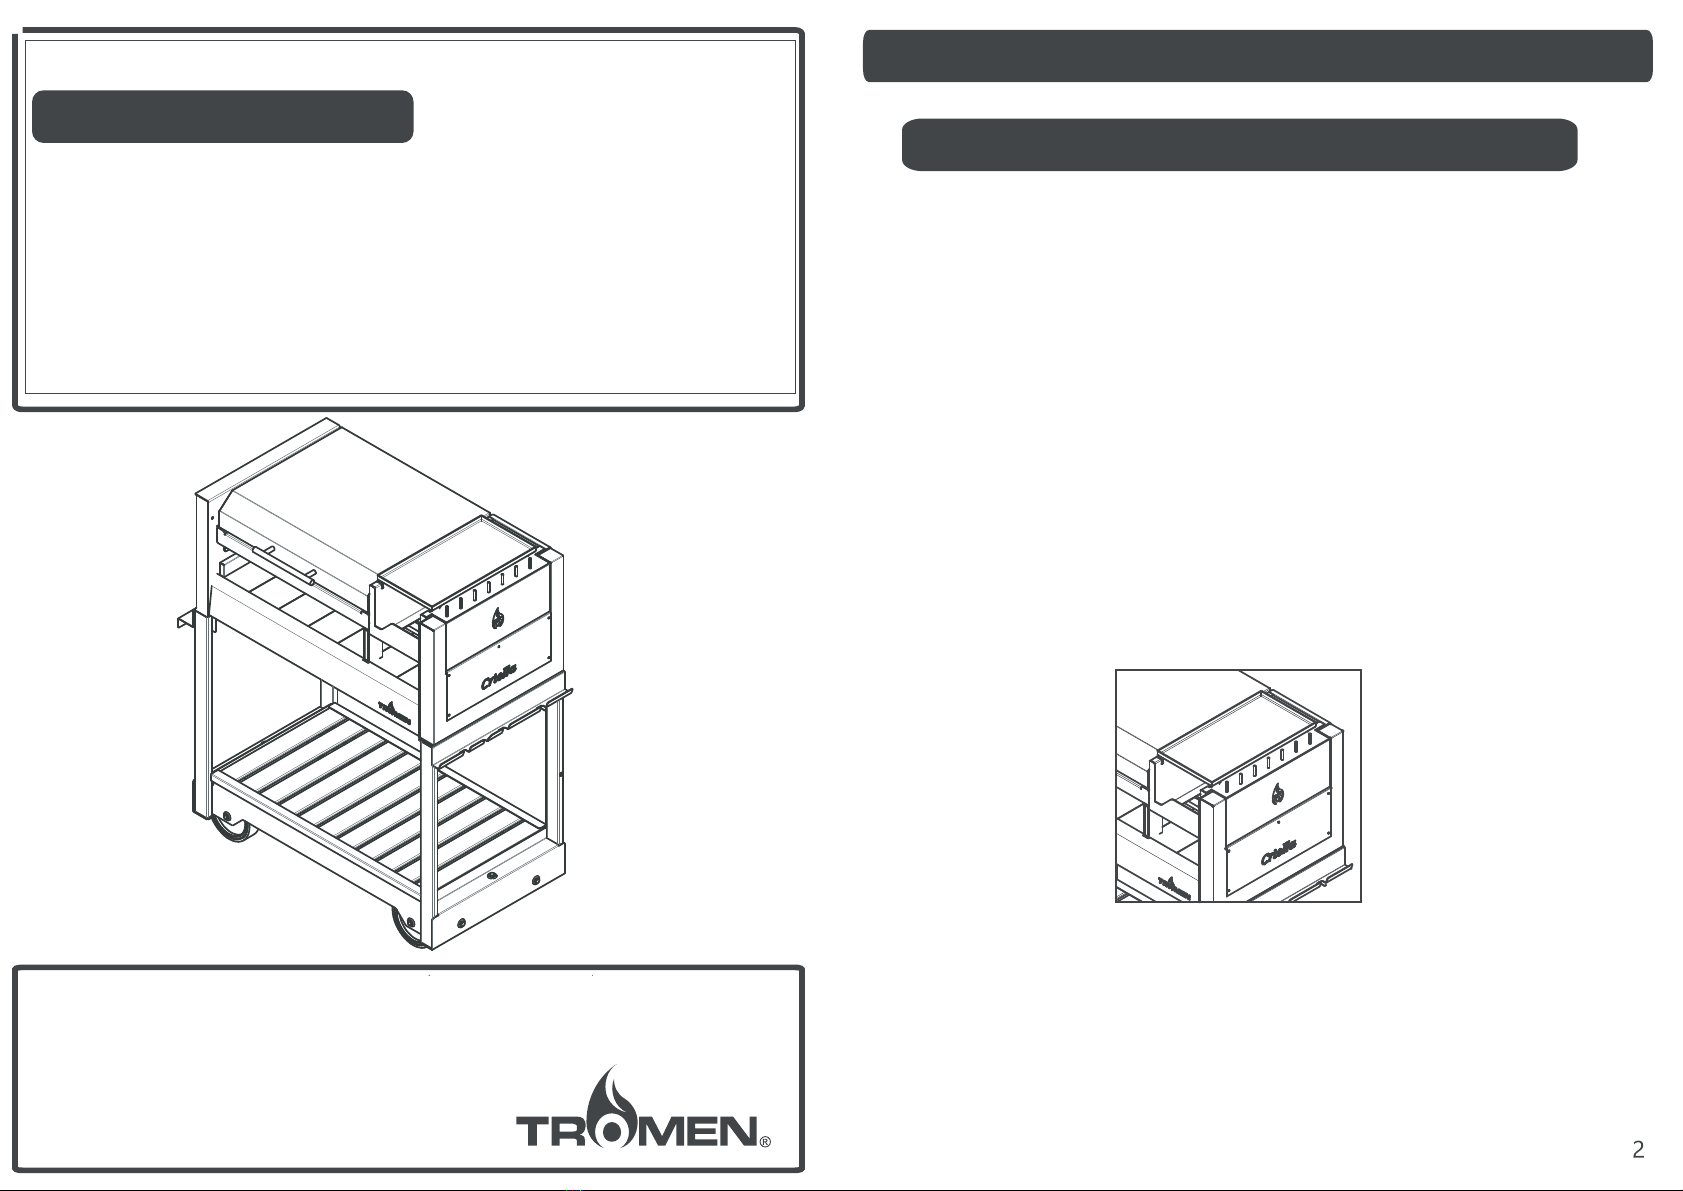
- Cuenta con buen acceso
- También el diseño del fogonero
permite una rápida extracción.
ACCESSORY
Don't throw away. It contains important information about your product
CRIOLLA GRILL
PROPIETOR GUIDE
GOURMET LINE
WELCOME TO THE GOURMET WORLD
You have bought the highest quality and design product.
In contrast with the current grills, its unique and innovating design
installment and they are suitable for any place in the house.
The grill is added to the segment of grills that don't require previous
meat in a gourmet dish.
with the TROMEN grills everyone can transform grilled
It doesn't matter how experienced the grill man is
to fire and ember, here the paint will deteriorate with the first uses.
and its modern style upgrades the place where it is set.
NOTE: the are shown in the following illustration is the most exposed
WE THANK YOU YOUR PREFERENCE AND TRUST PROUDLY
WARRANT
This guarantees the original purchaser of this TROMEN
charcoal grill that this accessory will be free
of fault both in its goods as well as in its manufacturing
as long as it is assembled and operated following the
instructions presented here since the purchase moment
and sticking to the following:
Paint. . . . . . . . . . . . . . . . . . . . . . . . . . . . . . 180 days
All the other components. . . . . . . . . . . . . . . . . . 1 year
TROMEN®could request prove of reliable purchase date.
compra. DUE TO THIS, YOU SHOULD KEEP YOUR
PURCHASE RECEIPT AND THE REGISTRATION LABEL
OF THE EQUIPMENT.
This warrant is restricted to the replacement of pieces that may
turn faulty under usage and normal service, and which,
under full TROMEN's satisfaction, are found faulty.
Once TROMEN verifies the fault and approves the claim, the piece
will be replaced free of charge. The components or the equipment
replacement will be done in the place where the product
was purchased. The reception of the equipment will be agreed
between the seller and the purchaser.
In case field supervisions are required for products
within the 60 days since the purchase date, this service will be free
of charge for the purchaser provided there are manufacturing faults.
On the contrary, the expenses will be covered by the purchaser.
This limited warrant does not cover flaws or operating troubles
due to accidents, overuse, mishandling, alteration,
wrong use, vandalism, inadequate installment, maintenance
or incorrect service or due to lack of normal and regular maintenance.
This warrant does not cover the decline or damages due
to weather conditions such as hail, hurricanes, earthquakes,
floods or to the fading due to exposure to chemical substances
either directly or because of conditions in the environment.
There is no other express warrant other than the one found here
and any other implicit commerce warrants or usability
are limited in duration to the time stated
in written by this limited warrant.
TROMEN® does not take responsibility for any especial
indirect damage, emerging, product damages caused
by the purchaser or third parties or any other incidental damage.
TROMEN® does not authorize any person or company to take
over any obligation and responsibility related to the purchase,
instalment, usage, withdrawal, refund or replacement
of the equipment in TROMEN's name.
No representation will be linked to this company.
This limited warrant does not cover flaws in the paint
if the accessory is stored outdoors since this will erode
the superficial applied termination prematurely.
TO VALIDATE THIS WARRANT, YOU WILL HAVE TO REGISTER ONLINE
ON OUR WEBSITE
.COM
WWW.TROMEN
WITHIN THE 10 DAYS AFTER THE EQUIPMENT WAS PURCHASED
OTHERWISE, THIS WARRANT WON'T BE VALID.
WARRANT
REPORT ANY FLAW TO:
The following label identifies your new product, remember
to keep it for future references related to the equipment.
Label
The security symbols will alert you on important information
Do not throw charcoal or ashes until they are fully off.
Keep the grill on a safe and level surface place all the time away
Tdo no throw hot charcoal away where it could be stepped
Do not remove the ashes until the charcoal has burnt completely,
You must proceed carefully when handling your grill.
In case you use ignition liquid, after using it, cap the bottle
Never add ignition liquid or any kind of inflatable fuel or vegetal
Do not try to move the grill when it is hot. Wait until it cools down
Never leave babies, kids or pets unsupervised near a hot or lit grill.
Do not use it indoors! This grill is meant to be used only outdoors.
Read all the security information in this owner's guide before starting
NOT FOLLOWING THE DANGER AND PRECAUTION WARNINGS
DESCRIBED IN THIS OWNER'S GUIDE CAN CAUSE
SERIOUS BODY INJURIES OR DEATH, OR FIRE THAT CAN THREATEN
LIFE OR CAUSE DAMAGE.
SECURITY INFORMATION
the fire in the grill.
If you use it inside your house, smoke and gases will accumulate
and this may cause fire, house damages, serious or fatal intoxication.
before moving it.
charcoal soaked in the same warm or hot vegetal charcoal.
and place it at a safe distance from the grill.
It will be hot while cooking and never leave it unsupervised while using it.
is off and the grill is cold.
from fuel materials.
on or where it can be in risk of fire.
Do not place cooked meals in the same container in which
Do not defrost meat, fish or birds at room temperature or on
Wash your hands with hot water and soap before you start to prepare
The grill will have to be fully cleaned on a regular basis.
Using abrasive cleaning products on the cooking grills or on the grill
Do not put the grill away until the ashes and charcoal are fully off.
Wash with water and soap all the containers and cooking utensils
itself will damage the surface termination.
SAFETY RECOMMENDATIONS FOR THE HANDLING OF MEALS
any dish and after having handled meat, birds and fresh fish.
the cooking table. Defrost the food in the refrigerator.
you placed raw food.
that have been in contact with meat or raw fish and wash them.
Don't set fire
Cooking zone
Stroker
6
the fire towards the centre of the grill.
highlighted area.
-Place them in the
Monoframe
CHARACTERISTICS
grill laterals from burn damages, grouping
assembled all the grill. This frame protects the
The monoframe is placed once you have
The monoframe must be folded
following the bricks outline.

7
The grill has on its laterals a utensils bear
on the left side.
on the right side and a transportation handle
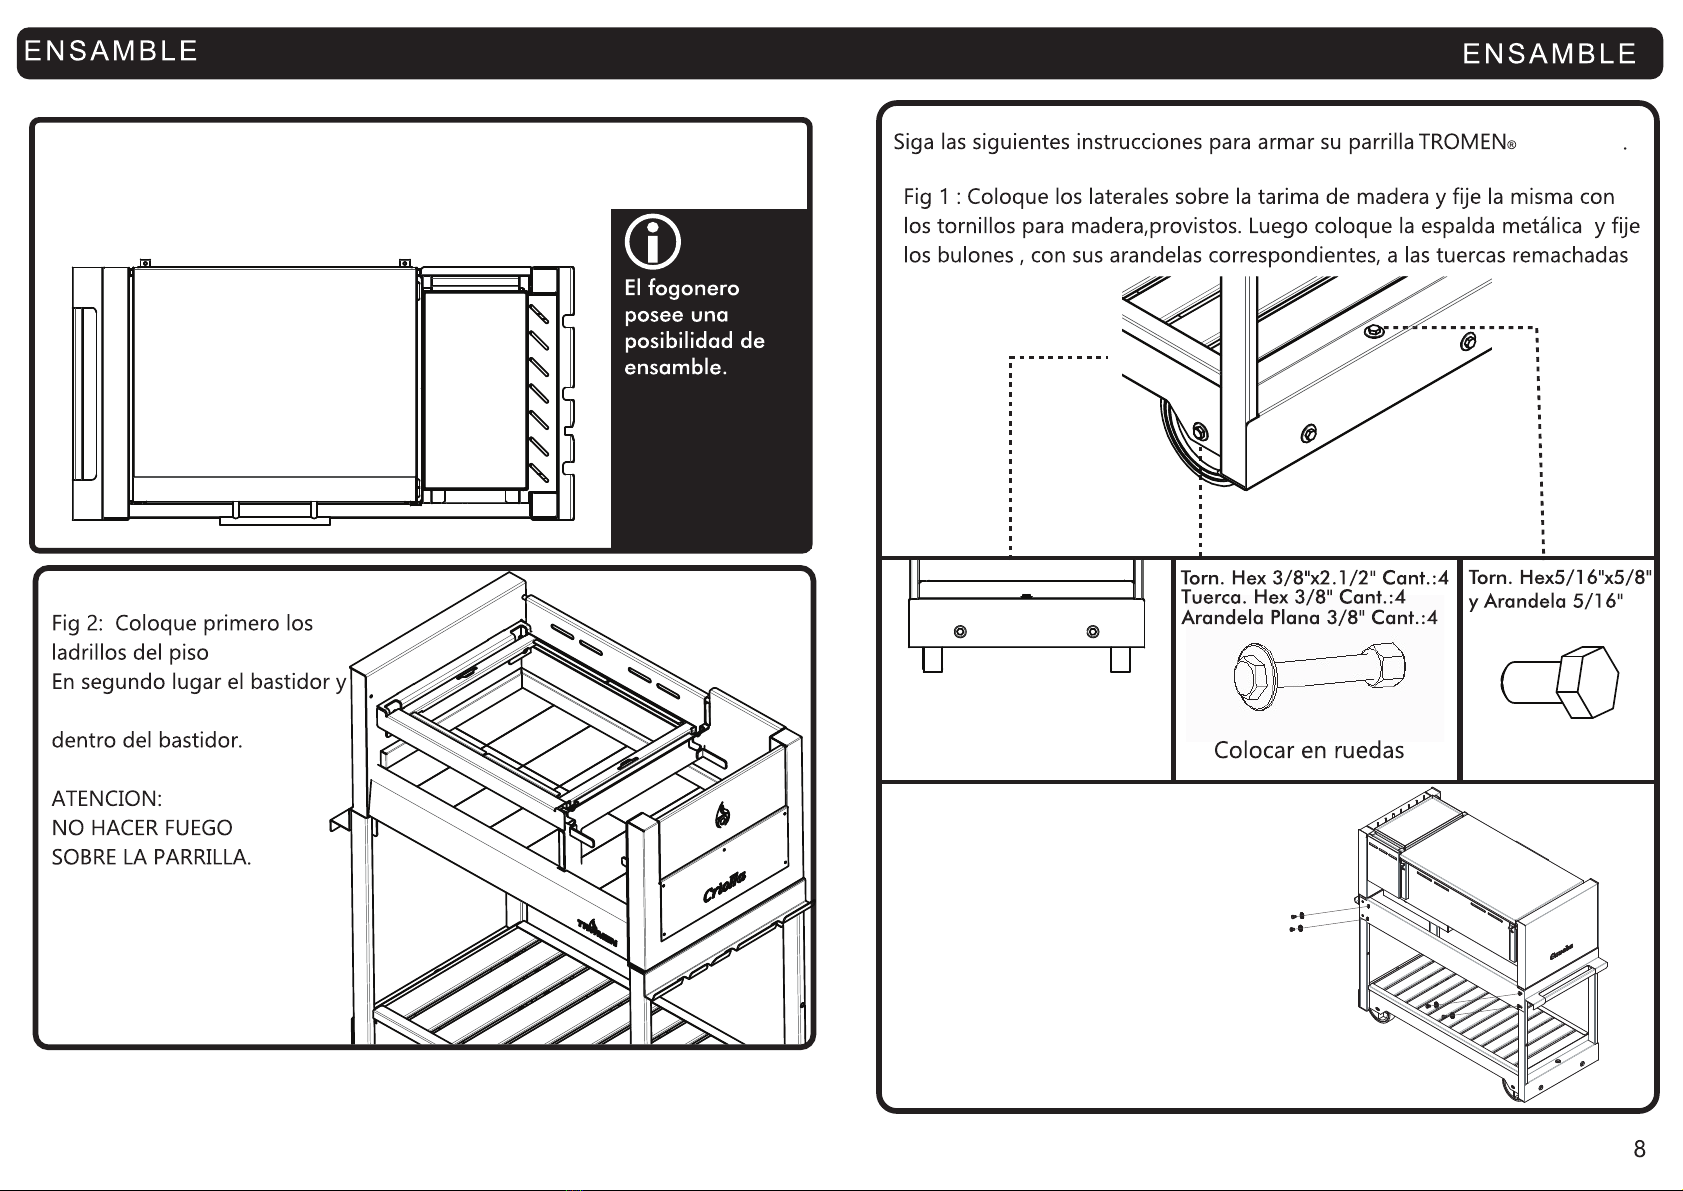
The stoker
can be assembled.
Image 2. Place the floor bricks first.
Then, place the stretcherThen, place the stretcherThen, place the stretcher
and next assemble the two
units inside the stretcher.
ATTENTION: DO NOT START
A FIRE ON THE GRILL.
ASSEMBLE
Follow the following instructions to assemble your CRIOLLA TROMEN grill.
Image 1. Place the laterals on the wooden flooring and fix it with the wooden
corresponding washers, to the riveted screws.
screws provided. Then, place the metal back and fix the bolts, with their
per side
W5 16 5/8 Quantity: 3
Screw Hex 3/8” Quantity: 4
Hex. Screw 3/8” x 2 ½” Quantity:4
Flat washer 3/8” Quantity:4
Place in wheels
Screw Hex 3/8” Quantity: 4
Screw Hex. 5/16” x 5/8”
and washer 5/16”
Quantity: 6
Base Assembly
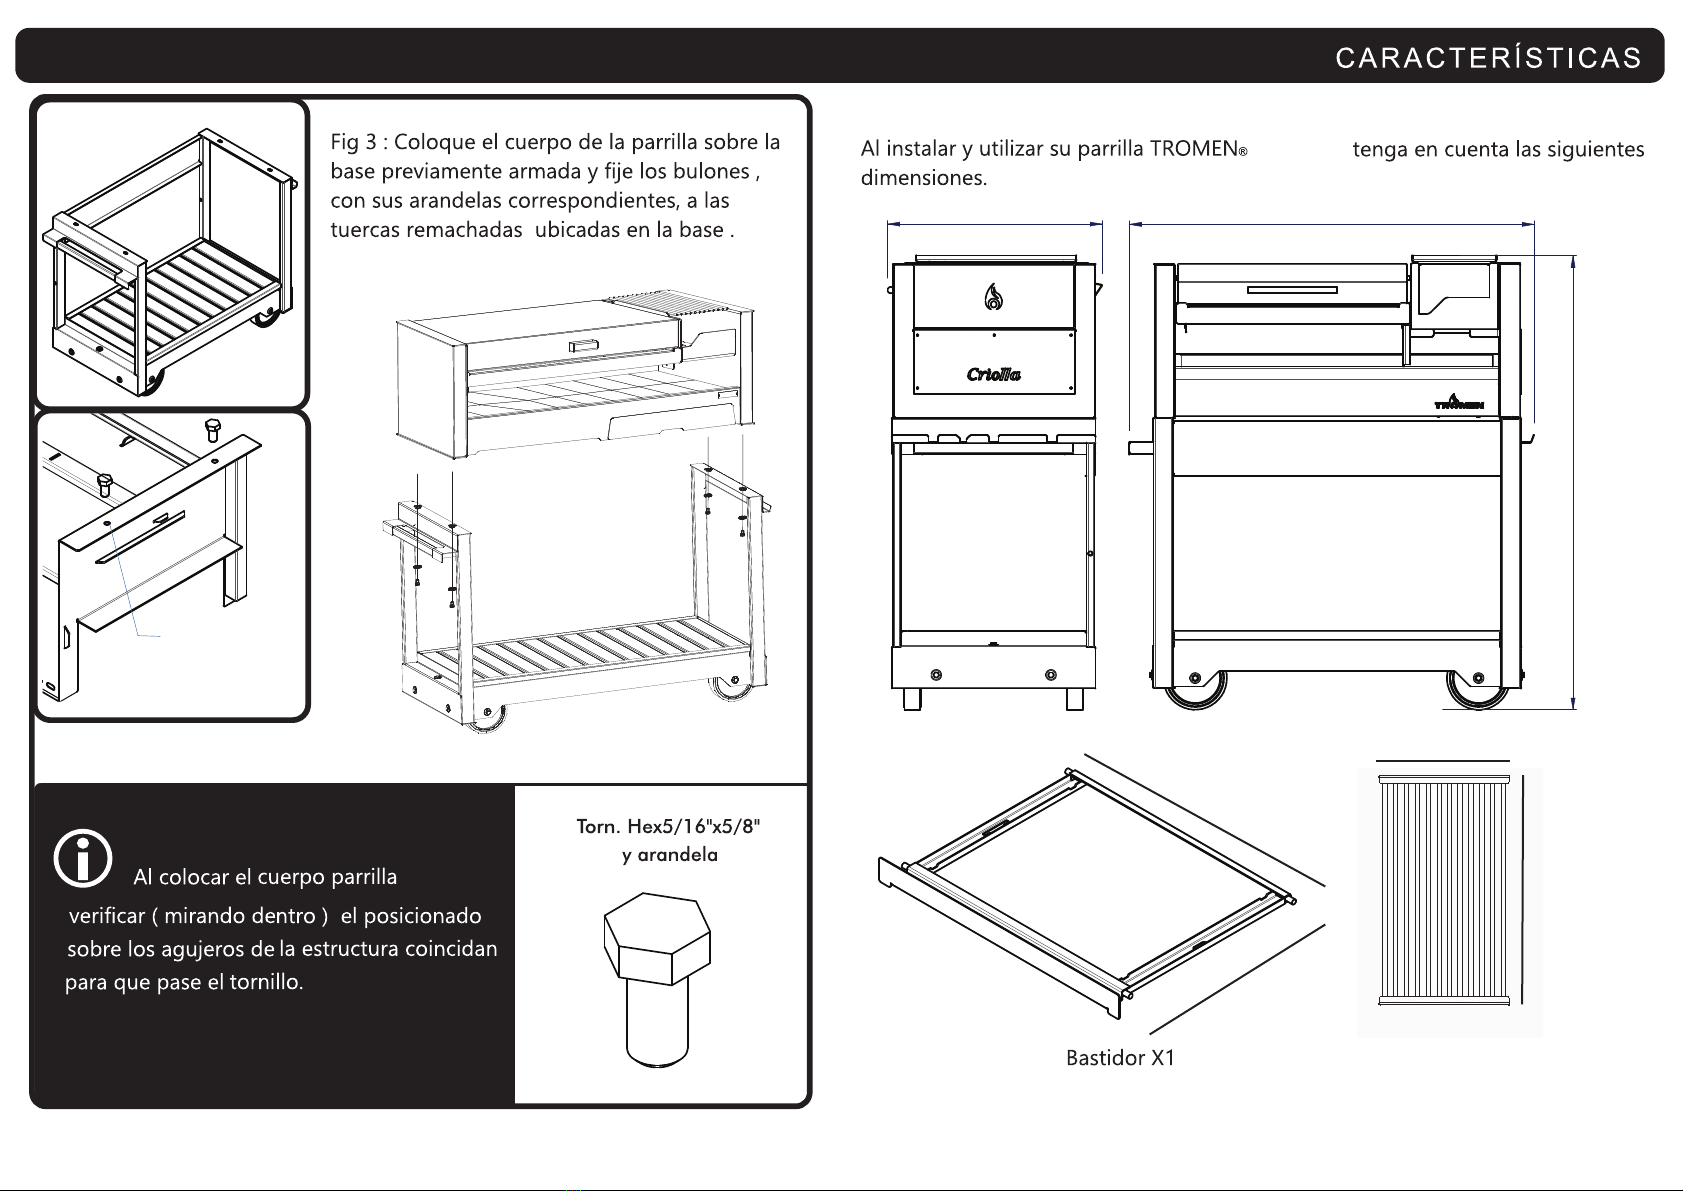
Place the body of the grill on the previously assembled basis and fix the bolts
with their corresponding washers to the riveted screws placed on the laterals.
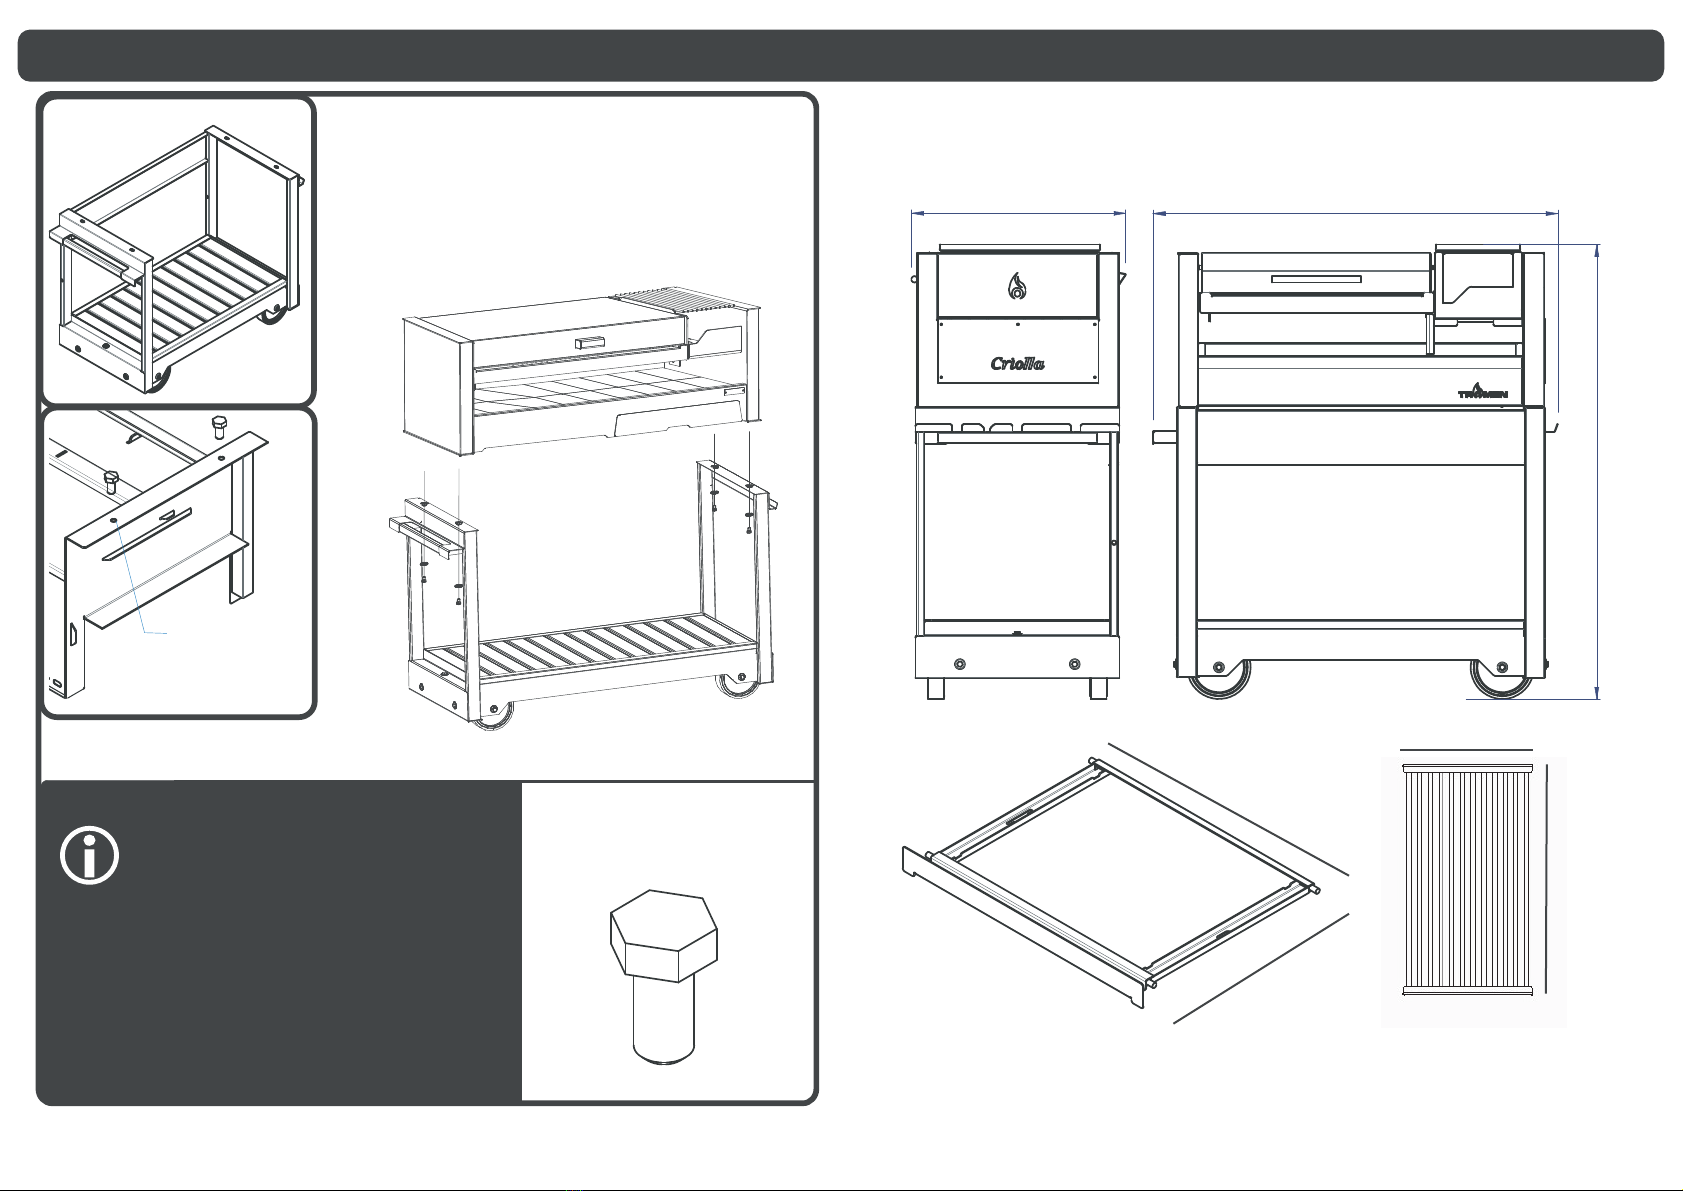
1148
1023
542
40cm
45cm
53cm
dimensions in mind.
When assembling and using your TROMEN CRIOLLA grill bear the following
CHARACTERISTICS
Grill Unit x2
Stretcher x 1
9 10
Image 3. Place the body of the grill on the previously assembled
to the riveted screws placed on the base.
basis and fix the bolts with their corresponding washers
in the lower part
Place the screw
When placing the body of the grill check (looking inside)
and you can place the screws through them.
the placement so that the structure's holes match
Hex. Screw 5/16” x 5/8”
and washer
Quantity: 4

ASSEMBLE
Place 5 placement screws
Grill Cover
positioned in the hinges
Place the threaded holes so that it is
11
Place the stoker in the joins.Place the stoker in the joins.Place the stoker in the joins.Place the stoker in the joins.
itself allowing the cook take care of the grill limits.
The folding is easy and fast, it is indicated by the design

Monomarco
according to your needs and the grill man liking.
stretcher which allows you to regulate the cooking
Your TROMEN grill has two heights for the
USE
Double cooking height
Slow cooking
Fast cooking
the height or for its assembly or dismantling will
The handling of the cooking stretcher to regulate
be done with two handles.
Fit the removal handle
Stretcher slot
while the grill is being used, the handles can deteriorate.
These two handles shouldn't be placed for good
Fig.5 To use your TROMEN stoker accessory in cooking mode,
TROMEN grill) as shown in the image.
add the grill or the plate (that come with CRIOLLA
Place the stoker in the joins.

18
18
94-002-079 CRIOLLA
1
1
1
2
14
1
1
1
It's likely that the first start-up of the grill causes a smell of
burnt paint, this is due to the fact that the paint is treated
while in use, this is a normal event and it won't happen
in the next start-ups.
During the process of final treatment, don't touch the
surface since the pain might be damaged.
Don't burn plas t is an oil by-product. Don't start a fire
on the grill. Do it in the stoker.
Don't wet, in contact with humidity it is likely that the
equipment gets rusty.
Choose a dry place to keep the equipment prot
it from the rain and dust.
2
HANDLES STRETCHER
WOODEN FLOORING
LATERAL MOBILE
GRILL BODY
BACK
STAINLESS MONOFRAME
BODY COVER
24 WASHER
HEX.5/8” SCREW
ASSEMBLE WRENCH
GRILLED PIECE
FIREPROOF BRICK
STAKE PLATE
MOVABLE SUPPORT
STOKER
STRETCHER
STAINLESS LATERAL
DESCRIPTION QUANTITY CHECK
COMPONENTS CHECKLIST
CHECKING DONE BY:
Your new grill was thought by the TROMEN design team
considering every aspect which make the art of cooking unique.
TROMEN DESIGN
-Its surface is fully enameled.
-It has good access to live coal
with the following details:
Practicality: your grill has a stoker
-It allows you to screw it to the
removal
basis for better safety.
where you can place the utensils.
Besides, it has a wooden flooring
that can move along any road.
with 4 strong wide diameter wheels
Mobility: your grill is fully mobile
Table of contents
Other Tromen Grill manuals


Popular Grill manuals by other brands


Dyna-Glo
Dyna-Glo DGA480BSN-1 manual

Lagrange
Lagrange Pierre Elegance 399002 manual

Naterial
Naterial KENTON 3276000323594 Assembly, Use, Maintenance Manual

cecotec
cecotec Txuletaco The Beast 6850 instruction manual

EXPERT GRILL
EXPERT GRILL 810-0040 owner's guide

Goldair
Goldair GBQ45 operating instructions


