Truly Ergonomic TEK 207 Datasheet

Key Location & Special Functionality
The key is at the center-bottom of the layout. Press with either thumb or either index finger.[Enter]
The key is as well at the center-bottom of the layout. Press with either index finger.[Backspace]
The is located at the top-center, represented by a quad-diamond shape.[Superkey]
Using the Windows Operating System, the Superkey acts as the Windows key.
® ®
Using the Linux Operating System, the Superkey becomes the Meta key.
®
Using the Mac OS , after configuring your TEK , the Superkey becomes the command key.X®
The is located at the top-center-left , represented by . The light(left of [Fn])CapsLock [A] [A]
indicator below this keycap turns on or off accordingly.
To select , press the , then press and release the key(function key)
[Insert] [A][Fn] [Insert]
, then release the key.(left of [Fn]) [Fn]
The is located at the top-center-right , represented by . The light(right of [Fn])NumLock [1] [1]
indicator below this keycap turns on or off accordingly.
To select , press the , then press and release the(function key)
[PrtScr](PrintScreen) [Fn] [PrtScr][1]
key , then release the Key.(right of [Fn]) [Fn]
Not labeled: press the to select press as the Win+Pause, ,[ScrollLock] [5%][Fn] [Fn][Superkey]
.press as the Control+Pause[6^][Fn]
First use
T suggesthe TEK is properly designed, and therefore different from other keyboards. We you plan a
couple of days to become accustomed using it, preferably, when you are not nearing a deadline. Keys
like the , , and are located in better different positions compared to[ ] [ ] [ ] [Ctrl]Enter Backspace Shift
conventional Akeyboards . s you use your TEK, you will get accustomed to the new key's locations
and your body will adjust to a healthier typing experience in a short time.
T as straight as possibleype with your wrists . Feel free to have your wrists, hands, and forearms in
the angle you feel most comfortable, without the need to match the split angle or columnar alignment
of your TEK, as long as your wrists are as straight as possible. As well, only rest your hands on the
.included Palmrest when you are not typing; it is better to "float" your hands while typing
Mechanical switches require very low force to activate and provide a gentle tactile feedback when
pressed that helps you feel when each key registers. If you hear a loud sound for each key press, it
means you are using too much force; .please press the keys as lightly as possible
pleaseD ,uring the first hour of typing look at the keyboard while typing type “s l o w l y”and
even if you are a fast touch-typist. This will greatly help you get accustomed to the keys' positions.
C , t ed ofompared to start typing fast without looking at the keyboard his recommend first hour
typing slowly will allow you to adjust faster.
Installation & Quick Start Guide
Truly Ergonomic Keyboard (TEK)
Models 207 and 209
Press the key along the top row of keys for special functionality.[Fn]
Model 209 shown
[Fn]
CapsLock: [A]
Insert: [A]
[Fn]
[Superkey]
(Windows, Meta,
or command key)
NumLock: [1]
[PrintScreen]: [1]
[Fn]
[Backspace]
[Enter]
Search
Reserved
Internet Browser
Mail
My Computer
Media Previous
Calculator
Media Select
Media Play/Pause
Volume Mute
Media Next
Volume Down
Volume Up
Media Eject
Fully Programmable
Setup
We recommend that you read this Guide in its entirety before installing your TEK.
For Model 207 using US layout: you can set DIP switch #4 to OFF to have an additional Tab key.
For Model 209 using JIS layout: set DIP switch #1 and #4 to OFF .
1. Turn ON your computer, and login if required.
2. Plug in your TEK into a working USB port.
3. The Operating System identifiesautomatically
your TEK, and after messagea few seconds a
is displayed mentioning that your TEK is
installed and ready to use.
Make sure your computer is ON the first time you plug in
your TEK for each computer. Otherwise, the Operating
System might not start. If this happens, simply turn OFF
your computer, unplug your TEK, and follow above steps.
1. Move DIP switch #2 to the OFF position .
2. Turn ON your computer, and login if required.
3. Plug in your TEK into a working USB port.
4. The Keyboard Setup Assistant opens.
5. Press the [Esc] key .(top leftmost key)
6. Manually select your TEK:
• ANSI for English US
• JIS for Japanese using Model 209
• ISO for all other languages
7. Click OK.
Language selection
The current Language selected in your computer's Operating System is the language you
continue using, and If your andprevails over what is printed on the keycaps of your TEK. computer
your TEK have a anddifferent language, some of the letters symbols printed on the keycaps might
and used by andnot correspond to the letters symbols the computer, as the TEK sends correct letters
the You can lsymbols according to selected language in your computer. earn more at our website:
Supp rt >o Default Layouts
All keys are . as manyfully programmable You can change the logical position of any key, add logical
as you want add special functionality to any key, have ,keys , unique key configurations and have up to
six different outs C keys and s are yourlay at once. ustom layout saved internally so you can connect
TEK to any computer without the need to install any additional software or to reprogram each time.
Yes, is fully programmable beyond what is available DIP switches. earn more atyour TEK via You can l
our website: Supp rt >o Fully Programmable - Custom Layout Designer
DIP switchesEmbedded Numeric Keypad
When required, press the key .( , right of [Fn])[1] NumLock key
When the NumLock is ON, the light indicator below this keycap
turns on, and selected keys on the right hand side of the
keyboard become the numeric keypad. The small symbols and
numbers printed on the front wall of selected keycaps indicate
which keys become the numeric keypad.
The embedded numeric keypad is available only on selected
Operating Systems that support an embedded numeric keypad.
The Embedded Numeric Keypad is non-synchronized. When you press the 's ,
TEK ( )[1] NumLock key
only the Embedded Numeric Keypad of the turns on or off, and no other Numeric Keypad turnsTEK
on or off. As well, when you press the [NumLock] key of any other device, the Embedded Numeric
Please note that f youKeypad of the does not turn on or off. or every key press of the 's
TEK TEK
Embedded Numeric Keypad, it is normal behavior that other NumLock's light turn on momentarily.
The TEK design is PATENTED. Designed in Canada by Truly Ergonomic Ltd. More information available at www.TrulyErgonomic.com
Truly Ergonomic and the Truly Ergonomic logo are trademarks of Truly Ergonomic Ltd. Windows Windows logo a registeredand the re
s Mac OS X and the re strademark of Microsoft Corporation in the United States and other countries. Mac logo a trademark of Apple Inc. registered in
Linux and the re sthe United States and other countries. Linux logo a registered trademark of Linus Torvalds in the United States and other countries.
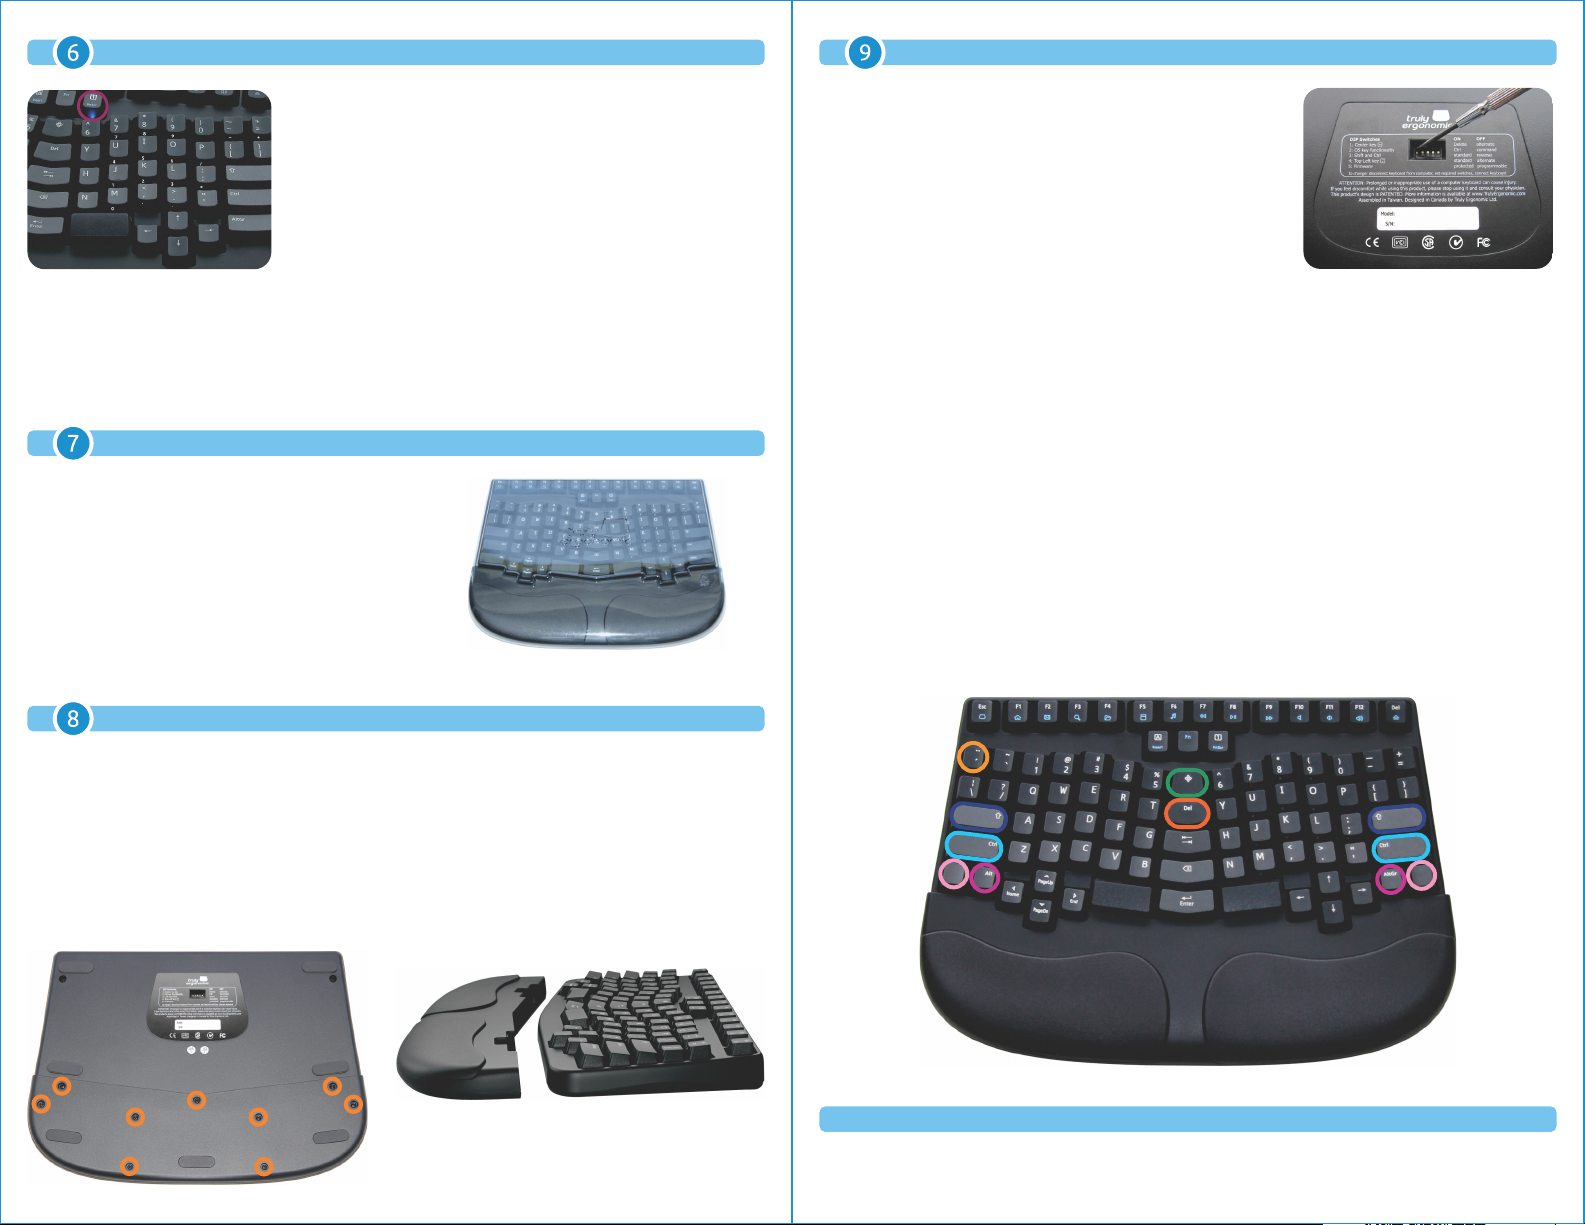
DIP switches are hardware switches located on the underside of
the keyboard that simplify changing the most common settings
of your TEK without the need to install any software.
To change:
1. Install Dustcover and unplug your TEK from your computer.
2. Place your TEK upside down over a soft clean cloth.
3. Set desired DIP switches. A gentle push using the tip of a tool
such as a small screwdriver is all you need to set ON or OFF.
4. Plug in your TEK following instructions on step .
DIP switch #1: [Del]Behavior of the Center key
ON: [Delete]
[International-4] [Fn][International-5]OFF: (07.8A : 0x79), (07.8B : 0x7B) for JIS layout
Operating System key functionalityDIP switch #2:
ON: Windows™: , ,
Windows™ key Left & Right Ctrl Left Alt & Right AltGr
Linux™: , ,Meta key Left & Right Ctrl Left Alt & Right AltGr
OFF: Mac OSX® Model 207: , ,command Left & Right command Left option & Right control
,Mac OSX® Model 209: , ,command Left & Right command Left & Right option Left & Right control
Behavior of the ([Ctrl] or [command] as per DIP #2)andDIP switch #3: [Shift] [Ctrl/command]
ON: standard: in home row, in lower row[Shift] [Ctrl/command]
OFF: reverse: in home row, in lower row[Ctrl/command] [Shift]
Behavior of the Top-Left keyDIP switch #4: [ ]´ ¨
ON: (07.64 : 0x56)[Europe-2]
OFF: Model 207: Additional key for US layout[Tab]
Model 209: (07.89 : 0x7D) for JIS layout[International-3]
Protects or allows Firmware to be reprogrammedDIP switch #5: ÷
ON: Firmware Protected; does not allow programming the firmware
OFF: Programmable; allows firmware to be programmed
Removable and cushioned palmrest
We recommend you keep the included Palmrest installed and only rest your hands when you are not
typing. It is better to "float" your hands while typing.
If you want to remove the palmrest:
1. Install Dustcover and unplug your TEK from your computer.
2. Place your TEK upside down over a soft clean cloth.
3. Use a screwdriver to remove the 9 screws shown below within orange circles. Please be aware that
if you suffer from pain in your hands or wrists, you should ask for help to remove the palmrest.
4. Lift the lower part of the palmrest, and then remove the top part of the palmrest.
5. Plug in your TEK following instructions on step .
Dustcover
Do not discard your Dustcover.
It is designed to protect your TEK from dust and
itunexpected mishaps when you are not using .
Model 209 shown
This manual suits for next models
1
Other Truly Ergonomic Keyboard manuals


