Trumpf quicksharp User manual

quicksharp
DK
DGB FE
INL


Betriebsanleitung
Operator's manual
Manuel opérateur
Istruzioni per l'esercizio
Manual de operatión
Driftsvejledning
NL
Gebruiksaanwijzing
Ersatzteilliste
Spare parts list
Liste des pièces de rechange
quicksharp
06/2000

Operator's manual
quicksharp
06/2000

Ordering information Please state title of document, desired language and date of
edition.
TRUMPF GmbH + Co KG
D-71254 Ditzingen
Johann-Maus-Straße 2
Phone (0 71 56) 303-0
Telefax (0 71 56) 303-540
Internet: http//www.trumpf.com
e-mail: [email protected]
This document has been drawn up by the Technical Documentation Dept. of
TRUMPF GmbH + Co.
All rights to this documentation, especially the right of reproduction and
distribution as well as translation, reserved to TRUMPF GmbH + Co., also in the
case of applications for industrial rights. Without the prior written consent of
TRUMPF GmbH + Co., no part of the documentation, in any form whatsoever,
may be reproduced or processed, copied or distributed using electronic systems.
Errors and technical modifications excepted.
TRUMPF GmbH + Co KG
TRUMPF GmbH + Co. cannot be held responsible for possible mistakes in this
documentation. Any warranty for direct and indirect damages, arising in
connection with the delivery or the use of this documentation, is excluded, as far
as this is legally permissible.

Table of Contents
1. For your safety 4
1.1 Overview of dangers 6
2. Description 7
2.1 Technical data 8
2.2 EC Declaration of Conformity 8
3. Installation 9
3.1 Hydraulic oil container 9
3.2 Grinding coolant container 9
3.3 Power supply 10
4. Operation 10
4.1 Regrinding dies 10
4.2 Regrinding flat punches 12
4.3 Regrinding punches with shear (Whisper Tools) 13
5. Maintenance 15
5.1 Sharpening the grinding wheel 15
5.2 Changing grinding wheels 15
5.3 Adjusting the locating stop 16
5.4 Setting the feedrate 16
5.5 Maintenance 17
5.5.1 Utilities 17
5.5.2 Maintenance intervals 17
6. Troubleshooting 18
B60E Table of Contents 3

1. For your safety
With the quicksharp you have at your disposal a grinding machine
which, in terms of safety, is state-of-the-art and safe in operation.
With the declaration of EC conformity and the CE label on the
machine, we confirm that the quicksharp complies with the relevant
regulations on occupational health and safety as stipulated in EC
Machinery Directive 89/392/EEC.
6840-H 3
1,7
16
M achine N °.
20
Nameplate and CE marking Fig. 24072E
The nameplate, together with the CE marking, is affixed to the rear of
the machine.
Despite all these provisions, however, the machine may still represent
a source of danger if incorrectly operated by untrained personnel or if
used for unauthorized application.
☞In addition to the guidelines provided in this manual, the
general guidelines governing safety and accident prevention
must also be observed!
Authorized application The quicksharp is designed for grinding dies, flat punches and
Whispertools.
Liability voided in the Any application beyond and above this shall be construed as
event of unauthorized unauthorized application. The manufacturer shall not be held liable for
application! any damages resulting therefrom; the entire risk rests solely with the
user.
4quicksharp B60E
Modifications to the Unauthorized changes or modifications to the machine by the owner
machine or the operator are strictly prohibited; the manufacturer shall not be
held liable for any injury to persons or material damage resulting
therefrom.
Instructing the Only authorized, trained and suitably instructed personnel may be
personnel entrusted with the operation, maintenance and service of the machine.
This personnel must receive specialized instruction regarding possible
hazards.
Reading the The complete technical documentation on the machine should be
documentation made available for study to all persons charged by the owner with the
operation, maintenance and service of the machine. It is
recommended that the owner obtain written confirmation from his staff
that they have studied and understood the documentation.
Maintenance work The mains plug must always be disconnected before undertaking any
adjustment, maintenance and service work on the machine unless
indicated otherwise.
Using original parts Original parts and accessories have been designed especially for the
machine. Replacement parts for these original parts and accessories
other than those supplied by the manufacturer of the machine are not
inspected and approved by the manufacturer. The incorporation
and/or use of such products may, therefore, have an adverse effect on
the function of the machine and diminish its safety.
Liability disclaimer The manufacturer shall not be held liable for any damage incurred
through the use of non-original parts and accessories or through
improper installation or exchange of original parts and accessories.
Notes on work safety The technical documentation on the machine provides information on
working safety that is of vital importance for the prevention of injuries
ensuing from hazards to health and life. The symbol on the left calls
your attention to this type of information.
☞For your safety: These statements must be observed without
fail!
B60E quicksharp 5

1.1 Overview of dangers
The following overview is a summary of the potential dangers that the
machine may pose to life and health, and of possible injuries. The
design and construction of the machine, coupled with the safety
equipment installed in compliance with EC machinery directive
89/392/EEC, eliminates danger to persons. Any measures that can be
taken by the user to reduce any residual dangers are indicated in the
overview below.
Type of danger Danger point Danger Extra measures*
Mechanical danger
•Being caught or rolled up •Rotary tool holder Danger of injury -
•Grinding wheel Danger of injury -
•Fluids and gases expelled
under high pressure •Hydraulic hoses Danger of injury -
•Parts ejected at high speed •Workpiece Danger of injury -
Electrical danger
•Due to electrical contact •Direct contact with normally Lethal danger -
live parts
•Indirect contact with parts Lethal danger -
that are live when faulty
Danger from noise emission
•Hearing loss •During the grinding process Health hazard -
Danger from material
•Through contact with or by •Grinding coolant Health hazard •Provide for adequate
inhaling toxic fluids, gases, ventilation
mist, vapors and dust •Use grinding coolants as
specified in operator's
manual (non-chlorinated)
Danger due to faults or
malfunctions •Drives Danger of injury -
•Power supply faults •Control voltage Danger of injury -
•Faulty installation •quicksharp Danger of injury •Note operating instructions
Thermal danger - - -
Danger from vibrations - - -
Danger from radiation - - -
*Extra measures the customer can take to reduce any danger remaining despite the
safety equipment of the machine
6quicksharp B60E
2. Description
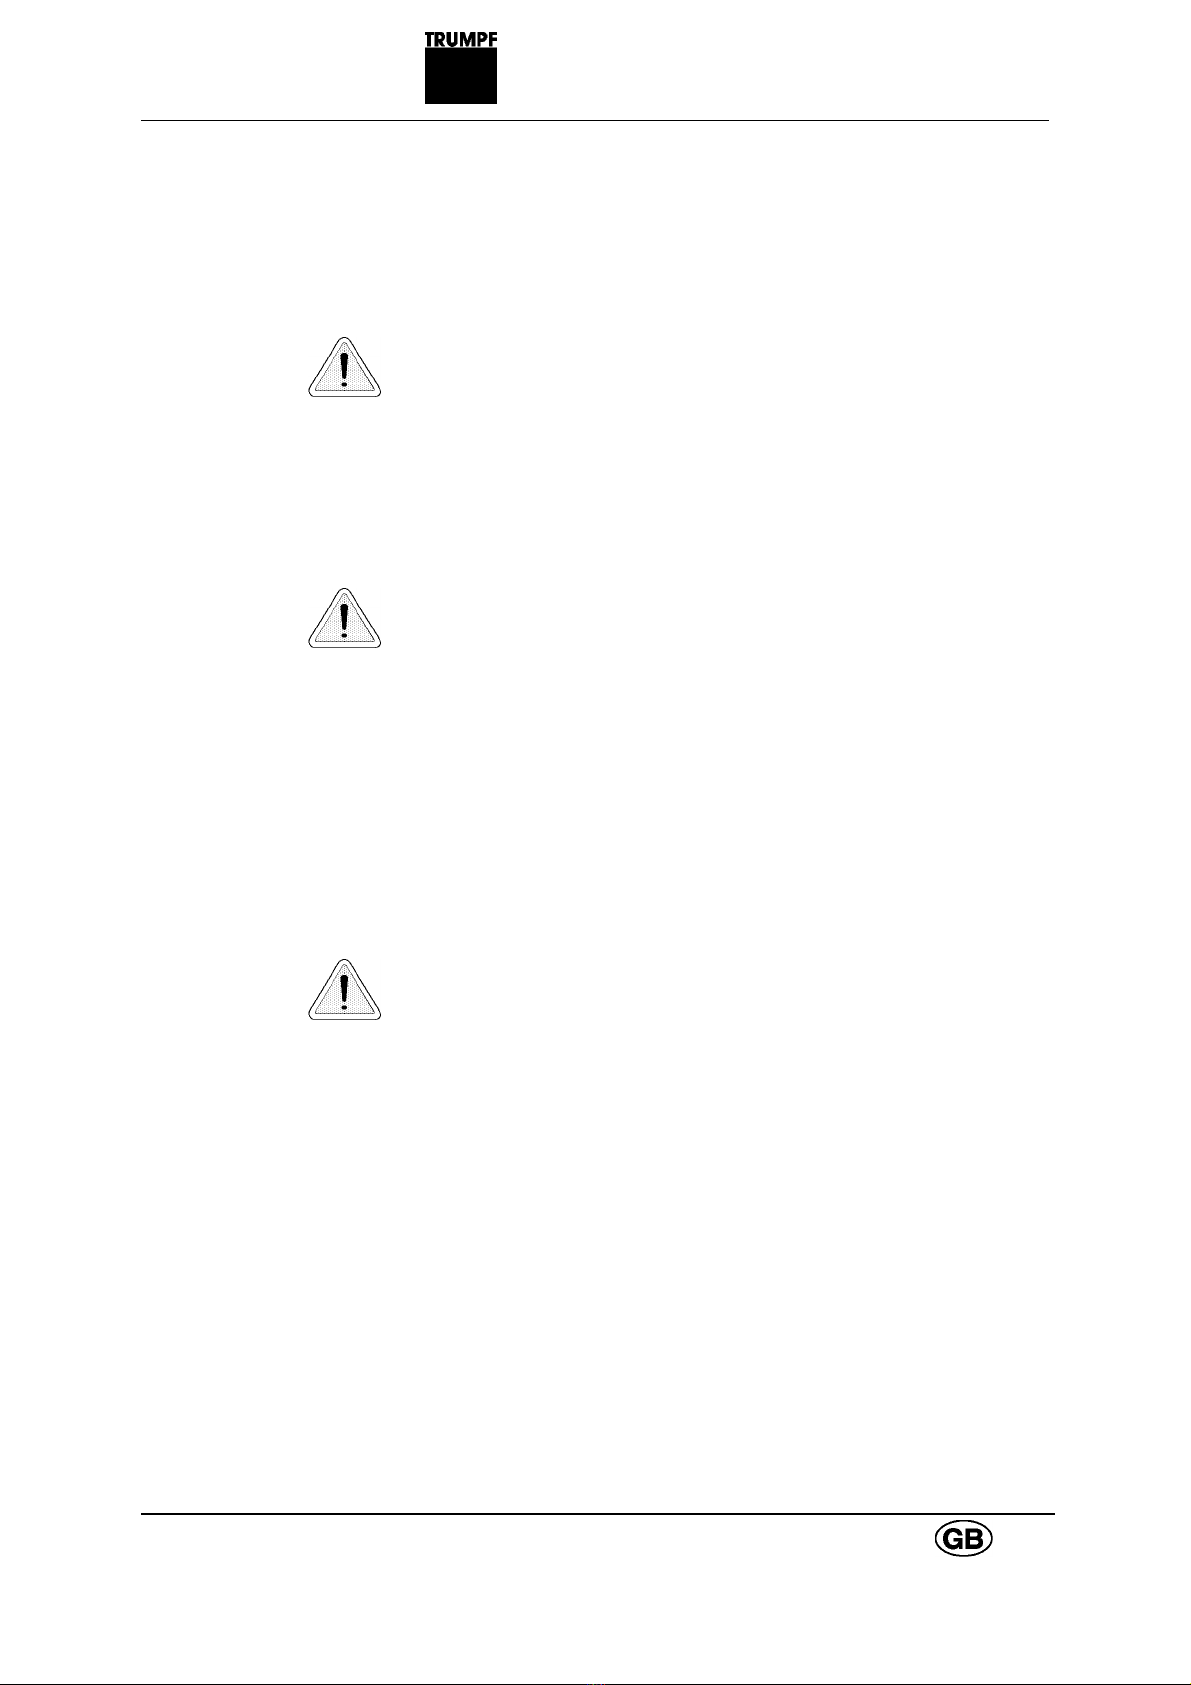
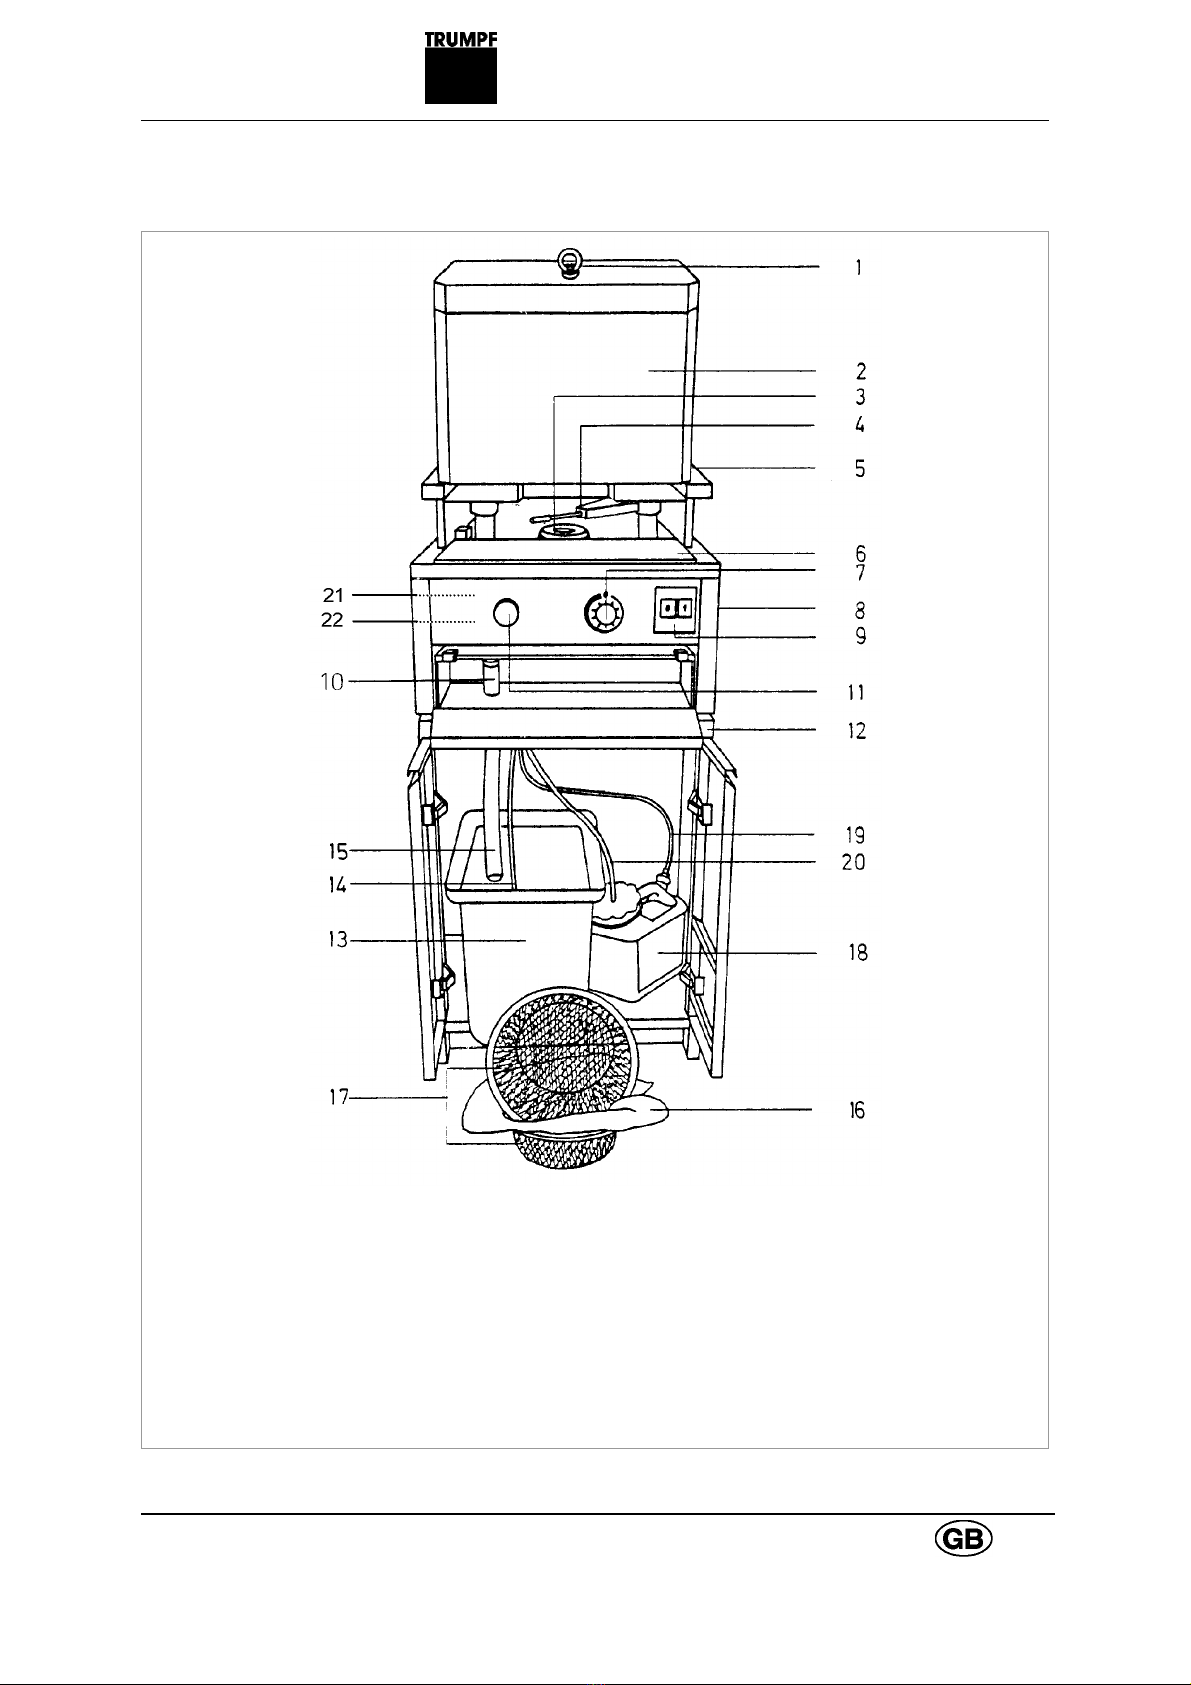
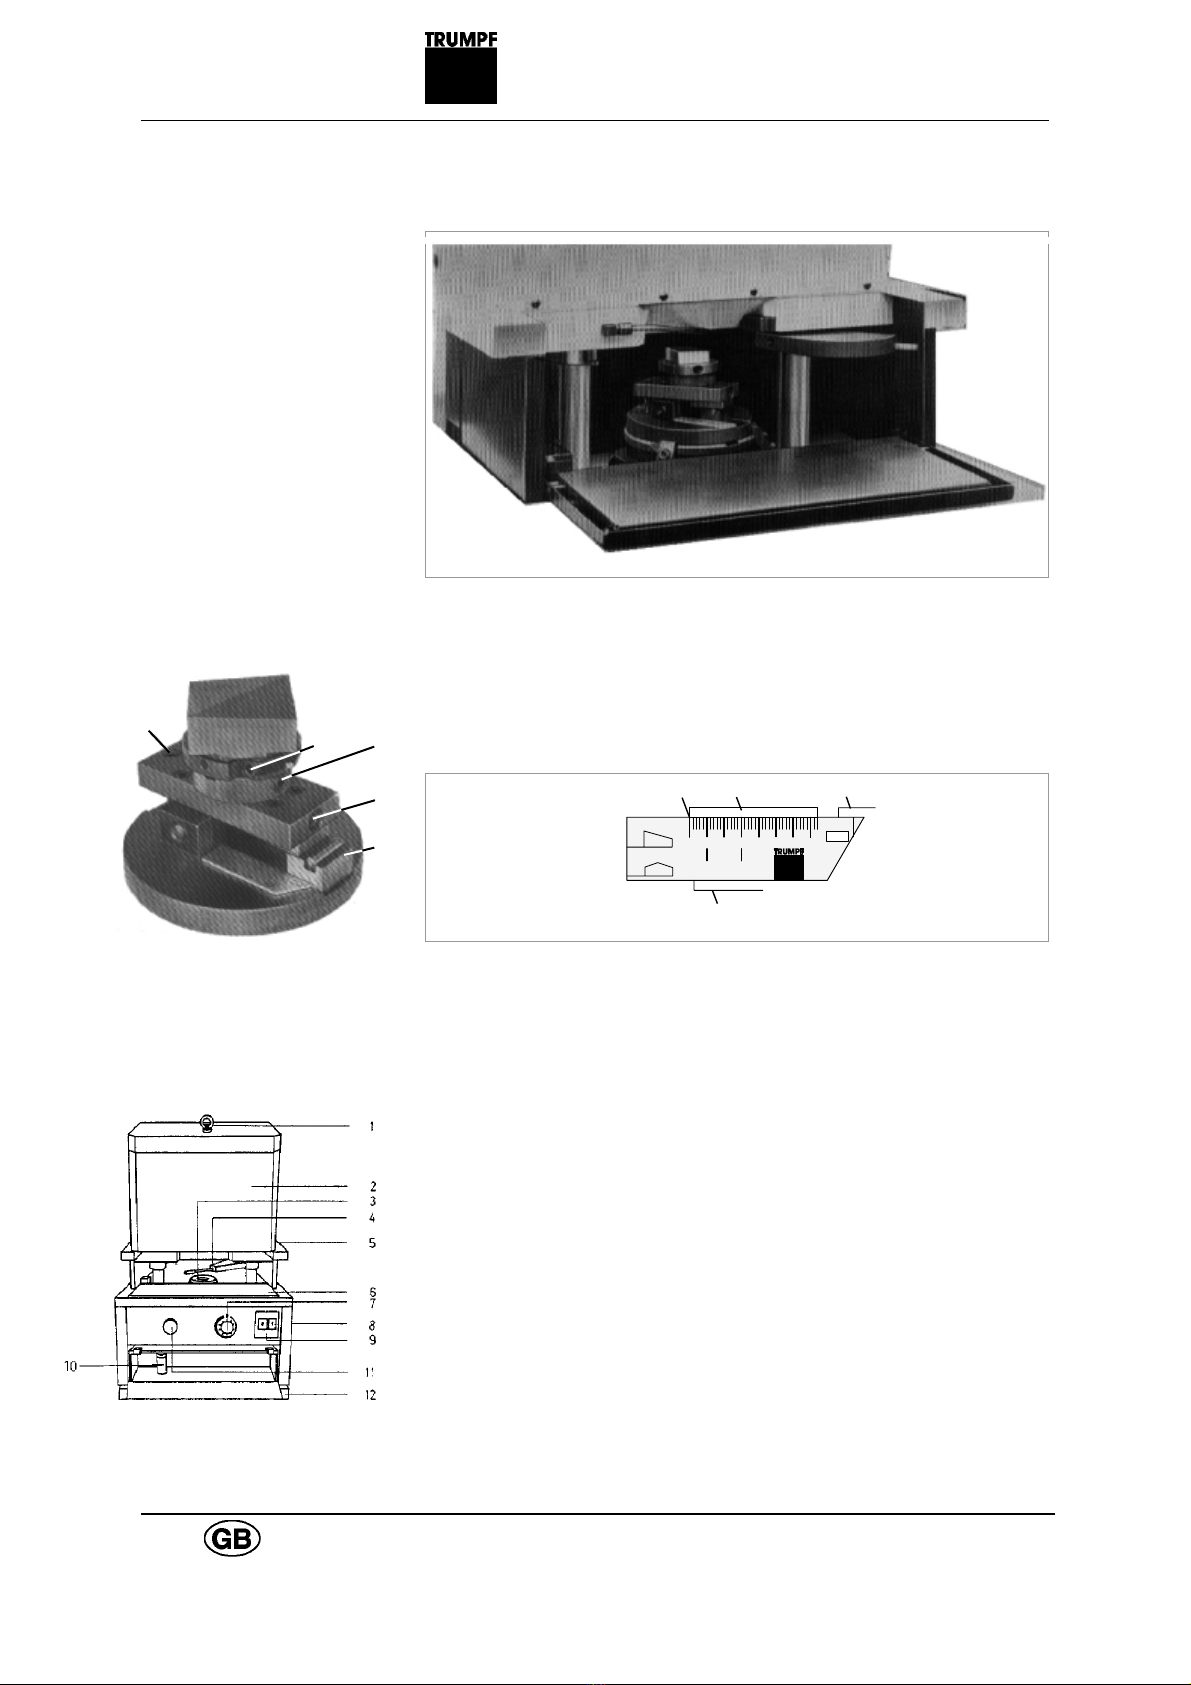
1 Lifting eyebolt 8 Indicator pin 17 Filter screens
2 Enclosure/top 9 Main switch OFF/ON 18 Hydraulic oil container
3 Rotary tool holder 10 Return flow pipe 19 Return hose for hydraulic oil
4 Locating stop 11 Feed button 20 Intake hose for hydraulic oil
5 Hole for brake 12 Base 21 Throttle valve
release 13 Grinding coolant container 22 Relief valve
6 Flap 14 Grinding coolant intake hose
7 Rotary knob for setting 15 Return flow/grinding coolant
the regrind amount 16 Filter paper
quicksharp Fig. 9885
B60E quicksharp 7

2.1 Technical data
quicksharp
Workpiece:
Clamping diameter 150 mm
Min. height 25 mm
Max. height 130 mm
Wheel motor:
Speeds 2800 - 3360 min-1
Voltages 200 - 265 V/350 - 460 V
Cycles 50/60 Hz
Power 1.1 kW
Grinding wheel diameter 125 mm
Grinding wheel height 23 mm
Cutting speed 20 m/s
Workpiece speed 40 min-1
Feedrate 0.1 mm/min
Regrind amount per grinding
operation 0 - 0.5 mm
Dimensions 600 x 600 x 1780 mm
Weight 300 kg
Hydraulic oil - container volume 5 l
Grinding coolant - container volume 20 l
Noise emission The typical A-effective sound level of the
unit is lower than 70 dB(A).
2.2 EC Declaration of Conformity
as defined by EC Machinery Directive 89/392/EEC, Annex IIA
We herewith declare that the machine indicated below, owing to its
engineering concept and construction and the model as introduced on
the market, complies with the relevant essential safety and health
provisions stipulated in the EC directive.
This declaration shall lose its validity if any changes are made to the
machine without our authorization.
Machine designation: Tool Grinding Machine
Machine type: quicksharp
Applicable EC directives: EC Machine Directive 89/392/EEC;
91/368/EEC, 93/44/EEC
EC Low Voltage Directive
(73/23/EEC)
EC-EMC Directive (89/336/EEC)
Applied harmonized stan-
dards, in particular: EN 292-1, EN 292-2, EN 60 204-1,
EN 55022, EN 55014
Hans Klingel
Director of Development
TRUMPF GmbH + Co.
D-71254 Ditzingen
8quicksharp B60E
3. Installation
•Check consignment for completeness and for any signs of damage
incurred during transit
•Use the lifting eyebolt (1) when lifting the unit (screw the bolt in all
the way). For safety reasons, the grinding machine and the base
should be transported separately
•Take care not to damage the hoses (14, 15)
Installation:
•Run the power cable to the rear of the machine
•Run the transparent return hose (15) through the base and clamp
to the return pipe (10) with a hose clip
•Run hoses (14, 15, 19, 20) through the cabinet top to the
containers (see connections below)
•Remove the lifting eyebolt after transport has been completed
•Open flap (6), release brake (5) (insert a hexagon screwdriver
SW6 in the tapped hole to push the pin back)
•Lift the top (2) and remove the transport safety (Styrofoam)
•Lower the top (2) approximately 50 mm, swing locating stop (4) to
the right and close the flap (6)
3.1 Hydraulic oil container
54
7
1
8
9
6
3
2
Connection:
•Unscrew the nut (7) and remove the cap (1)
•Attach the hose (4) and tighten the nut (7)
•Open lid (2), remove end plate (3)
•Insert hose (5) without filter (6) through lid (2)
•Mount filter (6) on hose (5)
•Add hydraulic oil as specified in "maintenance"
•Replace the lid (2)
3.2 Grinding coolant container
Prepare the grinding coolant:
•Mixture ratio: 1 : 30 (0.6 - 0.7 liters of Henkel P3-MULTAN 41-3 to
20 liters of water)
•Clean container (13) and fill it with grinding coolant
•Run intake hose (14) with filter (6) into the container
•Insert the filter paper (16) between the filter screens (17)
•Hang the filter screens into the container; the return flow/grinding
coolant must reach into the filter screens
B60E quicksharp 9

3.3 Power supply
The power supply plug should be attached to the connection cable by
an electrician in compliance with local regulations. Voltage is factory-
set by the manufacturer for the requirements in the country of
operation.
Check direction of rotation of the hydraulic pumps:
•Remove enclosure (2)
•Main switch (9) ON
•Both pumps must rotate in direction of arrow (clockwise)
•Pull the feed button (11) - the green indicator pin (8) must pop out
4. Operation
Basics Sharpen your tools regularly
Recommended regrinding amount: 0.1 - 0.2 mm
Approximate values The approximate values below serve as an aid for correct setting:
Punch*Die
∅(mm)/Size 30 76 I II
Scale value 1-2 2-3 2-3 3-4
*not Whispertools
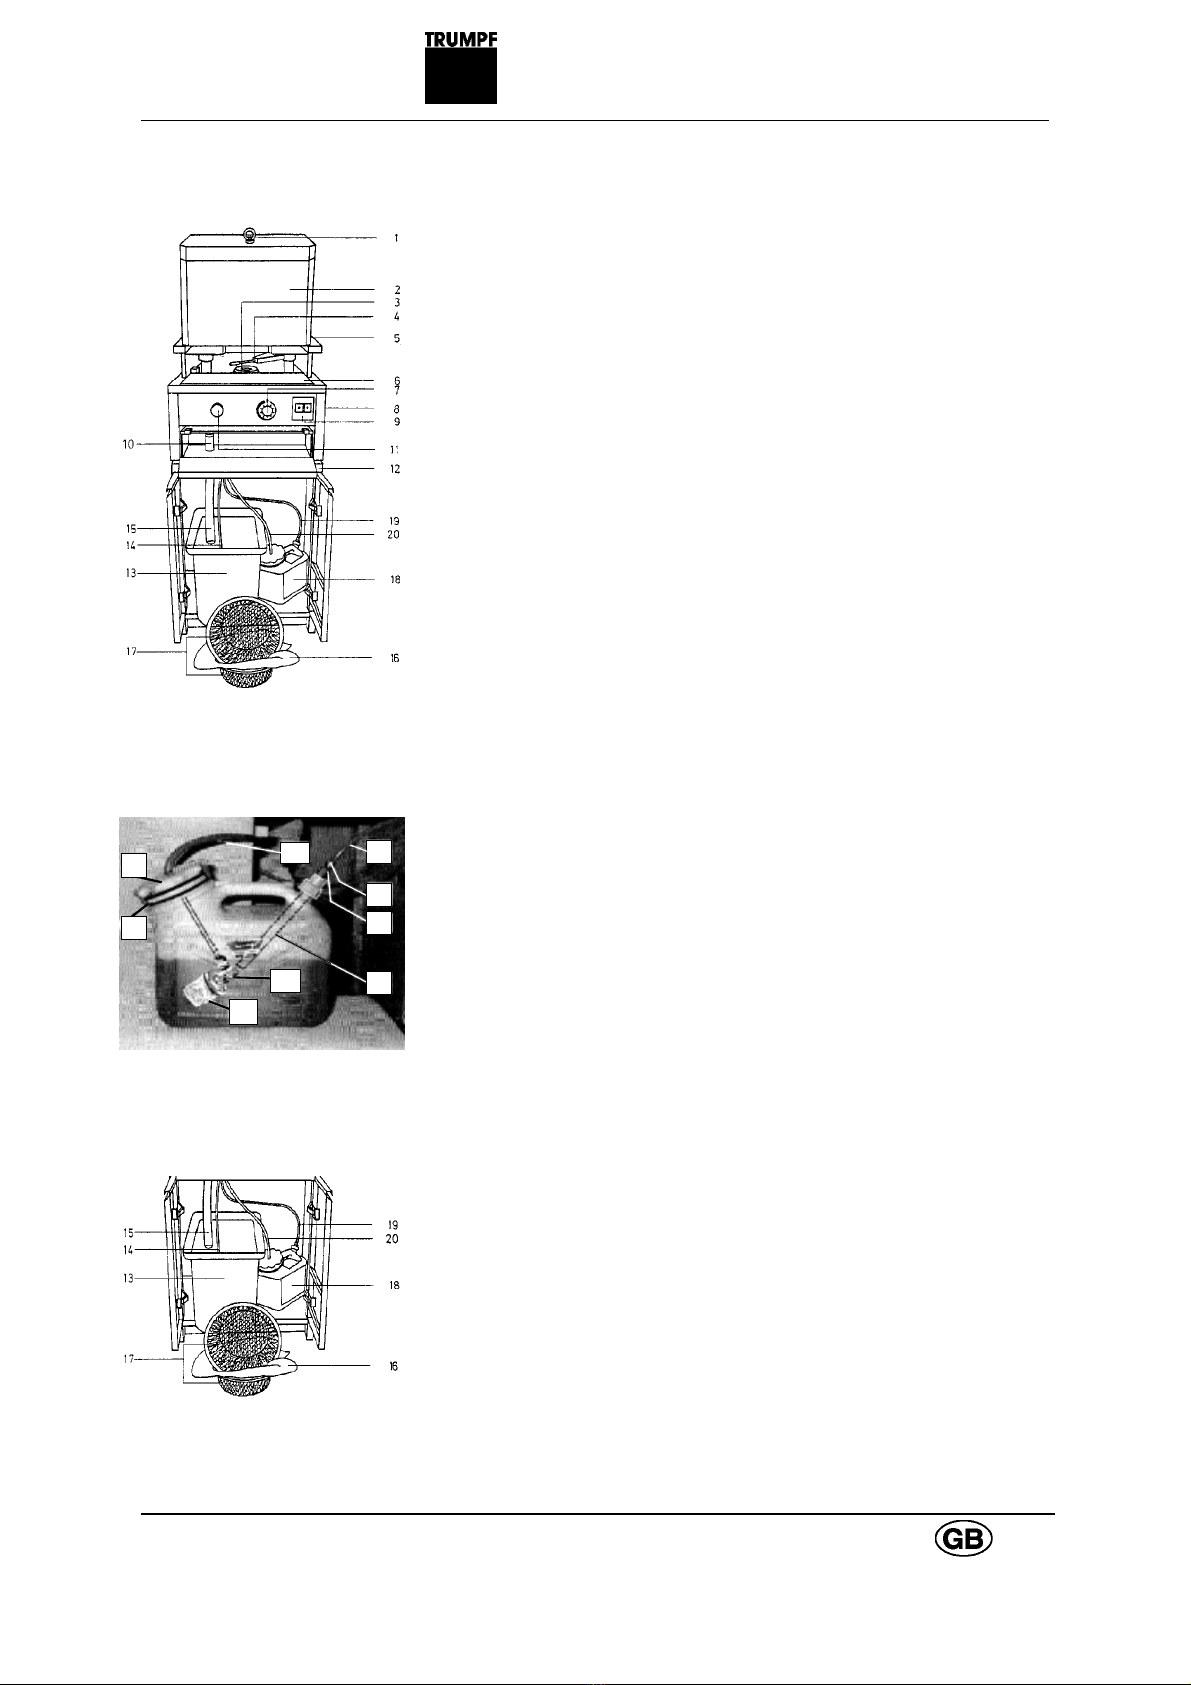
4.1 Regrinding dies
Regrinding dies Fig. 9892
Procedure •Insert die in a suitable adapter ring.
•Lock die in adapter ring onto the rotary tool holder with the
clamping jaws (loosen hex. screw on jaws and tighten)
10 quicksharp B60E

•Swing the locating stop (4) to the left; a certain amount of
resistance must be overcome when doing so
•Lower the top until the locating stop rests on the die - then swing
the stop back to the right
•Close flap (6); the machine cannot be started with the flap open
•Set the desired regrind amount at the rotary knob (7)
•Main switch (9) ON
•First pull, then press the feed button (11)
•Grinding takes place automatically. The quicksharp switches off
automatically when the grinding process is finished.
Regrinding Multitool In preparation for grinding, Multitool dies must be raised and shimmed
dies in the die holder.
☞Automatic grinding can be interrupted any time by pulling the
feed button (11).
As a visual aid, the green indicator pin (8) becomes visible at
the end of the automatic grinding cycle. The quicksharp
switches off automatically when the grinding process is
finished.
Suitable die clamping fixtures (see spare parts list) must be
used when sharpening dies from other manufacturers.
B60E quicksharp 11
4.2 Regrinding flat punches
Regrinding flat punches Fig. 9893
Procedure •Insert punch (with alignment ring) into the punch grinding fixture
•Tighten screws (1, 2 and 5)
4
2
3
1
5
•Loosen screw (4)
•Position slide (3) with red marker to the scale section for flat
punches (3):
50 60 7040
10080
12 3
4
Sine rule Fig. 9894
•Tighten screw (4)
•Swing the locating stop (4) to the left; a certain amount of
resistance must be overcome when doing so. Raise the top (2).
•Lock the punch grinding fixture on the rotary tool holder (3) with the
clamping jaws (loosen hex. screw on jaws and tighten)
•Lower the top until the locating stop rests on the punch - then
swing the stop back to the right
•Close flap (6); the machine cannot be started with the flap open
•Set the desired regrind amount at the rotary knob (7)
•Main switch (9) ON
•First pull, then press the feed button (11)
•Grinding takes place automatically. The quicksharp switches off
automatically when the grinding process is finished.
12 quicksharp B60E

☞Automatic grinding can be interrupted any time by pulling the
feed button (11).
As a visual aid, the green indicator pin (8) becomes visible at
the end of the automatic grinding cycle. The quicksharp
switches off automatically when the grinding process is
finished.
Suitable clamping fixtures must be used (see spare parts
list) when sharpening punches from other manufacturers.
4.3 Regrinding punches with shear
(Whisper Tools)
Differentiation Punches may have a shear on one or both sides:
•up to 72 mm outer circle diameter (corner dimension, diameter):
shear on one side
•outer circle diameter over 72 mm: shear on both sides (roof-
shaped).
Procedure •Insert punch (with alignment ring) into the punch grinding fixture
•Loosen screw (4)
4
2
3
1
5
•Position slide (3) with red marker to the scale section for punches
with single or roof-shaped shear. Set the values in the scale
section according to the outer circle diameter (corner dimension,
diameter) of the punch in mm:
50 60 7040
10080
12 3
4
Sine rule Fig. 9894
B60E quicksharp 13

•Scale section (1): for Whispertool punches max. 35 mm outer circle
diameter
•Scale section (2): for Whispertool punches with shear on one side
(35 - 72 mm outer circle diameter)
•Scale section (4): for Whispertool punches with roof-shaped shear
(outer circle diameter over 72 mm)
4
2
3
1
5
•Tighten screw (4)
•To make sure the punch face you want ground is exactly level, use
a height gauge
•Tighten screws (1, 2 and 5)
•Swing the locating stop (4) to the left; a certain amount of
resistance must be overcome when doing so; raise the top (2)
•Lock the punch grinding device on the rotary tool holder (3) with
the clamping jaws (loosen hex. screw on jaws and tighten)
•Lower the top until the locating stop rests on the punch - then
swing the stop back to the right
•Close flap (6); the machine cannot be started with the flap open
•Set the desired regrind amount at the rotary knob (7)
•Main switch (9) ON
•First pull, then press the feed button (11)
•Grinding takes place automatically - Roof-shaped punches must be
turned 180˚in the grinding device; to do so, loosen screw (2, top
Fig.), turn by 4 notches, tighten screw (2)
•Main switch (9) ON
•First pull, then press the feed button (11) - grinding takes place
automatically. The quicksharp switches off automatically when the
grinding process is finished.
☞Automatic grinding can be interrupted any time by pulling the
feed button (11).
As a visual aid, the green indicator pin (8) becomes visible at
the end of the automatic grinding cycle. The quicksharp
switches off automatically when the grinding process is
finished.
14 quicksharp B60E

5. Maintenance
For safety reasons, the mains plug must always be disconnected
before undertaking any maintenance work on the machine unless
indicated otherwise.
5.1 Sharpening the grinding wheel
☞Sharpen the wheel regularly!
When? If the grinding noise increases, the ground surface shinier and the
workpiece hotter than when the grinding wheel is sharp, the later
should be sharpened.
Procedure •Clamp the sharpening device (with corundum block protruding at
least 3 mm) onto the rotary tool holder
•Slide the locating stop to the left; a certain amount of resistance
must be overcome when doing so, and lower it carefully onto the
top of the corundum block
☞Caution: The corundum block may fracture!
•Then slide the stop to the right
•Loosen attachment of corundum block - pull it out upward 10-15
mm - clamp corundum block
•Close flap. The machine cannot be started with the flap open
•Main switch ON
•First pull, then press the feed button
•Pull the feed button once the visibly rapid descent of the top stops;
this improves sharpening results!
•To switch off: Main switch OFF
5.2 Changing grinding wheels
Attachment The wheel is attached with 3 screws and has 3 free tapped holes.
Dismantling the old •To dismantle, loosen the 3 fastening screws, thread them into the
grinding wheel free tapped holes and press the wheel out by applying uniform
pressure.
Mounting the new •Clean the flange faces
grinding wheel •Screw the new grinding wheel on
•Make sure the 2 small coolant tubes are directed straight onto the
wheel face (clearance: approx. 1 mm)
•Set the locating stop
B60E quicksharp 15

5.3 Adjusting the locating stop
When? The locating stop must be reset every time the grinding wheel is
replaced or sharpened:
2
1
3
1 Setting screw
2 Grub screw
3 Handle
Locating stop Fig. 9898
Procedure •Loosen grub screw (2)
•Insert hex. screwdriver SW6 into one of the holes on the setting
screw (1) - then turn setting screw to the left until the locating stop
rests lightly against the grinding wheel
•With hex. screwdriver SW6 turn to the right by 1 mark of the scale
on the setting screw (1)
•Using a feeler gauge, make sure there is a 1/10 mm gap between
grinding wheel and locating stop; if necessary, readjust the setting
screw (1)
•To lock: Tighten grub screw (2) using an Allen key
5.4 Setting the feedrate
The feedrate is correctly set at the factory and should not be re-
adjusted. (Cycle time approx. 3 1/2 - 4 1/2 min).
If no other recourse is available, the feedrate can be set - at working
temperature - at the throttle valve located behind the back cover of the
machine using a spanner SW32.
16 quicksharp B60E

5.5 Maintenance
5.5.1 Utilities
Lubrication point Quantity Recommended lubricant Designation Viscosity
Hydraulic oil container 5 l ARAL Vitam GF 32 or Vitam DE 32 HLP/HLPD ISO VG 32
BP Energol HLP 32 DIN 51525
CASTROL Hyspin AWS 32
ELF ELFOLNA HMD 32
ESSO TERESSO 32
FUCHS RENOLIN MR 10
MOBIL DTE 24 or 25
SHELL Tellus Oil DO 32 or DO 46
Grinding coolant 0.7 l / Henkel P3-MULTAN 41-3
container 20 l CASTROL Syntilo 81-E
(oil for grinding coolant)
5.5.2 Maintenance intervals
Interval Work to be done
After 8 h •Take the dirt bowl out of the rotary tool holder and rinse it out
•Check the hydraulic oil and grinding coolant
•Replace filter paper in coolant container as soon as filtration
effect diminishes
After 40 h •Clean the entire machine
•Lubricate locating stop using a grease gun
After 160 h •Clean the grinding coolant container
•Change the coolant, assure proper disposal of waste grinding
coolant
After 500 h/ •Remove hood, raise the motor bridge and
half-yearly lubricate ball bearings with slideway oil
•Check the fittings on the pumps for proper seating
After 4000 h •Replace the hydraulic oil and bleed the system at
the throttle valve, assure proper disposal of waste oil
B60E quicksharp 17
Table of contents
Popular Grinder manuals by other brands

Performance Tool
Performance Tool W50003 owner's manual

BW Manufacturing
BW Manufacturing DG-16 Operating & maintenance instructions

Ryobi
Ryobi P420 Repair sheet

Hitachi
Hitachi G 13VA Handling instructions

Parkside
Parkside 90983 Operation and safety notes translation of original operation manual

Parkside Performance
Parkside Performance PWSAP 20-Li B2 Operation and safety notes translation of the original instructions


