Trusted Clean Quench User manual


TABLE OFCONTENTS
SafetyPrecautions4
HandleAssembly 5
Machine Operation6
MachineMaintenance& Storage7
PartsLists8-13
WiringDiagram14
SAFETYPRECAUTIONS
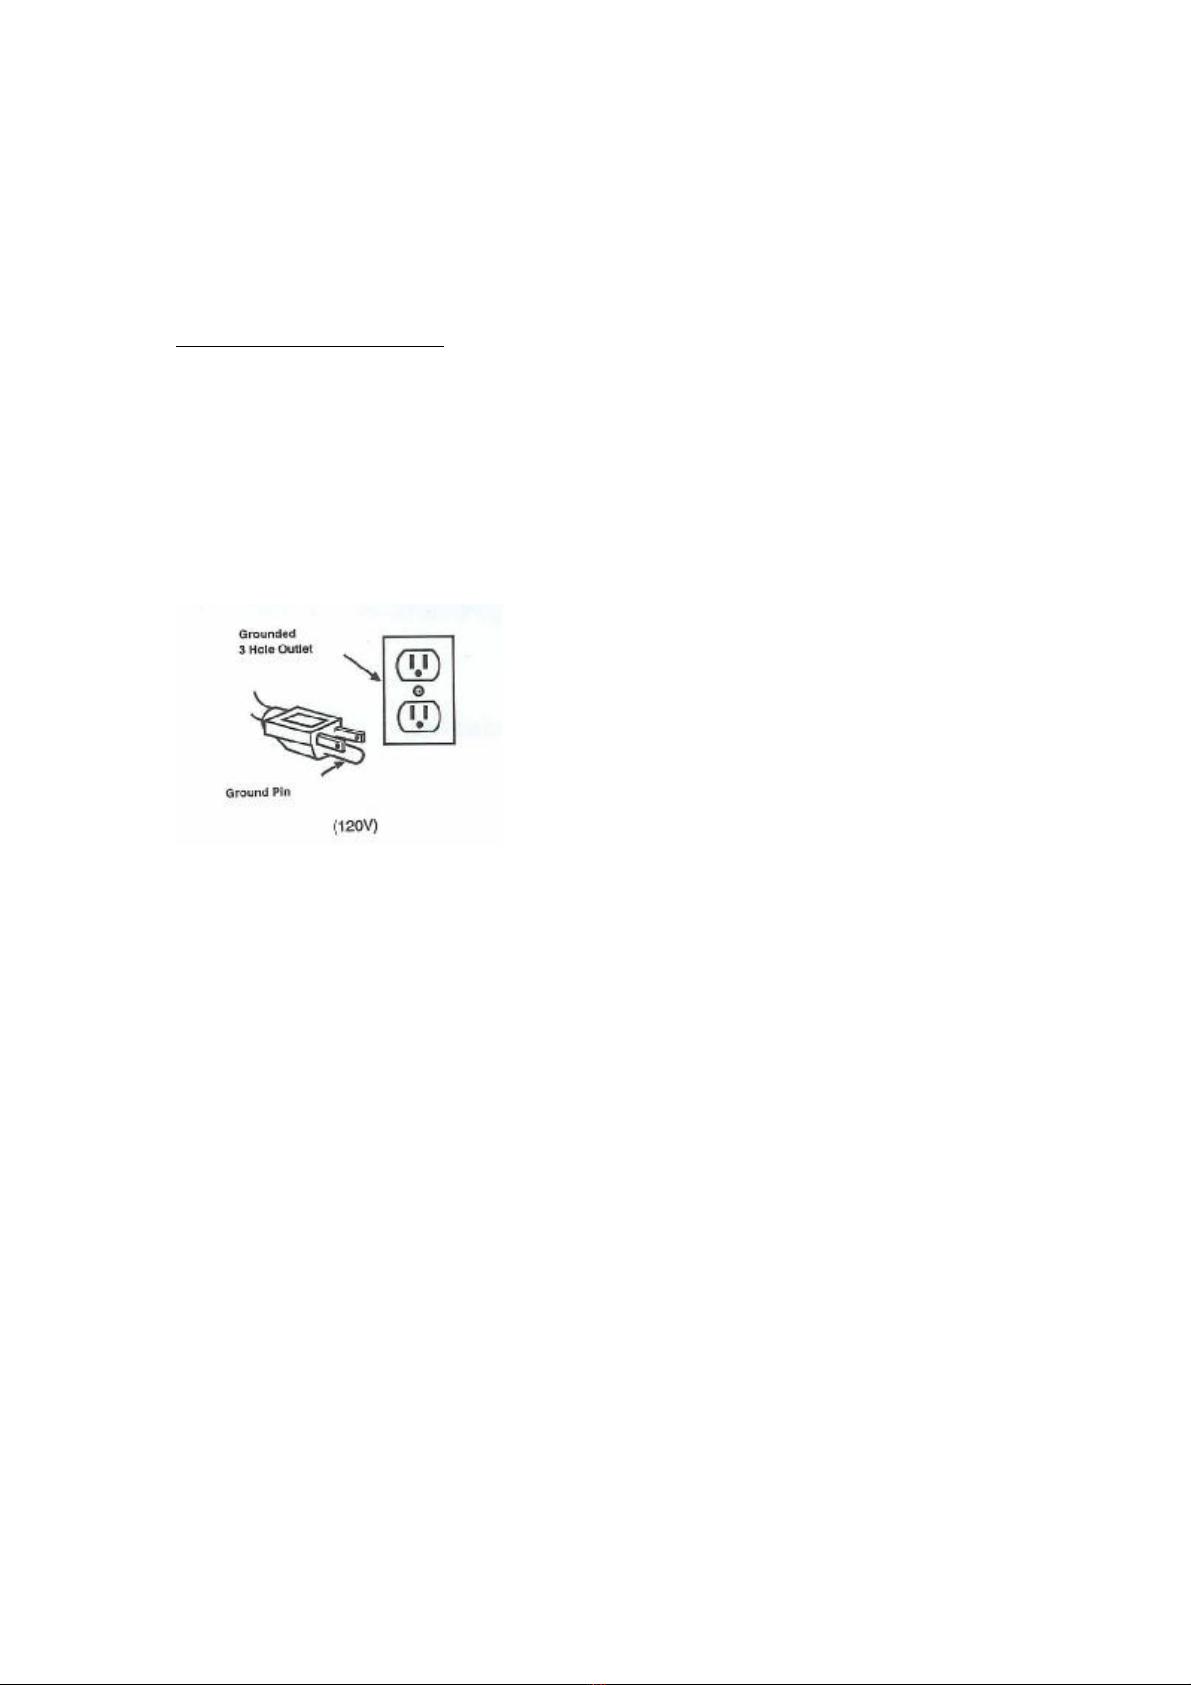
!!! Thismachinemustbegrounded!
Groundingprovidesthepathofleast
resistanceforelectricalcurrent.To
reducetherisk of electricalshock
shouldthemachinemalfunction,the
machinehasaspecialgroundingplug.
Donotremovethegroundpinunder
anycircumstances!
Thismachineisintendedforcommercial
use.Itisconstructed foruseinan
indoorenvironmentandisnotintended
foranyotheruse.Useonly
recommendedaccessories.
All operatorsshall read, understand
andexercisethefollowingsafety
precautions:
1)Donotoperatemachine:
-Unlesstrained andauthorized
-Unlessyouhavereadand
understandoperatorsmanual
-Inflammableorexplosiveareas.
-Withdamaged cordorplug.
-Ifnotinproperoperatingcondition.
-Inoutdoorareas.
-Instandingwater.
-Withoutbag/filtersinplace.
-Withtheuseofextensioncords.
2)Beforeoperatingmachine:
-Makesureallsafetydevicesare
inplaceandoperateproperly.
3)Whenusingmachine:
-Donotrunmachineovercord.
-Donotpull machinebycordor
plug.
-Donotpull cordaroundsharp
edgesorcorners.
-Turnpowerswitchto off prior
tounpluggingmachine.
-Donotunplugbypullingonthe
cord.
-Donotstretchcord.
-Donothandleplug withwet
hands.
-Keepcordawayfromheated
surfaces.
-Donotpickupburningor
smokingdebrissuchas
cigarettes,matchesorhot
ashes.
-Reportmachinedamageor
faultyoperationimmediately.
4)Beforeleavingorservicingmachine:
-Turnoff machine.
-Unplugcordfromoutlet.
5)Whenservicingmachine:
-Unplugcordfromoutlet.
-Usemanufacturersuppliedor
approvedreplacementparts.
4
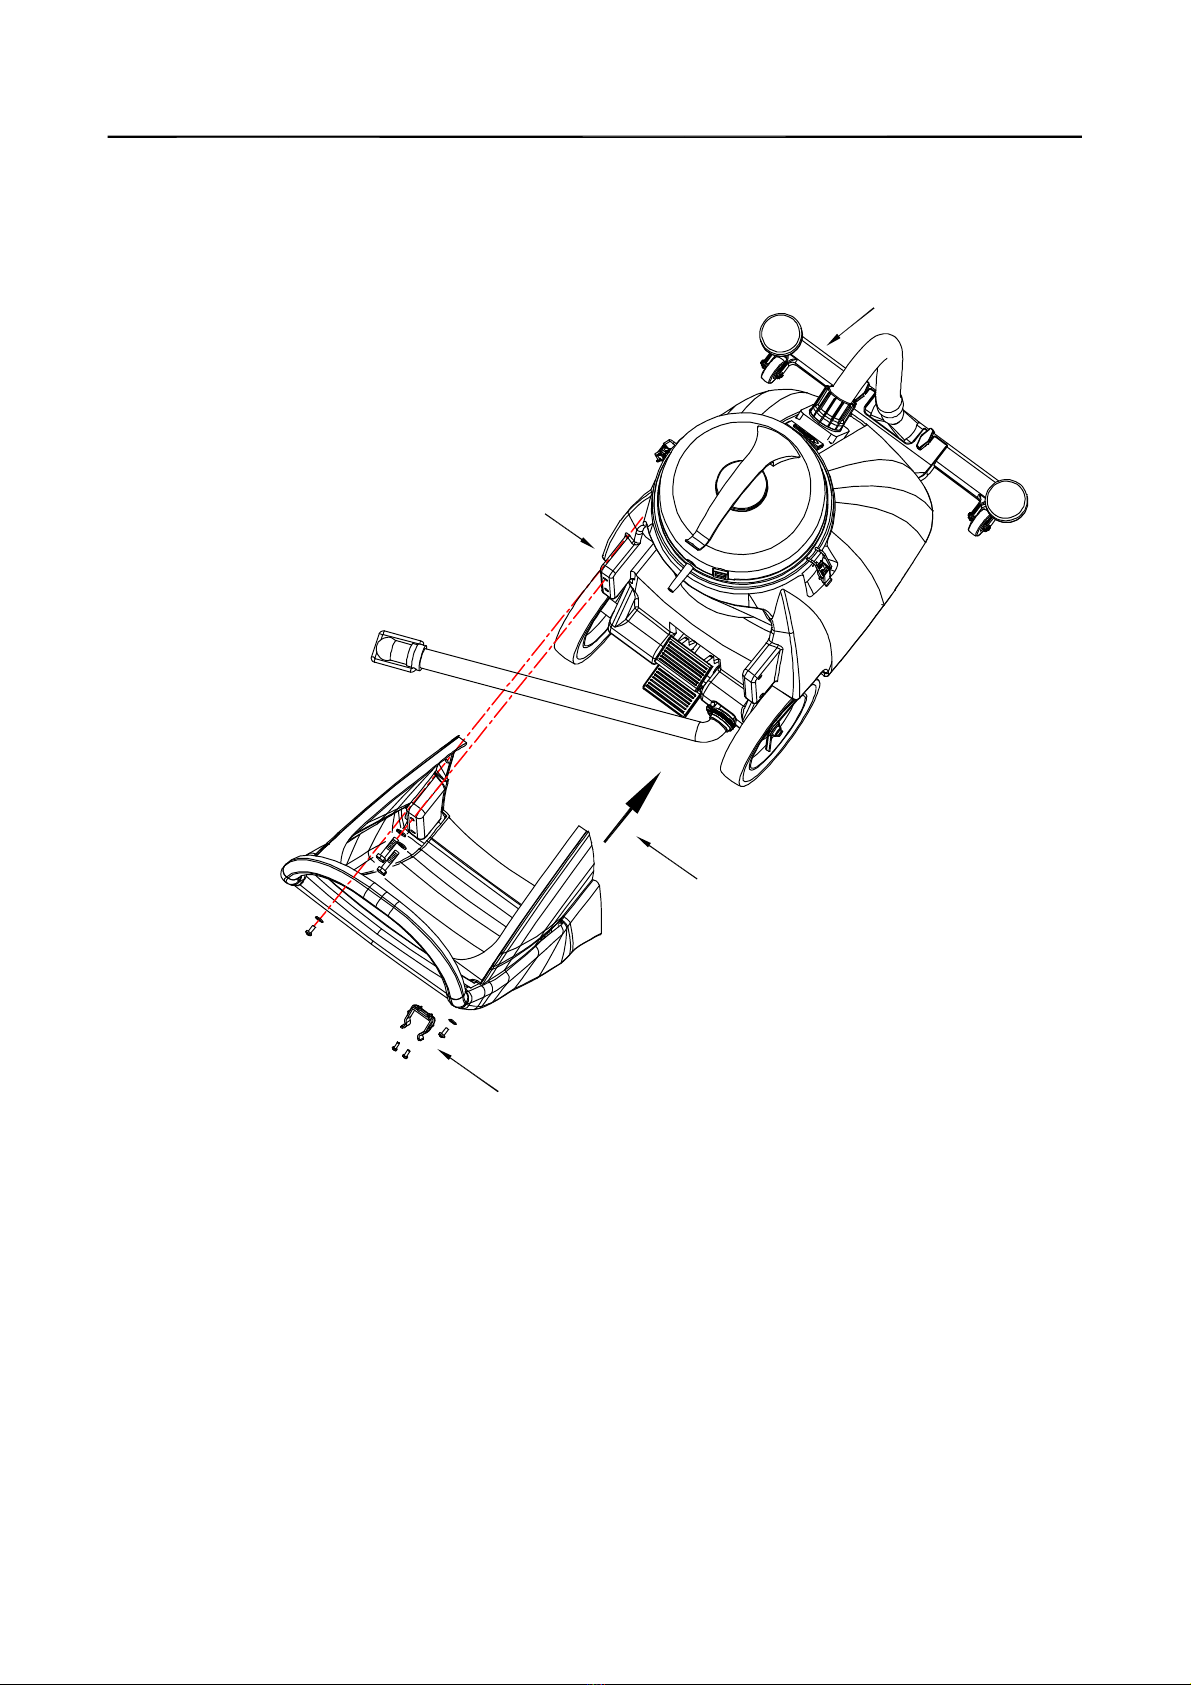
HANDLEASSEMBLY
Attaching Handle
1]Removehandlefromshippositionandremoveupperhandlemountingscrews
frommachine(Figure1).
2]Realignhandleasshownandreplacescrews&washers (Figure2).
3]Attachrearhosedumpclamp(Figure3).
4]Attachfrontmountsqueegee(Figure4).
HANDLEASSEMBLYINSTRUCTIONS
Figure1
Figure2
Figure3
Figure4
5

OperationofWet&DryVacuum
*Readoperatorsmanualthoroughlypriorto
operatingorservicingthismachine.
WETPICKUP
1]Removevacuumheadandremovethecloth
orpaperfilterfrom vacuum,install the
bubblebuster.
2]Whilevacuumheadisremoved,checkto
makesurethatthefloatshut-offis
unobstructedandfullyfunctional.
3]Replacevacuumheadandlatch itin place.
4]Connectvacuumhosetoinletonthe
machinebody.
5]Attach appropriateaccessorytoolforthe
jobtobecompleted.
6]Plug powercordintoagroundedoutlet.
*Donotuseanextensioncordin conjunction
withthestandardpowercord.
7]Ifusingthefront-mountedsqueegee
assembly,besurethatsqueegee isattached
tofrontofmachine.
8]Ifusingthefront-mountedsqueegee
assembly,lowersqueegee tothefloorby
depressingthetophalfofthepedal[rearof
themachine]forwardwithyourfoot.
9]Turnpowerswitch to on”position.
10]Duringwetpickup,thefloatshut-offwill
automaticallypreventwaterfromentering
therecoverytankoncetherecoverytankis
full.
*Iffoamdevelopsintherecoverytankduring
wetvacuuming,usede-foamerchemicalto
helpeliminatethefoam.Foamwillnotactivate
thefloatshut-off,andtherefore,maycause
vacuummotordamage.
11]Toraisethesqueegee assemblybackto
transport position,depress thebottomhalfof
thepedal[rearofthemachine]downwardwith
yourfoot.
*Besurethatthehandleisproperly
assembled onmachinebodypriortooperating
machine.
*Theshovelnosewet dryvacuumincludes
theGV25014”bubble buster”blue nylonfoam
suppressionbag. Thisbagmustbe used inall
wetpick-upapplications.Failuretousethebag
willvoidthewarrantyonthevacuummotor.
DRY PICKUP
1]Removevacuumheadandbubblebuster,
andbesuretheclothorpaperfilteris
properlyinstalled.
*Donotoperatemachinewithoutbagorfilter
properlyinstalled.
2]Replacevacuumheadandlatch itin place.
3]Connectvacuumhosetoinletonthe
machinebody.
4]Attach appropriateaccessorytoolforthe
jobtobecompleted.
5]Plug powercordintoagroundedoutlet.
*Donotuseanextensioncordin conjunction
withthestandardpowercord.
6]Turnpowerswitch to on”position.
7]Checkthefilterbagperiodicallytosee ifitis
full.Foroptimalperformance,replacebag
whenitis3/4 full.
DRAININGTHERECOVERY TANK
1]Unplug machinefrom poweroutlet.
2]Transport machinetonearestfloordrain or
bucket.
3]Removedrain hosefromrearofmachine.
Removeball plug from drain hose,anddrain
thecontentsofthetank.
4]Afterthecontentshavedrained,remove
thevacuumheadandrinserecoverytank
withcleanwater.
5]Replacetheball plugonthedrain hoseand
hanghosebackontherearofthemachine.
lTopreventodorsintherecoverytank,
removethevacuumheadwhenmachineis
notinoperationtoallowairtocirculate.
6

MAINTENANCE
Tokeepthemachineperformingwell formany
years,pleasefollowthefollowing
maintenanceprocedures.
* Alwaysconfirmthatthemachineis
unpluggedpriortoperformingany
maintenanceorrepairs.
1]Drain andrinserecoverytankaftereach
use.
2]Cleanfloatshut-offaftereach use.
3]Checkbagtosee ifitisfullaftereachuse.
Replacebagwhenitis3/4 full.
4]Cleanoutsideofmachinewithamild
cleaner.
5]Checkpowercordforany damage. Ifany .
6]Cleansqueegee bladeswithacloth.
*Donotuseyourfingerstowipetheblades!
7]Checkvacuumhoseforholesandclogs.
8]Lubricatewheels,castersandaxleswitha
waterresistantlubricanteverymonth.
9]Checkmachineforlooseormissingnuts
andbolts, andreplaceasnecessary.
*Aftereach usein awetpick-upapplication,
removetheGV25014 “Bubble Buster”blue
nylonfoamsuppressionbagandrinseitwith
cleanwater.Thiswillaidinpreventingany
build-upwhichcanreduceairflow.
STORAGE
1]Unplug machinefrom powersource.
2]Storein uprightpositionin adryarea.
3]Storewithsqueegee assemblyoffthe
ground.
4]Storewithvacuumheadoffunitsothat
tankmaybreathe.
7

B
PARTSLIST
VACUUM GROUP
8

40994
80865
DIA
NO
PA
RT
NUMBER DESCRIPTION NO
REQ'D
1GT10004 HANDLE 1
2VFREADMANUALLABEL 1
3VASERIALTAG 1
4VA80874 1
5GT10003B COVER, VACHEAD 1
6GT13001 ST5x12 PH 3
7GT10019 UPPERCOVER, MOTOR 1
8GT13004 ST5x20 PH 1
9GT13034 ST5x50 PH 4
10 GT13033 ST5x44 PH 6
11 VA13470 ST3x16 PH 2
12 VA21517 CLAMP, BLOCK 1
13 VA65001 CABLE POWER 1
14 VA21521 GROMMET,POWERCORD 1
15 VA91346 ON/OFF SWITCH 1
16 GV15002 MOUNTINGCOVER, MOTOR 1
17 FC25002A MOUNTINGPLATE MOTOR 1
18 VA41032 GASKET, MOTOR 2
19 ZD49000A VACMOTOR 115V 1
20 GV25002 SEALPLATE 1
21 GV15004A MOUNTINGBASE MOTOR 1
22 GV15006 GASKET, MOUNTINGPLATE 1
23 GV25010 FILTERSCREEN 1
24 GV25013 WATERGUARD 1
25 GV25006 TRUMPET 1
26 GV25003 POLE, BALL 1
27 VF14090 "O" RING 1
28 GV25009 BALL 1
29 GV0014 VACUUMFILTERASSY 1
30 GV25014 BUBBLEBUSTER 1
VACUUM
GROUP PARTS
LIST
FOR
CPL18VAC
9
WARNING LABEL
PARTSLIST
10
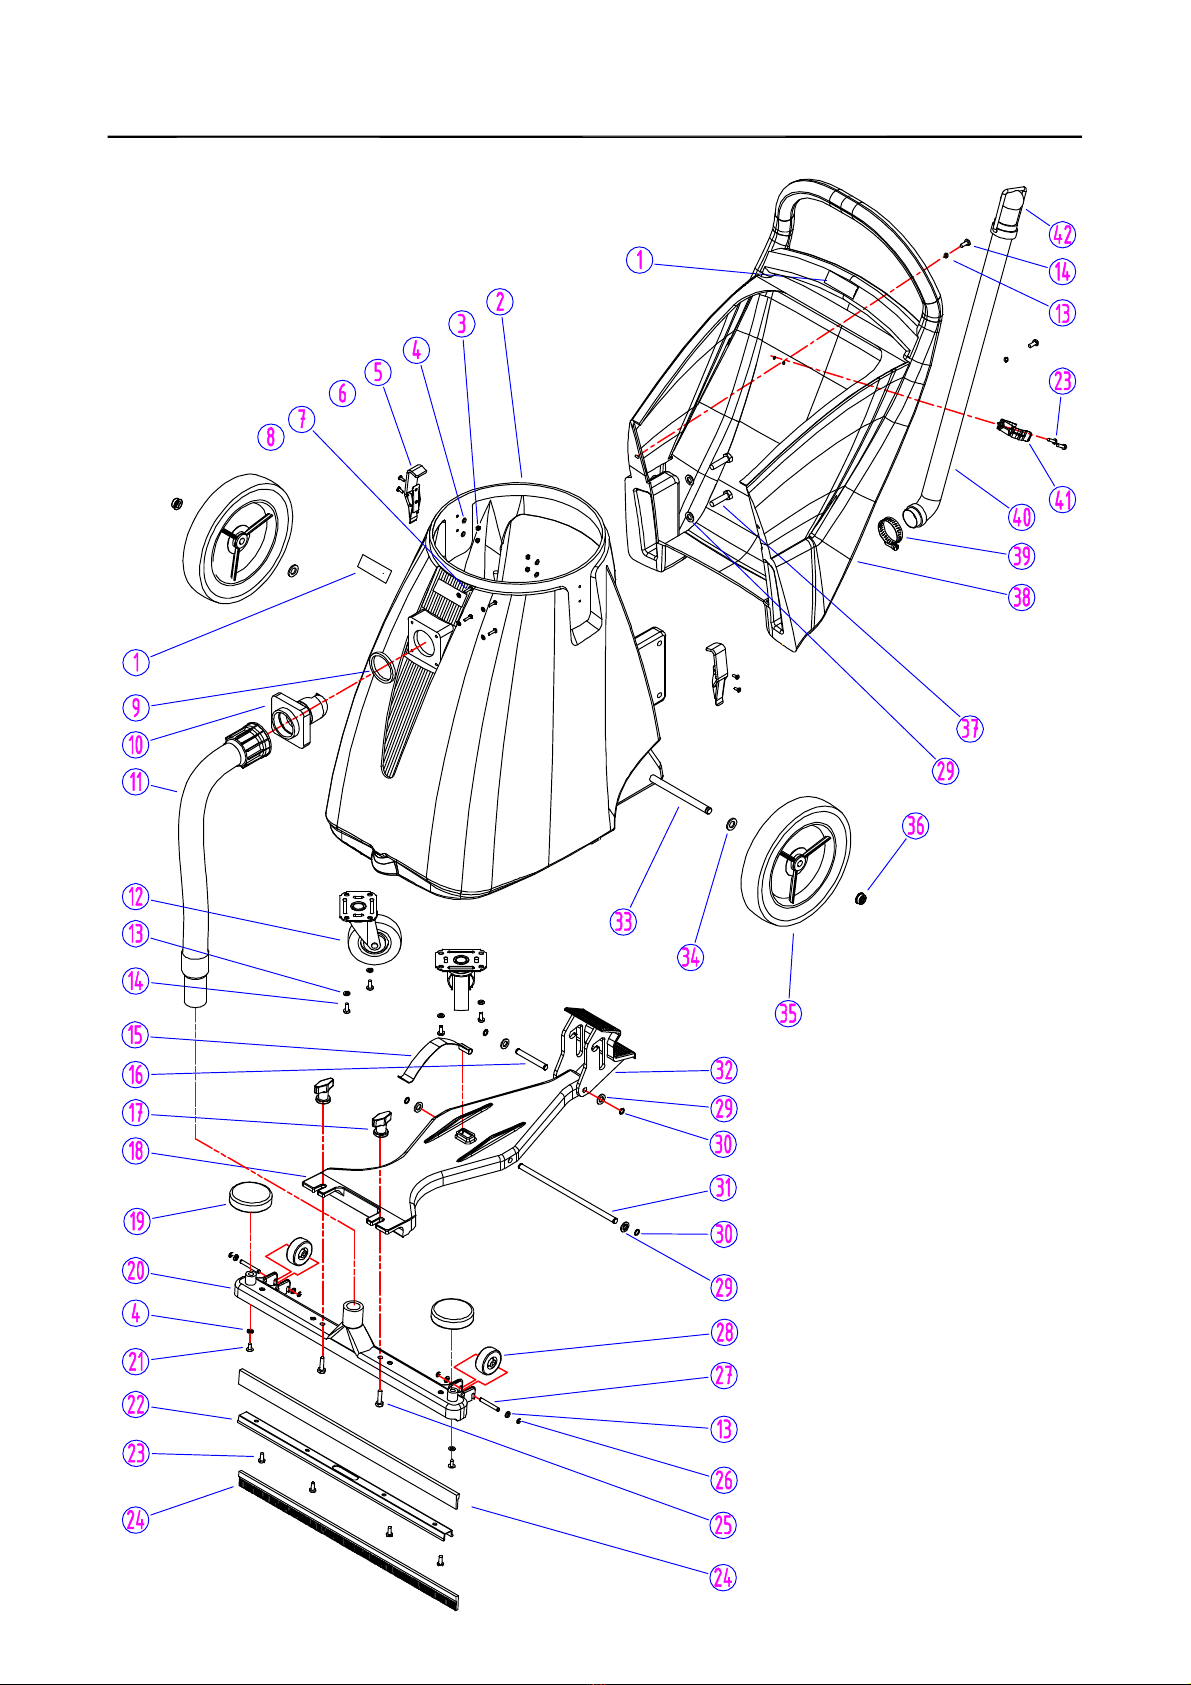
TANK GROUP

10011
DIA
NO
PA
RT
NUMBER DESCRIPTION NO
REQ'D
1VA80864 LOGO LABEL 2
2VA75001 TANK 1
3GT13022 NUT, M5, NYLONINSERT 4
4VF13474A WASHER 6
5VA21595 CATCH 2
6VA14010 SCREW, M5x20 4
7VA14004 SELF-TAPPINGSCREW, ST4x20 4
8VA13483 WASHER 4
9VA21514 GASKET 1
10 VA21513A INTAKE 1
11 VA85018 HOSEASSEMBLY 1
12 VA91342 3.5"CASTER 2
13 VF13600 WASHER 10
14 VF13495 SCREW, M6x16 6
15 VA75005 LEAFSPRING 1
16 VA75013 AXLE 1
17 VA85003 KNOB 2
18 VA75006 MOUNTINGPLATE, PICK-UP TOOL 1
19 VA75007 BUMPER 2
VA85002 BODY, PICK-UP TOOL24" 1
VA75008 BODY, PICK-UP TOOL30" 1
21 VA13471 SELF-TAPPINGSCREW, ST5x10 2
VA85001 CLAMP, BLADE, 24" 1
VA75009 CLAMP, BLADE, 30" 1
23 VV20501 SCREW, M5x14, PH 6
VA85007 BLADE, 24" 2
VA75010 BLADE, 30" 2
25 VA13491 SCREW, M8x25 2
26 VA85005 LOCK 4
27 VA85004 AXLE, WHEEL 2
28 VA91345-8 WHEEL, 2" 2
29 VF13516 WASHER 8
30 VA14001 LOCK 4
31 VA75011 AXLE, MOUNTINGPLATE 1
32 VA75012 PEDAL 1
33 VA75003 AXLE, PEDAL 1
34 VV60113S WASHER 2
35 VA75004BD 10"WHEEL 2
36 VV CAP, AXLE, WHEEL 2
37 VA14002 SCREW, M10 x50 6
38 VA75002 HANDLE 1
39 VV10113 CLAMP 2" 1
40 VA93208A DRAINHOSE 1
41 GV70034 CLAMP, DRAINHOSE 1
42 VA20104A PLUGDRAINHOSE 1
TANK
GROUP PARTS
LIST
FOR
24
20
22
11
CPL18VAC
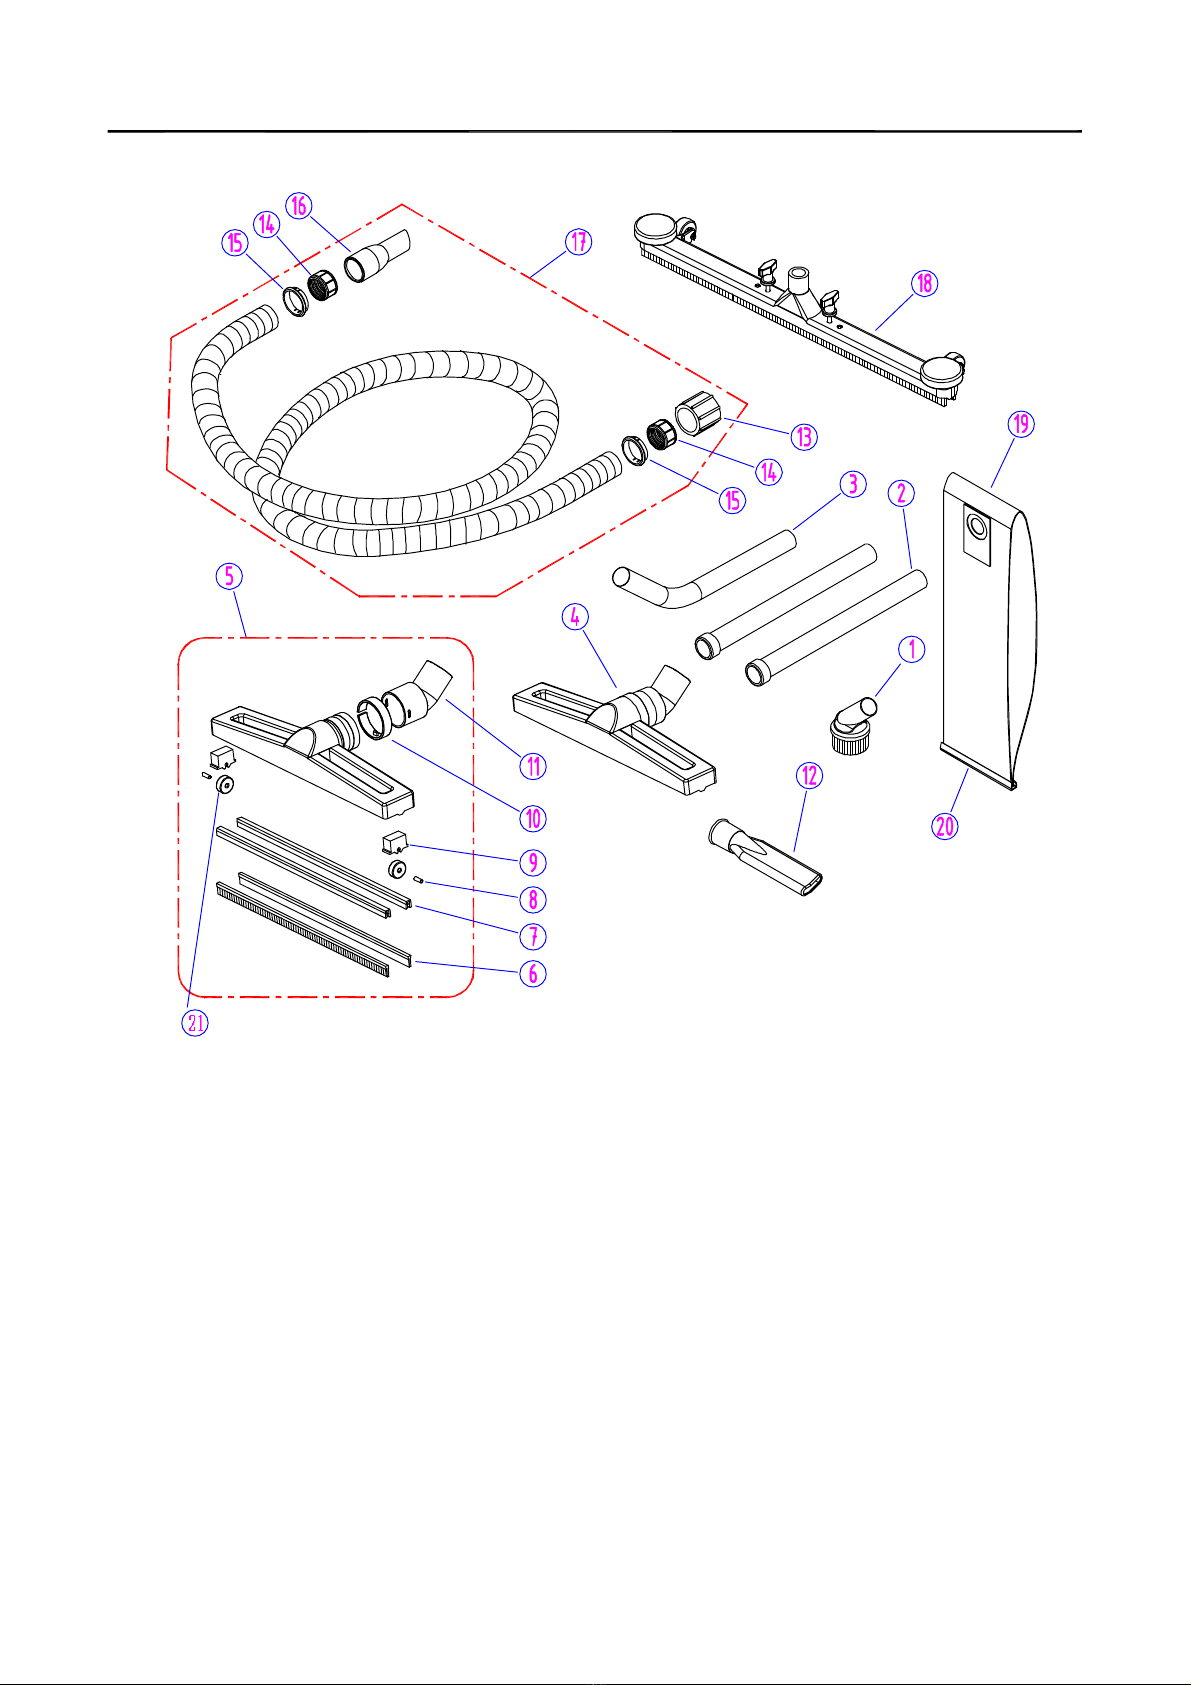
ACCESSORIES
12

21 2
o
20246
DIA
NO
PA
RT
NUMBER DESCRIPTION NO
REQ'D
1VA20803 DUSTINGTOOL 1
2VA20248 TUBE 2
3VA20209 WAND 1
4GV0040-D DRYPICK-UP TOOL 1
5GV0040-W WETPICK-UP TOOL 1
6VA20207-8 RUBBERBLADES, 400mm 2
7VA20207-5A SEAT, BLADE, 400mm 2
8VA20413 PIN, WHEEL 2
9VA20207-4 SEAT, WHEEL 2
10 VA20207-3 CLIP, FLOORTOOLADAPTER 1
11 VA20207-2 FLOORTOOLADAPTER(38mm) 1
12 VA20806 CREVICETOOL 1
13 VA20201 MACHINEEND 1
14 VA20202 THREADEDINSERT 2
15 VA20203 CLIP RING 2
16 VA20206 ANGLEDHOSEEND, 38mm 1
17 VA20288 HOSEASSY 1
VA00001 24"FRONT MOUNT SQUEEGEE ASSY 1
VA00002 30"FRONT MOUNT SQUEEGEE(OPTIONAL)ASSY 1
VA00005 24"DRYPICK-UP TOOLASSY(OPTIONAL) 1
19 VA75020 CLOTHBAG,DUST(OPTIONAL) 1
20 VA75020-1 CLIP, CLOTHBAG(OPTIONAL) 1
18
ACCESSORIES PARTSLISTFOR
13
VAROLLER
CPL18VAC

Black
White
Green
WiringDiagram
Power
Supply
Cord
SJT16/3C
Blue
White
Switch
G/Y
Motor
14
CPL18VAC
This manual suits for next models
1
Table of contents


