TTW Group mi-witness hd User manual

MI-Witness HD User Guide v1.0

Contents
Designed by TTW Group 2
Guarantee & Copyright
Safety precaution
Special features
Mi-Witness HD key components
Parts overview
Mi-Witness HD installation
Image recording
Operational status LED guide
Operational audio guide
Mi-Viewer software guide
Mi-Viewer mobile application
Micro SD card format
Firmware upgrade
Customer support & nationwide installation
Product specification
Guarantee and extended guarantee
3
4
6
7
8
10
14
16
17
18
27
33
34
35
36
37

Thank you for buying our Mi-Witness HD product
This instruction manual contains information on the main functions of Mi-Witness HD. Please read and understand these
instructions prior to installing and operating this product. The contents of this manual are subject to change without user's
prior consent.
□This product is an auxiliary images recording device for a vehicle. Storing the recorded images on a memory card through the
product (camera) mounted in the vehicle. Checking the recorded footage is done through a private program or video playback
(display) program.
□The recorded images on this product is supplementary data that can be used to determine incident circumstances.
□This product is an auxiliary device recording and storing images at the time of car accidents but it is not guaranteed to record all
the images of accidents. The moment of the accident occurring from slight shock may not be recorded because shock sensing
sensor would not work normally, and any images may not be recorded due to malfunction of the product caused by careless use
or incorrect installation.
□Depending on user environment, the performance and features of this product can be limited or unusable.
□Our company is not responsible for any data loss or recording equipment malfunction that can happen when our customers are
using this product.
□Please backup important images at all times for the precautions against data loss caused by product failure or malfunction.
□MI-Witness HD is the registered trademark of TTW Group.
□This manual is protected by copyright law.
□The copyright to all the materials is owned by TTW Group and any reproduction and use without authorization is prohibited.
Guarantee & Copyright
Designed by TTW Group 3

Safety precaution (1/2)
Designed by TTW Group 4
Please read the following precautions to ensure user safety
Please be informed of the precautions to protect user's safety and prevent property damage. Also, if you do not use the product
correctly, it will be cause product failure and abnormal operation. Please feel free to contact Mi-Witness HD customer
support center (technical@mi-witness.co.uk) for product failure, repair and other matters regarding the use of product.
□Do not disassemble, repair and remodel (convert) this product yourself, it may cause fire, electric shock and malfunction.
□If water or foreign objects get into the product, quickly disconnect the electrical power.
□Do not adjust the product whilst driving as this may cause an accident, only do this whilst the vehicle is stationary.
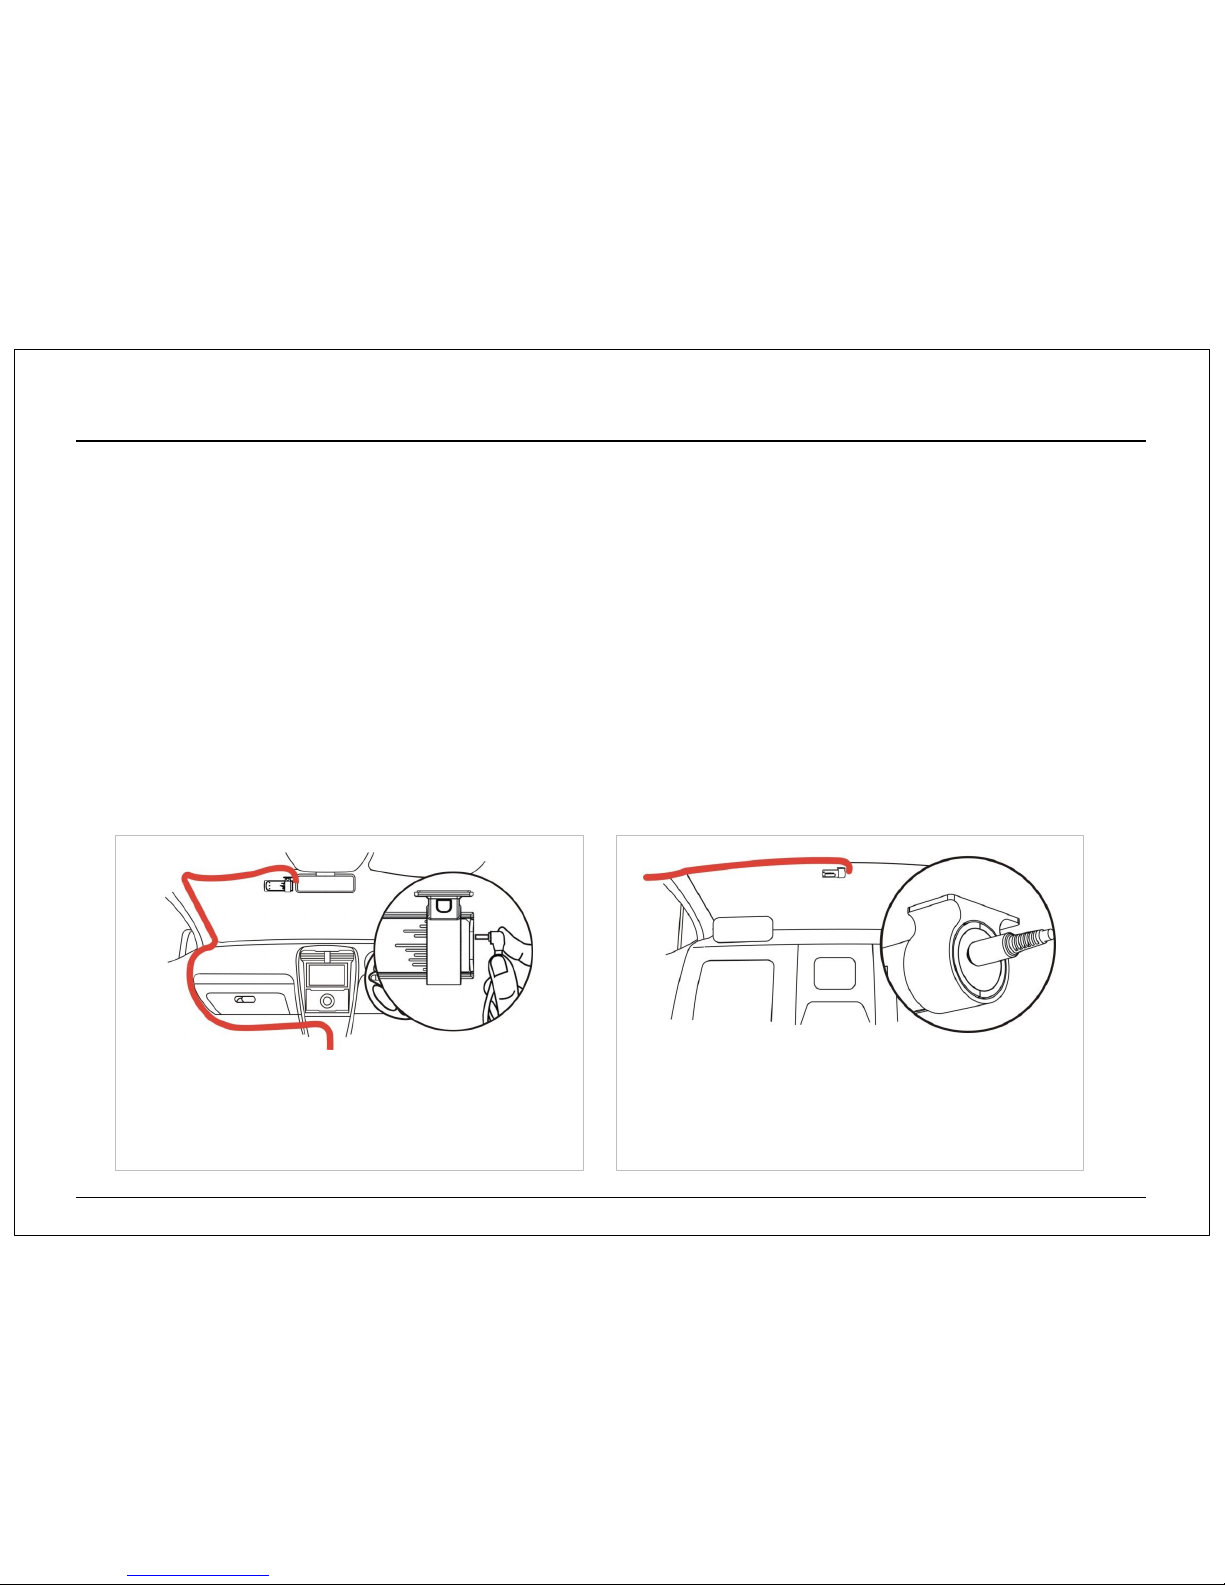
□Please install this product in a suitable place where the driver's field of vision is not obstructed.
□You must use the power cable supplied by the manufacturer. Please do not use a damaged or converted power cable because
this may lead to damage to the product or even fire/explosion.
□Please always keep the power cable terminals clean. It can be the cause of overheating and fire.
□Do not handle this product with wet hands or you may be electrocuted.
□If water/wax and other liquid substances get into this product, it may cause discoloration, deformation and breakdown.
□If you install this product in a place where the surrounding temperature and humidity is high, it may cause breakdown.
□If you install this product in a place where highly inflammable liquid or gas is nearby, it can be the cause of fires and explosions.
□Please keep this product out of the reach of children and pets.
□The product should be disconnected quickly, via the power cable, from the vehicle if the unit produces abnormal smoke or burning
smell.

Safety precaution (2/2)
Designed by TTW Group 5
Please read the following precautions to ensure user safety
□If you install this product in a place where the surrounding humidity is high, it can be the cause of breakdown. If this product is
not well ventilated i.e. being covered with something, it may cause discoloration, deformation and breakdown due to over-heating.
□Please always ensure the power cable and other accessories are firmly connected and the cabling is neatly stored.
□Whilst driving through a tunnel, where tunnel lighting is too bright or too dim, the recording quality of the video can be degraded.
□If this product is damaged because of accident or impact and power supply is cut off, the video recording can be stopped.
□If there are foreign substances on the lens or excessive window tinting, the recorded image can be blurred, distorted or appear
dark.
□Please be careful when this product is exposed to direct sunlight and turned on for a long time, as the camera may become hot.
□The micro SD card is a consumable item and its number of uses (reading/writing) is different depending on the product use. Please
exchange it with a new micro SD memory card if it no longer functions correctly.
□Please format the micro SD card on a regular basis. We recommend more than once per month using SD Formatter software.
□We recommend the use of specific micro SD cards, as sold on our online store, as we cannot guarantee that other products will be
compatible.
□We recommend this product to be installed by one of our recommended professional installers.
□Please note that the user has a liability for the recorded and stored image/sound data in accordance with Personal Data Protection
Act and related law (statute).
□Please use the authentic Mi-Witness HD product/parts that we provide. We will not be held responsible for the breakdowns and
accidents caused by the use of non-authentic Mi-Witness HD products/parts.

Special features
Designed by TTW Group 6
Special features of the Mi-Witness HD
□Recorded image of front and rear 2CH High-definition
Front and rear 1280x720 HD resolution. Smooth image recording with 30 frames from the front and 30 frames from the rear.
□WIFI control and real time monitoring through the Mobile Application (supports Android/iOS)
Provide various additional features such as instant playback, live view and settings adjustment by connecting to the WIFI network.
□External GPS cradle combined in the mount
An external GPS cradle that is easy to install.
□CPL Filter provided to reduce glare and reflection
Relieves the problem of light reflection or glare from the windscreen.
□Offers various recording modes
Normal traffic recording / impact detection recording / parking mode / motion detection mode / recording mode
□High-definition wide-angle lens of 123°
Record and store wider images of accidents through high definition wide-angle lens of 123°.
□Built in Smart Power and high temperature cut-off
Checks the battery voltage of the vehicle to prevent battery discharge and protects device through high temperature
cut off function in parking mode.
□Micro SD memory card support specification up to 64GB (only using recommended SD card products)
More video can be stored by supporting Micro SD memory card up to 64GB.
□PC viewer program (supports Windows/MAC)
PC viewer program supports various functions such as front/rear playback, MI-Witness settings, checking GPS location.

Mi-Witness HD package components
Mi-Witness HD key components
Designed by TTW Group 7
▶Accessory components of the product may vary depending on changes due to performance or specification improvements.
▶Package components can be purchase additionally through MI-Witness homepage (http://www.mi-witness.co.uk).
Power Cable
Rear Camera Rear Camera Cable
Front Mount
External GPS (Cradle)
Micro SD Card Micro SD Adaptor
Cigar Power Cable
CPL Filter
STB-11 Front Camera
4 Clips 3M Sticky Pad Manual
Please note

□Front
Parts overview (1/2)
Designed by TTW Group
Security LED
□Rear
FRONT Lens
STATUS: Product operation state LED
GPS: GPS reception state LED
WIFI: WIFI connection state LED
8
Part name and function of Mi-Witness HD

Parts overview (2/2)
Designed by TTW Group
V-IN: Rear camera connection port
GPS: External GPS connection port
DC-IN: Power connection port
Micro SD:
Memory card insertion slot
9
□Side □Rear camera
Reverse(LR): Image reversal switch(L/R)
V-OUT: Video output port of rear camera
Part name and function of Mi-Witness HD

Precautions before product installation
Mi-Witness HD installation (1/4)
Designed by TTW Group 10
□Start installation with vehicle turned off after parking it safely, if possible, on flat ground.
□For your safety, please refrain from installing on the side of the road, especially in busy areas.
□Please wipe clean the glass of the vehicle, where the sticky pad is to be installed, with an alcohol wipe.
□Please position this camera where it does not interfere with the driver's field of vision.
□It is recommended to get this product installed by a recommended professional installer to protect your warranty if hard wiring the
device.
□Mi-Witness and TTW will hold no responsibility for installations that damage the Mi-Witness HD or vehicle.
□How to of installing regular power cable
As shown in the figure, starting from the side where this
product would be attached, bury regular power cable along
the front window top of driver seat up to side frame next to
driver's seat. Pull out the cable up to the fuse terminals.
□How to installing rear camera cable
As shown in the figure, starting from the side where this
product would be attached, bury rear power cable along the
front window top of driver seat or passenger seat up to rear
window passing through the side of vehicle. Pull out the
cable to the position where rear camera would be attached.
Installing power cable and rear camera cable

Mi-Witness HD installation (2/4)
Designed by TTW Group 11
□STEP 1
Insert Micro SD into the main
body. You must ensure to insert
the correct way round.
Slide the mount onto the main
body after checking the recording
direction of front camera.
Slide the External GPS cradle onto
the mount.
Clean the glass, before placing the
sticky pad, with an alcohol wipe.
□STEP 2 □STEP 3 □STEP 4
□STEP 5
Remove the double-sided tape
from the sticky pad.
Attach the camera firmly by
pressing to the glass.
Connect the rear camera, External
GPS and power cable to the main
camera. The power cable must be
connected last.
Check if WIFI and STATE LED
are on after connecting power
cable. If STATE LED blinks this is
normal and GPS LED is on after the
receipt of GPS signal.
□STEP 6 □STEP 7 □STEP 8
▶The GPS Status LED will be constantly ON when it receives GPS signal. If GPS doesn’t receive signal, LED will blink. GPS will acquire a better
signal with a clear view of the sky.
Mi-Witness HD front camera installation
Please note

Mi-Witness HD installation (3/4)
Designed by TTW Group
It is recommended to install rear camera at the
top of the rear window and connect the cable so
it is located to the right direction, as shown above.
□Rear camera installation
12
You can set the image reverse (LR) to the left/
right depending on the direction of rear camera
by using the reverse switch that is provided.
□Reverse (LR) Switch
▶You can check status of cameras connection and camera degree by using the WiFi App.
Mi-Witness HD rear camera installation
Please note

Mi-Witness HD installation (4/4)
Designed by TTW Group 13
▶If you don't want to use External GPS, you can attach it directly to the mount by using an additional sticky pad (sold separately).
□Camera lens protector separating
Separate the attached front piece
(with the logo on) from the front
camera as shown above.
Press on the CPL Filter into the
same position and ensure it is
secure.
□CPL Filter mounting
□Adjusting the viewing angle
Adjust the recording angle by
rotating the camera within the
mount.
Press and hold the button on the
mount and detach the camera by
sliding the camera out of the
mount.
Holding the main body slide the
External GPS to the right.
□Removing the mount □Removing the External GPS
CPL Filter
Mi-Witness HD CPL Filter replacement, lens direction setting and mount/GPS removal
Please note

Image recording (1/2)
Designed by TTW Group 14
Category Regular driving recording Impact detection recording Parking mode motion
detection recording
Storage
Location normal event parking
Recording
time (max.) 1 min 40 sec 40 sec
Security LED
Motion Flickering Fast Flickering Fast Flickering
Features
-
Start the vehicle, recording begins
and continues automatically.
-
Recording begins with a chime
sound after 10 seconds, then there
will be a ding sound 20 seconds
after power connection.
-
In the regular recording mode or
parking mode, event recording
begins with a "ding" sound when
an impact to the vehicle is detected.
-
You can set the G-
Sensor sensitivity
for detecting impact in the settings.
-
An image is recorded 10 seconds
before and 30 seconds after the
occurrence of an impact.
-
In the parking mode, motion
recording begins when the front
and rear camera detect any
movement outside the vehicle.
-
You can set the G-Sensor
sensitivity for detecting any
movement in the settings.
-
An mage is recorded 10 seconds
before and 30 seconds after the
detection of movement.
Store type of record file
□ch1_NNNN_YYYYMMDD_HHMMSS_msec_duration_mode.avi
ch1 : Front / ch2 : Rear |NNNN : Sequence of file |YYYYMMDD : Year/Month/Date of Saving |HHMMSS_msec : Hour/Minute/Second of Saving
□duration : Recording Time 5 digits (sec 2 digits + msec 3 digits)
□mode : N - Regular driving recording |E - Impact detection recording |P - Parking mode motion detection recording
▶G-Sensor sensitivity, speaker volume, security LED setup can be changed in the settings in the PC Mi-Viewer or the Mi-Viewer App.
Image recording by each mode

Designed by TTW Group 15
Micro
SD Card
Capacity
Normal (Based on 60 seconds) Event (Based on 40 seconds) Parking (Based on 40 seconds)
Recording
File Count
(Front)
Recording
File Count
(Rear)
Total time
Recording
File Count
(Front)
Recording
File Count
(Rear)
Total time
Recording
File Count
(Front)
Recording
File Count
(Rear)
Total time
8GB About 46 About 46 1hrs 32min About 20 About 20 27min About 18 About 18 24min
16GB About 95 About 95 3hrs 10min About 42 About 42 56min About 40 About 40 49min
32GB About 191 About 191 6hrs 22min About 86 About 86 1hrs 55min About 75 About 75 1hrs 40min
64GB About 386 About 386 12hrs 52min About 173 About 173 3hrs 51min About 151 About 151 3hrs 21min
Image recording (2/2)
Use of memory card
□Normal recording time is 1 minute and event/parking recording time is 40 seconds per file.
□This information, on the number of recorded files and the time used, is based on the SD Card Capacity being set at “A – 70/20/10(%)”
□The Micro SD Capacity setting can be changed in “WiFi/Extras” of PC Mi-Viewer Settings.
Please note
▶Calculation capacity(Average): Normal 55MB / Event 35MB / Parking 20MB
▶ The number of files and saving time is based on the “Highest” video quality setting and can be different depending on the actual size of the
recorded image file.
▶The usable space of memory card for video recording can be smaller than indicated capacity due to minimum requirement space for running
DVR system.

Operational status LED guide
Designed by TTW Group 16
Operating Status
Front Security LED Rear Status LED
BLUE RED BLUE(GPS) YELLOW GREEN(WIFI) BLUE(STATUS)
Power ON (Booting) ON OFF OFF (after ON) OFF (after ON) OFF (after ON)
Power OFF OFF OFF OFF OFF OFF
Driving recording begins Flickering OFF N/A N/A Flickering
Event recording begins
(on driving mode) Fast Flickering OFF N/A N/A Fast Flickering
Parking mode begins
(WIFI off) OFF Flickering N/A OFF Flickering
Event recording begins
(on parking mode) OFF Fast Flickering N/A OFF Fast Flickering
Motion detected
(on parking mode) OFF Fast Flickering N/A OFF Fast Flickering
F/W upgrade Fast Cross
Flickering x 3 (Repeat)
Fast Cross
Flickering x 3 (Repeat) N/A N/A Fast Flickering x 3
(Repeat)
SD card format OFF OFF Fast Cross
Flickering (Repeat) OFF Fast Cross
Flickering (Repeat)
GPS connected (No Signal) N/A N/A Flickering N/A N/A
GPS connected (Signal) N/A N/A ON N/A N/A
GPS disconnected N/A N/A OFF N/A N/A
WIFI activation
(only Driving mode) N/A N/A N/A ON N/A
Error detected OFF OFF OFF ON OFF
Operational status LED guide is as follows

Operational audio guide is as follows
Operational audio guide
Designed by TTW Group 17
Operating Status Audio
Booting Di
SD card error / SD card is not inserted No SD card. Please insert the SD card. (2 times repeat and rebooting)
Recording end (Power off) Di (and power off)
Parking mode start D~~ing
Normal recording start Diririring
Event recording start Doooong
Firmware upgrade start di~ di~ di~ (Repeated at 1 second intervals)
File format start Proceed to format SD card. SD card format has been completed. (and rebooting)
SD card or cluster problem Proceed to format SD card. (and rebooting)
Not able to do auto formatting Please format the SD card. (repeat)
System end (Rebooting) D~~ing
SD card is pull out Di (and rebooting)
Insert rear camera The rear camera is connected. Restart the system. (and rebooting)
Operating “High temperature cut-off: over 85℃“(Parking mode) Ding x 3 (and power off when select “High temperature cut-off: ON)
Front camera error Di~~ding (and rebooting)
Operating “cut-off voltage” (Parking mode) Ding x 3 (and power off)
Change Setting and Saved (App) Restart the system. (and rebooting)

How to install the PC Mi-Viewer
Mi-Viewer software guide (1/9)
Designed by TTW Group 18
Put the micro SD card provided
with this product into the adapter
and connect to your computer.
1•Windows
Install the program by running
setup.exe in the “pc_viewer/win”
folder of micro SD card.
•MAC
Install the program by copying
mi-viewer in the “pc_viewer/mac”
folder of micro SD card to MAC
BOOK.
2When setup is completed, to check
if the PC Mi-Viewer is working
normally, run the shortcut icon of
the PC Mi-Viewer on desktop.
3
□MAC/Windows version of private PC Mi-Viewer is stored as pc viewer folder on the micro SD card that is provided with this product.
□You can also download private PC viewer from the download sections of our website, accessed through the Mi-Login area.
□It is a recorded image file (AVI format) and can be played by a general video player. However, on the PC Mi-Viewer, you can play
and check the images from the front and rear at the same time and various additional functions such as GPS details, changing
settings, image capture, and printing are provided.
□Support Version: MAC OS X 10.7 or later | Windows XP/Vista/7/8/10 or later (32/64bit)

□The PC Mi-Viewer software provides various additional features such as recorded image playback and settings of Mi-Witness HD.
□You can download programs from our website through the Mi-Login area. There are video help files available on the website.
Main screen and key features of the Mi-Viewer software
Mi-Viewer software guide (2/9)
Designed by TTW Group 19
Key Features
Front/Rear
Sync Play
Play & Frame Seek
Zoom Control Display
Video & Capture Image Backup
The Occurrence
Report & Print
Mi
-Witness Option Setting
Video
File Navigation & Filtering
G
-sensor State
Speed Display
Map
Navigation
SD
Card Format
Playback
Screen Size Control
▶The captured screen view in this manual is an example. The screen and icon display between MAC and PC versions will may be different from
this and some functions may not be available depending on the software used.
Please note

Detailed functions of Mi-Viewer (left screen)
Designed by TTW Group 20
Function
A
-1. Viewer information
A
-2. Video File Name
A
-3. Main Screen Zoom in/out (Scroll)
only Windows
A
-4. Video Color Change
A
-5. Front/Rear Playback Screen Change
A
-6. Reverse Display (Up/Down, Left/Right)
only Windows
B
-1. Play Progressive Bar/Play Time
B
-2. Play/Seek/Pause/Stop
B
-3. Play Speed Change (-4X/-2X/1X/2X/4X)
B
-4. Volume
B
-5. Speed Display (km/h, mph)
C
-1. Sub Screen Zoom in/out (Scroll)
only Windows
C
-2. G-Sensor Sensitivity Graph
▶Zoom in/out(A-3, C-1) and Reverse Display(A-5) functions are provided only in Windows version.
Mi-Viewer software guide (3/9)
A-1
A-3
A-2
B-1
B-2
B-3
A-5
A-6
B-4
B-5
C-1 C-2
A-4
Please note
Table of contents