ULTICARE IPET PRO User manual

User Guide
Blood Glucose Monitoring System

1
Table of Contents
Introduction..................................................................................................2
Important Safety Instructions .......................................................2
About iPet PRO
Blood Glucose Monitoring System.............................................3
About iPet PRO Meter .........................................................................4
About the iPet PRO Meter Display ...........................................5
About the iPet PRO Test Strip ......................................................6
About the iPet PRO Test Strip Vial ...........................................7
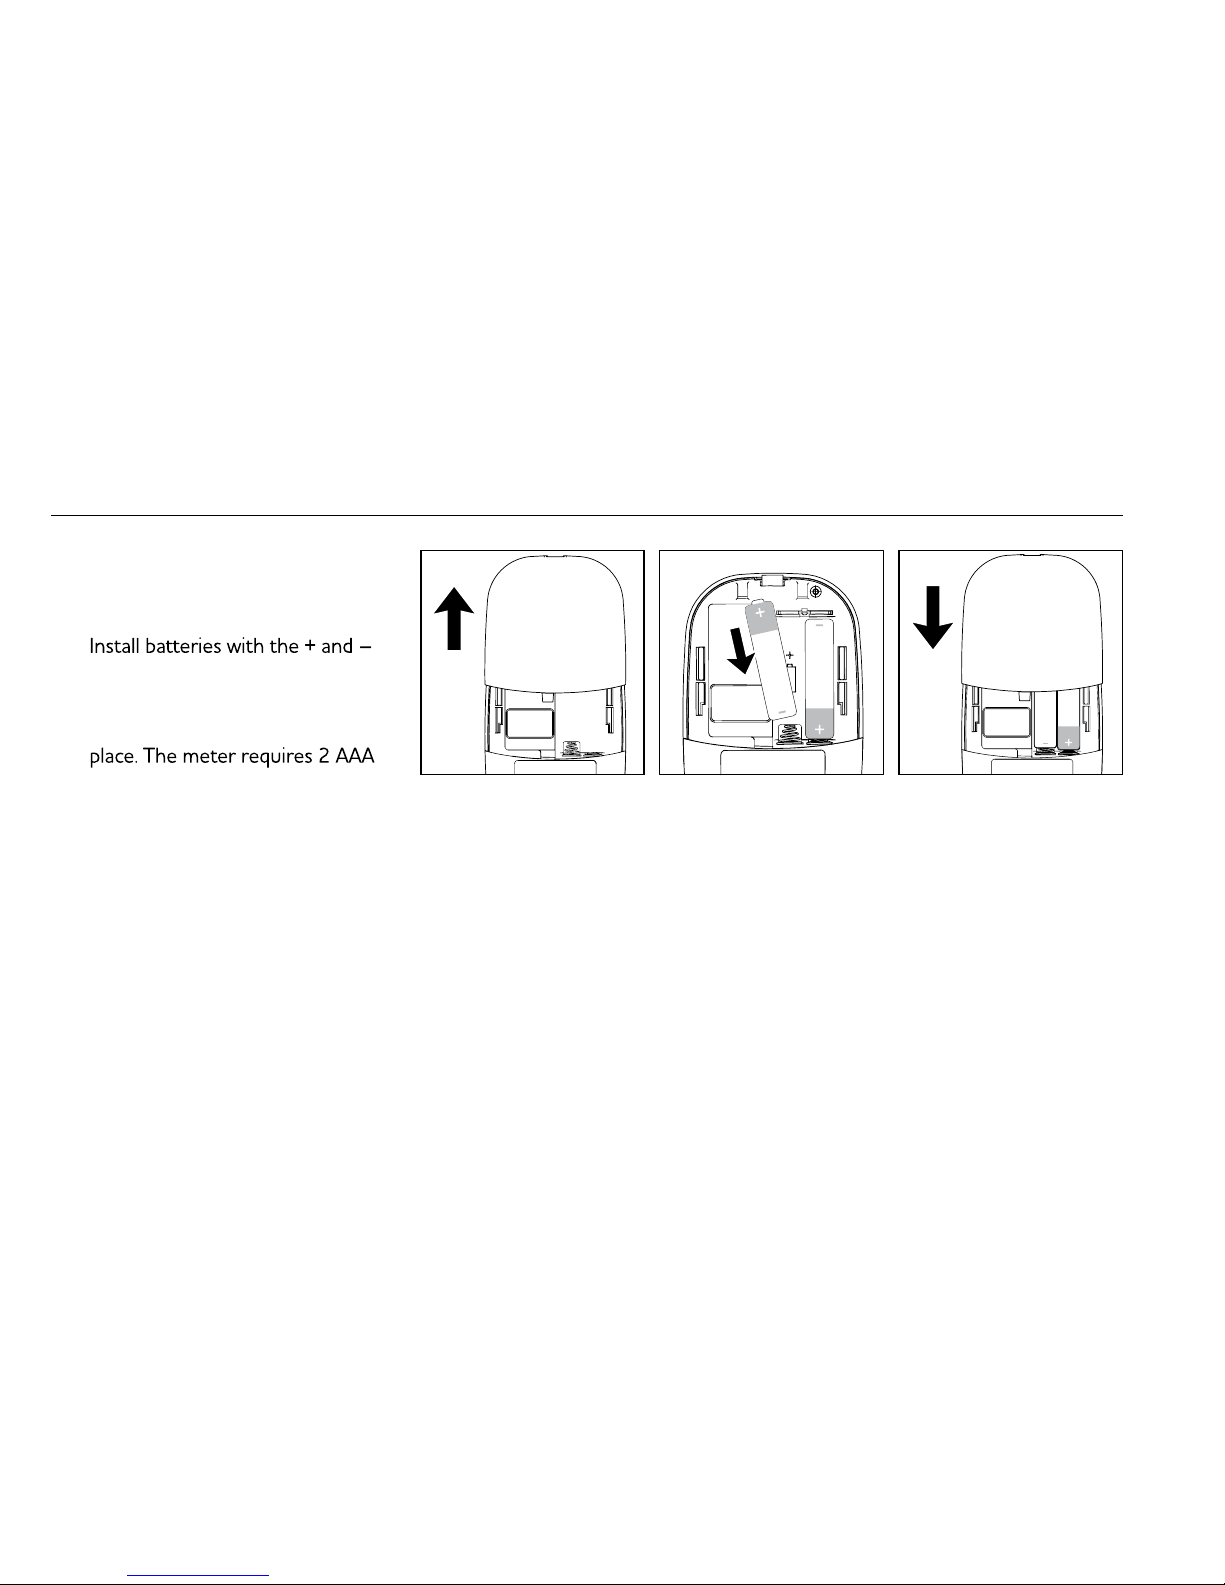
Installing/Replacing Batteries ........................................................8
Setting Up iPet PRO Meter .............................................................9
Coding iPet PRO Meter ...................................................................10
Setting Up Reminder Alarms .......................................................11
Setting Up the HI/LO Alarms ......................................................12
Important Information ......................................................................13
Blood Glucose Testing .......................................................................14
Obtaining a Blood Sample ..............................................................15
Applying a Blood Sample to iPet PRO Test Strip ........16
Understanding Blood Glucose Test Results .....................17
HI & LO Readings ..................................................................................18
Control Solution ....................................................................................18
Performing a Control Solution Test .......................................19
Control Solution Results .................................................................20
Memory Features ..................................................................................21
View Day Average Results .............................................................22
Exiting the Memory Mode .............................................................23
Cleaning and Disinfection Procedure ...................................23
Display Messages ........................................................................24–27
Error Messages ............................................................................28–31
Troubleshooting .....................................................................................32
Specifications ............................................................................................33
Icon Descriptions...................................................................................34
Service and Warranty ........................................................................35
Customer Service ..................................................................................36

2
3
Introduction
iPet PRO Blood Glucose Monitoring
System is specifically designed
for in-home and professional use
capillary or venous blood samples
taken from a cat, dog or horse. This
manual contains all information
required to operate and maintain
the device.
Please read carefully before use.
Monitoring System should be
considered potentially infectious
and are capable of transmitting
blood-borne pathogens. To ensure
that the animals and users are not
•
Test strips and lancets are for
single usage only
•
to be biohazardous and can
potentially transmit infectious
diseases even after cleaning and
disinfection have been performed
The complete kit contains:
•
1 iPet PRO blood glucose meter
•
1 iPet PRO test strip vial
(25 strips)
•
1 glucode chip
•
1 lancing device
•
30 gauge lancets
•
1 bottle of control solution
•
1 carrying case
•
1 user guide
•
1 user quick guide
•
1 logbook
Note:
25 & 50 count test strips can be
purchased separately.
Important Safety Instructions

4
5
1. Display: To display results in
numbers and icons
2. Button: Press and hold to
enter reminder alarm and HI/
LO alarm setting, or to adjust
numbers and to toggle settings
3. Button: Press and hold to
enter buzzer setting or to adjust
numbers and to toggle settings
4. Button: Press and hold to
enter the year/date/time setting,
averages in memory or to turn
the meter ON/OFF
5. Strip Ejector: Push to eject
the test strip
6. Test Port: Compatible test strips
and glucode chips are
inserted here
7. Battery Cover: To slide open
and closed
8. Meter Label: Manufacturer
information
9. Glucode Chip
1. Memory Icon:
memory mode
2. Year/Date: To display year/date
3. Control Solution Icon:
during a control solution test
and indicates a control solution
test result
4.
an alarm is set
5. Test Result: To display
test results
6. Buzzer Icon:
buzzer is ON
7. Meal Indicator Icon: Pre-meal
and post-meal
8. To select a specified
animal type ( , Hor) prior
to performing a test
9. Battery Icon:
10. Time: To display the time at
11. Code:
is displayed
12. Blood Drop Icon: Flashes
a blood sample
13.
result is out of range
14. Test Strip Icon:
the meter is ready for a test
15. Temperature Icon:
operating temperature
16. Measurement Units: To identify
test result units (mg/dL or
mmol/L )
1
1
11
12
13
14
15
16
10
2
3
4
6
7
89
5
2
3
4
5
6
7
8
9
Blood Glucose Monitoring System
B05Z102069/REV.0/V002-2016-11
Distributed by UltiMed, Inc., Excelsior, MN 55331
For questions, please call 1-877-854-3434 toll-free
Mon-Fri, 8AM - 4PM CST

4
5
1. Display: To display results in
numbers and icons
2. Button: Press and hold to
enter reminder alarm and HI/
LO alarm setting, or to adjust
numbers and to toggle settings
3. Button: Press and hold to
enter buzzer setting or to adjust
numbers and to toggle settings
4. Button: Press and hold to
enter the year/date/time setting,
averages in memory or to turn
the meter ON/OFF
5. Strip Ejector: Push to eject
the test strip
6. Test Port: Compatible test strips
and glucode chips are
inserted here
7. Battery Cover: To slide open
and closed
8. Meter Label: Manufacturer
information
9. Glucode Chip
1. Memory Icon:
memory mode
2. Year/Date: To display year/date
3. Control Solution Icon:
during a control solution test
and indicates a control solution
test result
4.
an alarm is set
5. Test Result: To display
test results
6. Buzzer Icon:
buzzer is ON
7. Meal Indicator Icon: Pre-meal
and post-meal
8. To select a specified
animal type ( , Hor) prior
to performing a test
9. Battery Icon:
10. Time: To display the time at
11. Code:
is displayed
12. Blood Drop Icon: Flashes
a blood sample
13.
result is out of range
14. Test Strip Icon:
the meter is ready for a test
15. Temperature Icon:
operating temperature
16. Measurement Units: To identify
test result units (mg/dL or
mmol/L )
1
1
11
12
13
14
15
16
10
2
3
4
6
7
89
5
2
3
4
5
6
7
8
9
Blood Glucose Monitoring System
B05Z102069/REV.0/V002-2016-11
Distributed by UltiMed, Inc., Excelsior, MN 55331
For questions, please call 1-877-854-3434 toll-free
Mon-Fri, 8AM - 4PM CST

6
7
iPet PRO test strips are for blood
iPet PRO meter.
Each test strip can be used
only ONCE!
The test strip consists of
1.
the test strip
2.
To confirm that sufficient
blood has been applied to
the target area
3. Contact Bar: The end of the test
strip inserted into the test port to
activate the meter
•
Do not use expired test strips as
this may cause inaccurate results
•
the vial, replace the vial cap
immediately and close it tightly
Test Strip Vial LabelTest Strip Vial
top side back side
1
2
3

8
9
Setting Up iPet PRO Meter
Installing/Replacing Batteries
1. From the back of the meter,
gently slide and remove the
battery cover (Fig.1).
2.
ends matching indication marks
on the battery compartment.
3. Slide battery cover back into
batteries to operate.
Be sure the batteries are properly
installed. The default is set to
instructions to properly set up
the meter.
Setting Year/Date/Time
1.
press and hold button for
4 seconds to enter setting.
2. Press or to select “24hr”
or “12hr”. Press to confirm
(Fig.2).
3.
appear and flash. Press or
to adjust and press to confirm
(Fig.3).
4.
appear and flash. Press or
to adjust and press to confirm
(Fig.4).
5.
appear and flash. Press or
to adjust and press to confirm
(Fig.5).
6.
appear and flash. Press or
to adjust and press to confirm
(Fig.6).
7.
appear and flash. Press or
to adjust and press to confirm
(Fig.8, Fig.9). Press to turn off
the meter. The meter year/date/
time setting is complete.
(Fig.1)
(Fig.2) (Fig.3)
(Fig.4) (Fig.5)
(Fig.6) (Fig.7)
(Fig.8) (Fig.9)

10
11
Coding iPet PRO Meter
Insert glucode chip to start the
procedure (Fig.10)
1.
is inserted (Fig.11).
2.
a flashing animal icon. Press or
to select a desired animal type
(Fig.12).
3.
make sure the code exactly
matches the test strip vial label.
Then, press to confirm and
(Fig.13).
4. Press to turn off the meter.
iPet PRO meter provides
4 reminder alarms for each
animal type.
To change to a different animal type,
insert glucode chip and select a
desired animal type.
set up reminder alarms.
1.
and hold button for 4 seconds
or longer to enter setting.
2.
appear on the display (Fig.14).
3. Press or to select
“ON” or “OFF”.
If “OFF” is chosen and pressed,
next reminder alarm setting. If
“ON” is chosen and pressed
(Fig.15), the number of “hour”
4. Press or to adjust and press
to confirm.
5.
flash (Fig.17). Press or to
adjust and press to confirm.
reminder alarm setting.
6. Repeat steps 3 to 5 to set the
rest of reminder alarms.
Glucode
Chip
(Fig.10) (Fig.11)
(Fig.14) (Fig.15) (Fig.16) (Fig.17)
(Fig.12)
(Fig.13)

12
13
Important Information
Setting Up the HI/LO Alarms
The iPet PRO blood glucose meter
provides an individual HI/LO alarm
for each animal type. To change to a
different animal type, please insert
glucode chip and select a desired
animal type.
1. After completing the reminder
alarm setting, press to enter
the HI alarm setting.
2. Press or to set “ON”, press
to confirm. If “OFF” is chosen,
the meter will skip this setting
(Fig. 18, 19).
3. To change the alarm setting,
press or until you reach
your desired HI setting and then
press to confirm (Fig.20). The
HI alarm value range is 100 -
400mg/dL (5.5 - 22.0mmol/L)
and the default value is 180mg/
dL (9.5mmol/L).
4. Continue to the LO alarm
setting (Fig.21), repeat Steps
2 and 3 (Fig.22, 23) to confirm
or to change LO alarm setting.
Press to turn off the meter.
The LO alarm value range is
40 - 90mg/dL (2.0-5.0mmol/L)
and the default value is 70mg/dL
(3.2mmol/L).
5. Press to finish setting and the
meter will be turned off.
Before testing
•
Always keep test strips in the
original vial. Tightly close the
vial immediately after removing
a test strip.
•
Replace the glucode chip every
time you begin using a new vial
of test strips.
•
Use each test strip immediately
after removing it from the vial.
Each test strip should only be
used ONCE.
•
Do not use test strips or control
solution beyond the expiration
date printed on the package since
this may cause inaccurate results.
•
Store your test strips and
the meter in a cool, dry place
between 39°F and 86ºF (4°C
and 30ºC). Temperatures beyond
the required range, as well as
humidity, can damage test strips
and lead to inaccurate results.
•
Any change of medications based
on the iPet PRO Blood Glucose
Monitoring System results
without advice of a veterinarian is
NOT RECOMMENDED.
•
Never share a lancing device or
lancet with any other animal.
•
Only iPet PRO test strips and
control solution can be used with
this meter.
(Fig.18) (Fig.19) (Fig.20) (Fig.21) (Fig.22) (Fig.23)

14
15
Obtaining a Blood Sample
Blood Glucose Testing
Before testing, you need the
following items:
•
iPet PRO blood glucose meter
•
iPet PRO test strip
•
Adjustable automatic lancing
device and sterile lancet
Preparing the test strip
1. Take a test strip from the vial and
re-cap the vial immediately.
2. Insert the test strip, top side
facing up, into the test port.
The meter will automatically
turn on (Fig. 24). The meter will
memorize the previously selected
animal type and a code number
will be displayed (Fig.25).
Note:
If you are using the meter for
the first time without coding the
meter, a “000” will appear on the
screen (Fig.26) and then turn off
automatically after 2 minutes.
You may not proceed to do any
testing unless the meter is coded.
Reminder:
Make sure that the code number on
the display matches the code number
displayed on the test strip vial. If the
numbers do not match, please code
the meter by using a new glucode
chip supplied with the test strip vial.
Insert glucode chip into the meter
until a new code appears on the
screen. This should match the code
on the test strip vial label (Fig.27).
3. A beep will sound, and a code
number will appear, followed by a
flashing icon. You can press
or to select the meal indicator
for marking the test as Pre-meal
, or Post-meal test , or no
marker (default) (Fig.28).
4. A blood sample can now
be obtained.
For further instructions, please
see the insert provided with the
lancing device.
1. Twist off the lancing device cap.
2. Place a lancet into the
lancet holder.
3. Twist off the lancet protective
cap to expose the sterile needle.
4. Screw the lancing device cap
back on. Select the preferred
depth setting.
5. Pull the cocking control back
until you hear a ‘click’ sound.
6. Place the lancing device firmly
against the animal paw or
marginal ear vein and press
the release button to obtain
a blood sample.
Removing the lancet from the
lancing device.
1. After use, twist off the lancing
device cap containing the
used lancet.
2. Slide the lancet ejector forward
and dispose of the used lancet in
an approved container.
CAUTION To reduce chances
of infection:
•
Always use a new and sterile
lancet. Lancets are for single
use only.
•
Wash hands thoroughly with
soap and water before and
after handling the meter,
lancing device, and test strips.
•
Please refer to section
“Cleaning and Disinfection
Procedure” (pg. 23) for meter
maintenance instructions.
(Fig.24) (Fig.25)
(Fig.26)
(Fig.27)
(Fig.28)

16
17
Understanding Blood Glucose Test Results
1.
discard the first drop to prevent
contamination. Introduce the tip
of the test strip to the drop of
strip (Fig.29).
Hold the tip of the test strip
touching the blood drop until
the meter beeps.
2.
completely filled the confirmation
be automatically stored into the
meter memory (Fig.30).
3.
if there is no further test, the
the test, remove the used test
strip by pushing the strip ejector.
Discard the test strip in
after use (Fig.31).
Please DO NOT point the
test strip at humans or animals
Used lancets and test strips are
considered biohazardous. Dispose
of used lancets and test strips in a
The meter displays results in
either mg/dL or mmol/L. The unit
of measure is preset. You cannot
change this setting.
The meter displays results from 20
– 600 mg/dL (1.1 – 33.3 mmol/L).
indicate a potentially serious medical
condition.
(Fig.29) (Fig.30) (Fig.31)

18
19
Performing a Control Solution Test
Control Solution
(Fig.32) (Fig.33)
1. iPet PRO is designed to display
test results between 20 - 600
mg/dL (1.1 - 33.3 mmol/L). If a
“HI” (Fig.32) or a “LO” (Fig.33)
message appears on the display,
it indicates that the meter has
detected a blood glucose level
higher than 600 mg/dL (33.3
mmol/L) or lower than 20 mg/
dL (1.1 mmol/L). It is suggested
the testing procedure should be
reviewed and the test should be
repeated using a new test strip to
confirm the result again.
The control solution is to ensure
that iPet PRO is working properly
and the user is performing a
test correctly.
When to perform a control
solution test
1. Using the iPet PRO blood
glucose meter for the first time.
2. Using a new vial of iPet PRO
test strips.
3. The test result of the system is
in question, or on a regular basis
to ensure accuracy, e.g. once a
week.
4. The test result is unexpectedly
lower or higher than normal.
Note:
For more information regarding the
control solution, please read the
control solution package insert.
1. Code the meter (refer to
page 10).
2. Be sure the control solution is
at room temperature between
59ºF - 95ºF (15ºC - 35ºC)
before testing.
3. Insert iPet PRO test strip, top
side facing up, contact bar end
first, into the test port. The
meter will be automatically
turned ON (Fig.34).
4. All segments of the LCD display
will appear, a beep will sound,
and a code number will appear
followed by a flashing icon
(Fig.35). Be sure the code
number on the display matches
the code number on the test
strip vial label.
5. Press and hold button for 2
seconds to change to the control
solution test mode will appear
on the display. If button is
pressed again for 2 seconds, the
meter will switch back to the
normal testing mode.
6. Discard the first drop of the
control solution and squeeze
a small drop on a clean
nonabsorbent surface such as a
clean piece of wax paper. Do not
apply the control solution directly
to the test strip from the bottle,
because contamination may
occur (Fig.36).
7. Introduce the tip of the test strip
to the droplet of the control
solution. The control solution
is automatically drawn into the
test strip. Hold until the meter
beeps. The meter will now start
to countdown and the control
solution test result will appear on
the LCD screen (Fig.37).
CAUTION:
Follow the above instructions
when performing a control
solution test in order to prevent
contamination.
(Fig.34) (Fig.35) (Fig.36) (Fig.37)
HI & LO Readings
Table of contents