manuals.online logo
Brands
  1. Home
  2. •
  3. Brands
  4. •
  5. UMI
  6. •
  7. Home Lighting
  8. •
  9. UMI Uncle Milton Moon In My Room User manual

UMI Uncle Milton Moon In My Room User manual

KEEP THESE INSTRUCTIONS FOR FUTURE REFERENCE - DO NOT DISCARD
Uncle Milton Inc,Westlake Village, CA 91362
1-888-742-2484 Fax: 818.707.0878 www.unclemilton.com
© UMI, Inc. All rights reserved. Moon In My Room is a trademark
of UMI. Printed in China.
®
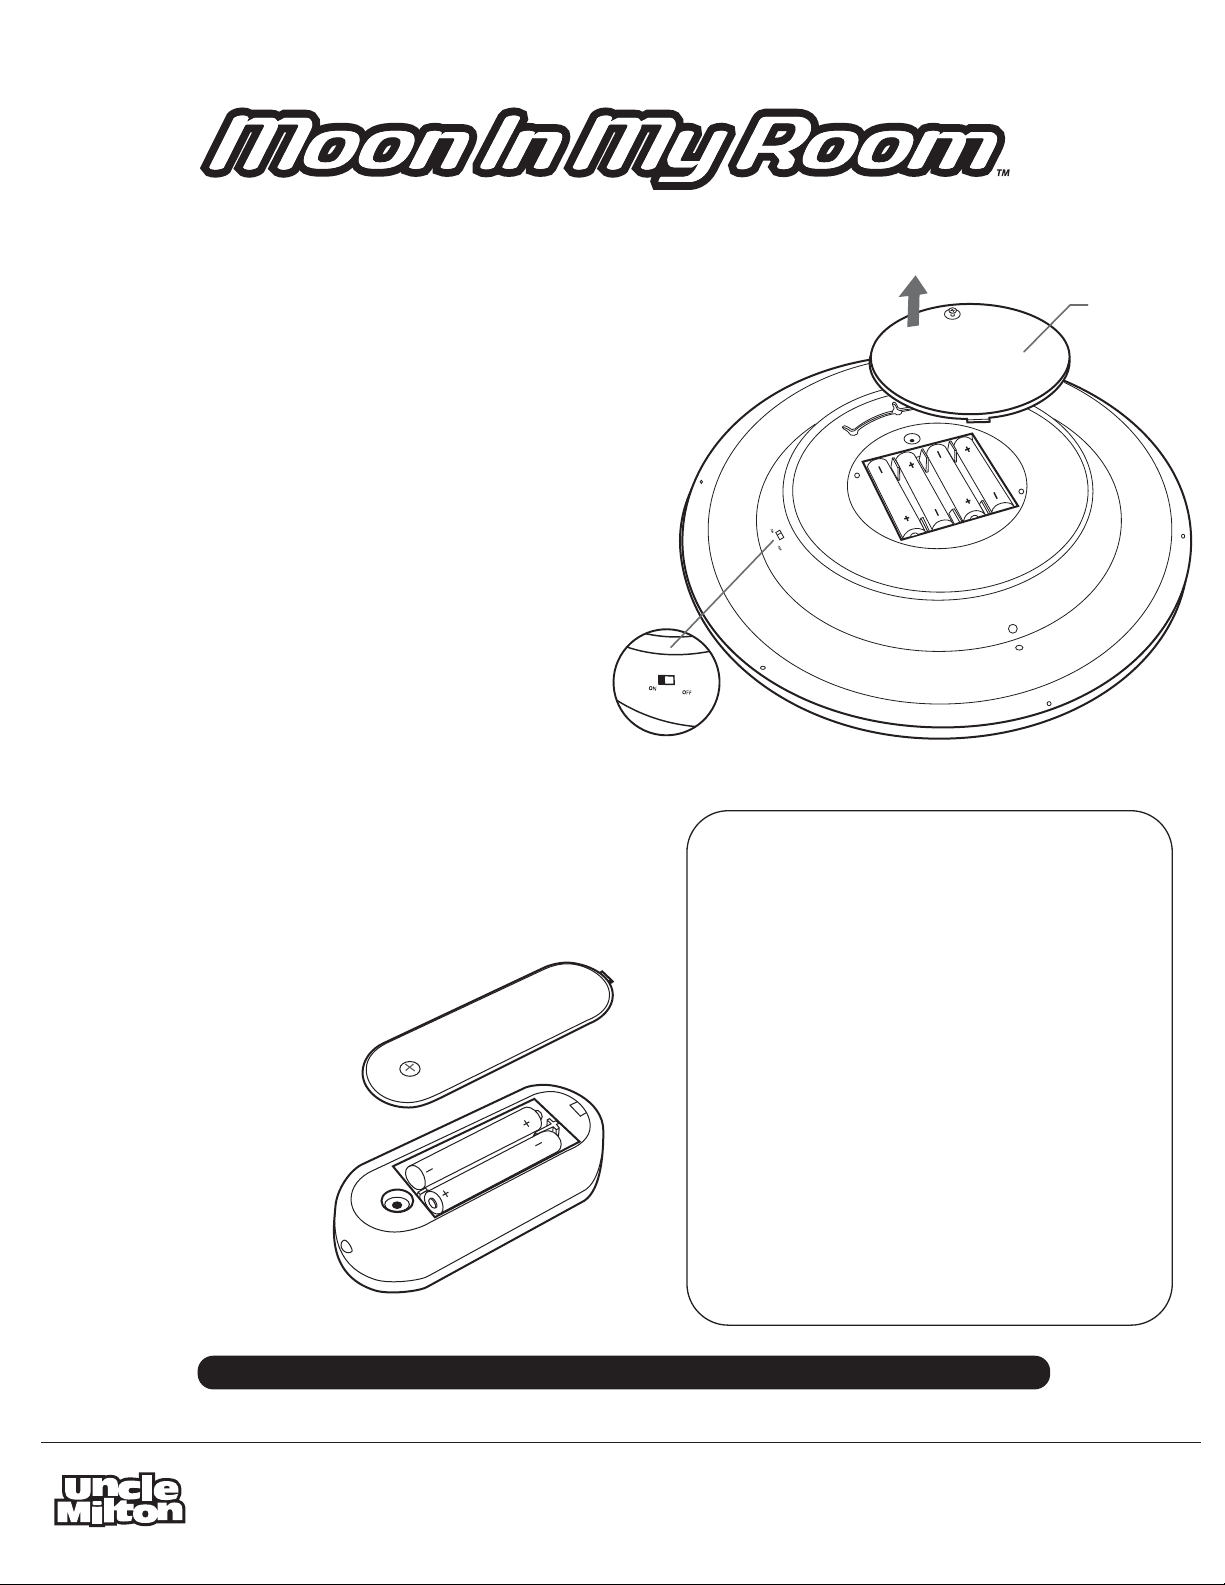
Installing batteries into Moon In My Room™
Tool required - Small Phillips head screwdriver
1. Use a Phillips head screwdriver to remove the battery
cover (See Fig. 1).
2. Insert 4 “AA” batteries. Make sure the “+” and “-” ends
are inserted correctly, as indicated in the battery
compartment.
3. Replace cover.
4. IMPORTANT! Switch Moon in My Room™to the
“ON” position before (see Fig. 2). PLEASE NOTE: The
unit will not activate without the remote control.
To ensure proper functionality, use Moon in
My Room™ in a darkened room.
Problems? Before taking this product back to the store please call us, we can help! 1-888-742-2484 or go to www.unclemilton.com
Figure 3
Installing batteries into the remote control
Tool required - Small Phillips head screwdriver
1. Use a Phillips head screwdriver to remove
the battery door (See Fig. 3).
2. Insert 2 “AAA” batteries. Make
sure the “+” and “-” ends
are inserted correctly,
as indicated in the
battery compartment.
3. Replace cover.
Figure 1
Figure 2
Battery
cover
2056-0506
AGES 6 AND UP
2056
BATTERY SAFETY INFORMATION
- Only adults should install and replace batteries.
- Switch toy off before opening battery compartment.
- Insert batteries correctly. Match positive + and negative - signs.
- Alkaline batteries are recommended for best performance.
- Rechargeable batteries are not recommended.
- If rechargeable batteries are used, they are only to be charged under
adult supervision.
- Rechargeable batteries are to be removed from the product before
they are charged.
- Do not recharge non-rechargeable batteries.
- Only use the batteries specified.
- Only batteries of the same or equivalent type as recommended are to be used.
- Do not mix different types of batteries: alkaline, standard (carbon-zinc)
or rechargeable (nickel-cadmium).
- Do not mix old and new batteries.
- Remove dead or exhausted batteries.
- Remove the batteries during long periods of non-use.
- Always remove exhausted batteries from the toy.
- Battery leakage and corrosion can damage this product.
- Dispose of batteries safely. Recycle where available.
- Do not dispose of batteries in a fire or attempt to open the outer casing.
Never short-circuit the battery terminals.
- Do not immerse battery-operated toys in water. Wipe clean only.
Hanging Moon In My Room™
NOTE: The Moon In My Room™is only intended to be
installed to a vertical wall.
1. Hang the Moon In My Room™by one of the three
hanging holes. (See Fig. 4)
2. Select any one of the 3 hang holes to angle the moon
to your desired position. This directly affects the angle
of the crescents.
Using Moon In My Room™
IMPORTANT: Before operating, be sure on/off switch
located on the back of Moon In My Room™is turned to the
“ON” position.
NOTE: In order for the moon to function properly, the room
lights should be off.
Auto On/Off
Moon automatically turns on in a darkened room. It
automatically shuts off after 30-minutes if there is no
manual interaction.
Night Light
Moon in My Room™is light sensitive, and will only function
in a darkened room. To turn the moon off, press the
ON/OFF button on your remote. Press ON/OFF button
again to reactivate a full moon.
Auto Phase
Your Moon In My Room™will cycle through the moon
phases automatically, when you push the automatic
phase button. The moon will cycle from phase to phase in
five-second intervals. In this mode, the moon will
automatically turn off after 30-minutes.
Manual Phase
To manually cycle through the moon phases, press the
manual phase button (see figure 5). If you leave the moon
on in a phase, it will automatically turn off after 30
minutes.
Permanent On/Off using Remote Control
Press and hold the remote ON/OFF button for 5 seconds.
This will turn the moon off and disable the auto light
sensor. Your moon will not turn on automatically in a
darkened room. Hold again for 5 seconds to turn the
moon back on, enabling the auto light sensor function.
Figure 4
Figure 5
On/Off
button
Automatic
phase
button
Manual
phase
button
ON/OFF
Switch
Hanging
holes

Popular Home Lighting manuals by other brands

Uplift Technologies Day-Light SKY user guide

Uplift Technologies

Uplift Technologies Day-Light SKY user guide

Philips myLiving 37778/17/16 Specification sheet

Philips

Philips myLiving 37778/17/16 Specification sheet

Unilux STRATA quick start guide

Unilux

Unilux STRATA quick start guide

FLOS ROMEO SOFT F quick start guide

FLOS

FLOS ROMEO SOFT F quick start guide

Inspire XTL7035B Assembly, Use, Maintenance Manual

Inspire

Inspire XTL7035B Assembly, Use, Maintenance Manual

JUNGLE HOBBIES LL-4800N Quick start manual

JUNGLE HOBBIES

JUNGLE HOBBIES LL-4800N Quick start manual

BROSA Dakota Table Lamp Assembly guide

BROSA

BROSA Dakota Table Lamp Assembly guide

Anslut 423-492 User instructions

Anslut

Anslut 423-492 User instructions

Lightolier Task Lighting F7600 Specification sheet

Lightolier

Lightolier Task Lighting F7600 Specification sheet

Royal Sovereign RDL-95M-D owner's manual

Royal Sovereign

Royal Sovereign RDL-95M-D owner's manual

Philips 69055-48-16 Specifications

Philips

Philips 69055-48-16 Specifications

HUDSON VALLEY LIGHTING L3724-PN installation instructions

HUDSON VALLEY LIGHTING

HUDSON VALLEY LIGHTING L3724-PN installation instructions

Philips myLiving 37432/11/16 user manual

Philips

Philips myLiving 37432/11/16 user manual

Dale Tiffany TA70678 Assembly instructions

Dale Tiffany

Dale Tiffany TA70678 Assembly instructions

Philips Ecomoods 42151/48/16 Specifications

Philips

Philips Ecomoods 42151/48/16 Specifications

Hay MATIN WALL instruction manual

Hay

Hay MATIN WALL instruction manual

Vaughan Leckford installation guide

Vaughan

Vaughan Leckford installation guide

OttLite A64PN9 manual

OttLite

OttLite A64PN9 manual

manuals.online logo
manuals.online logoBrands
  • About & Mission
  • Contact us
  • Privacy Policy
  • Terms and Conditions

Copyright 2025 Manuals.Online. All Rights Reserved.