UniData Communication Systems WPU-7700 Enterprise Edition Use and care manual

WPU-7700 Enterprise Edition
Administrator Manual
UniData Communication Systems Inc.

1
UniData Communication Systems is registered trademarks of UniData Communication Systems Inc.
Other referenced trademarks are trademarks (registered or otherwise) of the respective trademark owners.
This document is confidential and proprietary to UniData Communication Systems Inc. No part of this
document may be reproduced, stored, or transmitted in any form by any means without the prior written
permission of UniData Communication Systems Inc.
Information furnished herein by UniData Communication Systems Inc., is believed to be accurate and
reliable. The authors have used their best efforts in preparing this material. These efforts include the
development, research, and testing of the theories and programs to determine their effectiveness.
However, UniData Communication Systems assumes no liability for errors that may appear in this
document, or for liability otherwise arising from the application or use of any such information or for any
infringement of patents or other intellectual property rights owned by third parties which may result from
such application or use. The products, their specifications, and the information appearing in this document
are subject to change without notice.
Printed in Korea
1998-2008 by UniData Communication Systems Inc. All rights reserved.
COPYRIGHT NOTICE

2
Manual Introduction
Before use, kindly read this “Administrator Manual”thoroughly to have an understanding of the
contents
After reading, place it within reach at all times such as at the side of this product.
This manual is for administrator who has working knowledge of fundamental terms and
concepts of computer networking, converged voice and data networks to include LANs, WANs,
and IP switching and routing

3
Since this is provided to make safe and right use of WPU-7700 to prevent any accidents or risks, be sure
to carefully read it, follow instructions, and keep it where it is easily noticed.
Warning
This mark is intended to warn users of the risk of a serious injury or death when they violate instructions.
Do not put WPU-7700 in heating appliances such as heaters and microwave ovens to dry them if
they are wet.
It can cause explosions, deformation, or troubles. In this case, free services shall not be provided.
Do not use WPU-7700 in places that are too hot or too wet (keep them indoors between 0 and
+ 50 ).
If they get wet with rain, have drinks spilled, or are used in extremely hot/wet places such as public sauna
bathroom, it can cause battery explosions.
Put WPU-7700 and chargers in places out of reach of children or pets.
If one puts batteries his or her mouth, or uses broken batteries, it can hurt his or her body, or cause
electric shocks.
Do not disassemble WPU-7700, or apply shocks to them as you please.
If they get damaged while you disassemble them, or inflict shocks on them, you cannot have free
services.
Be sure to use designated batteries and accessories only for WPU-7700 provided by our company.
If you use unauthorized batteries or accessories, it can reduce the life of WPU-7700, cause explosions, or
damage them. In this case, you cannot have free services.
Safety Precautions

4
Be careful for conductors such as necklaces, keys, and coins not to contact battery terminals (metal
section). Since short circuits can cause explosions, be careful for such events never to take place.
Neither throws batteries, which can inflict shocks on them, nor put them near to heating appliances
such as heaters and microwave ovens.
It can cause the leak of battery contents, or explosions.
Use standard chargers that obtained Unidata authentication for batteries.
Otherwise, batteries will have their life reduced, face explosions, or damage WPU-7700. In this case, free
services shall not be provided.
Refrain from the use of WPU-7700, and leave the power cord of chargers unplugged when
thunders and lightening are severe.
Thunderbolts can cause severe physical injuries, or fires.
Do not hold WPU-7700 to your ears to turn on the power.
It can cause hearing impairments, or physical injuries.
Do not look at the infrared window in a direct way when using remote control.
It can cause visual impairments.
Do not use chemical detergents such as benzene, thinner, and alcohol to clean WPU-7700.
It can cause fires.
Never push the power button when WPU-7700 are wet, nor touch WPU-7700, chargers, or power
cords with wet hands.
I can cause fires or electric shocks
Precautions
This mark is intended to caution users against violating instructions since it can cause aslight physical
injury or product damage.

5
Correctly install WPU-7700 in compliance with instructions.
Otherwise, it can cause an abnormal operation of WPU-7700, or reduce their life.
Be aware of radio interference.
Since this radio equipment can have radio interference, services related to life safety are not provided.
Do not install WPU-7700 in places exposed to direct sunlight, and on carpets or cushions.
It can cause fires or troubles.
Do not install WPU-7700 in narrow places with poor ventilation, or near heat sources.
It can cause fires or troubles.
Do not install WPU-7700 in places with much dust.
It can cause operational problems, or reduce phone life.
Install WPU-7700 on flat places, not on shelves or slopes.
Otherwise, it can hurt you, or cause troubles when they drop.
Since emergency calls are available only within call coverage, check in advance whether or not
calls are available.
Do not use WPU-7700 covered wrap or vinyl.
Coating can be removed.
Record and keep the information contained in WPU-7700 separately.
Since the important information stored in WPU-7700 can be removed due to unavoidable circumstances
such as users’carelessness, maintenance, and product upgrade, please keep arecord of important
information. Take note that manufacturer will not take responsibility for any damage from the loss of
information.

6
If batteries are not used for a long time, keep them at room temperature after charging.
If you want to use again after leaving them for along time, it is recommended to use them after fully
charging.
Keep in mind that WPU-7700 can produce much heat while using for a long time.
Do not install WPU-7700 in heavily shaking places.
It can cause performance degradation, or reduce the life of products.
After using WPU-7700 for along time, they can produce aweak sound due to their liquid crystal
protective vinyl covering the speaker.
If WPU-7700 are separated from AP or chargers for along time, they cannot work due to battery
discharge.

7
INDEX
BASIC USAGE...............................................................................................................................................9
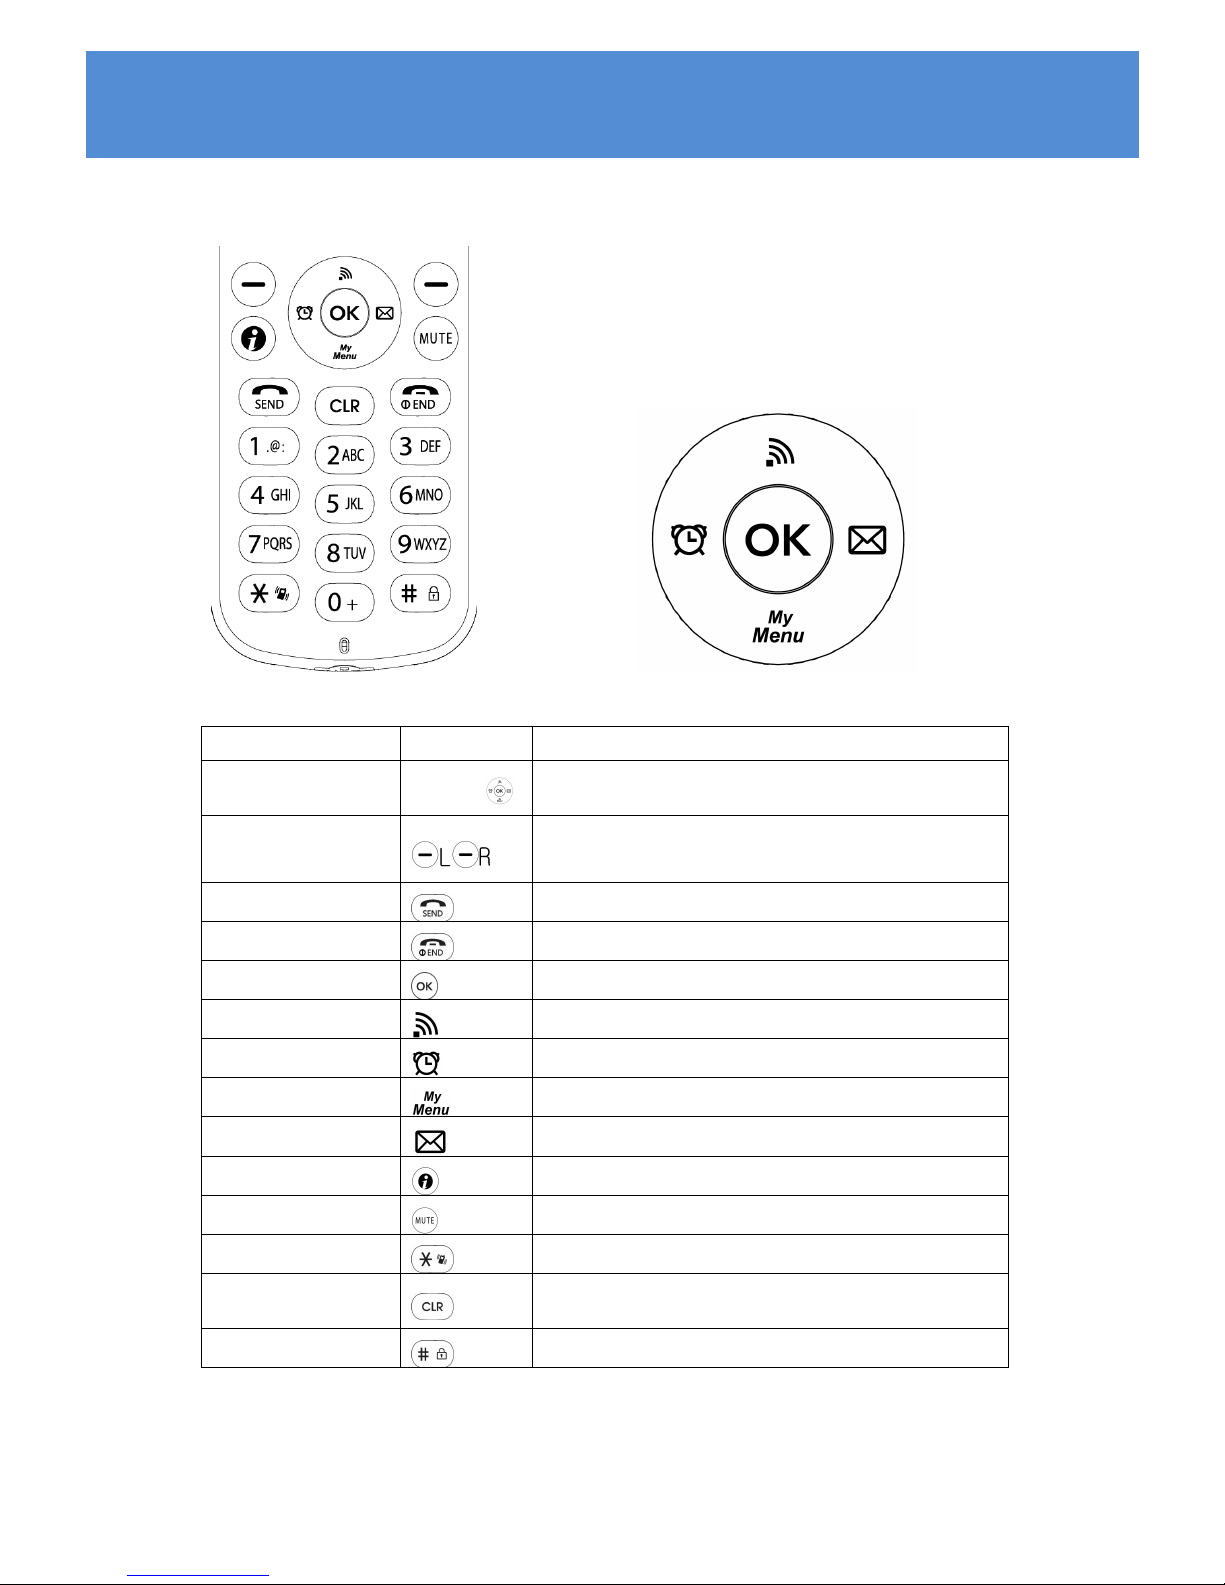
Names and functions of the KEY............................................................................................... 9
Get to Administrator Menu and Change Password .............................................................10
NETWORK..................................................................................................................................................12
Connect to new Temporary profile .........................................................................................12
Make New Network Profile......................................................................................................13
Modify Network Profile............................................................................................................14
Delete Network Profile.............................................................................................................. 15
Change Priority Network Profile............................................................................................. 16
Security ......................................................................................................................................17
Authentication...........................................................................................................................17
Certification manager...............................................................................................................18
TCP/IP........................................................................................................................................ 19
VoIP...............................................................................................................................................................20
SIP ..............................................................................................................................................20
QoS .............................................................................................................................................21
Coder.......................................................................................................................................... 22
SIP Outbound Proxy................................................................................................................. 24
DIAGNOSTIC..............................................................................................................................................25
Diagnose Network.....................................................................................................................25
Diagnose WLAN........................................................................................................................ 27
Diagnose RTP............................................................................................................................29
DSP TEST.................................................................................................................................. 30
LCD/LED test............................................................................................................................ 31
Speaker TEST ........................................................................................................................... 31
Ping test...................................................................................................................................... 32
AUTOPROVISINING GUIDE...................................................................................................................34

8
Ge
neral Sequence of Autoprovisioning
................................
................................
...................
34
Setting Auto provisioning Server Address.............................................................................. 35
Setting the .ini file in Autoprovisioning Server......................................................................36
FW upgrade............................................................................................................................... 40

9
BASIC USAGE
Names and functions of the KEY
Key Name Icon Basic functions
Direction key ▲▼◄► Used for menu viewing, Can be pressed up and down, left
and right
Left soft key
Right soft key Submenu operation etc
Send key
Used for receiving and making calls
End key
Used to end a call and to switch the power ON/ OFF
Ok key
Used to confirm
AP search key
Used for searching Access Point
Alarm key
Alarm/ Wake up call
My menu key
Using user-defined function
Message key
Using message function
Google Service key
Using Google service
Mute key
Mute ON / OFF
Vibration key
Vibration ON / OFF
Clear key Removing characters or figures entered, or moving to
previous screens
Lock key
Locks/ Unlocks button

10
Get to Administrator Menu and Change Password
Then, push the left direction key to go to the settings mode. Select the Admin Menu to enter
1 Press the left soft key to enter menu in standby mode
2 Press the direction key ▲▼◄► to Admin Menu
3Enter Administrator password. Default administrator password
is 000000 and user password is 0000
4Administrator can only change the Administrator password and
User password. To change Password, select “Admin Pwd”or
“User Pwd”

11
5Enter Password

12
NETWORK
Connect to new Temporary profile
It is only for the temporarily connected profile. The existing temporary profile will be disappeared if you
select another temporary profile. The profile will not be remained if you are rebooting the phone.
1 Press the AP search key to search available WiFi Access
Points in Standby mode
2 Select an access point using the direction key ▲▼◄► and
the OK key
3Enter security and authentication type of WiFi access point.
Please refer to Security and TCP/IP
Saved profile Search results of WiFi networks
Have no encryption set in WiFi network Have encryption set in WiFi network

13
Make New Network Profile
WPU-7700 supports 4profiles to provide afunction of connecting WPU-7700 to various wireless LAN
environments. Based on the results of search of wireless LAN services, select wireless LAN service to
which profiles will be added.
1 Press the AP search key to search available WiFi Access
Points in Standby mode.
2Select “Menu”and “3. Add Profile”using the Left soft
key to make new profile
3Enter admin password, SSID, security and authentication type
of WiFi access point.
To change Alphanumeric to numeric,press the right softkey
.
If 4 profiles is saved already, it is not able to add.
5Enter security and authentication type of WiFi access point.
Please refer to Security and TCP/IP chapter

14
Modify Network Profile
WPU-7700 supports feature to modify saved profiles.
1 Press the AP search key to enter WLAN search mode in
Standby mode
2After move cursor to target AP, press “Edit”.Then enter admin
password, SSID, security and authentication type of WiFi
access point.
3If you want to add aprofile which is not exist, select menu “3.
Add Profile”

15
Delete Network Profile
WPU-7700 supports feature to delect saved profiles. In WLAN search mode, select Menu then 4.Delete
to remove WiFi Network profile. After confirm with entering administrator password, select “Yes”, it will
be deleted.
1 Press the AP search key to enter WLAN search mode in
Standby mode
2After move cursor to target AP, press “menu”by the Left soft
key . Then select “4. Delete”to delete selected AP follow
by entering password.
3If you want to delete all profile, select menu “5. Delete all”
follow by entering password

16
Change Priority Network Profile
The higher position profile in the screen has higher priority to connect automatically
1 Press the AP search key to enter WLAN search mode in
Standby mode
2After choosing the profile you want to change priority, select
Up or Down in menu.
“VoIP”profile can be changed by the autoprovisioning
configuration only

17
Security
While set the profile up, security option can be set.
Select setup for security using the direction key ▲▼◄► ,and confirm using the Ok key. If no
security on AP, this procedure is passed. The supporting security is 64-bits WEP, 128-bits WEP, WPA-
PSK, WPA2-PSK, WPA-EAP and WPA2-EAP.
Authentication
If 802.1x authentication is using, select Yes to configure. Then select “None”,”PEAP”,”TTLS”or “TLS”
the direction key ▲▼◄► , and confirm using the Ok key.

18
Certification manager
In case of EAP-TLS, Select “Certs manger”in administrator menu. You can see the message below if you
select “View Root CA”or “View Private CA”before download them.
Reference and download of the Root CA and Private CA is possible in order to use 802.1x (EAP-TLS,
PEAP, TTLS). You can select which of TFTP, HTTP or HTTPS as a download system.
Root certificate Supporting .der, .cer and .pem Encode system
Private certificate Supporting .pfx and .p12 Encode system
:
Certificate will be deleted when select “Delete CA”

19
TCP/IP
.WPU-7700 support DHCP and manual IP. Select “DHCP”or ”Manual IP”using the direction key
▲▼◄► in network setup screen, and confirm using the Ok key during set the profile up
In case of using manual IP in network setup, IP, Netmask, Gateway and DNS should be entered using the
direction key ▲▼◄► .
Other manuals for WPU-7700 Enterprise Edition
2
Table of contents
Other UniData Communication Systems Cordless Telephone manuals