Uniden EXAI2980 Series User manual

900MHz
CORDLESS
with digital answering system
caller id/call waiting ✝
owner’s manual
EXAI2980
Series
✝ To activate the Caller ID features, you must
subscribe through your telephone company.
EXAI2980A ReSIZE-ENG 7/31 7/31/01 16:50 Page i

The EXAI2980 series features include
AAuuttooTTaallkk
TM
and
AAuuttooSSttaannddbbyy
TM
. AutoTalk allows you to answer a call by
just removing the handset from the base so you don’t have to waste time pushing buttons or flipping
switches. AutoStandby allows you to hang up by simply returning the handset to the base.
The
UUllttrraaCClleeaarrPPlluuss
TM
true compander circuitry virtually eliminates background noise. This innovative
technology, together with 40 different channels, provides you with the best possible reception during all
your conversations.
To protect you against misbilled calls which might result from your phone being activated by other
equipment, the EXAI2980 series has
RRaannddoommCCooddee
TM
digital security which automatically selects one of over
65,000 digital security codes for the handset and base. Also, the
AAuuttooSSeeccuurree
TM
feature electronically locks
your phone when the handset is in the base.
BBeessuurreettoovviissiittoouurrwweebbssiittee::wwwwww..uunniiddeenn..ccoomm
Welcome Congratulations on your purchase of the Uniden EXAI2980 series cordless telephone and answering system.
This phone is designed and engineered to exacting standards for reliability, long life, and outstanding
performance.
NNoottee::SSoommeeiilllluussttrraattiioonnssiinntthhiissmmaannuuaallmmaayyddiiffffeerrffrroommtthheeaaccttuuaalluunniittffoorr
eexxppllaannaattiioonnppuurrppoossee..
Features •900 MHz Extended Range Technology
•16 Digit, 3-line Backlit Display
•Integrated Telephone Answering Device (ITAD)
•Voice Prompted Guidance through ITAD Setup Menu
•10 Number Memory Dialing
•Caller ID and Call Waiting Caller ID
•30 Number Caller ID Memory
•32 Digit Redial
•Bilingual Language Option
•Flash and Pause
•Pulse/Tone Dialing
•Page/Find
•7 Hour Talk Time/14 Day Standby Time
•Handset Earpiece and Ringer Volume Control
•Hearing Aid Compatible
•40 Channel Autoscan
Uniden®is a registered trademark of Uniden America Corporation.
AutoTalk, AutoStandby, UltraClear Plus, Random Code, and AutoSecure are trademarks of Uniden America Corporation.
EXAI2980A ReSIZE-ENG 7/31 7/31/01 16:50 Page ii

Contents
Welcome/Features
Controls and Functions 2, 3
Getting Started
Read this First 4
Checking the Package Contents 4
Setting up the Phone 5
Mounting the Base Unit on a Wall 9
Setting Caller ID Options/Language 10
Entering Your Area Code 10
Basics
Making and Receiving Calls 11
Terminology 12
Adjusting the Handset Ringer and
Earpiece Volume 12
Redial 12
Tone Dialing Switch-over 12
Traveling Out-of-Range 13
Selecting a Different Channel 13
Page 13
Flash and Call Waiting 13
Memory Dialing
Storing Phone Numbers and Names 14
Steps for Entering Names and
Special Characters 15
Making Calls with Memory Dialing 16
Chain Dialing 17
Editing a Stored Name and/or Phone Number 17
Erasing a Stored Name and Phone Number 18
Caller ID Features
Caller ID 19
When the Telephone Rings 19
Viewing the Caller ID Message List 20
Deleting Information from the Caller ID List 20
Using the Caller ID List 21
The Integrated Answering Device
Features 23
Turning the Answering System On/Off 23
Setting Up Your Answering System 24
Using Your Answering System 28
Additional Information
Changing the Digital Security Code 32
Installing the Beltclip 32
Headset Installation 32
Note on Power Sources 33
Maintenance 33
General Information 33
Troubleshooting 34
Index 36
EXAI2980A ReSIZE-ENG 7/31 7/31/01 16:50 Page 1

CONTROLS AND FUNCTIONS
[ 2 ]
Controls and Functions
1. Handset antenna
2. Optional headset jack
3. Beltclip holes
4. Handset battery compartment
5. Handset earpiece
6. LCD display
7. Talk key
8. */left cursor ( )/tone key
9. Caller ID key
10. Volume down key (▼)
11. Select key
12. Handset microphone and ringer speaker
13. Memory (m) key
14. Flash key
15. #/right cursor ( ) key
16. Delete key
17. Volume up key (▲)
18. Redial/pause (p) key
19. Channel (chan) key
20. Handset charging contacts
EXAI2980A ReSIZE-ENG 7/31 7/31/01 16:50 Page 2

CONTROLS AND FUNCTIONS [ 3 ]
21. Handset retainer clip
22. Repeat/rewind (rew) key
23. Play/stop key
24. Delete key
25. Set key
26. Base charging contacts
27. Base speaker
28. Message counter display
29. Status LED
30. Skip/fast forward (ff) key
31. Voice memo/record (rec) key
32. Answer on/off key
33. Menu key
34. Page key
35. Speaker volume keys
36. Microphone
37. Base antenna
38. DC IN 9V jack
39. Telephone line jack
EXAI2980A ReSIZE-ENG 7/31 7/31/01 16:50 Page 3

GETTING STARTED[ 4 ]
Read this First
SStteepp11
Unpack the telephone and accessories.
SStteepp22((ppaaggee55))
Next, choose the best location to set
up the base unit.
SStteepp33((ppaaggee66ttoo88))
Then, insert the battery pack into
the handset. Connect the base unit.
You must charge the battery pack for
1155--2200hhoouurrssbbeeffoorreepplluuggggiinnggiinnttoo
tteelleepphhoonneelliinneeaanndduussiinnggtthheepphhoonnee.
This cordless telephone must be set up before use. Follow these steps:
SStteepp44((ppaaggee1100))
Finally, set the Caller ID options and store
your area code in the memory to use the
Caller ID service.
NNoottee::Skip the area code setting if your
calling area requires 10-digit dialing.
Checking the Package Contents
• BBaasseeuunniitt• HHaannddsseett• AACCaaddaapptteerr
• RReecchhaarrggeeaabbllee
bbaatttteerryy
• TTeelleepphhoonneeccoorrdd
Uniden Parts Department at (800) 554-3988
Hours: M-F 7:00 a.m. to 5:00 p.m. CST. We can also be reached
on the web at www.uniden.com
Make sure you have received the following items in the package.
If any of these items are missing or damaged, contact the Uniden
Parts Department.
AAllssooiinncclluuddeedd::
•This Owner’s Manual
•Quick Reference Guide
•Precautions and Important Safety
Instructions /Warranty Information
•Other printed Material
• WWaallllMMoouunntt
AAddaapptteerr
• BBeellttcclliipp
EXAI2980A ReSIZE-ENG 7/31 7/31/01 16:50 Page 4

GETTING STARTED [ 5 ]
GETTING STARTED
Setting up the Phone
DDootthheeffoolllloowwiinnggsstteeppss::
A. Choose the best location C. Connect the base unit
B. Install the battery pack D. Choose the dial mode
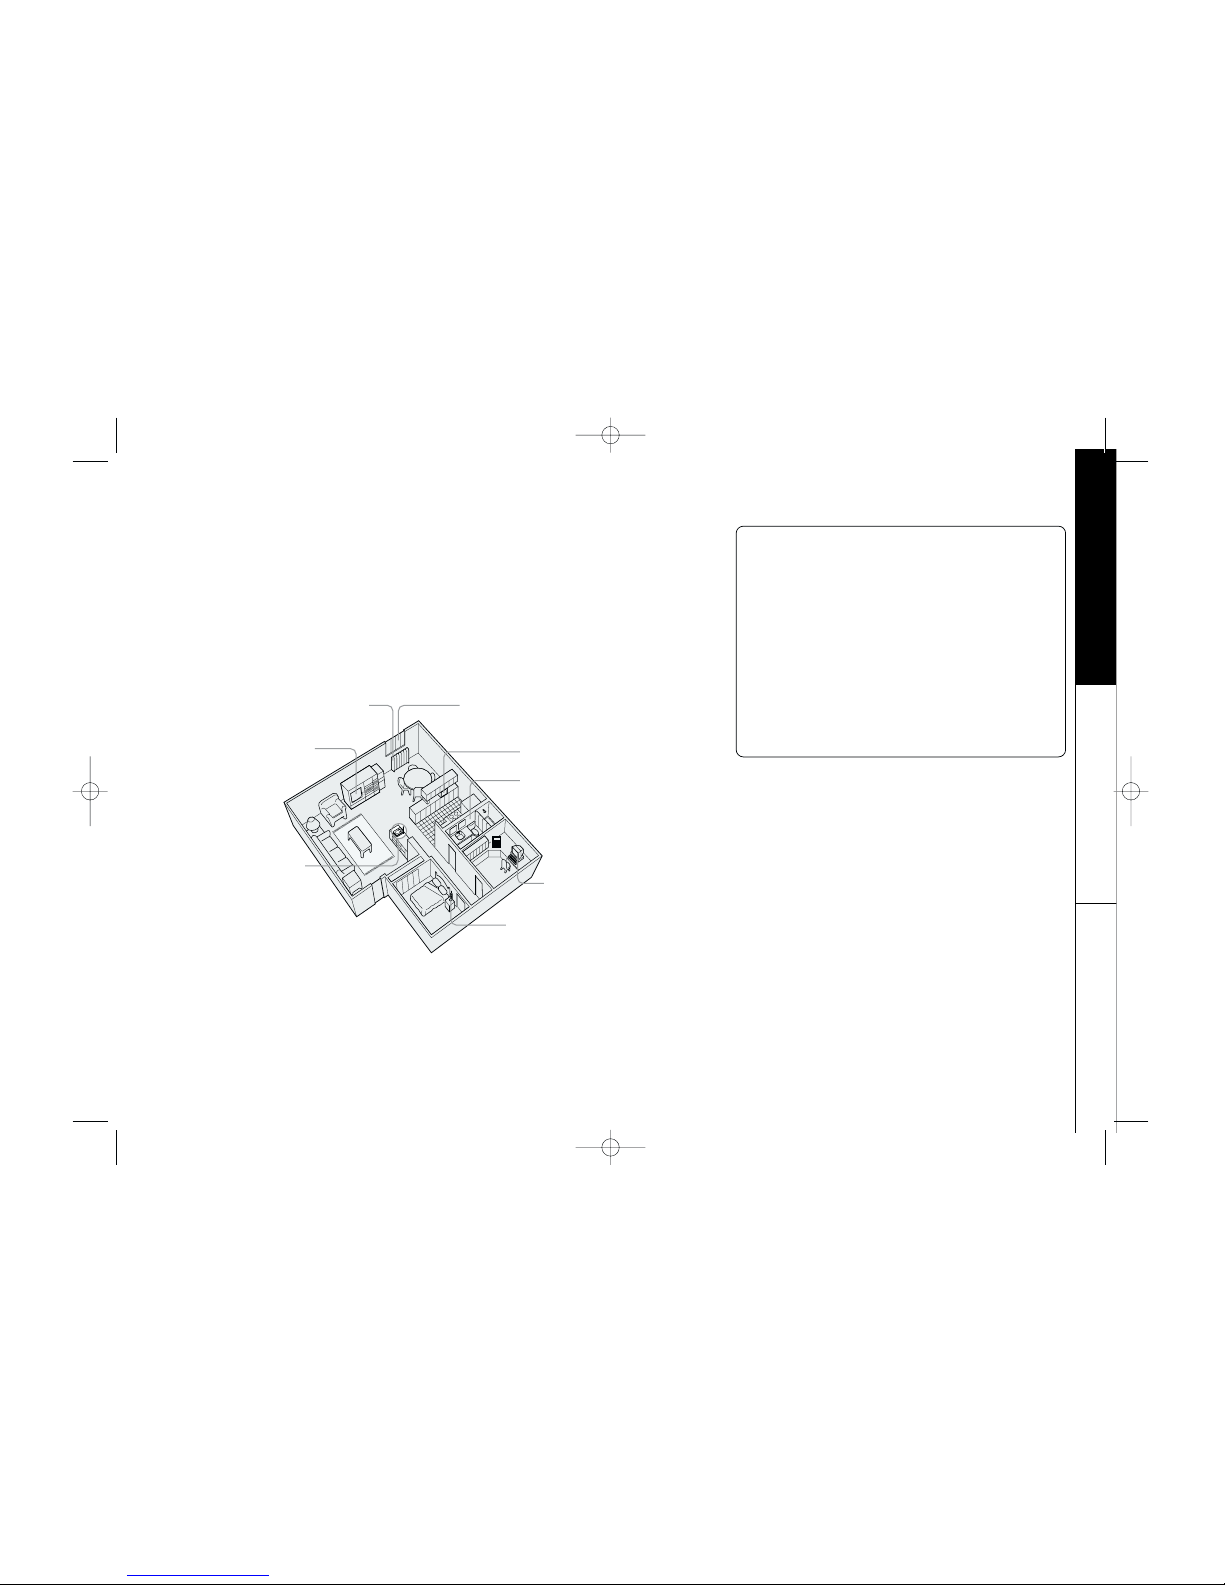
AA..CChhoooosseetthheebbeessttllooccaattiioonn
Before choosing a location for your new phone, read the INSTALLATION
CONSIDERATIONS included in the PRECAUTIONS AND IMPORTANT SAFET Y
INSTRUCTIONS brochure. Here are some important guidelines you
should consider:
•The location should be close to both a phone jack and a continuous power outlet
which is not switchable.
•Keep the base and handset away from sources of electrical noise such as motors,
microwave ovens, and fluorescent lighting.
•Be sure there is sufficient space to raise the base antenna to a vertical position.
•The base can be placed on a desk, tabletop, or mounted on a standard wall plate.
AAvvooiiddeexxcceessssiivveemmooiissttuurree,,eexxttrreemmeellyy
lloowwtteemmppeerraattuurreess,,dduusstt,,mmeecchhaanniiccaall
vviibbrraattiioonn,,oorrsshhoocckk
AAvvooiiddhheeaattssoouurrcceess,,ssuucchhaassrraaddiiaattoorrss,,
aaiirrdduuccttss,,aannddssuunnlliigghhtt
AAvvooiiddtteelleevviissiioonnsseettssaanndd
ootthheerreelleeccttrroonniicceeqquuiippmmeenntt
AAvvooiiddnnooiisseessoouurrcceessssuucchhaassaawwiinnddooww
bbyyaassttrreeeettwwiitthhhheeaavvyyttrraaffffiicc
AAvvooiiddmmiiccrroowwaavveeoovveennss
AAvvooiiddppeerrssoonnaallccoommppuutteerrss
AAvvooiiddootthheerrccoorrddlleesssstteelleepphhoonneess
CChhoooosseeaacceennttrraallllooccaattiioonn
AAbboouutttthheeddiiggiittaallsseeccuurriittyyccooddee
This cordless telephone uses a digital
security code to prevent unauthorized
access to your base unit. This security
code prevents other cordless handsets
from making calls through your base unit.
A random security code will be assigned
automatically between your base unit and
handset when you charge the battery pack
for the first time. If you want to reset the
security code, see page 32.
EXAI2980A ReSIZE-ENG 7/31 7/31/01 16:50 Page 5

GETTING STARTED
[ 6 ]
CChhaarrggeetthheebbaatttteerryyppaacckkffoorraattlleeaasstt1155--2200hhoouurrssbbeeffoorreepplluuggggiinnggtthheetteelleepphhoonneejjaacckk
aannddssttaarrttuussiinnggyyoouurrpphhoonnee..
1)Press in on the battery cover release and slide the cover down until it comes off.
2)Connect the battery pack connector observing correct polarity (black and red wires) to
the jack inside the battery compartment.
Do not exert any force on this connection. It could cause damage to the battery or
handset. Once you are certain that you have made a good connection, then insert the
battery pack into the battery compartment. Do not pinch the wires.
3)Securely close the battery compartment cover by sliding it up until it snaps into place.
4)Place the handset on the base. Remove the beltclip, if attached, for face up charging.
BB..IInnssttaalllltthheebbaatttteerryyppaacckk
BBaatttteerryyuusseettiimmee((ppeerrcchhaarrggee))
From fully charged
•Seven hours continuous use.
•Fourteen days when the handset is in the standby mode.
LLoowwbbaatttteerryyaalleerrtt
When the battery pack is very low and needs to be charged, the
phone is programmed to eliminate functions in order to save
power. If the phone is not in use, “Low Battery“appears on
the LCD and none of the keys will operate.
If the phone is in use, “Low Battery“flashes and the handset beeps. Complete your
conversation as quickly as possible and return the handset to the base unit for charging.
The last number dialed in the redial memory and the numbers stored in the memory
locations are retained for up to 30 minutes while you replace the battery pack.
•Use only the Uniden
battery (BT-905)
supplied with your
phone. Replacement
batteries are also
available through
the Uniden Parts
Department (see
page 4).
•Even when the
battery pack is not
being used, it will
gradually discharge
over a long period
of time.
For optimum
performance, be
sure to return the
handset to the base
unit after each
telephone call for
charging the
battery.
•If you must replace
the battery pack
during a telephone
call, complete the
replacement within
30 seconds, and
you may return to
the caller.
EXAI2980A ReSIZE-ENG 7/31 7/31/01 16:50 Page 6

GETTING STARTED [ 7 ]
GETTING STARTED
CClleeaanniinnggtthheebbaatttteerryycchhaarrggiinnggccoonnttaaccttss
TToommaaiinnttaaiinnaaggooooddcchhaarrggee,,iittiissiimmppoorrttaannttttoocclleeaanntthheebbaatttteerryyccoonnttaaccttssoonntthhee
hhaannddsseettaannddbbaasseeuunniittwwiitthhaaddrryyccllootthhoorraappeenncciilleerraasseerraabboouuttoonncceeaammoonntthh..
DDoonnoottuusseeaannyylliiqquuiiddssoorrssoollvveennttss..
CC..CCoonnnneecctttthheebbaasseeuunniitt
1)Connect the AC adapter to the
DDCCIINN99VV
jack and a standard 120V AC wall
outlet.
2)Set the base on a desk or tabletop, and place the handset on the base
unit as shown. Remove the beltclip, if attached for face up charging.
(For wall mounting, see "Mounting the Base Unit on a Wall", on page 9.)
3)Raise the antenna to a vertical position.
4)Make sure the
ssttaattuuss
LED lights. If the LED does not light, check to see
that the AC adapter is plugged in and the handset makes good contact
with the base charging contacts.
•Use only the supplied AD-420 AC adapter. Do not use any other AC adapter.
•Connect the AC adapter to a continuous power supply.
•Place the base unit close to the AC outlet so that you can unplug the AC
adapter easily.
•After installing the battery pack in the handset, charge your handset at least
1155--2200hhoouurrssbbeeffoorreepplluuggggiinnggiinnttootthheepphhoonneelliinnee. Once the handset battery pack is
fully charged, connect the telephone line cord to the base and telephone
wall outlet.
EXAI2980A ReSIZE-ENG 7/31 7/31/01 16:50 Page 7

GETTING STARTED
[ 8 ]
If your telephone outlet isn’t modular, contact your
telephone company for assistance.
DD..CChhoooosseetthheeddiiaallmmooddee
Most phone systems use tone dialing which sends DTMF tones through the phone line. However some phone systems
still use pulse dialing such as in rural areas. The default setting is tone dialing. Depending on your dialing system,
set the mode as follows:
1)Press and hold
ffllaasshh
until you hear a confirmation tone.
The current setting appears next to Dial Mode.
2)To set the dial mode for pulse dialing, press #. Or to set the dial
mode for tone dialing, press */tone .
A confirmation tone sounds to indicate the setting is complete.
•If you are not sure of your dialing system, set for tone dialing. Make a trial call.
If the call connects, leave the setting as is, otherwise set for pulse dialing.
•If your phone system requires pulse dialing and you need to send DTMF tones for certain situations during a
call, you may "switch-over" to tone dialing. (Refer to "Tone Dialing Switch-over" on page 12.)
Modular
5)Connect the telephone line cord to the
TTEELLLLIINNEE
jack and a telephone
outlet once the handset is fully charged.
Make sure your
battery pack is fully
charged before
choosing the dial
mode.
EXAI2980A ReSIZE-ENG 7/31 7/31/01 16:50 Page 8

GETTING STARTED [ 9 ]
GETTING STARTED
Mounting the Base Unit on a Wall
SSttaannddaarrddwwaallllppllaatteemmoouunnttiinngg
This phone can be mounted on any standard wall plate.
1)Snap the wall mount adapter into the notches on the base.
2)Plug the AC adapter to the DC IN 9V jack.
3)Wrap the AC adapter cord inside the molded wiring channel as shown.
4)Plug the AC adapter into a standard 120V AC wall outlet.
5)Place the handset on the base and charge for 15-20 hours.
6)Plug the telephone line cord into the TEL LINE jack. Wrap the cord
inside the molded wiring channel as shown.
7)Plug the telephone line cord into the telephone outlet.
8)Raise the antenna to a vertical position.
9)Align the mounting slots on the base with the mounting posts on the
wall. Then push in and down until the phone is firmly seated.
SSeettttiinnggtthheehhaannddsseettrreettaaiinneerrcclliippffoorrwwaallllmmoouunnttiinngg
1)On the base unit, pull the handset retainer clip out of the slot and rotate it clock-
wise 180 degrees.
2)Flip the retainer clip from front to back. Slide it back into the slot so that the lip
of the retainer is up and the ▼is down. The retainer holds the handset in place.
DDiirreeccttwwaallllmmoouunnttiinngg
If you don’t have a standard wall plate, you can mount your phone directly to the wall. Before doing
this, consider the following:
•Avoid electrical cables, pipes, or other items behind the mounting location that could cause a
hazard when inserting screws into the wall.
•Try to mount your phone within 5 feet of a working phone jack to avoid excessive cord lengths.
•Make sure the wall material is capable of supporting the weight of the base and handset.
•Use #10 screws (minimum length of 1-3/8 inches) with anchoring devices suitable for the wall
material where the base unit will be placed.
1)Insert two mounting screws into the wall, (with their appropriate anchoring device), 3-15/16 inches apart.
Allow about 1/8 of an inch between the wall and screw heads for mounting the phone.
2)Set the retainer clip if necessary.
3)Refer to steps 1 through 9 above to mount the telephone.
DO NOT use an
outlet controlled by
a wall switch.
If you have wall
mounted the base,
you have to remove
the beltclip to hang
the handset with
the display facing
forward.
EXAI2980A ReSIZE-ENG 7/31 7/31/01 16:50 Page 9

GETTING STARTED
[ 10 ]
Setting Caller ID Options/Language
There are three Caller ID setup options available. They are AutoTalk, CIDCW (Caller ID on Call Waiting), and Area
Code.
AAuuttooTTaallkkallows you to answer the phone without pressing the
ttaallkk
button. If the phone rings when AutoTalk is
on, simply remove the handset from the base and the phone automatically answers the call. Or if the handset is
not on the base, press any key to answer the call. If the phone rings when AutoTalk is off, you must press
ttaallkk
to
answer the call.
LLaanngguuaaggeeoption can be used to choose the language of your display. You can select either English or French.
TToocchhaannggeeyyoouurrCCaalllleerrIIDDooppttiioonnss//LLaanngguuaaggee::
1)Press and hold
ccaalllliidd
. The following screen appears.
2)Use ▲ and ▼ or a number key (1-4) to move the pointer to the selection that you
would like to change.
Press
sseelleecctt
to toggle between “On“and “Off“for AutoTalk and CIDCW.
3)To set up the language of your display, press ▼or the number key 4 to move the pointer to "Language".
Press select to select "Eng"(English) or "Fr"(French).
4)After you have made your Caller ID selections, press
ccaalllliidd
and return the handset to the base.
Entering Your Area Code
If you enter a 3-digit area code number in the Area Code option, your local area code does not appear in Caller
ID messages. Do not program this option, if your calling area requires 10-digit dialing.
When reviewing Caller ID messages, you will see only the local seven digit number.
For calls received from outside your local area code, you will see a full 10-digit number.
1)When the phone is in the standby mode, press and hold
ccaalllliidd
.
The Caller ID setting screen appears.
2)Press
33
to select “Area Code“or press ▼ twice.
3)Press
sseelleecctt
.
4)Use the number keys (
00
to
99
) to enter the 3-digit area code.
5)Press
sseelleecctt
. A tone sounds and the displayed area code is entered.
If your calling area
requires 10-digit
dialing, do not
program this
option.
EXAI2980A ReSIZE-ENG 7/31 7/31/01 16:50 Page 10

BASICS [ 11 ]
BASICS
Making and Receiving Calls
Pick up the handset (AutoTalk)
or press
ttaallkk
.
1)Pick up the handset.
2)Press
ttaallkk
.
3)Listen for the dial tone.
4)Dial the number.
OORR
1)Pick up the handset.
2) Dial the number, then press
ttaallkk
.
1)Pick up the handset.
2)Press
ttaallkk
.
3)Listen for the dial tone.
4)Press
rreeddiiaall//pp
.
Press any key (When the AutoTalk
is set to on) or press
ttaallkk
.
1)Press
ttaallkk
.
2)Listen for the dial tone.
3)Dial the number.
OORR
Dial the number, then press
ttaallkk
.
1)Press
ttaallkk
.
2)Listen for the dial tone.
3)Press
rreeddiiaall//pp
.
HHaannddsseett
OOnnBBaassee
HHaannddsseett
OOffffBBaassee
To answer
a call
To make
a call
To hang up
To redial
Press
ttaallkk
or return the handset to the base (AutoStandby).
Refer to page 10
"Setting Caller ID
Options" to turn
on the AutoTalk
feature if desired.
When the area code has already been stored in memory, the stored area code will be displayed. To change it,
use the
ddeelleettee
and number keys to enter the new area code. Then press
sseelleecctt
. A confirmation tone sounds.
To complete the setting, press
ccaalllliidd
or return the handset to the base unit.
6)Press
ccaalllliidd
to complete the setting. Or return the handset to the base unit to
complete the setting. The handset returns to the standby mode.
EXAI2980A ReSIZE-ENG 7/31 7/31/01 16:50 Page 11

BASICS
[ 12 ]
Adjusting the Handset Ringer and Earpiece Volume
RRiinnggeerrttoonneeaannddvvoolluummee
When the phone is in standby mode, pressing the
vvooll
▲or ▼key on the handset selects the handset ringer volume
and tone. There are two ringer tones each with two volume levels. Continue pressing the volume keys to listen to all
tones and volume levels. The phone keeps the last ringer tone and volume setting selected.
EEaarrppiieecceevvoolluummee
The handset earpiece volume settings (Low, Medium, High and Maximum) can only be adjusted during a call. (Talk
Mode) Press
vvooll
▲or ▼repeatedly to select Low, Medium, High, or Maximum. When you hang
up, the phone keeps the last volume setting selected.
As you increase or decrease the volume, your selection appears on the display.
Talk 0:15
Volume Hig
Redial
The
rreeddiiaall//pp
key redials the last number dialed. The redialed number can be up to 32 digits long.
Tone Dialing Switch-over
Some telephone companies use equipment that require pulse dialing (sometimes referred to
as rotary dialing). If you need to enter tone dialing digits, you can switch-over to tone dial-
ing during the call. An example of this could be entering your bank account number after
you have called your bank. The digits of your bank account can be entered using DTMF tones.
Initially make your call with the pulse dialing mode. Once your call connects, press */tone .
Enter the desired number (like in the example above, the bank account number). These digits will be sent as tone
dialing. This special number can be stored in a memory location. This is referred to as Chain Dialing (See page 17).
Once the call ends, the tone mode is canceled and pulse dialing resumes.
Terminology
Throughout this manual, terms such as Standby and Talk Mode are used. Below is the terminology explanation.
•SSttaannddbbyyMMooddee- The handset is not in use, off the base and
ttaallkk
has not been pressed. A dial tone is not present.
•TTaallkkMMooddee- The handset is off the base and
ttaallkk
has been pressed enabling a dial tone.
The tone feature
only applies when
the dial mode is set
to pulse.
EXAI2980A ReSIZE-ENG 7/31 7/31/01 16:50 Page 12

BASICS [ 13 ]
BASICS
You must subscribe through your local telephone
company to receive Call Waiting Service.
Flash and Call Waiting
If you have "Call Waiting" service and a call waiting tone sounds while you are on a call,
press
ffllaasshh
to accept the waiting call. There is a short pause, then you will hear the new
caller. To return to the original caller, press
ffllaasshh
again.
Selecting a Different Channel
If you encounter interference while using your phone, you can manually change the phone’s channel for
clear operation. Interference can come from appliances or other phones in your home. This function works
only when the phone is in use.
During the course of a conversation, if you hear static or noise which makes it difficult to hear, press chan.
"Scanning" appears on the display, indicating the phone is changing to another channel. For more infor-
mation on interference, refer to the enclosed Precautions and Warranty brochure.
Page
To locate the handset (while it’s off the base), press
ppaaggee
on the base. The handset
beeps for 60 seconds.
Paging is canceled when pressing any handset key,
ppaaggee
on the base or the handset
is returned to the base.
Traveling Out-of-Range
During a call, as you begin to move your handset too far from your base unit, noise increases. If you pass the
range limits of the base unit, your call will terminate within 30 seconds.
You can cancel
paging by pressing
ppaaggee
key on the
base.
EXAI2980A ReSIZE-ENG 7/31 7/31/01 16:50 Page 13

MEMORY DIALING
[ 14 ]
Storing Phone Numbers and Names
Memory Dialing allows you to dial a number using just a few key strokes.
Your EXAI2980 series stores up to 10 names/numbers in the handset.
1)Press and hold
mm
until “Memory Store“is displayed.
2)Press ▲ and ▼ or enter a number (0 - 9) to select the memory location where you
would like to store the number.
3)Press
sseelleecctt
. The following screen appears and a cursor flashes indicating that the
display is ready for the name to be entered.
If this screen appears, the selected memory location is already stored. Then you must
either change the entry in this location, clear the entry in this location, or select
“Go Back“to choose another location.
4)To enter a name (up to 14 characters), use number keys.
•See the “Steps for Entering Names and Special Characters“. (See page 15)
•Use #and */tone to move the cursor to the desired location.
•Use delete to delete characters as needed.
•Press and hold delete to delete all the characters.
•If a name is not required, go to step 5.
Memory Store
1
2
Store Name
Edit Memory 1
Delete Memory 1
Go Back
5)Press
sseelleecctt
. “Store Number“is displayed.
The cursor flashes indicating that the display is ready for the number to be entered.
6)Use the number keys to enter the phone number.
The phone number cannot exceed 20 digits.
•Use
rreeddiiaall//pp
to enter pause in the dialing sequence. The display shows a “P“.
Each pause counts as one digit and represents a two second delay of time between
the digits as they are sent.
•Use
ddeelleettee
to delete digits as needed.
Store Number
8002971023
Store Number
•In memory dialing
operation, you
must press a key
within 20 seconds
or the phone will
return to standby.
If you return the
handset to the
base, the phone
will return to
standby also.
•You have 20
seconds after
pressing
mm
to
enter the number
you wish to store.
Otherwise, an error
tone will sound.
•The pause feature
is useful for long
distance calling,
credit card dialing,
or sequences that
require a pause
between digits.
•The pause key
counts as one
digit. Pressing
rreeddiiaall//pp
more
than once increas-
es the length of
pause between
numbers.
EXAI2980A ReSIZE-ENG 7/31 7/31/01 16:50 Page 14

MEMORY DIALING [ 15 ]
MEMORY DIALING
NNuummbbeerrooffttiimmeesskkeeyyiisspprreesssseedd
Keys 123456789
1
ABCabc2
DEFdef3
GHIg i4
JKLjkl5
MNOmno6
PQRSpqrs7
TUVtuv8
WXYZwxyz9
*#-&()
(blank)
0
7)Press
sseelleecctt
. The handset beeps and displays the confirmation screen. Memory storage is
complete. For example, if you store a name and number into memory location number 7,
the display shows “Memory 7 Stored“.
After about 2 seconds, “Memory Store“is displayed.
Repeat steps 2 - 7 to store more numbers.
8)Press
mm
to return to standby mode.
Memory 7 Stored
Memory Store
7 UNIDEN CORP
8 (Memory 8)
Steps for Entering Names and Special Characters
Refer to the letters on the number keys to select
the desired characters. With each press of a
numeric key, the displayed character appears in
the following order : Upper case letters first,
lower case letters next, and finally the number
corresponding to the key.
IIffyyoouummaakkeeaammiissttaakkeewwhhiilleeeenntteerriinnggaannaammee
Use */
ttoonnee
or
##
to move the cursor to the
incorrect character, press
ddeelleettee
to erase up to
the wrong entry, then enter the correct character.
To delete all characters, press and hold
ddeelleettee
.
1
2abc
3def
4ghi
5jkl
6mno
7pqrs
8tuv
9wxyz
0
For example, to enter UUnniiddeenn;
1)Pick up the handset. Press and hold
mm
.
2)Enter a number or press ▲ , ▼to select a
memory location number.
3)Press
sseelleecctt
.
4)Press
88
twice.
5)Press
66
five times.
6)Press
44
six times.
7)Press
33
four times, then press #to move
the cursor to the right.
8)Press
33
five times.
9)Press
66
five times.
10)When finished, press
sseelleecctt
.
If the next character uses the same number key, you
must press # to move the cursor over. Otherwise
the next time you press the number key, it changes
the character that was previously set.
To continue to store the telephone number, proceed to step 6
on page 14.
•The 10 memory
locations are
represented by
the numbers 0-9
on the keys. If
you store a
number in one of
locations, then
attempt to store a
different number
in the same
location later, the
new number will
overwrite the
previous one.
EXAI2980A ReSIZE-ENG 7/31 7/31/01 16:50 Page 15

MEMORY DIALING
[ 16 ]
Making Calls with Memory Dialing
MMeemmoorryyddiiaalliinnggffrroommSSttaannddbbyyMMooddee
1)Press
mm
.
The handset displays your programmed memory locations.
2)Press ▲ and ▼ or enter a number (0 - 9) to select the memory location you would like
to dial.
3)Press
ttaallkk
. “Talk“and the volume setting appear on the display. Then the displayed
number is dialed.
DDiissppllaayyaapprrooggrraammmmeeddnnuummbbeerr
Use #and*/tone to toggle between the names display and the numbers display.
1 UNIDEN CORP
2 JOHN DOE
3 MOM AND DAD
Talk
0123456789012
PPrrooggrraammnnaammeePPrrooggrraammnnuummbbeerr
1
1
1 8002971023
2 5452930
3 8175551212
1 UNIDEN CORP
2 JOHN DOE
3 MOM AND DAD
5 012345678901
6 0118135543290
7
When the stored phone number has 15 or more digits, “\“is displayed next to
the 13th digit. Press #to see the extra digits and */tone to return.
•If you press
sseelleecctt
before
ttaallkk
, you
can confirm the
name and the
number stored in
the selected
memory location.
•To exit the
memory function
without dialing,
press
mm
. The
handset returns to
standby.
•Whenever you are
using a menu
screen, you must
press a key within
20 seconds or the
phone will return
to standby.
MMeemmoorryyddiiaalliinnggffrroommTTaallkkMMooddee
1)Press
ttaallkk
. “Talk“and the volume setting appear.
2)Press
mm
.
3)Enter a number (0 - 9) to select the memory location of the desired phone number. The
selected phone number is displayed. Then the number is dialed.
4)To hang up, press
ttaallkk
.
Talk Talk
Volume Hig
Talk 0:00
Talk 0:35
0123456789012
EXAI2980A ReSIZE-ENG 7/31 7/31/01 16:50 Page 16

MEMORY DIALING [ 17 ]
MEMORY DIALING
Chain Dialing
The 10 memory locations on the handset are not limited to phone numbers. You may want to store in memory a
group of numbers (up to 20 digits) that you need to enter once your call connects. This is referred to as Chain
Dialing.
An example of this is a bank account number. Once you have called your bank, when you are prompted to enter the
account number, simply press
mm
and then the location where the special number has been stored.
Store your special number with identifying name in memory as you would a phone number. (Refer to "Storing
Phone Numbers and Names" on page 14.) Enter a pause as necessary in the sequence.
A pause counts as one digit and represents a two second delay in time between digits as they are sent.
Editing a Stored Name and/or Phone Number
1)Press and hold
mm
until “Memory Store“is displayed.
2)Press ▲ and ▼ or enter a number (0 - 9) to select the memory location you would
like to edit.
3)Press
sseelleecctt
.
The following screen appears with the memory location number that you have selected
in the display.
4)Press ▲ or ▼ to select “Edit Memory“, then press
sseelleecctt
.
The following screen appears.
The cursor flashes indicating that the display is ready for the name to be edited.
When a name has not been stored, the cursor appears at the beginning of the
second line.
5)Use the number keys, */tone , #, or
ddeelleettee
to edit the name. (See page 14.)
To edit only the phone number, skip this step.
6)Press
sseelleecctt
. The following screen appears.
The cursor flashes indicating that the display is ready for the number to be edited.
7)Use the number keys,
rreeddiiaall//pp
or
ddeelleettee
to edit the phone number.
The phone number cannot exceed 20 digits. (See page 14.)
If you don´t want to change the phone number, skip this step.
Memory Store
1 UNIDEN CORP
2 JOHN DOE
Edit Memory 1
Delete Memory 1
Go Back
Store Name
UNIDEN CORP
Store Number
8002971023
EXAI2980A ReSIZE-ENG 7/31 7/31/01 16:50 Page 17

MEMORY DIALING
[ 18 ]
8)Press
sseelleecctt
. The handset beeps and displays the confirmation screen. The memory
storage is complete.
For example, if you store a name and number into memory location number 1, the
display shows “Memory 1 Stored“. After about 2 seconds, “Memory Store“is
displayed.
9)Press
mm
to return to standby mode.
Memory 1 Stored
Memory Store
1 UNIDEN CORP
2 JOHN DOE
1)Press and hold
mm
until “Memory Store“is displayed.
2)Press ▲ and ▼ or enter a number (0 - 9) to select the memory location you would like
to edit.
3)Press
sseelleecctt
.
The following screen appears with the memory location number that you have selected in
the display.
4)Press ▼ to move the pointer down to “Delete Memory“.
5)Press
sseelleecctt
. The following confirmation screen appears.
6)Press ▲ to move the pointer to “Yes“.
7)Press
sseelleecctt
or
ddeelleettee
.
The following screen appears.
8)After a few seconds the display returns to the “Memory Store“screen.
You may delete the information in another memory location (return to step 2) or press
mm
to return to standby.
Memory Store
1 UNIDEN CORP
2 JOHN DOE
Edit Memory 2
Delete Memory 2
Go Back
Edit Memory 2
Delete Memory 2
Go Back
Delete Memory 2?
Yes
No
Erasing a Stored Name and Phone Number
Memory 2 Deleted
Memory Store
2
3 MOM AND DAD
EXAI2980A ReSIZE-ENG 7/31 7/31/01 16:50 Page 18
Table of contents
Other Uniden Cordless Telephone manuals

Uniden
Uniden D2380-3 User manual

Uniden
Uniden DMX 778 Series User manual

Uniden
Uniden MER 9600C User manual

Uniden
Uniden EXL 8945 User manual

Uniden
Uniden EXT1265 User manual

Uniden
Uniden EXI 6960 User manual

Uniden
Uniden DSS2115 User manual

Uniden
Uniden EXT 1865 Assembly instructions

Uniden
Uniden TRU 3455 User manual

Uniden
Uniden DECT1480 User manual

Uniden
Uniden DCT6465 Series User manual

Uniden
Uniden ANA 9610 User manual

Uniden
Uniden EP200 User manual

Uniden
Uniden XS 910 User manual

Uniden
Uniden MULTIRANGE DRX332 User manual

Uniden
Uniden EXS 2060 User manual

Uniden
Uniden DECT 3136BT User manual

Uniden
Uniden DCT 5285 User manual

Uniden
Uniden DSS3450 User manual

Uniden
Uniden TRU 346 Service manual