Uniden EXS9500 User manual

CONTENTS
OF YOUR OWNER’S MANUAL
CONTENTS
Introduction............................................................1
•Welcome............................................................1
•Features ............................................................1
•Included in Your Package ..............................................2
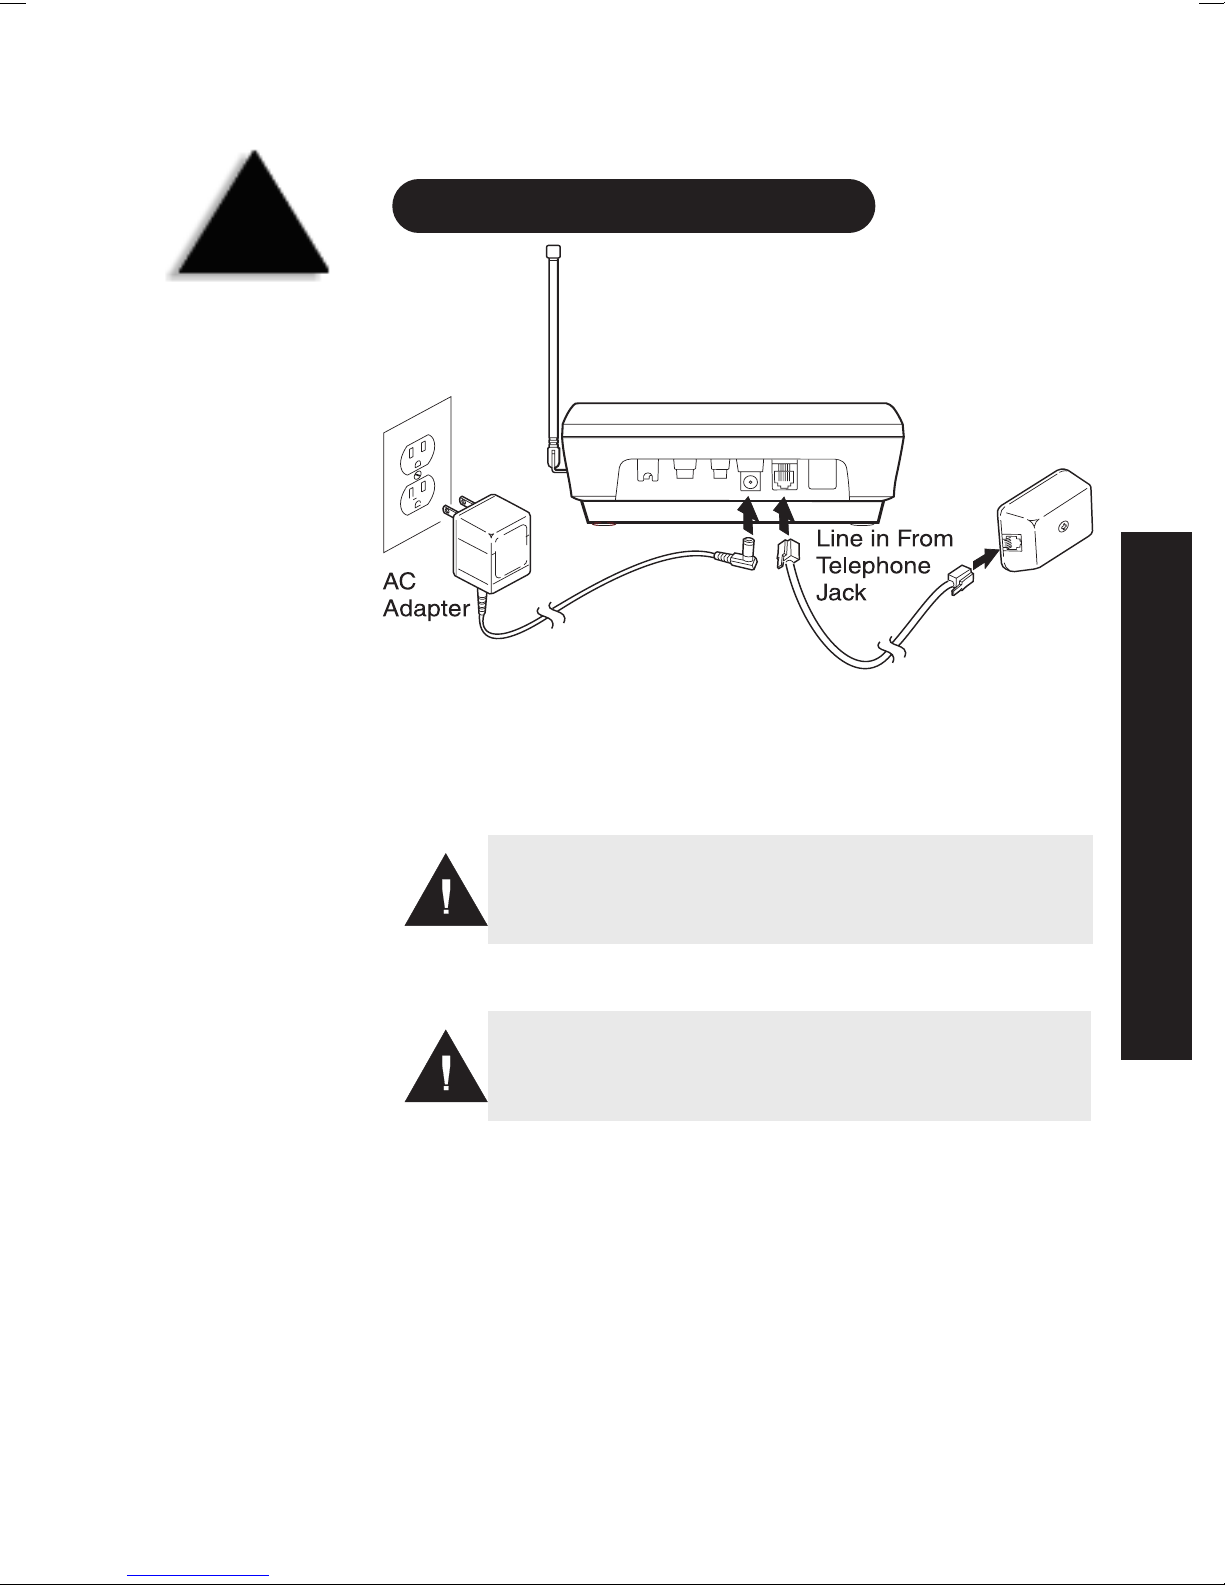
Installing and Adjusting Your Phone ........................................3
•Desk/Tabletop Installation..............................................3
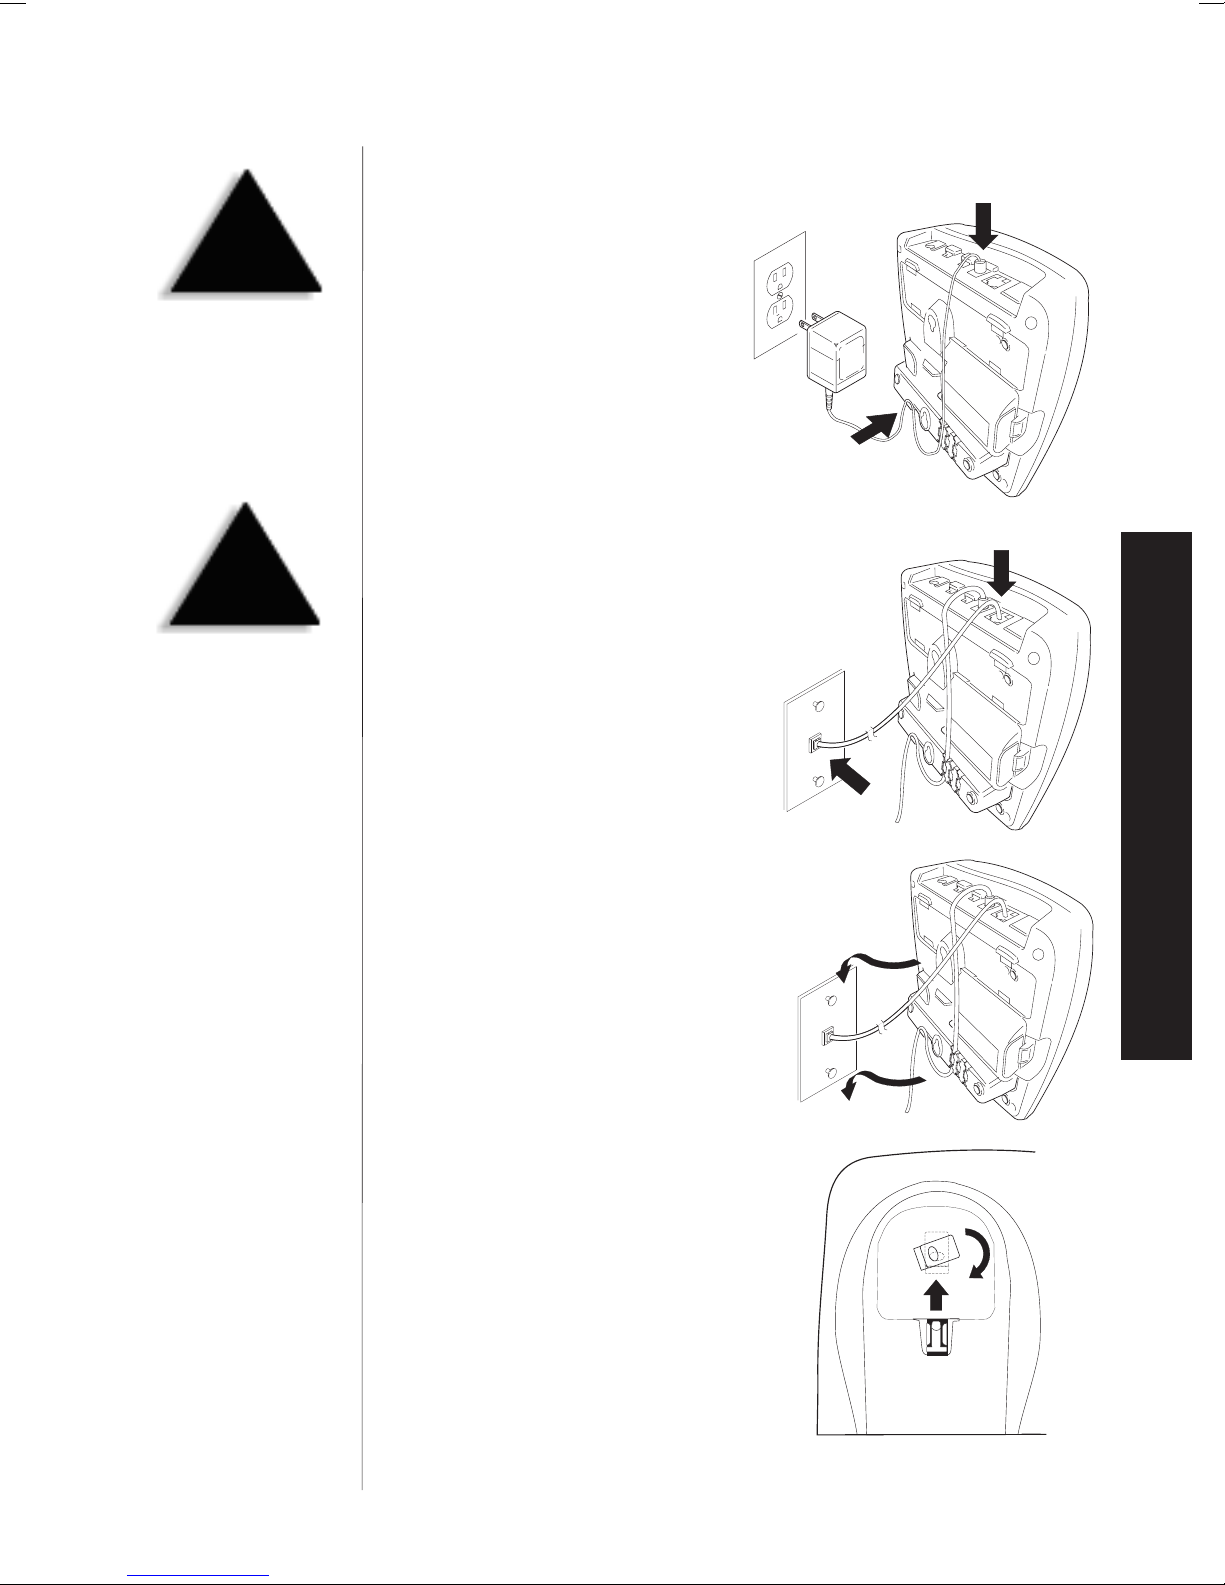
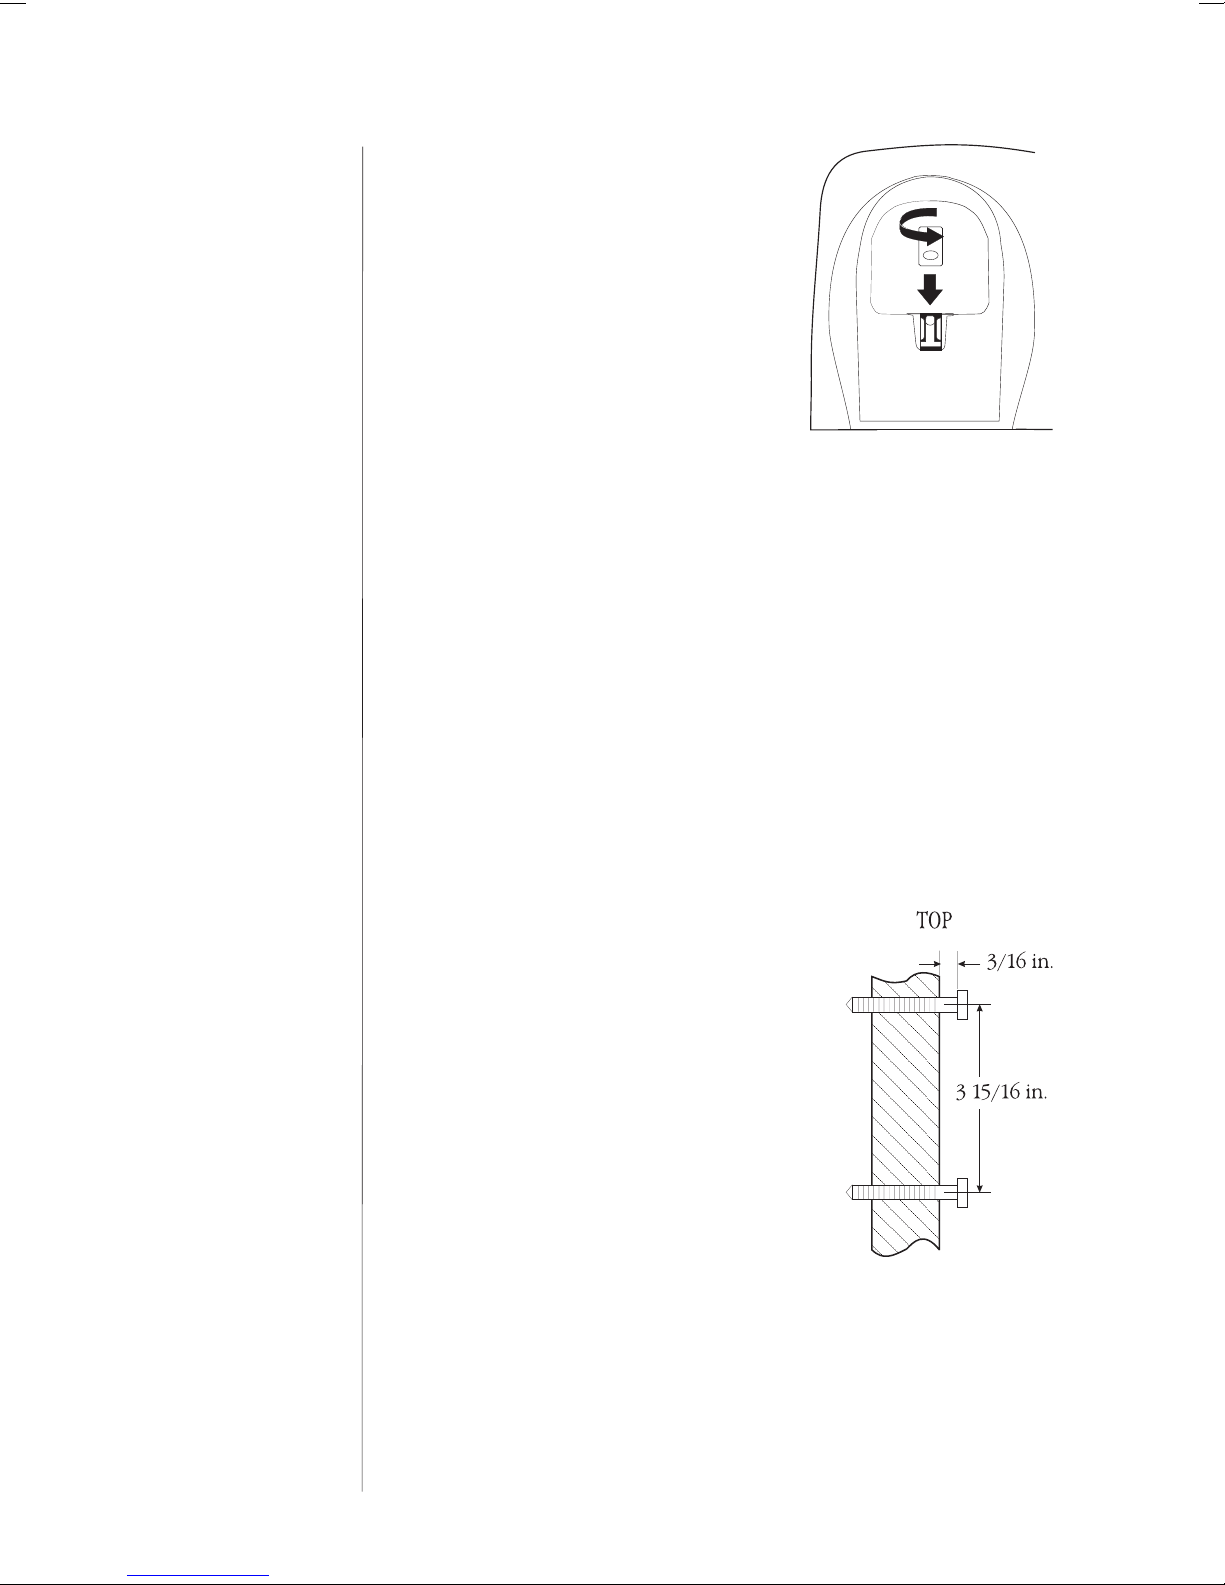
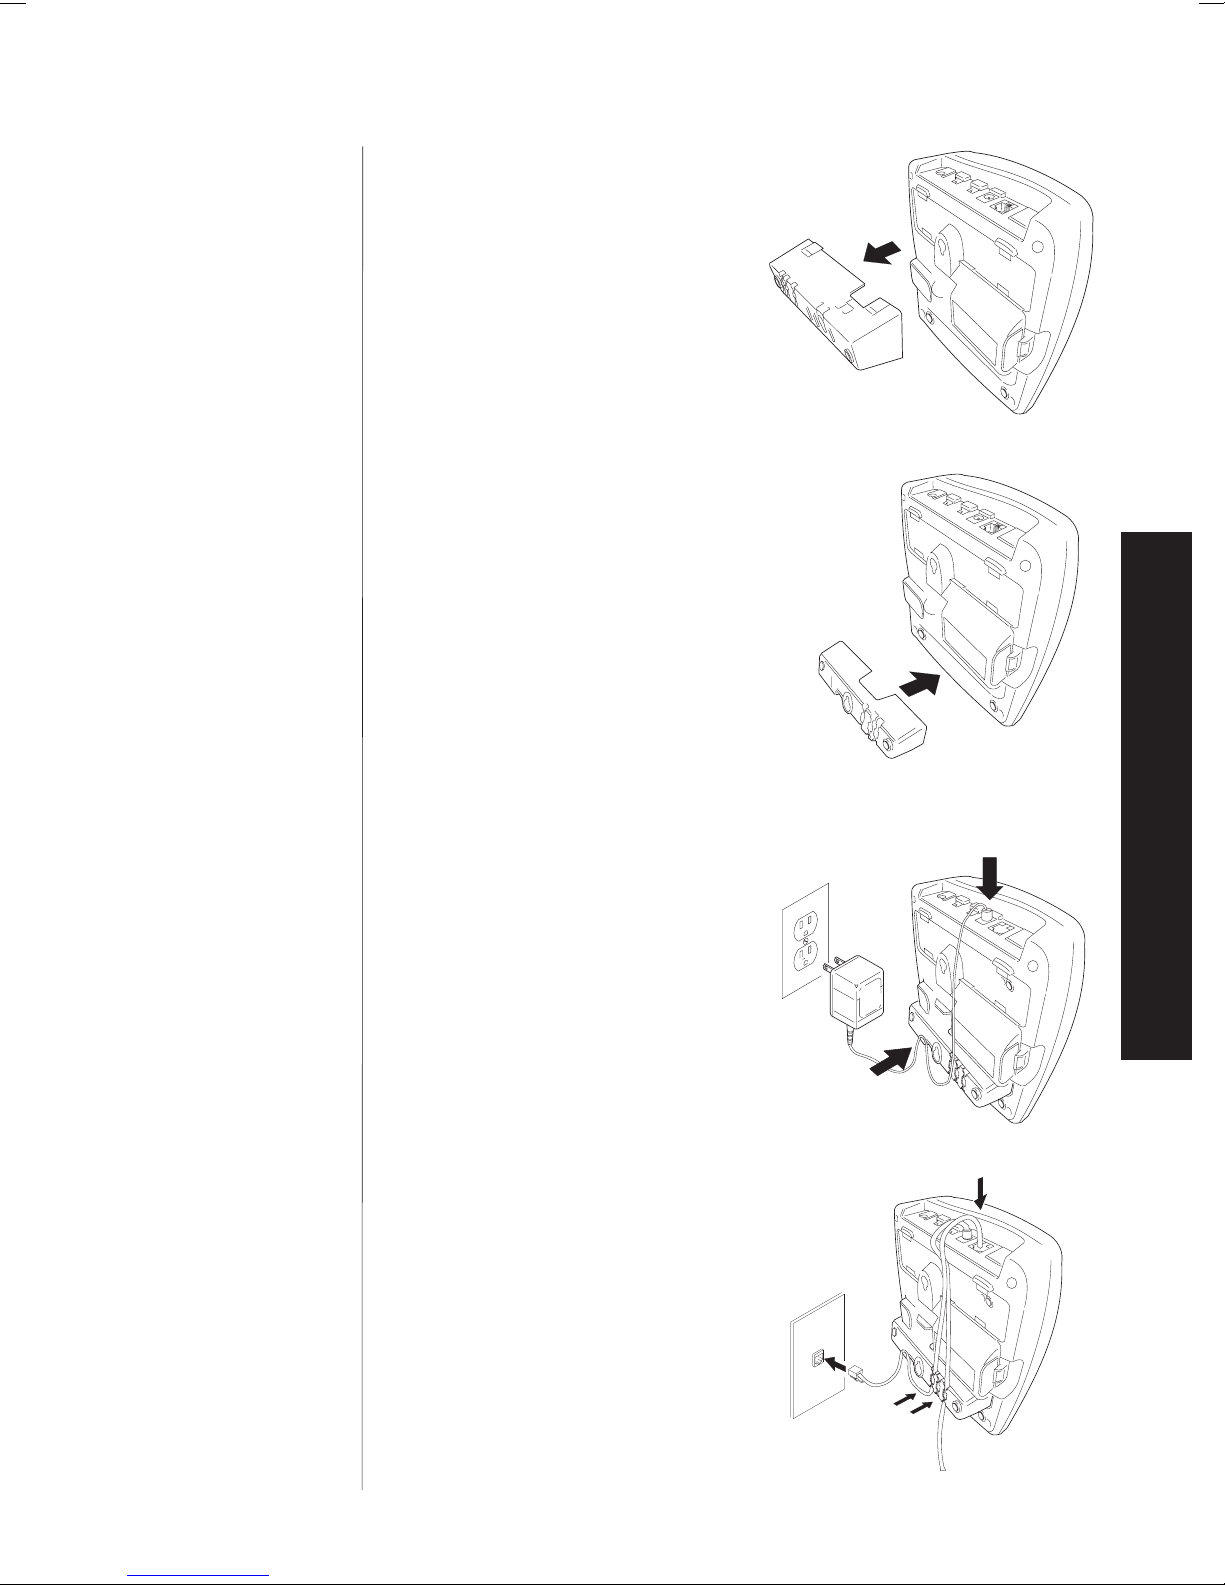
•Wall Installation......................................................4
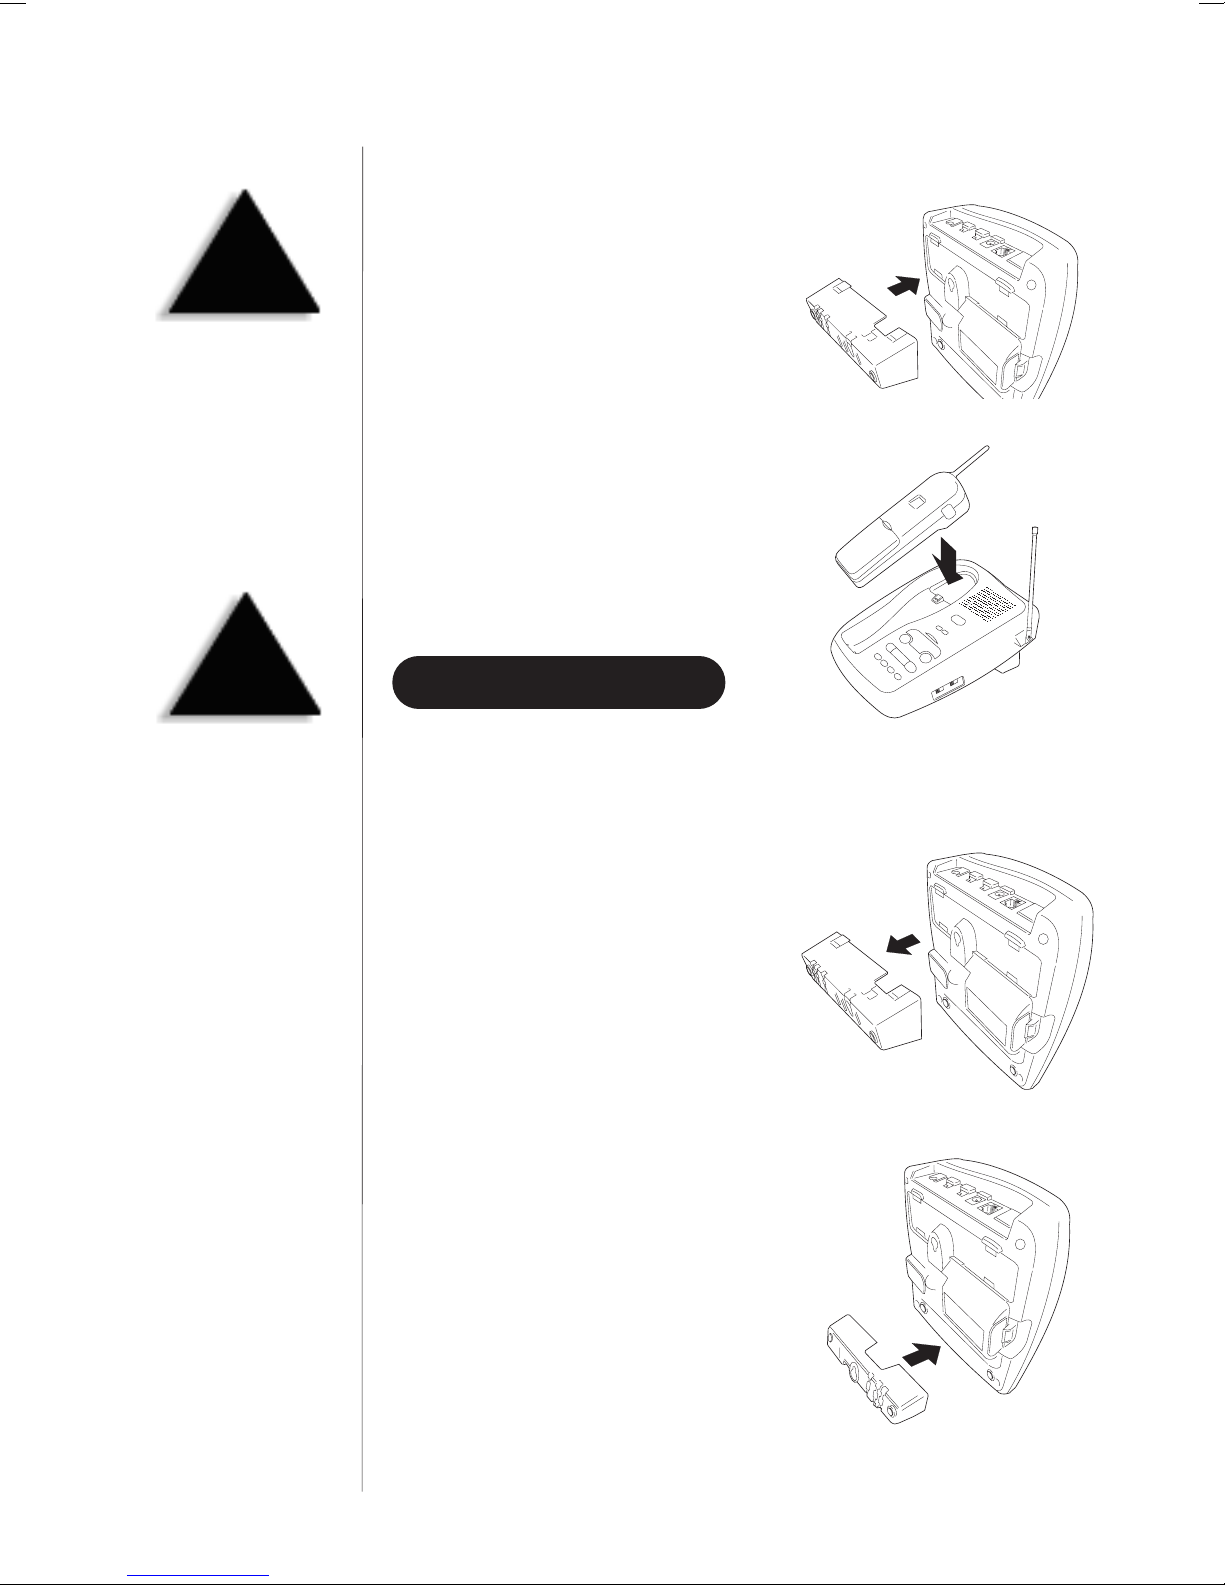
•Installing the Handset Battery Pack ......................................9
•Charging the Battery Pack ............................................10
•Cleaning the Battery Contacts..........................................11
•Page ..............................................................11
•Setting the Pulse/Tone Switch .........................................12
•Adjusting the Ringer Controls ..........................................12
•Changing the Handset Ringer ..........................................12
•Installing the Beltclip.................................................13
•Headset Installation ..................................................14
•Automatic Digital Code Security ........................................14
Using Your New Phone ..................................................15
•Making and Receiving Calls............................................15
•Flash and Call Waiting ...............................................15
•Storing a Phone Number in Memory ....................................16
•Dialing a Number ...................................................16
•Chain Dialing.......................................................17
•Erasing a Stored Number from Memory..................................17
•Redial .............................................................17
•Tone ..............................................................18
•Mute ..............................................................18
•Traveling Out-of-Range ...............................................18
•Using the Speaker Phone .............................................18
Setting Up the Integrated Answering Device .................................19
•The Integrated Answering Device .......................................19
•Features ...........................................................19
•Turning the Answering System On/Off ..................................20
•Setting the Clock ....................................................20
•Setting Your Outgoing Message (OGM) ..................................23
•Selecting the Message Time............................................24
•Memo .............................................................24
•Selecting a Pin Code .................................................25
•Calling Party Control Feature ..........................................26
•Setting the Toll Saver Switch ..........................................26
•Using the Reset Button ...............................................26
Using the Integrated Answering Device .....................................27
•Playing Your Messages ...............................................27
•Repeating a Message .................................................28
•Skipping a Message ..................................................29
•Deleting a Message ..................................................30
•Recording a Conversation .............................................30
•Remote Access Away from Home .......................................31
Troubleshooting........................................................32
•Quick Reference Chart................................................32
Specifications ..........................................................35
NOTE
Fold out the back cover of
this owner’s manual to use
the handy “Controls and
Functions” page
for reference.
C:\Manuals 7\EXS9500\EXS9500.vp
Tue Oct 06 09:19:11 1998
Color profile: Disabled
Composite Default screen

Introduction
WELCOME
Congratulations on your purchase of the Uniden EXS9500 cordless
telephone and answering system. This phone is designed for reliability,
long life, and outstanding performance utilizing the latest in 900 MHz
Spread Spectrum technology.
FEATURES
•900 MHz Spread Spectrum Technology
•Integrated Telephone Answering Device (ITAD)
•20 Enhanced Memory Dial Locations
•4 One-Touch Memory Locations
•32 Digit Redial
•2nd Battery Capability
•Back-up Power Supply with Optional Battery Pack
•Redial, Flash, and Pause
•Pulse/Tone Dialing
•Page
•7 Day Standby Battery Time
•4 Hour Talk Time
•Handset Earpiece and Ringer Volume Control
•Hearing Aid Compatible
Digital Spread Spectrum Technology utilizes a “wider frequency
band” vs. a “single narrow band” used in standard digital trans-
missions. The result is a more secure conversation with the clarity of
digital sound, extended range, and minimal interference from other
cordless phones.
Random CodeTM digital security automatically selects one of over
65,000 codes for the handset and base.
These features enhance your phone’s security and also prevent
unauthorized calls as a result of your phone being activated by
other equipment.
1
TO YOUR NEW PHONE
INTRODUCTION
INTRODUCTION
C:\Manuals 7\EXS9500\EXS9500.vp
Fri Oct 02 13:55:40 1998
Color profile: Disabled
Composite Default screen

INCLUDED IN YOUR PACKAGE
•
This Owners Manual
•
Precautions and Important Safety Instructions
•
Registration Card
2
Handset Base AC Adapter
Rechargeable Battery
Long Telephone Cord
Short Telephone Cord Beltclip
Desktop/ Wall Mount
Adapter Wall Mounting
Screws
TIP
To get the most from your
phone, please read this
owners manual thoroughly.
Also be sure to complete
and mail the product
registration form.
NOTE
Ifanyoftheseitemsare
missing or damaged,
contact the Uniden Parts
Department at (800)554-3988.
Hours are from 8:00 a.m. to
5:00 p.m. Central Time,
Monday through Friday. We
can also be reached on the
web at www.uniden.com.
C:\Manuals 7\EXS9500\EXS9500.vp
Tue Oct 06 09:20:37 1998
Color profile: Disabled
Composite Default screen

Installing and Adjusting Your Phone
DESK/TABLETOP INSTALLATION
1) Plug the AC adapter cord into the 9 VDC input jack on the back of
the base.
2) Wrap the AC adapter cord around the strain relief notch.
3) Plug the AC adapter into a standard 120 VAC wall outlet.
4) Charge the battery (refer to “Charging the Battery Pack,” page 10).
5) Plug one end of the long telephone cord into the TEL LINE jack on
the back of the base.
6) Plug the other end of the cord into your telephone jack on the wall.
3
AND ADJUSTING YOUR PHONE
INSTALLING
TIP
Before choosing a location
for your phone, read the
“Installation Considerations”
included in the “Precautions
and Important Safety
Instructions” brochure.
Place the power cord so that it does not create a trip
hazard or where it could become chafed and create a fire
or electrical hazard.
Use only the Uniden AC adapter supplied with this phone
and DO NOT use an outlet controlled by a wall switch.
INSTALLING AND ADJUSTING
C:\Manuals 7\EXS9500\EXS9500.vp
Fri Oct 02 14:14:40 1998
Color profile: Disabled
Composite Default screen

7) Attach the desktop stand to the base.
8) Set the base on a desk or tabletop,
then place the handset into the base
as shown. Then, raise the antenna
to a vertical position.
WALL INSTALLATION
▼Standard wall plate mounting
This phone can be mounted on any standard AT&T or GTE wall plate.
1) Remove the wall mount adapter
from the notches at the top of
the base.
2) Rotate the wall mount adapter
180 degrees and snap it into place at
the bottom of the base.
4
HINT
Before using your phone,
fully charge the Nickel-
Cadmium battery pack for
15-20 hours.
CAUTION
Place the power cord so
that it does not create a
trip hazard or where it
could become chafed and
create a fire or
electrical hazard.
C:\Manuals 7\EXS9500\EXS9500.vp
Tue Oct 06 09:22:22 1998
Color profile: Disabled
Composite Default screen

3) Plug the AC adapter into the base.
4) Put the AC adapter cord inside the
molded wiring channel, then wrap it
around the strain relief notch. Plug
the AC adapter into a standard
120 VAC wall outlet.
5) Plug one end of the short telephone
cord into the TEL LINE jack on the
back of the base, then plug the other
end into a standard telephone jack.
6) Line up the mounting slots on the base
with the mounting posts on the wall,
then push in and down until the
phone is firmly seated.
7) On the base unit, pull the handset
retainer out of the slot and rotate
it clockwise 180 degrees.
5
!
DO NOT use an outlet
controlled by a wall switch.
INSTALLING AND ADJUSTING
!
Before you plug the other
end of the telephone cord
into the modular jack on
the wall, charge the battery
(refer to “Charging the
Battery Pack,” page 10).
C:\Manuals 7\EXS9500\EXS9500.vp
Wed Oct 07 10:59:07 1998
Color profile: Disabled
Composite Default screen

8) Flip the retainer from front to back,
then slide it back into the slot so
that the lip of the retainer faces up
and the oval is at the bottom of the
retainer. This will hold the handset
in place.
▼Direct wall mounting
If you don’t have a standard wall plate, you can mount your phone
directly to the wall. Before doing this, consider the following:
•Select a location away from electrical cables, pipes, or other items
behind the mounting location. Inserting screws into areas such as
this can be hazardous.
•Try to mount your phone within 10 - 15 feet of a working phone
jack in order to avoid excessive lengths. Remember, you are not
mounting your phone to a wall plate with a built-in phone jack.
•If the selected mounting area has no wooden support beams directly
behind it, you will need the appropriate anchoring devices in order
for the wall to properly support your phone.
1) Insert two mounting screws into
the wall, with their appropriate
anchoring device if necessary,
3-15/16 inches apart. Allow about
3/16 of an inch between the wall
and screw heads for mounting
the phone.
6
C:\Manuals 7\EXS9500\EXS9500.vp
Fri Oct 02 14:21:48 1998
Color profile: Disabled
Composite Default screen

2) Remove the wall mount adapter
from the notches at the top of
the base.
3) Rotate the wall mount adapter
180 degrees and snap it into place at
the bottom of the base.
4) Plug the AC adapter into the base.
5) Put the AC adapter cord inside the
molded wiring channel, then wrap
the AC adapter cord around the
strain relief notch. Plug the AC
adapter into a standard
120 VAC wall outlet.
6) Plug one end of the long telephone
cord into the TEL LINE jack on the
back of the base, then plug the other
end into a standard telephone jack.
7
INSTALLING AND ADJUSTING
C:\Manuals 7\EXS9500\EXS9500.vp
Fri Oct 02 14:21:51 1998
Color profile: Disabled
Composite Default screen

7) Line up the mounting slots on the base
with the mounting screws on the wall,
then push in and down until the
phone is firmly seated.
8) On the base unit, pull the handset
retainer out of the slot and rotate
it clockwise 180 degrees.
9) Flip the retainer from front to back,
then slide it back into the slot so
that the lip of the retainer faces up
and the oval is at the bottom of the
retainer. This will hold the handset
in place.
8
C:\Manuals 7\EXS9500\EXS9500.vp
Fri Oct 02 14:21:53 1998
Color profile: Disabled
Composite Default screen

INSTALLING THE HANDSET BATTERY PACK
1) Press in on the battery cover release
and slide the cover down until it
comes off.
2) Install the nickel-cadmium battery
with the label facing down.
3) Slide the battery cover on until it snaps into place.
9
INSTALLING AND ADJUSTING
!
Use only the Uniden
battery (BT-990) supplied
with your phone.
C:\Manuals 7\EXS9500\EXS9500.vp
Tue Oct 06 09:23:31 1998
Color profile: Disabled
Composite Default screen

CHARGING THE BATTERY PACK
▼Initial battery charging
Before plugging the phone line into your new phone for the first time,
fully charge the rechargeable battery pack for 15-20 hours
without interruption.
1) Place the handset on the base.
2) Make sure that
status
LED lights. If the LED doesn’t light, check to see
that the AC adapter is plugged in and that the handset makes good
contact with the base charging contacts.
▼Charging optional battery packs
The base unit of your phone is equipped with a compartment for
charging an extra battery pack for use in your handset. You can
obtain an extra battery pack from your authorized Uniden dealer.
1) Position the battery pack so the inner side with contacts is facing up.
2) Slide the battery pack into the
charging compartment until it
clicks into place. The compartment
has a latch that keeps the battery
in place.
3) Fully charge the battery for 15-20 hours. When charging is complete,
pull up on the latch to remove the battery pack. To install the charged
battery into the handset, refer to “Installing the Handset Battery Pack,”
page 9.
10
!
Please visit your
authorized Uniden dealer
to obtain an extra battery
pack or contact the Uniden
parts department at
(800)554-3988. Hours are
from 8:00 a.m. to 5:00 p.m.
Central Time, Monday
through Friday.
In the event of a power failure, your spare battery pack
can be used as a back-up power supply for the base unit.
C:\Manuals 7\EXS9500\EXS9500.vp
Fri Oct 02 14:34:55 1998
Color profile: Disabled
Composite Default screen

▼Low battery indicator
When the battery pack is very low and
needs to be charged, the phone is pro-
grammed to eliminate functions in
order to save power. If the phone
is not in use, the
talk/batt low
LED flashes every three seconds.
If the phone is in use, the talk/batt
low LED flashes every three seconds
and the handset beeps. Complete your
conversation as quickly as possible and
return the handset to the base for charging.
CLEANING THE BATTERY CONTACTS
To maintain a good charge, clean all charging contacts on the handset
and base about once a month with a pencil eraser or other contact
cleaner. DO NOT use liquids or solvents; you may damage your phone.
PAGE
To locate the handset (while it’s
off the base), press
page
on the
base. The handset beeps for about
15 seconds.
11
INSTALLING AND ADJUSTING
C:\Manuals 7\EXS9500\EXS9500.vp
Tue Oct 06 09:23:52 1998
Color profile: Disabled
Composite Default screen

SETTING THE PULSE/TONE SWITCH
Be sure the PULSE/TONE switch is in
the TONE position unless your local
phone system uses pulse dialing.
ADJUSTING THE RINGER CONTROLS
▼Handset ringer volume
When the phone is either charging or in standby mode, pressing the
vol
▲or ▼key on the handset selects the handset ringer volume.
There are two ringer volume settings; high and low.
▼Handset earpiece volume
There are four volume settings for the handset earpiece; high, normal,
medium, and low. The handset earpiece volume can only be adjusted
during a call. To lower the volume, press
vol
▼. To raise the volume,
press
vol
▲.
▼Base unit ringer on-off
To turn the base ringer on, select the
RINGER ON
position. To turn the
base ringer off, select the
RINGER OFF
position.
CHANGING THE HANDSET RINGER
1. Press
flash
. LED flashes.
2. Press
1
,
2
,
3
or
4
on the keypad to select ringer tone.
12
TIP
Most phone systems use
tone dialing. Check with
your local phone company
if you’re not sure whether
your system is
tone or pulse.
C:\Manuals 7\EXS9500\EXS9500.vp
Tue Oct 06 09:24:17 1998
Color profile: Disabled
Composite Default screen

INSTALLING THE BELTCLIP
▼To attach the beltclip
1) Remove the slot cover.
2) Put the beltclip in the slot and press
down until it clicks.
▼To remove the beltclip
1) Pull back on the release tab and
pull the beltclip up.
2) Replace the slot cover. You can
store either the beltclip
or slot cover on the
bottom of the base.
13
INSTALLING AND ADJUSTING
C:\Manuals 7\EXS9500\EXS9500.vp
Fri Oct 02 14:35:27 1998
Color profile: Disabled
Composite Default screen

HEADSET INSTALLATION
Your phone may be used with an
optional headset, the Uniden HS910.
To use this feature, simply plug the
headset plug into the headset jack.
Your headset is ready for
hands-free conversations.
AUTOMATIC DIGITAL CODE SECURITY
To prevent other parties from making unauthorized calls on your
phone line, a digital code was added to the EXS9500. Your phone’s
handset and base share this code, which is randomly set each time you
place the handset in the charging cradle.
▼To reestablish communication between the handset and the
base in the event of a power failure
1) Restore power to the base
2) Place the handset on the base. The
status
LED blinks to indicate that
the digital security code is reset.
14
NOTE
If you are using an optional
headset, you must still use
the handset keypad for
phone operations.
Keep headset wire away
from base antenna.
IMPORTANT
Use only the Uniden
HS910 headset specifically
designed for Spread
Spectrum phones. You will
hear a buzz or hum on
other headsets.
headset
jack
C:\Manuals 7\EXS9500\EXS9500.vp
Tue Oct 06 09:24:36 1998
Color profile: Disabled
Composite Default screen

Using Your New Phone
MAKING AND RECEIVING CALLS
Handset
On Base
Handset
Off Base
To answer
a call
Pick up the handset. Press any button.
To make
a call
1) Pick up the handset.
2) Press
talk
.
3) Listen for the dial tone.
4) Dial the number.
1) Press
talk
.
2) Listen for dial the tone.
3) Dial the number.
To hang up Press
talk
, or return the handset to the
base (AutoStandby).
To redial
1) Pick up the handset.
2) Press
talk
.
3) Listen for the dial tone.
4) Press
redial
.
1) Press
talk
.
2) Listen for the dial tone.
3) Press
redial
.
FLASH AND CALL WAITING
If you have “call waiting” service
and a call waiting tone sounds
while you are on a call, press
flash
to accept the waiting call.
There is a short pause, then you
will hear the new caller. To
return to the original caller,
press flash again.
15
USING YOUR PHONE
USING
YOUR NEW PHONE
C:\Manuals 7\EXS9500\EXS9500.vp
Tue Oct 06 09:24:55 1998
Color profile: Disabled
Composite Default screen

STORING A PHONE NUMBER IN MEMORY
1) Remove the handset from the base.
2) Press
mem
and the
talk/batt low
LED blinks.
3) Enter the phone number, up to 16 digits. If a pause is needed during
dialing to access a long distance service, press
redial/p
to insert a
pause.
4) Press
mem
again.
5) Enter the memory location (01-20) on the keyboard or press memory
key
a
,
b
,
c
,or
d
. A tone indicates that the number is stored.
DIALING A NUMBER
▼Using the memory location features
1) Press
talk
.
2) Press
mem
.
3) Enter the memory location (01-20). The number automatically dials.
▼One-touch memory dialing
Press memory key
a
,
b
,
c
,or
d
. The number automatically dials.
16
NOTE
The pause button counts as
one digit. Pressing
redial/p
more than once
increases the length of
pause between numbers.
NOTE
Accidentally pressing
memory keys
a
,
b
,
c
or
d
after pressing
mem
, may
result in unintentional
dialing.
C:\Manuals 7\EXS9500\EXS9500.vp
Fri Oct 02 14:36:21 1998
Color profile: Disabled
Composite Default screen

CHAIN DIALING
On certain occasions after dialing a number,
you may be requested to enter an access
code, such as your account number. You can
enter this number into a memory location
for later use by doing the following.
1) Store the access code into one of the
memory locations (01-20) or memory keys
a
,
b
,
c
,or
d
following steps 1-5 above.
2) Dial the party or service main number.
3) When you need to enter the special number, press
mem
followed by
the memory location (01-20) or memory keys
a
,
b
,
c
,or
d.
ERASING A STORED NUMBER FROM MEMORY
1) Remove the handset from the base unit.
2) Press the
mem
button twice.
3) Press the memory location (01-20) or memory key
a
,
b
,
c
,or
d
to be erased.
A tone indicates that the stored number is erased from memory.
REDIAL
The
redial
key redials the last number dialed. The redialed number
can be up to 32 digits long.
17
USING YOUR PHONE
NOTE
An error sounds and the
erase procedure will be
canceled if more than 20
seconds elapse between
each keystroke.
C:\Manuals 7\EXS9500\EXS9500.vp
Fri Oct 02 14:36:37 1998
Color profile: Disabled
Composite Default screen

TONE
If you are dialing in the pulse mode
and need to enter tone digits, press
tone
to enter the digits. Once the call
has ended, the tone mode is canceled
and pulse dialing resumes.
MUTE
To use the mute feature during a conversation, press
mute
. The other
party will not be able to hear you although you can hear them. To
disable the mute feature, press
mute
again.
TRAVELING OUT-OF-RANGE
As you begin to move too far from your base unit, you will first hear a
clicking sound. As you travel further out-of-range, the voice
transmission will begin to break up. If you pass the range limits of the
base unit, your call will terminate.
USING THE SPEAKER PHONE
You may use your phone as a speaker phone by pressing the
speaker
button on the base unit. When you hang up, press
speaker
again.
If the handset is on the base, you may use the handset keypad to
dial a number or use memory dialing.
18
NOTE
The tone feature only
applies when the base unit
is set to pulse.
C:\Manuals 7\EXS9500\EXS9500.vp
Fri Oct 02 14:36:53 1998
Color profile: Disabled
Composite Default screen

Setting Up the Integrated Answering Device
THE INTEGRATED ANSWERING DEVICE
The EXS9500 has a built-in answering system that answers and records
incoming calls. You can also use your answering system to record a
conversation, leave a memo message for others who use the phone, or to
announce a special message to callers when you’re away from your phone.
FEATURES
•Digital Tapeless Recording
•15 minutes of Recording Time
•Call Screening
•Selectable Outgoing Messages
•Time and Day Stamp
•Remote Access
•Toll Saver
Digital Tapeless Recording allows you to quickly review, save, or delete
the messages you choose. You’ll never have to worry about a tape
wearing out, jamming, or resetting improperly.
The Integrated Answering System is easy and convenient to use, but
please read through all of the instructions carefully before attempting
to use it.
19
SETTING UP
THE INTEGRATED ANSWERING DEVICE
ANSWERING DEVICE SETUP
C:\Manuals 7\EXS9500\EXS9500.vp
Fri Oct 02 14:41:59 1998
Color profile: Disabled
Composite Default screen
Table of contents
Other Uniden Cordless Telephone manuals

Uniden
Uniden EXP2800 User manual

Uniden
Uniden WXI3077 User manual

Uniden
Uniden DECT2180 User manual

Uniden
Uniden CLX 465 SERIES User manual

Uniden
Uniden 6035 + 1 User manual

Uniden
Uniden EXI2960 User manual

Uniden
Uniden DSS 2465 User manual

Uniden
Uniden EXS 9995 User manual

Uniden
Uniden DECT 1805 User manual

Uniden
Uniden WDECT 2355+2 User manual

Uniden
Uniden DCT738 Series User manual

Uniden
Uniden EXA 7950 User manual

Uniden
Uniden XC815 User manual

Uniden
Uniden DXAI5688 Series User manual

Uniden
Uniden DXI 4286-2 Series User manual

Uniden
Uniden EXAI398 Series User manual

Uniden
Uniden D3097 Series User manual

Uniden
Uniden TRU546 User manual

Uniden
Uniden TRU 246 User manual

Uniden
Uniden EXI2926 User manual