manuals.online logo
Brands
  1. Home
  2. •
  3. Brands
  4. •
  5. Unigas
  6. •
  7. Burner
  8. •
  9. Unigas HP60 Operating manual

Unigas HP60 Operating manual

M03957CI rel 8.12 09/2016
BURNERS - BRUCIATORI - BRULERS - BRENNER - QUEMADORES -
ГОРЕЛКИ
Progressive
and fully-modulating
gas - light oil burners
MANUAL OF INSTALLATION - USE - MAINTENANCE
HP60 - HP65
HP72 - HP73A
2
DANGERS, WARNINGS AND NOTES OF CAUTION
THIS MANUAL IS SUPPLIED AS AN INTEGRAL AND ESSENTIAL PART OF THE PRODUCT AND MUST BE DELIVERED TO THE
USER.
INFORMATION INCLUDED IN THIS SECTION ARE DEDICATED BOTH TO THE USER AND TO PERSONNEL FOLLOWING
PRODUCT INSTALLATION AND MAINTENANCE.
THE USER WILL FIND FURTHER INFORMATION ABOUT OPERATING AND USE RESTRICTIONS, IN THE SECOND SECTION
OF THIS MANUAL. WE HIGHLY RECOMMEND TO READ IT.
CAREFULLY KEEP THIS MANUAL FOR FUTURE REFERENCE.
1) GENERAL INTRODUCTION
The equipment must be installed in compliance with the regulations in
force, following the manufacturer’s instructions, by qualified personnel.
Qualified personnel means those having technical knowledge in the
field of components for civil or industrial heating systems, sanitary hot
water generation and particularly service centres authorised by the
manufacturer.
Improper installation may cause injury to people and animals, or
damage to property, for which the manufacturer cannot be held liable.
Remove all packaging material and inspect the equipment for integrity.
In case of any doubt, do not use the unit - contact the supplier.
The packaging materials (wooden crate, nails, fastening devices, plastic
bags, foamed polystyrene, etc), should not be left within the reach of chil-
dren, as they may prove harmful.
Before any cleaning or servicing operation, disconnect the unit from
the mains by turning the master switch OFF, and/or through the cut-
out devices that are provided.
Make sure that inlet or exhaust grilles are unobstructed.
In case of breakdown and/or defective unit operation, disconnect the
unit. Make no attempt to repair the unit or take any direct action.
Contact qualified personnel only.
Units shall be repaired exclusively by a servicing centre, duly authorised
by the manufacturer, with original spare parts and accessories.
Failure to comply with the above instructions is likely to impair the unit’s
safety.
To ensure equipment efficiency and proper operation, it is essential that
maintenance operations are performed by qualified personnel at regular
intervals, following the manufacturer’s instructions.
When a decision is made to discontinue the use of the equipment,
those parts likely to constitute sources of danger shall be made harm-
less.
In case the equipment is to be sold or transferred to another user, or in
case the original user should move and leave the unit behind, make
sure that these instructions accompany the equipment at all times so
that they can be consulted by the new owner and/or the installer.
This unit shall be employed exclusively for the use for which it is
meant. Any other use shall be considered as improper and, therefore,
dangerous.
The manufacturer shall not be held liable, by agreement or otherwise, for
damages resulting from improper installation, use and failure to comply
with the instructions supplied by the manufacturer.The occurrence of any
of the following circustances may cause explosions, polluting unburnt
gases (example: carbon monoxide CO), burns, serious harm to people,
animals and things:
- Failure to comply with one of the WARNINGS in this chapter
- Incorrect handling, installation, adjustment or maintenance of the burner
- Incorrect use of the burner or incorrect use of its parts or optional supply
2) SPECIAL INSTRUCTIONS FOR BURNERS
The burner should be installed in a suitable room, with ventilation ope-
nings complying with the requirements of the regulations in force, and
sufficient for good combustion.
Only burners designed according to the regulations in force should be
used.
This burner should be employed exclusively for the use for which it
was designed.
Before connecting the burner, make sure that the unit rating is the
same as delivery mains (electricity, gas oil, or other fuel).
Observe caution with hot burner components. These are, usually, near
to the flame and the fuel pre-heating system, they become hot during
the unit operation and will remain hot for some time after the burner
has stopped.
When the decision is made to discontinue the use of the burner, the user
shall have qualified personnel carry out the following operations:
a Remove the power supply by disconnecting the power cord from the
mains.
b Disconnect the fuel supply by means of the hand-operated shut-off
valve and remove the control handwheels from their spindles.
Special warnings
Make sure that the burner has, on installation, been firmly secured to
the appliance, so that the flame is generated inside the appliance fire-
box.
Before the burner is started and, thereafter, at least once a year, have
qualified personnel perform the following operations:
a set the burner fuel flow rate depending on the heat input of the
appliance;
b set the flow rate of the combustion-supporting air to obtain a combu-
stion efficiency level at least equal to the lower level required by the
regulations in force;
c check the unit operation for proper combustion, to avoid any harmful or
polluting unburnt gases in excess of the limits permitted by the regula-
tions in force;
d make sure that control and safety devices are operating properly;
e make sure that exhaust ducts intended to discharge the products of
combustion are operating properly;
f on completion of setting and adjustment operations, make sure that all
mechanical locking devices of controls have been duly tightened;
g make sure that a copy of the burner use and maintenance instructions
is available in the boiler room.
In case of a burner shut-down, reser the control box by means of the
RESET pushbutton. If a second shut-down takes place, call the Tech-
nical Service, without trying to RESET further.
The unit shall be operated and serviced by qualified personnel only, in
compliance with the regulations in force.
3) GENERAL INSTRUCTIONS DEPENDING ON FUEL USED
3a) ELECTRICAL CONNECTION
For safety reasons the unit must be efficiently earthed and installed as
required by current safety regulations.
It is vital that all saftey requirements are met. In case of any doubt, ask
for an accurate inspection of electrics by qualified personnel, since the
manufacturer cannot be held liable for damages that may be caused
by failure to correctly earth the equipment.
Qualified personnel must inspect the system to make sure that it is
adequate to take the maximum power used by the equipment shown
on the equipment rating plate. In particular, make sure that the system
cable cross section is adequate for the power absorbed by the unit.
No adaptors, multiple outlet sockets and/or extension cables are per-
mitted to connect the unit to the electric mains.
An omnipolar switch shall be provided for connection to mains, as
required by the current safety regulations.
The use of any power-operated component implies observance of a
few basic rules, for example:
-do not touch the unit with wet or damp parts of the body and/or with
bare feet;
-do not pull electric cables;
-do not leave the equipment exposed to weather (rain, sun, etc.)
unless expressly required to do so;
-do not allow children or inexperienced persons to use equipment;
The unit input cable shall not be replaced by the user.
In case of damage to the cable, switch off the unit and contact quali-
fied personnel to replace.
When the unit is out of use for some time the electric switch supplying
all the power-driven components in the system (i.e. pumps, burner,
etc.) should be switched off.
3
3b) FIRING WITH GAS, LIGHT OIL OR OTHER FUELS
GENERAL
The burner shall be installed by qualified personnel and in compliance
with regulations and provisions in force; wrong installation can cause
injuries to people and animals, or damage to property, for which the
manufacturer cannot be held liable.
Before installation, it is recommended that all the fuel supply system
pipes be carefully cleaned inside, to remove foreign matter that might
impair the burner operation.
Before the burner is commissioned, qualified personnel should inspect
the following:
a the fuel supply system, for proper sealing;
b the fuel flow rate, to make sure that it has been set based on the firing
rate required of the burner;
c the burner firing system, to make sure that it is supplied for the desig-
ned fuel type;
d the fuel supply pressure, to make sure that it is included in the range
shown on the rating plate;
e the fuel supply system, to make sure that the system dimensions are
adequate to the burner firing rate, and that the system is equipped with
all the safety and control devices required by the regulations in force.
When the burner is to remain idle for some time, the fuel supply tap or
taps should be closed.
SPECIAL INSTRUCTIONS FOR USING GAS
Have qualified personnel inspect the installation to ensure that:
a the gas delivery line and train are in compliance with the regulations
and provisions in force;
b all gas connections are tight;
c the boiler room ventilation openings are such that they ensure the air
supply flow required by the current regulations, and in any case are
sufficient for proper combustion.
Do not use gas pipes to earth electrical equipment.
Never leave the burner connected when not in use. Always shut the
gas valve off.
In case of prolonged absence of the user, the main gas delivery valve
to the burner should be shut off.
Precautions if you can smell gas
a do not operate electric switches, the telephone, or any other item likely
to generate sparks;
b immediately open doors and windows to create an air flow to purge the
room;
c close the gas valves;
d contact qualified personnel.
Do not obstruct the ventilation openings of the room where gas
appliances are installed, to avoid dangerous conditions such as the
development of toxic or explosive mixtures.
DIRECTIVES AND STANDARDS
Gas burners
European directives
-Regulation 2016/426/UE (appliances burning gaseous fuels)
-2014/35/UE (Low Tension Directive)
-2014/30/UE (Electromagnetic compatibility Directive)
-2006/42/EC (Machinery Directive)
Harmonized standards
-UNI EN 676 (Automatic forced draught burners for gaseous fuels)
-EN 55014-1 (Electromagnetic compatibility- Requirements for house
hold appliances, electric tools and similar apparatus)
-EN 60204-1:2006 (Safety of machinery – Electrical equipment of
machines.)
-CEI EN 60335-1 (Specification for safety of household and similar
electrical appliances);
-CEI EN 60335-2-102 (Household and similar electrical appliances.
Safety. Particular requirements for gas, oil and solid-fuel burning
appliances having electrical connections).
-UNI EN ISO 12100:2010 (Safety of machinery - General principles for
design - Risk assessment and risk reduction);
Light oil burners
European directives
-2014/35/UE (Low Tension Directive)
-2014/30/UE (Electromagnetic compatibility Directive)
-2006/42/EC (Machinery Directive)
Harmonized standards
-UNI EN 267-2011(Automatic forced draught burners for liquid fuels)
-EN 55014-1 (Electromagnetic compatibility- Requirements for house
hold appliances, electric tools and similar apparatus)
-EN 60204-1:2006 (Safety of machinery – Electrical equipment of
machines.)
-CEI EN 60335-1 (Specification for safety of household and similar
electrical appliances);
-CEI EN 60335-2-102 (Household and similar electrical appliances.
Safety. Particular requirements for gas, oil and solid-fuel burning
appliances having electrical connections).
-UNI EN ISO 12100:2010 (Safety of machinery - General principles for
design - Risk assessment and risk reduction);
National Standard
-UNI 7824 (Atomizing burners of the monobloc type. Characteristics and
test methods)
Heavy oil burners
European Directives
-2014/35/UE (Low Tension Directive)
-2014/30/UE (Electromagnetic compatibility Directive)
-2006/42/EC (Machinery Directive)
Harmonized standards
-UNI EN 267(Automatic forced draught burners for liquid fuels)
-EN 55014-1 (Electromagnetic compatibility- Requirements for house
hold appliances, electric tools and similar apparatus)
-EN 60204-1:2006 (Safety of machinery – Electrical equipment of
machines.)
-CEI EN 60335-1 (Specification for safety of household and similar
electrical appliances);
-CEI EN 60335-2-102 (Household and similar electrical appliances.
Safety. Particular requirements for gas, oil and solid-fuel burning
appliances having electrical connections).
-UNI EN ISO 12100:2010 (Safety of machinery - General principles for
design - Risk assessment and risk reduction);
Norme nazionali / National Standard
-UNI 7824 (Atomizing burners of the monobloc type. Characteristics and
test methods.
4
Gas - Light oil burners
European Directives
-Regulation 2016/426/UE (appliances burning gaseous fuels)
-2014/35/UE (Low Tension Directive)
-2014/30/UE (Electromagnetic compatibility Directive)
-2006/42/EC (Machinery Directive)
Harmonized standards
-UNI EN 676 (Automatic forced draught burners for gaseous fuels)
-UNI EN 267(Automatic forced draught burners for liquid fuels)
-EN 55014-1 (Electromagnetic compatibility- Requirements for house
hold appliances, electric tools and similar apparatus)
-EN 60204-1:2006 (Safety of machinery – Electrical equipment of
machines.)
-CEI EN 60335-1 (Specification for safety of household and similar
electrical appliances);
-CEI EN 60335-2-102 (Household and similar electrical appliances.
Safety. Particular requirements for gas, oil and solid-fuel burning
appliances having electrical connections).
-UNI EN ISO 12100:2010 (Safety of machinery - General principles for
design - Risk assessment and risk reduction);
Norme nazionali / National Standard
-UNI 7824 (Atomizing burners of the monobloc type. Characteristics and
test methods.
Gas - Heavy oil burners
European directives:
-Regulation 2016/426/UE (appliances burning gaseous fuels)
-2014/35/UE (Low Tension Directive)
-2014/30/UE (Electromagnetic compatibility Directive)
-2006/42/EC (Machinery Directive)
Harmonized standards
-UNI EN 676 (Automatic forced draught burners for gaseous fuels)
-EN 55014-1 (Electromagnetic compatibility- Requirements for house
hold appliances, electric tools and similar apparatus)
-EN 60204-1:2006 (Safety of machinery – Electrical equipment of machi-
nes.)
-CEI EN 60335-1 (Specification for safety of household and similar electri-
cal appliances);
-CEI EN 60335-2-102 (Household and similar electrical appliances.
Safety. Particular requirements for gas, oil and solid-fuel burning
appliances having electrical connections).
-UNI EN ISO 12100:2010 (Safety of machinery - General principles for
design - Risk assessment and risk reduction);
National Standard
- UNI 7824 (Atomizing burners of the monobloc type. Characteristics and
test methods.
Industrial burners
European directives
-Regulation 2016/426/UE (appliances burning gaseous fuels)
-2014/35/UE (Low Tension Directive)
-2014/30/UE (Electromagnetic compatibility Directive)
-2006/42/EC (Machinery Directive)
Harmonized standards
-EN 55014-1 (Electromagnetic compatibility- Requirements for house
hold appliances, electric tools and similar apparatus)
-EN 746-2 (Industrial thermoprocessing equipment - Part 2: Safety requi-
rements for combustion and fuel handling systems)
-UNI EN ISO 12100:2010 (Safety of machinery - General principles for
design - Risk assessment and risk reduction);
-EN 60204-1:2006 (Safety of machinery – Electrical equipment of machi-
nes.)
-EN 60335-2 (Electrical equipment of non-electric appliances for house-
hold and similar purposes. Safety requirements)
Burner data plate
For the following information, please refer to
the data plate:
burner type and burner model: must be
reported in any communication with the
supplier
burner ID (serial number): must be repor-
ted in any communication with the supplier
date of production (year and month)
information about fuel type and network
pressure
SYMBOLS USED
Figures, illustrations and images used in this manual may differ in appearance from
the actual product.
WARNING!
Failure to observe the warning may result
in irreparable damage to the unit or
damage to the environment
DANGER!
Failure to observe the warning may result
in serious injuries or death.
WARNING!
Failure to observe the warning may result
in electric shock with lethal consequen-
ces
Type --
Model --
Year --
S.Number --
Output --
Oil Flow --
Fuel --
Category --
Gas Pressure --
Viscosity --
El.Supply --
El.Consump. --
Fan Motor --
Protection --
Drwaing n° --
P.I.N. --
5
GENERAL FEATURES
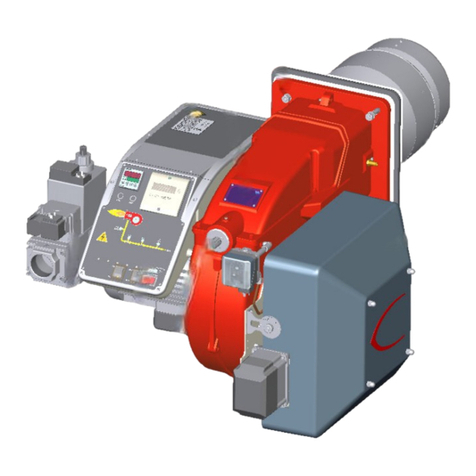
This series represents monobloc gas burners made in die-cast aluminium housing, that can burn either gas or light oil, thanks to the
adjustable combustion head which allows a good performance with both fuels. They can be provided in progressive or fully-modulating
version.
Fig. 1
1 Mimic panel with startup switch
2 Gas proving system
3 Gas valve group
4 Burner flange
5 Blast tube-Combustion head ass.y
6 Cover
7 Light oil pump
8 Pump motor
9 Gas adjusting cam
10 Actuator
Gas operation: the gas coming from the supply line, passes through the valves group provided with filter and stabiliser. This one for-
ces the pressure in the utilisation limits. The actuator (10) moves proportionally the air damper and the gas butterfly valve It drives an
adjusting cam (13) with variable shape. This one allows the optimisation of the gas flue values, as to get an efficient combustion.
Light oil operation:the fuel coming from the supply line, is pushed by the pump (8) to the nozzle and then into the combustion cham-
ber, where the mixture between fuel and air takes place and consequently the flame.
In the burners, the mixture bertween fuel and air, to perform clean and efficient combustion, is activated by atomisation of oil into very
small particles. This process is achieved making pressurised oil passing through the nozzle.
The pump (8) main function is to transfer oil from the tank to the nozzle in the desired quantity and pressure. To adjust this pressure,
pumps are provided with a pressure regulator (except for some models for which a separate regulating valve is provided). Other pumps
are provided with two pressure regulators: one for the high and one for low pressure (in double-stage systems with one nozzle).
The adjustable combustion head can improve the burner performance. The combustion head (5) determines the energetic quality and
the geometry of the flame. Fuel and comburent are routed into separated ways as far as the zone of flame generation (combustion
chamber). The control panel (1), placed on the burner front side, shows each operating stage.
How to interpret the burner “Performance curve”
To check if the burner is suitable for the boiler to which it must be installled, the following parameters are needed:
zfurnace input, in kW or kcal/h (kW = kcal/h / 860);
zbackpressure (data are available on the boiler’s ID plate or in the user’s manual).
Example:
Furnace input: 600kW
Backpressure: 4mbar
In the “Performance curve” diagram (Fig. 2), draw a vertical line matching the furnace input value and an horizontal line matching the
backpressure value. The burner is suitable if the intersection point A is inside the performance curve.
PART I: INSTALLATION
9
57
6
4
3
2
1
8
10
6
Fig. 2
Data are referred to standard conditions: atmospheric pressure at 1013mbar, ambient temperature at 15°C
Checking the proper gas train size
To check the proper gas train size, it is necessary to know the available gas pressure value upstream the burner’s gas valve. Then sub-
tract the backpressure. The result is called pgas. Draw a vertical line matching the furnace input value (600kW, in the example), quoted
on the x-axis, as far as intercepitng the network pressure curve, according to the installed gas train (DN65, in the example). From the
interception point, draw an horizontal line as far as matching, on the y-axis, the value of pressure necessary to get the requested fur-
nace input. This value must be lower or equal to the pgas value, calculated before.
Fig. 3
Matching the burner to the boiler
The burners described in this manual have been tested with combustion chambers that comply with EN676 regulation and whose
dimensions are described in the diagram . In case the burner must be coupled with boilers with a combustion chamber smaller in dia-
meter or shorter than those described in the diagram, please contact the supplier, to verify that a correct matching is possible, with
respect of the application involved. To correctly match the burner to the boiler verify the necessary input and the pressure in combu-
stion chamber are included in the burner performance curve; otherwise the choice of the burner must be revised consulting the burner
manufacturer. To choose the blast tube lenght follow the instructions of the boiler manufacturer. In absence of these consider the fol-
lowing:
zCast-iron boilers, three pass flue boilers (with the first pass in the rear part): the blast tube must protrude no more than 100 mm into
the combustion chamber.
zPressurised boilers with flame reversal: in this case the blast tube must penetrate at least 50 - 100 mm into combustion chamber in
respect to the tube bundle plate.
zThe length of the blast tubes does not always allow this requirement to be met, and thus it may be necessary to use a suitably-
sized
spacer to move the burner backwards or to design a blast tube tha suites the utilisation (please, contact the manifacturer).
Fig. 4
Key
a) Heat output in kW
b) Lenght of the flame tube in meters
c) Flame tube firing intensity in MW/m3
d) Combustion chamber diameter (m)
Fig. 4 - Firing intensity, diameter and lenght of the test flame tube as a function of the heat
input in kW.
Campo di lavoro bruciatori
Tipo P60 Mod. M-xx.x.IT.A.0.50 - M-.xx.x.IT.A.0.65
-1
0
1
2
3
4
5
6
7
8
100 200 300 400 500 600 700 800 900
Potenza kW
Contropressione in camera di
combustione mbar
A
()
0
5
10
15
20
25
100 200 300 400 500 600 700 800 900
Potenza / Output (kW)
Minima pressione gas in
rete / Minimum inlet gas
pressure (mbar)
Rp 2" (50)
DN65
7
Burner model identification
Burners are identified by burner type and model. Burner model identification is described as follows.
Specifications
*
NOTE ON THE BURNER WORKING SERVICE: for safety reasons, one controlled shutdown must be performed every
24 hours of continuous operation.
Type HP60 Model MG. PR. S. *. A. 1. 50
(1) (2) (3) (4) (5) (6) (7) (8)
(1) BURNER TYPE HP60
(2) FUEL M - Natural gas G - Light oil
B - Biogas
(3) OPERATION (Available versions) PR - Progressive MD - Fully modulating
(4) BLAST TUBE S - Standard L - Extended
(5) DESTINATION COUNTRY * - see data plate
(6) BURNER VERSION A - Standard
Y - Speciale
(7) EQUIPMENT 0 = 2 gas valves
1 = 2 gas valves + gas proving system
7 = 2 gas valves + maximum gas pressure switch
8 = 2 gas valves + gas proving system + maximum gas pressure switch
(8) GAS CONNECTION
see Specifications
32 = Rp11/4 40 = Rp11/2 50 = Rp2
65 = DN65 80 = DN80
BURNER TYPE HP60
Output min. - max. kW 170 - 880
Fuel Natural gas - Light oil
Gas category (see next paragraph)
Gas rate min. - max. (Stm3/h) 18 - 93
Gas pressure min. - max. mbar (see Note 2)
Light oil train inlet pressure max. bar 2
Light oil rate min. - max.kg/h 14 - 74
Viscosity 2 - 7.4 cSt @ 40°C
Oil density 840 kg/m3
Power supply 230V 3~ / 400V 3N ~ 50Hz
Total power consumption kW 2.15
Fan motor kW 1.1
Pump motor kW 0.55
Protection IP40
Approx. weight kg 70
Operation Progressive - Fully modulating
Gas Train - 32 Valves size / Gas connection 1”1/4 / Rp11/4
Gas Train - 40 Valves size / Gas connection 1”1/2 / Rp11/2
Gas Train - 50 Valves size / Gas connection 2” / Rp2
Gas Train - 65 Valves size / Gas connection 2”1/2 / Rp21/2
Operating temperature °C -10 ÷ +50
Storage Temperature °C -20 ÷ +60
Working service*Intermittent
Note1: All gas flow rates are referred to Stm3/h (1013 mbar absolute pressure, 15 °C temperature) and are valid for G20 gas
(net calorific value Hi= 34.02 MJ/Stm3).
Note2: Maximum gas pressure = 360mbar (with Dungs MBDLE/MBC valves)
= 500mbar (with Dungs MBC and Siemens VGD gas valves).
Minimum gas pressure = see gas curves.
8
* NOTE ON THE BURNER WORKING SERVICE: for safety reasons, one controlled shutdown must be performed every 24 hours of continuous
operation.
BURNER TYPE HP65
Output min. - max. kW 270 - 970
Fuel Nat. gas - Light oil
Gas category (see next paragraph)
Gas rate min. - max. (Stm3/h) 29 - 103
Gas pressure min. - max. mbar (see Note 2)
Light oil train inlet pressure max. bar 2
Oil viscosity min.- max.kg/h 23 - 82
Oil density 2 - 7.4 cSt @40°C
Oil density 840 kg/m3
Power supply 230V 3~ / 400V 3N ~ 50Hz
Total power consumption kW 2.6
Fa motor kW 1.5
Pump motor kW 0.55
Protection IP40
Approx. weight kg 105
Operation Progressive - Fully modulating
Gas Train - 32 Valves size / Gas connection 1”1/4 / Rp11/4
Gas Train - 40 Valves size / Gas connection 1”1/2 / Rp11/2
Gas Train - 50 Valves size / Gas connection 2” / Rp2
Gas Train - 65 Valves size / Gas connection 2”1/2 / Rp21/2
Operating temperature °C -10 ÷ +50
Storage Temperature °C -20 ÷ +60
Working service*Intermittent
BURNER TYPE HP72...0.40 HP72...0.50 HP72...0.65 HP72...0.80
Output min. - max. kW 330 - 1200
Fuel Nat. gas - Light oil
Gas category (see next paragraph)
Gas rate min.- max. (Stm3/h) 35 - 127
Gas pressure min. - max. mbar (see Note 2)
Light oil train inlet pressure max. bar 2
Oil viscosity min.- max. kg/h 28 - 101
Oil density 2 - 7.4 cSt @40°C
Oil density 0.84 kg/m3
Power supply 230V 3~ / 400V 3N ~ 50Hz
Total power consumption kW 3.25
Fan motor kW 2.2
Pump motor kW 0.55
Protection IP40
Approx. weight kg 105 110 120 130
Operation Progressive - Fully modulating
Gas Train 40 50 65 80
Valves size / Gas connection 1”1/2 / Rp11/2 2” / DN50 2”1/2 / DN65 3” / DN80
Operating temperature °C -10 ÷ +50
Storage Temperature °C -20 ÷ +60
Working service*Intermittent
Note1: All gas flow rates are referred to Stm3/h (1013 mbar absolute pressure, 15 °C temperature) and are valid for G20 gas
(net calorific value Hi= 34.02 MJ/Stm3).
Note2: Maximum gas pressure = 360mbar (with Dungs MBDLE/MBC valves)
= 500mbar (with Dungs MBC and Siemens VGD gas valves).
Minimum gas pressure = see gas curves.
9
* NOTE ON THE BURNER WORKING SERVICE: for safety reasons, one controlled shutdown must be performed every 24 hours of
continuous operation.
BURNER TYPE HP72...1.40 HP72...1.50 HP72...1.65 HP72...1.80
Output min. - max. kW 330 - 1550
Fuel Nat. gas - Light oil
Gas category (see next paragraph)
Gas rate min. - max. (Stm3/h) 35 - 164
Gas pressure min.- max. mbar (see Note 2)
Light oil train inlet pressure max. bar 2
Oil viscosity min.- max. kg/h 28 - 131
Oil density 2 - 7.4 cSt @40°C
Oil density 840 kg/m3
Power supply 230V 3~ / 400V 3N ~ 50Hz
Total power consumption kW 3.25
Fan motor kW 2.2
Pump motor kW 0.55
Protection IP40
Approx. weight kg 105 110 120 130
Operation Progressive - Fully modulating
Gas Train 40 50 65 80
Valves size / Gas connection 1”1/2 / Rp11/2 2” / Rp2 2”1/2 / DN65 3” / DN80
Operating temperature °C -10 ÷ +50
Storage Temperature °C -20 ÷ +60
Working service*Intermittent
BURNER TYPE HP73A
MG..x.50
HP73A
MG..x.65
HP73A
MG..x.80
Output min. - max. kW 320 - 2300
Fuel Nat. gas - Light oil
Gas category (see next paragraph)
Gas rate min.- max. (Stm3/h) 34 - 243 34 - 243 34 - 243
Gas pressure min.- max. mbar (see Note 2)
Light oil train inlet pressure max. bar 2
Oil viscosity min.-max. kg/h 27 - 194 27 - 194 27 - 194
Oil density 2 - 7.4 cSt @40°C
Oil density 840 kg/m3
Power supply 230V 3~ / 400V 3N ~ 50Hz
Total power consumption kW 4.05
Fan motor kW 3
Pump motor kW 0.55
Index of Protection IP40
Approx. weight kg 115 125 135
Operation Progressive - Fully modulating
Gas train 50 65 80
Valves size/Gas connection 2” / Rp2 2”1/2 / DN65 3” / DN80
Storage Temperature °C -10 ÷ +50
Working service*°C -20 ÷ +60
Operating temperature Intermttent
Note1: All gas flow rates are referred to Stm3/h (1013 mbar absolute pressure, 15 °C temperature) and are valid for G20 gas (net
calorific value Hi= 34.02 MJ/Stm3).
Note2: Maximum gas pressure = 360mbar (with Dungs MBDLE/MBC valves)
= 500mbar (with Dungs MBC and Siemens VGD gas valves).
Minimum gas pressure = see gas curves.
10
Country and usefulness gas categories
Fuel
The burner technical specifications, described in this manual, refer to natural gas (calorific net value Hi = 9.45 kWh/Stm3, density ρ=
0.717 Kg/Stm3). For different fuel such as LPG, town gas and biogas, multiply the values of flow and pressure by th corrective factors
shown in the table below.
For example, to obtain the flow and pressure values for the biogas:
GAS
CATEGORY
COUNTRY
I2H AT ES GR SE FI IE HU IS NO CZ DK GB IT PT CY EE LV SI MT SK BG LT RO TR CH
I2E LUPL-----------------------
I2E( R ) B BE------------------------
(*) I2EK NL------------------------
I2ELL DE------------------------
I2Er FR------------------------
(*) Only for I2EK : the appliance was configured for the appliance category K (I2K) and is suitable for the use of G and G+ distribution gases according to the specifications as
included in the NTA 8837:2012 Annex D with a Wobbe index of 43.46 – 45.3 MJ/m3 (dry, 0 °C, upper value) or 41.23 – 42.98 (dry, 15 °C, upper value). This appliance can
moreover be converted and/or be calibrated for the appliance category E (I2E). This therefore implies that the appliance “is suitable for G+ gas and H gas or is demonstrably
suitable for G+ gas and can demonstrably be made suitable for H gas” within the meaning of the “Dutch Decree of 10 May 2016 regarding amendment of the Dutch Gas
Appliances Decree and the Dutch Commodities (Administrative Fines) Act in connection with the changing composition of gas in the Netherlands as well as technical
amendment of some other decrees.
Fuel Hi (KWh/Stm3)ρ(kg/Stm3)fQfp
LPG 26.79 2.151 0.353 0.4
Town gas 4.88 0.6023 1.936 3.3
Biogas 6.395 1.1472 1.478 3.5
ATTENTION! The combustion head type and the settings depend on the fuel. The burner must be used only for its
intended purpose specified in the burner data plate .
ATTENTION! The corrective factors in the above table depend on the gas composition, so on the calorifc value and
the density of the gas. The above value can be taken only as reference.
Qbiogas QnaturalGas 1 478,⋅=
pbiogas pnaturalGas 35,⋅=
11
Overall dimensions (mm)
Boiler recommended drilling template
12
*DN = gas valves size
HP60 - HP72:
it is recommended to fit a counterflange between burner and boiler. As an alternative, make a smaller hole H, but greather than Y and fit the blast tube from the internal side of boiler.
DNAAABBBCCCD E F G H J K L M NO-minO-maxP Q R S U V W Y Z
HP60 MG..0.32 32 1119 99 383 314 736 362 930 595 430 240 280 210 240 344 M10 269 190 190 190 463 112 256 444 x 464 162 120
HP60 MG..0.40 40 1153 99 383 314 770 362 1044 500 415 240 280 202 240 344 M10 269 190 190 190 439 112 327 444 x 464 162 120
HP60 MG.. 0.50 50 1153 99 383 314 770 362 930 500 430 240 280 210 240 344 M10 269 190 190 190 445 112 335 519 x 464 162 120
HP60 MG.. 0.65 65 1153 99 383 314 770 362 1115 685 430 240 280 250 240 420 M10 269 190 190 190 845 112 403 540 313 540 162 120
HP65 MG.. 0.32 32 1156 139 362 347 794 382 1022 588 454 240 280 208 300 376 M10 330 216 250 233 463 130 256 539 x 531 162 155
HP65 MG.. 1.32 32 1156 139 362 347 794 382 1148 714 454 240 280 208 300 376 M10 330 216 250 233 463 130 256 539 x 531 162 155
HP65 MG.. 0.40 40 1156 139 362 347 794 382 1022 579 454 240 280 208 300 376 M10 330 216 250 233 457 130 327 535 x 531 162 155
HP65 MG.. 1.40 40 1156 139 362 347 794 382 1148 710 454 240 280 208 300 376 M10 330 216 250 233 457 130 327 535 x 531 162 155
HP65 MG.. 0.50 50 1156 139 362 347 794 382 1022 568 454 240 280 208 300 376 M10 330 216 250 233 465 130 335 519 x 531 162 155
HP65 MG.. 1.50 50 1156 139 362 347 794 382 1148 694 454 240 280 208 300 376 M10 330 216 250 233 465 130 335 519 x 531 162 155
HP65 MG..0.65 65 1156 139 362 347 794 382 1120 666 454 240 280 275 300 393 M10 330 216 250 233 533 130 403 565 313 548 162 155
HP65 MG..1.65 65 1156 139 362 347 794 382 1226 772 454 240 280 275 300 393 M10 330 216 250 233 533 130 403 565 313 548 162 155
HP72 MG.. 0.40 40 1299 139 505 373 794 382 1022 584 454 300 340 208 300 376 M10 330 216 250 233 457 130 327 519 x 531 198 155
HP72 MG..1.40 40 1299 139 505 373 794 382 1148 710 454 300 340 208 300 376 M10 330 216 250 233 457 130 327 519 x 531 198 155
HP72 MG.. 0.50 50 1299 139 505 373 794 382 1022 568 454 300 340 208 300 376 M10 330 216 250 233 465 130 335 519 x 531 198 155
HP72 MG..1.50 50 1299 139 505 373 794 382 1148 694 454 300 340 208 300 376 M10 330 216 250 233 465 130 335 519 x 531 198 155
HP72 MG..0.65 65 1299 139 505 373 794 382 1120 666 454 300 340 275 300 393 M10 330 216 250 233 533 130 403 565 313 548 198 155
HP72 MG..1.65 65 1299 139 505 373 794 382 1226 772 454 300 340 275 300 393 M10 330 216 250 233 533 130 403 565 313 548 198 155
HP72 MG.. 0.80 80 1299 139 505 373 794 382 1120 666 454 300 340 275 300 407 M10 330 216 250 233 574 130 444 565 344 562 198 155
HP72 MG..1.80 80 1299 139 505 373 794 382 1228 774 454 300 340 275 300 407 M10 330 216 250 233 574 130 444 565 344 562 198 155
HP72 MG..0.100 100 1299 139 505 373 794 382 1395 941 454 300 340 434 300 579 M10 330 216 250 233 653 130 523 824 405 734 198 155
HP72 MG..1.100 100 1299 139 505 373 794 382 1503 1049 454 300 340 434 300 579 M10 330 216 250 233 653 130 523 824 405 734 198 155
HP73A MG..1.50 50 1294 139 500 373 794 382 1148 694 454 234 264 208 300 376 M10 330 216 250 233 465 130 335 519 x 531 198 155
HP73A MG..1.65 65 1294 139 500 373 794 382 1226 772 454 234 264 275 300 393 M10 330 216 250 233 533 130 403 565 313 548 198 155
HP73A MG..1.80 80 1294 139 500 373 794 382 1228 774 454 234 264 275 300 407 M10 330 216 250 233 574 130 444 565 344 562 198 155
HP73A MG..1.100 100 1294 139 500 373 794 382 1503 1049 454 234 264 434 300 579 M10 330 216 250 233 653 130 523 824 405 734 198 155
13
Performance Curves
To get the input in kcal/h, multiply value in kW by 860.
Data are referred to standard conditions: atmospheric pressure at 1013mbar, ambient temperature at 15°C
NOTE: The performance curve is a diagram that represents the burner performance in the type approval phase or in the laboratory
tests, but does not represent the regulation range of the machine. On this diagram the maximum output point is usually reached by adj-
suting the combustion head to its “MAX” position (see paragraph “Adjusting the combustion head”); the minimum output point is rea-
ched setting the combustion head to its “MIN” position. During the first ignition, the combustion head is set in order to find a
compromise between the burner output and the generator specifications, that is why the minimum output may be different from the Per-
formance curve minimum.
BACK PRESSURE IN
COMBUSTION CHAMBER mbar
HP60
kW
BACK PRESSURE IN
COMBUSTION CHAMBER mbar
HP65
kW
HP72 MG.....0...
kW
BACK PRESSURE IN
COMBUSTION CHAMBER mbar
HP72 MG.....1...
kW
HP73A ..1...
kW
14
Pressure in the network - gas rate curves
GAS PRESSURE IN
THE NETWORK mbar
HP60
Gas rate Stm3/h
HP65
Gas rate Stm3/h
GAS PRESSURE IN
THE NETWORK mbar
HP72...0.xx
Gas rate Stm3/h
HP72...1.xx
Gas rate Stm3/h
GAS PRESSURE IN
THE NETWORK mbar
HP73A
Gas rate Stm3/h
Caution: the gas rate value is quoted on the x-axis, the related network pressure is quoted on the y-axis (pres-
sure value in the combustion chamber is not included). To know the minimum pressure at the gas train inlet,
necessary to get the requested gas rate, add the pressure value in the combustion chamber to the value read on
the y-axis.
WARNING: the diagrams refers to natural gas. For different type of fuel please refer to the paragraph “Fuel” at
the beginning of this chapter.
0
25
50
75
100
125
0 50 100 150 200 250
Rp 2" (50)
DN65
DN80
15
MOUNTINGS AND CONNECTIONS
Packing
Burners are despatched in cardboard packages and whose dimensions: 1280mm x 850mm x 760mm (L x P x H)
Packing cases of this kind are affected by humidity and are not suitable for stacking. The following are placed in
each packing case:
zburner with gas train detached;
zgasket to be inserted between the burner and the boiler;
zflexible oil pipes;
zoil filter;
zenvelope containing this manual
To get rid of the burner’s packing, follow the procedures laid down by current laws on disposal of materials
Handling the burner
The burner is mounted on a stirrup provided for handling the burner by means of a fork lift truck: the forks must be inserted into the A
anb B ways. Remove the stirrup only once the burner is installed to the boiler.
Fitting the burner to the boiler
To install the burner into the boiler, proceed as follows:
1 make a hole on the closing door of the combustion chamber as described on paragraph “Overall dimensions”)
2 place the burner to the boiler: lift it up and handle it according to the procedure described on paragraph “Handling the burner”;
3 place the stud bolts (5) on boiler’s door, according to the burner drilling template described on paragraph “Overall dimensions”;
4 fasten the stud bolts;
5 place the gasket on the burner flange;
6 install the burner into the boiler;
7 fix the burner to the stud bolts, by means of the fixing nuts, according to the next picture.
8 After fitting the burner to the boiler, ensure that the gap between the blast tube and the refractory lining is sealed with appropriate
insulating material (ceramic fibre cord or refractory cement).
The burner is designed to work positioned according to the picture below. For different installations, please contact the Technical
Department.
ATTENTION! The handling operations must be carried out by specialised and trained personnel. If these
operations are not carried out correctly, the residual risk for the burner to overturn and fall down still persists.
To move the burner, use means suitable to support its weight (see paragraph “Technical specifications”).
The unpacked burner must be lifted and moved only by means of a fork lift truck.
H
PL
AB
Keys
1 Burner
2 Fixing nut
3 Washer
4 Sealing gasket
5 Stud bolt
7Blasttube
SIDE UP
SIDE DOWN
16
Gas train connections
The next diagrams show the components of the gas train included in the delivery and which must be fitted by the installer.The diagrams
are in compliance with the current laws.
* Note: the maximum gas pressure switch can be mounted either upstream or downstream the gas valve but upstream the butterfly
gas valve (see item no.4 in the scheme above).
ATTENTION: BEFORE EXECUTING THE CONNECTIONS TO THE GAS PIPE NETWORK, BE SURE THAT THE
MANUAL CUTOFF VALVES ARE CLOSED. READ CAREFULLY THE “WARNINGS” CHAPTER AT THE BEGINNING
OF THIS MANUAL.
Gas train with valves group MB-DLE (2 valves + gas filter + pressure governor + pressure switch) + gas leakage pressure switch
(PGCP)
Gas train with valves group VGD with built-in gas pressure governor + gas leakage pressure switch (PGCP)
Key
1 Burner
2 Butterfly valve
4 Maximum gas pressure switch (option*)
5 Minimum gas pressure switch
6 Gas filter
7 Bellow joint
8 Manual valve
9 MB-DLE Valves group
11 VGD Valves group
16 Gas leakage pressure switch (PGCP)
1
2
5
78
9
4
16
4
MANUFACTURER INSTALLER
1
2
5
4
678
11
16
4
INSTALLERMANUFACTURER
17
Assembling the gas grain
Fig. 5 - Example of gas train
To mount the gas train, proceed as follows:
1-a) in case of threaded joints: use proper seals according to the gas used;
1-b) in case of flanged joints: place a gasket (no. 1A..1E - Fig. 5) between the elements
NOTE: the bellow joint, the manual valve and the gaskets are not part of the standard supply.
The procedures of installation fo the gas valves are showed in the next paragraphs, according to the gas train used:
zthreaded gas trains with Multibloc Dungs MB-DLE or Siemens VGD20..
zflanged gas trains with Multibloc Dungs MB-DLE or Siemens VGD40..
MULTIBLOC DUNGS MB-DLE 405..412
Mounting
1. Mount flange onto tube lines: use appropriate sealing agent (see Fig. 8);
2. insert MB-DLE: note position of O rings (see Fig. 8);
3. tighten screws A, B, C and D (Fig. 6 - Fig. 7), accordind to the mounting positions (Fig. 9);
4. after installation, perform leakage and functional test;
5. disassembly in reverse order.
2
ATTENTION: once the gas train is mounted according to the diagram on Fig. 5, the gas proving test mus be performed,
according to the procedure set by the laws in force.
ATTENTION: it is recommended to mount filter and gas valves to avoid that extraneous material drops inside the
valves, during maintenance and cleaning operation of the filters (both the filters outside the valves group and
the ones built-in the gas valves).
Fig. 6 Fig. 7 Fig. 8 Fig. 9
1A
5
1B
4
1C
21D
1E
3
”direction” arrows for installation
gas supply network
Keys
1A..1E Gasket
2 Gas filter
3 Gas valves group
4 Bellow joint
5 Manual cock
MOUNTING POSITIONS
18
MULTIBLOC DUNGS MB-DLE 415..420
Mounting
1. Loosen screws A and B do not unscrew (Fig. 10 - Fig. 11).
2. unscrew screws C and D (Fig. 10 - Fig. 11).
3. Remove MultiBloc between the threaded flanges (Fig. 11).
4. After mounting, perform leakage and functional tests.
Siemens VGD20.. and VGD40.. gas valves - with SKP2.. (pressure governor)
Mounting
zWhen mounting the VGD.. double gas valve, two flanges are required (as for VGD20.. model, the flanges are threaded); to prevent
cuttings from falling inside the valve, first fit the flanges to the piping and then clean the associated parts;
zinstall the valve;
zthe direction of gas flow must be in accordance with the direction of the arrow on the valve body;
zensure that the bolts on the flanges are properly tightened;
zensure that the connections with all components are tight;
zmake certain that the O-rings and gaskets between the flanges and the double gas valve are fitted.
zConnect the reference gas pipe (TP in figure; 8mm-external size pipe supplied loose), to the gas pressure nipples placed on the
gas pipe, downstream the gas valves: gas pressure must be measured at a distance that must be at least 5 times the pipe size.
Leave the blowhole free (SA in figure). Should the spring fitted not permit satisfactory regulation, ask one of our service centres for a
suitable replacement.
Fig. 10 Fig. 11 Fig. 12 Fig. 13
Caution: the SKP2 diaphragm D must be vertical (see Fig. 17).
WARNING: removing the four screws BS causes the device to be unserviceable!
Fig. 14 Fig. 15 Fig. 16
MOUNTING POSITIONS
BS
BS
SKP1. SKP2.
BS
BS
SA
SA TP
D
7631z05/0101
SIEMENS VGD..MOUNTING
POSITIONS
19
Siemens VGD valves with SKP actuator:
The pressure adjusting range, upstream the gas valves group, changes according to the spring provided with the valve group.
Once the train is installed, connect electrically all its elements: gas valves group, pressure switches, gas proving system.
Performance range (mbar) 0 - 22 15 - 120 100 - 250
Spring colour neutral yellow red
ATTENTION: once the gas train is mounted according to the diagram on Fig. 5, the gas proving test mus be performed,
according to the procedure set by the laws in force.
2
(cap)
1
(spring)
Fig. 17
20
Hydraulic diagrams for light oil supplying circuits
NOTE: in plants where gravity or ring feed systems are provided, install an automatic interception device (see n. 4 - Fig. 21).
Fig. 18 - Gravity circuit
Fig. 19 - Ring circuit
Fig. 20 - Suction circuit
Key
1 Manual valve
2 Light oil filter
3 Light oil feeding pump
4 One way valve
5 Flexible hoses
6 Relief valve

Other manuals for HP60

5

This manual suits for next models

3

Other Unigas Burner manuals

Unigas PBY90 Operating manual

Unigas

Unigas PBY90 Operating manual

Unigas P60 VS Operating manual

Unigas

Unigas P60 VS Operating manual

Unigas K890A Operating manual

Unigas

Unigas K890A Operating manual

Unigas KTP1030 Operating manual

Unigas

Unigas KTP1030 Operating manual

Unigas HP20 Operating manual

Unigas

Unigas HP20 Operating manual

Unigas K990A User manual

Unigas

Unigas K990A User manual

Unigas KP91 Operating manual

Unigas

Unigas KP91 Operating manual

Unigas HRX2060 Operating manual

Unigas

Unigas HRX2060 Operating manual

Unigas TLX83 Operating manual

Unigas

Unigas TLX83 Operating manual

Unigas LO140 G-.TN Series Service manual

Unigas

Unigas LO140 G-.TN Series Service manual

Unigas HR75A Series Operating manual

Unigas

Unigas HR75A Series Operating manual

Unigas HRX515 Operating manual

Unigas

Unigas HRX515 Operating manual

Unigas HTLX 1025.1 User manual

Unigas

Unigas HTLX 1025.1 User manual

Unigas P75R Operating manual

Unigas

Unigas P75R Operating manual

Unigas HTLX92R User manual

Unigas

Unigas HTLX92R User manual

Unigas RX63 User manual

Unigas

Unigas RX63 User manual

Unigas PN1025 Operating manual

Unigas

Unigas PN1025 Operating manual

Unigas TG90 Operating manual

Unigas

Unigas TG90 Operating manual

Unigas TLX2020 User manual

Unigas

Unigas TLX2020 User manual

Unigas HR1025 Operating manual

Unigas

Unigas HR1025 Operating manual

Unigas S10 Owner's manual

Unigas

Unigas S10 Owner's manual

Unigas H365X Operating manual

Unigas

Unigas H365X Operating manual

Unigas PBY1025 Operating manual

Unigas

Unigas PBY1025 Operating manual

Unigas IDEA NG280 Service manual

Unigas

Unigas IDEA NG280 Service manual

Popular Burner manuals by other brands

Carlin 99FRD instruction manual

Carlin

Carlin 99FRD instruction manual

CIB UNIGAS TN 1030 Manual of installation - use - maintenance

CIB UNIGAS

CIB UNIGAS TN 1030 Manual of installation - use - maintenance

Air Burners 300 Series operating manual

Air Burners

Air Burners 300 Series operating manual

RYNO WORX RY10MA-Pro Operator's manual

RYNO WORX

RYNO WORX RY10MA-Pro Operator's manual

ECOSTAR ECO 55 K L C 2 Installation, operating and maintenance manual

ECOSTAR

ECOSTAR ECO 55 K L C 2 Installation, operating and maintenance manual

ECOSTAR PB 200 Installation, operating and maintenance manual

ECOSTAR

ECOSTAR PB 200 Installation, operating and maintenance manual

ECOSTAR ECO 1 Installation, operating and maintenance manual

ECOSTAR

ECOSTAR ECO 1 Installation, operating and maintenance manual

Twin Eagles TEPB24HG-B Installation, use & care manual

Twin Eagles

Twin Eagles TEPB24HG-B Installation, use & care manual

Sime FUEL 30 DT BFX Installation, use and maintenance instructions

Sime

Sime FUEL 30 DT BFX Installation, use and maintenance instructions

Midco Economite E20B Installation and service instructions

Midco

Midco Economite E20B Installation and service instructions

Riello Gulliver BS2 TL Installation, use and maintenance instructions

Riello

Riello Gulliver BS2 TL Installation, use and maintenance instructions

baltur TBG 35 ME INSTALLATION, USE AND MAINTENANCE INSTRUCTION MANUAL

baltur

baltur TBG 35 ME INSTALLATION, USE AND MAINTENANCE INSTRUCTION MANUAL

Bentone B 55-2H Installation and maintenance  instruction

Bentone

Bentone B 55-2H Installation and maintenance instruction

Riello Burners RIELLO 40 F10 Installation, use and maintenance instructions

Riello Burners

Riello Burners RIELLO 40 F10 Installation, use and maintenance instructions

Riello RLS 120/EV MX TC FS2 Installation, use and maintenance manual

Riello

Riello RLS 120/EV MX TC FS2 Installation, use and maintenance manual

KitchenAid KBZU122VSS Installation Instructions and Use & Care Guide

KitchenAid

KitchenAid KBZU122VSS Installation Instructions and Use & Care Guide

Beckett CF 2300A instruction manual

Beckett

Beckett CF 2300A instruction manual

Eastman Outdoors Revolution 37059 Instruction and safety manual

Eastman Outdoors

Eastman Outdoors Revolution 37059 Instruction and safety manual

manuals.online logo
manuals.online logoBrands
  • About & Mission
  • Contact us
  • Privacy Policy
  • Terms and Conditions

Copyright 2025 Manuals.Online. All Rights Reserved.