UNIPRODO UNI PBM 25/32 User manual

BUTTON MACHINE
UNI_PBM_25/32
UNI_PBM_58
UNI_PBM_37PLUS
USER MANUAL
BEDIENUNGSANLEITUNG
INSTRUKCJA OBSŁUGI
NÁVOD K POUŽITÍ
MANUEL D´UTILISATION
ISTRUZIONI PER L‘USO
MANUAL DE INSTRUCCIONES
KEZELÉSI ÚTMUTATÓ
expondo.com

3
11.02.2022
INHALT | CONTENT | TREŚĆ | OBSAH | CONTENU | CONTENUTO | CONTENIDO | TARTALOM
3
7
11
15
19
23
27
31
DEUTSCH
ENGLISH
POLSKI
ČESKY
FRANÇAIS
ITALIANO
ESPAÑOL
MAGYAR
TECHNISCHE DATEN
Die Begrie „Gerät“ oder „Produkt“ in den Warnungen
und Beschreibung des Handbuchs beziehen sich auf
BUTTONMASCHINE.
2.1. SICHERHEIT AM ARBEITSPLATZ
a) Halten Sie Ihren Arbeitsplatz sauber und
gut beleuchtet. Unordnung oder schlechte
Beleuchtung kann zu Unfällen führen. Handeln Sie
vorausschauend, beobachten Sie, was getan wird,
und nutzen Sie Ihren gesunden Menschenverstand
bei der Verwendung des Gerätes.
VOR INBETRIEBNAHME MUSS DIE ANLEITUNG
GENAU DURCHGELESEN UND VERSTANDEN
WERDEN.
1. ALLGEMEINE BESCHREIBUNG
Diese Anleitung ist als Hilfe für eine sichere und
zuverlässige Nutzung gedacht. Das Produkt wurde strikt
nach den technischen Vorgaben und unter Verwendung
modernster Technologien und Komponenten sowie
unter Wahrung der höchsten Qualitätsstandards
entworfen und angefertigt.
Für einen langen und zuverlässigen Betrieb des Geräts
muss auf die richtige Handhabung und Wartung
entsprechend den in dieser Anleitung angeführten
Vorgaben geachtet werden. Die in dieser Anleitung
angegebenen technischen Daten und die Spezifikation
sind aktuell. Der Hersteller behält sich das Recht vor,
im Rahmen der Verbesserung der Qualität Änderungen
vorzunehmen. Unter Berücksichtigung des technischen
Fortschritts und der Geräuschreduzierung wurde das
Gerät so entworfen und produziert, dass das infolge
der Geräuschemission entstehende Risiko auf dem
niedrigsten Niveau gehalten wird.
ERLÄUTERUNG DER SYMBOLE
Gebrauchsanweisung beachten.
ACHTUNG! Warnung vor Handverletzungen!
HINWEIS! In der vorliegenden Anleitung
sind Beispielbilder vorhanden, die von dem
tatsächlichen Aussehen das Produkt abweichen
können.
Die originale Anweisung ist die deutschsprachige
Fassung. Sonstige Sprachfassungen sind
Übersetzungen aus der deutschen Sprache.
ACHTUNG! Lesen Sie alle Sicherheitshinweise und
alle Anweisungen durch. Die Nichtbeachtung der
Warnungen und Anweisungen kann zu schweren
Verletzungen bis hin zum Tod führen.
2. NUTZUNGSSICHERHEIT
b) Bei Zweifeln, ob das Produkt ordnungsgemäß
funktioniert, oder wenn Schäden festgestellt
werden, wenden Sie sich bitte an den Kundendienst
des Herstellers.
c) Das Produkt darf nur vom Hersteller repariert
werden. Reparieren Sie es nicht selbst!
d) Bewahren Sie die Gebrauchsanleitung für
den weiteren Gebrauch auf. Sollte das Gerät
an Dritte weitergegeben werden, muss die
Gebrauchsanleitung mit ausgehändigt werden.
e) Verpackungselemente und kleine Montageteile
außerhalb der Reichweite von Kindern
aufbewahren.
2.2. PERSÖNLICHE SICHERHEIT
a) Es ist nicht gestattet, das Gerät im Zustand der
Ermüdung, Krankheit, unter Einuss von Alkohol,
Drogen oder Medikamenten zu betreiben,
wenn das die Fähigkeit das Gerät zu bedienen,
einschränkt.
b) Das Gerät darf nicht von Kindern oder Personen
mit eingeschränkten physischen, sensorischen und
geistigen Fähigkeiten oder ohne entsprechende
Erfahrung und entsprechendes Wissen bedient
werden. Dies ist nur unter Aufsicht einer für die
Sicherheit zuständigen Person und nach einer
Einweisung in die Bedienung der Maschine
gestattet.
c) Das Gerät ist kein Spielzeug. Kinder sollten in der
Nähe des Geräts unter Aufsicht stehen, um Unfälle
zu vermeiden.
2.3. SICHERE ANWENDUNG DES GERÄTS
a) Nicht verwendete Werkzeuge sind außerhalb
der Reichweite von Kindern sowie von Personen
aufzubewahren, welche weder das Gerät noch die
Anleitung kennen. In den Händen unerfahrener
Personen können diese Geräte eine Gefahr
darstellen.
b) Halten Sie das Gerät stets in einem einwandfreien
Zustand. Prüfen Sie vor jeder Inbetriebnahme, ob
am Gerät und seinen beweglichen Teilen Schäden
vorliegen (defekte Komponenten oder andere
Faktoren, die den sicheren Betrieb der Maschine
beeinträchtigen könnten). Im Falle eines Schadens
muss das Gerät vor Gebrauch in Reparatur
gegeben werden.
c) Reparatur und Wartung von Geräten dürfen
nur von qualiziertem Fachpersonal und mit
Originalersatzteilen durchgeführt werden. Nur
so wird die Sicherheit während der Nutzung
gewährleistet.
d) Das Gerät ist kein Spielzeug. Reinigung und
Wartung dürfen nicht von Kindern ohne Aufsicht
durch eine erwachsene Person durchgeführt
werden.
e) Es ist untersagt, in den Aufbau des Geräts
einzugreifen, um seine Parameter oder
Konstruktion zu ändern.
f) Geräte von Feuer – und Wärmequellen fernhalten.
DE
BEDIENUNGSANLEITUNG
PRODUKTNAME BUTTONMASCHINE
PRODUCT NAME BUTTON MACHINE
NAZWA PRODUKTU MASZYNKA DO PRZYPINEK
NÁZEV VÝROBKU STROJ NA VÝROBU PLACEK
NOM DU PRODUIT MACHINE A FABRIQUER DES BADGES
NOME DEL PRODOTTO MACCHINA PER SPILLE
NOMBRE DEL PRODUCTO MÁQUINAS PARA HACER CHAPAS
TERMÉK NÉV KITŰZŐKÉSZÍTŐ
MODELL
UNI_PBM_25/32
UNI_PBM_58
UNI_PBM_37PLUS
PRODUCT MODEL
MODEL PRODUKTU
MODEL VÝROBKU
MODÈLE
MODELLO
MODELO
TÍPUS
HERSTELLER
EXPONDO POLSKA SP. Z O.O. SP. K.
MANUFACTURER
PRODUCENT
VÝROBCE
FABRICANT
PRODUTTORE
FABRICANTE
TERMELŐ
ANSCHRIFT DES HERSTELLERS
UL. NOWY KISIELIN-INNOWACYJNA 7, 66-002 ZIELONA GÓRA | POLAND, EU
MANUFACTURER ADDRESS
ADRES PRODUCENTA
ADRESA VÝROBCE
ADRESSE DU FABRICANT
INDIRIZZO DEL PRODUTTORE
DIRECCIÓN DEL FABRICANTE
AGYÁRTÓCÍME
Parameter Werte
Produktname BUTTONMASCHINE
Modell UNI_
PBM_25/32
UNI_
PBM_58
UNI_
PBM_37
PLUS
Abmessungen
[mm]
300x170
x510
290x170
x510
290x170
x500
Gewicht [kg] 9,8 14,26 8,1

54
11.02.2022
3 4
1
2
4
5
6
3
2
5
DE
3. NUTZUNGSBEDINGUNGEN
Das Produkt ist zur Herstellung von Buttons bzw.
Ansteckern vorgesehen. Das Produkt ist nur für den
Heimgebrauch bestimmt!
Für alle Schäden bei nicht sachgemäßer Verwendung
haftet allein der Betreiber.
3.1. GERÄTEBESCHREIBUNG
DE
1. Bereiten Sie die Basis des Geräts vor.
Schrauben Sie den Korpus mit einem kleinen
Sechskantschlüssel an die Basis der Maschine.
2. Die obere Form sollte in das Loch unter dem
Hebel eingeführt werden. Stellen Sie sicher, dass
der Bolzen in ein spezielles Loch eingeführt ist.
3. Schieben Sie den Formboden (zusammen mit den
Formen) in die speziellen Führungen (wie auf dem
Foto gezeigt).
4. Bewegen Sie die Basis so, dass sich die obere
Form zwischen den unteren Formen bendet.
Führen Sie die Positionierungsstifte in die Löcher
auf beiden Seiten der Gleitbasis ein.
5. Überprüfen Sie den Betrieb. Bewegen Sie Form
A unter den Hebel (unter die obere Form) und
drücken Sie sie nach unten.
ACHTUNG! Es wird eine Lücke (leere Stelle) in der
oberen Form geben, aber es wird keine Lücke
zwischen der oberen Form und der A-Form
geben.
3.2.3. SCHNEIDWERKZEUG MONTAGE
1. Positionsnder
2. Messer
3. Drehknopf (einstellbar)
4. Gri (einstellbar)
1. Setzen Sie die Klinge wie auf dem Foto gezeigt in
die Halterung ein.
2. Setzen Sie den Drehknopf, mit dem die
Messerklinge befestigt ist, an die richtige Stelle
(wie auf dem Foto gezeigt) und stellen Sie ihn ein.
3. Platzieren Sie den Positionsnder an der dafür
vorgesehenen Stelle.
4. Die Messerklinge ist austauschbar. Um die Klinge
zu ersetzen, brechen Sie ein Stück der Klinge vom
technischen Messer ab (mit einer gebrochenen
Klinge).
5. Entfernen Sie die Schraube und ersetzen Sie die
Klinge.
3.3. ARBEIT MIT DEM GERÄT
3.3.1. VORBEREITUNG DES MUSTERS MIT EINEM
SCHNEIDWERKZEUG
1. Platzieren Sie den Positionsnder auf dem
gedruckten (oder gezeichneten) Muster/Design.
Halten Sie mit einer Hand den Positionsnder
und drücken Sie ihn gegen das Papier. Drehen
Sie mit der anderen Hand den Gri, bis die
Musterscheibe ausgeschnitten ist.
3.3.2. VORBEREITEN BZW. ANFERTIGUNG
EINES BUTTONS
1. Setzen Sie die Metallkappe in Form Aein. Setzen
Sie dann das zuvor vorbereitete Muster darauf (in
der richtigen Größe ausgeschnitten). Legen Sie
am Ende eine transparente Folie ein.
2. Legen Sie den Metallverschluss in Form B.
ACHTUNG! Denken Sie daran, dass der Verschluss
(Sicherheitsnadel) nach unten zeigt.
1. Hebelgri
2. Obere Form
3. Formular A.
4. Formular B.
5. Gleitbasis
6. Maschinenbasis
ZUBEHÖR
1. Schneidewerkzeug (Snipping Tool)
2. Metallabdeckung
3. Transparente Folie
4. Metallverschluss
3.2. VORBEREITUNG ZUR VERWENDUNG
3.2.1. ARBEITSPLATZ DES GERÄTES
Das Gerät sollte immer auf einer ebenen, stabilen,
sauberen, feuerfesten und trockenen Oberäche und
außerhalb der Reichweite von Kindern und Personen
mit eingeschränkten geistigen, sensorischen und
psychischen Fähigkeiten verwendet werden.
123
4
1
5
ACHTUNG! Obwohl das Gerät in Hinblick
auf Sicherheit entworfen wurde und über
Schutzmechanismen sowie zusätzlicher
Sicherheitselemente verfügt, besteht bei
der Bedienung eine geringe Unfall- oder
Verletzungsgefahr. Es wird empfohlen, bei der
Nutzung Vorsicht und Vernunft walten zu lassen.
3.2.2. AUFBAU DES GERÄTES
4
2
3
1 2
3 4
5 6
7
6. Überprüfen Sie den Betrieb. Bewegen Sie Form
B unter den Hebel (unter die obere Form) und
drücken Sie sie nach unten. ACHTUNG! Es wird
weder in der oberen Form noch zwischen der
oberen Form und der B-Form eine Lücke (leere
Stelle) geben.
7. Einstellung der Form. Wenn die unteren Formen
nicht ausgerichtet sind, stellen Sie sie manuell
ein (drehen Sie die Form vorsichtig in die
entsprechende Richtung herum).

76
11.02.2022
DE
5. Der Button bzw. Anstecker ist fertig.
3.4. REINIGUNG UND WARTUNG
a) Verwenden Sie zur Reinigung der Oberäche
ausschließlich Mittel ohne ätzende Inhaltsstoe.
b) Lassen Sie nach jeder Reinigung alle Teile gut
trocknen, bevor das Gerät erneut verwendet wird.
c) Bewahren Sie das Gerät an einem trockenen,
kühlen, vor Feuchtigkeit und direkter
Sonneneinstrahlung geschütztem Ort auf.
d) Es ist verboten, das Gerät mit einem Wasserstrahl
zu besprühen oder in Wasser zu tauchen.
e) In Hinblick auf technische Ezienz und zur
Vorbeugung vor Schäden sollte das Gerät
regelmäßig überprüft werden.
TECHNICAL DATA
EN
The terms „device“ or „product“ are used in the warnings
and instructions to refer to BUTTON MACHINE.
2.1. SAFETY IN THE WORKPLACE
a) Make sure the workplace is clean and well lit.
A messy or poorly lit workplace may lead to
accidents. Try to think ahead, observe what is
going on and use common sense when working
with the device.
b) If you are unsure about whether the product is
operating correctly or if you nd damage, please
contact the manufacturer’s service centre.
c) Only the manufacturer’s service centre may make
repairs to the product. Do not attempt to make
repairs yourself!
d) Please keep this manual available for future
reference. If this device is passed on to a third
party, the manual must be passed on with it.
e) Keep packaging elements and small assembly
parts in aplace not available to children.
2.2. PERSONAL SAFETY
a) Do not use the device when tired, ill or under the
inuence of alcohol, narcotics or medication which
can signicantly impair the ability to operate the
device.
b) The device is not designed to be handled by
persons (including children) with limited mental
and sensory functions or persons lacking relevant
experience and/or knowledge unless they are
supervised by a person responsible for their
safety or they have received instruction on how to
operate the device.
c) The device is not atoy. Children must be supervised
to ensure that they do not play with the device.
2.3. SAFE DEVICE USE
a) When not in use, store in asafe place, away from
children and people not familiar with the device
who have not read the user manual. The device
may pose ahazard in the hands of inexperienced
users.
b) Keep the device in perfect technical condition.
Before each use check for general damage and
especially check for cracked parts or elements and
for any other conditions which may impact the safe
operation of the device. If damage is discovered,
hand over the device for repair before use.
c) Device repair or maintenance should be carried
out by qualied persons, only using original spare
parts. This will ensure safe use.
d) The device is not atoy. Cleaning and maintenance
may not be carried out by children without
supervision by an adult person.
e) It is forbidden to interfere with the structure of
the device in order to change its parameters or
construction.
f) Keep the device away from sources of re and
heat.
DO NOT USE THE DEVICE UNLESS YOU HAVE
THOROUGHLY READ AND UNDERSTOOD THIS
USER MANUAL.
To increase the product life of the device and to ensure
trouble-free operation, use it in accordance with this
user manual and regularly perform maintenance tasks.
The technical data and specifications in this user manual
are up to date. The manufacturer reserves the right to
make changes associated with quality improvement.
The device is designed to reduce noise emission risks to
aminimum, taking into account technological progress
and noise reduction opportunities.
1. GENERAL DESCRIPTION
The user manual is designed to assist in the safe and
trouble-free use of the device. The product is designed
and manufactured in accordance with strict technical
guidelines, using state-of-the-art technologies and
components. Additionally, it is produced in compliance
with the most stringent quality standards.
LEGEND
Read instructions before use.
ATTENTION! Hand crush hazard!
PLEASE NOTE! Drawings in this manual are for
illustration purposes only and in some details may
differ from the actual product.
The original operation manual is written in German.
Other language versions are translations from the
German.
2. USAGE SAFETY
ATTENTION! Read all safety warnings and all
instructions. Failure to follow the warnings and
instructions may result in serious injury or even
death.
ATTENTION! Despite the safe design of the device
and its protective features, and despite the use of
additional elements protecting the operator, there
is still aslight risk of accident or injury when using
the device. Stay alert and use common sense when
using the device.
3. USE GUIDELINES
The product is intended for making buttons. The product
is intended for home use only!
The user is liable for any damage resulting from
unintended use of the device.
USER MANUAL
Parameter
description Parameter value
Product name BUTTON MACHINE
Model UNI_
PBM_25/32
UNI_
PBM_58
UNI_
PBM_37
PLUS
Dimensions
[mm]
300x170
x510
290x170
x510
290x170
x500
Weight [kg] 9,8 14,26 8,1
3. Form Aunter den Hebel bringen und nach unten
drücken. Alle Elemente werden in der oberen
Form sein.
4. Bewegen Sie Form B unter den Hebel und drücken
Sie sie nach unten.
f) Zum Reinigen ist ein weicher, feuchter Lappen zu
verwenden.
g) Zum Reinigen darf man keine scharfen und/
oder Metallgegenstände (z.B. Drahtbürste
oder Metallspachtel) benutzen, weil diese die
Oberäche des Materials, aus dem das Gerät
hergestellt ist, beschädigen können.

98
11.02.2022
3 4
1
2
4
5
6
3
2
5
EN
1. Place the blade in the handle as shown on the
picture.
2. Put the knob securing the knife blade in the right
place (as shown on the picture) and adjust it.
3. Put the position locator in the designated place.
4. The knife blade is replaceable. To replace it, break
o apiece of the blade from the technical knife
(with abroken blade).
5. Remove the screw and replace the blade.
3.3. DEVICE USE
3.3.1. PREPARING THE PATTERN
WITH ACUTTING DEVICE
1. Place the position locator on the printed (or
drawn) pattern/design. With one hand, grab the
position locator and press it against the paper,
and with the other hand, rotate the handle until
the pattern disc is cut out.
3.3.2. PREPARING BUTTONS
1. Place the metal cap in the „A” mold. Then place
the previously prepared pattern on it (cut out in
the correct size). Put atransparent foil at the end.
2. Place the metal clasp in the „B” mold.
CAUTION! Remember that the clasp (safety pin) is
pointing downwards.
3. Move the „A” mold under the lever and press
down. All items will be in the upper mold.
4. Move the „B” mold under the lever and press down.
4
5
EN
1. Prepare the base of the device. Screw the body to
the base of the machine using asmall hexagonal
(Allen) key.
2. The upper mold should be inserted into the hole
under the lever. Make sure that the pin is inserted
into aspecial hole.
3. Slide the mold base (together with the molds) into
the special guides (as shown on the picture).
4. Move the base so that the upper mold is between
the lower molds. Place the positioning pins in the
holes on both sides of the sliding base.
5. Checking the operation. Move the „A” mold under
the lever (under the upper mold) and press down.
CAUTION! There will be agap in the upper mold,
but there will be no gap between the upper mold
and the „A” mold.
6. Checking the operation. Move the „B” mold under
the lever (under the upper mold) and press down.
CAUTION! There will be no gap in either the upper
mold or between the upper mold and the „B”
mold.
7. Mold setting adjustment. If the lower molds are
not aligned, adjust them manually (gently turn the
mold the right way round).
3.2.3. CUTTING TOOL ASSEMBLY
1. Position locator
2. Knife
3. Knob (adjustable)
4. Handle (adjustable)
1. Lever handle
2. Upper mold
3. „A” mold
4. „B” mold
5. Sliding mold base
6. Base of the machine
ACCESSORIES:
1. Cutting device
2. Metal cover
3. Transparent foil
4. Metal clasp
3.2. PREPARING FOR USE
3.2.1. APPLIANCE LOCATION
The device should always be used when positioned on
an even, stable, clean, fireproof and dry surface, and be
out of the reach of children and persons with limited
mental and sensory functions.
3.2.2. ASSEMBLING THE DEVICE
123
4
1
2
3
3.1. DEVICE DESCRIPTION 5 6
7
1 2
3 4

1110
11.02.2022
DANE TECHNICZNE
INSTRUKCJAOBSŁUGI
Opis parametru Wartość parametru
Nazwa produktu MASZYNKA DO PRZYPINEK
Model UNI_
PBM_25/32
UNI_
PBM_58
UNI_
PBM_37
PLUS
Wymiary [mm] 300x170
x510
290x170
x510
290x170
x500
Ciężar [kg] 9,8 14,26 8,1
1. OGÓLNY OPIS
Instrukcja przeznaczona jest do pomocy wbezpiecznym
i niezawodnym użytkowaniu. Produkt jest
zaprojektowany i wykonany ściśle według wskazań
technicznych przy użyciu najnowszych technologii
i komponentów oraz przy zachowaniu najwyższych
standardów jakości.
PRZED PRZYSTĄPIENIEM DO PRACY NALEŻY
DOKŁADNIE PRZECZYTAĆ IZROZUMIEĆ
NINIEJSZĄ INSTRUKCJĘ.
Dla zapewnienia długiej iniezawodnej pracy urządzenia
należy dbać ojego prawidłową obsługę oraz konserwację
zgodnie ze wskazówkami zawartymi w tej instrukcji.
Dane techniczne ispecykacje zawarte wtej instrukcji
obsługi są aktualne. Producent zastrzega sobie prawo
dokonywania zmian związanych z podwyższeniem
jakości. Uwzględniając postęp techniczny i możliwość
ograniczenia hałasu, urządzenie zaprojektowano
izbudowano tak, aby ryzyko jakie wynika zemisji hałasu
ograniczyć do najniższego poziomu.
OBJAŚNIENIE SYMBOLI
Przed użyciem należy zapoznać się
zinstrukcją.
UWAGA! Niebezpieczeństwo zgniecenia
dłoni!
UWAGA! Ilustracje wniniejszej instrukcji obsługi
mają charakter poglądowy i w niektórych
szczegółach mogą różnić się od rzeczywistego
wyglądu produktu.
Instrukcją oryginalną jest niemiecka wersja instrukcji.
Pozostałe wersje językowe są tłumaczeniami z języka
niemieckiego.
2. BEZPIECZEŃSTWO UŻYTKOWANIA
UWAGA! Przeczytać wszystkie ostrzeżenia
dotyczące bezpieczeństwa oraz wszystkie
instrukcje. Niezastosowanie się do ostrzeżeń
iinstrukcji może spowodować ciężkie obrażenia
ciała lub śmierć.
Termin „urządzenie” lub „produkt” w ostrzeżeniach
i w opisie instrukcji odnosi się do MASZYNKI DO
PRZYPINEK.
2.1. BEZPIECZEŃSTWO WMIEJSCU PRACY
a) Utrzymywać porządek w miejscu pracy i dobre
oświetlenie. Nieporządek lub złe oświetlenie może
prowadzić do wypadków. Należy być przewidującym,
obserwować co się robi i zachowywać rozsądek
podczas używania urządzenia.
b) Wrazie wątpliwości czy produkt działa poprawnie
lub stwierdzenia uszkodzenia należy skontaktować
się zserwisem producenta.
c) Naprawę produktu może wykonać wyłącznie
serwis producenta. Nie wolno dokonywać napraw
samodzielnie!
d) Zachować instrukcję użytkowania w celu jej
późniejszego użycia. W razie, gdyby urządzenie
miało zostać przekazane osobom trzecim, to
wraz z nim należy przekazać również instrukcję
użytkowania.
e) Elementy opakowania oraz drobne elementy
montażowe należy przechowywać w miejscu
niedostępnym dla dzieci.
2.2. BEZPIECZEŃSTWO OSOBISTE
a) Niedozwolone jest obsługiwanie urządzenia
w stanie zmęczenia, choroby, pod wpływem
alkoholu, narkotyków lub leków, które ograniczają
wistotnym stopniu zdolności obsługi urządzenia.
b) Urządzenie nie jest przeznaczone do tego, by
było użytkowane przez osoby (w tym dzieci)
o ograniczonych funkcjach psychicznych,
sensorycznych i umysłowych lub nieposiadające
odpowiedniego doświadczenia i/lub wiedzy,
chyba że są one nadzorowane przez osobę
odpowiedzialną za ich bezpieczeństwo lub
otrzymały od niej wskazówki dotyczące tego, jak
należy obsługiwać urządzenie.
c) Urządzenie nie jest zabawką. Dzieci powinny być
pilnowane, aby nie bawiły się urządzeniem.
2.3. BEZPIECZNE STOSOWANIE URZĄDZENIA
a) Nieużywane urządzenia należy przechowywać
w miejscu niedostępnym dla dzieci oraz osób
nieznających urządzenia lub tej instrukcji
obsługi. Urządzenia są niebezpieczne w rękach
niedoświadczonych użytkowników.
b) Utrzymywać urządzenie w dobrym stanie
technicznym. Sprawdzać przed każdą pracą czy
nie posiada uszkodzeń ogólnych lub związanych
z elementami ruchomymi (pęknięcia części
ielementów lub wszelkie inne warunki, które mogą
mieć wpływ na bezpieczne działanie urządzenia).
W przypadku uszkodzenia, oddać urządzenie do
naprawy przed użyciem.
c) Naprawa oraz konserwacja urządzeń powinna być
wykonywana przez wykwalikowane osoby przy
użyciu wyłącznie oryginalnych części zamiennych.
Zapewni to bezpieczeństwo użytkowania.
d) Urządzenie nie jest zabawką. Czyszczenie
i konserwacja nie mogą być wykonywane przez
dzieci bez nadzoru osoby dorosłej.
e) Zabrania się ingerowania wkonstrukcję urządzenia
celem zmiany jego parametrów lub budowy.
f) Trzymać urządzenia zdala od źródeł ognia iciepła.
UWAGA! Pomimo iż urządzenie zostało
zaprojektowane tak aby było bezpieczne,
posiadało odpowiednie środki ochrony oraz
pomimo użycia dodatkowych elementów
zabezpieczających użytkownika, nadal istnieje
niewielkie ryzyko wypadku lub odniesienia
obrażeń w trakcie pracy z urządzeniem. Zaleca
się zachowanie ostrożności i rozsądku podczas
jego użytkowania.
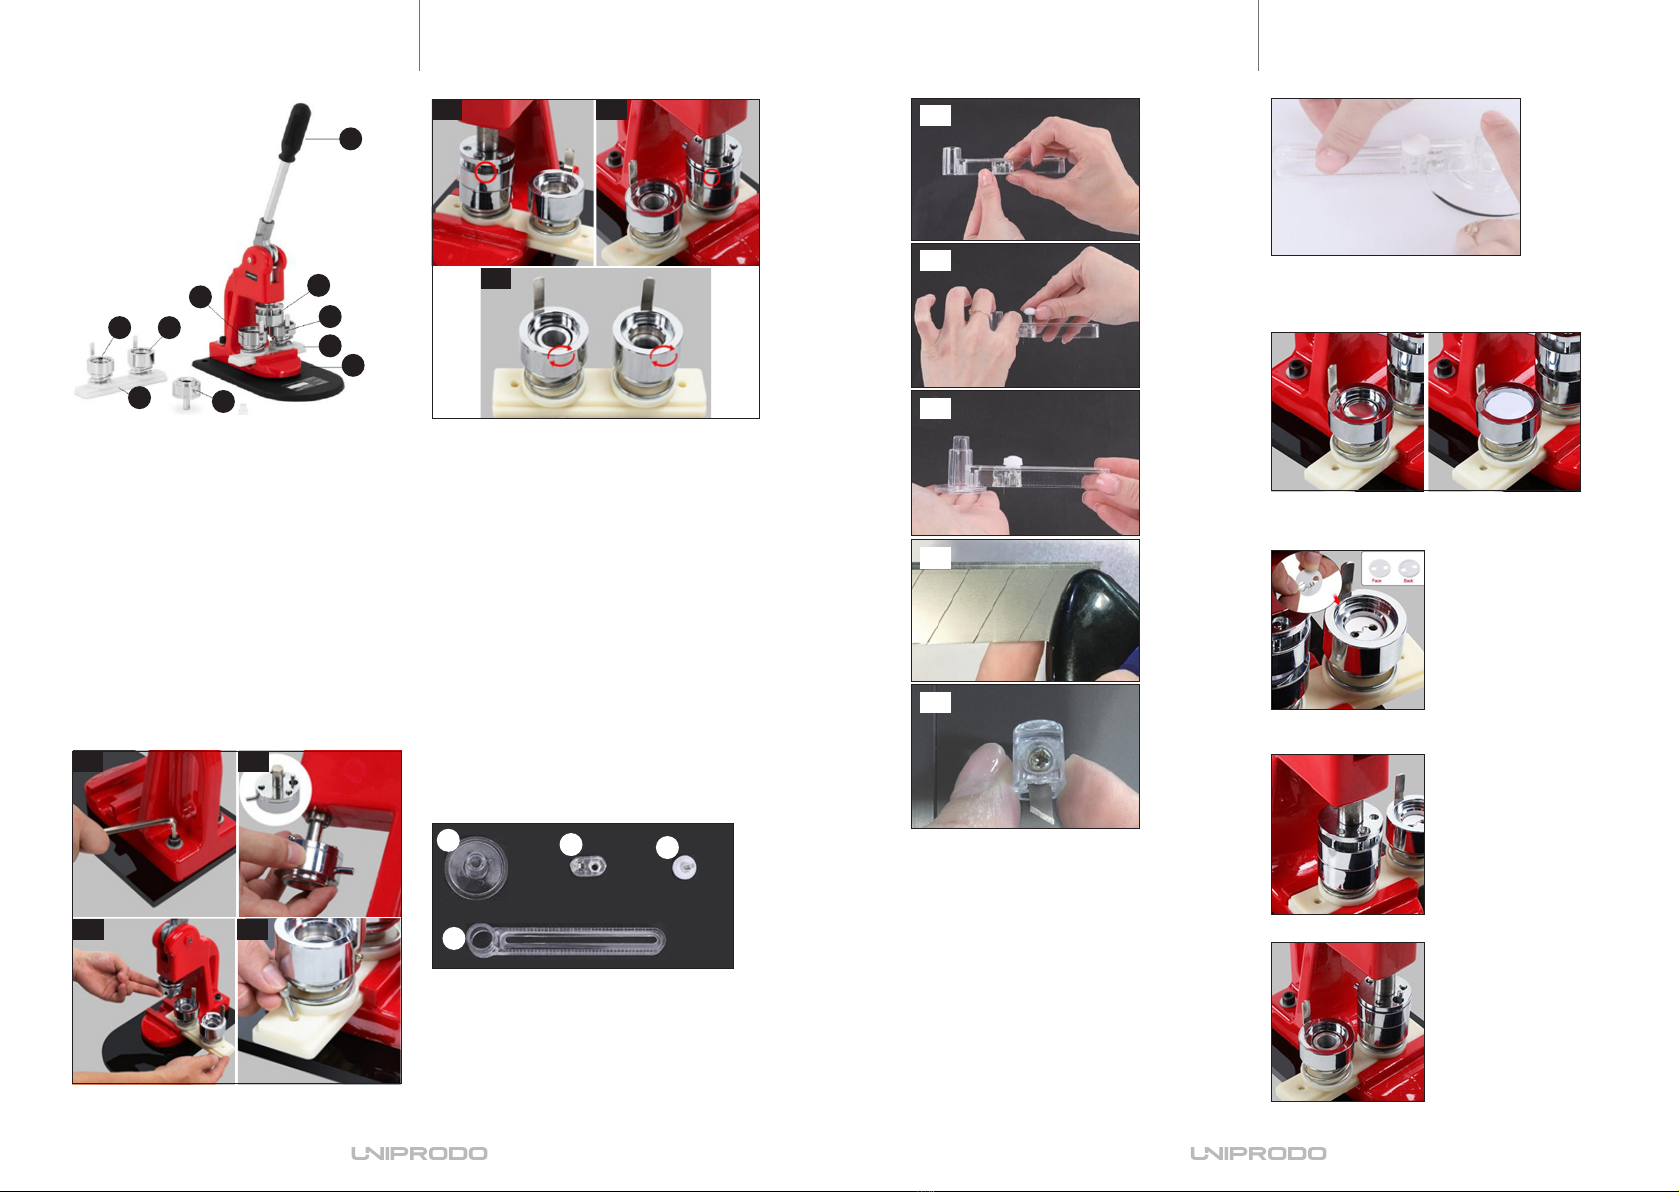
5. The button is ready.
3.4. CLEANING AND MAINTENANCE
a) Use only non-corrosive cleaners to clean the
surface.
b) After cleaning the device, all parts should be dried
completely before using it again.
c) Store the unit in a dry, cool place, free from
moisture and direct exposure to sunlight.
d) Do not spray the device with a water jet or
submerge it in water.
e) The device must be regularly inspected to check
its technical eciency and spot any damage.
f) Use asoft, damp cloth for cleaning.
g) Do not use sharp and/or metal objects for
cleaning (e.g. a wire brush or a metal spatula)
because they may damage the surface material of
the appliance.
EN PL

1312
11.02.2022
3 4
1
2
4
5
6
3
2
5
3. ZASADY UŻYTKOWANIA
Produkt przeznaczony jest do wykonywania przypinek.
Produkt jest przeznaczony tylko do użytku domowego!
Odpowiedzialność za wszelkie szkody powstałe
wwyniku użytkowania niezgodnego zprzeznaczeniem
ponosi użytkownik.
3.1. OPIS URZĄDZENIA
1. Przygotować bazę urządzenia. Korpus przykręcić
do podstawy maszynki za pomocą małego klucza
sześciokątnego (imbusowego).
2. Formę górną należy wsunąć w otwór pod
dźwignią. Należy zwrócić uwagę, aby bolec został
wsunięty wspecjalny otwór.
3. Należy wsunąć podstawę formy (razem
zformami) wspecjalne prowadnice (jak pokazano
na zdjęciu).
4. Przesunąć podstawę tak, aby górna forma
znajdowała się pomiędzy dolnymi formami.
Umieścić kołki pozycjonujące wotworach po obu
stronach przesuwnej podstawy.
5. Sprawdzenie działania. Przesunąć formę A pod
dźwignię (pod górną formę) idocisnąć.
UWAGA! Pojawi się szczelina (przerwa) w górnej
formie, nie będzie natomiast żadnej przerwy
między górną formą, aformą A.
6. Sprawdzenie działania. Przesunąć formę B pod
dźwignię (pod górną formę) idocisnąć.
UWAGA! Nie będzie szczeliny (przerwy) ani
wgórnej formie, ani między górną formą, aformą
B.
7. Regulacja ustawienia formy. Jeśli dolne formy
nie są ustawione równo, należy wyregulować je
ręcznie (delikatnie obrócić formę wodpowiednią
stronę).
1. Uchwyt dźwigni
2. Forma górna
3. Forma A
4. Forma B
5. Przesuwna podstawa formy
6. Podstawa maszynki
AKCESORIA
1. Narzędzie do wycinania
2. Metalowa nakładka
3. Transparentna folia
4. Metalowe zapięcie
3.2. PRZYGOTOWANIE DO PRACY
3.2.1. UMIEJSCOWIENIE URZĄDZENIA
Urządzenie należy zawsze użytkować na równej,
stabilnej, czystej, ognioodpornej i suchej powierzchni
i poza zasięgiem dzieci oraz osób ograniczonych
funkcjach psychicznych, sensorycznych iumysłowych.
3.2.2. MONTAŻ URZĄDZENIA
1 2
3 4
5 6
7
1. Umieścić ostrze wuchwycie, tak jak pokazano na
zdjęciu.
2. Wsadzić pokrętło zabezpieczające ostrze
noża w odpowiednie miejsce (jak na zdjęciu)
iwyregulować.
3. Umieścić lokalizator pozycji w wyznaczonym
miejscu.
4. Ostrze noża jest wymienialne. W celu jego
wymiany ułamać kawałek ostrza z noża
technicznego (złamanym ostrzem).
5. Odkręcić śrubę iwymienić ostrze.
3.3. PRACA ZURZĄDZENIEM
3.3.1. PRZYGOTOWANIE WZORU ZA POMOCĄ
NARZĘDZIA DO WYCINANIA
1. Umieścić lokalizator pozycji na wydrukowanym
(lub narysowanym) wzorze/projekcie.
Jedną ręką należy złapać lokalizator pozycji
i przycisnąć do kartki, a drugą ręką obracać
uchwyt, aż zostanie wycięty krążek zwzorem.
3.3.2. PRZYGOTOWANIE PRZYPINKI
1. Umieścić metalową nakładkę w formie A.
Następnie położyć na niej wcześniej przygotowany
wzór (wycięty w odpowiednim rozmiarze). Na
końcu umieścić transparentną folię.
2. Umieścić metalowe zapięcie wformie B.
UWAGA! Należy pamiętać, żeby zapięcie (agrafka)
była skierowana do dołu.
4
5
3.2.3. MONTAŻ NARZĘDZIA DO WYCINANIA
1. Lokalizator pozycji
2. Nóż
3. Pokrętło (regulowane)
4. Uchwyt (regulowany)
123
4
1
2
3
PL PL

1514
11.02.2022
3. Przesunąć formę A pod dźwignię i docisnąć.
Wszystkie elementy znajdą się wgórnej formie.
4. Przesunąć formę B pod dźwignię idocisnąć.
5. Przypinka jest gotowa.
3.4. CZYSZCZENIE IKONSERWACJA
a) Do czyszczenia powierzchni należy stosować
wyłącznie środki niezawierające substancji
żrących.
b) Po każdym czyszczeniu wszystkie elementy należy
dobrze wysuszyć, zanim urządzenie zostanie
ponownie użyte.
c) Urządzenie należy przechowywać w suchym
i chłodnym miejscu chronionym przed wilgocią
ibezpośrednim promieniowaniem słonecznym.
d) Zabrania się spryskiwania urządzenia
strumieniem wody lub zanurzania urządzenia
wwodzie.
e) Należy wykonywać regularne przeglądy
urządzenia pod kątem jego sprawności
technicznej oraz wszelkich uszkodzeń.
f) Do czyszczenia należy używać miękkiej, wilgotnej
ściereczki.
g) Do czyszczenia nie wolno używać ostrych i/
lub metalowych przedmiotów (np. drucianej
szczotki lub metalowej łopatki) ponieważ mogą
one uszkodzić powierzchnię materiału, zktórego
wykonane jest urządzenie.
TECHNICKÉ ÚDAJE
NÁVODKPOUŽITÍ
Pojem „zařízení“ nebo „výrobek“ v bezpečnostních
pokynech a návodu se vztahuje na STROJ NA VÝROBU
PLACEK.
2.1. BEZPEČNOST NA PRACOVIŠTI
a) Na pracovišti udržujte pořádek a mějte dobré
osvětlení. Nepořádek nebo špatné osvětlení
mohou vést k úrazům. Buďte předvídaví asledujte,
co se během práce kolem vás děje. Při práci se
zařízením vždy zachovávejte zdravý rozum.
b) Budete-li mít pochybnosti, zda výrobek funguje
správně, nebo zjistíte poškození, kontaktujte servis
výrobce.
c) Výrobek může opravovat pouze servis výrobce.
Opravy neprovádějte sami!
d) Návod k obsluze uschovejte za účelem jeho
pozdějšího použití. V případě předánání zařízení
třetím osobám musí být spolu se zařízením předán
rovněž návod k obsluze.
e) Obalový materiál a drobné montážní prvky
uchovávejte na místě nedostupném pro děti.
2.2. OSOBNÍ BEZPEČNOST
a) Zařízení nepoužívejte, jste-li unaveni nebo pod
vlivem drog, alkoholu nebo léků, které významně
snižují schopnost zařízení ovládat.
b) Zařízení není určen k tomu, aby jej používaly
osoby (včetně dětí) s omezenými psychickými,
smyslovými nebo duševními schopnostmi nebo
osoby bez příslušných zkušeností a/nebo znalostí,
ledaže jsou pod dohledem osoby zodpovědné za
jejich bezpečnost nebo od ní obdržely pokyny, jak
zařízení obsluhovat.
c) Zařízení není hračka. Dohlížejte na děti, aby si
nehrály se zařízením.
2.3. BEZPEČNÉ POUŽÍVÁNÍ ZAŘÍZENÍ
a) Nepoužívaná zařízení uchovávejte mimo dosah
dětí aosob, které nejsou seznámeny se zařízením
nebo návodem k obsluze. Zařízení jsou nebezpečná
v rukou nezkušených uživatelů.
b) Zařízení udržujte v dobrém technickém stavu.
Kontrolujte před každou prací jeho celkový stav
i jednotlivé díly a ujistěte se, že je vše v dobrém
stavu, auživateli tak při práci se zařízením nehrozí
žádné nebezpečí. V případě, že zjistíte poškození,
nechte zařízení opravit.
c) Opravu a údržbu zařízení by měly provádět
pouze kvalikované osoby za výhradního použití
originálních náhradních dílů. Zajistí to bezpečné
používání zařízení.
d) Zařízení není hračka. Čištění a údržbu nesmí
provádět děti bez dohledu dospělé osoby.
e) Nezasahujte do zařízení s cílem změnit jeho
parametry nebo konstrukci.
f) Udržujte zařízení mimo zdroje ohně atepla.
3. ZÁSADY POUŽÍVÁNÍ
Výrobek je určen k výrobě placek. Zařízení je určeno
pouze pro domácí použití!
Odpovědnost za veškeré škody vzniklé v důsledku
použití zařízení v rozporu s určením nese uživatel.
PŘED ZAHÁJENÍM PRÁCE SI DŮKLADNĚ PŘEČTĚTE
TENTO NÁVOD AUJISTĚTE SE, ŽE JSTE POCHOPILI
VŠECHNY POKYNY.
Pro zajištění dlouhého aspolehlivého fungování zařízení
pravidelně provádějte revize a údržbu v souladu s
pokyny uvedenými v tomto návodu. Technické údaje
aspecifikace uvedené v návodu jsou aktuální. Výrobce
si vyhrazuje právo provádět změny za účelem zvýšení
kvality. Vzhledem k technickému pokroku a možnosti
omezení hluku bylo zařízení navrženo avyrobeno tak,
aby nebezpečí vyplývající zemise hluku bylo omezeno
na nejnižší úroveň.
1. VŠEOBECNÝ POPIS
Návod slouží jako nápověda pro bezpečné aspolehlivé
používání výrobku. Výrobek je navržen a vyroben
přesně podle technických údajů za použití nejnovějších
technologií a komponentů a za dodržení nejvyšších
jakostních norem.
VYSVĚTLENÍSYMBOLŮ
Před použitím výrobku se seznamte s
návodem.
VAROVÁNÍ! Nebezpečí pohmoždění rukou!
POZOR! Obrázky v tomto návodu jsou pouze
ilustrační av některých detailech se od skutečného
vzhledu výrobku mohou lišit.
Originálním návodem je německá verze návodu. Ostatní
jazykové verze jsou překladem zněmeckého jazyka.
2. BEZPEČNOST POUŽÍVÁNÍ
POZNÁMKA! Přečtěte si tento návod včetně všech
bezpečnostních pokynů. Nedodržování návodu
avýstrah může způsobit těžký úraz nebo smrt.
POZNÁMKA! I když zařízení bylo navrženo tak,
aby bylo bezpečné, tedy má vhodné bezpečnostní
prvky, tak i přes použití dodatečné ochrany
uživatelem při práci se zařízením nadále existuje
malé riziko úrazu nebo poranění. Doporučuje
se zachovat opatrnost a zdravý rozum při jeho
používání.
Popis parametru Hodnota parametru
Název výrobku STROJ NA VÝROBU PLACEK
Model UNI_
PBM_25/32
UNI_
PBM_58
UNI_
PBM_37
PLUS
Rozměry [mm] 300x170
x510
290x170
x510
290x170
x500
Hmotnost [kg] 9,8 14,26 8,1
PL CZ

1716
11.02.2022
3 4
1
2
4
5
6
3
2
5
1. Připravte základnu zařízení. Přišroubujte tělo k
základně stroje pomocí malého šestihranného
(imbusového) klíče.
2. Horní forma by měla být zasunuta do otvoru
pod pákou. Ujistěte se, že je kolík zasunut do
zvláštního otvoru.
3. Zasuňte základnu formy (společně s formami)
do speciálních kolejniček (jak je znázorněno na
fotograi).
4. Posuňte základnu tak, aby horní forma byla mezi
spodními formami. Vložte polohovací kolíky do
otvorů na obou stranách posuvné základny.
5. Kontrola fungování zařízení. Přesuňte formu
Apod páku (pod horní formu) azatlačte dolů.
POZOR! V horní formě bude štěrbina (mezera),
ale mezi horní formou aformou Anebude žádná
mezera.
6. Kontrola fungování zařízení. Přesuňte formu B
pod páku (pod horní formu) azatlačte dolů.
POZOR! V horní formě ani bez horní formou
aformou B nebude žádná mezera.
7. Úprava nastavení formy. Pokud nejsou spodní
formy vyrovnány, upravte je ručně (jemně otočte
formu správným směrem).
3.2.3. INSTALACE MONTÁŽNÍHO ZAŘÍZENÍ
1. Vyhledávač polohy
2. Nůž
3. Knoík (nastavitelný)
4. Rukojeť (nastavitelná)
1. Držák páky
2. Horní forma
3. Forma A
4. Forma B
5. Posuvná základna formy
6. Základna stroje
PŘÍSLUŠENSTVÍ:
1. Stříhací nástroj
2. Kovový kryt
3. Průhledná fólie
4. Kovová spona
3.2. PŘÍPRAVA K PRÁCI
3.2.1. UMÍSTĚNÍ ZAŘÍZENÍ
Zařízení vždy používejte na rovnoměrném, stabilním,
čistém a ohnivzdorném povrchu, mimo dosah dětí
a osob s omezenými psychickými, smyslovými
aduševními funkcemi.
3.2.2. MONTÁŽ ZAŘÍZENÍ
123
4
1
2
3
3.1. POPIS ZAŘÍZENÍ 5 6
7
1 2
3 4
1. Vložte čepel do držáku, jak je znázorněno na
fotograi.
2. Vložte knoík zajišťující čepel nože na správné
místo (jak je znázorněno na fotograi) a seřiďte
jej.
3. Umístěte vyhledávač polohy na určené místo.
4. Čepel nože je vyměnitelná. Chcete-li jej vyměnit,
odlomte kousek čepele od technického nože (se
zlomenou čepelí).
5. Vyšroubujte šroub avyměňte nůž.
3.3. PRÁCE SE ZAŘÍZENÍM
3.3.1. PŘÍPRAVA VZORKU POMOCÍ ŘEZACÍHO NÁŘADÍ
1. Umístěte vyhledávač polohy na tištěný (nebo
nakreslený) vzor / projekt. Jednou rukou uchopte
vyhledávač polohy apřitlačte jej na papír adruhou
rukou otáčejte rukojetí, dokud nebude vyříznut
kotouč se vzorem.
3.3.2. PŘÍPRAVA PLACKY
1. Vložte kovovou čepičku do formy A. Poté na ni
umístěte předem připravený vzor (vystřihněte ve
správné velikosti). Na konec vložte průhlednou
fólii.
2. Vložte kovovou sponu do formy B.
POZOR! Pamatujte, že spona (zavírací špendlík)
směřuje dolů.
3. Zasuňte formu A pod páku a zatlačte dolů.
Všechny elementy budou v horní formě.
4. Přesuňte formulář B pod páku astiskněte dolů.
4
5
CZ CZ

1918
11.02.2022
DÉTAILS TECHNIQUES
Les notions d‘« appareil », de « machine » et de « produit »
gurant dans les descriptions et les consignes du manuel
se rapportent à/au MACHINE AFABRIQUER DES BADGES.
2.1. SÉCURITÉ AU POSTE DE TRAVAIL
a) Veillez à ce que votre poste de travail soit toujours
propre et bien éclairé. Le désordre ou un éclairage
insusant peuvent entraîner des accidents. Soyez
prévoyant, observez les opérations et faites preuve
de bon sens lorsque vous utilisez l’appareil.
b) En cas de doute quant au bon fonctionnement de
l‘appareil ou si vous constatez des dommages sur
celui-ci, veuillez communiquer avec le service client
du fabricant.
c) Seul le fabricant doit réparer le produit. Ne tentez
pas de réparer le produit par vous-même !
d) Conservez le manuel d’utilisation an de pouvoir
le consulter ultérieurement. En cas de cession de
l’appareil à un tiers, l’appareil doit impérativement
être accompagné du manuel d’utilisation.
e) Tenez les éléments d’emballage et les pièces de
xation de petit format hors de portée des enfants.
2.2. SÉCURITÉ DES PERSONNES
a) N‘utilisez pas l‘appareil lorsque vous êtes fatigué,
malade, sous l‘eet de drogues ou de médicaments
et que cela pourrait altérer votre capacité à utiliser
l‘appareil.
b) Cet appareil n‘est pas conçu pour être utilisé
par les personnes dont les facultés physiques,
sensorielles ou mentales sont limitées (enfants y
compris), ni par des personnes sans expérience
ou connaissances adéquates, à moins qu‘elles se
trouvent sous la supervision et la protection d‘une
personne responsable ou qu‘une telle personne
leur ait transmis des consignes appropriées en lien
avec l‘utilisation de l’appareil.
c) Cet appareil n‘est pas un jouet. Les enfants doivent
demeurer sous la supervision d’un adulte an
qu’ils ne jouent pas avec l’appareil.
2.3. UTILISATION SÉCURITAIRE DE L‘APPAREIL
a) Les outils qui ne sont pas en cours d‘utilisation
doivent être mis hors de portée des enfants et
des personnes qui ne connaissent ni l‘appareil,
ni le manuel d‘utilisation s‘y rapportant. Entre les
mains de personnes inexpérimentées, ce genre
d‘appareils peut représenter un danger.
b) Maintenez l‘appareil en parfait état de marche.
Avant chaque utilisation, vériez l’absence de
dommages en général et au niveau des pièces
mobiles (assurez-vous qu’aucune pièce ni
composant n’est cassé et vériez que rien ne
compromet le fonctionnement sécuritaire de
l’appareil). En cas de dommages, l’appareil doit
impérativement être envoyé en réparation avant
d’être utilisé de nouveau.
c) La réparation et l‘entretien des appareils doivent
être eectués uniquement par un personnel
qualié, à l‘aide de pièces de rechange d‘origine.
Cela garantit la sécurité d’utilisation.
d) Cet appareil n‘est pas un jouet. Le nettoyage
et l’entretien ne doivent pas être eectués par
des enfants, à moins qu’ils se trouvent sous la
supervision d’un adulte responsable.
e) Il est défendu de modier l’appareil pour en
changer les paramètres ou la construction.
f) Gardez le produit à l’écart des sources de feu et de
chaleur.
LISEZ ATTENTIVEMENT LE PRÉSENT MANUEL ET
ASSUREZ-VOUS DE BIEN LE COMPRENDRE AVANT
LA PREMIÈRE UTILISATION.
Afin de garantir le fonctionnement fiable et durable
de l'appareil, il est nécessaire d'utiliser et d'entretenir
ce dernier conformément aux consignes figurant
dans le présent manuel. Les caractéristiques et les
spécifications contenues dans ce document sont à
jour. Le fabricant se réserve le droit de procéder à des
modifications à des fins d’amélioration du produit.
L'appareil a été mis au point et fabriqué en tenant
compte des progrès techniques et de la réduction de
bruit afin de réduire au maximum les risques liés aux
émissions sonores.
1. DESCRIPTION GÉNÉRALE
L'objectif du présent manuel est de favoriser une
utilisation sécuritaire et fiable de l'appareil. Le produit
aété conçu et fabriqué en respectant étroitement les
directives techniques applicables et en utilisant les
technologies et composants les plus modernes. Il est
conforme aux normes de qualité les plus élevées.
SYMBOLES
Respectez les consignes du manuel.
ATTENTION ! Mise en garde liée à un risque
de blessures des mains !
REMARQUE! Les illustrations contenues dans le
présent manuel sont fournies à titre explicatif.
Votre appareil peut ne pas être identique.
La version originale de ce manuel a été rédigée
en allemand. Toutes les autres versions sont des
traductions de l'allemand.
2. CONSIGNES DE SÉCURITÉ
ATTENTION! Veuillez lire attentivement toutes les
consignes de sécurité et toutes les instructions. Le
non-respect des avertissements et des consignes
de sécurité peut entraîner des blessures graves ou
la mort.
FR
MANUEL D´UTILISATION
Description
des paramètres Valeur des paramètres
Nom du produit MACHINE AFABRIQUER
DES BADGES
Modèle UNI_
PBM_25/32
UNI_
PBM_58
UNI_
PBM_37
PLUS
Dimensions
[mm]
300x170
x510
290x170
x510
290x170
x500
Poids [kg] 9,8 14,26 8,1
5. Placka je hotová.
3.4. ČIŠTĚNÍ AÚDRŽBA
a) K čištění povrchu zařízení používejte výhradně
prostředky neobsahující žíravé látky.
b) Po každém čištění je nutno všechny prvky dobře
osušit, než bude zařízení opět použito.
c) Zařízení skladujte na suchém achladném místě,
chráněném proti vlhkosti apřímému slunečnímu
svitu.
d) Je zakázáno zařízení polévat vodou nebo je do
vody ponořovat.
e) Pravidelně provádějte revize zařízení
a kontrolujte, zda je technicky způsobilé a není
poškozeno.
f) K čištění používejte měkký, vlhký hadřík.
g) K čištění nepoužívejte ostré ani kovové předměty
(například drátěný kartáč nebo kovovou
obracečku), protože mohou poškodit povrch
materiálu, zněhož je zařízení vyrobeno.
CZ

2120
11.02.2022
3 4
1
2
4
5
6
3
2
5
3. CONDITIONS D’UTILISATION
Le produit est destiné à la fabrication de badges. Le
produit est destiné uniquement à l’utilisation privée !
L’utilisateur porte l’entière responsabilité pour
l’ensemble des dommages attribuables à un usage
inapproprié.
3.1. DESCRIPTION DE L‘APPAREIL
FR
1. Poignée
2. Matrice supérieure
3. Matrice A
4. Matrice B
5. Base coulissante de la matrice
6. Base de la machine
ACCESSOIRES
1. Outil de coupe
2. Rondelle métallique
3. Film transparent
4. Fermoir métallique
3.2. PRÉPARATION À L‘UTILISATION
3.2.1. CHOIX DE L’EMPLACEMENT DE L’APPAREIL
Utilisé toujours l’appareil sur une surface plane, stable,
propre, ininammable et sèche, hors de portée des
enfants et des personnes présentant des capacités
physiques, sensorielles ou mentales diminuées.
ATTENTION! Bien que l‘appareil ait été conçu
en accordant une attention spéciale à la sécurité
et qu‘il comporte des dispositifs de protection,
ainsi que des caractéristiques de sécurité
supplémentaires, il n’est pas possible d’exclure
entièrement tout risque de blessure lors de son
utilisation. Nous recommandons de faire preuve
de prudence et de bon sens lorsque vous utilisez
l’appareil.
3.2.2. MONTAGE DE L’APPAREIL
1 2
3 4
5 6
7
FR
1. Placer la lame dans la poignée comme indiqué sur
la photo.
2. Insérer le bouton de xation de la lame du
couteau à l’endroit approprié (comme sur la
photo) et l’ajuster
3. Placer le localisateur de position à l‘endroit
indiqué.
4. La lame du couteau est remplaçable. Pour la
remplacer, casser un morceau de la lame du
couteau technique (avec lame cassable).
5. Dévisser la vis et remplacer la lame.
3.3. UTILISATION DE L‘APPAREIL
3.3.1. PRÉPARATION DU MOTIF AVEC OUTIL DE COUPE
1. Placer le localisateur de position sur un motif /
projet imprimé (ou dessiné). Avec une main, saisir
le localisateur de position et l’appuyer contre le
papier, et avec l‘autre main, tourner la poignée
jusqu‘au découpage du disque avec motif.
3.3.2. PREPARATION DU BADGE
1. Placer la rondelle métallique dans la matrice A.
Ensuite, y placer le motif préalablement préparé
(découpé à la bonne taille). Ala n mettre le lm
transparent.
2. Placer le fermoir métallique dans la matrice B.
ATTENTION! Ne pas oublier que le fermoir
(épingle) doit être orienté vers le bas.
5
3.2.3. ASSEMBLAGE DE L‘OUTIL DE COUPE
123
4
4
2
3
1
1. Préparer la base de l‘appareil. Visser le corps
à la base de la machine à l‘aide d‘une petite clé
hexagonale (Allen).
2. La matrice supérieure doit être insérée dans
l’ouverture sous le levier. Assurez-vous que la
goupille est insérée dans une ouverture spéciale.
3. Insérer la base de la matrice (avec matrices) dans
les glissières spéciales (comme indiqué sur la
photo).
4. Déplacer la base de sorte que la matrice
supérieure se trouve entre les matrices
inférieures. Placer les broches de positionnement
dans les ouvertures sur les deux côtés de la base
coulissante.
5. Vérication du fonctionnement. Déplacer
la matrice A sous le levier (sous la matrice
supérieure) et l’enfoncer.
ATTENTION ! Une fente (écartement) dans la
forme supérieure apparaitra, mais il n‘y aura pas
d‘écartement entre la matrice supérieure et la
matrice A.
6. Vérication du fonctionnement. Déplacer
la matrice B sous le levier (sous la matrice
supérieure) et l’enfoncer.
ATTENTION ! Il n‘y aura aucune fente (écartement)
ni dans la matrice supérieure ni entre la matrice
supérieure et la matrice B.
7. Réglage du placement de la matrice. Si les
matrices inférieures ne sont pas alignées, il faut
les ajuster manuellement (tourner doucement la
matrice dans la direction appropriée).
1. Localisateur de position
2. Couteau
3. Bouton (réglable)
4. Poignée (réglable)

2322
11.02.2022
FR
5. Le badge est prêt
3.4. NETTOYAGE ET ENTRETIEN
a) Pour nettoyer les diérentes surfaces, n‘utilisez
que des produits sans agents corrosifs.
b) Laissez bien sécher tous les composants après
chaque nettoyage avant de réutiliser l’appareil.
c) Conservez l‘appareil dans un endroit propre, frais
et sec, à l‘abri de l‘humidité et des rayons directs
du soleil.
d) Il est interdit d’asperger l‘appareil d‘eau ou de
l‘immerger dans l‘eau.
e) Contrôlez régulièrement l‘appareil pour vous
assurer qu‘il fonctionne correctement et ne
présente aucun dommage.
DATI TECNICI
Il termine „apparecchio“ o „prodotto“ nelle avvertenze
e descrizioni contenute nel manuale si riferisce alla/al
MACCHINA PER SPILLE.
2.1. SICUREZZA SUL LAVORO
a) Mantenere il posto di lavoro pulito e ben illuminato.
Il disordine o una scarsa illuminazione possono
portare a incidenti. Essere sempre prudenti,
osservare che cosa si sta facendo e utilizzare il
buon senso quando si adopera il dispositivo.
b) In presenza di dubbi sul corretto funzionamento
del dispositivo ose ci sono dei danni, rivolgersi al
servizio clienti del produttore.
c) Il prodotto può essere riparato soltanto dal
fornitore. Non auto-ripararlo.
d) Conservare le istruzioni d‘uso per uso futuro. Nel
caso in cui il dispositivo venisse adato a terzi,
consegnare anche queste istruzioni.
e) Tenere gli elementi di imballaggio e le piccole parti
di assemblaggio fuori dalla portata dei bambini.
2.2. SICUREZZA PERSONALE
a) Non è consentito l‘uso del dispositivo in uno stato
di aaticamento, malattia, sotto l‘inuenza di alcol,
droghe ofarmaci, se questi limitano la capacità di
utilizzare il dispositivo.
b) Questo dispositivo non è adatto per essere
utilizzato da persone, bambini compresi, con
ridotte capacità siche, sensoriali o mentali,
così come da privi di adeguata esperienza
e/oconoscenze. Si fa eccezione per coloro iquali
siano sorvegliati da un responsabile qualicato
che si prenda carico della loro sicurezza e abbia
ricevuto istruzioni dettagliate al riguardo.
c) Questo dispositivo non è un giocattolo. Ibambini
devono essere sorvegliati anché non giochino
con il prodotto.
2.3. USO SICURO DEL DISPOSITIVO
a) Gli strumenti inutilizzati devono essere tenuti fuori
dalla portata dei bambini e delle persone che non
hanno familiarità con il dispositivo e le istruzioni
d’uso. Nelle mani di persone inesperte, questo
dispositivo può rappresentare un pericolo.
b) Mantenere il dispositivo in perfette condizioni.
Prima di ogni utilizzo, vericare che non vi siano
danni generali o danni alle parti mobili (frattura
di parti e componenti o altre condizioni che
potrebbero compromettere il funzionamento
sicuro del prodotto). In caso di danni, l‘unità deve
essere riparata prima dell‘uso.
c) La riparazione e la manutenzione dell‘attrezzatura
devono essere eseguite esclusivamente da
personale specializzato qualicato e con pezzi
di ricambio originali. Ciò garantisce la sicurezza
durante l‘uso.
d) Questo apparecchio non è un giocattolo! La
pulizia e la manutenzione non devono essere
eseguite da bambini ameno che non siano sotto la
supervisione di un adulto.
e) È vietato intervenire sulla costruzione del
dispositivo per modicare isuoi parametri ola sua
costruzione.
f) Tenere dispositivi lontano da fonti di fuoco e
calore.
PRIMA DELLA MESSA IN FUNZIONE È
NECESSARIO AVER LETTO E COMPRESO LE
ISTRUZIONI D'USO.
Per un funzionamento duraturo e affidabile del
dispositivo assicurarsi di maneggiarlo e curarne la
manutenzione secondo le disposizioni presentate in
questo manuale. Idati e le specifiche tecniche indicati
in questo manuale sono attuali. Il fornitore si riserva
il diritto di apportare delle migliorie nel contesto del
miglioramento dei propri prodotti. L'apparecchiatura è
stata progettata e realizzata tenendo in considerazione
il progresso tecnico e la riduzione di rumore, in maniera
tale da mantenere al minimo ipossibili rischi derivanti
dalle emissioni di rumore.
1. DESCRIZIONE GENERALE
Queste istruzioni sono intese come ausilio per un uso
sicuro e affidabile. Il prodotto è stato rigorosamente
progettato e realizzato secondo le direttive tecniche
e l'utilizzo delle tecnologie e componenti più moderne
e seguendo gli standard di qualità più elevati.
SIMBOLI
Leggere attentamente le istruzioni.
ATTENZIONE! Pericolo di lesione alle mani!
AVVERTENZA! Le immagini contenute in questo
manuale sono puramente indicative e potrebbero
differire dal prodotto.
Il manuale originale è stato scritto in tedesco. Le
versioni in altre lingue sono traduzioni dalla lingua
tedesca.
2. SICUREZZA NELL'IMPIEGO
ATTENZIONE! Leggere le istruzioni d'uso e di
sicurezza. Non prestare attenzione alle avvertenze
e alle istruzioni può condurre a gravi lesioni
oaddirittura al decesso.
ATTENZIONE! Anche se l‘apparecchiatura è
stata progettata per essere sicura, sono presenti
degli ulteriori meccanismi di sicurezza. Malgrado
l‘applicazione di queste misure supplementari di
sicurezza sussiste comunque il rischio di ferirsi.
Si raccomanda inoltre di usare cautela e buon
senso.
IT
ISTRUZIONI D`USO
Parametri
- Descrizione Parametri - Valore
Nome
del prodotto MACCHINA PER SPILLE
Modello UNI_
PBM_25/32
UNI_
PBM_58
UNI_
PBM_37
PLUS
Dimensioni
[mm]
300x170
x510
290x170
x510
290x170
x500
Peso [kg] 9,8 14,26 8,1
3. Déplacer la matrice Asous le levier et l’enfoncer.
Tous les éléments se retrouveront dans la matrice
supérieure.
4. Déplacer la matrice B sous le levier et l’enfoncer.
f) Il est conseillé de laver l’appareil uniquement avec
un chion mou et humide.
g) N’utilisez aucun objet présentant des arêtes
tranchantes, ni objet métallique (tels qu’une
brosse ou une spatule en métal) pour le nettoyage
car ils pourraient endommager la surface de
l’appareil.

2524
11.02.2022
3 4
1
2
4
5
6
3
2
5
3. CONDIZIONI D‘USO
Il prodotto serve per la realizzazione di spille. Questo
prodotto è destinato esclusivamente all’uso domestico!
L‘operatore è responsabile di tutti idanni derivanti
da un uso improprio.
3.1. DESCRIZIONE DEL DISPOSITIVO
1. Impugnatura leva
2. Stampo superiore
3. Stampo A
4. Stampo B
5. Base scorrevole
6. Base macchina
ACCESSORI
1. Taglierina
2. Lamierina
3. Pellicola trasparente
4. Chiusura di sicurezza in metallo
3.2. PREPARAZIONE AL FUNZIONAMENTO
3.2.1. POSIZIONAMENTO DEL DISPOSITIVO
Il dispositivo va sempre utilizzato su una supercie
piana, stabile, pulita, ignifuga e asciutta, lontano dalla
portata dei bambini e di persone con capacità psichiche,
sensoriali e mentali ridotte.
3.2.2. MONTAGGIO DEL DISPOSITIVO
IT
1 2
3 4
5 6
7
1. Inserire la lama nel manico come riportato in gura.
2. Inserire la protezione lama nell’apposito posto
(come in gura) e regolare.
3. Collocare il posizionatore nel posto desiderato.
4. La lama del coltello è sostituibile. Per sostituirla,
staccare un pezzo dalla lama del coltello a lama
spezzabile.
5. Svitare la vite e cambiare la lama.
3.3. LAVORARE CON IL DISPOSITIVO
3.3.1. PREPARAZIONE DEL MOTIVO
TRAMITE LA TAGLIERINA
1. Collocare il posizionatore sul motivo/progetto
stampato o disegnato. Con una mano aerrare
il posizionatore e premere contro il foglio, con
l’altra mano far girare il manico no aritagliare il
cerchio con il motivo.
3.3.2. PREPARAZIONE DELLA SPILLA
1. Inserire il lamierino nello stampo A, quindi
apporvi la graca preparata (ritagliata nella
dimensione appropriata). Inne mettere sopra la
pellicola trasparente.
2. Inserire la chiusura di sicurezza in metallo nello
stampo B.
ATTENZIONE! Ricordare che la chiusura (spilla di
sicurezza) sia rivolta verso il basso.
3. Spostare lo stampo Asotto la leva e premere. Tutti
gli elementi si troveranno nello stampo superiore.
4
5
IT
1. Preparare la base della macchina. Avvitare il
corpo alla base della macchina con la piccola
chiave abrugola.
2. Inserire lo stampo superiore nel foro sotto la leva.
Fare attenzione afar entrare il perno nell’apposito
foro
3. Inserire la base scorrevole (con gli stampi) nelle
apposite guide (come riportato in gura).
4. Far scorrere la base in modo che lo stampo
superiore si trovi tra gli stampi inferiori. Inserire
iperni di posizionamento nei fori da due lati della
base.
5. Verica del funzionamento. Spostare lo stampo
A sotto la leva (sotto lo stampo superiore) e
pressare.
NOTA! Ci sarà una luce (spazio) nello stampo
superiore, non ci sarà invece nessuna luce tra lo
stampo superiore e lo stampo A.
6. Verica del funzionamento. Spostare lo stampo
B sotto la leva (sotto lo stampo superiore) e
pressare.
NOTA! Non ci sarà nessuna luce (nessuno spazio)
né nello stampo superiore, né tra lo stampo
superiore e lo stampo B.
7. Regolazione della posizione dello stampo. Se gli
stampi inferiori non sono ben allineati, regolare
la loro posizione amano (girare leggermente lo
stampo nella direzione corretta).
3.2.3. MONTAGGIO UTENSILI DA TAGLIO
1. Posizionatore
2. Coltello
3. Protezione lama (regolabile)
4. Manico (regolabile)
123
4
1
2
3

2726
11.02.2022
DATOS TÉCNICOS
MANUAL DE INSTRUCCIONES
Conceptos como „aparato“ o „producto“ en las
advertencias y descripciones de este manual se reeren
aMÁQUINAS PARA HACER CHAPAS.
2.1. SEGURIDAD EN EL PUESTO DE TRABAJO
a) Mantenga el lugar de trabajo limpio y bien
iluminado. El desorden o la mala iluminación
pueden provocar accidentes. Tenga cuidado,
preste atención al trabajo que está realizando y
use el sentido común cuando utilice el dispositivo.
b) En caso de duda sobre si el producto funciona
correctamente o si detectara daños, póngase en
contacto con el servicio de atención al cliente del
fabricante.
c) El producto solamente puede ser reparado por el
fabricante. ¡No intente repararlo usted mismo!
d) Conserve el manual de instrucciones para futuras
consultas. Este manual debe ser entregado atoda
persona que vaya ahacer uso del dispositivo.
e) Los elementos de embalaje y pequeñas piezas de
montaje deben mantenerse alejados del alcance
de los niños.
2.2. SEGURIDAD PERSONAL
a) No está permitido utilizar el aparato en estado de
fatiga, enfermedad, bajo la inuencia del alcohol,
drogas o medicamentos, ya que estos limitan la
capacidad de manejo del aparato.
b) Este aparato no debe ser utilizado por personas
(entre ellas niños) con capacidades físicas,
sensoriales o mentales reducidas, o con falta de
la experiencia y/o los conocimientos necesarios,
amenos que sean supervisadas por una persona
responsable de su seguridad oque hayan recibido
de esta persona responsable las indicaciones
pertinentes en relación al manejo del aparato.
c) Este aparato no es un juguete. Debe controlar que
los niños no jueguen con él.
2.3. MANEJO SEGURO DEL APARATO
a) Mantenga las herramientas fuera del alcance
de los niños y de las personas que no estén
familiarizadas con el equipo en sí o no hayan
recibido las instrucciones pertinentes al respecto.
En manos de personas inexpertas este equipo
puede representar un peligro.
b) Mantenga el aparato en perfecto estado
de funcionamiento. Antes de cada trabajo,
compruébelo en busca de daños generales o de
piezas móviles (fractura de piezas y componentes
u otras condiciones que puedan perjudicar el
funcionamiento seguro de la máquina). En caso
de daños, el aparato debe ser reparado antes de
volver aponerse en funcionamiento.
c) La reparación y el mantenimiento de los equipos
solo pueden ser realizados por personal
cualicado y siempre empleando piezas de
repuesto originales. Esto garantiza la seguridad
durante el uso.
d) Este aparato no es un juguete. La limpieza y el
mantenimiento no deben ser llevados acabo por
niños que no estén bajo la supervisión de adultos.
e) Se prohíbe realizar cambios en la construcción
del dispositivo para modicar sus parámetros
odiseño.
f) Mantenga el dispositivo alejado de fuentes de
fuego ocalor.
ANTES DE LA PUESTA EN FUNCIONAMIENTO,
LEA LAS INSTRUCCIONES MINUCIOSAMENTE Y
ASEGÚRESE DE COMPRENDERLAS.
Para garantizar un funcionamiento duradero y fiable
del aparato, el manejo y mantenimiento deben llevarse
acabo de acuerdo con las instrucciones de este manual.
Los datos técnicos y las especificaciones de este manual
están actualizados. El fabricante se reserva el derecho
de realizar modificaciones para mejorar la calidad.
1. DESCRIPCIÓN GENERAL
Este manual ha sido elaborado para favorecer
un empleo seguro y fiable. El producto ha sido
estrictamente diseñado y fabricado conforme a las
especificaciones técnicas y para ello se han utilizado las
últimas tecnologías y componentes, manteniendo los
más altos estándares de calidad.
EXPLICACIÓNDELOSSÍMBOLOS
Respetar las instrucciones de uso.
¡ATENCIÓN! ¡Advertencia de lesiones en
manos!
¡ADVERTENCIA! En este manual se incluyen fotos
ilustrativas que podrían no coincidir exactamente
con la apariencia real del dispositivo.
El texto en alemán corresponde a la versión original.
Los textos en otras lenguas son traducciones del
original en alemán.
2. SEGURIDAD
¡ATENCIÓN! Lea todas las instrucciones
e indicaciones de seguridad. La inobservancia de
las advertencias e instrucciones al respecto puede
provocar lesiones graves oincluso la muerte.
¡ATENCIÓN! Aunque en la fabricación de este
aparato se ha prestado gran importancia a la
seguridad, dispone de ciertos mecanismos de
protección extras. Apesar del uso de elementos
de seguridad adicionales, existe el riesgo de
lesiones durante el funcionamiento, por lo
que se recomienda proceder con precaución y
sentido común.
Parámetro
- Descripción Parámetro - Valor
Nombre del
producto MÁQUINAS PARA HACER CHAPAS
Modelo UNI_
PBM_25/32
UNI_
PBM_58
UNI_
PBM_37
PLUS
Dimensiones
[mm]
300x170
x510
290x170
x510
290x170
x500
Peso [kg] 9,8 14,26 8,1
4. Spostare lo stampo B sotto la leva e premere.
5. La spilla è fatta.
3.4. PULIZIA E MANUTENZIONE
a) Per pulire la supercie utilizzare solo detergenti
senza ingredienti corrosivi.
b) Dopo la pulizia, prima di riutilizzare l‘apparecchio,
asciugare tutte le parti.
c) Tenere l‘apparecchio in un luogo asciutto, fresco,
protetto dall‘umidità e dalla luce diretta del sole.
d) È vietato spruzzare il dispositivo con un getto
d‘acqua oimmergere il dispositivo in acqua.
e) Eettuare controlli regolari del dispositivo per
mantenerlo eciente e privo di danni.
f) Per la pulizia utilizzare un panno morbido e
umido.
g) Non utilizzare oggetti appuntiti o / e metallici
(come una spazzola o una spatola metallica)
per la pulizia, poiché potrebbero danneggiare
la supercie del materiale con cui è fatto il
dispositivo.
IT ES

2928
11.02.2022
3 4
1
2
4
5
6
3
2
5
3. INSTRUCCIONES DE USO
El producto está diseñado para hacer chapas. ¡El
producto solamente puede utilizarse de forma privada!
El usuario es responsable de los daños derivados de
un uso inadecuado del aparato.
3.1. DESCRIPCIÓN DEL APARATO
1. Mango de palanca
2. Molde superior
3. Molde A
4. Molde B
5. Base deslizante del molde
6. Base de la máquina
ACCESORIOS
1. Herramienta de corte
2. Recubrimiento metálico
3. Lámina transparente
4. Cierre metálico
3.2. PREPARACIÓN PARA LA PUESTA EN MARCHA
3.2.1. LUGAR DE TRABAJO
El aparato se debe usar siempre en una superficie
plana, estable, limpia, ignífuga y seca, fuera del alcance
de los niños y de personas con funciones psíquicas,
mentales y sensoriales limitadas.
3.2.2. MONTAJE DE LA MÁQUINA
1 2
3 4
5 6
7
1. Coloque la cuchilla en el soporte como se muestra
en la ilustración.
2. Coloque el pomo que sujeta la hoja de la cuchilla
en el lugar correcto (como se muestra en la
ilustración) y ajústelo.
3. Coloque el localizador de posición en el lugar
designado.
4. La hoja de la cuchilla es reemplazable. Para
reemplazarla, rompa un trozo de la hoja de la
cuchilla.
5. Quite el tornillo y reemplace la cuchilla.
3.3. MANEJO DEL APARATO
3.3.1. PREPARACIÓN DEL PATRÓN CON LA HERRAMIENTA
DE CORTE
1. Coloque el localizador de posición en el patrón/
diseño impreso (o dibujado). Con una mano,
sujete el localizador de posición y presiónelo
contra el patrón, y con la otra mano, gire el mango
hasta que se recorte el círculo del patrón.
3.3.2. PREPARACIÓN DE LAS CHAPAS
1. Colocar la tapa metálica en el molde A.
A continuación, coloque el patrón previamente
preparado (recortado en el tamaño adecuado).
Por último, coloque la lámina transparente.
2. Coloque el cierre metálico en el molde B.
NOTA: Asegúrese de que el cierre (pasador de
seguridad) esté orientado hacia abajo.
4
5
1. Prepare la base del dispositivo. Atornille el cuerpo
ala base de la máquina con una pequeña llave
hexagonal (Allen).
2. El molde superior debe insertarse en el oricio
debajo de la palanca. Asegúrese de que el
pasador esté insertado en el oricio especial.
3. Deslice la base del molde (junto con los moldes)
en las guías especiales (como se muestra en la
ilustración).
4. Mueva la base de modo que el molde superior
quede entre los moldes inferiores. Inserte los
pasadores de posicionamiento en los oricios
aambos lados de la base deslizante.
5. Comprobación de funcionamiento. Mueva el
molde Adebajo de la palanca (debajo del molde
superior) y presione hacia abajo.
¡ATENCIÓN! Habrá un espacio (espacio) en el
formulario superior, pero no habrá espacio entre
el formulario superior y el formulario A.
6. Comprobación del funcionamiento. Ponga el
molde B debajo de la palanca (debajo del molde
superior) y presione.
ATENCIÓN. No habrá espacio ni en el molde
superior ni entre el molde superior y el molde B
7. Ajuste del molde. Si los moldes inferiores no
están alineados, ajústelos manualmente (gire
suavemente el molde en la dirección correcta).
3.2.3. MONTAJE DE LA HERRAMIENTA DE CORTE
1. Localizador de posición
2. Cuchilla
3. Pomo (ajustable)
4. Mango (ajustable)
123
4
1
2
3
ES ES

3130
11.02.2022
3. Deslice el molde A bajo la palanca y presione.
Todos los elementos estarán en el molde
superior.
4. Deslice el molde B bajo la palanca y presione.
5. La chapa estará lista.
3.4. LIMPIEZA Y MANTENIMIENTO
a) Para limpiar la supercie, utilice solo productos
que no contengan sustancias corrosivas.
b) Después de cada limpieza, deje secar bien todas
las piezas antes de volver autilizar el aparato.
c) Guarde el aparato en un lugar seco, fresco y
protegido de la humedad y la radiación solar
directa.
d) Prohibido rociar agua sobre el dispositivo
osumergirlo en agua.
e) En lo que respecta a la eciencia técnica y
posibles daños, el dispositivo debe ser revisado
regularmente.
f) Para su limpieza utilizar un paño húmedo y suave.
g) No utilizar para la limpieza objetos de metal
puntiagudos y/oalados (p.ej. cepillos metálicos
o espátulas de metal), ya que podrían dañar la
supercie del material del que está hecho el
aparato.
ES
MŰSZAKI ADATOK
KEZELÉSI ÚTMUTATÓ
A gyelmeztetésekben és a használati utasításban
szereplő „készülék” vagy „termék” kifejezés
aKITŰZŐKÉSZÍTŐ-re vonatkozik.
2.1. MUNKAHELYRE VONATKOZÓ BIZTONSÁGI SZABÁLYOK
a) Ügyeljen a munkahelyen a rendre és a jó
megvilágításra. A rendetlenség vagy a rossz
megvilágítás balesetekhez vezethet. Legyen
előrelátó, ügyeljen a cselekedeteire és használja
ajózan eszét aberendezés használata során.
b) Ha bizonytalan abban, hogy atermék megfelelően
működik-e, vagy sérülést észlel, lépjen kapcsolatba
agyártó szervizével.
c) Aterméket csak agyártó szervize javíthatja. Tilos
önálló javításokat végezni aterméken!
d) A használati utasítást meg kell őrizni, később
is szükség lehet rá. Ha a készüléket átadja egy
következő tulajdonosnak, ahasználati utasítást is
mindenképpen atermékkel együtt át kell adni.
e) A csomagolás részeit és az apró alkatrészeket
gyermekektől elzárva kell tartani.
2.2. SZEMÉLYEKRE VONATKOZÓ BIZTONSÁGI SZABÁLYOK
a) Tilos a készüléket fáradtan, betegen vagy
alkohol, kábítószer vagy olyan gyógyszer hatása
alatt használni, amely jelentősen korlátozza
akoncentrációs képességet.
b) Akészüléket nem használhatják csökkent szellemi,
érzékszervi és mentális funkciókkal rendelkező
személyek (beleértve agyerekeket), valamint nem
használhatják megfelelő tapasztalattal és/vagy
ismeretekkel nem rendelkező személyek, kivéve
ha egy a biztonságukért felelős személy felügyeli
munkájukat, vagy elmagyarázta, hogy hogyan kell
kezelni akészüléket.
c) A készülék nem játék. Nem szabad megengedni,
hogy gyermekek játszanak akészülékkel.
2.3. AKÉSZÜLÉK BIZTONSÁGOS HASZNÁLATA
a) Az épp használaton kívüli készüléket tartsa távol
gyermekektől és olyan személyektől, akik nem
ismerik a készüléket vagy a használati utasítást.
A készülék veszélyes lehet a tapasztalatlan
felhasználók kezében.
b) Tartsa a készüléket jó műszaki állapotban.
Minden munka előtt ellenőrizze, hogy nincsenek-e
sérülések aburkolaton vagy amozgó alkatrészeken
(repedések az alkatrészeken és alegységeken, vagy
bármilyen más körülmény, amely befolyásolhatja
akészülék biztonságos működését). Sérülés esetén
akészüléket használat előtt javítsa meg.
c) A készülékek javítását és karbantartását csak
szakképzett személyek végezhetik, kizárólag
eredeti cserealkatrészek használatával. Ez
biztosítja abiztonságos használatot.
d) Akészülék nem játék. Gyermekek nem végezhetik
felnőtt felügyelete nélkül a tisztítási vagy
akarbantartási munkálatokat.
e) Tilos módosítani a készülék felépítését
paramétereinek vagy kialakításának
megváltoztatása érdekében.
f) Tartsa távol a készülékeket tűztől és más
hőforrásoktól.
AMUNKA MEGKEZDÉSE ELŐTT ALAPOSAN,
ÉRTŐ OLVASÁSSAL TANULMÁNYOZZA AJELEN
HASZNÁLATI UTASÍTÁST.
A készülék hosszú és megbízható működésének
érdekében ügyelni kell a készülék megfelelő
használatára és karbantartására az ebben ahasználati
utasításban leírtaknak megfelelően. A használati
utasításban szereplő műszaki adatok és specifikációk
aktuálisak. Agyártó fenntartja magának ajogot atermék
minőségének javítására, módosítására. A legújabb
műszaki megoldások és azajcsökkentési technológiák
figyelembe vételével a készülék úgy lett megtervezve
és megépítve, hogy azajkibocsátásból eredő esetleges
kockázat alehető legalacsonyabb legyen.
1. ÁLTALÁNOS LEÍRÁS
Ahasználati utasítás célja abiztonságos és megbízható
használat elősegítése. A termék szigorúan a műszaki
előírásoknak megfelelően, a legújabb műszaki
megoldások és alkatrészek felhasználásával,
a legmagasabb minőségi előírások betartásával lett
tervezve és legyártva.
SZIMBÓLUMMAGYARÁZAT
Használat előtt olvassa el ahasználati
utasítást.
VIGYÁZAT! Kézfej zúzódás veszélye!
VIGYÁZAT! A használati utasítás illusztrációi
szemléltető jellegűek és bizonyos részletekben
eltérhetnek atényleges terméktől.
Ahasználati utasítás eredeti változata anémet verzió.
Atöbbi nyelvi verzió az eredeti német fordítása.
2. BIZTONSÁGOS ÜZEMELTETÉS
VIGYÁZAT! Olvassa el az összes biztonsági
figyelmeztetést és a teljes használati utasítást.
A figyelmeztetések és utasítások figyelmen kívül
hagyása súlyos sérüléseket vagy halálos balesetet
okozhat.
VIGYÁZAT! Annak ellenére, hogy akészülék minél
biztonságosabbra lett tervezve, fel lett szerelve
megfelelő biztonsági eszközökkel, valamint
a felhasználó biztonságát óvó plusz elemek
használatának ellenére is fennáll abaleset vagy
sérülés veszélye akészülékkel való munka során.
Atermék használata során járjon el óvatosan és
ajózan ész szabályai szerint.
Magyarázat
paraméterek Érték paraméterek
Termék neve KITŰZŐKÉSZÍTŐ
Modell UNI_
PBM_25/32
UNI_
PBM_58
UNI_
PBM_37
PLUS
Méretek [mm] 300x170
x510
290x170
x510
290x170
x500
Súly [kg] 9,8 14,26 8,1
HU

3332
11.02.2022
1. Helyezze a pengét a tartóba a képen látható
módon.
2. Helyezze a pengét rögzítő gombot a megfelelő
helyre (mint aképen), és állítsa be.
3. Helyezze ahelyzetjelzőt akijelölt helyre.
4. A penge cserélhető. A cseréhez törjön le egy
darabot egy tapétavágó betétből (amelynek
törhető akése).
5. Távolítsa el acsavart és cserélje ki apengét
3.3. AKÉSZÜLÉK HASZNÁLATA
3.3.1. MINTA ELŐKÉSZÍTÉSE VÁGÓSZERSZÁMMAL
1. Helyezze a helyzetjelzőt a nyomtatott (vagy
rajzolt) mintára/tervre. Egyik kezével fogja meg
a helyzetjelzőt és nyomja a papírhoz, a másik
kezével pedig forgassa el afogantyút, amíg ki nem
vágja amintatárcsát.
3.3.2. AKITŰZŐ ELKÉSZÍTÉSE
1. Helyezze a fémrátétet az A formába. Ezután
helyezze rá az előzőleg elkészített mintát (amelyet
korábban megfelelő méretre vágott). Végül
helyezzünk rá átlátszó fóliát.
2. Helyezze afémkapcsot aB formára.
VIGYÁZAT! Ne feledje, a kapocsnak lefelé kell
néznie.
4
5
3.2.3. AVÁGÓSZERSZÁM ÖSSZESZERELÉSE
1. Helyzetjelző
2. Kés
3. Gomb (állítható)
4. Fogantyú (állítható)
123
4
1
2
3
HU
3 4
1
2
4
5
6
3
2
5
3. ÜZEMELTETÉS SZABÁLYAI
Atermék kitűzők készítésére szolgál.
Atermék kizárólag otthoni használatra készült!
A felhasználó felelős a nem rendeltetésszerű
használatból eredő bármilyen károkért.
3.1. AKÉSZÜLÉK LEÍRÁSA
1. Fogantyú
2. Felső forma
3. Aforma
4. B forma
5. Csúszó formaalap
6. Akészülék alapja
KIEGÉSZÍTŐK
1. Vágószerszám
2. Felső fémrátét
3. Átlátszó fólia
4. Fémkapocs
3.2. BEÜZEMELÉS ELŐTT
3.2.1. AKÉSZÜLÉK ELHELYEZÉSE
A készüléket mindig egyenes, stabil, tiszta, tűzálló és
száraz felületen kell használni, gyermekek és csökkent
szellemi, érzékszervi vagy mentális funkciókkal
rendelkező személyek számára elérhetetlen helyen.
3.2.2. AKÉSZÜLÉK ÖSSZESZERELÉSE
1 2
3 4
5 6
7
1. Készítse elő a készülék alapját. Csavarozza
a főrészt a készülék aljához egy kis hatszögletű
(imbuszkulcs) segítségével.
2. A felső formát a fogantyú alatti lyukba kell
behelyezni. Győződjön meg arról, hogy acsap az
arra kijelölt lyukba beleillett.
3. Csúsztassa a formaalapot (a formákkal együtt)
aspeciális vezetőkbe (aképen látható módon).
4. Mozgassa az alapot úgy, hogy a felső forma az
alsó formák közé kerüljön. Helyezze apozicionáló
csapokat acsúszótalp két oldalán lévő furatokba.
5. Aműködésének ellenőrzése.
Nyomja az Aformát afogantyú alá (afelső forma
alá), és nyomja le.
VIGYÁZAT! A felső formában rés keletkezik,
viszont afelső és az Aforma között nem lesz rés.
6. Aműködésének ellenőrzése.
Nyomja aB formát afogantyú alá (afelső forma
alá), és nyomja le.
VIGYÁZAT! Nem lesz rés sem a felső formában,
sem afelső és aB forma között.
7. Aforma pozíciójának beállítása.
Ha az alsó formák nincsenek egy vonalban, állítsa
be őket kézzel (noman fordítsa el a formát
amegfelelő irányba).
HU

3534
11.02.2022
NOTES/NOTIZEN
3. Mozgassa az A formát a kar alá, és nyomja le.
Minden elem afelső formában lesz.
4. Nyomja aB formát afogantyú alá, és nyomja le.
5. Akitűző kész van.
3.4. TISZTÍTÁS ÉS KARBANTARTÁS
a) Afelület tisztítására csak maró anyagoktól mentes
tisztítószereket szabad használni.
b) Minden tisztítás után az összes alkatrészt
alaposan meg kell szárítani a készülék újbóli
használata előtt.
c) Akészüléket hűvös és száraz helyen, nedvességtől
és közvetlen napfénytől védve kell tárolni.
d) Tilos a készüléket vízsugárral fröcskölni, vagy
vízbe meríteni.
e) A készüléket rendszeresen ellenőrizni kell, hogy
nincsenek-e raja sérülések és megfelelően
működik-e.
f) Atisztításhoz nedves, puha rongyot kell használni.
g) Ne használjon éles és/vagy fém eszközöket (pl.
drótkefét vagy fém spatulát) a tisztításhoz, mert
azok sérülést okozhatnak a készülék felületét
bevonó anyagon.
HU

expondo.com
Our customers‘ satisfaction is our main goal!
Please contact us with questions AT:
Unser Hauptziel ist die Zuredenheit unserer Kunden!
bei fragen kontaktieren Sie uns bitte unter:
Naszym głównym celem jest satysfakcja klientów
Wprzypadku pytań prosimy okontakt zprzedstawicielem wdanym kraju:
Naším hlavním cílem je spokojenost našich zákazníků!
V případě otázek nás prosím kontaktujte na:
Notre but premier est votre satisfaction!
pour toute question, contactez nous sur:
Nuestro objetivo principal es la satisfacción de nuestros clientes!
si tiene preguntas, por favor pónganse en contacto con nostros en:
Inostro principale obiettivo è la soddisfazione dei nostri clienti!
per eventuali domande per favore, ci contattino sotto:
Fő célunk, hogy az ügyfeleink elégedettek legyenek, kérdés esetén,
Kérjük vegye fel az adott ország képviselőjével kapcsolatot:
CONTACT
expondo Polska sp. zo.o. sp. k.
ul. Nowy Kisielin-Innowacyjna 7
66-002 Zielona Góra | Poland, EU
e-mail: [email protected]
This manual suits for next models
2
Table of contents
Languages: