ENGLISH
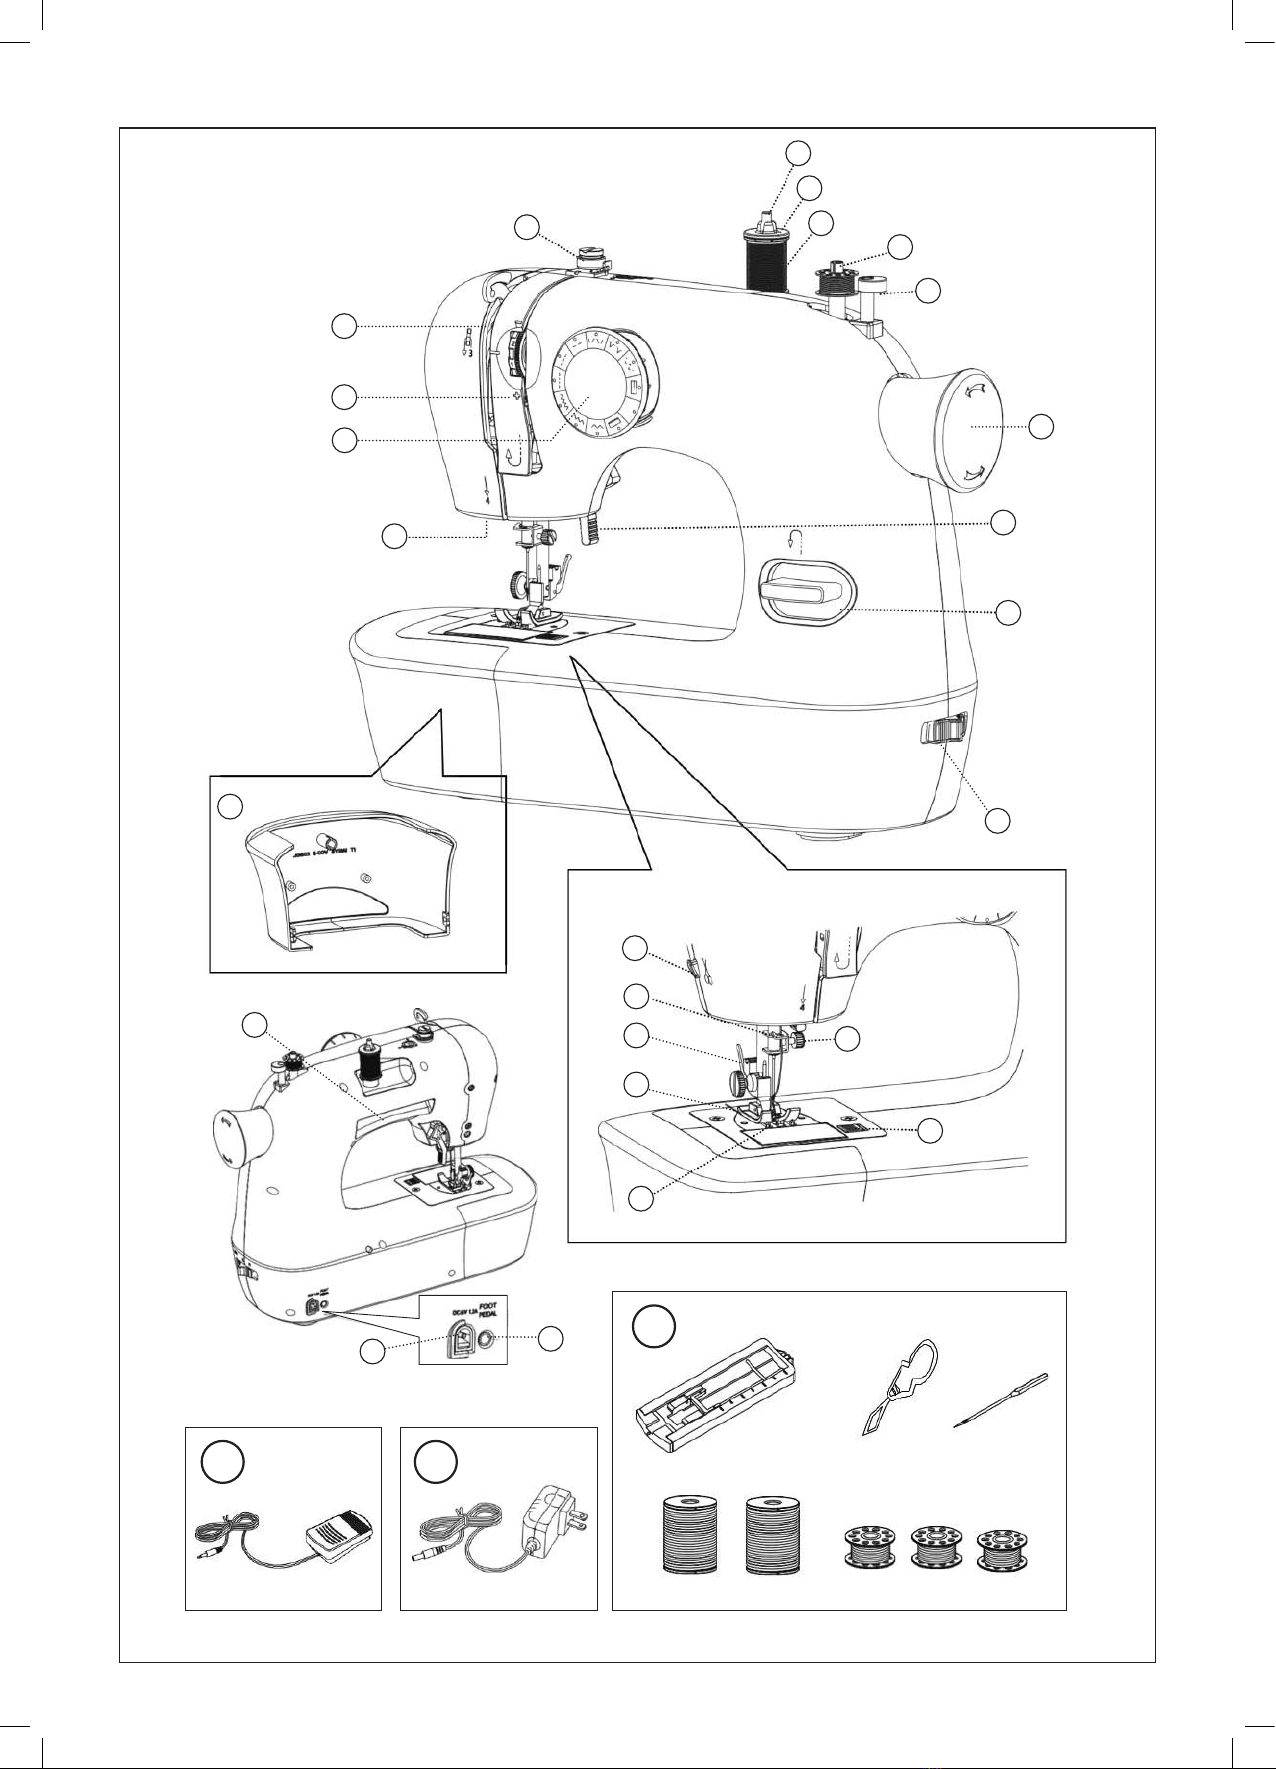
SEWING MACHINE
SW8220
Dear customer,
Many thanks for choosing to purchase a SOLACbrand product.
Thanks to its technology, design and operation and the fact that it
exceeds the strictest quality standards, a fully satisfactory use and long
product life can be assured.
The sewing machine is ideal for beginners or for those with previous
sewing machine experience. Compact, easy to use and small enough to
store in the smallest alcove when not in use, this sturdy little machi-
ne will aid you in many mending jobs or help you to create your own
designs.
Read these instructions carefully before switching on the appliance
and keep them for future reference. Failure to follow and observe these
instructions could lead to an accident.
SAFETY ADVICE AND WARNINGS
- This appliance can be used by children aged
from 8 years and above and persons with re-
duced physical, sensory or mental capabilities
or lack of experience and knowledge if they
have been given supervision or instruction
concerning use of the appliance in a safe way
and understand the hazards involved.
- This appliance is not a toy. Children should be
supervised to ensure that they do not play with
the appliance.
- Cleaning and user maintenance shall not be
made by children unless they are supervised.
- Switch off or unplug the appliance when lea-
ving it unattended.
- Unplug the appliance before carrying out main-
tenance or replacing lamps.
- -
tric connector provided.
- If the connection to the mains has been dama-
ged, it must be replaced, take the appliance to
an authorised technical support service. Do not
attempt to disassemble or repair the appliance
by yourself in order to avoid a hazard.
- This appliance is for household use only, not
professional, industrial use.
- The battery must be removed from the applian-
ce before it is scrapped.
- The battery is to be disposed of safely.
- Ensure that the voltage indicated on the electric connectorr rating label
matches the mains voltage before plugging in.
- Connect the appliance to a socket that can supply a minimum of 10
amperes.
-
not alter the plug. Do not use plug adaptors.
- Do not force the power cord. Never use the power cord to lift up, carry
or unplug the electric connector.
- Do not wrap the power cord around the appliance.
- Do not clip or crease the power cord.
- Check the state of the power cord. Damaged or tangled cables in-
crease the risk of electric shock.
- Do not touch the plug with wet hands.
- Do not use the appliance if the cable or plug is damaged.
- If any of the appliance casings breaks, immediately disconnect the ap-
pliance from the mains to prevent the possibility of an electric shock.
-
signs of damage or if it has a leak.
- Keep the working area clean and well lit. Cluttered and dark areas
invite accidents.
-
- Do not use or store the appliance outdoors.
- Do not leave the appliance out in the rain or exposed to moisture.
If water gets into the appliance, this will increase the risk of electric
shock.
- Do not touch any of the appliance’s moving parts while it is operating.
- Avoid all contact with the liquid that could be released from the battery.
In case of contact with eyes, wash them thoroughly and seek medical
advice. The liquid spilled from the battery may accuse irritation or
burns.
Use and care:
-
- Do not use the appliance if the accessories attached to it are defec-
tive. Replace them immediately.
- Never run the machine when there’s thread in the needle, but no fabric
on the machine. This could damage the machine.
- Always keep your hands away from the needle, hand wheel, upper
thread tension dial and pattern selection dial when the appliance is
running.
-
the sewing machine needle.
- Never sew with a damaged needle plate as this can cause needle to
break.
- Do not use bent needles
-
causing it to break.
- Never drop or insert any object into any opening.
- Do not use the appliance if the on/off switch does not work.
- Use the appliance handle/s, to catch it or move it.
- Disconnect the appliance from the mains when not in use and before
undertaking any cleaning task.
- Unplug the appliance from the mains before replacing any accessory.
- Store this appliance out of reach of children and/or persons with physi-
cal, sensory or reduced mental or lack of experience and knowledge.
- Keep the appliance in a dry, dust-free place, out of direct sunlight.
- Make sure that dust, dirt or other foreign objects do not block the fan
grill on the appliance.
- Keep the appliance in good condition. Check that the moving parts are
not misaligned or jammed and make sure there are no broken parts or
anomalies that may prevent the appliance from operating correctly.
- Use the appliance and its accessories and tools in accordance with
these instructions, taking into account the working conditions and the
work to be performed. Use the appliance for operations different from
those intended could result in a hazardous situation.
- Never leave the appliance unattended while in use.
- Do not open the battery/ies under any circumstances whatsoever.
-
designed. The use of any other battery/ies s can cause an explosion
Service:
- Make sure that the appliance is serviced only by specialist personnel,
and that only original spare parts or accessories are used to replace
existing parts/accessories.
- Any misuse or failure to follow the instructions for use renders the
guarantee and the manufacturer's liability null and void.