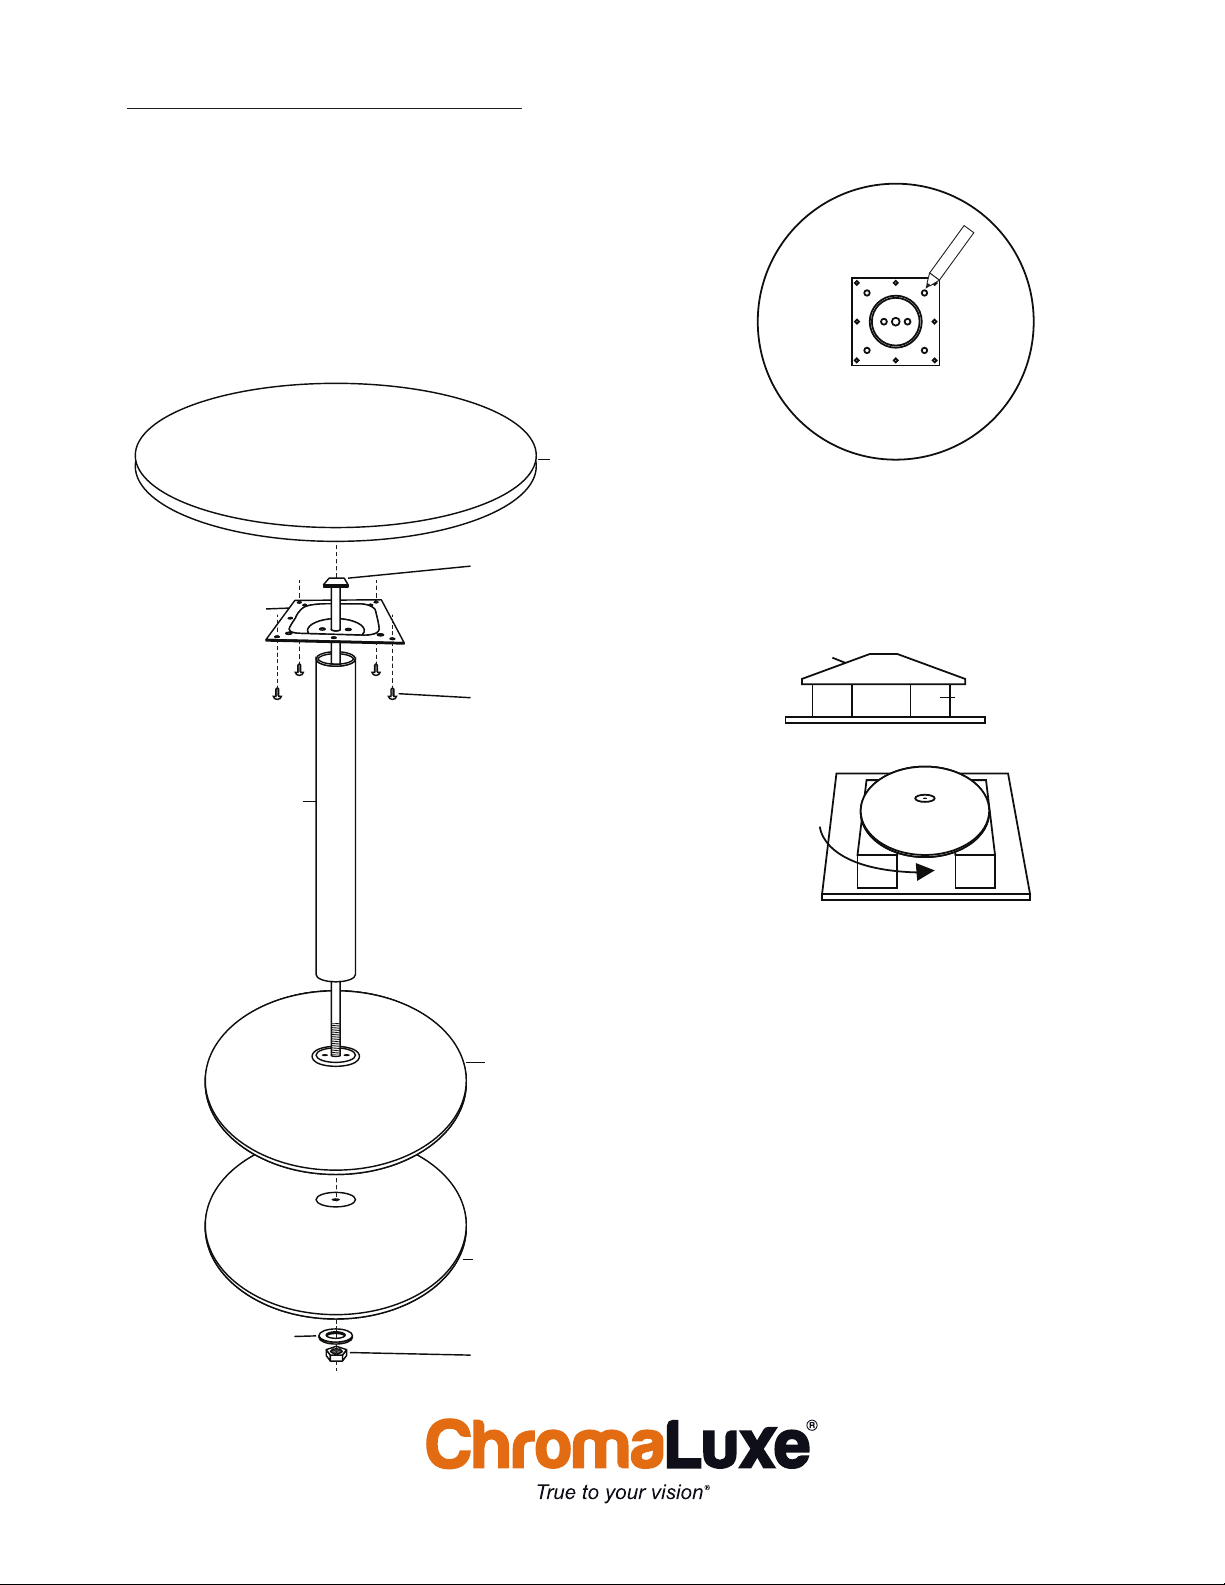
manuals.online logo
Brands
  1. Home
  2. •
  3. Brands
  4. •
  5. Universal Woods
  6. •
  7. Indoor Furnishing
  8. •
  9. Universal Woods ChromaLuxe Table Tops Operator's manual

Universal Woods ChromaLuxe Table Tops Operator's manual

MATERIALS NEEDED (for sublimation):
• Blank ChromaLuxe Table Top
• Sublimation Printer (RIP Printing Software)
• Heat press (Heat Gloves, Heat Tape &
Tape Dispenser)
• Poly Fabric (to help wick away moisture)
• Blowout Paper
• Nomex Pad
• Cloth for cleaning surface
• All purpose cleaner/rubbing alcohol
SUBLIMATION INSTRUCTIONS
1. Peel film o table top, and clean the coated surface with a cloth.
2. Place transfer paper flat on a table and line up blank surface of the table
top within the boundaries of the bleed. Wrap edges of transfer paper (just
two of the sides - see Figure 1-2) around to the back of the table top and
tape the edges to the back.
3. Follow Figure 1-1 to layer each material on the heat press. Start with the
Nomex Pad at the base of the heat press. Add each layer as shown,
completing the set up with a poly fabric layer to wick away moisture and
distribute heat evenly. (Extra tip as seen in Figure 1-3: Pull fabric tight and
use four large magnets to attach poly fabric to the top platen of the heat
press. Switch out monthly for best results).
ChromaLuxe® is a registered trademark of Universal Woods, Inc. ©2015
ChromaLuxe Table Tops
ChromaLuxe Sublimation and Assembly Tip Sheet
Figure 1-1 - Clamshell press used for
demo purposes
Figure 1-2
Figure 1-3
ChromaLuxe® is a registered trademark of Universal Woods, Inc. ©2015
Tip for Handling Table Bowing
1. There will typically be a small amount of bowing on the sublimated side of the table. If the table is not
completely flat after it has cooled for about 24 hours (see Figure 2-2), place a fresh sheet of blowout paper
beneath the table top (with sublimated surface facing down).
2. Place both back in the heat press for another 30-50 seconds at the same temperature and pressure as
before. This time on this second pressing is critical because if you don’t press it long enough it won’t
become flat; if you press it for to long it will begin to bow the opposite way, away from the sublimated
surface. Because each heat press and environment is dierent, managing table bowing will be dierent
for everyone.
3. After pressing upside down, let it cool on a large sheet of paper on a cool surface with the sublimated side
facing up.
Figure 2-2
SUBLIMATION INSTRUCTIONS Continued.
4. Line the table top up in the center of the heat press and press at 325 degrees F for 7 minutes
and 30 seconds at 60-70 psi (pounds per sq. inch).
5. After pressing, remove transfer from the table top. Once the table top is cool enough to
touch, lay table top on a clean sheet of paper on a cool surface (like a concrete floor) with the
sublimated side facing up. Allow to fully cool for 24 hours or until completely cool.
6. Order a table base at tablebases.com and follow the assembly instructions to assemble a
general table base. (General table base instructions are included in this tip sheet).
EXPLODED VIEW
B-SPIDER
A-THREADED ROD
H-TABLE TOP
D-TABLE BASE
COVER
C- COLUMN
E-TABLE BASE
(HEAVY)
F-WASHER G- HEX NUT
I-SCREWS
Center B-Spider on back of H-Table Top.
Mark and drill pilot holes you are
going to use to secure base
assembly to Table Top.
BACK OF TABLE TOP
1
Side View
ACCESS BLOCKS
TABLE BASE
3/4 View
ACCESS!
2
Set up access blocks (such as 4x4”s)
on your work surface so you can access
boom of E-Table Base.
Alternavely, you can work upside-down
to assemble base components.
3
Place square end of A-Threaded Rod in
spider. Place components onto Threaded
Rod shown in Exploded View.
B-Spider C-Column D-Table base cover
4
Insert threaded end of A-Threaded Rod
into E-Table Base. Underneath Table
Base, place F-Washer onto Threaded Rod.
Tighten assembly with G-Hex Nut with a
wrench.
5
Aligning with previously-marked pilot
holes, place H-Table Top onto base
assembly and install I-Screws to aach
Table Top to base assembly.
ChromaLuxe® is a registered trademark of Universal Woods, Inc. ©2015
MATERIALS NEEDED (for assembly)
• Sublimated ChromaLuxe table top
• Table base (from tablebases.com)
• Drill / Two 4x4 access blocks / Wrench
• One washer / One hex nut / Four screws
EXPLODED VIEW
B-SPIDER
A-THREADED ROD
H-TABLE TOP
D-TABLE BASE
COVER
C- COLUMN
E-TABLE BASE
(HEAVY)
F-WASHER G- HEX NUT
I-SCREWS
Center B-Spider on back of H-Table Top.
Mark and drill pilot holes you are
going to use to secure base
assembly to Table Top.
BACK OF TABLE TOP
1
Side View
ACCESS BLOCKS
TABLE BASE
3/4 View
ACCESS!
2
Set up access blocks (such as 4x4”s)
on your work surface so you can access
boom of E-Table Base.
Alternavely, you can work upside-down
to assemble base components.
3
Place square end of A-Threaded Rod in
spider. Place components onto Threaded
Rod shown in Exploded View.
B-Spider C-Column D-Table base cover
4
Insert threaded end of A-Threaded Rod
into E-Table Base. Underneath Table
Base, place F-Washer onto Threaded Rod.
Tighten assembly with G-Hex Nut with a
wrench.
5
Aligning with previously-marked pilot
holes, place H-Table Top onto base
assembly and install I-Screws to aach
Table Top to base assembly.

Popular Indoor Furnishing manuals by other brands

FourStarGroup 11227306 manual

FourStarGroup

FourStarGroup 11227306 manual

LDI Spaces SAFCO CoGo 4361 instructions

LDI Spaces

LDI Spaces SAFCO CoGo 4361 instructions

Safavieh Furniture Dove ACC2501 manual

Safavieh Furniture

Safavieh Furniture Dove ACC2501 manual

Furniture of America CM6257 Assembly instructions

Furniture of America

Furniture of America CM6257 Assembly instructions

Emmezeta KIKI II 120414 Assembling instructions

Emmezeta

Emmezeta KIKI II 120414 Assembling instructions

Furniture of America Estell CM4107E Assembly instructions

Furniture of America

Furniture of America Estell CM4107E Assembly instructions

Staples 26685 easy instructions

Staples

Staples 26685 easy instructions

topstar SPEED CHAIR 2 Assembly Instruction and instructions for use

topstar

topstar SPEED CHAIR 2 Assembly Instruction and instructions for use

Next 893771 Assembly instructions

Next

Next 893771 Assembly instructions

Donco kids 795 Assembly instructions

Donco kids

Donco kids 795 Assembly instructions

Furniture Solutions 17CAE15SG instruction manual

Furniture Solutions

Furniture Solutions 17CAE15SG instruction manual

modway MOD-5178 manual

modway

modway MOD-5178 manual

Next DORSET A77315 Assembly instructions

Next

Next DORSET A77315 Assembly instructions

modway EEI-4447 quick start guide

modway

modway EEI-4447 quick start guide

ADIROffice 690-03 Assembly instructions

ADIROffice

ADIROffice 690-03 Assembly instructions

Walker Edison AF42RAYCT Assembly instructions

Walker Edison

Walker Edison AF42RAYCT Assembly instructions

Restoration Hardware Callum Full-Over-Full Bunk Bed Assembly guide

Restoration Hardware

Restoration Hardware Callum Full-Over-Full Bunk Bed Assembly guide

Argos 482/4495 Assembly instructions

Argos

Argos 482/4495 Assembly instructions

manuals.online logo
manuals.online logoBrands
  • About & Mission
  • Contact us
  • Privacy Policy
  • Terms and Conditions

Copyright 2025 Manuals.Online. All Rights Reserved.