manuals.online logo
Brands
  1. Home
  2. •
  3. Brands
  4. •
  5. Urban
  6. •
  7. Plumbing Product
  8. •
  9. Urban PF600 Manual

Urban PF600 Manual

Drinking Fountains
Model: PF600
INSTALLATION, OPERATION AND MAINTENANCE INSTRUCTIONS
SPECIFICATIONS
CUSTOMER SERVICE
2year
warranty
Quality Certified
ISO 9001:2015
AU1228-QC
CARE AND MAINTENANCE
WARRANTY
www.urbanff.com.au
[email protected]
07 3382 7372
07 3287 5598
All Urban Fountains and Furniture outdoor drinking fountains are covered by a 2 year manufacturers
guarantee against faulty materials and workmanship under normal wear and tear conditions.
All fountains are date stamped at the time of despatch.
This warranty will only apply under the following conditions:
• The fountain was installed in accordance with our installation instructions that are supplied
with every fountain.
• The fountain was installed by a licensed plumber
• The water lines have been thoroughly flushed prior to connection to the fountain
• The fountain has not been tampered with or repaired in any way without obtaining prior
approval from our factory specialists first.
• The fountain has been serviced and maintained as per our supplied instructions.
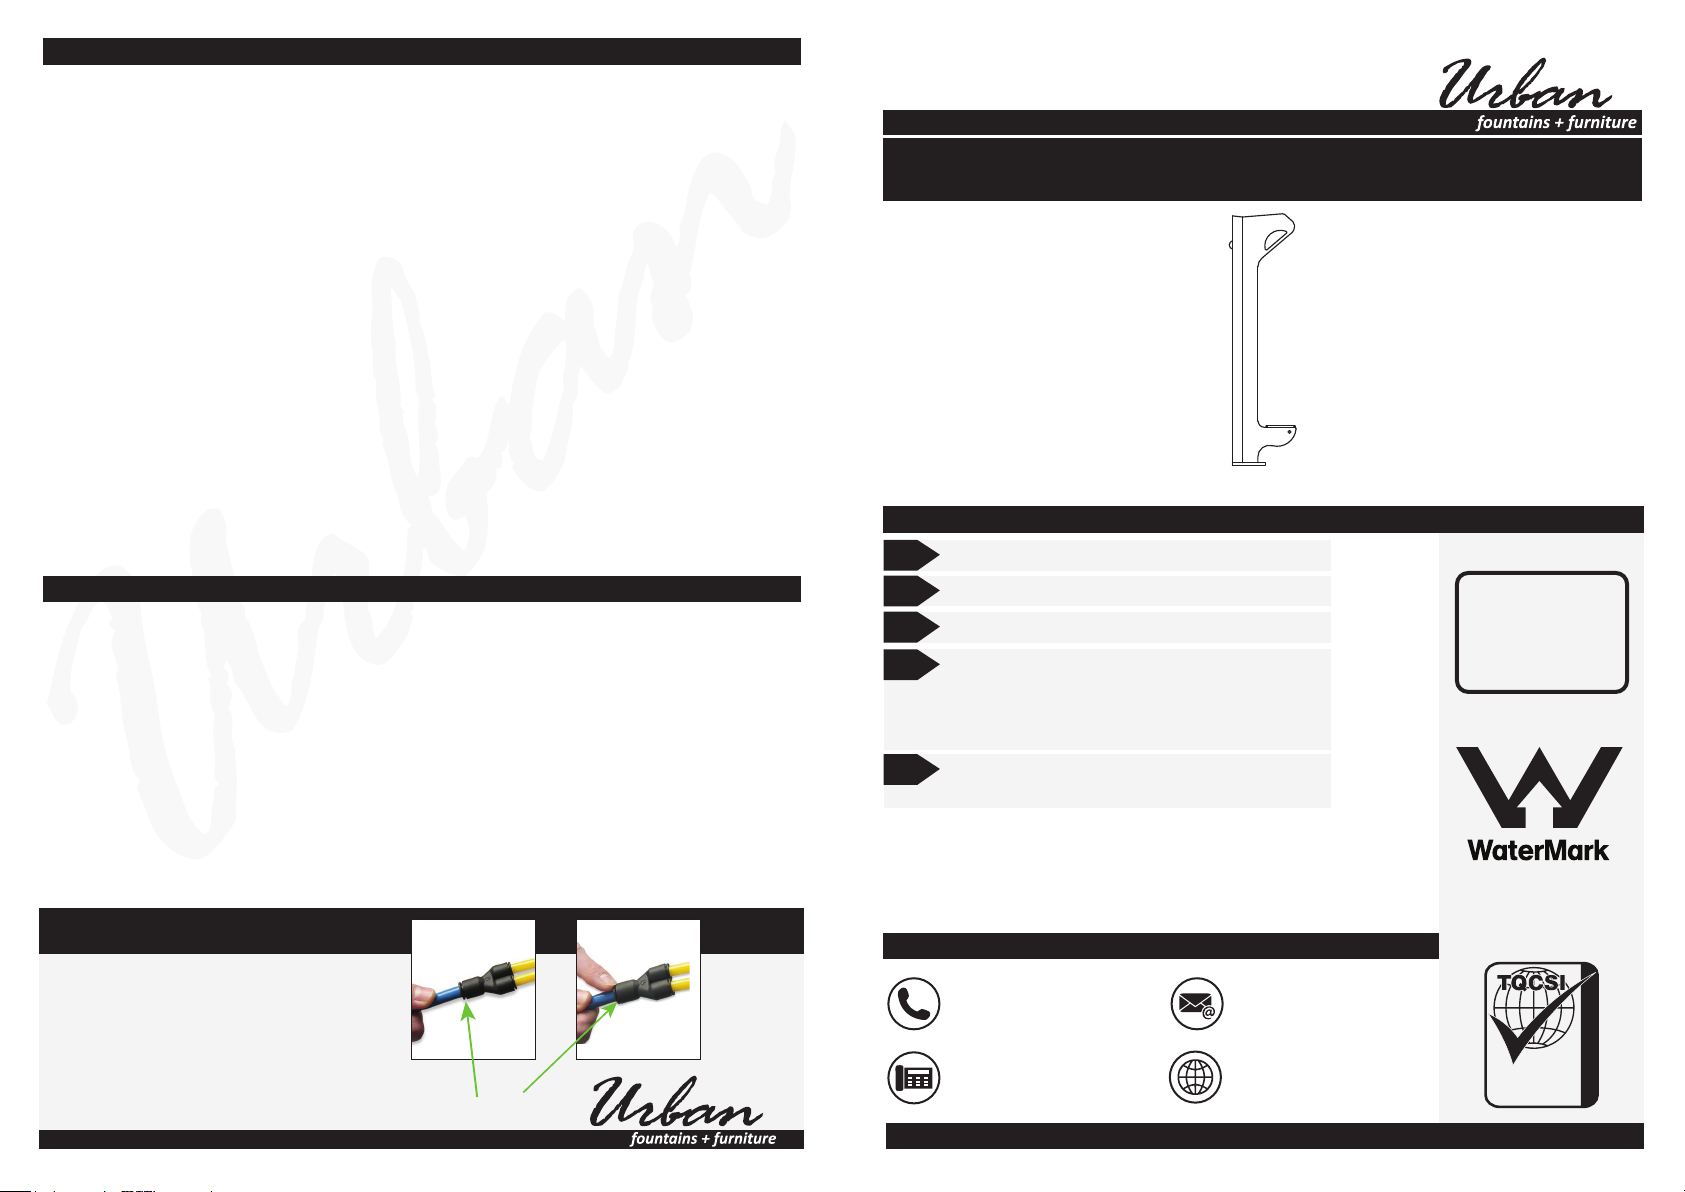
These quick release fittings allow instant
connection and disconnection
without the use of spanners. Push outer ring in to
release tube from fitting
ATTENTION PLUMBERS
This fountain uses “Push In Fittings”.
Failure to release these fittings correctly
will result in leakage.
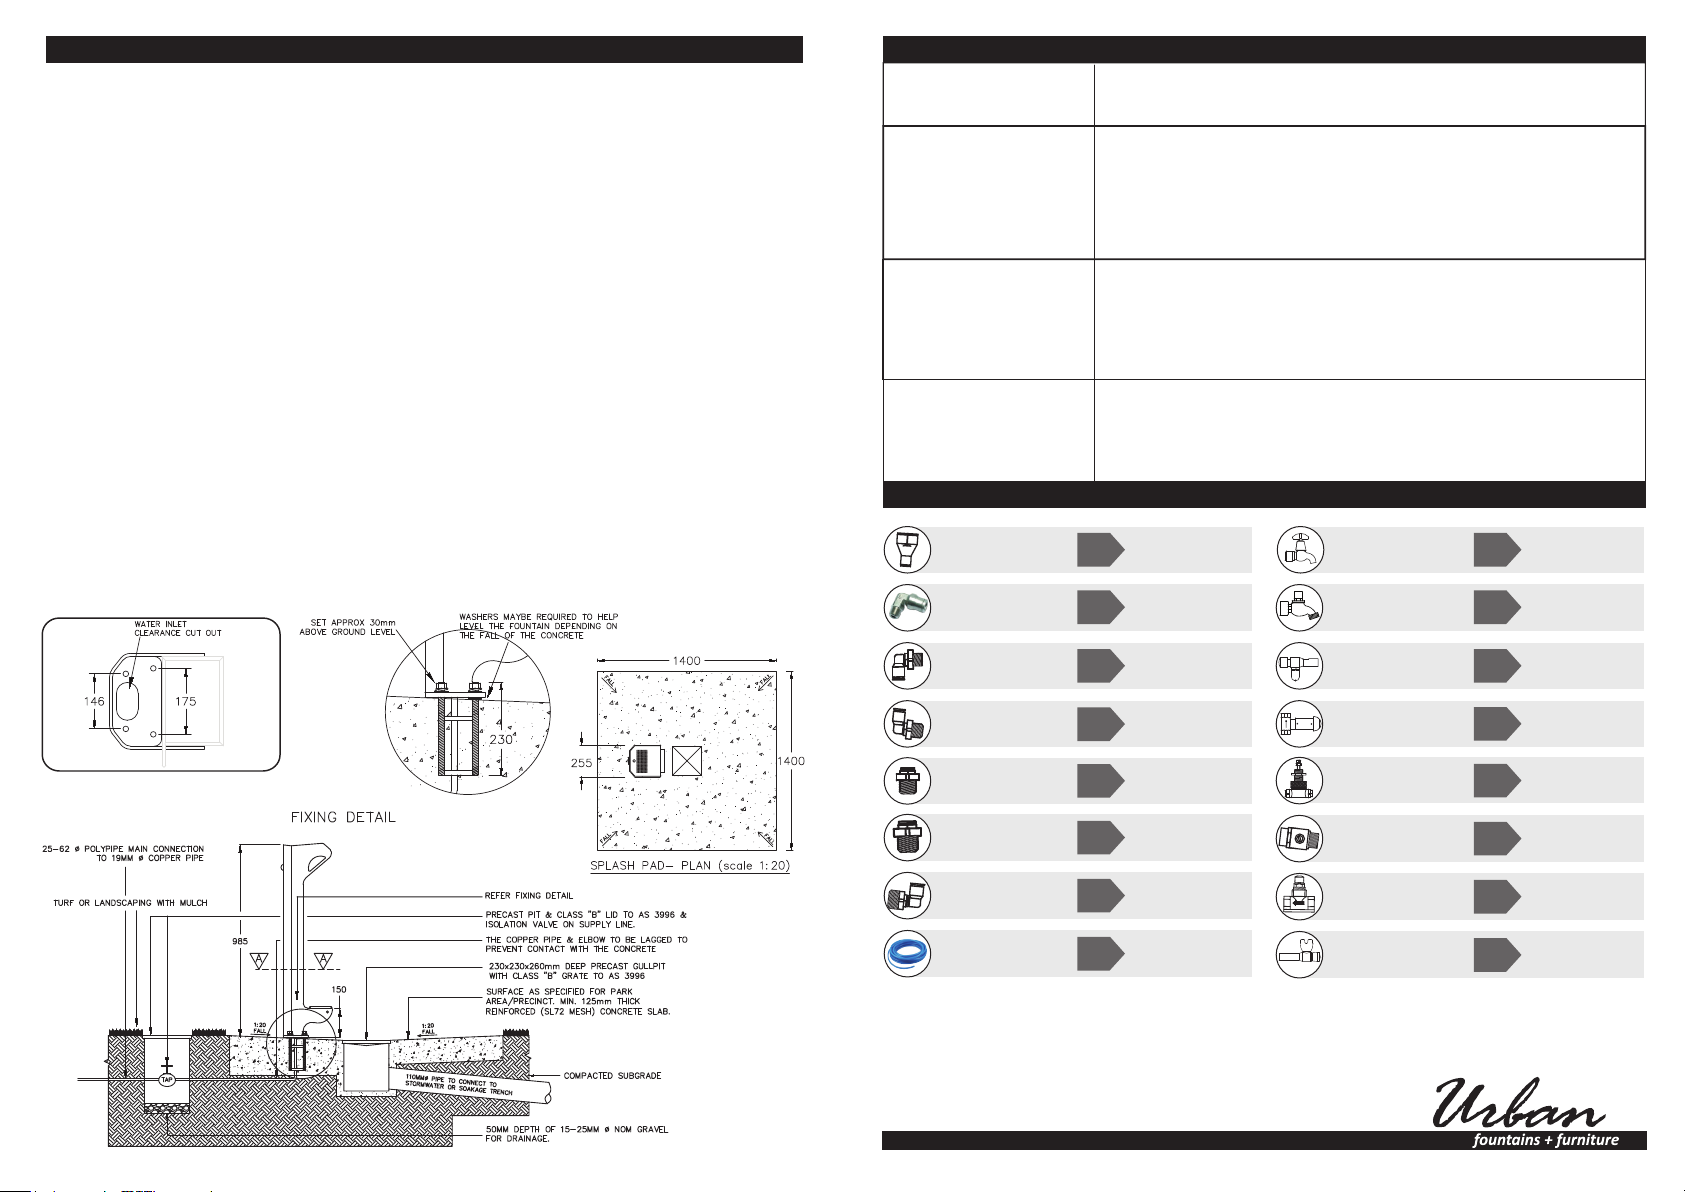
1/2” bsb water inlet (15mm)
Maximum Temperature: 40 c
Maximum Water Pressure: 2000 kpa
Complies with WMTS-105:2016 Technical
Specification: Appliances - Beverage
dispensers and icemakers
Complies with AS/NZS 4020:2005 Testing of
products in contact with drinking water
O
Model: PF600
1. Regular washing down of the exterior surface will help prolong the lustre of the painted finish.
2. Painted fountains that become dull due to prolonged exposure to direct sunlight can be
restored with an appropriate surface polish.
3. To maintain the exterior of the fountain carefully remove any loose surface deposits with a wet sponge.
Use a soft (non abrasive) brush and dilute a solution of mild detergent (eg. PH-neurtral liquid hand
washing detergent in warm water (DO NOT use solvents) to remove dust, salt and other deposits.
Rinse thoroughly with clean fresh water to remove residues. To remove any Tea Staining on
Stainless Steel surfaces we recommend Drifter Hull cleaner and stain remover.
4. Do not use any solvents on the surface as this will adversely affect the longevity of the painted
finish.
5. Surface scratches and inconsistencies can be touched up using Dulux touch up paint.
Most colours can be matched.
6. We recommend the use of anti-seize paste on all external fixing bolts to maintain ease of
access over long periods of time.
7. Check the fountain internal connections, water flow and all external access screws and fixing
bolts regularly (every 3mths) to ensure they are tight.
8. In high debris areas (parks, children’s playgrounds etc) where there may be sand or bark or
a lot of leaf letter that may be placed in to the basin, check regularly and remove debris to
prevent blocking of the basin or the waste outlet pipe.
9. After any interruption to the water supply, always flush the lines prior to reconnection to the
fountain to prevent debris entering the valve.
CMA-WM-080042
WMTS-105:2016
INSTALLATION
1. All UrbanFF Fountains must be installed by a qualified plumber in accordance with National
plumbing and drainage code AS/NZS 3500.1 and AS/NZS 3500.2 and any local authority codes.
2. Before Installation FLUSH ALL EXTERNAL LINES before connecting to fountain.
3. Installer must ensure adequate drainage is available to remove water run off from dog basin.
4. Provide adequate level surface for mounting fountain as specified in local area codes
(approx. 1400mm square x 125 mm deep minimum concrete slab) and install an inground fixing cage
(preferred method of installation) or alternatively (remove main acces panel) and mark the anchor
points for the fountain to be dyna-bolted or chemset in place after the concrete slab has been
poured with a central drainage collection point.
5. Locktighting of foundation cage bolts is recommended.
6. Remove the fountain from the packaging preventing scratching and damage
7. All fountains have been checked for leaks as part of our quality assurance program and some
droplets of water may be evident inside the packaging and/or unit. This is perfectly normal.
8. Remove main access panel from fountain using 4mm allen key.
9. If you have not flushed the external water inlet pipes – do it now! Flushing the water inlet pipes from
the mains supply before connecting to fountain will help prevent blockage by any debris that may be
in the external pipes.
10. Connect the 40mm waste outlet pipe to the waste water connection.
11. Remove underside access panel and adjust the flow rate via the mini ball valve as required so flow
enters the middle of the basin (mains water pressure varies from city to city).
12. Test the bubbler by activating the button
13. Refer to trouble shooting guide if you experience any problems
14. Check all connections and waste piping to ensure they are tight and secure
15. Re-install both the access panels once satisfied the fountain is installed correctly
TROUBLESHOOTING
There is restricted or
no water flow?
The water continues
to drip / run after
shutting off?
Leaking from the
internal connections?
The water flow is
shooting over the top of
the basin or is not high
enough and trickling
over the nozzle?
Check the inlet lines for kinks in the tubing. Ensure the water
supply valve is fully open. Check the water pressure regulator is open.
The water pressure is too high / low and needs to be adjusted via the
water flow regulator so it flows in to the catchment area of the basin.
Check that they have been installed correctly. (all fountains are leak
tested prior to leaving the factory). Have the push in fittings been pulled?
(see instructions on how to connect and disconnect push in fittings).
Is the water inlet connection tight?
The most common cause of water not shutting off is a leaking valve and
is due to the lines not being flushed adequately and debris getting in to
the valve through the inlet and sitting on the rubber seals.
To check the valve it will need to be removed. Please contact this office
for details instructions to ensure this is done correctly.
1/4 x 90 Fitting
3/8 x 90 Fitting
15-JG8-ELB-1-4X90
15-JG8-ELB-3-8X90
15-JG8-YPIECE
reorder
code:
reorder
code:
reorder
code:
reorder
code:
reorder
code:
reorder
code:
reorder
code:
reorder
code:
15-JG8-STR-1-4
Blue Hose 15-HOS-BL8
Y fitting
15-LEG8M-ELB-8X1-4
1/4 x 90 LF-Fitting
15-TAP-BUB208C
Self Returning Tap
1/4 Straight
15-JG8-STR-3-8
3/8 Straight
1/2 x 90 Fitting
o
o
o
o
SPARE PARTS
reorder
code:
reorder
code:
reorder
code:
reorder
code:
reorder
code:
reorder
code:
reorder
code:
reorder
code:
Maintenance Tap
Bottle Filler
Bubbler
Push Button Valve
Water Regulator
Mini Ball Valve
Stop tap BUB268
15-TAP-VP350
15-BUB-TD90P
15-BUB-TD90P
15-VAL-ENW00415
15-REG-G14
15-VAL-15MINBAL
15-VAL-ENW00120
15-JG12-ELB-1-2X90
Diagram A

Popular Plumbing Product manuals by other brands

American Standard Edgemere TU018500 installation instructions

American Standard

American Standard Edgemere TU018500 installation instructions

American Standard 7426508 owner's manual

American Standard

American Standard 7426508 owner's manual

Moen 6100 Series Specifications

Moen

Moen 6100 Series Specifications

Mira Select Flex Installation and user guide

Mira

Mira Select Flex Installation and user guide

Luxart Poydras PO341 installation manual

Luxart

Luxart Poydras PO341 installation manual

Bradley S19-270C installation instructions

Bradley

Bradley S19-270C installation instructions

Mofem MLU-01N230 Mounting instructions

Mofem

Mofem MLU-01N230 Mounting instructions

Moen CHATEAU 4625 series Specifications

Moen

Moen CHATEAU 4625 series Specifications

Axor ShowerSelect Square 36717 Series installation instructions

Axor

Axor ShowerSelect Square 36717 Series installation instructions

Abode Vixo manual

Abode

Abode Vixo manual

MAINLINE Amiche AM341-T installation manual

MAINLINE

MAINLINE Amiche AM341-T installation manual

JADO Wynd 816 installation instructions

JADO

JADO Wynd 816 installation instructions

Hans Grohe iBoxPlug 1D-D40 25022180 Instructions for use/assembly instructions

Hans Grohe

Hans Grohe iBoxPlug 1D-D40 25022180 Instructions for use/assembly instructions

CRISTINA CRICS703 installation instructions

CRISTINA

CRISTINA CRICS703 installation instructions

Axor Citterio 39037003 Instructions for use/assembly instructions

Axor

Axor Citterio 39037003 Instructions for use/assembly instructions

Hans Grohe Plug & Shower Showerpipe 27626000 installation instructions

Hans Grohe

Hans Grohe Plug & Shower Showerpipe 27626000 installation instructions

METHVEN FUTURA installation guide

METHVEN

METHVEN FUTURA installation guide

Akron acquabella installation manual

Akron

Akron acquabella installation manual

manuals.online logo
manuals.online logoBrands
  • About & Mission
  • Contact us
  • Privacy Policy
  • Terms and Conditions

Copyright 2025 Manuals.Online. All Rights Reserved.