urmet domus Director 2 CL 4091 User manual

DS 4091-002 LBT 8142
Mod.
4091
DEDICATED MULTIFUNCTIONAL TELEPHONE
Ref. 4091/14
INSTRUCTION MANUAL

2DS4091-002 3
DS4091-002
INFORMATIVE NOTES
DECLARATION OF CONFORMITY
The manufacturer, Urmet Domus S.p.A. whose legal offices are in via Bologna 188/C - 10154 Torino (TO),
Italy, hereby declares that this telephone complies with the following standards:
• EN55022, EN55024 - Electromagnetic compatibility
• EN60950 - Electrical safety
Moreover, the device meets the specifications of Directive 1999/5/EC by the European Parliament and
Council dated 9 March 1999 for radio devices, telecommunication terminals and reciprocal compliance
acknowledgement.
Conformity to the requirements above is expressed by means of the marking.
PACKAGING
Check that the packing and the contents are not visibly damaged. Contact the retailer immediately if
parts are either missing or damaged. Do not attempt to use the device in this case. Send the product
back in its original packing if it is damaged.
RECOMMENDED INSTALLATION LOCATION
It is advisable to use the telephone in sheltered environments with temperature in the range from 5 to
40°C and relative humidity in the range from 20 to 75%.
Keep the telephone away from directly sunlight or sources of heat.
It is advisable not to install the telephone in particularly dusty environments because the accumulation
of dust can compromise the correct operation of moving parts.
INSTALLATION ADVICE
The device is designed to be used with a Urmet Domus PABX. Do not connect the telephone directly
to the telephone line to prevent damage. Refer to the INSTALLATION chapter for how to activate the
device correctly.
CLEANING THE TELEPHONE
Use a moist or antistatic cloth for cleaning the telephone only. Do not use volatile liquids, like petrol,
alcohol, solvents, etc., or chemically treated cloths: they could damage the surface finish.
Although, the telephone feet do not usually leave marks, you may need to clean the table top regularly
given the variety of possible materials.
CONTENTS OF THE BOX
• 1 telephone device
•1 spacer
•1 handset
•1 handset spiral cord
•1 straight cord with plug-in terminals
•1 telephone socket
•1 box of bolts for fastening to the wall
•1 drilling template
•1 instruction manual
•1 “Consumer’s Rights”list
•1 technical service centre list.
Urmet Domus reserves the right to change the product specifications and performance without prior
notice.
TABLE OF CONTENTS
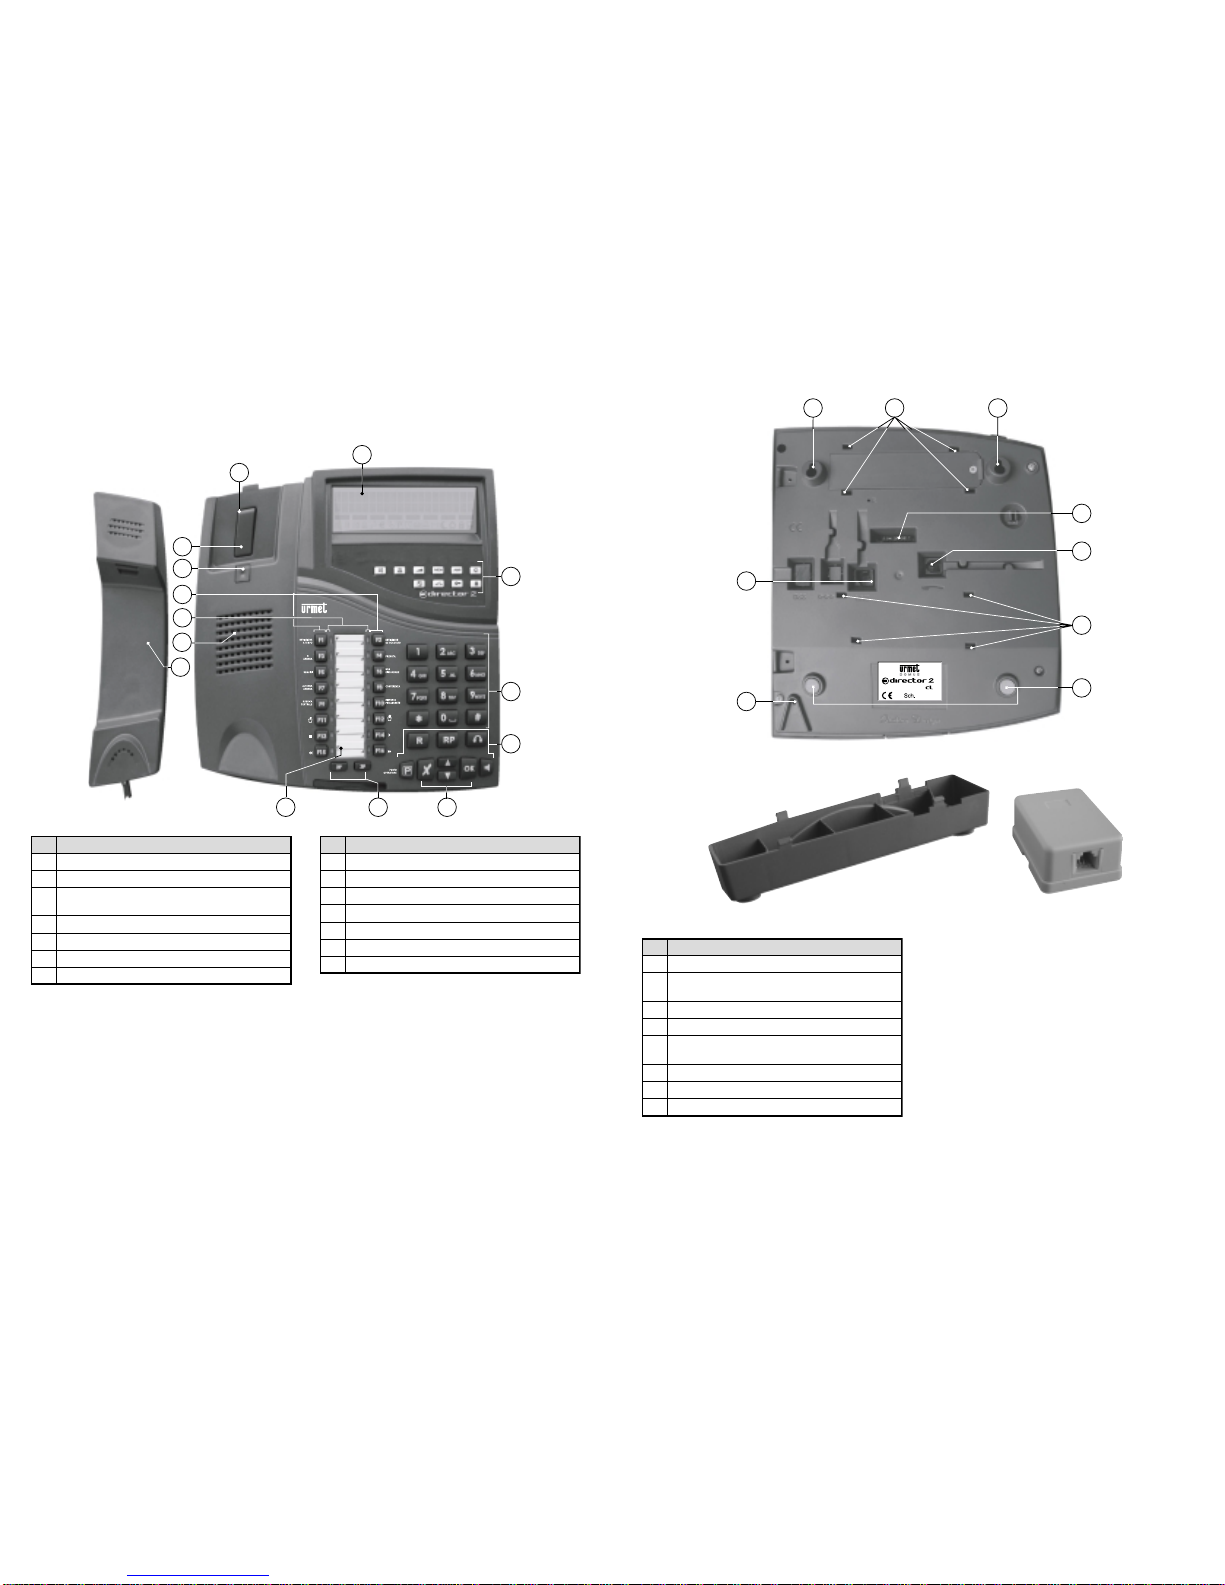
1. DESCRIPTION OF THE TELEPHONE.......................5
1.1 Elements.............................................................6
1.2 Display................................................................8
1.3 Switchboard services and special
functions buttons.................................................9
1.4 Telephone dial pad ...........................................10
1.5 Call management buttons.................................10
1.6 Menu navigation buttons...................................10
1.7 Programmable buttons and second
and third function buttons..................................11
1.8 LEDs ..............................................................12
2. INSTALLATION ........................................................13
2.1 Table-top configuration.....................................13
2.2 Wall-mounted configuration..............................15
2.3 Headset connection..........................................16
2.4 Preliminary telephone activation operations.....16
2.4.1 Standard mode activation .....................16
2.4.2 KTS mode activation.............................16
2.4.3 Switchboard socket...............................17
2.4.4 Extension port .......................................17
2.4.5 Language ..............................................18
3. USER MENU.............................................................19
3.1 Telephone settings............................................20
3.1.1 Password ..............................................20
3.1.2 Handset volume ....................................21
3.1.3 Handfree volume...................................21
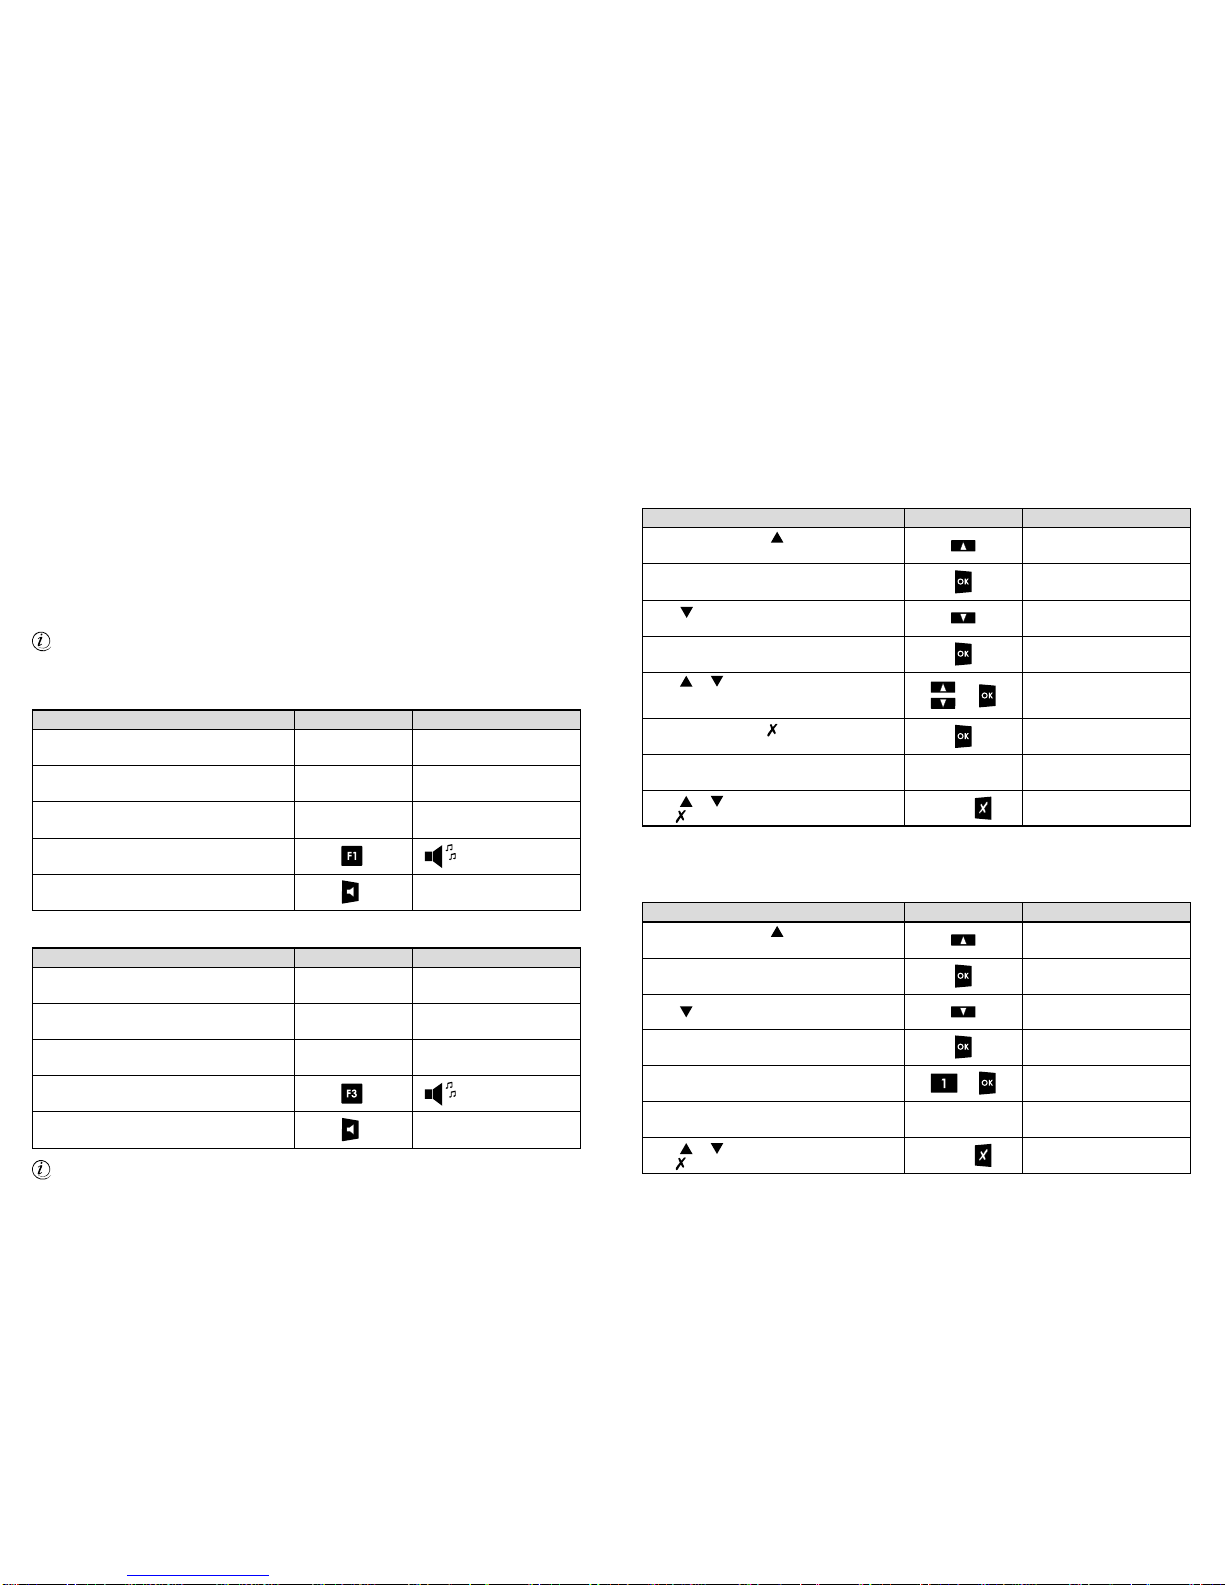
3.1.4 Ringer volume.......................................22
3.1.5 Ringer melody.......................................22
3.1.6 Display contrast:....................................23
3.1.7 Restore parameters (volumes)..............23
3.2 Keys setting procedure.....................................24
3.2.1 Direct number association.....................24
3.2.2 Trunk line association ...........................24
3.2.3 Extension association ..........................25
3.2.4 Phone book number association...........25
3.2.5 Restore parameters
(programmable keys) ............................25
3.3 Call list .............................................................25
3.3.1 Outgoing calls .......................................25
3.3.2 Answered calls......................................26
3.3.3 Unanswered calls..................................26
3.3.4 Restore parameters (call list)................26
3.4 Telephone directory..........................................27
3.4.1 Adding a record (name/number)...........27
3.4.2 Modifying a record.................................27
3.4.3 Deleting a record...................................27
3.5 Telephone lock..................................................27
4. USING THE TELEPHONE........................................28
4.1 Answering calls.................................................28
4.2 Making calls......................................................29
4.3 Dialling using a programmable button ..............29
4.4 Last number redial ...........................................29
4.5 Calling a directory number ...............................29
4.5.1 Dialling a number from the
phone book ...........................................29
4.5.2 Speed dialling the first 20 numbers
in the phone book..................................30
4.5.3 Dialling a number from the central
directory ................................................30
4.6 Volume..............................................................30
4.7 Switching off the microphone............................30
4.8 Messages on display ........................................31
5. KTS FUNCTIONS .....................................................32
5.1 Incoming call from external line ........................32
5.2 Divert and call back...........................................32
5.3 Internal call........................................................32
5.4 Several calls at the same time..........................32
6. TELEPHONE NETWORKS ON
EXTERNAL LINES....................................................33
6.1 Call on external line ..........................................33
6.2 Booking a trunk line ..........................................33
6.3 Pick up..............................................................33
6.4 Putting an external call on-hold to answer
another external call..........................................33
6.5 Putting an external call on-hold to make
another external call..........................................34
6.6 Putting an external call on-hold to make
an internal call...................................................34
6.7 Parking an external call ....................................34
6.8 Three-party conference ....................................35
6.9 Timed divert of DISA external call to
another extension ............................................35
6.10 Divert of DISA external call to
another extension now......................................35
6.11 External divert to private line ............................36
6.12 Call divert to private line ...................................36
6.13 Capture call to answering machine or fax.........37
7. TELEPHONE NETWORKS ON INTERNAL LINES..38
7.1 Internal call........................................................38
7.2 Book on busy....................................................38
7.3 Pick up..............................................................38
7.4 Putting an external call on-hold to make
an internal call...................................................38
7.5 Putting an internal call on-hold to answer
an external call..................................................38
7.6 Putting an external call on-hold to make
another external call..........................................39
7.7 Timed divert of internal call to another
extension ..........................................................39
7.8 Divert call to other extension now.....................40
8. OTHER SERVICES...................................................41
8.1 Follow me..........................................................41
8.2 Do-not-disturb...................................................41
8.3 Night service.....................................................42
8.4 External speaker access...................................42
8.5 Alarm ..............................................................42
8.6 PABX call on-hold.............................................42
8.7 Supplementary telephone functions (STS)
offered by Telecom Italia...................................42
9. DOOR PHONE FUNCTIONS....................................43
9.1 Connection to the door panel............................43
9.2 Answering a door phone call ............................43
9.3 Answering the door phone during a call............43
9.4 Door phone follow-me ......................................43
9.5 Opening an outside door ..................................44
9.6 Opening an outside door during
a conversation...................................................44
9.7 Actuator relays..................................................44
10. EMERGENCY OPERATION .....................................45

4DS4091-002 5
DS4091-002
FUNCTION NUMBER OR BUTTON
Timed divert 2F + F1 + extension
Query timed divert 3F + F1
Timed divert off 2F + F1 + your number
Book line or busy extension 2F + F13
Flash on dial line 2F + F7
Capture call to answering machine or fax 2F + F12
Follow-me to other extension on 2F + F5 + your number
Follow-me from your extension off 2F + F5 + your number
Query follow-me 2F + F5
Conference call on 2F + F8
Alternate dial line 2F + F16
Recall central memory 2F + F9 + 000 + 199
Do-not-disturb on 2F + F6
Do-not-disturb off 3F + F6
Pick-up call on dial line 2F + F10
Pick-up call to extension 2F + F10 + extension
Divert now 2F + F2 + extension
Divert now off 2F + F2 + your number
Query divert now 3F + F2
Park
External speaker
Alarm on 2F + F15 + hours and minutes
Query alarm 3F + F15
Night service on 2F +
Night service off
Connect to door panel
Open door after receiving door phone call
Open door + 1, 2, 3
Actuator relay 1 + 0, 1, 2, 3
Actuator relay 2 2F + + 0, 1, 2, 3
Actuator relay 3 3F + + 0, 1, 2, 3
Actuator relay 4 2F + + 0, 1, 2, 3
Door phone follow-me on 2F + + 31 + 40 (line or access)
Door phone follow-me off 3F +
Group calls 73 + 1÷7(group number)
General call 40
Include R +2
Check system clock #650
Divert out on 2F + F3 + external line code
Divert out off 3F + F3
Call divert on 2F + F4 + external line code
Call divert off 3F + F4
Show missed calls 2F + F11
Open door 2 2F + F14
1. DESCRIPTION OF THE TELEPHONE
Director 2 CL is a multifunctional analogue telephone designed for use with AgoràUrmet Domus PABXs and
is optimised for working with 1362/624 switchboards.
The main features of the telephone are:
• Modern and functional design
• LCD split on two lines (20 characters and 16 pictograms)
• 16 LEDs for indicating line and/or extension status
• Display contrast adjustment
• Differentiated handset and handfree volume adjustment
• 250 memory directory (telephone number and name)
• Speakerphone function with free-hands dialling function
• Caller’s ID function (CLID)
• PABX switchboard dial line status display (dial lines and extensions)
• 26 functional buttons (speed dial), 16 of which are programmable
• 17 indirect dial functions (two buttons need to be pressed in sequence)
• Dial line pick-up/release for use with telephone headset
• Last 20 calls dialled, missed and picked up
• Door phone functions by means of dedicated buttons
• Telephone lock by means of password
• Operation without battery or external power
• Four-wire interface
• May be wall-mounted
204 mm
78 mm222 mm

6DS4091-002 7
DS4091-002
1.1 ELEMENTS
The Director 2 CL telephone consists of the following elements:
13
12
3
678
9
10
11
12
14
4
5
Id. DESCRIPTION
HANDSET SUPPORT1 LCD
2
DIAL PAD4 CALL MANAGEMENT BUTTONS
5MENU NAVIGATION BUTTONS6 FUNCTION BUTTONS 2AND 37
SWITCHBOARD SERVICES AND
SPECIAL FUNCTIONS BUTTONS
3
Id. DESCRIPTION
NUMBER CARD8 HANDSET GRIP
9
PROGRAMMABLE BUTTONS
11 CUSTOMISABLE BUTTON LEDS12 HANDSET HOOK13 HOOK LEVER14
HANDFREE SPEAKER
10
1 2 1
3
5
6
4
7
8
SPACER
TELEPHONE
SOCKET
4
09
1
/
1
4
Id. DESCRIPTION
WALL-MOUNTING SUPPORTS
1SPACER ANCHORING HOLES
(TABLE-TOPARRANGEMENT)
2
HANDSET/HEADPHONE WIRE CONNECTOR
4SPACER ANCHORING HOLES
(WALL-MOUNTED ARRANGEMENT)
5
RUBBER FEET6 HANDFREE MICROPHONE
7LINE WIRE CONNECTOR8
RESERVED USE CONNECTOR
3

8DS4091-002 9
DS4091-002
1.2 DISPLAY
The telephone is provided with an LCD split into two parts:
The indications associated to the pictograms are listed for the sake of convenience below:
Refer to the specific paragraphs for a detailed description of the various functions.
In stand-by mode, the data and time are shown on the first line of the display only if the telephone is
connected to an Agorà6 or Agorà2 switchboard (1372 Mod. 2). The wording “URMET Director CL”
will appear in other cases.
two lines, 20 characters per line
(for all alphanumeric messages)
16 pictograms
(switchboard function and
operative status displa
y
)
SYMBOL DESCRIPTION
Handfree function
Paging function
Microphone off
Ringer off
Unanswered calls
Charging service
Call divert
Parking service
SYMBOL DESCRIPTION
Alarm service
Voice mail messages
Fax reception
Night service
Day service
Locked telephone
Connection to PC
NOT USED
1.3 SWITCHBOARD SERVICES AND SPECIAL FUNCTIONS BUTTONS
Located under the telephone display, these buttons are used to rapidlyaccess some switchboard services
or special telephone functions.
(*): Function supplied by the switchboard. Refer to the switchboard manual for available functions and
detailed descriptions.
Press the button to switch the telephone ringer off.
The corresponding pictogram will appear on the display when
the function is on.
RINGER
OFF
BUTTON DESCRIPTION OF THE FUNCTION
Press this button to establish a connection to the door panel.
FUNCTION
Press the button to switch the handset and handfree
microphone off. The corresponding pictogram will appear on the
display when the function is on.
MICROPHONE
OFF
Press this button to adjust the handset and handfree volume.
Press the UP and DOWN navigation buttons to adjust the volume.
VOLUME
ADJUSTMENT
Press this button to manually switch the switchboard night
configuration on (changing the incoming call management according
to time). The current configuration appears on the display
(SUN pictogram for day configuration and MOON pictogram for
night configuration).
DAY/NIGHT
(*)
Press the button to access the phone book
menu SEARCH function.
ACCESS
TO PHONE BOOK
Press this button to access a possible external amplifier system.
EXTERNAL
AMPLIFIER (*)
DOOR PHONE
SERVICE
DOOR PANEL
CONNECTION (*)
Press this button to control a relay such as, for example,
the staircase lights.
DOOR PHONE
SERVICE ACTUATOR
(RELAY)
CONTROL (*)
Press this button to open an electrical door lock.
DOOR PHONE
SERVICE
OPEN DOOR (*)
Press this button and enter the corresponding password to lock
the telephone. The telephone will not receive calls.
The corresponding pictogram will appear on the display when
the function is on.
TELEPHONE LOCK

10 DS4091-002 11
DS4091-002
1.4 TELEPHONE DIAL PAD
The dial pad may be used as a normal telephone
dial pad and to enter letters and numbers in the
PHONE BOOK. Press the buttons repeatedly to
select the associated characters and digits.
1.5 CALL MANAGEMENT BUTTONS
Button > character correspondence table
7
C
F
I
L
O
R
V
Y
2
3
4
5
6
S
8
Z9
B
E
H
K
N
Q
U
X
0
1
A
D
G
J
M
P
T
W
*
white
space
#
DIAL LINE PARK
HANDFREE
FUNCTION
Press this button to put one or more dial line on-hold to perform other operations.
The corresponding pictogram will appear on the display when one or more lines are
parked.
The HANDFREE function allows to use the telephone without the handset
(FREE-HANDS mode). The corresponding pictogram will appear on the display when
the HANDFREE function is on.
DESCRIPTION
The RP button is used to repeat the last dial number or enter one or more PAUSES
during dialling.
REPEAT/PAUSE
This button is used to pick-up and hang up the dial line when a headset is used.TELEPHONE
HEADSET
BUTTON
The FLASH function is used to activate/deactivate specific PABX services and to
activate/deactivate the services offered by some telephone companies.
FLASH
1.6 MENU NAVIGATION BUTTONS
The menu navigation buttons are used to select functions and set values in the USER MENU.
OK
FUNCTION
Confirm an entered value or selection.
DESCRIPTION
Access the USER MENU, increase numeric data, go to the next level menu, increase
menu.
UP
Access the USER MENU, decrease numeric data, go to the previous level menu,
decrease volume.
DOWN
BUTTON
Cancels the last entry, cancels the selected operation or goes to the previous level
menu.
CANC
1.7 PROGRAMMABLE BUTTONS AND SECOND AND THIRD FUNCTION BUTTONS
The PROGRAMMABLE BUTTONS are configured with default settings for using the 1362/624 PABX
switchboard and allow to pick-up the first three lines (buttons F1, F3 and F5) and to recall the first 12
extensions (41 ÷52). Refer to the BUTTON PROGRAMMING paragraph to reconfigure the DIRECT
FUNCTIONS buttons. The functions associated to the buttons are shown in the following table.
DIRECT FUNCTION
(DEFAULT SETTING)
Fn BUTTON
SECOND FUNCTION
BUTTON + Fn BUTTON THIRD FUNCTION
BUTTON +
Fn BUTTON
BUTTON
PICK-UP LINE 1 - This allows to
engage a dial line for making a call
or pick-up a parked line.
TIMED DIVERT - This function will divert
the calls reaching your extension after five
rings.
QUERY TIMED DIVERT
This queries the status of
the service.
CALL EXTENSION 5 - This function
allows to directly call the telephone
connected to extension 5 of the
switchboard (default setting: 45).
DIVERT NOW - This function is used to
divert all calls routed to your extension. QUERY DIVERT NOW
This queries the status of
the service.
PICK-UP LINE 2 - This allows to
engage a dial line for making a call
or pick-up a parked line.
DIVERT OUT - This function is used to
immediately divert all calls routed to your
extension to a previously programmed
external number using another telephone
line configured as private (DISA must be
enabled).
DIVERT OUT OFF -
This is used to switch the
service off.
CALL EXTENSION 6 - This function
allows to directly call the telephone
connected to extension 5 of the
switchboard (default setting: 46).
CALL DIVERT - It can be used to divert
external calls not routed to a specific
extension after the fifth ring towards a
previously programmed external number
using another telephone line configured as
private (DISA enabling is required).
DIVERT OFF -
This is used to switch the
service off.
CALL EXTENSION 7 - This function
allows to directly call the telephone
connected to extension 5 of the
switchboard (default setting: 47).
DO-NOT-DISTURB - This function is used
to cut off the ringer for internal calls,
external calls and door phone calls.
DIAL LINE R - This function is used
to output a FLASH on the dial line
for accessing supplementary
services offered by the telephone
company.
DIAL LINE R - This function is used to
output a FLASH on the dial line for
accessing supplementary services offered
by the telephone company.
CALL EXTENSION 8 - This function
allows to directly call the telephone
connected to extension 5 of the
switchboard (default setting: 48).
CONFERENCE - This function is used to
establish a conversation between three
users.
CALL EXTENSION 1 - This function
allows to directly call the telephone
connected to extension 5 of the
switchboard (default setting: 41).
CENTRAL DIRECTORY - This allows to
access the switchboard directory
telephone numbers.
CALL EXTENSION 9 - This function
allows to directly call the telephone
connected to extension 5 of the
switchboard (default setting: 49).
PICK-UP CALL - This function is used to
pick-up a call directed to another extension
from your extension.
DO-NOT-DISTURB OFF
This function is used to
switch the ringer for
internal calls, external
calls and door phone calls
back on.
-
-
-
-
PICK-UP LINE 3 - This allows to
engage a dial line for making a call
or pick-up a parked line.
FOLLOW-ME - The function is used to
divert all calls routed to your extension to
another extension. This function is
activated from the extension where you
want to receive the calls.
QUERY FOLLOW-ME -
This queries the status of
the service.

12 DS4091-002 13
DS4091-002
DIRECT FUNCTION
(DEFAULT SETTING)
Fn BUTTON
SECOND FUNCTION
BUTTON + Fn BUTTON THIRD FUNCTION
BUTTON +
Fn BUTTON
BUTTON
CALL EXTENSION 2 - This function
allows to directly call the telephone
connected to extension 5 of the
switchboard (default setting: 42).
MISSED CALLS - This function is used to
display the missed (unanswered) calls.
CALL EXTENSION 10 - This
function allows to directly call the
telephone connected to extension 5
of the switchboard
(default setting: 50).
CAPTURE CALL - This operation is used
to divert a call after it has been established
with an answering machine or fax machine
to your extension.
CALL EXTENSION 3 - This function
allows to directly call the telephone
connected to extension 5 of the
switchboard (default setting: 43).
BOOK - This function is used to make a
call when either the called extension or
dial line is busy.
-
-
-
CALL EXTENSION 11 - This
function allows to directly call the
telephone connected to extension 5
of the switchboard
(default setting: 51).
DOOR OPENER - This function is used to
open the second door.
CALL EXTENSION 4 - This function
allows to directly call the telephone
connected to extension 5 of the
switchboard (default setting: 44).
ALARM - This function is used to operate
the telephone ringer at a certain time.
CALL EXTENSION 12 - This
function allows to directly call the
telephone connected to extension 5
of the switchboard
(default setting: 52).
ALTERNATE DIAL LINE - You can also
switch between conversations, i.e. speak
with one caller and kept the other caller
on-hold.
QUERY ALARM - This
function is used to check
the programmed time.
-
-
The SECOND and THIRD function buttons are not configurable and are specific for Agorà6
switchboard functions.
1.8 LEDS
The optical indications output by the LEDsassociated to the CUSTOMISABLE BUTTONS identify the status
of atelephone line or extension (providing that the customisable button is associated to adial line or
extension).
LED INDICATION
OFF DIAL LINE FREE
ON
ON FOR FOUR SECONDS FUNCTION CONFIRM
ON AND OFF BRIEFLY PARKED LINE
SLOW BLINKING LINE STANDING BY
FAST BLINKING
BUSY LINE
CALL RECEPTION LINE
MEANING
2. INSTALLATION
The telephone may be installed on atable top or on the wall.
2.1 TABLE-TOP CONFIGURATION
After identifying the surface where to install the telephone, fasten the telephone socket considering the length
of the line cord supplied. Fasten the socket and connect to the switchboard.
SOCKET
TERMINALS
ITEM SWITCHBOARD
TERMINAL
GREEN WIRE TEL. EXTENSION
TELEPHONE
CONNECTION
RED WIRE TEL. EXTENSION
BLACK WIRE SE -
DATA
LINE
YELL
O
W WIR
E
SE +
1
2
3
4
1 2
34
SWITCHBOARD
TELEPHONE
SOCKET
(internal view)
Maximum
distance:
250 metres
Disconnect switchboard
p
owe
r
before connectin
g.
Conne
ct
ion of o
t
her downs
t
ream devi
c
e
s
(e.
g
. modems) is not recommende
d
because correct o
p
eration of th
e
tele
p
hone cannot be ensured i
n
t
his
c
ase
.
When replacin
g
Urmet Domus Tea
m
and Euro tele
p
hones, reverse th
e
SE+ and SE- si
g
nals in socket
s
of
the existin
g
system
.
LINE
CORD
Plug one end of the line cord into the
telephone socket and the other end into
the telephone LINE socket.
Carefully arrange the line code
in the groove on the bottom of
the telephone.

14 DS4091-002 15
DS4091-002
Fit the spacer on the telephone base underneath the line cord in the specific grooves.
Plug the short end of the spiral cord into the handset connector and the other end into the connector with the
symbol on the base of the telephone.
Carefully arrange the flat end of the spiral wire in the groove obtained on the base of the telephone.
4091/14
3 Remove the handset hook by pressing on the
tabs.
2 Install the spacer on the base of the telephone
as shown in the following figure.
1 The telephone can be installed on the wall using
two 5mm bolts (included) at the specific slots on
the back of the telephone. Use the template in
the telephone box for drilling the wall. Let the
screws protrude from the wall by approximately
5mm.
2.2 WALL-MOUNTED CONFIGURATION
4091
/
1
4
4 Insert the hook turned by 180°in the seat so
that it can hold the handset.
5 Connect the line and the handset as shown in paragraph 2.1.
6 Apply the telephone onto the wall so that the heads of the screws fit inside the wide hole in the slots and
lock the telephone by moving it vertically downwards.
✱
✱
The handset can be arranged on top
of the wall-mounted telephone to put
the caller on hold.

16 DS4091-002 17
DS4091-002
2.3 HEADSET CONNECTION
Plug the headset into the handset socket and keep the handset on hook in position if this configuration is
required. Refer to Urmet Domus sales or click on www.urmetdomus.it for more information.
2.4 PRELIMINARY TELEPHONE ACTIVATION OPERATIONS
The activation procedure is required to operate the telephone and specifically the function buttons correctly.
The Director 2 CL telephone may be enabled to work in STANDARD MODE or, if allowed by the PABX
switchboard, in KTS MODE (Key Telephone System). The difference essentially regards the way of replying
to calls from external lines:
STANDARD MODE: Pick up the handset (*).
KTS MODE: Pick up the handset (*) and either press the function button or enter the access code of
the line. Calls may also be made if there are one or more incoming calls in this mode.
Select the operating mode according to needs.
(*): or press the handfree button.
Standard or KTS mode may be activated on Agorà6 and Agorà2 switchboards. Only the central socket
may be programmed on 1332/5xx switchboards (refer to §2.4.3).
2.4.1 STANDARD MODE ACTIVATION
2.4.2 KTS MODE ACTIVATION
Refer to the switchboard manual for how to change the operating mode at a later time.
DESCRIPTION OF THE OPERATION BUTTON DISPLAY
Hang up the handset and power the switchboard.
The initialisation message will appear briefly. Initialising
wait....
The telephone software release message will
appear for a few seconds immediately after. URMET Director CL
SW version nn.nn
The telephone will switch to stand-by mode and
the following will appear. DD/MM/YYYY HH:MM
Press the function button to activate STANDARD
MODE and wait for the configuration message.
Press the handfree button at the end of the
activation procedure. DD/MM/YYYY HH:MM
ACTIVE COMMAND
DESCRIPTION OF THE OPERATION BUTTON DISPLAY
Hang up the handset and power the switchboard.
The initialisation message will appear briefly. Initialising
wait....
The telephone software release message will
appear for a few seconds immediately after. URMET Director CL
SW version nn.nn
The telephone will switch to stand-by mode and
the following will appear. DD/MM/YYYY HH:MM
Press the function button to activate KTS MODE
and wait for the configuration message.
Press the handfree button at the end of
the activation procedure. DD/MM/YYYY HH:MM
ACTIVE COMMAND
2.4.3 SWITCHBOARD SOCKET
The Director 2 CL telephone may be connected to three PABX switchboard families:
• Agorà6 - (PABX 1362/624) - default setting
• Agorà1/5, 2/8 and 3/12 (PABX 1332/5xx)
• Agorà2 Mod1(PABX 1372 Mod1) and Mod2 (PABX 1372 Mod2) - future development.
The procedure for modifying the default settings is described below (this procedure will clear all programmed
parameters, including the customised buttons).
2.4.4 EXTENSION PORT
The number of the physical port of the switchboard to which the telephone is connected is required for
programming the EXTENSION PORT. Telephone operation may be comprised if the parameter is not
programmed correctly. Values from 1 to 32 are admitted.
DESCRIPTION OF THE OPERATION BUTTON DISPLAY
In stand-by state, press and select
Customization. user menu
Customization
Press OK to access the Customization
menu type. Customization
Language
Press to select PABX. Customization
PABX type
PABX type
PABX 1362/624
Press OK to confirm or to quit. PABX 1332/5XX
OK= Exit
The Customization menu item will appear
again after the new setting is displayed. Customization
PABX type
Press or to select the other menu items or
press twice to quit. DD/MM/YYYY HH:MM
Press OK to access the PABX type menu.
The default value is displayed.
Press or to select the type of switchboard
(e.g. 1332/5xx) to which the telephone is
connected and press OK to confirm.
Modify?
OK=YES X=NO
twice
DESCRIPTION OF THE OPERATION BUTTON DISPLAY
In stand-by state, press and select
Customization. user menu
Customization
Press OK to access the Customization menu. Customization
Language
Press OK to enter/edit the port number. Port not setted
Port?
Port setted 01
Press or to select the other menu items or
press twice to quit. DD/MM/YYYY HH:MM
Enter the number of switchboard port to which the
telephone is connected (e.g. 1) and press OK.
The Customization menu item will appear after
the confirmation message. Customization
Extension Port
twice
Customization
Extension Port
Press or to select Extension Port.

18 DS4091-002 19
DS4091-002
3. USER MENU
To access the USER MENU, press or and press OK to access the function. The same navigation
methods are used to access a submenu. Press to quit the submenu or main menu.
PHONEBOOK SEARCH
DETAILS
DELETE
MODIFY
ADD
LANGUAGE
PABX 1362/624
PABX 1332/5XX
LOCK TELEPHONE
CALL LIST OUTGOING CALLS
UNANSWERED CALLS
ANSWERED CALLS
RINGER MELODY
RINGER VOLUME
HANDFREE VOLUME
HANDSET VOLUME
PASSWORD
CUSTOMIZATION
VERSION
DISPLAY CONTRAST
KEYS SETTING
PABX TYPE
PABX 1372/Mod. 2
PABX 1372/Mod. 1
ITALIANO
ENGLISH
RESTORE
PARAMETERS VOLUMES
PROGRAMMABLE KEYS
CALL LIST
PHONE BOOK
TEL F1
TEL F16
...
TRUNK LINE
RECALL PHONE BOOK
DIRECT NUMBER
EXTENSION (PORT)
EXTENSION PORT
2.4.5 LANGUAGE
The following procedure describes how to change the language.
DESCRIPTION OF THE OPERATION BUTTON DISPLAY
In stand-by state, press and select
Customization. user menu
Customization
Press OK to access the Customization menu. Customization
Language
Press OK to access the language menu. Language
Italiano
Language
English
Press or to select the other menu items or
press twice to quit. DD/MM/YYYY HH:MM
The Customization menu item will appear after
the confirmation message. Customization
Language
twice
Press OK to confirm.
Press or to change the language.

20 DS4091-002 21
DS4091-002
3.1 TELEPHONE SETTINGS
3.1.1 PASSWORD
The following procedure describes how to change the password (4 digits). The default setting is 0000.
DESCRIPTION OF THE OPERATION BUTTON DISPLAY
In stand-by state, press and select
Customization. user menu
Customization
Press OK to access the Customization menu. Customization
Language
Press to select Password. Customization
Password
Old Password?
Press OK again to confirm (1). New Password?
Enter the new 4-digit password
(1111 in the example). New Password?
****
Press or to select the other menu items
or press twice to quit. DD/MM/YYYY HH:MM
Press OK to access the Password menu.
Enter the old password at the prompt.
Enter the password to be changed (default 0000). Old Password?
****
twice
Press OK to confirm.
Enter the new password again at the prompt. Password
Enter the new password again. Ridigit Password
****
Press OK again to confirm (1). The confirmation
message will appear for a few instants. Password Updated
Customization
Password
The Password menu will appear again
immediately after.
four times
four times
four times
(1) Wrong password entry display message table DISPLAY
Press OK after entering a password longer than 4 digits.
The error will shut the menu down. Operation deleted
Press OK after entering an old password different from the one stored.
The error not shut the menu down. Wrong Password
Press OK after entering the new password.
The error not shut the menu down. Passwords
Different
3.1.2 HANDSET VOLUME
The procedure for adjusting the handset volume is described below. The default value is 03. The volume may
be set to 5 levels, where 01 is the minimum value and 05 the maximum value.
3.1.3 HANDFREE VOLUME
The procedure for adjusting the Handfree volume is described below. The default value is 03. The volume
may be set to 5 levels, where 01 is the minimum value and 05 the maximum value.
DESCRIPTION OF THE OPERATION BUTTON DISPLAY
In stand-by state, press and select
Customization. user menu
Customization
Press OK to access the Customization menu. Customization
Language
Press to select Handset volume. Customization
Handset volume
Handset volume
Volume 03
Press OK to confirm.
The Handset volume menu is shown. Customization
Handset volume
Press or to select the other menu items
or press twice to quit. DD/MM/YYYY HH:MM
Press OK to access the Handset volume menu.
The set value is shown.
Press or to adjust the handset volume
(e.g. level 02 in the example). Handset volume
Volume 02
twice
DESCRIPTION OF THE OPERATION BUTTON DISPLAY
In stand-by state, press and select
Customization. user menu
Customization
Press OK to access the Customization menu. Customization
Language
Press to select Handfree volume. Customization
Handfree volume
Handfree Volume
Volume 03
Press OK to confirm.
The Handfree volume menu is shown. Customization
Handfree volume
Press or to select the other menu items
or press twice to quit. DD/MM/YYYY HH:MM
Press OK to access the Handfree volume
menu. The set value is shown.
Press or to adjust the Handfree
volume (e.g. level 02 in the example). Handfree Volume
Volume 02
twice

22 DS4091-002 23
DS4091-002
3.1.4 RINGER VOLUME
The procedure for adjusting the ringer volume is described below. The default value is 04. The volume may
be set to 5 levels, where 01 is the minimum value and 05 the maximum value.
3.1.5 RINGER MELODY
The procedure for adjusting the ringer melody is described below. The default value is E. Six tones may be
selected.
DESCRIPTION OF THE OPERATION BUTTON DISPLAY
In stand-by state, press and select
Customization. user menu
Customization
Press OK to access the Customization menu. Customization
Language
Press to select Ringer volume. Customization
Ringer volume
Ringer Volume
Volume 03
Press OK to confirm.
The Ringer volume menu is shown. Customization
Ringer volume
Press or to select the other menu items
or press twice to quit. DD/MM/YYYY HH:MM
Press OK to access the Ringer volume menu.
The set value is shown.
Press or to adjust the ringer volume
(e.g. level 02 in the example). Ringer volume
Volume 02
twice
DESCRIPTION OF THE OPERATION BUTTON DISPLAY
In stand-by state, press and select
Customization. user menu
Customization
Press OK to access the Customization menu. Customization
Language
Press to select Ringer Melody. Customization
Ringer Melody
Select Melody
Melody [E]
Press OK to confirm.
The Ringer Melody menu is shown. Customization
Ringer Melody
Press or to select the other menu items
or press twice to quit. DD/MM/YYYY HH:MM
Press OK to access the Ringer Melody menu.
The set value is shown.
Press or to select the ringer tone which is
played at the set volume for a few instants
(refer to §3.1.4.). Melody D is set in the example
shown).
Select Melody
Melody [D]
twice
3.1.6 DISPLAY CONTRAST
The procedure for adjusting the display contrast is described below. The default value is 03. The contrast
may be set to 5 levels, where 00 is the minimum value and 04 the maximum value.
3.1.7 RESTORE PARAMETERS (VOLUMES)
The procedure for restoring the default volumes is described below.
DESCRIPTION OF THE OPERATION BUTTON DISPLAY
In stand-by state, press and select
Customization. user menu
Customization
Press OK to access the Customization menu. Customization
Language
Press to select Display Contrast. Customization
Display Contrast
Display Contrast
Contrast 03
Press OK to confirm.
The Display Contrast menu is shown. Customization
Display Contrast
Press or to select the other menu items
or press twice to quit. DD/MM/YYYY HH:MM
Press OK to access the Display Contrast menu.
The set value is shown.
Press or to adjust the display contrast
(e.g. level 02 in the example). Display Contrast
Contrast 02
twice
DESCRIPTION OF THE OPERATION BUTTON DISPLAY
In stand-by state, press and select
Customization. user menu
Customization
Press OK to access the Customization menu. Customization
Language
Press to select Restore parameters. Customization
Restore parameters
Restore parameters
Volume
Press OK to confirm (or to cancel).
The restored parameters confirmation message
will appear for a few instants.
Restore done
Press or to select the other menu items
or press three times to quit. DD/MM/YYYY HH:MM
Press OK to access the Restore parameters
menu.
Press OK to access Restore volumes. Restore?
0K=Yes X=No
The Restore parameters Volume menu will
appear again immediately after. Restore parameters
Volume
three times

24 DS4091-002 25
DS4091-002
3.2 KEYS SETTING PROCEDURE
This procedure is used to directly program the programmable buttons (F1 ÷F16) on the left of the
telephone.
• Select Keys setting in the USER MENU Customization and press OK.
• Use buttons / to select the button to be programmed TEL F1 ÷TEL F16 and press OK.
Hold / pressed to scroll the menu faster.
• Select the function to be assigned to the button using the / arrows:
Direct number:the number to be dialled
Trunk Line:the number of the dial line (1 ÷6).
Extension (Port):the number of the terminal socket (physical port) to which the extension is connected
(1 for extension 41,2 for extension 42,...32 for extension 72)
Recall phonebook:number of the memory position in the telephone directory (1 ÷250).
• Press OK.
• Enter the number corresponding to the required position.
• Press OK.
Internal programming example:to program dialling (and consequently assembly) of extension 42 (related
to port 2) on the first telephone LED (button F1),select “TEL F1”in the guided menu,OK, “Extension (Port)”,
OK, 2,OK.
Central memory recall programming example:to program the second function button F2 to recall the fifth
central memory position (39005 where 39 is the service code for recalling the PABX memory and 005 is the
memory position),select “TEL F2”in the guided menu,then OK, “Direct number”,OK, 39005,OK.
Remember that the following data will need to be entered according to the selected function and the PABX
selection (switchboard socket):
3.2.1 DIRECT NUMBER ASSOCIATION
Any programmable button may be associated to a number for speed dialling.
• Select and access the Direct number function.
• Enter the direct number to be associated to the button.
• Press OK to confirm or to quit.
The LED corresponding to the button will remain off when the Speed Dial option is on.
3.2.2 TRUNK LINE ASSOCIATION
This function allows to associate any programmable button to pickup and monitor a dial line of the system.
• Select and access the Trunk Line function.
• Enter the external line number to be associated to the button.
• Press OK to confirm or to quit.
The Trunkline number associated to the button may be from 1 to 6 for 1362/624 PABX.
TYPE OF DATA ADMISSIBLE DATA
PABX 1362/624 PABX 1372/Mod2
PABX 1372/Mod1
PABX 1332/5xx
DIRECT NUMBER maximum 21 digits maximum 21 digits
TRUNK LINE 1 .. 0 1 .. 3
EXTENSION 1 .. 40 1 .. 12
RECALL PHONE BOOK 1 .. 250 1 .. 250
3.2.3 EXTENSION ASSOCIATION
This function allows to associate any programmable button to call/divert and monitor an extension of the
system.
• Select and access the Extension (port) function.
• Enter the extension number to be associated to the button.
• Press OK to confirm or to quit.
The Extension (port) options relates to the number of the extension socket and not its flexible number,
which may be from 1 to 40 for PABX 1362/624.
3.2.4 PHONE BOOK NUMBER ASSOCIATION
This function allows to associate any programmable button to a telephone directory position for quick
dialling.
• Select and access the Recall phonebook function.
• Enter the telephone directory position to be recalled when the button is pressed (1 …250).
To identify the position associated to the number, access the directory/search function: three digits
corresponding to the position will appear after the stored number.
• Press OK to confirm or to quit.
The LED corresponding to the button will remain off when the Recall phonebook option is on.
3.2.5 RESTORE PARAMETERS (PROGRAMMABLE KEYS)
The procedure for restoring the default settings of the programmable keys is described below.
3.3 CALL LIST
3.3.1 OUTGOING CALLS
This is the list of the last 20 dialled numbers,the name associated to the number in the phone book(where
applicable) and the time and date of the call:
• Select the Outgoing Calls function in the USER MENU Call List.
DESCRIPTION OF THE OPERATION BUTTON DISPLAY
Press to select Customization. user menu
Customization
Press OK to access the Customization menu. Customization
Language
Press to select Restore parameters. Customization
Restore parameters
Restore parameters
Volume
Press OK to confirm (or to cancel).
The restored parameters confirmation message
will appear for a few instants.
Restore done
Press or to select the other menu items
or press three times to quit. DD/MM/YYYY HH:MM
Press OK to access the Restore parameters
menu.
Press to select Programmable Keys. Restore parameters
Programmable Keys
The Restore parameters Programmable Keys
menu will appear again immediately after. Restore parameters
Programmable Keys
three times
Restore?
0K=Yes X=No
Press OK to access Programmable Keys.

26 DS4091-002 27
DS4091-002
• Use / to explore the call list.
• Press OK to call the displayed number or engage the line. Press button to go back to the previous
menu.
3.3.2 ANSWERED CALLS
This is the list of the last 20 received numbers, the name associated to the number in the phone book (where
applicable) and the time and date of the call:
• Select the Answered Calls function in the USER MENU Call List.
• Use / to explore the call list.
• Press OK to call the displayed number or engage the line. Press button to go back to the previous
menu.
3.3.3 UNANSWERED CALLS
This is the list of the last 10 unaswered calls and the date and time of the call.
An icon on the telephone is used to indicate if new missed calls are present. The icon will remain on
until the missed call list is accessed by pressing function button (2F + F11) or by selecting the Missed Calls
function in the USER MENU Call List.
To read the call list or recall the number:
• Select the Unaswered Call function in the USER MENU Call List or press buttons 2F + F11. The last 20
unaswered calls are stored and arranged in decreasing order (from the most recent to the oldest).
• Use the arrows / to scroll the missed calls which have been stored.
If the CLID (caller’s ID) function is available, the number will be shown and may be recalled.
• Press buttons 2F + F11.
• Use the arrows / to scroll the unaswered call list and reach the number to be called back.
• Engage the line or press OK to dial the number automatically.
The telephone will engage the line without dialling the number if the ID is unknown when the button is
pressed.
3.3.4 RESTORE PARAMETERS (CALL LIST)
The procedure below explains how to clear the call list from the telephone memory.
DESCRIPTION OF THE OPERATION BUTTON DISPLAY
Press to select Customization. user menu
Customization
Press OK to access the Customization menu. Customization
Language
Press to select Restore parameters. Customization
Restore parameters
Restore parameters
Volume
Press OK to confirm (or to cancel).
The restored parameters confirmation message
will appear for a few instants.
Restore done
Press or to select the other menu items
or press three times to quit. DD/MM/YYYY HH:MM
Press OK to access the Restore parameters
menu.
Press to select Call List. Restore parameters
Call List
The Restore parameters Call list
menu will appear again immediately after. Restore parameters
Call List
three times
Restore?
OK=Yes X=No
Press OK to access Restore call list.
3.4 PHONE BOOK
Up to 250 names and numbers may be stored in the phone book.
• Select Phone book using the / buttons and press OK.
3.4.1 ADDING A RECORD (NAME/NUMBER)
To add a new name:
• Select Add using the / buttons and press OK.
• Enter the number (up to 20 digits) to be stored (number entry mode, telephone buttons) and press OK.
Enter 0 in front of the telephone number to be stored. Alternatively, directly select the required
telephone line before recalling the telephone directory number (default F1, F3 or F5 for lines 81, 82 or
83).
• Enter the name (up to 17 characters) to be associated to the number (alphanumeric entry mode, telephone
buttons) and press OK.
• Enter the position (from 1 to 250) where to store the number (number entry mode, telephone buttons) or
accept the number suggested by the telephone (the telephone will display the first available position) and
press OK.
The first 20 memory positions may be rapidly selected (refer to §4.5.2).
• Press OK again to confirm or to cancel.
Special characters * and #, Flash (R button) and Pause (RP button) may be included in the telephone
number.
Press if you make a mistake.
Wait for approximately 2 second before entering the next character of a name. The button-character
correspondence is shown in table §1.4.
A new directory record may be stored in a position which may be overwritten.
3.4.2 MODIFYING A RECORD
To edit an existing number or name:
• Select Edit.
• Enter the first letter of the name.
• Use / to find the name to be edited and press OK.
• The word insert name will appear. Use the keypad to edit (up to 17 characters). Continue and press OK.
• The word number will appear. Use the keypad to edit (up to 20 characters). Continue and press OK.
• On the page Modify? press OK to confirm or to cancel.
3.4.3 DELETING A RECORD
To cancel a number with alphabetic search:
• Select Delete.
• Enter the first letter of the name to be deleted.
• Use / to find the number to be deleted and press OK.
• On the page: Delete? press OK to confirm or to cancel.
3.5 TELEPHONE LOCK
This function is used to prevent the use of the telephone for dialling calls and accessing the telephone menu
(including directory). A password is needed to access all functions.
• Select Telephone Lock using the / buttons and press the button.
• Enter the 4-digit password and press OK.
The telephone status will switch from locked to released if the password is correct.
The icon will light up when the telephone is locked.
The default password is 0000. Refer to the procedure described in §3.1.1 for changing the password.
Take note of the password and keep it in a safe place to avoid permanently locking the telephone is the
password is lost. Contact a service centre or your retailer if you forget the password.

28 DS4091-002 29
DS4091-002
4. USING THE TELEPHONE
The Director 2 CL telephone can be used in three different ways:
• With handset.
• With handfree.
• Amplified.
The operating mode can be changed during a conversation as follows:
The icon lights up on the display during amplified and handfree use.
4.1 ANSWERING CALLS
The ringer will ring when a call is received. The rhythm of the ringer indicates the type of call (internal,
external door phone). Messages appear on the display.
• Pick up the handset to reply.
Press to exclude (and reactivate) the ringer. Icon will light up to indicate that the ringer is off.
CONVERSATION MODE DESCRIPTION
HANDSET The earpiece and microphone in the handset are used for
establishing a conversation.
HANDFREE The speaker and microphone arranged in the body of the
telephone are used for establishing a conversation.
AMPLIFIED The earpiece and microphone in the handset and the speaker
arranged in the body of the telephone are used for establishing a
conversation.
HANDSET HANDFREE
AMPLIFIED
STAND-BY
4.2 MAKING CALLS
NORMAL MODE
• Engage the line and wait for the dial tone.
• Dial the extension number, the dial line access number followed by the number to be called or the service
to be accessed.
PRESELECTION MODE
• Dial the number.
• Engage the line.
In this mode, you can correct the dialled number by press to delete the numbers one by one.
4.3 DIALLING USING A PROGRAMMABLE BUTTON
Proceed as follows if telephone buttons F1 ÷F16 are programmed as dial line or extension speed dial
button:
• Press the button associated to the call type (internal or external). The line is engaged automatically in
handfree mode.
Refer to the description in chapter 3 for programming buttons F1 ÷F16.
4.4 LAST NUMBER REDIAL
Proceed as follows if the dialled number is an extension:
• Press RP. The line will be automatically engaged in handfree mode if it was not previously engaged by
pressing RP.
Proceed as follows if the external call number already includes the dial line access code:
• Press RP.
Proceed as follows if the number is dialled after pressing a function button to engage the dial line:
• Press the function button associated to a dial line.
• Press RP.
4.5 CALLING A DIRECTORY NUMBER
The Director2 CL telephone extension has various directories organised as follows:
• 250 personal numbers in the phone book.
• Personal numbers in the PABX central unit to which the telephone is connected (10 max.).
• Common numbers in the PABX central unit to which the telephone is connected (190 max.).
The directory size of the last two options depends on the PABX features.
4.5.1 DIALLING A NUMBER FROM THE PHONE BOOK
The directory is searched in alphabetical order.
• Press .
• Enter the first letter of the name using the text entry procedure.
• Press / to display the required directory name and proceed in one of the following two modes:
Mode 1: if number 0 was entered in the directory to select the dial line, simply pick up the handset or select
handfree to make the call.
Otherwise, press OK to display the number on the display and press OK again (or engage) to dial the
required number. Press to go back to the search menu.
Mode 2: Press OK if number 0 was not included in the directory for selecting the dial line (the number
will appear on the second line of the display). If the number is the one you require, select the line were
to make the call using the external line programmable buttons (default settings: F1, F3 or F5 for 81, 82 or
83). Press OK to dial after engaging the line.

30 DS4091-002 31
DS4091-002
4.5.2 SPEED DIALLING THE FIRST 20 NUMBERS IN THE PHONE BOOK
The first twenty numbers stored in the phone book may be speed dialled simply by pressing two buttons.
If 0 is not included in the directory to select the dial line, select the dial line by pressing the keypad or using
a programmed button (default F1, F3 or F5 for 81, 82 or 83).
For the first 10 numbers (positions from 1 to 10), press 2F and a button from 1 to 0 (where 0 is position 10)
which corresponds to the required number.
For the next 10 numbers (positions from 11 to 20), press 3F and a button from 1 to 0 (where 1 is position 11
and 0 is position 20) which corresponds to the required number.
Handfree mode will be automatically activated if the line is not engaged before calling the directory number.
4.5.3 DIALLING A NUMBER FROM THE CENTRAL DIRECTORY
Calls can be made to a number stored in the central directory (PABX switchboard) identified by a short code
from an extension. Each extension may access a 200 number directory in which the first ten numbers are
specific for the extension while the other 190 numbers are in common to all extensions. Short codes consist
of three digits from 000 to 199, the first ten of which (000-009) correspond to the numbers of the system itself,
while the other (010-199) are common numbers.
To call a number stored in the directory on a dial line:
• Lift the handset and wait for the dial tone.
• Press 2F followed by F9 and then the short code 000-199 which identifies the telephone number to be
called.
• Wait for the switchboard to make the required call and proceed as follows:
A:Aconversation will be established if the call procedure is successful.
B:If you hear the message // Settings from 000 to 099 are empty it means that there are no numbers in
the directory associated to the entered code.
C:If you hear the message Line not available, it means that the there are no free lines. Hang up or book
a dial line.
4.6 VOLUME
The volume may be temporarily adjusted during a conversation. The volume adjustment method depends
on the operating mode. The speaker volume will be adjusted in handfree more while the handset earpiece
volume will be adjusted in handset mode.
In amplified mode, both the handfree and the handset volume may be adjusted. Press the button to
adjust both the handfree and the handset volume.
•Press the button and /to adjust.
The changes made in this way are temporary. The volume will return to the previous settings at the next
call.
4.7 SWITCHING OFF THE MICROPHONE
The microphone may be switched off using a conversation.
• Press the button to switch from on to off.
The icon will light up on the display to indicate that the microphone is off.
This function may only be activated when the line is engaged.
The microphone will be switched back on when switching from handset to handfree and vice versa.
4.8 MESSAGES ON DISPLAY
With the telephone off
Date and time. The information is received from the PABX (except for
1332/5xx). Telephone settings are not possible.
Telephone ringing
All calls on 1332/5xx switchboard.
Telephone ringing
Telephone number of external call.
Telephone ringing
Call from external line 2 on Agorà6or Agorà2 switchboard.
Telephone ringing
Telephone number of external call on Agorà6or Agorà2 switchboard.
Telephone ringing
Door phone call from external line 1 on Agorà6or Agorà2 switchboard.
While dialling
The dialled number appears on the lower line. The duration of the telephone
call appears on the upper line (hh:mm:ss).

32 DS4091-002 33
DS4091-002
5. KTS FUNCTIONS
Director 2 CL telephones may be enabled to work either in standard or KTS mode: the two mode differ by the
way calls from external lines are answered. In standard mode, simply pick up the handset to answer a call. In
KTS mode, you will hear the dial tone when the handset is picked up. To answer an incoming call, press the
functional button associated to the line which is ringing or alternatively enter the access code of the line (e.g.
81 if the call is from line 1). Simply pick up the handset to answer an internal call in either mode.
5.1 INCOMING CALL FROM EXTERNAL LINE
The KTS rings as all other telephones when one or more incoming calls are received on local lines. Incoming
calls are immediately answered when the handset is picked up: you will hear the dial tone instead.
After picking up the handset, you can:
A: Answer the external call by pressing the function button corresponding to the line (F1, F3...) or digit the
line number (81, 82...).
B: Make a call on a dial line by pressing the function button associated to a dial line, dialling the code of a
free line or dialling 0 to engage the first free dial line.
C: Make an internal call by pressing the function button associated to the extension or dialling the number
of the extension.
If two external calls directed to the KTS are received, you will hear the dial tone when you pick up. Select the
line to answer either by pressing the function button associated to the line or by dialling the line number.
5.2 DIVERT AND CALL BACK
Answer an external call, either press the function button associated to the line where to divert the call or press
R followed by the extension where to divert the call.
The KTS telephone will be called back if the extension does not answer. You will hear the dial tone when you
pick up: either press the function button associated to the line or dial the number corresponding to the line
to take the call.
You can choose which line to pick up if the KTS diverts several calls and the lines call back.
5.3 INTERNAL CALL
Simply pick up the KTS handset to reply to an internal call.
5.4 SEVERAL CALLS AT THE SAME TIME
In the case of two calls at the same time both directed to the KTS extension, one from the dial line and the
other from an extension, the internal call will be answered when the handset is picked up.
6. TELEPHONE NETWORKS ON EXTERNAL LINES
6.1 CALL ON EXTERNAL LINE
To make a call on an external line:
• Press the function button associated to the external line or if the external line is not associated to one of
the programmable function buttons:
• Pick up the handset and wait for the dial tone.
• Select the line to be used for the call by dialling.
0for any available line
81 ÷86 for line 1 ÷6
87 ÷89 for basic interface 1 ÷3
74 for basic interface 4
80 for any available private line.
• Wait and proceed as follows according to the reply:
A: Dial the number to be called when your hear the dial tone. The first digit must be entered within 10
seconds after which the telephone is cut off.
B: If you hear a deterrent tone, it means that the extension is not authorised to external calls. Hang up.
C: If you hear the message Line not available, it means all lines are busy. Hang up or book an external
line.
6.2 BOOKING A TRUNK LINE
A trunk line can be booked if the line you want or all lines are engaged, that is when you hear the “Line not
available”message when calling an external line.
When the line is freed, the telephone which made the booking will ring for 25 seconds.
To book a dial line after hearing the “Line not available”message:
• Press 2F followed by button F13 and wait for the confirmation tone.
• Hang up.
• Wait for the free line indication by the ringer.
• Pick up the handset and wait for the dial tone.
• Dial the number to call. The first digit must be entered within 10 seconds after which the telephone is cut
off.
When you hear the dial tone, the line is engaged and direct dialling only is possible. You cannot call a number
stored in the directory using a short code following a booking.
6.3 PICK-UP
Calls from external lines will make all extensions enabled to received incoming calls ring according to the
external call tone.
The call can be picked up also from a telephone which is not enabled to receive incoming calls. This
telephone will not ring unless the “pick-up”function is programmed.
All telephones will stop ringing when the call is picked up.
To answer from an enabled telephone:
• Pick up the handset.
To answer from an non-enabled telephone:
• Pick up the handset and wait for the dial tone.
Press 2F followed by F10 and select the line from where the call is originating.
6.4 PUTTING AN EXTERNAL CALL ON-HOLD TO ANSWER ANOTHER EXTERNAL CALL
The first call can be put on-hold and the second call answered if a second external call is received during an
external call (indicated by a warning tone). You can also switch between conversations, i.e. speak with one
caller and kept the other caller on-hold.

34 DS4091-002 35
DS4091-002
To put an external conversation on-hold and answer a second external incoming call:
• Press R and wait for the dial tone. The external user will hear the on-hold music and announcement.
• Dial 9. This will switch the conversation to the other external call.
Press 2F and press F16 to switch from one conversation to another.
Press R twice to shut down the active conversation and pick up the call on hold.
Hang up the handset to hang up the active call: the dial line will be freed and the local line on-hold will call
back.
6.5 PUTTING AN EXTERNAL CALL ON-HOLD TO MAKE ANOTHER EXTERNAL CALL
You can put an external conversation on-hold and make a second external call.
You can also switch between conversations, i.e. speak with one caller and kept the other caller on-hold.
To put an external conversation on-hold and make a second external call:
• Press the function button associated to the external line or if the external line is not associated to one of
the programmable function buttons:
• Select the line to be used for the call by dialling.
0for any available line
81 ÷86 for line 1 ÷6
87 ÷89 for basic interface 1 ÷3
74 for basic interface 4
80 for any available private line.
• Press R and wait for the dial tone. The external user will hear the on-hold music and announcement.
• Wait and proceed as follows according to the reply:
A: Dial the number to be called when your hear the dial tone. The first digit must be entered within 10
seconds after which the telephone will be encapsulated and the line on-hold will call back.
B: If you hear a deterrent tone, it means that the extension is not authorised to external calls. Hang up.
The line on-hold will call back.
C: If you hear the message Line not available, it means all lines are busy. Hang up. The line on-hold will
call back.
Press 2F and press F16 to switch from one conversation to another.
Press R twice to shut down the active conversation and pick up the call on hold.
Hang up the handset to hang up the active call: the dial line will be freed and the local line on-hold will call
back.
6.6 PUTTING AN EXTERNAL CALL ON-HOLD TO MAKE AN INTERNAL CALL
You can put an external conversation on-hold and make a second internal call. To make an internal call while
an external conversation is in progress:
• Press the function button associated to the extension. The external line will be put on hold and the call will
be forwarded to the extension at the same time.
If the extension to be called is not associated to a programmable function button:
• Press R and wait for the dial tone. The external user will hear the on-hold music and announcement.
• Dial the number to call: 41 ÷72 for extensions 1 ÷32.
Press 2F and press F16 to switch from one conversation to another.
Press R twice to shut down the active conversation and pick up the call on hold.
Hang up the handset to hang up the active call: the dial line will be freed and the local line on-hold will call
back.
6.7 PARKING AN EXTERNAL CALL
The parking function is used to put any call in progress on hold without hanging the connection up so as to
pick it up later from any other extension.
To put an external conversation on hold:
• Press .
• Hang up.
To pick up a parked call from any extension:
• Pick up the handset and wait for the dial tone.
• Press the function button associated to the external parked line on Director telephones or dial 31 followed
by the direct access code of the external line (81-89 or 74) on normal telephones.
The icon will light up on the display if the external conversation is put on hold.
When parked, all extensions telephones can be hang up. The call must be resumed within 90 seconds
otherwise the parked call will call back.
6.8 THREE-PARTY CONFERENCE CALL
This function allows to establish a three-party conference call.
Proceed as follows during a conversation:
• Press the function button associated to the extension. The external line will be put on hold and at the same
time the call will be diverted to the extension. Alternatively, if the extension to be called is not associated
to one of the programmable telephone buttons:
• Press R and wait for the dial tone. The external user will hear the on-hold music and announcement.
• Dial the number to call: 41 ÷72 for extensions 1 ÷32.
• After the reply, inform the user that a conference call is about to be established and press 2Ffollowed by
F8.
During the conference call all parties will hear the conference call tone: the tone will be switched off as soon
as one of the extensions hangs up and therefore ends the conference call.
6.9 TIMED DIVERT OF DISA EXTERNAL CALL TO OTHER EXTENSION
This function is used to divert external calls to your extension after five rings (DISAfunction must be
enabled). A“divert”tone will be heard when the function is active when you pick up the handset. The
telephone can be used to make calls in any case.
To switch the function on:
• Press 2F followed by F1.
• Dial the number of the extension where to divert calls 41 ÷72 for extensions 1 ÷32.
• Press the button to end after you hear the Divert to... message confirming that the service is active.
To switch the function off:
• Press 2F followed by F1.
• Dial your extension number 41 ÷72 for extensions 1 ÷32.
• Press the button to end after you hear the Service not active message confirming that the service is
not active.
To check the function:
• Press 3F followed by F1.
• Wait for the confirmation message and press the button to end.
The icon will light up on the display to indicate that the divert service is on.
6.10 DIVERT DISA EXTERNAL CALL TO OTHER EXTENSION NOW
This function is used to immediately divert external calls to your extension after five rings (DISAfunction
must be enabled). A“divert”tone will be heard when the function is active when you pick up the handset. The
telephone can be used to make calls in any case.
To switch the function on:
• Press 2F followed by F2.
• Dial the number of the extension where to divert calls 41 ÷72 for extensions 1 ÷32.
• Press the button to end after you hear the Divert to... message confirming that the service is active.
To switch the function off:
• Press 2F followed by F2.
• Dial your extension number 41 ÷72 for extensions 1 ÷32.

36 DS4091-002 37
DS4091-002
• Press the button to end after you hear the Service not active message confirming that the service is not
active.
To check the function:
• Press 3F followed by F2.
• Wait for the confirmation message and press the button to end.
The icon will light up on the display to indicate that the divert service is on.
6.11 EXTERNAL DIVERT TO PRIVATE LINE
This function is used to immediately divert all calls routed to your extension to a previously programmed
externalnumberusinganothertelephonelineconfiguredasprivate(DISAmustbeenabled).Theswitchboard
dials the programmed telephone number and connects the two lines. A specific number can be programmed
for each extension. This connection lasts for 60 seconds and can be extended by pressing any DTMF during
the last 5 seconds of connection (a tone will be heard). A “divert”tone will be heard when the function is
active when you pick up the handset. The telephone can be used to make calls in any case.
Press ∗∗∗ to end the call.
To switch the function on:
• Press 2F followed by F3.
• Dial L and wait for the “service on”message, where:
L =
80 for any available private line.
81 ÷86 for line 1 ÷6
87 ÷89 for basic interface 1 ÷3
74 for basic interface 4
• Press the button to end.
To switch the function off:
• Press 3F followed by F3.
• Press the button to end after you hear the “Service not active”message confirming that the service is
not active and press the button to end.
To check the function:
• Pick up the handset and wait for the dial tone.
• Dial #672 and wait for the message indicating state of the service.
• Hang up.
The message “incorrect command”will be heard if you attempt to activate the function on a non-private line
or without programming the number where to divert the call.
6.12 CALL DIVERT TO PRIVATE LINE
It can be used to divert external calls not routed to a specific extension after the fifth ring towards a previously
programmed external number using another telephone line configured as private (DISA enabling is required).
The switchboard dials the programmed telephone number and connects the two lines. This connection lasts
for 60 seconds and can be extended by pressing any DTMF during the last 5 seconds of connection (a tone
will be heard). A “divert”tone will be heard when the function is active when you pick up the handset. The
telephone can be used to make calls in any case.
Press ∗∗∗ to end the call.
To switch the function on:
• Press 2F followed by F4.
• Dial L and wait for the “service on”message, where:
L =
80 for any available private line.
81 ÷86 for line 1 ÷6
87 ÷89 for basic interface 1 ÷3
74 for basic interface 4
• Press the button to end.
To switch the function off:
• Press 3F followed by F4.
• Press the button to end after you hear the “Service not active”message confirming that the service is
not active and press the button to end.
To check the function:
• Pick up the handset and wait for the dial tone.
• Dial #662 and wait for the message indicating state of the service.
• Hang up.
The message “incorrect command”will be heard if you attempt to activate the function on a non-private line
or without programming the number where to divert the call.
6.13 CAPTURE CALL TO ANSWERING MACHINE OR FAX
The call capture function is used to route an established communication to an answering machine terminal
or a fax machine as required by the device making the request.
To activate the function:
• Press 2F followed by dedicate button F12.

38 DS4091-002 39
DS4091-002
7. TELEPHONE NETWORKS ON INTERNAL LINES
7.1 INTERNAL CALL
To call an extension:
• Press the function button associated to the extension and pick up the handset.
If the extension to be called is not associated to a programmable function button:
• Pick up the handset and wait for the dial tone.
• Dial the number to call: 41 ÷72 for extensions 1 ÷32.
• Wait for reply and proceed as follows accordingly.
A: Free, i.e. the ringing tone is heard. Wait for the called number to pick up. The caller will hear a deterrent
tone if the called phone is picked up and hang up again.
B: Busy, i.e. the busy tone is heard. The following alternatively actions are possible: hang up, book a call,
include a caller.
7.2 BOOK ON BUSY
This function is used to make a booking when an extension is busy. The callers telephone will ring when the
called number is free.
To make the booking:
• Press 2F followed by button F13 and wait for the confirmation tone.
• Hang up.
• The ringer will sound when the booked extension hangs up.
• Pick up the handset: the other extension which is ringing will be heard.
7.3 PICK-UP
You can pick up a call from other ringing extension on your own extension.
To answer an internal call routed to another extension:
• Press 2F and then press F10.
• Dial the number of the extension which rings: 41 ÷72 for extensions 1 ÷32.
• Pick up the handset.
The ringing extension will stop ringing.
7.4 PUTTING AN INTERNAL CALL ON-HOLD TO MAKE ANOTHER INTERNAL CALL
You can put an internal conversation on-hold and make a second internal call. To put an internal conversation
on-hold and make a second internal call:
• Press the function button associated to the extension. The internal line will be put on hold and the call will
be forwarded to the extension at the same time.
If the extension to be called is not associated to a programmable function button:
• Press R and wait for the dial tone. The user on-hold will hear the on-hold tone.
• Dial the number to call: 41 ÷72 for extensions 1 ÷32.
Press 2F and press F16 to switch from one conversation to another.
Press R twice to shut down the active conversation and pick up the call on hold.
Hang up the handset to shut down both conversations. The user on hold receives a deterrent tone.
7.5 PUTTING AN INTERNAL CALL ON-HOLD TO ANSWER ANOTHER EXTERNAL CALL
The first call can be put on-hold and the second call answered if an external call is received during an internal
call (indicated by a warning tone). You can also switch between conversations, i.e. speak with one caller and
kept the other caller on-hold.
To put an internal conversation on-hold and answer a second external incoming call:
• Press R and wait for the dial tone. The user on-hold will hear the on-hold tone.
• Dial 9. This will switch the conversation to the other external call.
Press 2F and press F16 to switch from one conversation to another.
Press R twice to shut down the active conversation and pick up the call on hold.
Hang up while the external call is in progress to end the external communication. The internal user on-hold
will hear the call confirmation tone and the extension will ring each other back.
Hang up the handset while the internal call is in progress to transfer the external line to the other extension.
7.6 PUTTING AN INTERNAL CALL ON-HOLD TO MAKE AN EXTERNAL CALL
You can put an internal conversation on-hold and make an external call. You can also switch between
conversations, i.e. speak with one caller and kept the other caller on-hold.
You can put an internal conversation on-hold and make an external call.
• Press the function button associated to the external line or if the external line is not associated to one of
the programmable function buttons:
• Select the line to be used for the call by dialling.
0for any available line
81 ÷86 for line 1 ÷6
87 ÷89 for basic interface 1 ÷3
74 for basic interface 4
80 for any available private line.
• Press R and wait for the dial tone. The external user will hear the on-hold music and announcement.
• Wait and proceed as follows according to the reply:
A: Dial the number to be called when you hear the dial tone. The first digit must be entered within 10
seconds after which the telephone will be encapsulated and the line on-hold will call back.
B: If you hear a deterrent tone, it means that the extension is not authorised to receive external calls. Hang
up. The line on-hold will call back.
C: If you hear the message Line not available, it means all lines are busy. Hang up. The line on-hold will
call back.
Press 2F and press F16 to switch from one conversation to another.
Press R twice to shut down the active conversation and pick up the call on hold.
Hang up while the external call is in progress to end the external communication. The internal user on-hold
will hear the call confirmation tone and the extension will ring each other back.
Hang up the handset while the internal call is in progress to transfer the external line to the other extension.
7.7 TIMED DIVERT OF INTERNAL CALL TO OTHER EXTENSION
This function is used to divert all routed to your extension after five rings to another extension. A “divert”tone
will be heard when the function is active when you pick up the handset. The telephone can be used to make
calls in any case.
To switch the function on:
• Press 2F followed by F1.
• Dial the number of the extension where to divert calls 41 ÷72 for extensions 1 ÷32.
• Press the button to end after you hear the Divert to... message confirming that the service is active.
To switch the function off:
• Press 2F followed by F1.
• Dial your extension number 41 ÷72 for extensions 1 ÷32.
• Press the button to end after you hear the Service not active message confirming that the service is
not active.
To check the function:
• Press 3F followed by F1.
• Wait for the confirmation message and press the button to end.
The icon will light up on the display to indicate that the divert service is on.
Table of contents
Other urmet domus Cordless Telephone manuals