US Digital Media Accutower Series User manual

Accutower Series Stand-alone Tower Duplicators
User Manual

1
ACCUTOWER SERIES STAND ALONE TOWER
DUPLICATORS
User Manual
©2008 US Digital Media Inc.
1929 West Lone Cactus Drive
Phoenix, AZ • 85027
Phone 623.587.4900 • Fax 623.587.4920
Revised 01/08

2
My Tower Information:
Write your tower information here for reference
Tower Serial Number:_______________________________
Order Number:_____________________________________
My Sales Rep:______________________________________
Date Purchased:____________________________________

3
Getting To Know Your Accutower

4
Included with your Accutower
User Manual Free inkjet printable media
CD media with CD towers
CD & DVD media with DVD towers
Wheels and Hardware Power Cord
On 9+ burner towers

5
Table of Contents
CHAPTER INDEX PAGE
1. Introduction & Quick Start Guide 6
2. Features / Specifications 10
3. Control Panel 11
4. Menu Overview 13
5. Operation 17
6. About the Image Manager 31
7. Troubleshooting 33

6
1. Introduction
USDigitalMedia(cdrom2go.com)wouldliketo
thankyouforyourpurchase. Accutower
Duplicators are an excellent choice for fast
and reliable disc duplication.
Accutower is a stand-alone CD/DVD duplicator available in several different
configurations. Towers are available from 1 to 11 burners; Accutower
Unlimited links towers together for 10 to 50 burners and beyond.
The easy to use control panel includes an LCD screen and four buttons. All
operating messages, instructions, operating status, or error message(s) will
display on the LCD screen.
The built-in Hard Disk Drive allows users to load many CD and DVD
Master Discs onto the HDD for use anytime. Disc images stored on the
HDD will reduce the risk of damaging master discs and speed up duplication
jobs.
An intelligent hard drive management system will dynamically assign hard
drive space to each CD and DVD disc image equal to the actual capacity,
saving precious hard drive space.
At US Digital Media, our towers are built in house using only the highest
quality components. Each tower is thoroughly tested before leaving our
facility. You can trust Accutower for continuous and reliable operation.
Chapter
1

7
Quick Start Guide
The controller in your Accutower is both user-friendly and efficient. This
quick start guide will explain the basic operation, and lay the groundwork for
the rest of the manual.
(Note: some references in this manual will be made to both DVD and CD. If your tower is a CD
tower, you will still have DVD options available in the controller but you can only burn CDs.
Tower Capabilities:
CD towers = CD media only
DVD towers = both CD media and DVD media
Inside the shipping box, you should find:
Accutower Duplicator
Power cord
Wheels and screws (select towers only)
User Manual with these quick set-up instructions
STEP ONE: Set up your Accutower
• Carefully open box and remove power cord, manuals, and media.
Take care when removing Tower from its carton, the drive side
(front) of the tower is heavy and may be awkward when lifting.
• Place the system on a level workspace free of debris, dust,
excessive heat or humidity, and electronic interference.
Keep out of direct sunlight.
Allow at least six inches of clearance on all sides of unit for
ventilation.
IT IS VERY IMPORTANT THAT YOU KEEP
ALL OF THE PACKAGING FOR YOUR
DUPLICATION SYSTEM
In case it needs to be returned for any
reason!!
STEP TWO:

8
IMPORTANT: be sure the power supply is ‘switched’ to its
appropriate setting –115V for the United States.
(The factory default is 115 but occasionally during shipping and handling it gets
changed.)
Using the enclosed 3-prong power cord, plug the tower into a properly
grounded outlet. It is highly recommended that you use a surge
protector to protect against transient voltage surges.
STEP THREE:
Press the power button to turn on the duplicator.
(Round power button is on lower right front of tower)
The system will run through a series of self-tests and the primary menu
will then appear. It is not recommended at this point to change your
setup options. The factory settings are suitable for most users and
should not be changed unless a specific setting is required; see your
manual for instruction on how to set the recording speed, source drive
etc.
You are now ready to start duplicating!
STEP FOUR (DVD towers):
After following these simple steps, you will become
confident in the basic operations of your Accutower.
For more detailed instructions and for setup options,
please refer to the later chapters in this User Manual.
If you have a tower equipped with a Hard Drive, your source is set to the
Hard Drive as default and you will need to LOAD the master to the
Hard Drive. To LOAD the masters to the Hard Drive, insert your disc
into any drive in the tower. Using the up and down arrows, get to menu
option 12.Image Manager and press Enter. Again, using the up and
down arrows go the 12.2 Disc => Image and press Enter. The master
disc will begin loading onto the Hard Drive.

9
When the disc is finished loading to the hard drive it will eject, and you
can remove it and store it in a safe place. The complete contents of that
disc are saved on the Hard Drive as a disc image.
Use the Esc button to return to 12.Image Manager, then using the arrows
return to the COPY command. Load appropriate blank media into the
recording drives (it is not necessary to fill the tower). The tower will begin
automatically after a few moments or you can start the burn process with
the Enter button.
Once the burn process is complete, the completed discs will eject.
Simply load more blank media to repeat the process.
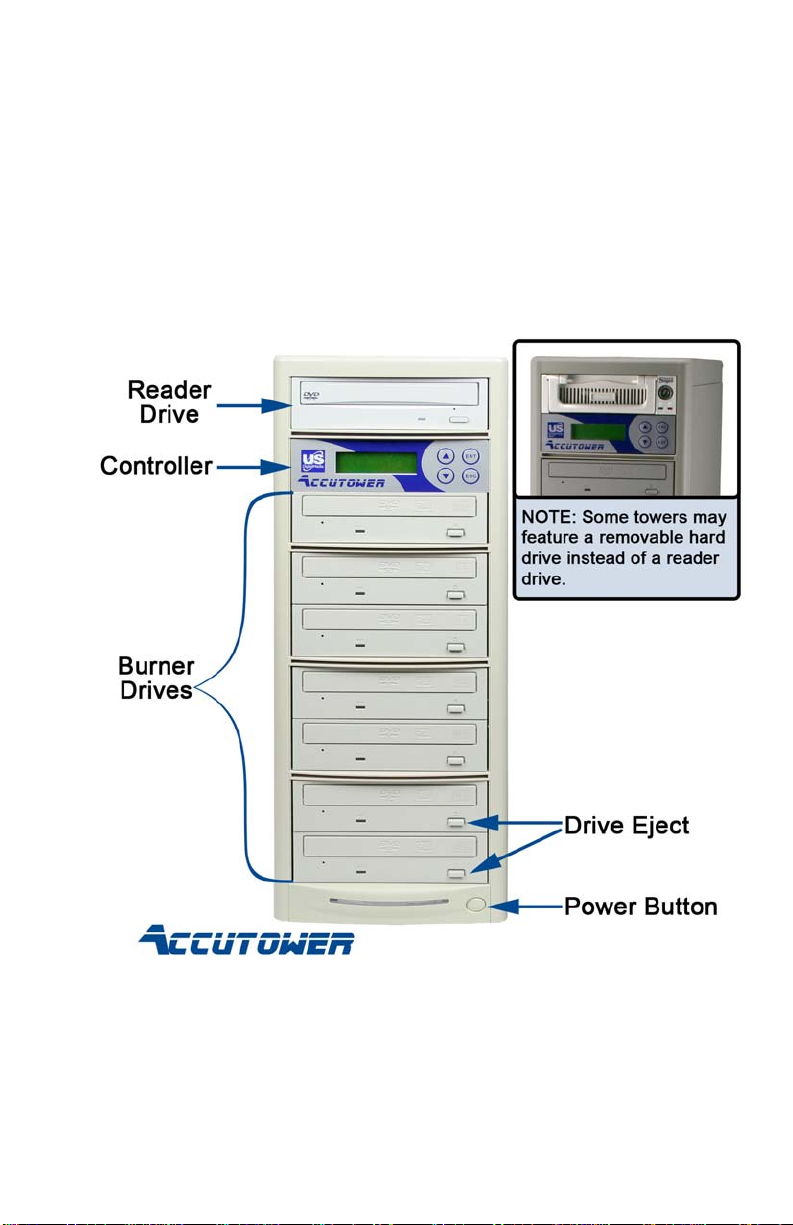
STEP FOUR (CD towers):
For towers not equipped with a hard drive or for towers set to burn “disc
to disc,” it is not necessary to load master discs to the hard drive to make
copies.
When the tower boots up, the default menu will be 1.COPY. Place your
Master disc into the Reader drive (the top drive of the tower). Load
appropriate blank media into the recording drives (it is not necessary to fill
the tower). The tower will begin automatically after a few moments or
you can initiate the burn process with the Enter button.
Once the burn process is complete, the completed discs will eject.
Simply load more blank media to repeat the process.
Should any disc fail during duplication, drive tray will not be ejected
and the display will confirm which discs failed. To acknowledge the
failed disc you will need to press the Esc button to return to the 1.COPY
command. Remove the ‘bad’ disc and replace with new blank media.
This completes the Quick Start section of the User Manual.
You are now ready to begin duplicating!
The following chapters contain detailed instructions on the functions of
your tower, and are intended to assist you in getting the most out of your
Accutower.

10
2. Features and
Specifications
FEATURES
• 2 line LCD display
• 4 control buttons
• Upgradeable Firmware
• Button beep on / off
• Selectable duplication speeds
• Multiple source options
• Integrated hard drive
• Audio track extraction
• Support for all major disc types
• Auto detection of source disc
SPECIFICATIONS
Power Voltage: 5Volts ±5%
Current: 0.7Amps Max
Environment Working
Temperature 0C°~75C
Storage
Temperature -20 C~85 C
Humidity Working Humidity 20%~80%
Storage Humidity 5%~95%
Model Max Burn CD
SPEED Max Burn DVD
SPEED Buffer Memory
Size
Accutower CD 52X -- 64 MB
Accutower DVD 40X 18X 64 MB
Chapter
2

11
3. Control Panel
1. Control Buttons
There are 4 control buttons: ▲,▼, ENT, ESC
▲: UP; Backward; Use this button to navigate backward to search
functions
▼: Down; Forward; Use this button to navigate forward to search function
ENT: OK, Enter, Execute the function
ESC: Escape, Go back to previous function or menu
2. LCD Display
The LCD display is a 2 line x 16 character monochrome Liquid Crystal
Display. The system displays menu driven function information, status
information, and instructions on the LCD.
The menus are sequentially numbered and submenus are contained inside
root menus. The following menu structure is provided as a roadmap of all
menus and sub-menus.
The list was added as a helpful reference!
Chapter
3

12
3. Menu Structure
The menus and sub menus are organized in the following order:
1. Copy
2. Test
3. Copy & Verify
4. Copy & compare
5. Verify
6. Compare
7. Set Burn Speed
8. Select Source
9. Track Edit
10. Utility
10.1 Pre-scan
10.2 Quick Erase
10.3 Full Erase
10.4 Eject All Disc
10.5 Disc Info
10.6 Drive Info
10.7 System Info
10.8 Update BIOS
11. Setup
11.1 Power On Time
11.2 Auto Start Time
11.3 Startup Menu
11.4 Display Mode
11.5 Button Beep
11.6 Skip Read Error
11.7 Eject on Start
11.8 Show Copy Time
11.9 Reader Speed
11.10 Compare Speed
11.11 Change Bad Master Disc
11.12 CD Overburn
11.13 Copy CD-TEXT
11.14 Show HDD Image Name
11.15 Boot Password
11.16 Set Password
11.17 Language
11.18 Clear Setup
The Following Menu Options are available on
select towers
12. Image Manager
12.1 Select Image
12.2 Disc to Image
12.3 Set Reader Speed
12.4 Show Image Info
12.5 Rename Image
12.6 Delete Image
12.7 Show HDD Info
12.8 Format HDD
12.9 Load & Copy
13. Link Setup
13.1 Set MyPosition
13.2 Start Link
13.3 Update BIOS
13.4 Synchron-BIOS

13
4. Menu Overview
1.Copy This is to make CD/DVD copies. Before you start copying, please
make sure you have set the correct source drive and blank discs.
The system will detect and display how many blank discs were
inserted. When the system is ready, just press ENT to begin
making CD/DVD copies
2.Test This is Copying Process Simulation. The process is the same as
COPY, but it won’t write anything to the recordable disc. The
purpose of this process is to ensure error free duplication
3.Copy & Verify This operation will make copies and after the copy process has
been finished, it will perform a verification process to ensure data
correctness
4.Copy & Compare
This operation will make copies and after copy process has been
finished, it will perform a comparison process to ensure data
correctness.
5.Verify This operation will check your master discs and the copied disc’s
readability to make sure all of your copies are readable
6.Compare This is to make a bit-by-bit Comparison between Master Reading
Source and all the copied discs inside the writer tray. This
operation is to ensure all of your copies have the exactly same
information as your Master Reading Source.
7.Set Burn Speed This operation will allow you to adjust and select duplication
speed when burning CDs, Audio CDs, and DVDs
8.Select source Allows the user to change the Master Reading Source as Optical
Drive or Hard Drive Disk.
9.Track Edit This is to make Audio Tracking Selection. This will help you to
combine audio tracks from various CDs into a single customized
audio CD.
Chapter
4

14
10.Utility
10.1 Pre-scan This feature will help to check whether the Master Source Disc
can be correctly duplicated.
10.2 Quick Erase This operation will erase your re-writeable discs in the Writer Tray.
10.3 Full Erase This operation will completely erase your re-writeable discs in the
Writer Tray. It takes longer time than Quick Erase.
10.4 Eject All Disc Disc Eject all discs, including master source disc and all of disc in
writer tray.
10.5 Disc Info This feature will allow you to check disc’s basic information such
as disc type, data length, and available space.
10.6 Drive Info This feature will allow you to check the duplicator’s major
component information, such as manufacturer, Writer or Reader
model number and version.
10.7 System Info This feature provides information about the duplicator including
controller model number, buffer memory capacity, and firmware
version.
10.8 Update BIOS This operation will update your duplicator’s software. You need to
insert manufacturer’s certified update CD.
10.9 Copy Counter This option allows you to keep track of the total number of
burned discs, including a reset function.

15
11.Setup
11.1 Power On Time Set the amount of time the controller waits for drives to perform
their individual diagnostics. Default is preferred.
11.2 Auto Start Time
Set the amount of time the duplicator waits for additional blank
media before automatically starting. You can set OFF, or to a
number of seconds (1 - 99). This function is used for: COPY,
TEST, VERIFY, COMPMARE, COPY&VERIFY, and
COPY&COMPARE.
11.3 Startup Menu You can select which function on the menu displayed when you
first turn on the duplicator.
11.4 Display Mode Choose between Basic and Expert displays on the LCD.
11.5 Button Beep You can choose if you would like to hear a beep or not when you
press a button.
11.6 Skip Read Error Turns off notifications when a master disc with too many read
errors is inserted.
11.7 Eject on Start Choose which drives to eject when the tower is turned on.
11.8.Show Copy
Time
Displays the elapsed copy time after each burn.
11.9 Reader Speed Change the speed at which the reader reads discs. Slower speeds
offer better throughput but take more time.
11.10 Compare
Speed
Changes the speed at which the disc’s contents are compared with
the HDD image of the disc.
11.11 CHG Bad
Master
This function allows the master disc to be replaced with an exact
copy of the same disc while copying. Very useful for badly
scratched master discs.
11.12 CD Overburn Enables duplication of CD’s exceeding 79:59.
11.13 Copy CD-TEXT Enable or Disable duplication of CD-TEXT discs.
11.14 Show HDD
Image Name
This option allows you to change the naming system of the images
stored on the Hard Disk Drive.
11.15 Boot
Password
Secure your duplicator against unauthorized use by enabling a
password when the tower is turned on.
11.16 Set Password Set the boot-up password.
11.17 Language Menu displays are available in English, Spanish, and Portuguese.
11.18 Clear Setup Reset all of the options in the Setup menu to the factory default
settings.

16
12.Image Manager
12.1 Select Image To select Image file as Sources to be copied to discs.
12.2 Disc==> Image To copy Source Disc to HDD and save as Image file.
12.3 Reader Speed ONLY when performing 12.2 Disc -> Image function, you can set
the Reading Speed of reading the master source disc.
12.4 Show Image
Info
To check image file information and file size.
12.5 Rename Image Change the name of an image file stored on the HDD.
12.6 Delete Image To delete image file in HDD. If the file is selected as source file,
you are not able to delete it unless you go back to 12.1 to re-select
the image.
12.7 Show HDD Info To check the information in HDD, such as how many discs are
stored and HDD available space.
12.8 Format HDD This feature will allow you to format the HDD. However, you will
not be able to format the HDD if the HDD image was selected as
source.
12.9 Load & Copy Consolidates the imaging and burning process into one step.
Image Manager is only available on towers equipped with a Hard
Drive.
13.Link Setup
13.1 Set My Position Choose what position the tower has in the array. Choices are first,
middle, last, and stand-alone.
13.2 Start Link Open the connection to one or more towers.
13.3 Update BIOS Allows you to update the firmware on the same tower.
13.4 Synchron-BIOS Allows all towers in the array to be updated to the newest
firmware revision.
Link Setup is only available on Accutower Daisy Chain &
Accutower Unlimited Series towers.

17
5. OPERATION
1. COPY
This menu area will allow you to COPY the Source to Blank CD
or DVD disc. Please ensure that Source is set to the READER if
you would like to make Disc-to-Disc copies (if recording
multiple passes of the same disc or duplicating DVDs we highly
recommend you record from the Hard Drive – See section 12 for
detailed information).
With the duplicator powered on, the normal default will be the
COPY menu area, (if not use the , keys to get to 1.Copy),
before you press enter to start the copy procedures, please make sure you have selected the correct
source (master) and the correct blank discs (CDs or DVDs) in the recorder drives.
Note
The Accutower will display how many blank discs were detected and are ready for copying.
When ready to copy, just press ENT to start the CD/DVD copies.
The system begins the copying process; first it will start Loading Disc, analyzing the discs, and
then start copying. During the copy pass the LCD screen will display Master Source Disc’s data
size and copying progress. When the tower is finished with the copy pass, the Writer Trays will
eject the copied discs. (“Bad” or rejected discs will be retained in drives).
2. TEST
This menu area will allow you to TEST or simulate the copy functions of the Accutower. The
process is the same as COPY, but it won’t actually write anything to the recordable discs.
Use the , keys to get to the 2. TEST menu area, you will have to have a master and blank discs
just like if you were doing an actual copy.
The Accutower will detect and display how many blank discs were detected and are ready for
testing. Press Enter and the system will start to simulate the process of COPY. However, there is
no data that will be actually written to the blank discs. The purpose of this is to try to ensure error
free duplication by going through the process of reading of the master and the blank discs to
simulate actual duplication.
Chapter
5
You CANNOT record CD to DVD, or DVD to CD. You can only copy
to/from from the same type of disc.

18
Note
3. COPY&VERIFY
This operation will make copies and after the copy process has been finished, it will continue on
and perform a Verification process to ensure data correctness. The Accutower duplicator will not
eject discs when copying is finished until verification has been done.
Use the , keys to get to 3.Copy & Verify. Before you press enter to start the procedures, please
make sure you have put correct reading source (master) and the correct blank discs (CDs or DVDs)
in the recorder drives.
The system will detect and display how many blank discs were detected and are ready for copying
and verifying. When the system is ready to go, just press Enter to begin CD/DVD verifying and
copying.
When the system starts the copying process, first it will start Loading Disc, analyzing the discs, and
then start copying. During the copying, the LCD screen will display Master Source Disc’s data size
and copying progress.
When finished, the system will continue to verify to make a disc Readability check.
When the verification is finished, the writer trays will eject.
4. COPY&COMPARE
This operation will make copies and after copy process has been finished, it will perform a
comparison process to ensure data correctness. Therefore, the duplicator will not eject discs until
discs comparison is finished.
a. The system will detect and display how many blank discs were inserted.
b. When the system is ready to copy, just press ENT to start copying.
c. When finished, the system will perform a comparison process to ensure that the copied
discs are exactly the same as source disc.
When the comparison is finished, the Writer Trays will eject.
Copy & Compare makes a bit-by-bit comparison between Master Reading Source and all the
copied discs inside the writer tray. This operation is to ensure all of your copies have the exactly
same information as your Master Reading Source.
TEST does not guarantee successful recording because the actual laser
is not turned on, however TEST will catch major read errors and help
avoid losing media due to failed burns.

19
5. VERIFY
This operation will check your master discs and the copied disc’s readability to make sure all of
your copies are readable.
a. Put master source disc and all copied discs into the duplicator
b. Press ENT and the duplicator will start loading disc, analyzing source disc and start
verification.
c. When verification is finished, the writer trays will eject.
6. COMPARE DISC
This is to make a bit-by-bit comparison between Master Reading Source and all the copied discs
inside the writer tray. This operation is to ensure all of your copies have the exact same information
as your Master Reading Source.
a. Put master source disc and all copied discs into the duplicator.
b. Press ENT and the duplicator will start loading disc, analyzing source disc and start
comparison.
c. When the comparison is finished, the writer trays will eject.
Note:
7. SET BURN SPEED
This operation will allow you to adjust the burn speed for three different disc types: CD, Audio
CD, and DVD.
a. Move to navigate to function 7. SET BURN SPEED, and press ENT
b. You will see three disc types of CD, Audio CD, and DVD. Move , to change disc
type and press ENT to confirm your selection. Press , to select burn speed.
The Compare function works only with data discs, and NOT with Audio
CD’s.
This manual suits for next models
2
Table of contents