US Robotics 5436A User manual

i
Wireless USB Print
Server
Quick Installation Guide
Guide d'installation rapide
Installationsanleitung
Guida per l'installazione rapida
Guía breve de instalación
Beknopte installatiegids
R24.0616.00
rev 1.0

ii

iii
English . . . . . . . . . . . . . . . . . . . . . . . . . . . . . . . . . . . . . . 1
Installation .............................................................................1
Troubleshooting...................................................................... 5
Additional Information ............................................................. 7
Français. . . . . . . . . . . . . . . . . . . . . . . . . . . . . . . . . . . . . . 9
Installation ............................................................................ 9
Dépannage ............................................................................13
Informations complémentaires .................................................15
Deutsch . . . . . . . . . . . . . . . . . . . . . . . . . . . . . . . . . . . . . 17
Installation ...........................................................................17
Fehlerbehebung .....................................................................21
Weitere Informationen ........................................................... 23
Italiano . . . . . . . . . . . . . . . . . . . . . . . . . . . . . . . . . . . . . 25
Installazione ........................................................................ 25
Risoluzione di problemi ......................................................... 29
Informazioni aggiuntive ..........................................................31
Español . . . . . . . . . . . . . . . . . . . . . . . . . . . . . . . . . . . . . 33
Instalación ........................................................................... 33
Solución de problemas........................................................... 37
Información adicional ............................................................ 39
Nederlands . . . . . . . . . . . . . . . . . . . . . . . . . . . . . . . . . . 41
Installatie .............................................................................41
Problemen oplossen .............................................................. 45
Extra informatie .................................................................... 47

iv

English
1
English
Installation
Package Contents
Physical Features
LEDs
Back
!5436A Wireless USB Print Server !Quick Installation Guide
!Switching power adapter !Installation CD-ROM
LED State Function
LAN
Solid Ethernet LAN link is achieved.
Flashing Sending or receiving LAN data.
Off Not connected to LAN.
WLAN
Solid Ethernet WAN link is achieved.
Flashing Sending or receiving WAN data.
Off Not connected to WAN.
ACT
Flashing Sending or receiving data.
ERR
Solid No printer connection is detected.
Off Printer is connected.
Item Function
RESET
To restore your print server to the factory default settings:
1. Unplug the power adapter from the print server.
2. Press and hold the RESET button.
3. Plug the power adapter back in to the print server.
4. Release the RESET button.
To print a status page, press the
RESET
button once.
LAN
Connects the print server to your computer’s Ethernet adapter.
USB
Connects the print server to your computer’s USB adapter.
POWER
Connects your print server to the supplied power adapter.
WLAN
LAN
ERR
AC T
POWER
P O W E R

2
English
Requirements
!A computer with an Ethernet internet connection
!The Installation CD-ROM that came with your printer
!An HTML 4.01-compliant Web Browser (such as Internet Explorer 5.5 or
later or Netscape 8.0 or later) with JavaScript enabled
!Ethernet cable
!USB cable
Installation Instructions
Step One: Connect the Wireless USB Print Server
Note:The Wireless USB Print Server must be connected to your network using
an Ethernet cable for the initial configuration. After the initial configura-
tion, you can establish a wireless connection to the network.
1. Turn on your printer.
2. Connect one end of the USB cable to the USB port on your printer, and con-
nect the other end to the USB port on the print server.
3. Connect one end of the Ethernet cable to your router and the other end to
the LAN port on the print server.
LAN

English
3
4. Slide the standard power plug for your country on to the power adapter.
Apply enough pressure to cause a click and firmly seat the plug. The power
adapter must be unplugged when you attach the plug.
5. Connect the included power adapter to the POWER power port on the print
server and plug the power adapter into a standard power outlet.
Step Two: Configure the Wireless USB Print Server
1. Verify you are logged on to your computer as an administrator. You must be
logged on as an administrator to ensure the software will be properly
installed.
2. Insert the USRobotics Installation CD-ROM.
3. Select Setup Wizard and click Next.
4. Select the Wireless USB Print Server from the list and click Next.
Follow the on-screen instructions to configure the settings for the print
server. Make sure your enter the correct settings for your wireless network,
including SSID, security information, and network type (Infrastructure or
AdHoc).
5. Click Finish.
6. When prompted to install the PTP (Peer-to-Peer) driver, click Yes. Then,
click Next and follow the on-screen instructions.
7. In the Printer Port Setup, select the printer and click Next.
"If you do not see the printer, click Refresh until the port name appears.
8. Select the printer from the Existing Printers list.
"If the printer doesn’t appear, click Add New Printer and follow the on-
screen instructions.
9. Click Connect.
"If you do not see an asterisk next to the port name in the Printer Port
Setup screen, click Refresh. If it still doesn’t appear, refer to the “Trouble-
shooting” section in this guide.
10. Click Close to complete the setup.
North America UK Europe
LAN

4
English
Step Three: Print a Test Page
1. Windows XP, 2000, and NT Users:
oClick Windows Start > Printers and Faxes.
Windows Me, 98, and 95 Users:
1) Click Windows Start >Settings >Control Panel.
2) Within Control Panel, click Printers and Faxes.
2. Right-click the printer you just installed and select Properties.
3. Click Print Test Page. Your printer should successfully print a test page. If it
does not print a test page, refer to the “Troubleshooting” section in this
guide.
Step Four: Setup the Print Server for Wireless Access
You can now access the wireless functions of the Wireless USB Print Server.
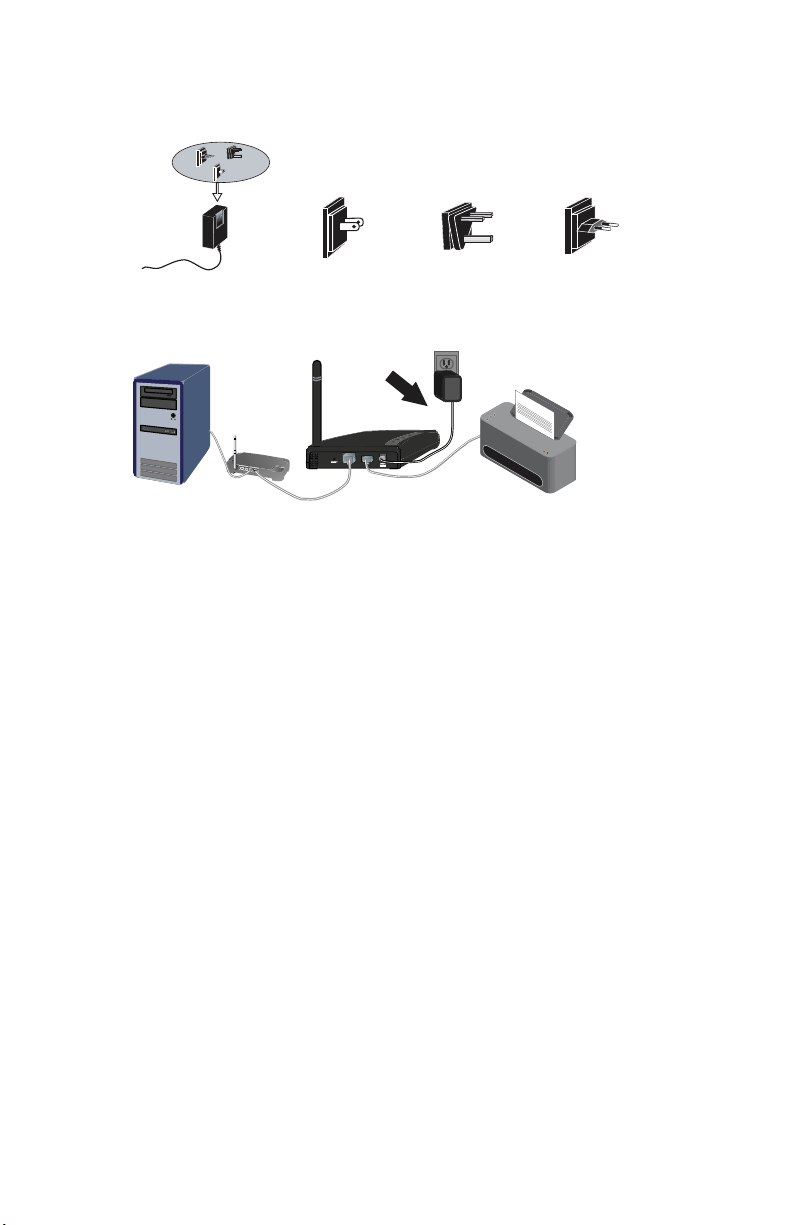
1. Disconnect the Ethernet cable and the power adapter from the print server.
2. Reconnect the power adapter to restart the print server. The print server
should now establish a wireless connection to your wireless router or access
point.
3. Repeat the instructions from Step Three: Print a Test Page.
If you are unable to print the test page, there is a problem with your wireless
connection. Refer to the Troubleshooting section in this guide.
Step Five: Connect Clients to the Wireless USB Print Server
To allow other computers on your network to print using the Wireless USB Print
Server, you must perform the client installation procedure on each computer.
Note:You may need the Installation CD-ROM that came with your printer.
1. Insert the U.S. Robotics Installation CD-ROM into the CD-ROM drive.
2. Click Additional Installs and then click Next.
3. Select User and then follow the on-screen instructions to install the print
server software.
4. When prompted, select the printer and click Next.
5. Select the printer from the Existing Printers list.
"If the printer doesn’t appear, click Add New Printer and follow the on-
screen instructions.
6. Click Close.
Congratulations. You have successfully completed the installation procedure.
Please register your Wireless USB Print Server at
www.usr.com/productreg/
.

English
5
Troubleshooting
For Macintosh and Linux assistance, refer to the Troubleshooting section in the
User Guide on the Installation CD-ROM.
Basic Troubleshooting Procedure
This procedure addresses a number of symptoms that you might experience with
your print server:
1. Verify the physical cable connections between the print server, the printer,
your router, and your power outlet.
2. Ensure that the power outlet to which the print server is connected is a live
outlet.
3. Refer to the LED descriptions at the beginning of this guide and then check
the LEDs on the print server to make sure you are receiving power and that
there is not a print error.
If you still have trouble using the phone, follow the procedure below that best
describes your symptom.
My Setup Wizard cannot detect the Wireless USB Print
Server.
Solution:
Restore the factory default settings of the print server and repeat the installation
procedure. To restore the factory default settings:
1. Unplug the power adapter from the print server.
2. Press and hold the RESET button.
3. Plug the power adapter back in to the print server.
4. Release the RESET button.
At the end of the Setup Wizard, I receive a message that says
“Network busy, or device not found”.
Solution:
On the main menu of the U.S. Robotics Installation CD-ROM, click Additional
Installs and then click User. Follow the on-screen instructions to continue the
installation procedure.
My Wireless USB Print Server is not appearing in the Printer
Port Setup screen.
Solution:
Restore the factory default settings of the print server and repeat the installation
procedure. To restore the factory default settings:

6
English
1. Unplug the power adapter from the print server.
2. Press and hold the RESET button.
3. Plug the power adapter back in to the print server.
4. Release the RESET button.
I am unable to add my printer in Add Printer Wizard.
Solution:
Your printer may not be compatible with the Wireless USB Print Server. Close all
the print server setup screens and disconnect the printer from the print server.
1. Install the printer on your computer according to the printer manufacturer’s
instructions.
2. When finished, reconnect the printer to the print server.
3. Click Windows Start > Programs > U.S. Robotics Print Server > Print Driver
Setup.
4. Follow the on-screen instructions to complete the installation.
I am unable to print a test page.
Solution:
1. Windows XP, 2000, and NT Users:
oClick Windows Start > Printers and Faxes.
Windows Me, 98, and 95 Users:
1) Click Windows Start >Settings >Control Panel.
2) Within Control Panel, click Printers and Faxes.
2. Right-click the printer you just installed, select Properties, and then click the
Ports tab.
3. Make sure the print server port is selected. If it is not, select it, click Apply,
and then click OK. You should now be able to print a test page.
I am unable to print via a wireless connection or the Wireless
USB Print Server is not connecting to my wireless network.
Solution 1:
Make sure you have the SSID and security information that match the settings of
the wireless router in your network. If any of this information doesn’t match, you
will not be able to connect to the wireless network. You will need to reconnect
the print server to your router using an Ethernet cable in order to make any con-
figuration changes.
Solution 2:
Make sure your router or access point is using only WEP or WPA-PSK with
TKIP for security. These are the only two types of security that the Wireless USB
Print Server supports.

English
7
I created a new wireless network and my Wireless USB Print
Server cannot connect.
Solution:
1. Insert the U.S. Robotics Installation CD-ROM into your CD-ROM drive.
2. Click Setup Wizard and follow the on-screen instructions.
3. When you get to the areas concerning wireless settings, enter the appropriate
information for the new wireless network.
I have installed my multi-function printer, but my fax and
scanner capabilities do not work.
Solution:
If you have a multi-function printer (printer/fax/scanner) connected to the print
server, only the printer functionality will work.
I tried to install the software for Peer-to-Peer (PTP) printing,
but received an error message and the installation was
aborted.
Solution:
If you have previously installed the Wireless USB Print Server software, you will
need to uninstall it before you can install the Peer-to-Peer software.
1. Click Windows Start > Programs > Print Server.
2. Select Uninstall and follow the on-screen instructions.
3. When the uninstallation is complete, you will need to reboot your computer.
You will then be able to install the Peer-to-Peer software.
Additional Information
For Regulatory and Warranty information, see the User Guide on the
USRobotics Installation CD-ROM.
For operation and configuration information, see the User Guide on the
USRobotics Installation CD-ROM.
For troubleshooting and technical support:
1. See the User Guide on the USRobotics Installation CD-ROM.
2. Go to the Support section of the USRobotics Web site at
www.usr.com/support/.
Many of the most common difficulties that users experience have been
addressed in the FAQ and Troubleshooting Web pages for your print server.
The Support pages also contain information on the latest firmware and may
contain documentation updates.

8
English
3. Submit your technical support question using an online form, or contact the
USRobotics Technical Support Department.
Model Number Serial Number
5436A
Country Webmail Voice
Austria www.usr.com/emailsupport/de 07110 900 116
Belgium (Flemish) www.usr.com/emailsupport/bn 070 23 35 45
Belgium (French) www.usr.com/emailsupport/be 070 23 35 46
Czech Republic www.usr.com/emailsupport/cz
Denmark www.usr.com/emailsupport/ea 38323011
Finland www.usr.com/emailsupport/ea 08 0091 3100
France www.usr.com/emailsupport/fr 0825 070 693
Germany www.usr.com/emailsupport/de 0180 567 1548
Greece www.usr.com/emailsupport/gr
Hungary www.usr.com/emailsupport/hu 0180 567 1548
Ireland www.usr.com/emailsupport/uk 1890 252 130
Italy www.usr.com/emailsupport/it 800 979 266
Luxembourg www.usr.com/emailsupport/be 342 080 8318
Middle East/Africa www.usr.com/emailsupport/me 870 844 4546
Netherlands www.usr.com/emailsupport/bn 0900 202 5857
Norway www.usr.com/emailsupport/ea 23 16 22 37
Poland www.usr.com/emailsupport/pl
Portugal www.usr.com/emailsupport/pt 21 415 4034
Russia www.usr.com/emailsupport/ru 8 800 200 20 01
Spain www.usr.com/emailsupport/es 902 117964
Sweden www.usr.com/emailsupport/se 08 5016 3205
Switzerland www.usr.com/emailsupport/de 0848 840 200
Turkey www.usr.com/emailsupport/tk 0212 444 4 877
UAE www.usr.com/emailsupport/me 0800 877 63
UK www.usr.com/emailsupport/uk 0870 844 4546

Français
9
Français
Installation
Contenu de la boîte
Caractéristiques matérielles
Voyants DEL
Face arrière
!5436A Wireless USB Print Server !Guide d'installation rapide
!Adaptateur secteur de commutation !CD-ROM d'installation
Voyant DEL Etat Fonction
LAN
Continu Connexion Ethernet LAN établie.
Clignotant Envoi ou réception de données sur le LAN.
Eteint Pas de connexion au LAN.
WLAN
Continu Connexion Ethernet WAN établie.
Clignotant Envoi ou réception de données sur le
WAN.
Eteint Pas de connexion au WAN.
ACT
Clignotant Envoi ou réception de données.
ERR
Continu Pas de connexion imprimante détectée.
Eteint Imprimante connectée.
Elément Fonction
RESET
Pour rétablir les paramètres par défaut de votre serveur d'impression :
1. Débranchez l'adaptateur secteur du serveur d'impression.
2. Appuyez sur le bouton RESET et maintenez-le enfoncé.
3. Rebranchez l'adaptateur secteur au serveur d'impression.
4. Relâchez le bouton RESET.
Pour imprimer une page d'état, appuyez une fois sur le bouton
RESET
.
LAN
Connecte le serveur d'impression à l'adaptateur Ethernet de votre
ordinateur.
USB
Connecte le serveur d'impression à l'adaptateur USB de votre
ordinateur.
POWER
Connecte le serveur d'impression à l'adaptateur secteur fourni.
WLA N
LAN
ERR
AC T
POWER
P O W E R

10
Français
Configuration requise
!Un ordinateur équipé d'une connexion Ethernet à Internet
!Le CD-ROM d'installation livré avec votre imprimante
!Un navigateur Web compatible HTML 4.01 (tel qu'Internet Explorer 5.5 ou
version ultérieure ou Netscape 8.0 ou version ultérieure) avec activation
Javascript
!Câble Ethernet
!Câble USB
Instructions d'installation
Etape 1 : connexion du Wireless USB Print Server
Remarque : le Wireless USB Print Server doit être connecté à votre réseau à
l'aide d'un câble Ethernet afin de procéder à la configuration
initiale. Après la configuration initiale, vous pouvez établir une
connexion sans fil au réseau.
1. Allumez votre imprimante.
2. Connectez une extrémité du câble USB au port USB de votre imprimante,
puis connectez l'autre extrémité au port USB du serveur d'impression.
3. Connectez une extrémité du câble Ethernet à votre routeur et l'autre
extrémité au port LAN du serveur d'impression.
LAN

Français
11
4. Insérez la fiche standard de votre pays dans l'adaptateur secteur. Appliquez
une pression suffisante pour enclencher et fixer solidement la fiche.
Débranchez l'adaptateur pour insérer la fiche en toute sécurité.
5. Connectez l'adaptateur secteur fourni au port d'alimentation POWER du
serveur d'impression et branchez-le dans une prise de courant standard.
Etape 2 : configuration du Wireless USB Print Server
1. Vérifiez que vous êtes connecté en tant qu'administrateur à votre ordinateur.
Si vous utilisez un compte différent, vous ne pourrez pas installer
correctement le logiciel.
2. Insérez le CD-ROM d'installation USRobotics.
3. Sélectionnez Setup Wizard (Assistant d'installation) et cliquez sur Next
(Suivant).
4. Sélectionnez le Wireless USB Print Server dans la liste et cliquez sur Next
(Suivant).
Suivez les instructions à l'écran pour configurer les paramètres du serveur
d'impression. Assurez-vous de saisir les paramètres adaptés à votre réseau
sans fil, dont le SSID, les informations de sécurité et le type de réseau
(Infrastructure ou AdHoc).
5. Cliquez sur Finish (Terminer).
6. Lorsqu'il vous est demandé d'installer le pilote PTP (Client à Client), cliquez
sur Yes (Oui). Cliquez ensuite sur Next (Suivant) et suivez les instructions à
l'écran.
7. A l'écran de configuration du port d'imprimante, sélectionnez l'imprimante et
cliquez sur Next (Suivant).
"Si le nom de l'imprimante n'est pas dans la liste, cliquez sur Refresh
(Actualiser) jusqu'à ce que le nom de port apparaisse.
8. Sélectionnez l'imprimante dans la liste Existing Printers (Imprimantes
disponibles).
"Si l'imprimante n'apparaît pas, cliquez sur Add New Printer (Ajouter une
nouvelle imprimante) et suivez les instructions à l'écran.
9. Cliquez sur Connect (Connecter).
"Si aucun astérisque n'apparaît à côté du nom de port à l'écran de
configuration du port d'imprimante, cliquez sur Refresh (Actualiser).
Si l'imprimante n'apparaît toujours pas, reportez-vous à la section
« Dépannage » de ce manuel.
Amérique du Nord Royaume-Uni Europe
LAN

12
Français
10. Pour mettre fin à la configuration, cliquez sur Finish (Terminer).
Etape 3 : impression d'une page de test
1. Utilisateurs de Windows XP, 2000 et NT :
oCliquez sur Démarrer > Imprimantes et télécopieurs.
Utilisateurs de Windows Me, 98 et 95 :
1) Cliquez sur Démarrer > Paramètres > Panneau de configuration.
2) Dans la fenêtre du panneau de configuration, cliquez sur Imprimantes
et télécopieurs.
2. Effectuez un clic droit sur l'imprimante que vous venez d'installer, puis
sélectionnez Propriétés.
3. Cliquez sur Imprimer une page de test. Votre imprimante imprimera une
page de test si l'installation a réussi. Si aucune page de test n'est imprimée,
reportez-vous à la section « Dépannage » de ce manuel.
Etape 4 : configuration du serveur d'impression pour une connexion sans
fil
Vous pouvez désormais accéder aux fonctions sans fil du Wireless USB Print
Server.
1. Déconnectez le câble Ethernet et l'adaptateur secteur du serveur
d'impression.
2. Reconnectez l'adaptateur secteur et redémarrez le serveur d'impression. Le
serveur d'impression établit alors une connexion sans fil vers votre point
d'accès ou routeur sans fil.
3. Recommencez la procédure à partir de l'Etape 3 : impression d'une page de test.
Si vous ne pouvez pas imprimer la page de test, c'est qu'il y a un problème
avec votre connexion sans fil. Reportez-vous à la section Dépannage de ce
manuel.
Etape 5 : connexion des clients au Wireless USB Print Server
Pour permettre à d'autres ordinateurs connectés à votre réseau d'imprimer à
l'aide du Wireless USB Print Server, vous devez effectuer la procédure
d'installation de client sur chaque ordinateur.
Remarque : vous aurez peut-être besoin du CD-ROM d'installation livré avec
votre imprimante.
1. Insérez le CD-ROM d'installation U.S. Robotics dans votre lecteur de
CD-ROM.
2. Cliquez sur Additional Installs (Installations supplémentaires), puis sur Next
(Suivant).
3. Cliquez sur User (Utilisateur), puis suivez les instructions à l'écran pour
installer le logiciel du serveur d'impression.
4. Lorsque vous y êtes invité, sélectionnez l'imprimante et cliquez sur Next
(Suivant).
5. Sélectionnez l'imprimante dans la liste Existing Printers (Imprimantes
disponibles).
"Si l'imprimante n'apparaît pas, cliquez sur Add New Printer (Ajouter une
nouvelle imprimante) et suivez les instructions à l'écran.
6. Cliquez sur Close (Fermer).
Félicitations ! L'installation a réussi. Veuillez enregistrer votre Wireless USB
Print Server à l'adresse :
www.usr.com/productreg/
.

Français
13
Dépannage
Pour obtenir de l'assistance sur Macintosh et sur Linux, reportez-vous à la
section Dépannage du guide d'utilisation sur le CD-ROM d'installation.
Procédure basique de dépannage
Cette procédure permet de résoudre certains problèmes que vous pourriez
rencontrer avec votre serveur d'impression :
1. Vérifiez les connexions physiques des câbles entre le serveur d'impression,
l'imprimante, votre routeur et la prise de courant.
2. Vérifiez que la prise de courant à laquelle le serveur d'impression est branché
est active.
3. Reportez-vous aux descriptions des voyants DEL au début de ce guide,
puis inspectez les voyants DEL du serveur d'impression pour vérifier que
l'appareil est sous tension et qu'aucune erreur d'impression ne s'est produite.
Si les problèmes persistent, suivez la procédure ci-dessous qui correspond le
mieux à votre problème.
Mon assistant d'installation ne parvient pas à détecter le
Wireless USB Print Server.
Solution :
Rétablissez les paramètres par défaut du serveur d'impression et recommencez la
procédure d'installation. Pour rétablir les paramètres par défaut :
1. Débranchez l'adaptateur secteur du serveur d'impression.
2. Appuyez sur le bouton RESET et maintenez-le enfoncé.
3. Rebranchez l'adaptateur secteur au serveur d'impression.
4. Relâchez le bouton RESET.
A la fin de l'installation, un message s'affiche : « Network
busy, or device not found » (Réseau occupé ou périphérique
introuvable).
Solution :
Dans le menu principal du CD-ROM d'installation U.S. Robotics, cliquez sur
Additional Installs (Installations supplémentaires), puis cliquez sur User
(Utilisateur). Suivez les instructions à l'écran pour continuer la procédure
d'installation.
Mon Wireless USB Print Server n'apparaît pas à l'écran de
configuration du port d'imprimante.
Solution :
Rétablissez les paramètres par défaut du serveur d'impression et recommencez la
procédure d'installation. Pour rétablir les paramètres par défaut :

14
Français
1. Débranchez l'adaptateur secteur du serveur d'impression.
2. Appuyez sur le bouton RESET et maintenez-le enfoncé.
3. Rebranchez l'adaptateur secteur au serveur d'impression.
4. Relâchez le bouton RESET.
Je ne parviens pas à ajouter mon imprimante avec l'Assistant
Ajout d'imprimante.
Solution :
Votre imprimante n'est peut-être pas compatible avec le Wireless USB Print
Server. Fermez toutes les fenêtres de configuration du serveur d'impression, puis
déconnectez l'imprimante du serveur d'impression.
1. Installez l'imprimante sur votre ordinateur en suivant les instructions du
fabricant de l'imprimante.
2. Une fois que vous avez terminé, reconnectez l'imprimante au serveur
d'impression.
3. Cliquez sur Démarrer > Tous les programmes > U.S. Robotics Print Server >
Print Driver Setup (Configuration du pilote d'impression).
4. Suivez les instructions à l'écran pour terminer l'installation.
Je ne parviens pas à imprimer une page de test.
Solution :
1. Utilisateurs de Windows XP, 2000 et NT :
oCliquez sur Démarrer > Imprimantes et télécopieurs.
Utilisateurs de Windows Me, 98 et 95 :
1) Cliquez sur Démarrer > Paramètres > Panneau de configuration.
2) Dans la fenêtre du panneau de configuration, cliquez sur Imprimantes
et télécopieurs.
2. Effectuez un clic droit sur l'imprimante que vous venez d'installer,
sélectionnez Propriétés, et cliquez sur l'onglet Ports.
3. Assurez-vous que le port du serveur d'impression est sélectionné. Si ce n'est
pas le cas, sélectionnez-le, cliquez sur Appliquer, puis sur OK. A présent, vous
devriez pouvoir imprimer une page de test.
Je ne parviens pas à imprimer via une connexion sans fil, ou
le Wireless USB Print Server ne se connecte pas à mon
réseau sans fil.
Solution 1:
Vérifiez que le SSID et les informations de sécurité correspondent bien aux
paramètres du routeur sans fil sur votre réseau. Si ce n'est pas le cas, vous ne
pourrez pas établir de connexion au réseau sans fil. Si vous souhaitez modifier
la configuration, vous devez connecter le serveur d'impression à votre routeur à
l'aide d'un câble Ethernet.
Solution 2:
Vérifiez que votre routeur ou point d'accès utilise uniquement le protocole
de sécurité WEP ou WPA-PSK avec TKIP. Le Wireless USB Print Server
est compatible avec ces deux types de sécurité uniquement.

Français
15
J'ai créé un nouveau réseau sans fil et mon Wireless USB
Print Server ne parvient pas à se connecter.
Solution :
1. Insérez le CD-ROM d'installation U.S. Robotics dans votre lecteur de
CD-ROM.
2. Cliquez sur Setup Wizard (Assistant d'installation) et suivez les instructions
à l'écran.
3. Lorsque vous accédez aux écrans de configuration des paramètres sans fil,
saisissez les informations correspondant au nouveau réseau sans fil.
J'ai installé mon imprimante multifonctions, mais les
fonctionnalités fax et scanner ne sont pas disponibles.
Solution :
Si vous connectez une imprimante multifonctions (imprimante/fax/scanner) au
serveur d'impression, seule la fonctionnalité d'impression sera disponible.
J'ai essayé d'installer le logiciel pour l'impression PTP
(Client à Client), mais un message d'erreur s'est affiché et
l'installation a échoué.
Solution :
Si vous avez précédemment installé le logiciel du Wireless USB Print Server, vous
devrez le désinstaller avant de pouvoir installer le logiciel PTP.
1. Cliquez sur Démarrer > Tous les programmes > Print Server (Serveur
d'impression).
2. Sélectionnez Uninstall (Désinstaller) puis suivez les instructions à l'écran.
3. Lorsque la désinstallation est terminée, vous devez redémarrer votre
ordinateur. Vous pourrez alors installer le logiciel PTP.
Informations complémentaires
Pour obtenir plus d'informations sur les mentions légales et la garantie,
reportez-vous au Guide de l'utilisateur sur le CD-ROM d'installation d'USRobotics.
Pour obtenir plus d'informations sur le fonctionnement et la
configuration, reportez-vous au Guide de l'utilisateur sur le CD-ROM
d'installation d'USRobotics.
Pour des conseils de dépannage ou une assistance technique :
1. Reportez-vous au Guide de l'utilisateur sur le CD-ROM d'installation
d'USRobotics.
2. Accédez à la section Support du site Web d'USRobotics à l'adresse :
www.usr.com/support/.

16
Français
Vous trouverez des réponses à la plupart des problèmes rencontrés par les
utilisateurs dans les pages Web FAQ et Dépannage consacrées à votre serveur
d'impression. Les pages d'assistance contiennent également des informations
sur les microcodes les plus récents et les mises à jour de documentation.
3. Posez votre question à l'assistance technique à l'aide du formulaire en ligne ou
contactez le service d'assistance technique d'USRobotics.
Numéro de modèle Numéro de série
5436A
Pays Adresse Web Téléphone
Autriche www.usr.com/emailsupport/de 07110 900 116
Belgique (Flamand) www.usr.com/emailsupport/bn 070 23 35 45
Belgique (Français) www.usr.com/emailsupport/be 070 23 35 46
République tchèque www.usr.com/emailsupport/cz
Danemark www.usr.com/emailsupport/ea 38323011
Finlande www.usr.com/emailsupport/ea 08 0091 3100
France www.usr.com/emailsupport/fr 0825 070 693
Allemagne www.usr.com/emailsupport/de 0180 567 1548
Grèce www.usr.com/emailsupport/gr
Hongrie www.usr.com/emailsupport/hu 0180 567 1548
Irlande www.usr.com/emailsupport/uk 1890 252 130
Italie www.usr.com/emailsupport/it 800 979 266
Luxembourg www.usr.com/emailsupport/be 342 080 8318
Moyen-Orient/Afrique www.usr.com/emailsupport/me 870 844 4546
Pays-Bas www.usr.com/emailsupport/bn 0900 202 5857
Norvège www.usr.com/emailsupport/ea 23 16 22 37
Pologne www.usr.com/emailsupport/pl
Portugal www.usr.com/emailsupport/pt 21 415 4034
Russie www.usr.com/emailsupport/ru 8 800 200 20 01
Espagne www.usr.com/emailsupport/es 902 117964
Suède www.usr.com/emailsupport/se 08 5016 3205
Suisse www.usr.com/emailsupport/de 0848 840 200
Turquie www.usr.com/emailsupport/tk 0212 444 4 877
EAU www.usr.com/emailsupport/me 0800 877 63
Royaume-Uni www.usr.com/emailsupport/uk 0870 844 4546
Table of contents
Languages:
Other US Robotics Print Server manuals