Utilitech FSI UT-312-2000BRZ User manual
PREPARATION/PREPARACIÓN
FEELING CONFIDENT? START YOUR NEXT
PROJECT/¿SE SIENTE CONFIADO? EMPIECE
SU PRÓXIMO PROYECTO
• Before beginning assembly of product, make sure all parts are present. Compare parts with package contents list and hardware contents list. If any part is missing
or damaged, do not attempt to assemble the product./ Antes de comenzar a ensamblar el producto, asegúrese de tener todas las piezas. Compare las piezas con
la lista del contenido del paquete y la lista de aditamentos. No intente ensamblar el producto si falta alguna pieza o si estas están dañadas.
• At an ambient temperature of 77°F, RH 30%-80%, the motion detection distance is at max. (up to 25-ft.) As the temperature increases or decreases, the motion
detection distance will be aected./ A una temperatura ambiente de 25°C, humedad relativa de 30% a 80%, la distancia de detección de movimiento está al máximo
(hasta 7,62 m). A medida que la temperatura aumenta o disminuye, se verá afectada la distancia de detección de movimiento.
• To reduce possible nuisances, do not mount the xture near a heat source like an air conditioner, vent, or furnace exhaust, or in a direction facing any reective
object or other nearby light source./ Para reducir posibles molestias, no monte la lámpara cerca de una fuente de calor, como un aire acondicionado, un tubo de
ventilación o un escape de horno, o en una dirección orientada a un objeto reectante o a una fuente de luz cercana.
• Make sure there are no reective objects within 1.5m radius of the sensor head, otherwise, it will cause ashing lights./ Asegúrese de que no haya objetos
reectantes en un radio de 1,5 m del cabezal del sensor; de lo contrario, se producirán luces intermitentes.
Estimated Assembly Time: 20 minutes per light
Tiempo estimado de ensamblaje: 20 minutos por luz
TOOLS REQUIRED (NOT INCLUDED)/
HERRAMIENTAS NECESARIAS (NO SE INCLUYEN)
SAFETY INFO/INFORMACIÓN DE SEGURIDAD
IMPORTANT INFO/INFORMACIÓN IMPORTANTE
SENSOR HEAD ADJUSTMENT/
AJUSTE DEL CABEZAL DEL SENSOR BATTERY REPLACEMENT/REEMPLAZO DE LA BATERÍA
• Your motion light is not a toy. Keep it out of reach from small children./ Su luz con detector de movimiento no es un juguete. Manténgala alejada del alcance de
niños pequeños.
• Your solar panel must be installed where it can receive direct light from the sun./ Su panel solar debe instalarse donde pueda recibir luz solar directa.
• If using a step ladder, you may require a second person to help install the solar motion light./ Si utiliza una escalera de tijera para instalar la luz solar con detector
de movimiento, puede que necesite ayuda.
• Prior to installation, lay out all components and check against the part list section in this manual./ Antes de la instalación, disponga todos los componentes y
compárelos con la sección de la lista de piezas de este manual.
• CAUTION! Never look directly into the solar motion light when illuminated./¡PRECAUCIÓN! Nunca mire directamente a la luz solar con detector de movimiento
cuando esté encendida.
• Ensure the solar panel is placed where it is exposed to optimal sunlight./ Asegúrese de que el panel solar esté colocado donde esté expuesto a la luz solar óptima.
• Be aware of objects such as trees or property overhangs that may impede the panel’s ability to generate a charge./ Tenga cuidado con los objetos que pueden
impedir la capacidad del panel de generar carga.
• Aim sensor head toward desired detection area./
Apunte el cabezal del sensor hacia el área de detección
deseada.
When replacing the batteries, be sure to/Al reemplazar las baterías, asegúrese de:
• Use rechargeable batteries only. Replace only with lithium-ion 3.7V 2200mAh rechargeable
batteries, 2 batteries needed./ Use solo baterías recargables. Reemplace solo con baterías
recargables de iones de litio de 3,7 V y 2200 mAh, se necesitan 2 baterías.
• Match the replacement battery specications with the batteries that have been removed./ Haga
coincidir las especicaciones de la batería de reemplazo con las de las baterías que se retiraron.
• Observe the correct polarity (+ and -) when installing the replacement batteries./Tenga en cuenta
la polaridad correcta (+ y -) durante la instalación de las baterías de reemplazo.
• Do not mix old and new batteries and do not mix alkaline, standard (carbon-zinc) or rechargeable
(ni-cad, ni-mh etc.) batteries. / No mezcle baterías viejas y nuevas. No mezcle baterías alcalinas,
estándar (carbono-zinc) o recargables (níquel-cadmio, níquel-hidruro metálico, etc).
•IMPORTANT: Dispose of the Lithium-ion batteries in accordance with local, state, and federal
regulations./ IMPORTANTE: deseche las baterías de iones de litio de acuerdo con los
reglamentos locales, estatales y federales.
Thank you for purchasing this
Utilitech
product. We’ve created these easy-to-follow instructions to ensure you spend your time enjoying the product instead of
putting it together. But, if you need more information than what is provided here, please visit Lowes.com, search the item number and refer to the Guides &
Documents tab on the product’s page.
If the item is no longer for sale, or if you have any questions or problems, please call our customer service department at 1-866-994-4148, 8 a.m. - 8 p.m., EST,
Monday - Sunday. You could also contact us at [email protected] or visit www.lowespartsplus.com.
Gracias por comprar este producto Utilitech. Hemos creado estas instrucciones fáciles de seguir para garantizar que pase su tiempo disfrutando el producto
en lugar de armándolo. No obstante, si necesita más información que la entregada aquí, visite Lowes.com, busque el número de artículo y consulte la pestaña
Guides & Documents (Guías y documentos) en la página del producto.
Si el artículo ya no está a la venta o si tiene alguna pregunta o problema, llame a nuestro Departamento de Servicio al Cliente al 1-866-994-4148, de lunes a
domingos de 8 a.m a 8 p.m, hora estándar del Este. También puede comunicarse con nosotros a través de [email protected] o visitar www.lowespartsplus.
com.
RR21033
ITEM/ARTÍCULO #3832074
MODEL/MODELO #FSI UT-312-2000BRZ
MOTION-ACTIVATED SOLAR
SECURITY LIGHT/
LUZ DE SEGURIDAD
SOLAR ACTIVADA POR
MOVIMIENTO
120° / 25ft
UTILITECH and logo
design are trademarks
or registered trademarks
of LF, LLC. All right
reserved.
UTILITECH y el diseño
del logotipo son marcas
comerciales o marcas
registradas de LF, LLC.
Todos los derechos
reservados.
1. Where should the motion light be placed?/ ¿Dónde debe colocarse la luz con detector de movimiento?
Place your motion light in driveways, backyards, gardens or anywhere light is needed./ Coloque su luz con detector de movimiento en entradas de vehículos,
patios posteriores, jardines o en cualquier lugar donde se necesite luz.
2. Does the solar panel require direct sun to charge?/ ¿El panel solar requiere luz solar directa para cargarse?
The solar panel will charge the internal batteries in direct and indirect light. For best results, try to optimize your solar panel's sun exposure./ El panel solar cargará
las baterías internas con luz directa e indirecta. Para obtener los mejores resultados, pruebe optimizar la exposición al sol de su panel solar.
3. Will decorative lights or streetlights have an eect on the motion sensor's ability to operate?/ ¿Tendrán las luces decorativas o las farolas un efecto sobre la
capacidad de funcionamiento del sensor de movimiento?
Yes, the sensor of the motion light is light-sensitive. For best results, ensure no other light activates the motion sensor./ Sí, el sensor del detector de movimiento es
sensible a la luz. Para obtener los mejores resultados, asegúrese de que ninguna otra luz active el detector de movimiento.
4. What type of battery does the motion light require to operate?/ ¿Qué tipo de batería requiere la luz con detector de movimiento para funcionar?
The motion light requires 2 pcs of lithium-ion 3.7V 2200mAh rechargeable batteries./ La luz con detector de movimiento requiere 2 baterías recargables de iones
de litio de 3,7 V y 2200 mAh.
FREQUENTLY ASKED QUESTIONS/PREGUNTAS FRECUENTES
CARE AND MAINTENANCE/CUIDADO Y MANTENIMIENTO
• It is advisable to adjust the angle of the solar panel for optimal sun exposure during the winter months./ Es recomendable ajustar el ángulo del panel solar para
una exposición óptima al sol durante los meses de invierno.
• The solar panel should be cleaned with a damp cotton cloth on a regular basis. This will ensure optimal performance and battery charging. Periodically, utilize the
same technique to clean the lenses of the motion lights./ El panel solar debe limpiarse con un paño de algodón húmedo de forma periódica. Esto garantizará que
la carga de la batería y el rendimiento sean óptimos. Utilice la misma técnica periódicamente para limpiar las micas de las luces con detector de movimiento.
• Never let any abrasive material come into contact with the solar panel./ Nunca permita que un material abrasivo entre en contacto con el panel solar.
• Please do not open or repair the product by yourself without support of a professional engineer./ No abra ni repare el producto usted mismo sin la ayuda de un
ingeniero profesional.
WARRANTY/GARANTÍA
This product is covered under a 2-year limited warranty. Manufacturer warrants to the original purchaser that this product is free from defects in materials and
workmanship for the period of 2 years from the date of purchase. The included batteries are not covered under this warranty. Proof of purchase including date and
explanation of complaint is required for warranty service./ Este producto está cubierto por una garantía limitada de 2 años. El fabricante garantiza al comprador
original que este producto no presentará defectos ni en los materiales ni de fabricación durante 2 años a partir de la fecha de compra. Esta garantía no cubre la
baterías que se incluye. Para obtener servicio de garantía, se requiere una prueba de compra donde se incluya la fecha y la explicación de la queja.
Printed in China
Impreso en China
• Visit Lowes.com for more information.
/Para obtener más
información, visite Lowes.com.
1/4-in
Bit/Broca
de 1/4 pulg.
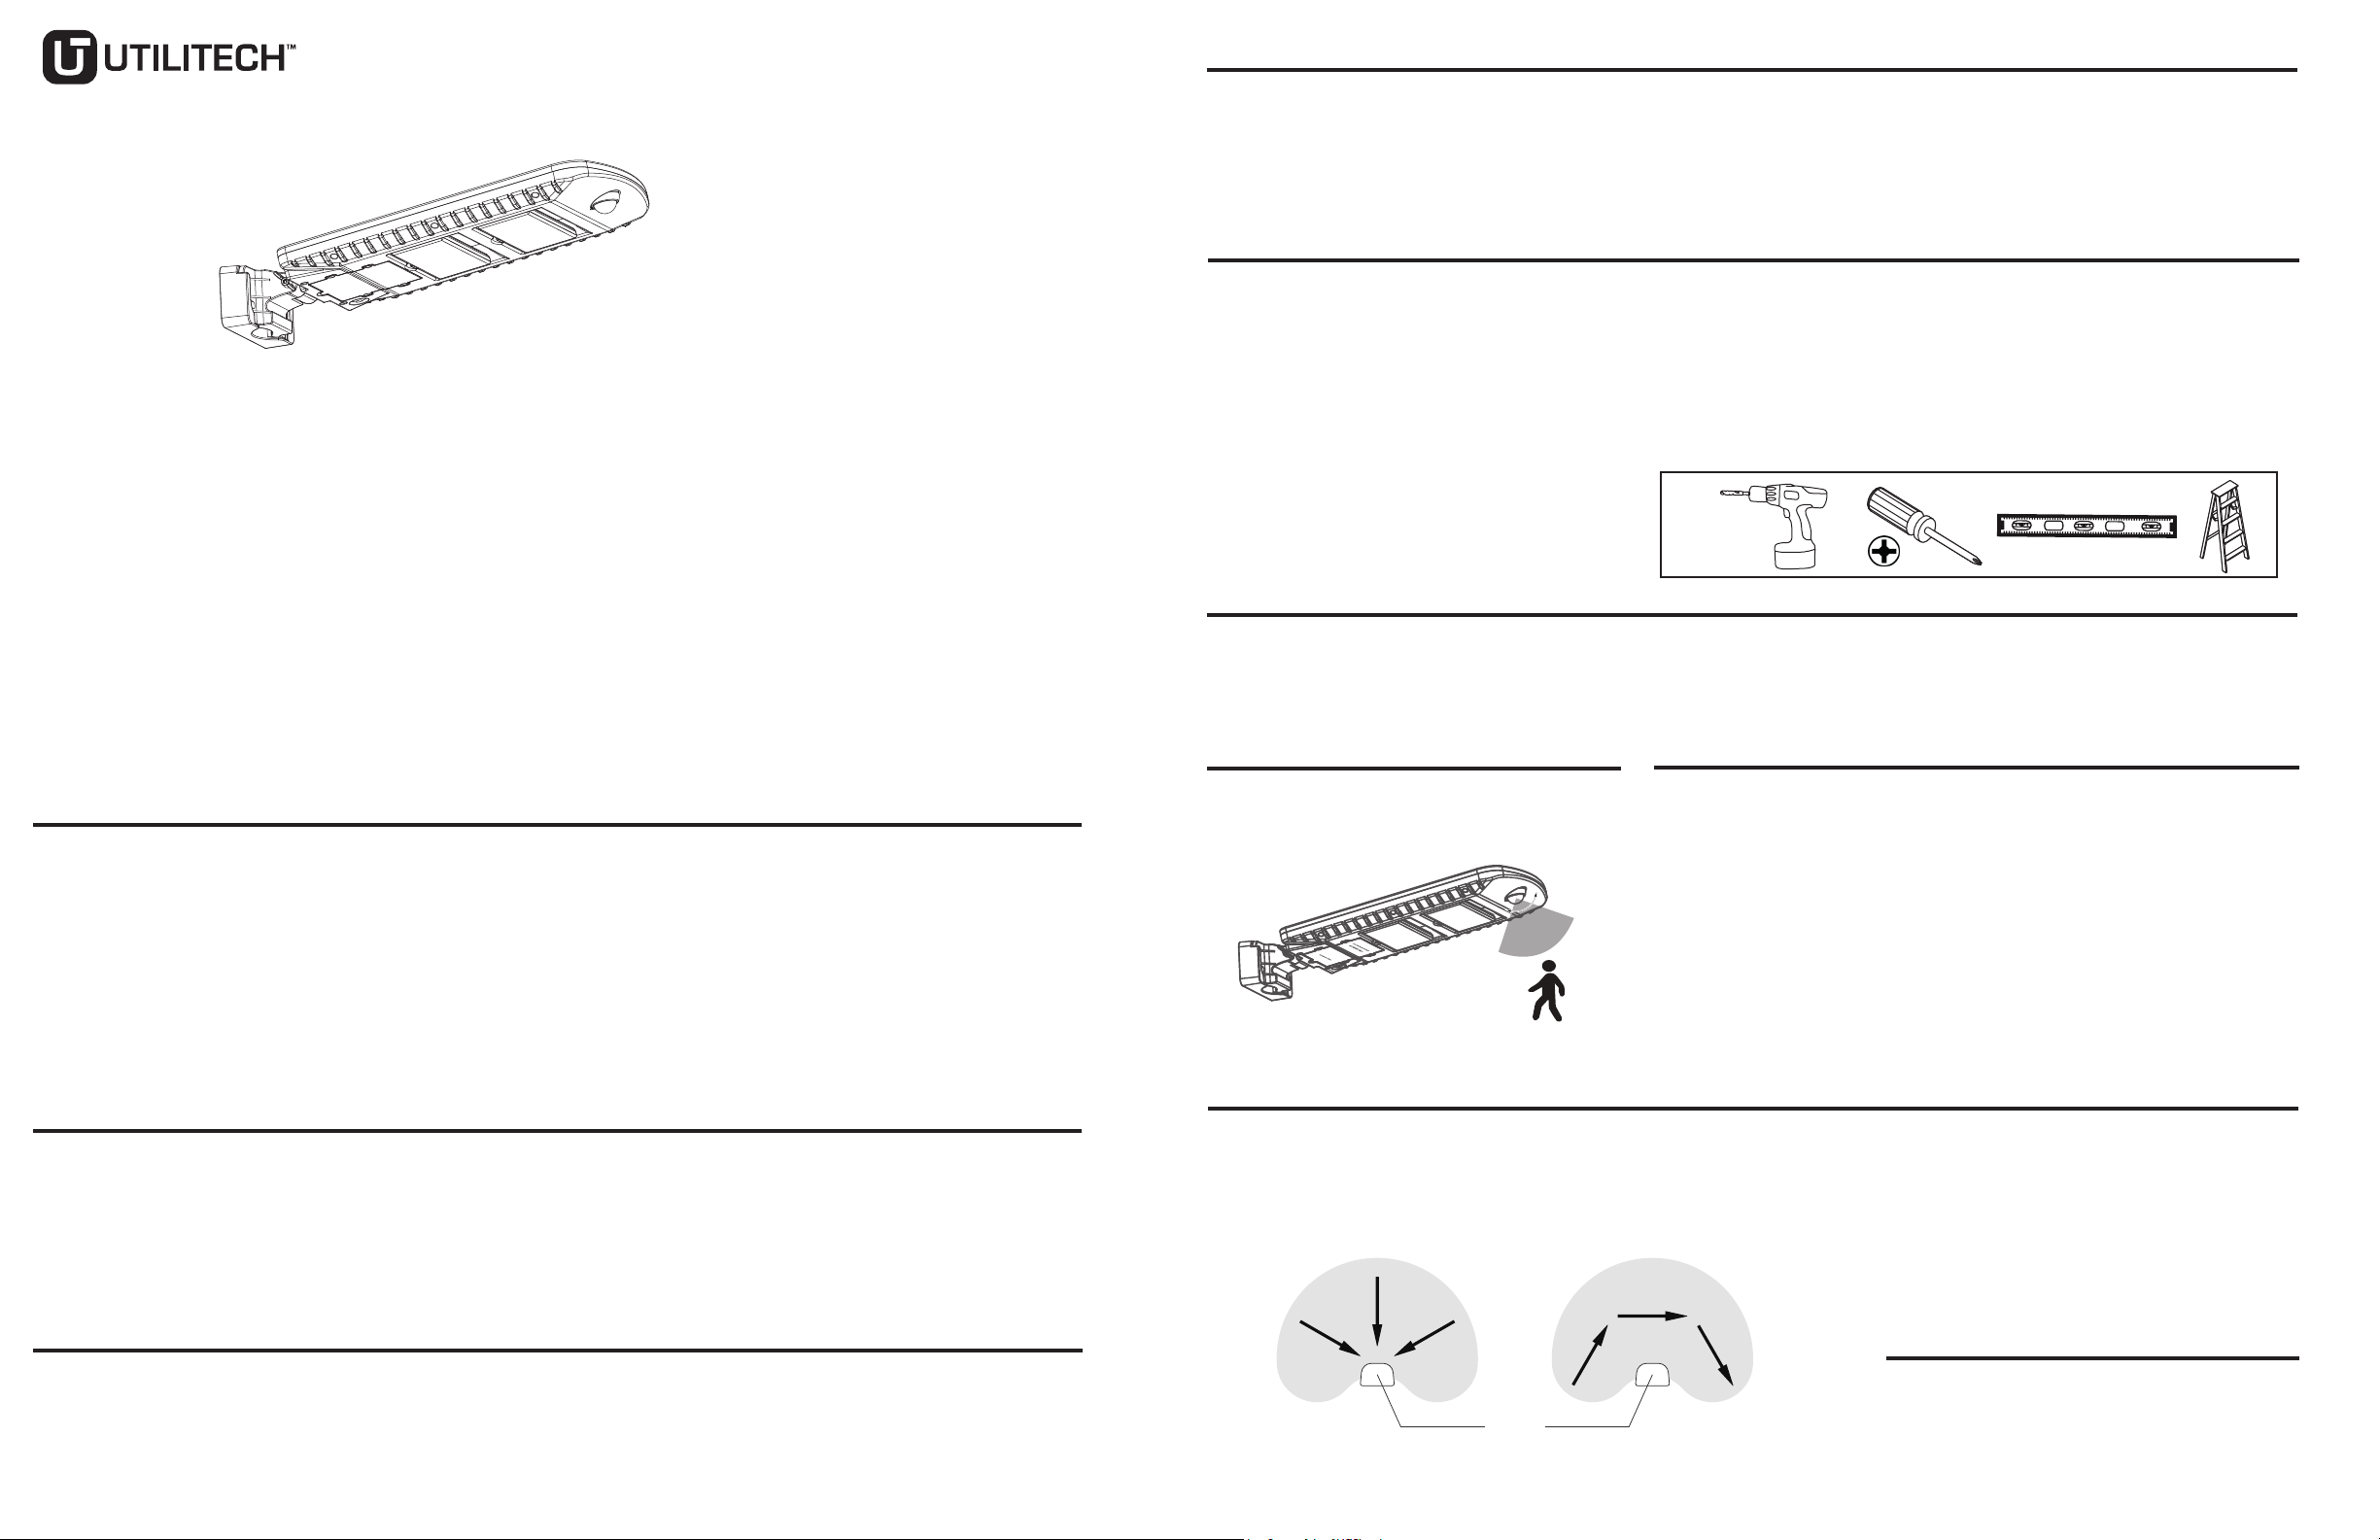
RECOMMENDED INSTALL HEIGHT/ALTURA DE INSTALACIÓN RECOMENDADA
8-12 feet above the ground. At such a height, the xture will provide a detection distance of up to 25 feet at 77°F. The motion sensor is the most sensitive if a
person or object moves parallel to the sensor head. The motion sensor is the least sensitive if a person or object moves directly at the sensor head./ 2,43 m a
3,65 m sobre el piso. A esa altura, la lámpara proporcionará una distancia de detección de hasta 7,62 m a 25 °C. El detector de movimiento es más sensible
si una persona u objeto se mueven en paralelo al cabezal del detector. El detector de movimiento es menos sensible si una persona u objeto se mueven en
dirección al cabezal del detector.
Motion/Movimiento
Least Sensitive/
Menos sensible
Most Sensitive/
Más sensible
Sensor
Sensor
Motion/Movimiento
120° / 25-ft/
120° / 7,62 m
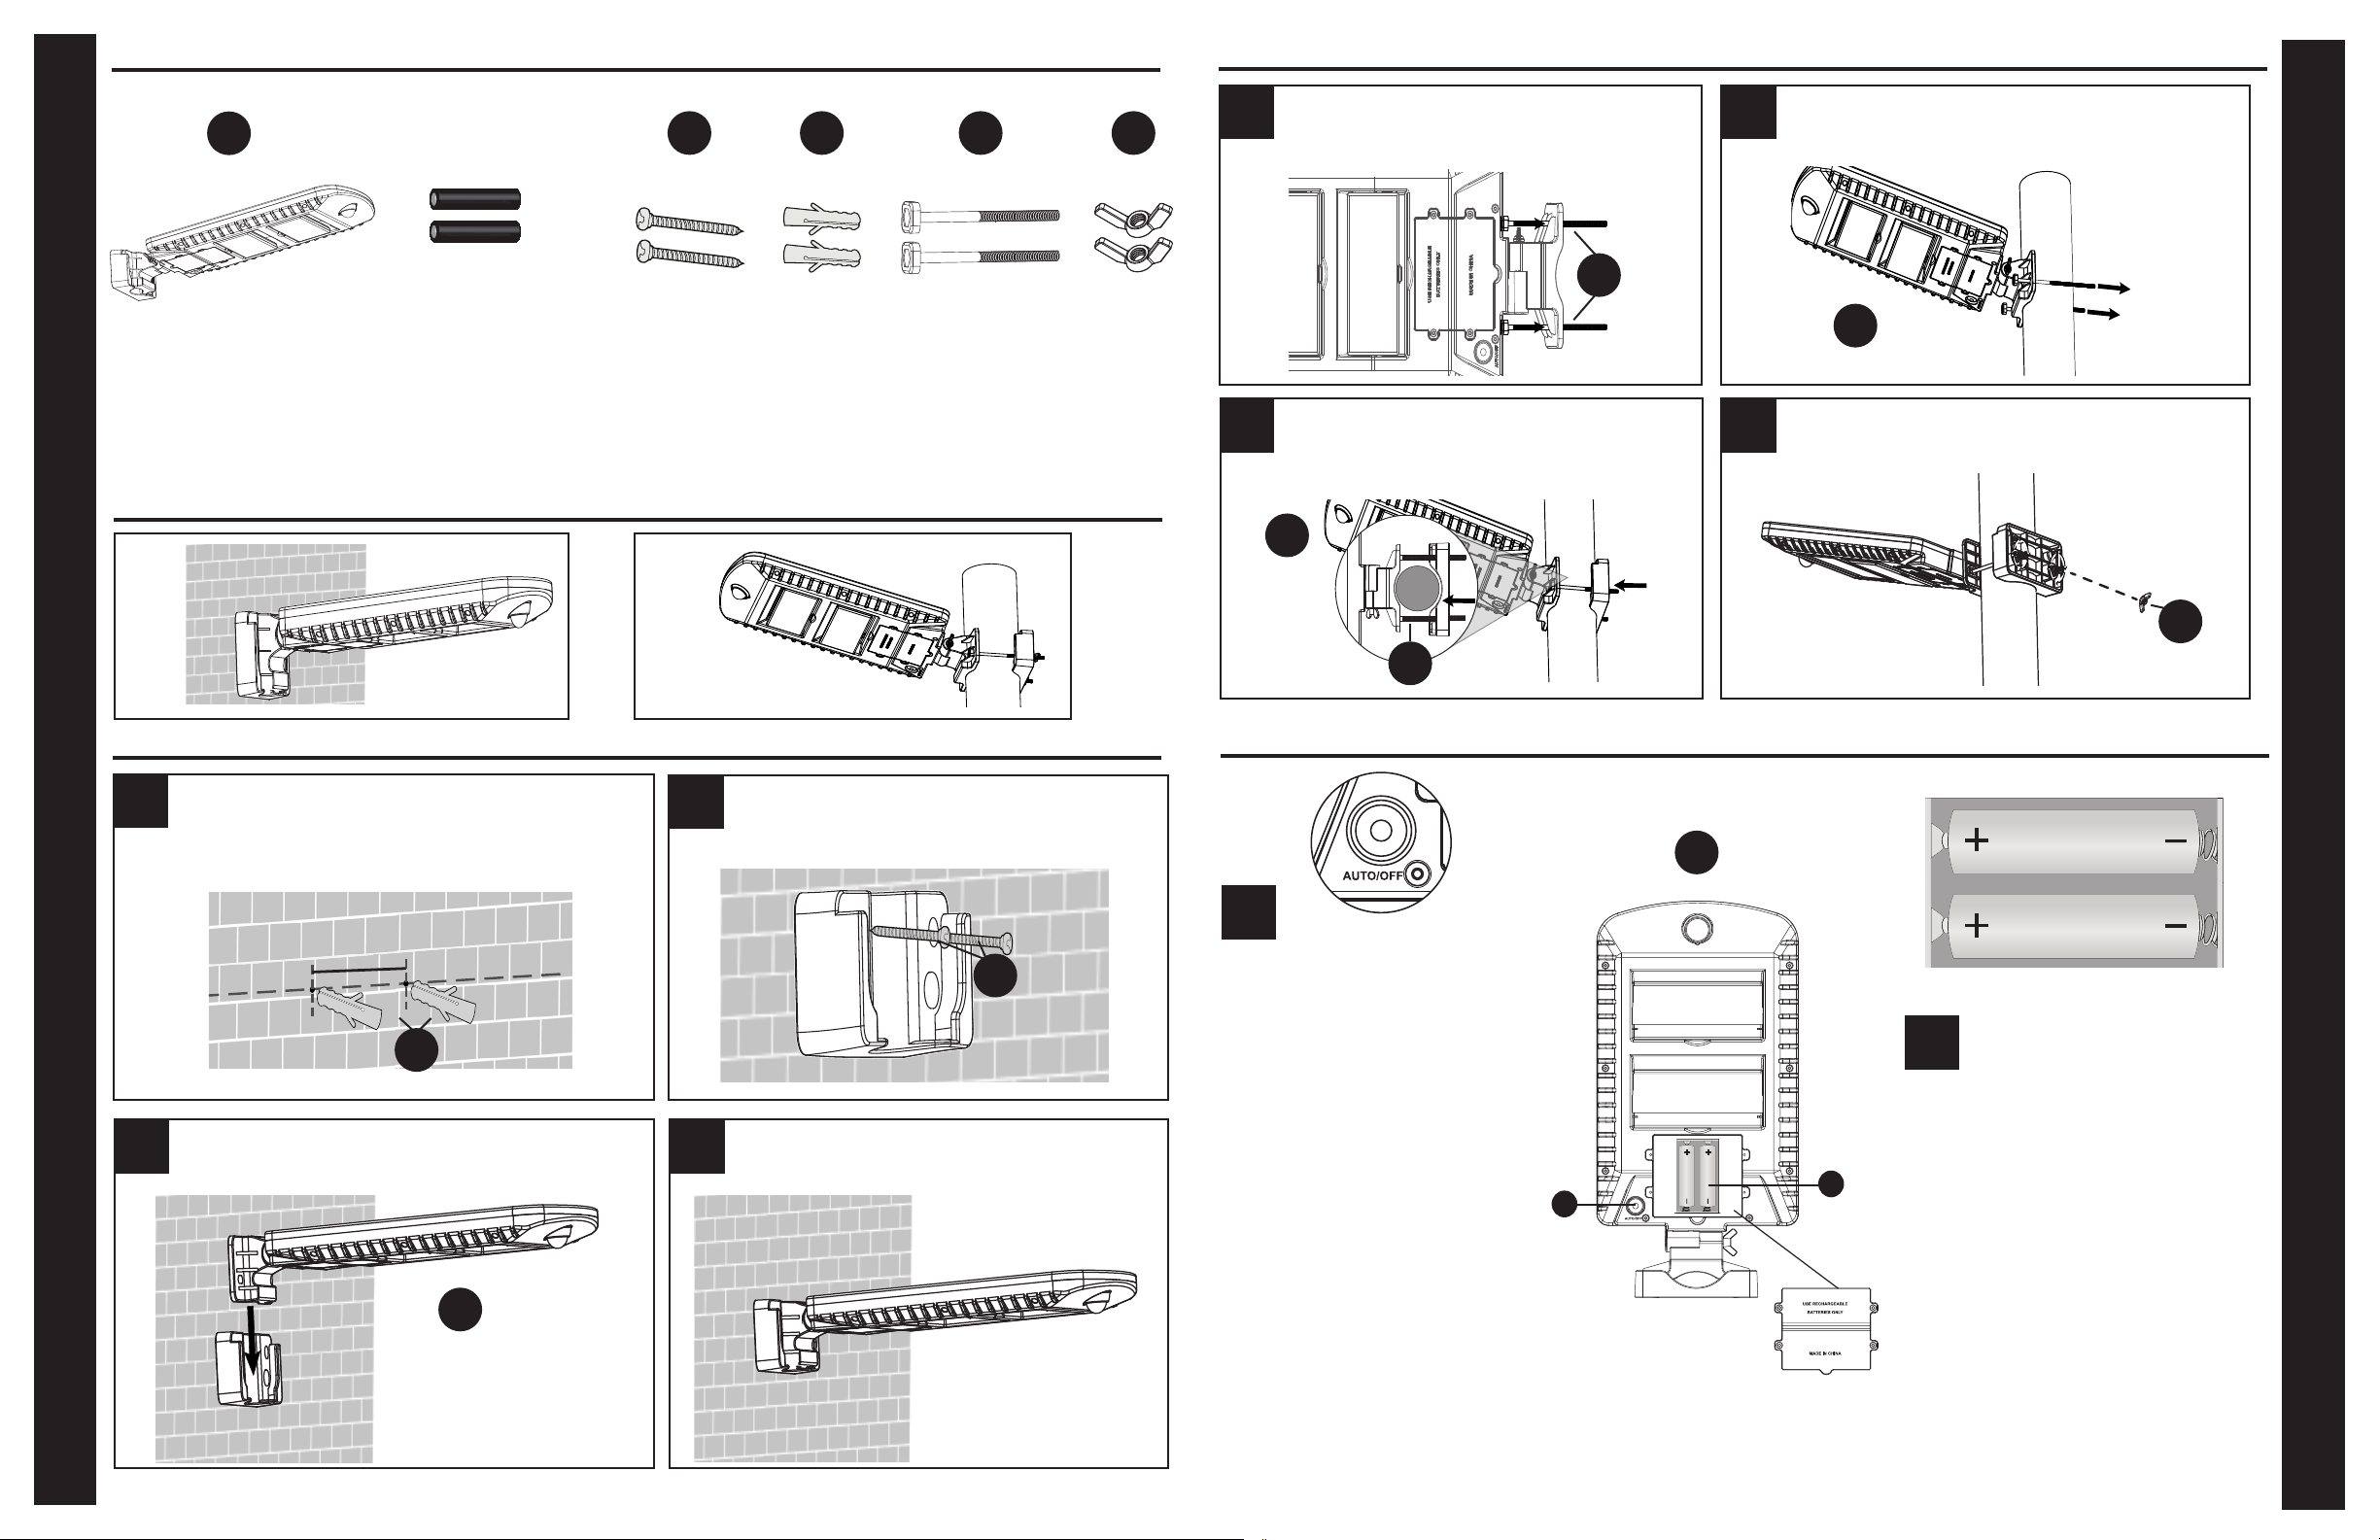
MULTIPLE MOUNTING OPTIONS/MÚLTIPLES OPCIONES DE MONTAJE
WALL MOUNT INSTALLATION/INSTALACIÓN CON MONTAJE EN LA PARED
12
QUICK REFERENCE GUIDE/GUÍA DE REFERENCIA RÁPIDA
QUICK REFERENCE GUIDE/GUÍA DE REFERENCIA RÁPIDA
Drill 2 holes on the chosen surface (distance between the
holes is 3.48 in). Insert 2 screw anchors BB into the holes./
Taladre 2 oricios en la supercie elegida (la distancia entre
los oricios es de 8,85 cm). Inserte 2 anclas de expansión para
tornillos BB en los oricios.
Use 2 mounting screws AA to mount the plate onto wall./
Utilice 2 tornillos de montaje AA para montar la placa en
la pared.
3.48in/88,5mm
BB
AA
WALL
PARED
POLE
VARILLA
x 2x 2 x 2x 2 x 2
HARDWARE CONTENTS/ADITAMENTOS
AA CCBB DD
POLE MOUNT INSTALLATION/INSTALACIÓN DE MONTAJE CON VARILLA
CONTROL SWITCH OPERATION & BATTERY LOCATION/FUNCIONAMIENTO DEL INTERRUPTOR DE CONTROL
Y UBICACIÓN DE LA BATERÍA
1
5
6
3
3
2
4
4
Thread 2 long machine screws CC through the holes
on the motion light./ Enrosque 2 tornillos para metal
largos CC a través de los oricios de la luz con
detector de movimiento.
Slide the mounting plate onto the end of the machine
screws CC (pole diameter less than 2.76 in)./ Deslice
la placa de montaje en el extremo de los tornillos para
metal CC (diámetro de la varilla inferior a 7,01 cm).
Prior to using your solar motion light, initial
charge is needed. This initial charge should
be done in the OFF position. After 3 days,
the included batteries will have enough
power for operation. Place the light in the
AUTO position. At dusk, it will illuminate
automatically in low-level dusk-to-dawn
brightness. When the PIR motion sensor
is activated, it will automatically light up
to full brightness for a certain time (30s).
Then after no motion, it returns back to the
low-level dusk-to-dawn brightness mode./
Antes de usar su luz solar con detector de
movimiento, se necesita una carga inicial.
Esta carga inicial debe realizarse en la
posición OFF (apagado). Después de 3 días,
las baterías incluidas tendrán suciente
energía para funcionar. Coloque la luz en la
posición AUTO (automático). Al
anochecer, se iluminará automáticamente
en un nivel bajo de brillo desde el
anochecer hasta el amanecer. Cuando se
activa el detector de movimiento PIR, se
iluminará automáticamente hasta alcanzar
el brillo total durante un tiempo
determinado (30 s). Luego, después de que
no haya movimiento, regresa al modo de
brillo de bajo nivel de anochecer a
amanecer.
Batteries are located in the battery housing
next to the LED panels. Turn the light to the
OFF position on the light prior to opening the
battery housing. Remove the screws to reveal
the batteries./ Las baterías están ubicadas en
la carcasa de la batería junto a los paneles
LED. Ajuste la luz en la posición OFF
(apagado) antes de abrir la carcasa de la
batería. Retire los tornillos para ver las
baterías.
CAUTION/PRECAUCIÓN:
Refer to Battery Replacement Instructions
for information on replacing the batteries./
Consulte las Instrucciones de reemplazo de las
baterías para obtener información sobre cómo
reemplazar las baterías.
Slide the light A down into the mounting plate./
Deslice la luz A hacia abajo en la placa de montaje.
Place the motion light A against the pole./ Coloque la luz
con detector de movimiento A contra la varilla.
Secure the light onto the pole with 2 wing nuts DD./
Asegure la luz a la varilla con 2 tuercas mariposa DD.
Installation complete./ Se completó la instalación.
CC
CC
DD
A
A
A
5
A
6
Pre-Installed
Preinstaladas
PACKAGE CONTENTS/CONTENIDO DEL PAQUETE
x 1
A
+-
+-
This manual suits for next models
1
Other Utilitech Outdoor Light manuals


Popular Outdoor Light manuals by other brands


Lighthub Direct
Lighthub Direct BHRO10PIR installation instructions

LIGMAN
LIGMAN MARVIK 4 MV-30031 installation manual

LightPro
LightPro Tiga DL user manual

STEINEL
STEINEL L 260 LED installation instructions

Kenroy Home
Kenroy Home SIMPLICITY 30100ORB Use and care guide

Lake Lite
Lake Lite LL-SPL-8 series instructions


