V-TAC VT-5136 User manual

R
TABLE OF CONTENTS
ENGLISH........................................................................1-8
FRENCH.........................................................................9-12
GERMAN........................................................................13-16
BULGARIAN...................................................................17-20
CROATIAN......................................................................21-24
SPANISH.........................................................................29-32
HUNGARIAN...................................................................33-36
ITALIAN...........................................................................37-40
POLISH ..........................................................................45-48
ROMANIAN.....................................................................49-52
CZECH............................................................................53-56
GREEK ...........................................................................41-44
PORTUGUESE...............................................................25-28

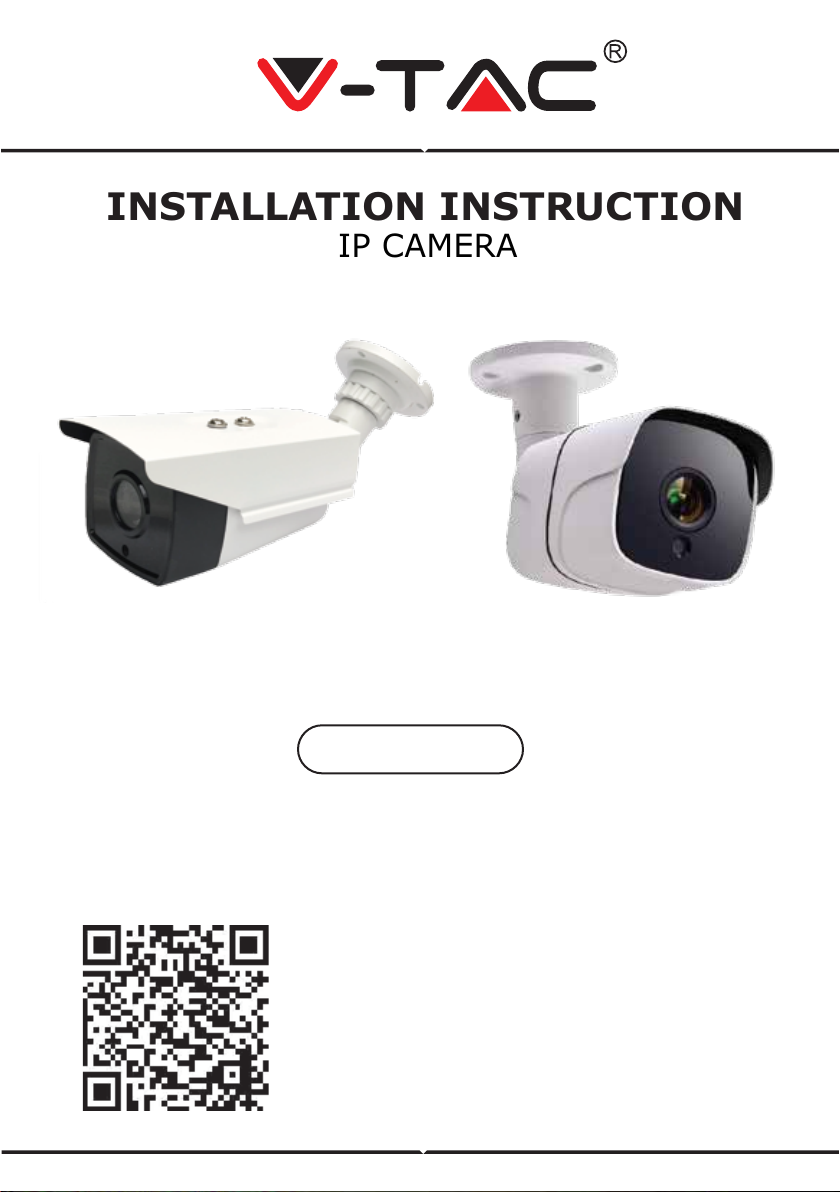
INSTALLATION INSTRUCTION
IP CAMERA
VT-5135
VT-5136
WEEE Number: 80133970
1
Thank you for selecting and buying V-TAC product. V-TAC will serve you the best.
Please read these instructions carefully before starting the installing and keep this
manual handy for future reference. If you have any another query, please contact
our dealer or local vendor from whom you have purchased the product. They are
trained and ready to serve you at the best.
INTRODUCTION
Multi-Language Manual QR CODE
Please scan the QR code to access the manual
in multiple languages.
ENGLISH

TECHNICAL SPECIFICATIONS - VT-5135
Key Features VT-5135
Sensor Type
1/2.8" Low Illuminaon CMOS
Sensor
Minimum illuminaon
Color-0.01Lux @(F1.2,AGC ON); 0
Lux with IR
Black and white
0.001 Lux @ (F1.2, AGC ON), 0 Lux
with IR
Shuer
1/50 (1/60) seconds to 1/10,000
seconds
Lens 3.6mm@F1.8
Lens type
M12
Day and night conversion mode
Support IR-CUT
Maximum Pixel
1920*1080
Frame rate
1080P@20fps
Image sengs
Saturaon, brightness, contrast
adjustable through the client or
browser
Compression standard
H.264
Storage funcon
Network storage
Support protocols
TCP/IP, HTTP, DHCP, DNS, DDNS,
PPPoE, SMTP, NTP
Communicaon interface
1 10/100Mbps adapve Ethernet
port, RJ45 interface
Audio I/0
No
Working temperature
-10°C-+60°C
Working humidity
10%-90% RH
Power supply
DC12V±10%
Infrared distance
20-30 meters;
Power consumpon
MAX 7W
Material
Aluminum
Waterproof Index
IP65
2
ENGLISH

TECHNICAL SPECIFICATIONS - VT-5136
Key Features: VT-5136
Effective pixel 2.0 Mega Pixel
Sensor 1/2.7” CMOS 0.001Lux/F1.2(colorful)
;
Electronic shutter 1/25---1/10000 Second
Day and night conversion
mode
Full Color
Digital noise reduction 3D DNR
Video compression
standard
H.265
H.265 encoding type PROFILE_BASELINE
Video compression rate 32 Kbps~ 8Mbps
Maximum image size 1920*1080
Main
stream:1920*1080(1080P)、1280*960(960P)、1280*720(7
20P
)、
704*576(D1)
、
640*480(VGA)
Slave stream
:
640*480(VGA)
、
352*288
(
CIF
)
、
176*144(QVGA)
Main stream resolution and
frame rate
1080P; 25fps
Area of interest Support setting 8 ROI areas
Masking settings Support 4 sets of masking block settings
Image settings Brightness, contrast, saturation, gain, shutter, white balance
Mirroring supports horizontal, vertical, diagonal mirroring
Intelligent alarm
motion detection, occlusion alarm, video loss, network cable
disconnection, IP address conflict
Support Protocols TCP/IP, DHCP, HTTP, DNS, RTP RTSP
Docking Protocols ONVIF
,
Hikvision, Dahua
Platform docking Built-in powerful P2P function for flexible remote monitoring
Universal feature
One-click recovery, dual stream, heartbeat, mirroring, video masking,
anonymous access
Communication interface 1 RJ45 10M / 100M adaptive Ethernet port
Power supply DC12V
Power Consumption 1.2W
Waterproof Index IP65
Support image format
3
ENGLISH

INSTALLATION DIAGRAM
A. CONNECTION OF IPC SYSTEM WITHOUT POE
B. HOW TO CONNECT IP CAMERA
Network Switcher
Network Switcher
Video Recorder
Computer
IPC without POE
RJ45
Plug
RJ45 Plug
RJ45 Plug
Network
Cable
Power Supply
Power Supply
IP Camera
Camera’s Power Input
Camera’s video output
Connect it with
Recorder or computer
4
ENGLISH

TIPS
When installing the camera, please don’t make the camera lens face towards
strong light, mirror-type objects, or extremely light-coloured objects i.e. glasses,
water surface, lamps. Front-Lighting Installation is recommended for camera
placement.
BACK-LIGHTING VIEW FRONT-LIGHTING VIEW
IOS APP
ANDROID APP
DOWNLOAD THE APP
• Google Play Store - Search “XMEYE”
• IOS (Apple Store) - Search “XMEYE”
• Android phones and IOS (Iphone) can download by scanning the following
QR codes.
5
ENGLISH

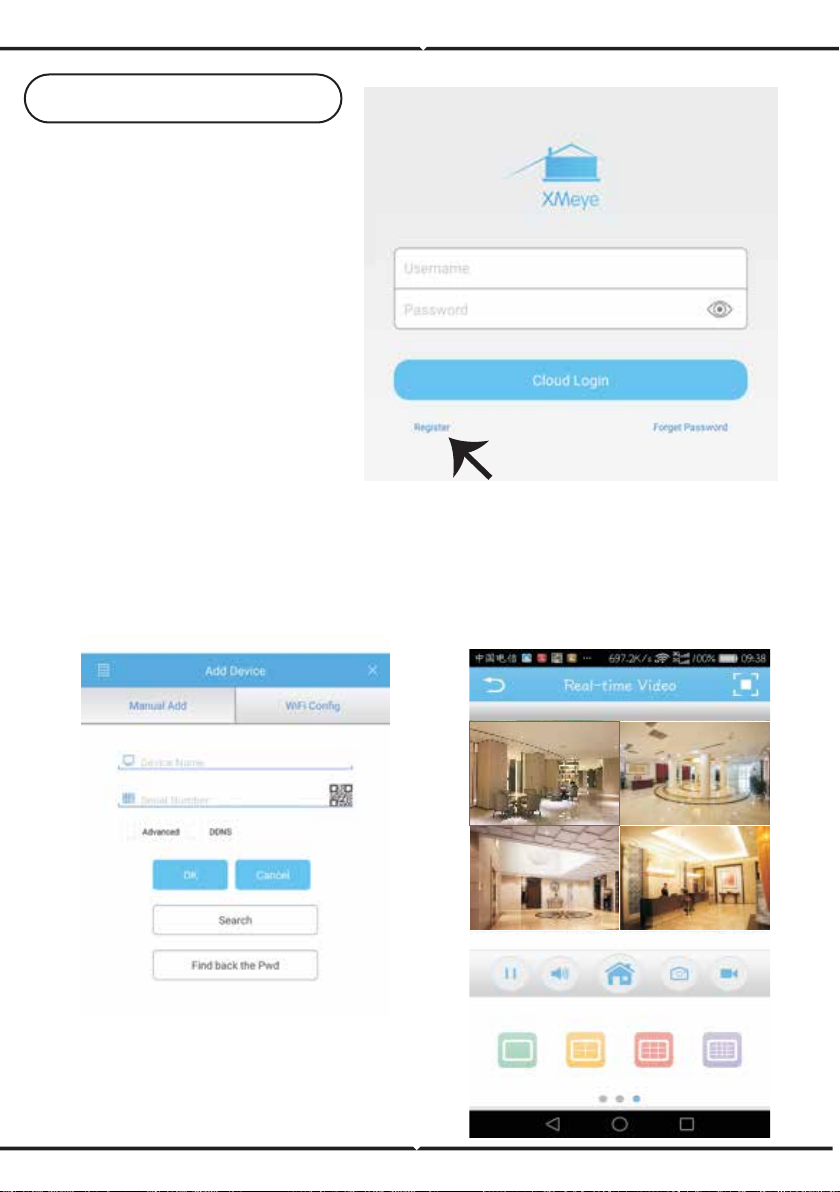
REGISTER NEW ACCOUNT
After successfully logging in, click the ‘+’ icon on the top right corner to add
device 1) automatically by the XMEYE QR Code or 2) manually by entering
the device name, username (arbitrary), and the password (default password
is empty). Click the device name, and choose your preferred channel.
1. Tap on “Register” to sign up
with your email address as
user ID and tap on “Next”
to get confirmation Code.
2. The APP will send a
confirmation code to your
email ID. Please confirm the
code to complete the
registarion process. Enter
new user ID and password.
6
ENGLISH

1. Access www.xmeye.net on IE browser. Go to
'Device Login’. Enter your serial number. Now
you can access remote viewing with playback
operation and more.
2. Click ‘Main Stream’ or ‘Deputy Stream’ on the
interface to see the live feed on IE browser.
REMINDER:
When remote viewing has failed, click the
main menu on your left-hand side. Go to
System Information > Version Information
to check equipment status. If it is searching
DNS, please check if your network connec-
tion is normal or not and remove the ‘Auto-
matically Obtain IPAddress’ option. Manually
change the IP address of LAN and match the
gateway with the routing gateway.
GUIDE TO MANAGING CMS ON YOUR COMPUTER
IE VIEWING METHOD
Insert the CD installer, download, and install CMS for Windows. Login (default
admin + password is empty) and go to System Setting >Monitoring Point Manage-
ment > Add Area. Select an area then click 'Add Device’, then ‘Add Settings’. Now,
you can see a preview in the software for equipment management. Note: Remote
Viewing can only be activated by logging on to the cloud (http://www.xmeye.net.-
main) and entering the serial number.
7
ENGLISH

A. MULTI-CONTROLLING B. PLAYBACK REMOVE
VIDEO ON MOBILE
C. STORE REMOTE VIDEO
TO LOCAL DEVICES
D. PTZ THROUGH MOBILE
OTHER FUNCTIONS OR REMOTE MONITORING
8
ENGLISH

9
ASTUCES
Lors de l’installation de la caméra, veuillez ne pas orienter la lentille de caméra
vers une lumière vive, des objets de type miroir ou des objets extrêmement
clairs, par ex. verres, surface de l’eau, lampes. Pour le placement de la caméra
est recommandée une installation de l’éclairage avant.
TÉLÉCHARGEMENT DE L’APPLICATION
• Google Play Store - recherche “XMEYE”
• IOS (Apple Store) - recherche “XMEYE”
• Les téléphones Android et IOS(Iphone) peuvent la télécharger en scannant les
codes QR.
INTRODUCTION
Merci d’avoir choisi et acheté un produit à V-TAC. V-TAC vous offrira le meilleur.
Veuillez lire attentivement ces instructions avant de commencer l’installation et
conservez ce manuel à portée de main pour référence ultérieure. Si vous avez
d’autres questions, veuillez contacter notre distributeur ou le fournisseur local
auprès duquel vous avez acheté le produit. Ils sont formés et prêts à vous servir
au mieux.
IOS APP
ANDROID APP
FRENCH

CRÉER UN NOUVEAU COMPTE
Une fois connecté avec succès, cliquez sur l’icône « + » dans le coin supérieur droit
pour ajouter un dispositif 1) automatiquement par le code QR de XMEYE ou 2)
manuellement en entrant le nom du dispositif, le nom d’utilisateur (arbitraire) et le
mot de passe (le mot de passe par défaut est vide). Cliquez sur le nom du dispositif,
puis choisissez votre canal préféré.
1. Tapez sur «S’inscrire» pour
vous inscrire avec votre adresse
électronique comme ID utilisateur
et tapez sur «Suivant» pour
obtenir un code de confirmation.
2. L’application enverra un code
de confirmation à votre identifiant
de courriel. Veuillez confirmer le
code pour compléter le processus
d’inscription. Entrez le nouveau
nom d’utilisateur et mot de
passe.
10
FRENCH

1. Accéder à www.xmeye.net par le navigateur
Internet Explorer. Allez à «Connexion
périphérique». Entrez votre numéro de série.
Maintenant vous pouvez obtenir un accès à distance
à la fonction de lecture et autres.
2. Cliquez sur «Main Stream» ou «Stream secon-
daire» sur l’interface pour voir le flux en direct sur
le navigateur Internet Explorer.
RAPPEL:
Si la vue à distance a échoué, cliquez sur le menu
principal à gauche de l’écran. Allez sur «informa-
tions système» > «informations sur la version» pour
vérifier l’état de l’équipement. Si c’est «recherche
de DNS», vérifiez si votre connexion réseau est
normale ou pas et supprimez l’option «Recherche
automatique d’adresse IP». Changez manuellement
l’adresse IP du LAN et connectez le portail à la
passerelle routage.
GUIDE DE GESTION DE CMS SUR VOTRE ORDINATEUR
MÉTHODE DE VUE SUR IE
Insérez le CD d’installation, téléchargez et installez CMS pour Windows. Connexion
(par défaut admin + mot de passe qui est vide) et allez dans réglage système >
Gestion de point de contrôle > Ajouter zone. Sélectionner une zone, ensuite cliquez
sur «Ajouter dispositif», ensuite «ajouter des réglages». Maintenant, vous pouvez
voir un aperçu du logiciel pour la gestion de l’équipement. Remarque: La visualisa-
tion à distance ne peut être activée qu’en vous connectant sur le nuage (http://ww-
w.xmeye.net.-principal) et en entrant le numéro de série.
11
FRENCH

A. MULTI-CONTRÔLE B. LECTURE SUPPRIMER
VIDÉO SUR MOBILE
C. STOCKER UNE VIDÉO
ENREGISTRÉE À DISTANCE SUR
DES PÉRIPHÉRIQUES LOCAUX D. PTZ À TRAVERS LE MOBILE
AUTRES FONCTIONS DE TÉLÉSURVEILLANCE
12
FRENCH

13
TIPPS
Achten Sie bei der Installation der Kamera darauf, daß das Objektiv der Kamera
nicht starkem Licht, spiegelartigen Objekten oder extrem hellen Objekten (z. B.
Gläsern, Wasseroberfläche, Lampen) ausgesetzt ist. Die Installation von Frontbel-
euchtung wird für die Positionierung der Kamera empfohlen.
IOS APP
ANDROID APP
LADEN SIE DIE APP HERUNTER
• Google Play Store - Suche nach "XMEYE"
• IOS (Apple Store) - Suche nach “XMEYE”
• Android-Telefone und IOS (IPhone) können durch Scannen der folgenden
QR-Codes heruntergeladen werden.
INFÜHRUNG
Wir danken Ihnen, dass Sie ein V-TAC ausgesucht und gekauft haben. V-TAC wird
Ihnen die besten Dienste erweisen. Lesen Sie, bitte, diese Gebrauchsanweisung
vor der Montage aufmerksam durch und halten Sie sie für Auskünfte in der Zukun-
ft parat. Sollten Sie weitere Fragen haben, kontaktieren Sie, bitte, unseren lokalen
Händler oderVerkäufer, von dem Sie das Produkt gekauft haben. Sie sind ausgebil-
det und bereit Sie auf die bestmögliche Art und Weise zu unterstützen.
GERMAN

NEUES BENUTZERKONTO
REGISTRIEREN
Klicken Sie nach erfolgreicher Anmeldung auf das Pluszeichen (+) in der oberen
rechten Ecke, um das Gerät 1) automatisch durch den XMEYE-QR-Code oder 2)
manuell hinzuzufügen, indem Sie den Gerätenamen, den Benutzernamen
(beliebig) und das Kennwort eingeben (das Standardkennwort ist leer). Klicken
Sie auf den Gerätenamen und wählen Sie Ihren bevorzugten Kanal.
1. Tippen Sie auf "Registrieren", um
Ihre E-Mail-Adresse als Benutzer-ID zu
registrieren, und tippen Sie auf
"Weiter", um den Bestätigungscode zu
erhalten.
2. Die APP sendet einen Bestäti-
gungscode an Ihre E-Mail-ID. Bitte
bestätigen Sie den Code, um den
Registrierungsvorgang abzuschließen.
Geben Sie eine neue Benutzer-ID und
ein neues Passwort ein.
14
GERMAN

1. Rufen Sie www.xmeye.net im IE-Browser auf. Gehen
Sie zu Geräteanmeldung, „Device Login“. Geben Sie Ihre
Seriennummer ein. Jetzt können Sie auf die Fernanzeige
mit Wiedergabebetrieb (und mehr) zugreifen.
2. Klicken Sie auf der Benutzeroberfläche auf "Main
Stream" (Haupt-Stream) oder "Deputy Stream"
(Neben-Stream), um den Live- Einspeisung im
IE-Browser anzuzeigen.
ERINNERUNG:
Wenn die Remote-Anzeige fehlgeschlagen ist, klicken
Sie auf das Hauptmenü auf der linken Seite. Wechseln
Sie zu Systeminformationen> Versionsinformationen,
um den Gerätestatus zu überprüfen. Wenn Sie nach
DNS suchen, überprüfen Sie, ob Ihre Netzw-
erkverbindung normal ist oder nicht, und entfernen
Sie die Option "IP-Adresse automatisch beziehen".
Ändern Sie die IP-Adresse des LAN manuell und
passen Sie das Gateway an das Routing-Gateway an.
ANLEITUNG ZUR VERWALTUNG VON CMS AUF IHREM COMPUTER
IE ANZEIGEVERFAHREN
Legen Sie das CD-Installationsprogramm ein, laden Sie CMS für Windows herunter
und installieren Sie es. Melden Sie sich an (Standardeinstellung admin + Kennwort
ist leer), und wechseln Sie zu Systemeinstellung> Überwachungspunktverwaltung>
Bereich hinzufügen. Wählen Sie einen Bereich aus und klicken Sie auf "Gerät
hinzufügen" und dann auf "Einstellungen hinzufügen". Nun sehen Sie eine Vorschau
in der Software für die Geräteverwaltung. Hinweis: Die Remote-Ansicht kann nur
aktiviert werden, indem Sie sich in der Cloud (http://www.xmeye.net.-primär)
anmelden und die Seriennummer eingeben.
15
GERMAN

A. MULTI-CONTROLLING B. WIEDERGABE VIDEO AM
MOBILTELEFON ENTFERNEN
C. FERNVIDEO AUF LOKALEN
GERÄTEN SPEICHERN
D. PTZ DURCH MOBILTELEFON
ANDERE FUNKTIONEN ODER FERNÜBERWACHUNG
16
GERMAN

17
IOS APP
ANDROID APP
СЪВЕТИ
При инсталирането на камерата, моля не насочвайте лещата на камерата към
силна светлина, огледални обекти или изключително светли на цвят обекти,
напр. стъкла, водна повърхност, лампи и т.н. Препоръчителна е инсталация за
предна светлина за поставянето на камера.
СВАЛЯНЕ НА ПРИЛОЖЕНИЕТО
• Google Play Store - Търсене на “XMEYE”
• IOS (Apple Store) - Търсене на “XMEYE”
• Андроид телефони и IOS (IPhone) могат да изтеглят приложението чрез
сканиране на следните QR кодове.
ВЪВЕДЕНИЕ
Благодарим ви, че избрахте и закупихте продукт на Ви-Тек (V-TAC). Ви-Тек
(V-TAC) ще ви послужи по най-добрия възможен начин. Моля прочетете тези
инструкции внимателно преди инсталация и съхранявайте ръководството за
бъдещи справки. Ако имате други въпроси, моля свържете се с нашия дилър
или с местния търговец, от който сте закупили продукта. Те са обучени и са
готови да ви послужат по най-добрия начин.
BULGARIAN

РЕГИСТРАЦИЯ НА НОВ ПРОФИЛ
След успешно влизане, кликнете върху иконата ‘+’ в горния десен ъгъл, за да
добавите устройство 1) автоматично с XMEYE QR Код или 2) ръчно чрез
въвеждането на името на устройството, потребителското име (произволно) и
паролата (паролата по подразбиране е празна). Кликнете върху името на
устройството и изберете вашия предпочитан канал.
1. Натиснете върху „Регистър”, за да
се регистрирате с вашия имейл адрес
като идентификатор на потребител и
натиснете върху „Следващ”, за да
получите код за потвърждение.
2. Приложението ще изпрати код за
потвърждение до вашия имейл
идентификатор. Моля потвърдете
кода, за да завършите процеса за
регистрация. Въведете новия
идентификатор на потребител и
парола.
18
BULGARIAN

1. Влезте в www.xmeye.net чрез IE навигатор.
Отидете в „Вход в устройство”. Въведете своя сериен
номер. Сега можете да получите дистанционен
достъп до плейбек функцията и други.
2. Кликнете върху „Основен поток” или
„Допълнителен поток” върху интерфейса, за да
видите предаването наживо в навигатора на IE.
НАПОМНЯНЕ:
В случай че дистанционното гледане не е
успешно, натиснете върху основното меню от
лявата страна на екрана. Отидете в „Системна
информация” > „Информация за версията”, за да
проверите статуса на оборудването. Ако е
„търсене на DNS”, моля проверете дали вашата
мрежова връзка е нормална или не и отстранете
опцията „Автоматично търсене на IP адрес”.
Ръчно сменете IP адреса на LAN и свържете
портала с маршрутизиращия портал.
РЪКОВОДСТВО ЗА УПРАВЛЕНИЕ НА CMS ВЪРХУ ВАШИЯ КОМПЮТЪР
МЕТОД ЗА РАЗГЛЕЖДАНЕ В IE
Поставете инсталационния компакт диск, свалете и инсталирайте CMS за
Windows. Влезте (по подразбиране администратор + парола, която е празна) и
отидете до Системна настройка > Управление на пункт за наблюдение >
Добавяне на област. Изберете област, след това кликнете върху „Добавяне на
устройство”, след това „Добавяне на настройки”. Сега можете да видите
предварителен изглед в софтуера за управлението на оборудването.
Забележка: Дистанционното наблюдение може да бъде активирано само чрез
вход в облака (http://www.xmeye.net.- основен) и въвеждането на серийния
номер.
19
BULGARIAN
This manual suits for next models
1
Table of contents
Languages:
Popular IP Camera manuals by other brands

Edimax
Edimax IC-7000PTn user manual

visual engineering
visual engineering Helmet Cam user manual

ALIBI
ALIBI ALI-NS2036R Quick installation guide

Santec
Santec SNC-211RSIA user manual

EverFocus
EverFocus ED335 Operation instructions

TRENDnet
TRENDnet TV-IP512WN - ProView Wireless N Internet Surveillance... user guide