V-tech TeleZapper VT2558 User manual

1
When using your telephone equipment, basic safety precautions should always be followed to reduce the
risk of fire, electric shock and injury, including the following:
1. Read and understand all instructions.
2. Follow all warnings and instructions marked on the product.
3. Unplug this product from the wall outlet before cleaning. Do not use liquid cleaners or aerosol cleaners. Use
a damp cloth for cleaning.
4. Do not use this product near water (for example, near a bath tub, kitchen sink, or swimming pool).
5. Do not place this product on an unstable cart, stand, or table. The product may fall, causing serious damage
to the product.
6. Slots and openings in the cabinet and the back or bottom are provided for ventilation. To protect it from
overheating, these openings must not be blocked by placing the product on the bed, sofa, rug, or other
similar surface. This product should never be placed near or over a radiator or heat register. This product
should not be placed in a built-in-installation where proper ventilation is not provided.
7. This product should be operated only from the type of power source indicated on the marking label. If you are
not sure of the type of power supply to your home, consult your dealer or local power company.
8. Do not allow anything to rest on the power cord. Do not locate this product where the cord will be abused by
persons walking on it.
9. Never push objects of any kind into this product through cabinet slots as they may touch dangerous voltage
points or short out parts that could result in a risk of fire or electric shock. Never spill liquid of any kind on the
product.
10.To reduce the risk of electric shock, do not disassemble this product. If service or repair work is required,
contactVTech Customer Service at 1-800-595-9511.Opening or removing cabinet parts other than specified
access doors may expose you to dangerous voltages or other risks. Incorrect reassembling can cause
electric shock when the appliance is subsequently used.
11.Do not overload wall outlets and extension cords as this can result in the risk of fire or electric shock.
12.Unplug this product from the wall outlet:
a) When the power supply cord or plug is damaged or frayed.
b) If liquid has been spilled into the product.
c) If the product has been exposed to rain or water.
d) If the product does not operate normally by following the operating instructions. Adjust only those controls
that are covered by the operating instructions because improper adjustment of other controls may result in
damage and will often require extensive work to restore the product to normal operation.
e) If the product has been dropped and the cabinet has been damaged.
f) If the product exhibits a distinct change in performance.
13.Avoid using a telephone (other than a cordless type) during an electrical storm. There may be a remote risk
of electric shock from lighting.
14.Do not use the telephone to report a gas leak in the vicinity of the leak.
If you have questions about this product, or if you're
having difficulty with setup or operation, do not return
your phone to the store. Call our Customer Support
Center at:
1-800-595-9511
In Canada, call
1-800-267-7377
Important Safety Instructions

2
Introduction
Parts Check List:
1. Handset
2. Base Unit
3. Telephone Line Cord
4. Battery Pack
5. AC Adapter
6. Belt Clip
7. Owner's Manual
Topurchasereplacementbatterypacks,
call VTech Communications at 1-800-
595-9511. In Canada, call VTech
Telecommunicationsat 1-800-267-7377.

3
Connecting power to Base Unit
Plug the AC power adapter into an electrical outlet, and the DC connector into
the bottom of the Base Unit.
Setup
1
2
Installation of Battery Pack in Handset
Follow the steps below:
1. Remove the battery cover by pressing
on the indent and sliding downward.
2. Withtheredandblackwiresatthebottom
right corner of the pack, angle the top of
the battery into the compartment, under
the two ‘claws’. Next, press the lower
endofthebatterypackdown,soitsnaps
inplace,underthelowerclaw. Now,plug
the connector into the socket, located
below the battery. Slip the wires under
the wire guide, located below and to the
left of the socket.
3. Replace the battery cover by sliding it
upwards.
4. If the new battery pack is not already
charged, place the Handset in the Base
Unit, and allow it to charge for 12 hours.
After the initial charge, a maintenance
charge of 8 hours should be sufficient.
Maximum talk time is 5 hours on a full
charge.Maximumstandbytimeis5days.
COMPLIES WITH 47 CFR Part 68
FCC REGISTRATION NO.: xxxxxxxxxxxxxxxx
RINGER EQUIVALENCE: 0.1B
USOC JACK: RJ11C,RJ11W
THIS DEVICE COMPLIES WITH PART 15 OF THE FCC RULES.
OPERATION IS SUBJECT TO THE FOLLOWING TWOCONDITIONS:
1)THIS DEVICE MAY NOT CAUSEHARMFUL INTERFERENCE; AND
2)THIS DEVICE MUST ACCEPT ANY INTERFERENCE RECEIVED,
INCLUDING INTERFERENCE THAT MAY CAUSE UNDESIRED
OPERATION.
HAC FCC ID: xxxxxxxx
CANADA xxxxxxxxxxxxx REN/IES: 0.1
IC: xxxxxxxxxx
PRIVACY OF COMMUNICATIONS MAY NOT BE ENSURED
WHEN USING THIS PHONE.
MODEL: 2458
DC 9V 500mA
CLASS 2 POWER SOURCE ONLY
CORDLESS TELEPHONE
MANUFACTURED IN CHINA
Getting Started

4
Setup
CAUTION: Toreducetheriskoffireorinjury,readandfollowtheseinstructions:
1. Use only theVTech batterysuppliedorequivalent.
2. Donotopenormutilate thebattery.Releasedelectrolyteis corrosive andmaycause
damagetotheeyesorskin.Itmaybetoxicifswallowed.
3. Exercise care in handling batteries in order not to short thebatterywithconducting
materialssuchas rings,bracelets,andkeys. The batteryorconductormay overheat
andcauseburns.
4. Donotdisposeofthe battery inafire.Thecellmayexplode.
Connect to phone line
Plug one end of the telephone line cord into the jack on the bottom of the Base
Unit. Plug the other end of this cord into the wall jack.
Checking for dial tone
After the battery pack is charged, pick up the Handset and press the PHONE key.
The IN USE indicator should light up, and you should hear a dial tone; if not, see
IN CASE OF DIFFICULTY.
Tone/Pulse Selection
See OPERATING INSTRUCTIONS for details.
CAUTION: Use only the VTech power supply provided with your telephone.
IMPORTANT:
For best performance the VT2558 should be
installed as follows:
Inanelevatedlocation,inthecenteroftheroom,
with no obstructions nearby.
In a location that is away from other electrical
appliancessuchas microwave ovens, personal
computers, or televisions.
Getting Started

5
General Information
TheTeleZapperfeatureinyourVT2558isapatenteddevicethathelpsyoueliminate
many of those annoying telemarketing calls.
•TheTeleZapperfeatureinyourVT2558coversallthetelephonesandanswering
machines connected to that line in your home or office.
•Whenyouoryouransweringmachinepickupthephone,theTeleZapperemits
aspecialtonethatfoolsthecomputerintothinkingyournumberisdisconnected.
•Instead of connecting you to a salesperson, the computer drops the call and
stores your number as disconnected in its database.
•As your number is eliminated from more and more lists, those annoying
computer-generated calls just about stop altogether.
•The TeleZapper won’t interfere with manually dialed calls, or with answering
machines, Caller ID or Call Waiting.
•Once you’ve activated the TeleZapper feature in your VT 2558, keep in mind
that if you answer your telephone and there’s no one there, the odds are that
you just “zapped” a telemarketer. After a few weeks, you’ll notice that you
are receiving fewer and fewer of these calls.
•TheTeleZapperevenworkswithyouransweringsystemto“zap”telemarketers
when you are away or when you prefer not to answer the phone. When your
answering machine picks up a call for you, the TeleZapper emits its special
tone to “zap” the telemarketer. We recommend that you re-record your
messageanddelayspeakingforafewsecondstoallowtimefortheTeleZapper
tone prior to the start of your recorded message.
Programming Instructions
TheTeleZapperfeatureinyour VT2558hastwolevelsofprivacytohelp“zap”computer
dialed telemarketing calls. Your VT 2558 is shipped with the BASIC level of privacy
activated, which will help with the majority of telemarketing calls. At this level, the
TeleZapper feature will emit a single tone which is the first of three (3) tones for the
disconnectedsignal.TheADVANCEDlevelofprivacywillswitchtheTeleZapperfeature
toallthreetonesofthedisconnectedsignalandwill“zap”evenmoretelemarketingcalls.
Getting Started
Here are the instructions to switch from
BASIC to ADVANCED privacy, or to
disable the feature:
1. Look on the underside of the Base
Unit, and locate the 3-position
TeleZapper selector switch.
2. Your switch has 3 settings: BAS
(Basic), ADV (Advanced) and OFF
(Off). Choose your desired setting.
NOTE: If you are dialing in
Pulse
(rotary) mode from another phone sharing
the same line, your TeleZapper feature must be set to either BASIC or OFF.
Using the TeleZapper®Feature
TeleZapper Q&A:
Q. How does the TeleZapper feature work?
A. The TeleZapper uses the technology of telemarketers’ automatic dialing equipment

6
against them. When you or your answering machine picks up a call, the TeleZapper emits
a special tone that “fools” the computer into thinking your number is disconnected. Instead
of connecting you to a salesperson, the computer stores your number as disconnected in
its database. Over time, as your number is removed from more and more databases, you’ll
see a dramatic decrease in the number of annoying telemarketing calls you receive.
Q. How do I know when I’ve “zapped” a telemarketer?
A. If you answer your telephone and there’s no one there, the odds are that you just “zapped”
a telemarketer. Quite often you will see the caller ID from such a call is “unavailable.” After
a few weeks, you will notice that you receive fewer and fewer of these calls.
Q. Do I need one for each telephone or telephone jack in my home or office?
A. No. One VT 2558 with the TeleZapper feature covers ALL telephones and answering
machines connected to the same line (telephone number). If you have two lines, you need
an additional unit for your other line.
Q. Will it interfere with my computer or fax machine?
A. No. The TeleZapper does not interfere with the operation of your computer, your fax
machine or other telecommunications or electronic equipment. It plays the tone briefly when
the line is answered, then goes to “sleep” waiting for the next call.
Q. Will it interfere with my answering machine?
A. No. This is the best way to use your TeleZapper feature. Let your answering machine
pick up the line, the TeleZapper feature “zaps” the telemarketer, and you were not bothered
at all! You will need to delay your message for a few seconds to allow the tone to play.
A caller who wishes to leave a message on your answering machine will hear a short tone
followed by your recording.
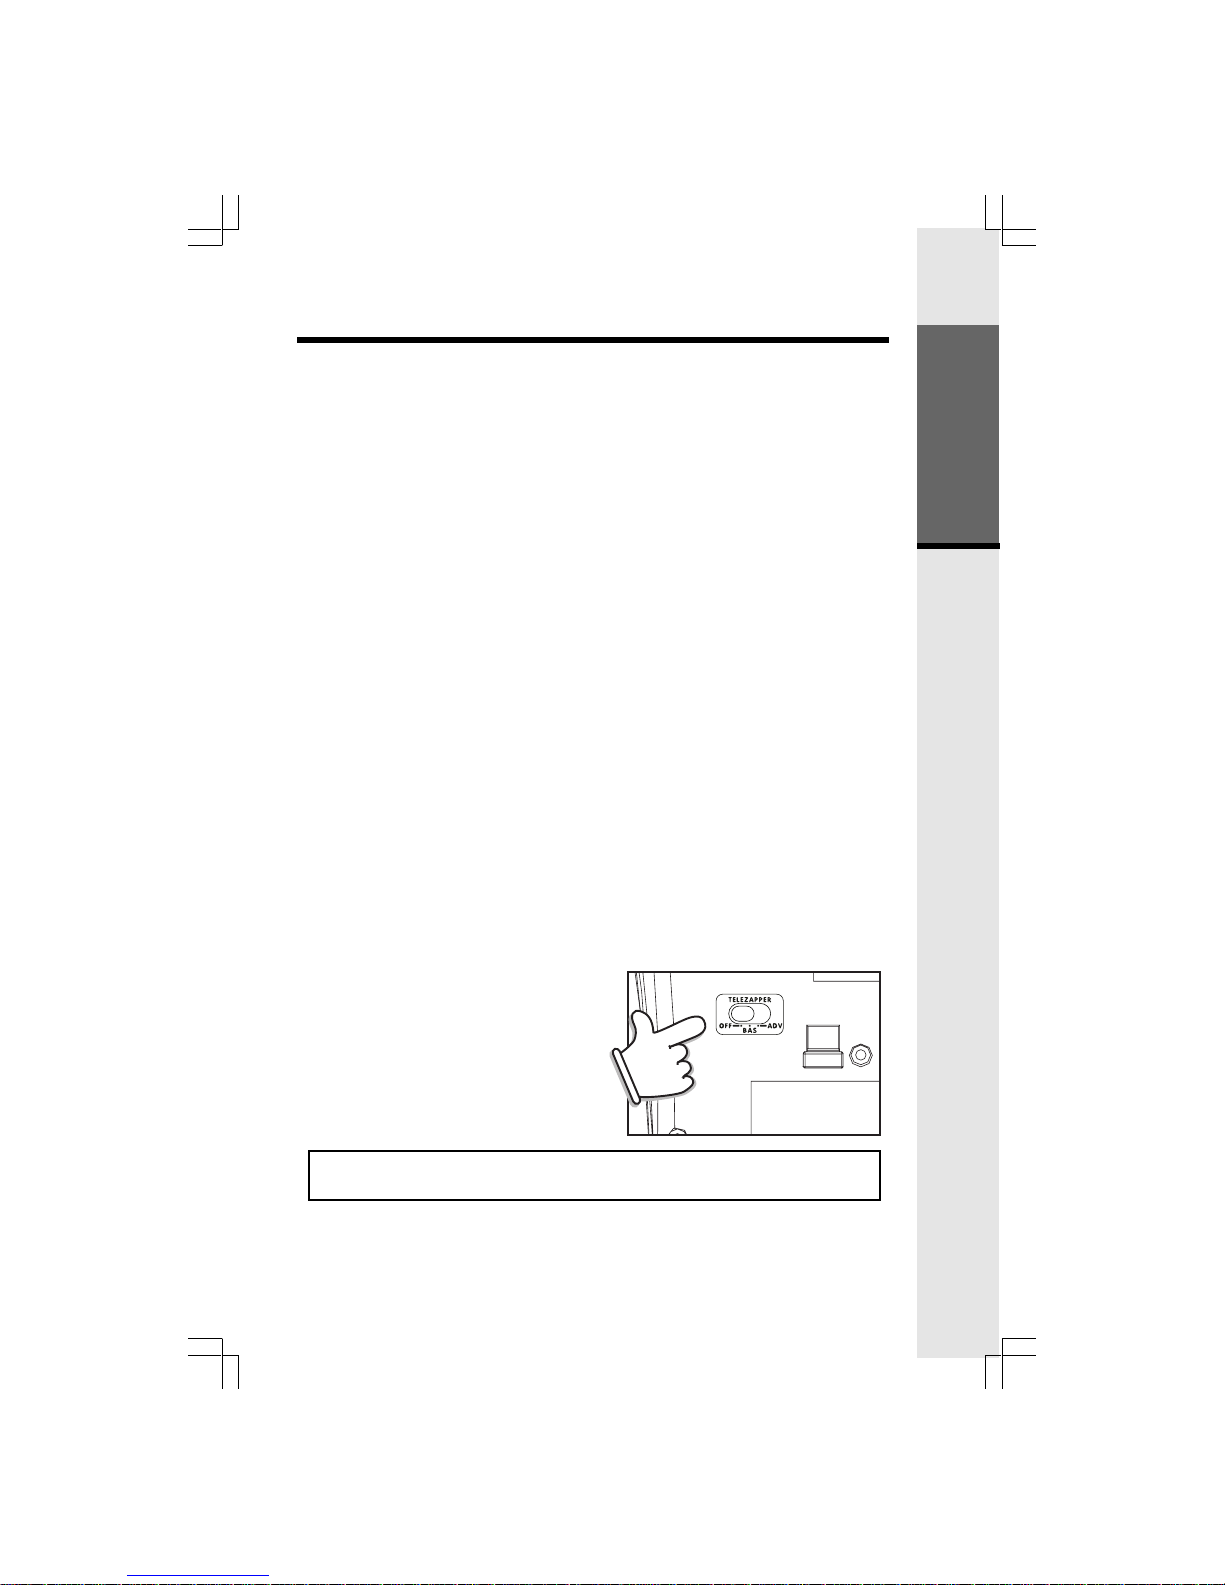
NOTE:
WithyourTeleZapperfeaturesettoADV(Advanced),ifyouransweringdevice‘answers’
the call before you do, the answering device may not automatically stop once you’ve answered
(if your answering device has an ‘Auto Stop’ feature). You would need to press ‘Stop’ on
the answering device to return it to the idle, or sleep mode. With the TeleZapper set to
BAS (Basic), your answering system’s Auto Stop feature should function normally when you
pick up a call.
Q. I have voicemail from the telephone company. Will it work with this?
A. Yes and No. Your telephone must go “off-hook” for the TeleZapper to emit its tone. As
long as you pick up a call, the phone goes “off-hook” and the TeleZapper emits its tone
to “zap” telemarketers. If, instead, the telephone company “answers” your calls through
voicemail, your phone does not go “off-hook” and the TeleZapper cannot emit its tone. The
TeleZapper will not interfere with the normal operation of your voicemail.
Q. Will the TeleZapper “zap” calls from anyone other than telemarketers?
A. It is important to understand that the TeleZapper emits its special tones each time a
call is picked up, regardless of who’s calling you. The TeleZapper is designed to “zap”
calls made by predictive dialer computers by doing two things: first, by disconnecting
predictive-dialed calls before you can be connected to a live telemarketer, and, second,
by deleting your phone number from telemarketing computer lists. Whether the TeleZapper
will affect computer-dialed calls from other sources depends on the type of computer
equipment and how that equipment is being used. Therefore, it may also “zap” calls from
businesses and organizations that use predictive dialing systems – not just telemarketers.
Many companies and organizations do not rely entirely on computerized calling systems
to reach you. Most have secondary means in place to contact or notify people with important
information. Furthermore, these organizations can always contact you by simply dialing
your phone number manually. Manually dialed calls will not be zapped. As such, you
can contact businesses and organizations to determine if they use predictive dialers and,
if so, to ask that your phone number be manually dialed or that alternate means be used
in order to contact you.
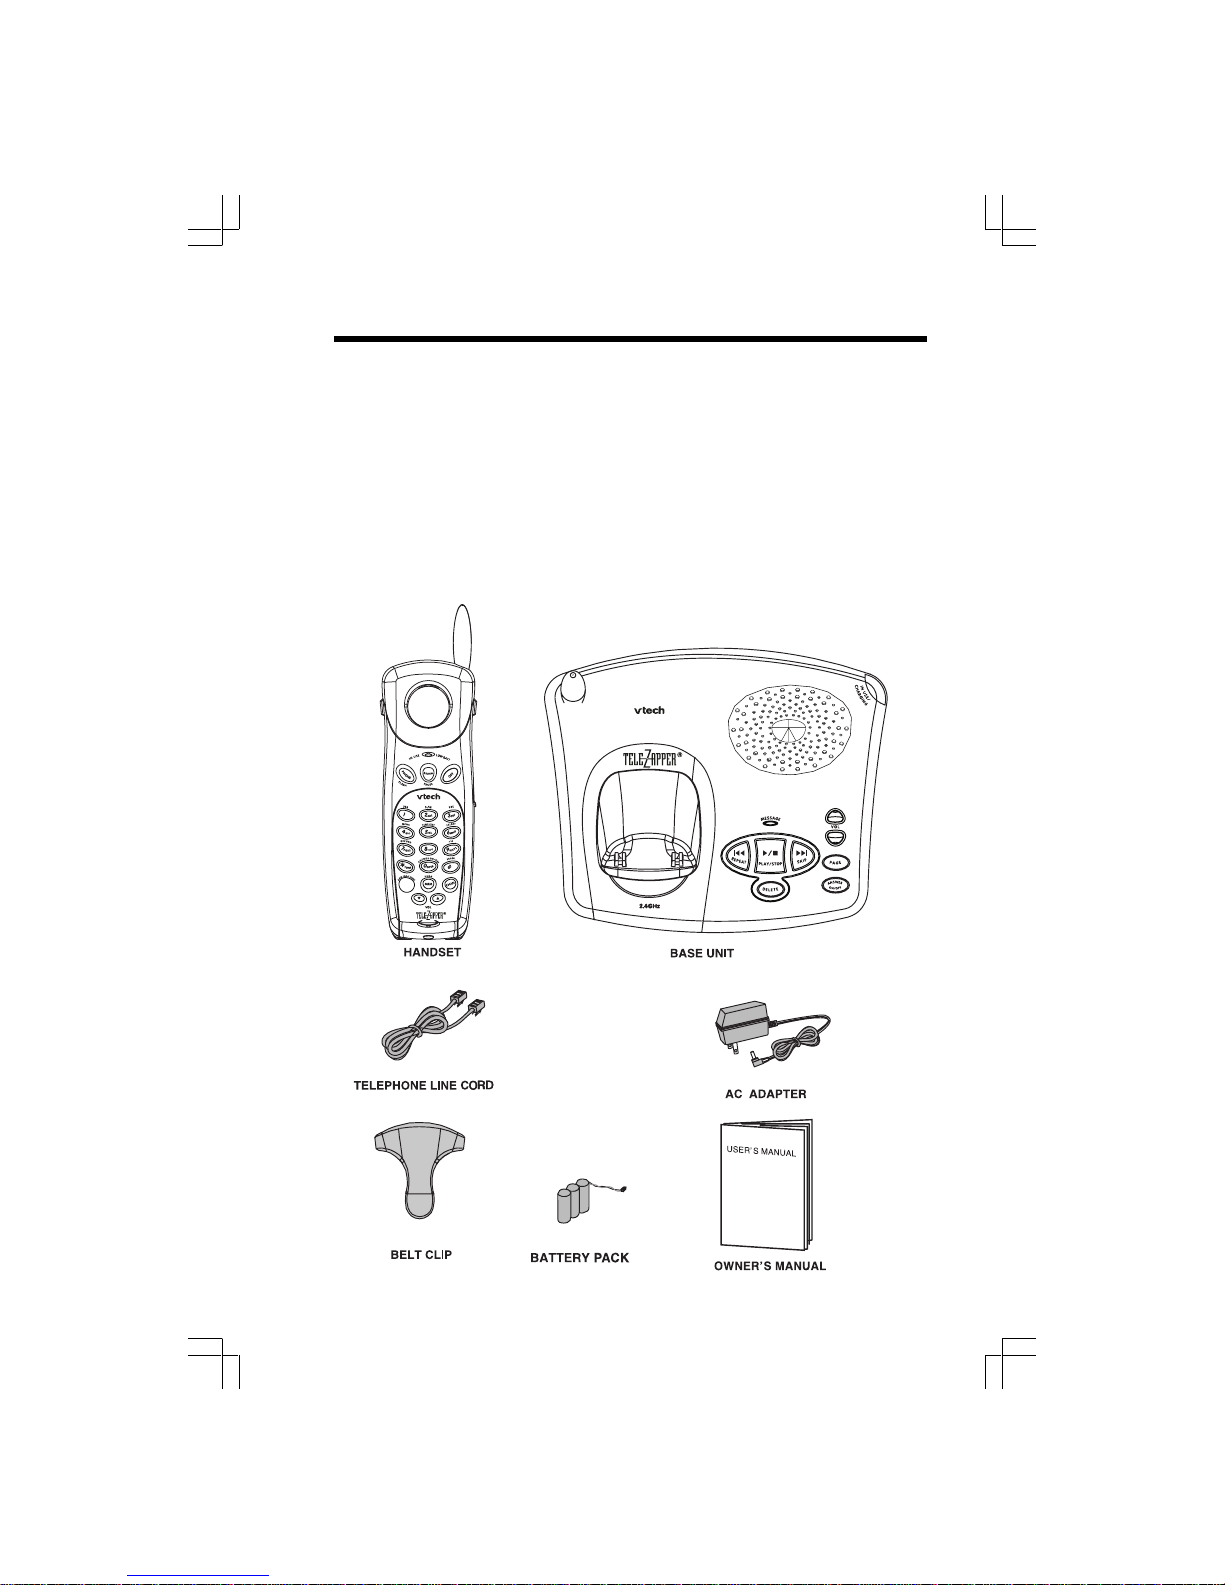
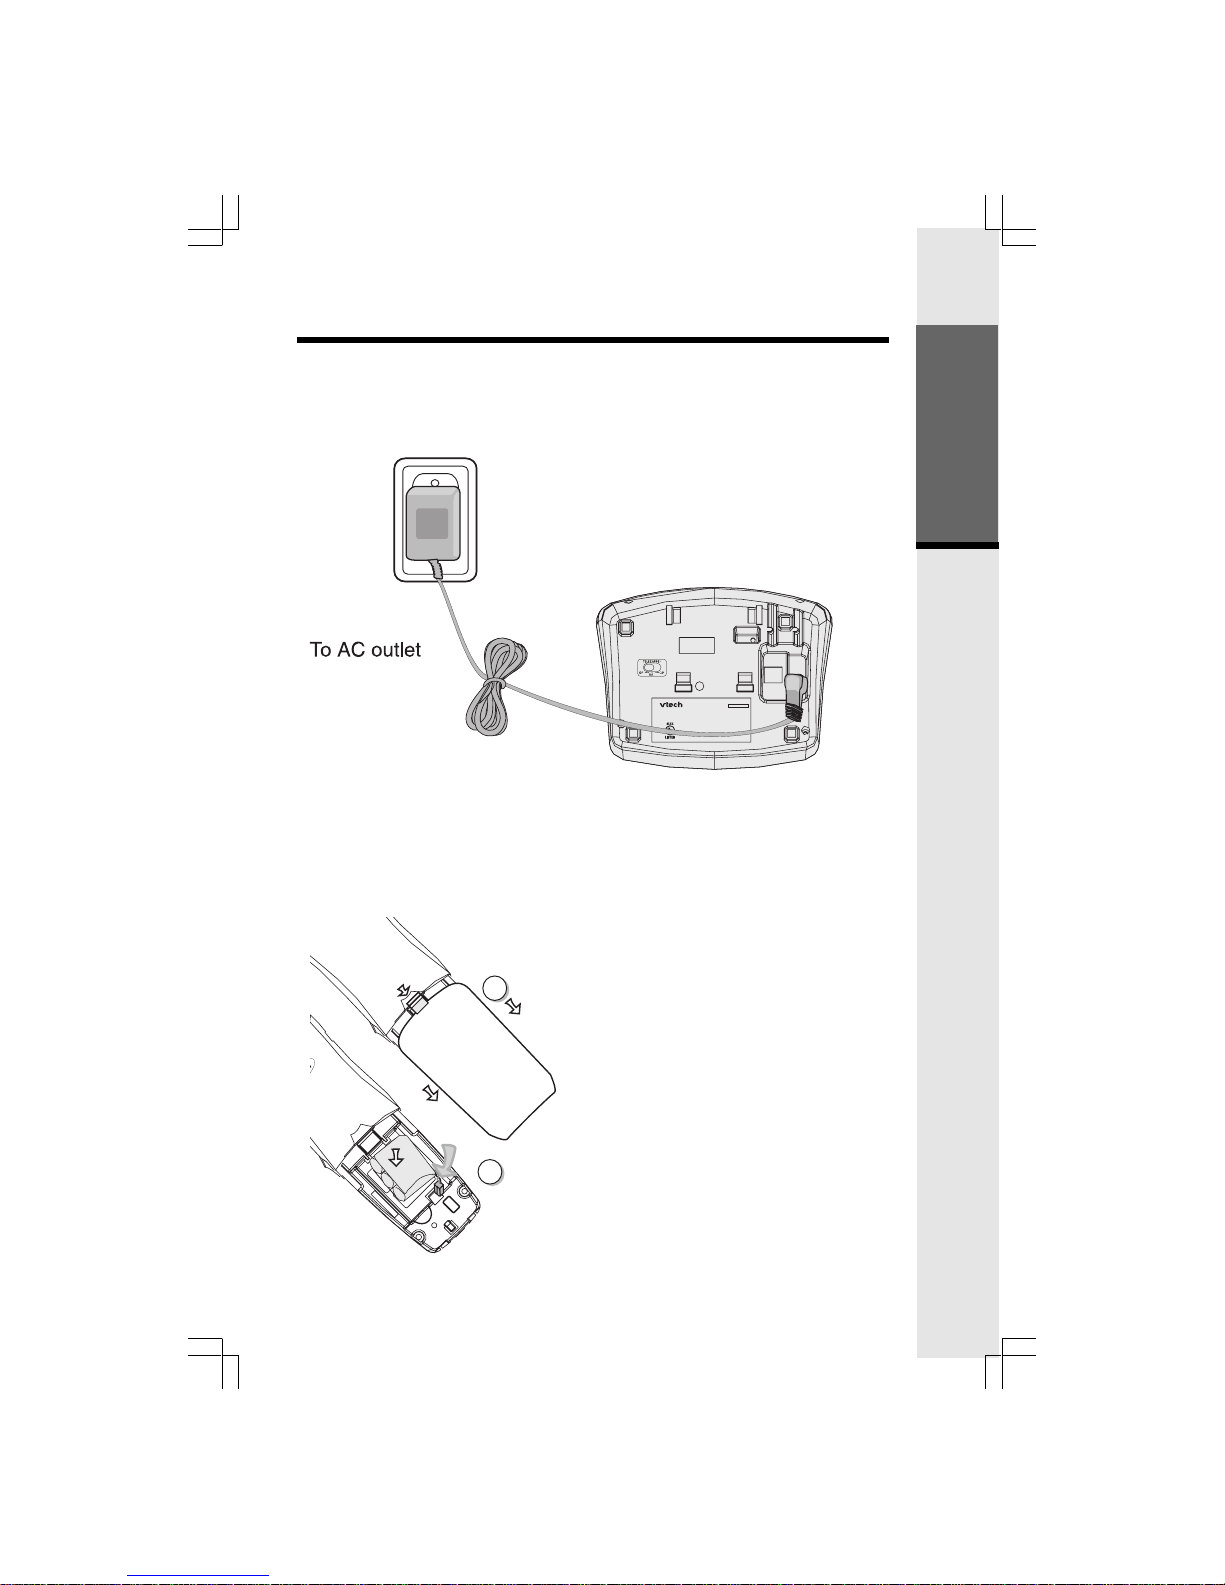
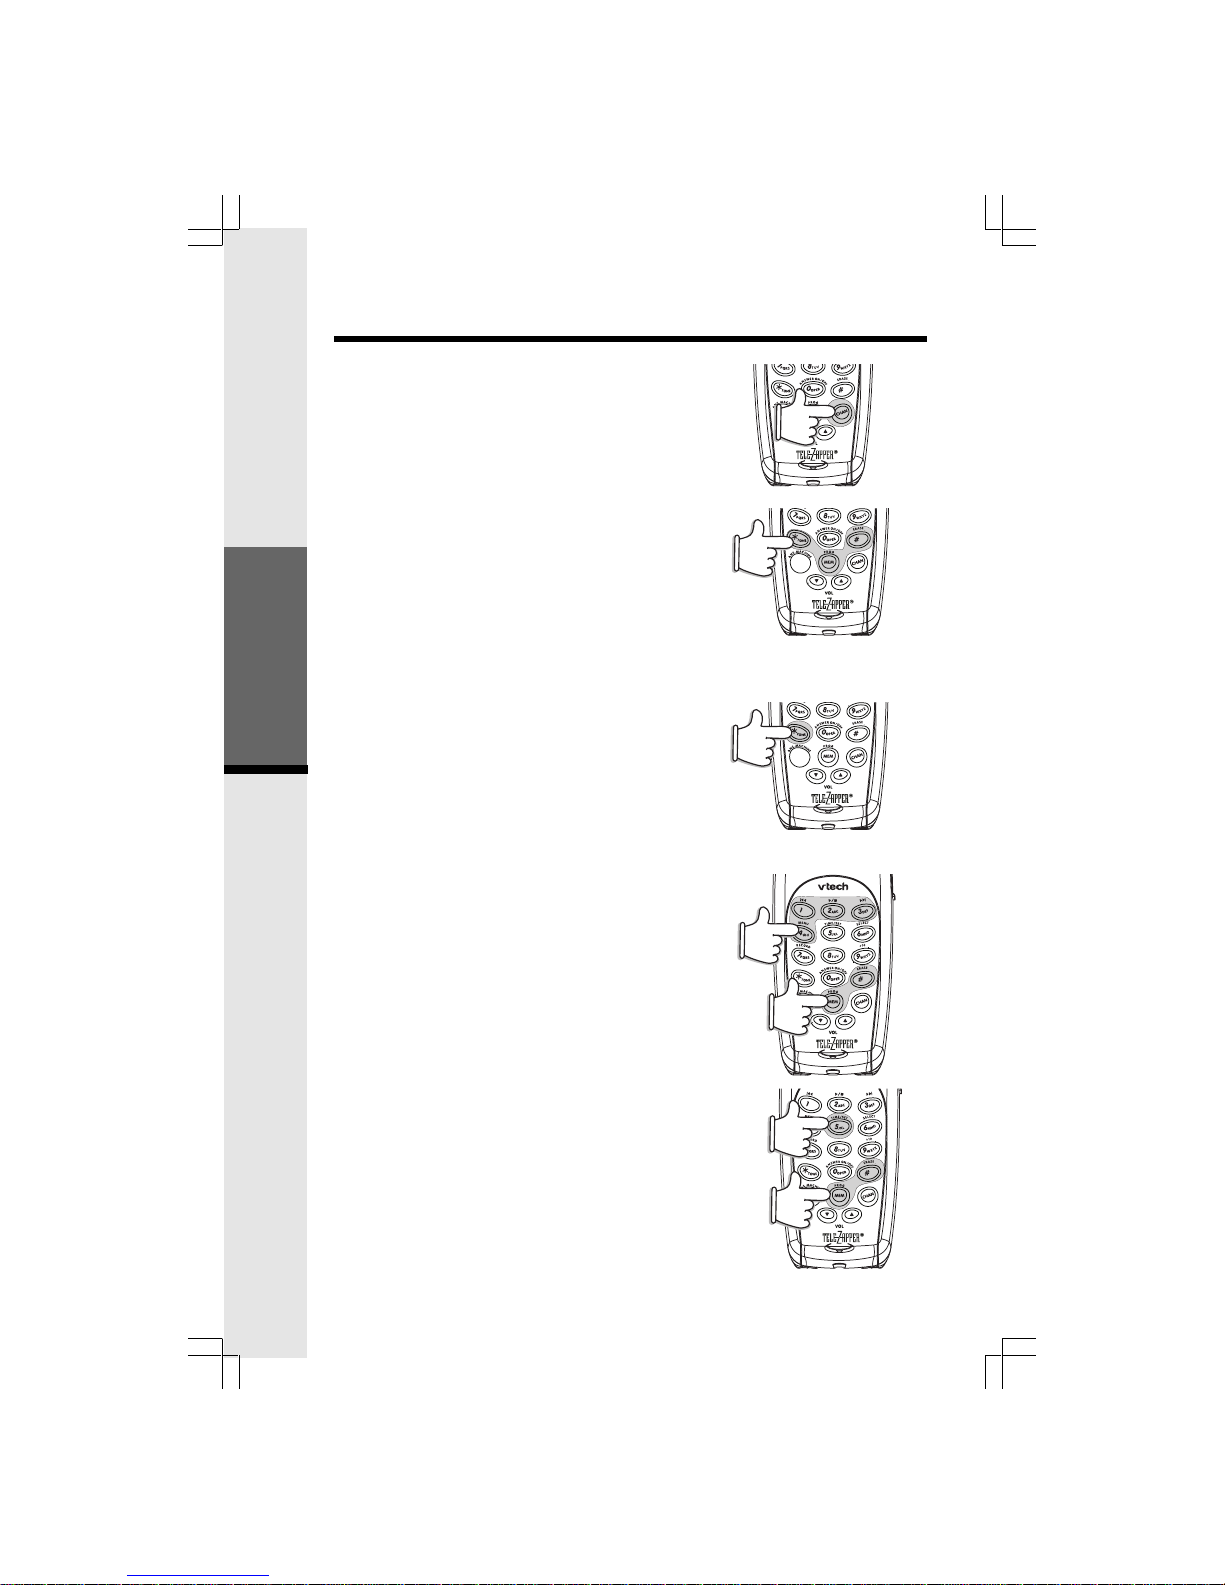
Getting Started
Using the TeleZapper®Feature

7
Handset Features
1. IN USE/LOW BATTERY LED
• Glows when the Handset is in use.
• Flashes duing programming mode.
• Flashes in cadence with incoming
ringing.
• Flashesslowlywhenthebatterypack
needsrecharging.
2. PHONE/FLASH
• Press this key to answer a call or get
a dialtone.While onacall, whenyou
receive a Call Waiting alert, press
PHONE/FLASH to switch between
calls.
3. ANSWERINGMACHINE
• Press this key to enter Answering
System mode. It will flash while
the
Handset is controlling the Answer
ing
System. It will also flash to alert you
to new messages.
SeethesectionHandsetLayout
For
Answering System
Operation for
moredetails.
4. VOLUME UP /VOLUME DOWN
• These keys will raise and lower the
earpiece volume while either in
PHONE or ANSWERING SYSTEM
mode.
5. REDIAL/PAUSE
• With the Handset ON, pressing this
key will dial the last number you
called.InProgrammingmode,
REDIAL/PAUSE will add a 4 second
pause to a dialing sequence.
6. OFF
• Press this key to end a call.The OFF
key is also used to exit all modes of
operation.
7. PROG/MEM
• ThiskeyisusedtoenterProgramming
mode, as well as Memory Dial mode.
8. CHANNEL
• Ifyouexperiencenoiseorinterference
while on a call, press CHAN toswitch
to a clear channel.
1
2
3
4
5
6
7
8
Getting Started

8
Base Unit Features
1. MESSAGELED
•
Flashes slowly to indicate new
messages;Glowssteadilytoindicate
old (previously heard) messages;
Flashes rapidly to indicate that the
Answering System is full and cannot
take any more messages.
2. REPEAT
•
During message playback, press
REPEAT toreturntothe beginning of
the message being played. Hold
down the REPEAT key to slow down
message playback.
3. PLAY/STOP
• Press to play messages; press again
to stop.
4. DELETE
•
During message playback, press
DELETEtoerasethemessagebeing
played.
During idle mode, press and
hold DELETE to erase all previously
played messages.
5. SKIP
•
During message playback, press
SKIP to the next message. Hold
down the SKIP key to speed up
message playback.
6. ANSWER ON/OFF LED
• Glows steadily when the Answering
System is ON and the day and time
hasbeenset;Flashestoindicatethat
the day and time need to be set.
Flashes slowly to indicate the
AnsweringSystem is inANNOUNCE
ONLY mode .
7. PAGE
• Press PAGE to engage the Handset
in a ring sequence, which will last for
60seconds.Youcanendthepage
by
pressing PAGE again on the
Base
Unit,or pressingOFFontheHandset.
8. VOLUME
• Raise or lower the Base Unit speaker
volume. These are 8volume levels.
At thelowestlevel(Level1),incoming
messages cannotbe screenedatthe
Base Unit as they come in.
9. IN USE/CHARGING LED
• Flashes slowly when the Handset is
in TALK mode; Flashes in cadence
withtheinboundringing;Glowswhen
the Handset is charging in the Base
Unitcradle;FlasheswhenHandset is
in ANSWERING SYSTEM mode.
1
2 3 4 5
6
7
8
9
Getting Started

9
Operating Instructions
Making Calls
• Pick up the Handset and press PHONE.
• When you hear a dial tone, dial the number.
• TheINUSELED willilluminatewhilethe Handsetisona call.Ifyoumake amistake
when dialing, press OFF to hang up, then press PHONE to get the dial tone again.
• You must always press PHONE before you can dial a call on the Handset.
Answering Calls
• When an incoming call is ringing, the IN USE/CHARGING LED on the Base and
IN USE/LOW BATT LED on the Handset will flash.
• To answer a call when the Handset is in the Base, just pick up the Handset.
— OR —
• To answer a call when the Handset is away from the Base, press any key on
the Handset (except OFF). This is very useful in a dark environment; you do not
have to fumble around looking for the PHONE key to answer the call.
Disconnecting
• To end a call, either place the Handset back in the Base.
— OR —
• Press OFF on the Handset.
Basic Operation

10
Operating Instructions
Changing Channels
• If you notice interference when using your
Handset,pressCHAN toswitchtoaclear channel.
This function is only available when you are on
a call.
TONE/PULSE Setting
NOTE: Your VT 2558 is preset at the factory for
TONEdialing.
.If you have rotary service, press PROG/MEM,
*,#, PROG/MEM to switch to PULSE.
.To return to touch tone service, press PROG/
MEM, *, *, PROG/MEM.
Temporary Tone
If you have rotary (dial-pulse) telephone service,
(TONE/PULSE setting is set to PULSE), this feature
allows you to enter special codes and tones to
operateansweringmachines,useelectronicbanking
services, calling cards, or other special services.
• Dial the call normally.
• Activate the Temporary Tone feature by pressing
TONE (the *key).
• You can then press the numbers or symbols you
need,andyourphonewillsendthepropersignals.
• To end the call, press OFF or place the Handset
back in the Base. The phone will automatically go
back to rotary (dial-pulse) service.
Programming the Ringer Type
The Handset ringer is capable of four different types
of ringing tones. To select a different ringer type do
the following:
• Press PROG/MEM.
• Press the #key.
• Press a key 1 - 4 to select a ringer type.
• Press the PROG/MEM key to confirm.
NOTE: To program, the Handset must be OFF.
Turning Off the Ringer
Toturnofftheringeron theHandset,dothefollowing:
• Press PROG/MEM.
• Press the #key.
• Press 5 to turn off the ringer. Press the PROG/
MEM key to confirm.
• To turn the ringer on again, see Programming
the Ringer Type.
Basic Operation

11
Checking the Ringer
To check the ringer which is currently
programmed, do the following:
• Press PROG/MEM.
• Press the #key.
• Press 0.
• PressthePROG/MEMkeytoconfirm.
Memory Dialing
• TheVT2558canstoreupto10different
phone numbers that you can dial just
by pressing PHONE, PROG/MEMand
one of the number keys (0-9)
Programming Speed Dial Numbers
The Handset must be OFF.
• Press PROG/MEM. The IN USE LED
willblink to indicate that you are in the
programming mode.
• Press the number of the memory
location you wish to store the number
in (0-9).
• Using the dial pad, dial the number
you want to store. The number can
be up to 16 digits long. The number
can be entered manually or by using
REDIAL/PAUSE.
• PressPROG/MEMto store thephone
number to the key you selected.The
phone exits program mode and emits
a tone.
Speed Number Dialing
• Press PHONE/FLASH to get a dial
tone.
• Press PROG/MEM and the memory
location number key (0-9).
• For example, to dial the number you
assigned to key ‘8’, you would press
PHONE, PROG/MEM, 8.
To Change or Replace a Speed Dial
Number
• To change or replace a stored
number in speed dial memory, simply
enter the new number and store it in
the memory location you wish to
change.
Operating Instructions
Basic Operation

12
Storing Pauses in Memory
•To insert a pause in a phone number,
press PAUSE. The pause is
approximately4 secondsin length.For
longer pauses, press PAUSE two or
moretimes. Eachadditionalpressadds
an additional 4 second pause.
• IfyourphoneisconnectedtoaPBXyou
can store the PBX access number and
a pause before the phone number. For
example,tostore9-PAUSE-555-1234in
memory location 8 do the following:
• Press PROG/MEM.
• Press 8.
• Press 9.
• PressREDIAL/PAUSE.
• Dial555-1234.
• Press PROG/MEM.
Using Redial
• To redial the last number you called,
press PHONE/FLASH then press
REDIAL/PAUSE. The phone will
automatically dial the number.
StoringaRedialNumberintoSpeedDial
• To store the last number you dialed as
a Speed Dial number, press PROG/
MEM,alocationnumber(0-9),REDIAL/
PAUSE,PROG/MEM.
The Page Feature
• From the Base Unit, press PAGE to
signal the person at the idle Handset.
• To end the page at the Base, press
PAGEagain.
• To end the page at the Handset, press
OFF,or place the Handset back in the
Base.
• This feature is useful in locating a
misplaced Handset.
• The page alert will continue for
approximately 60 seconds.
Operating Instructions
Basic Operation

13
Answering System Operation
Introduction
Your
VT 2558
has a digital Answering Device in the Base Unit, capable of storing
approximately12minutesofmessages.Youroutgoingmessage(announcement)can
be up to 90 seconds in length. Incoming messages can be up to 4 minutes inlength.
• You can listen to your messages from the Handset or the Base Unit.
• You can also screen messages while your callers leave them from either the
Handset or the Base Unit.
Call Screening from Base Unit
Simply keep the Base Unit volume level above the minimum setting. You will hear
messages at the Base Unit as your callers leave them.
Call Screening from Handset
Press ANS. MACHINE on the Handset as a message comes in. You will be able
to hear your caller, but your caller cannot hear you. If you want to talk to your caller
now, press PHONE/FLASH. The answering system will return to idle mode.
USE THE
VT 2558
HANDSET TO PROGRAM YOUR ANSWERING
SYSTEM!!!
Advanced Operation

14
With the Handset in the idle mode (on hook), first press ANS. MACHINE to enter
Answering System mode, then one of the following keys:
KEY FUNCTION
Handset Layout For Answering System Operation
Repeatcurrentmessage
Play/Stop(forplaybackand recording)
Skip to the next message
MENU(forprogrammingyourAnsweringSystem)
SET(forprogrammingyourAnsweringSystem)
SELECT(forprogrammingyourAnsweringSystem)
Record(OutgoingMessagesandMemos)
Increment by 10 (for programming time and security code)
AnsweringSystemON/OFF
Erase
1
2
3
4
5
6
7
9
0
#
Press ANS. MACHINE or OFF to exit Answering System mode.
Advanced Operation

15
Answering System Setup
Before using your
VT 2558
Answering System, follow these programming steps:
1 Set Outgoing Message
Record your greeting to be heard by callers. If you do not record a greeting, your
VT 2558
will play a default greeting.
• Press ANS. MACHINE on the Handset.
• Press 4 (MENU). The voice prompt says “Set Outgoing Message”.
• Press 7 (Record). The voice prompt says “Now Recording”, followed by a
beep. Speak into the Handset to record your announcement.
Press 2 (Stop) when done.Your recorded announcement will be played for
you.
2 Set Security Code
Your 2 digit security code gives you access to your
VT 2558
Answering System
from a telephone at a different location. Factory preset to 19, your security code
can be set to any number from 10 to 99.
• Press ANS. MACHINE on the Handset.
• Press 4 (MENU) twice, until you hear: “Set Security Code”.
• Press 6 (SELECT) to increment the security code by one per each press.
Press 9to increment by 10.
• Press 5 (TIME/SET) to confirm your security code selection. You can either
press 4 (MENU) to continue programming, or OFF to exit programming.
3 Set Audible Message Alert
This feature provides a beep tone at the Base Unit every 10 seconds, alerting you
to new messages.
• Press ANS. MACHINE on the Handset.
• Press 4 (MENU) three times. You will hear: “Set Audible Message Alert”.
• Press 6 (SELECT) to toggle between ON and OFF.
• Press 5 (TIME/SET) to confirm your selection.
• Press 4 (MENU) to continue programming, or OFF to exit.
4 Set Announce Only
Your
VT2558
AnsweringSystemcanalsoplayyourgreeting,withouttakingmessages
from callers. In this case, ANNOUNCE ONLY is set to ON.
• Press ANS. MACHINE on the Handset.
• Press 4 (MENU) four times. You will hear: “Set Announce Only”.
• Press 6 (SELECT) to toggle between ON and OFF.
• Press 5 (TIME/SET) to confirm your selection.
• Press 4 (MENU) to continue programming, or OFF to exit.
Advanced Operation

16
Answering System Setup
Now,followthestepsin1SETOUTGOINGMESSAGEtorecordyour“AnnounceOnly”
greeting. The
VT 2558
Answering System will retain both outgoing greetings; one for
Normal (record messages) mode, and one for Announce Only mode.
NOTE!!!!! THE ANSWERING SYSTEM IS PRESET AT THE FACTORY FOR
ANNOUNCE ONLY OFF. THIS IS THE NORMAL MODE, REQUIRED FOR YOUR
VT 2558
TO RECEIVE MESSAGES FROM CALLERS.
5 Set Base Ringer
You can turn your Base Unit On or Off. This is independent of the Handset ringer.
• Press ANS. MACHINE on the Handset.
• Press 4 (MENU) five times. You will hear: “Set Base Ringer”.
• Press 6 (SELECT) to toggle between ON and OFF.
• Press 5 (TIME/SET) to confirm your selection.
• Press 4 (MENU) to continue programming, or OFF to exit.
6 Set Number of Rings
Choose between 2, 4, 6, or Toll Saver. Toll Saver will cause the Answering System
to activate after 4 rings if there are no new messages, and after 2rings if there are
new, unplayed messages.
• Press ANS. MACHINE on the Handset.
• Press 4 (MENU) six times. You will hear: “Set Number of Rings”.
• Press 6 (SELECT) to choose between 2, 4, 6 and Toll Saver.
• Press 5 (TIME/SET) to confirm your selection.
• Press 4 (MENU) to continue programming, or OFF to exit.
NOTE: DURING PROGRAMMING, PRESS ANS. MACHINE OR OFF
AT ANY TIME TO EXIT.
Checking and Setting Day and Time
• Press ANS. MACHINE on the Handset.
• Press 5 (TIME/SET). The current Day and Time setting can be heard from
the Handset and Base.
• After the current day and time announcement, the system will announce, "To
set day and time, press TIME /SET". To change the current setting, press 5
(TIME/SET) again.
• Press 6 (SELECT) until you hear the correct day; then press 5 (TIME/SET).
• Press 6 (SELECT) until you hear the correct hour; then press 5 (TIME/SET).
• Press 6 (SELECT) until you hear the correct minute (or press 9to increment
the minutes by 10); then press 5 (TIME/SET). Your setting will be played for you.
You can press ANS.MACHINE or OFF to exit.
Advanced Operation

17
Recording a Memo
• Press ANS. MACHINE on the Handset.
• Press 7 (RECORD). After the prompt: “Now Recording”, speak into the Handset.
• Press OFF or ANS. MACHINE to end recording and exit Answering System
mode, or press 2 (STOP) to end recording and stay in Answering System mode.
Turning Your Answering System ON/OFF
Your
VT 2558
Answering System is turned ON when you first apply power to it. From
the Handset you can turn the system ON and OFF.
• Press ANS. MACHINE on the Handset.
• Press 0. Through the earpiece, you will hear “Answering Machine OFF (or ON).
Continued presses of the 0key will toggle between ON and OFF.
• Press OFF to exit programming mode.
Answering System Setup
Advanced Operation

18
Answering System Setup
PLAYBACK OF GREETINGS, MESSAGES AND MEMOS
NEW MESSAGE PRIORITY - New, unplayed messages/memos are played
first. Playback will then stop. You can then enter playback mode again to
hearall‘old’messages.
From the Base Unit
Use the PLAY/STOP to start and stop playback of messages and memos.
•Press the SKIP key to jump ahead to the next message.
•Hold the SKIP key to speed up message playback.
• Press the REPEAT key to return to the beginning of the current message.
2 consecutive presses of the REPEAT key will take you back to the previous
message.
• Hold the REPEAT key to slow down message playback.
• Press DELETE while a message is playing to erase that message.
• Press and Hold DELETE whiletheAnsweringSystemisidletoeraseallpreviously
heard messages.
• Adjust the Base Unit speaker volume using the VOL UP and DOWN keys.
The MESSAGE LED blinks when there are new messages. It glows steadily when
it contains only old, previously heard messages.
From the Handset
• Press ANS.MACHINE on the Handset.
• Press 2 (PLAY) to hear messages from the Handset.
• Press 1to repeat the message; press 3to skip to the next message.
• Press # (DELETE) to erase the current message.
• Press OFF or ANS. MACHINE to end message playback and exit Answering
System mode; or press 2 (STOP) to end message playback and stay in
Answering System mode.
NOTE: Your VT 2558 prevents accidental erasure of unplayed messages
To Hear Your Outgoing Greeting
•Press ANS.MACHINE on the Handset.
• Press 4 (MENU).
• Press 2 (PLAY/STOP).
• Press 4 (MENU) to continue programming, or OFF to exit.
Advanced Operation

19
Remote Operation of Your
VT 2558
Answering System
You can access messages and change your greeting remotely, using a touch tone
phone from a different line or location.
Dial the phone number associatedwith the linetoyour
VT2558
.Whilethe greeting
is playing, press your 2 digit security code.
You are now in remote access mode.
A voice menu will first tell you how many new and old messages you have, and
then, after a pause, you will hear a review of the following remote commands:
REMOTE COMMANDS
#1 HELP MENU
#2 PLAY ALL MESSAGES
#4 REPEATCURRENTMESSAGE
#4, #4 PLAY PREVIOUS MESSAGE
#5 STOP (Playback or Recording)
#6 SKIP TO NEXT MESSAGE
#7 REVIEW GREETING (Outgoing Message)
#9 ERASE CURRENT MESSAGE
#0 ANSWERING SYSTEM ON/OFF
*7 RECORD GREETING (Outgoing Message)
*8 RECORD MEMO
*0 HANG UP
NOTE: You do not have to wait until the voice menu announces the command to
execute a particular remote function.
Advanced Operation

20
Headset Operation
YourVT2558Handsetisequippedwitha2.5mmHeadsetJackforusewithanoptional
accessoryHeadsetforhands-freeoperation.Ifyouchooseto usetheHeadset option,
youmustobtainanoptionalaccessory Headset,whichiscompatiblewiththeVT2558.
To purchase a Headset, call VTECH Customer Service at 1-800-595-9511.
Onceyou haveacompatible2.5mmHeadset,locatetheHeadsetJackontheVT2558
Handset. Connect the plug on the Headset cord to the jack on the cordless Handset.
The plug should fit securely. Do not force the connection.
NOTE :
Whenever a compatible Headset is
connected to the cordless Handset, the
microphoneontheHandsetwillbemuted.
Thisisdonetolimittheeffectofbackground
noise.
Many compatible Headsets have a
reversible, monaural design. You can
wear your Headset on either ear, leaving
one ear free for room conversation.
Belt Clip
The VT2558 is also equipped with a
detachable belt clip. Align the pins on the
insideedgeoftheclipwiththenotcheson
the sides of the Handset. The belt clip
should snap securely into place. Do not
force the connection.
Additional
Information
Table of contents
Other V-tech Cordless Telephone manuals

V-tech
V-tech i 5866 User manual

V-tech
V-tech USB 7200 User manual

V-tech
V-tech TD43996974 - 5.8GHz Accessory Handset User manual

V-tech
V-tech DS6673-6C User manual

V-tech
V-tech FS6220-2 User manual

V-tech
V-tech LS6305 User manual

V-tech
V-tech S1310 User manual

V-tech
V-tech TELEZAPPER VT 2528 User manual

V-tech
V-tech DS6311-2 User manual

V-tech
V-tech t2415 User manual

V-tech
V-tech MI6889 User manual

V-tech
V-tech i6725 User manual

V-tech
V-tech 2151 User manual

V-tech
V-tech vt2467 User manual

V-tech
V-tech LS6117-18 User manual

V-tech
V-tech DS3211-2 User manual

V-tech
V-tech CareLine SN6166 User manual

V-tech
V-tech gz 2404 User guide

V-tech
V-tech SN6127 User manual

V-tech
V-tech DS6600 User manual